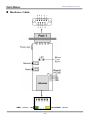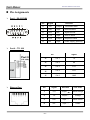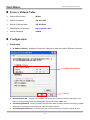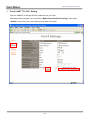
1
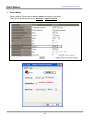
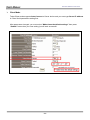
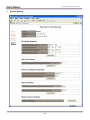
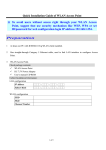
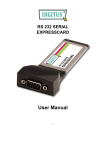
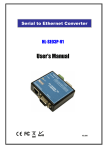
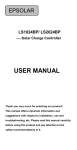
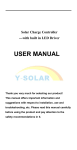
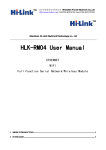
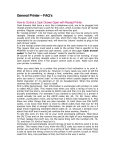
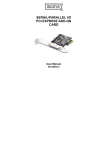
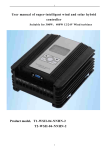
Serial to Ethernet Converter 2-Port Serial RS-232 User’s Manual V3.606 User’s Manual Serial to Ethernet converter Contents Table Welcome...…………………………………………………… 2 Package Contents.…………………………………………… 2 Feature………………………………………………………. 2 Application…………………………………………………… 3 Specification…………………………………………………. 4 Hardware Guide……………………………………………… 5 Ping Assignments……………………………………………. 6 Factory Default Value……………………………………….. 7 Configuration ¾ Preparation…………………………………..……………… 7 ¾ Login WEB-Based Configuration……………..……………… 8 ¾ Port 0 – Setting…………………….…………..……………. 9 ¾ Port 1 – Setting…………………..……………………….…. 10 ¾ Server Mode…………………..……………………….……. 11 ¾ Client Mode…………………..……………………….…….. 12 ¾ System Setting…………………..……………………….….. 13 ¾ Hardware Recover Factory Default …………………..………. 14 Warranty Policy…………………..……………………….…. 14 -1- User’s Manual Serial to Ethernet converter Welcome 2-Port Serial RS-232 to Ethernet Converter is designed to offer the high speed, reliable and cost-effective network communication for multiple serial devices to Internet networking instantly. It’s easily network your current RS-232 serial devices over a TCP/IP-based Ethernet and supported Full TDD (Time Division Duplex) serial to Ethernet communication. Package Contents ¾ 2-Port Serial RS-232 to Ethernet Converter x1 ¾ 5V-DC USB Power Adapter x1 ¾ USB Power Cable x1 ¾ User’s Manual x1 Feature ¾ Mini size design: 77 x 31 x 17 mm. ¾ 32-Bit ARM7 CPU. ¾ Build-in WEB-Based Configuration. ¾ Support UPnP (Universal Plug and Play) ¾ 10/100 Mbps Auto-Sensing Ethernet Interface. ¾ Support TCP-Server, TCP-Client Auto-Connect Mode. ¾ Support WinSock Protocol ¾ At Client-Server Mode, Client-device will auto-connect to Server-device. ¾ Support 1-Port RS-232 & 1-Port TTL232 serial devices through an Ethernet networking at the same time. ¾ Support Standard WinSock ( Program Writing “Call MSCOMM.OCX” ) ¾ Support Hardware Flow Control : CTS / RTS ¾ Support Parity : None , Odd , Even , Mark , Space ¾ Support Stop Bit : 1 , 2 ¾ Support Data Bit : 5 , 6 , 7 , 8 ¾ ¾ Baud Rate up to 1024000bps = 1Mbit/Sec. Port 0 - Baud Rate: 110/300/600/1200/2400/4800/9600/14400/19200/38400/57600/115200/230400bps ¾ Port 1 - Baud Rate: 110/300/600/1200/2400/4800/9600/14400/19200/38400/57600/115200/230400/460800/1024000bps -2- User’s Manual Serial to Ethernet converter Application -3- User’s Manual Serial to Ethernet converter Specification Description 2-Port Serial RS-232 to Ethernet Converter Network Interface Connector RJ45 Interface Ethernet 10Base-T or 100Base-TX (Auto-Sensing) Setup HTTP Browser Setup Mode TCP Server/TCPIP Client /UDP Client Protocols ARP, IP, ICMP, UDP, TCP, HTTP, DHCP, Telnet Serial Interface Port 0 UART TTL-232 Port 0 Data Rates Up to 230,400 bits/sec Port 1 RS-232 D-SUB 9-Pin Connector Port 1 Data Rates Data rate up to 1 Mbit/sec. Data Bit 5,6,7,8 Stop Bits 1 or 2 Parity None, Odd, Even, Mark, Space Flow Control RTS / CTS Others Current Consumption Max. 145 mA Input Voltage 5V DC Operating Temperature 0 ~ +60℃ Storage Temperature -10 ~ +70℃ RoHS Compliant with RoHS Dimensions 71*33*17 mm -4- User’s Manual Serial to Ethernet converter Hardware Guide LINK ACTIVE Indicator Indicator -5- User’s Manual Serial to Ethernet converter Pin Assignments ¾ Port 1 - RS-232 DB9 Pin ¾ Signal Direction 2 TxD Output Transmitted Data 3 RxD Input Received Data 5 Gnd N/A Signal Ground 7 CTS Input Clear to Send 8 RTS Output Request to Send 9 Vcc Input Power Supply (optional) Port 0 – TTL 232 Pin ¾ Ethernet Port Signal J7 Pin 1 TX J7 Pin 2 RX J7 Pin 3 CTS J7 Pin 4 RTS J7 Pin 5 GND Pin Signal Direction Line Color 1 TX+ Output ← White Orange 2 TX- Output ← Orange 3 RX+ Input → White Green 6 RX- Input → Green -6- User’s Manual Serial to Ethernet converter Factory Default Value ¾ Default Device name : SE02A ¾ Default IP Address : 192.168.1.254 ¾ Default IP Subnet Mask : 255.255.255.0 ¾ WEB-Based Configuration : http://192.168.1.254 ¾ Default Password : 123456 Configuration ¾ Preparation 1. IP Address Setting - Configure Computer IP address to same as Serial to Ethernet Converter.. 1. Configure IP Address 2. Enter 2. Connecting Power - Connect power adapter with Power Jack of Serial to Ethernet Converter. If the power is properly supplied then the LED indicator will light and show “Red” color. 3. Connecting Network - Connect one end of the Ethernet cable to Serial to Ethernet Converter 10/100M Ethernet port and the other end of Ethernet cable to Ethernet network. 4. Connecting Serial Device – Connect Serial port of Serial to Ethernet Converter to Serial devices. -7- User’s Manual ¾ Serial to Ethernet converter Login WEB-Based Configuration 1. Open your browser and link to 2. Type the password http://192.168.1.254 ** Default Password: 123456 ** 3. Press “Login” button. 4. Success Login to Web Configuration SE02A -8- User’s Manual ¾ Serial to Ethernet converter Port 0 (UART TTL-232) - Setting Click the “Port 0” to change RS-232 parameters as you need. After parameters changed, you must select “Make these the default settings” then press “Submit” button then your new setting just will work successful. 1 3 -9- 2 User’s Manual ¾ Serial to Ethernet converter Port 1 (RS-232 DB9) – Setting Click the “Port 1” to change Serial parameters as you need. After parameters changed, you must select “Make these the default settings” then press “Submit” button then your new setting just will work successful. 1 3 - 10 - 2 User’s Manual ¾ Serial to Ethernet converter Server Mode Factory default Telnet mode is Server mode and waiting to be linked. Client device is able link Server by WinSock or Hyper Terminal [ Hyper Terminal Setting ] * IP Address * COM Port Number * Mode - 11 - User’s Manual ¾ Serial to Ethernet converter Client Mode Telnet Client mode supports Auto-Connect to Server device and you must type Server IP address in Client Serial parameters setting first. After parameters changed, you must select “Make these the default settings” then press “Submit” button then your new setting just will work successful. - 12 - User’s Manual ¾ Serial to Ethernet converter System Setting SE02A - 13 - User’s Manual ¾ Serial to Ethernet converter Hardware Recover Factory Default 1. Turn off power. 2. P Keep press “Recover” button of Serial to Ethernet Converter then turn on power after 5 seconds take your hand off Recover button then Serial to Ethernet Converter will become factory default value. Warranty Policy 1. This device is guaranteed against manufacturing defects for one full year from the original date of purchase. 2. This warranty is valid at the time of purchase and is non-transferable. 3. This warranty must be presented to the service facility before any repair can be made. 4. Sales slip or other authentic evidence is required to validate warranty. 5. Damage caused by accident, misuse, abuse, improper storage, and/or uncertified repairs is not covered by this warranty. 6. All mail or transportation costs including insurance are at the expense of the owner. 7. Do not send any product to service center for warranty without a RMA (Return Merchandise Authorization) and proof of purchase. Ensure a trackable method of delivery is used (keep tracking number). 8. Warranty is valid only in the country of purchase. 9. We assume no liability that may result directly or indirectly from the use or misuse of these products. 10. This warranty will be voided if the device is tampered with, improperly serviced, or the security seals are broken or removed". - 14 -