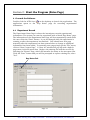
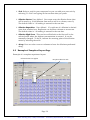
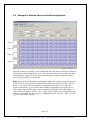
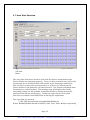
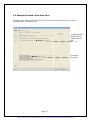
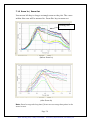
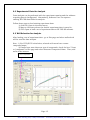
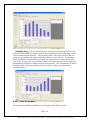
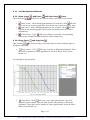
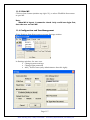
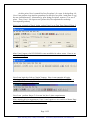
1
Artisan Technology Group is your source for quality new and certified-used/pre-owned equipment • FAST SHIPPING AND DELIVERY • TENS OF THOUSANDS OF IN-STOCK ITEMS • EQUIPMENT DEMOS • HUNDREDS OF MANUFACTURERS SUPPORTED • LEASING/MONTHLY RENTALS • ITAR CERTIFIED SECURE ASSET SOLUTIONS SERVICE CENTER REPAIRS Experienced engineers and technicians on staff at our full-service, in-house repair center WE BUY USED EQUIPMENT Sell your excess, underutilized, and idle used equipment We also offer credit for buy-backs and trade-ins www.artisantg.com/WeBuyEquipment InstraView REMOTE INSPECTION LOOKING FOR MORE INFORMATION? Visit us on the web at www.artisantg.com for more information on price quotations, drivers, technical specifications, manuals, and documentation SM Remotely inspect equipment before purchasing with our interactive website at www.instraview.com Contact us: (888) 88-SOURCE | [email protected] | www.artisantg.com RT-CES® /CIM SP/MP Software User’s Manual Artisan Technology Group - Quality Instrumentation ... Guaranteed | (888) 88-SOURCE | www.artisantg.com Preface Thank you very much for using ACEA RT-CES® /CIM system, a novel microelectronic biosensor system for label free, real time and automated monitoring of cell status in a variety of cell-based assays. This RT-CES/CIM SP/MP Software User’s Manual explains use of the RT-CES® SP/MP software, in connection with the operation of RT-CES® and RT-CIM system. The same software RT-CES® is used for operating RT-CES® and RT-CIM systems. Please read RT-CES User Guide and this SP/MP Software User’s Manual before operating the system. • • • No part of this RT-CES® /CIM SP/MP Software User’s Manual should be reproduced without ACEA’s permission. The content of this manual is subject to change without prior notice. ACEA has carefully prepared this manual. However, ACEA makes no expressed or implied warranty of any kind and assumes no responsibility for errors and or omissions. Required knowledge: This RT-CES®/CIM SP/MP Software User’s Manual was prepared for users having entry-level knowledge of Windows® based programs. Screens used in this User Guide: This User Guide describes how to perform tasks in Windows 2000/NT®. Therefore, refer to your Windows® instruction manuals for those screens and tasks specific to your version of Windows® Operating System. Artisan Technology Group - Quality Instrumentation ... Guaranteed | (888) 88-SOURCE | www.artisantg.com Table of Contents Section 1 2 3 Title Page ACEA RT-CES ® System Introduction 1-1 1.1 RT-CES® and RT-CIM Technology 1.2 RT-CES ® /RT-CIM System Components 1.2.1 RT-CES SP System 1.2.2 RT-CES MP System 1.2.3 RT-CIM System 1.3 Software Functions 1.3.1 SP Software Functions Required for Running Experiments 1.3.2 SP Software Functions Required for Monitoring Experiment 1.3.3 MP Software Functions 1.4 Requirement and RT-CES Software Installation 1.4.1 Requirement 1.4.2 Installation 1.4.3 Removal 1.4.4 Getting Started 1-1 1-3 1-3 1-4 1-4 1-5 1-5 1-6 1-7 1-9 1-9 1-10 1-11 1-12 Start the Program (Notes Page) 2-1 2.1 2.2 2.3 2.4 2.5 2-1 2-1 2-2 2-3 2-3 Launch the Software Experiment Record Information Text Boxes Example Check Software Version Design Experiment 3-1 3.1 3.2 3.3 3.4 3.5 3.6 3-1 3-2 3-2 3-3 3-4 3-5 Experiment Layout Enable Wells Enter Experiment Information Information Boxes Example of Completed Layout Page Example of Dilution Factor and Dilution Repetition 3.7 Scan Plate Function 3-6 Artisan Technology Group - Quality Instrumentation ... Guaranteed | (888) 88-SOURCE | www.artisantg.com 3.8 Example of Results from Scan Plate 3.9 Handle Connection Issues 3.10 Copy | Paste Layout Settings 4 Test Time Setting 4-1 4.1 4.2 4.3 4.4 4.5 4.6 4-1 4-2 4-2 4-2 4-2 4-2 4.7 4.8 4.9 4.10 4.11 5 6 7 3-7 3-8 3-10 Add Steps Set Test Time for Each Step Change the Preset Test Time of a Step Delete Steps Insert Steps Set up Multiple “test time setting” in the Same Step Set up a Background Step Text Box and Button Functions Example of Multiple Step and “test time setting” Saving Setup(s) Opening Setup file 4-3 4-3 4-4 4-4 4-5 Start the Experiment 5-1 5.1 5.1.1 5.2 5.3 5.4 5.5 5-1 5-1 5-2 5-2 5-3 5-3 Start Experiment Resume Experiment Stop Experiment Start Steps Stop Steps Monitor the Current Experiment Status Monitor Experiment 6-1 6.1 6-1 Menu Functions Plot Experiment Data (Plot Page) 7-1 7.1 7.2 7.3 7.4 7.5 7.6 7.7 7-2 7-3 7-4 7-4 7-5 7-5 7-6 Plot Selection Curve Options Scale Curve Selections Other Function Buttons Well Map Example of Adding Data Points to Chart Artisan Technology Group - Quality Instrumentation ... Guaranteed | (888) 88-SOURCE | www.artisantg.com 8 9 7.8 Example of Average Function 7.9 Example of Log Scale 7.10 Zoom In / Zoom Out 7-7 7-7 7-8 Export Experiment Data 8-1 8.1 Export Experiment Data to Microsoft Excel 8.2 Copy Graphic Chart 8.3 Example of Right Click Menu 8-1 8-1 8-1 Data Analysis 9-1 9.1 9.2 9.3 9.4 9-1 9-2 9-2 9-3 User Interface Experimental Data for Analysis Well Selection for Analysis An Example of Data Analysis: Dose-Response-Curve (DRC) at a Time Point 9.5 Curve Types and Curve-Fit Formula 9.5.1 Curve Types 9.5.2 Curve Fit Formula 9.6 Data Analysis on Averaged Data for Replicate Wells 9.7 Compare Dose-Response-Curves and Corresponding EC50/IC50 values for Selected Wells At Different Time Points 10 9-4 9-4 9-7 9-7 9-9 9.8 Compare Dose-Response-Curves and Corresponding EC50/IC50 Values for Different Wells At A Same Time Point 9-10 9.9 Compare Cell Index Slopes (or Cell Index Doubling Times) 9-11 9.10 Tool Bar Button Definitions and 9.10.1 Draw Curve , Add Curve Clear Curve Curve and Copy Data 9.10.2 Copy Curve 9-13 9-13 Message Board 10-1 10.1 Sensor Quality 10.2 Experiment Monitoring Events 10-1 10-1 9-13 Artisan Technology Group - Quality Instrumentation ... Guaranteed | (888) 88-SOURCE | www.artisantg.com 11 10.3 Example of Message Page 10-2 RT-CES ® MP Software 11-1 11.1 11.2 11-1 RT-CES MP System Components Brief Instruction to RT-CES Hardware Setup 11.3 Launch /Exit RT-CES MP Software 11.3.1 Launch MP 11.3.2 Exit MP 11.4 Configuration and User Management 11.4.1 Change system settings 11.4.2 Change login password 11.4.3 Add / Delete Users 11.5 MP Status And Motor Control 11.5.1 View MP Status 11.5.2 Reserve / Release Plate 11.5.3 Motor Control 11.5.4 All Start / All Stop Experiments 11.5.5 View All 96-Well Graphs 11.6 Tool Bar Buttons Overview 11.7 Running a Quick Experiment 11-3 11-6 11-6 11-7 11-7 11-8 11-8 11-8 11-9 11-9 11-10 11-10 11-10 11-10 11-11 11-14 Artisan Technology Group - Quality Instrumentation ... Guaranteed | (888) 88-SOURCE | www.artisantg.com Section 1: Introduction 1.1 RT-CES® and RT-CIM Technology The ACEA RT-CES® (Real Time Cell Electronic Sensor) System is a proprietary microelectronic biosensor system for cell-based assays. The core of the system is the microelectronic cell sensor arrays that are integrated in the bottom of standard microtiter plates. The sensors detect electronic properties of the interface between cell membranes and the electronic sensor surfaces. Such electronic readouts require no labels or reporters, and the cells are not harmed or affected by the electronic signal. The testing is non-invasive, so that individual wells can be interrogated repeatedly, throughout the experiment. Test compounds or other reagents can be added periodically and monitored. Unlike "end point" assays, the system allows an investigator to monitor the entire course of the experiment in real time. The ACEA RT-CIM (Real Time Cell Invasion/Migration) System is an extension and further development of RT-CES System for cell invasion and migration assays. The core of the system is the RT-CIM device, composed of an upper chamber and a lower chamber. The upper chamber upper chamber has 16 wells that are sealed at the bottom with a micro-pore-containing polycarbonate or polyester (PET) membrane. The membrane contains microelectronic sensor arrays that are integrated on the bottom surface of the membrane. The lower chamber serves as a reservoir for media. Cells are added to the upper chamber and are being detected by the microelectrodes on the membrane after they migrate/invade through pores on the membranes. Similar to that RT-CES system, detection of cell invasion and migration on RT-CIM system does not require labels or reporters. There is no washing, no staining and no fixation steps. Cells are continuously and automatically monitored and measured - no tedious cell counting is needed. ACEA RT-CES ® System includes an analyzer, a device station, integrated software (RT-CES ® SP or RT-CES ® MP), and consumable sensor devices (16x or 96x E-Plates) in either the 16X or 96X microtiter plate format. The RT-CES ® System allows monitoring of cell viability, cell proliferation, cell morphology change, and cell adhesion. ACEA RT-CIM System includes an analyzer, a RT-CIM station, integrated software (RT-CES ® SP) , and consumable RT-CIM devices in 16X upperchamber and lower chamber format. The RT-CIM System allows monitoring of cell migration and cell invasion. Note that the software for operating and running RT-CIM system is RT-CES SP, the same as that used for running single 96x E-Plates (or six 16x E-Plates). Page 1-1 Artisan Technology Group - Quality Instrumentation ... Guaranteed | (888) 88-SOURCE | www.artisantg.com The user-friendly RT-CES ® SP/MP software provides unparalleled instrument control for flexible experiment setups, data acquisition and data analysis. All instrument and experiment controls are embedded in the software to simplify instrument setup and operation. The RT-CES ® SP software consists of 7 function pages; Experiment Notes Page, Layout Page, Test Time Page, Cell Index Page, Plot Page, Data Analysis Page and the Message Page. The first 3 pages (Experiment Notes Page, Layout Page, Test Time Page) contain functions required for running experiments. The latter 4 pages (Cell Index Page, Plot Page, Data Analysis Page and the Message Page) contain functions for monitoring and analyzing experiments. New features programmed into the software provide the complete solution for dynamic measurement of cell status in the wells. Based on experiment requirements the measurements can be performed in any time intervals between less than one minute to over a day for time period up to days or weeks. The real time data acquisition, data normalization, and dataplotting functions allow the users to monitor experiments in real time, and to summarize experimental results such as cell-index doubling time, IC50s, or EC50s at a given time interval or a time-dependent IC50s or EC50s for an entire period of compound treatment. Comprehensive kinetic monitoring is a standard integrated software feature that makes the RT-CES ® system fully automated and easy to use. Page 1-2 Artisan Technology Group - Quality Instrumentation ... Guaranteed | (888) 88-SOURCE | www.artisantg.com 1.2 RT-CES® /RT-CIM System Components 1.2.1 RT-CES® SP System Computer with RT-CES® SP Software RT-CES® Analyzer 16x E-Plate® Station 96x E-Plate® Station Page 1-3 Artisan Technology Group - Quality Instrumentation ... Guaranteed | (888) 88-SOURCE | www.artisantg.com 1.2.2 RT-CES MP System 1.2.3 RT-CIM System Page 1-4 Artisan Technology Group - Quality Instrumentation ... Guaranteed | (888) 88-SOURCE | www.artisantg.com 1.3 Software Functions This software user’s manual mainly describes the functions and utilities of RTCES Single-Plate (SP) software. The functions and operation concepts for SP, except the Data Analysis Page, are also applicable to RT-CES MP (Multiple EPlate) system. Refer to Section 11 “RT-CES ® MP Software Quick Reference” for more information and instructions for RT-CES® MP software. 1.3.1 SP Software Functions Required for Running Experiments Experiment Notes Page: Record Key Information about the Experiment Experiment Layout Page: Design Experiment Page 1-5 Artisan Technology Group - Quality Instrumentation ... Guaranteed | (888) 88-SOURCE | www.artisantg.com Test Time Setting Page: Program Experiment Steps and Real Time Data Acquisitions 1.3.2 SP Software Functions Required for Monitoring Experiments Cell Index Page: Real Time Data Acquisition and Monitoring Experiment Data Plot Page: Multiple Data Plot and Data Export Functions Page 1-6 Artisan Technology Group - Quality Instrumentation ... Guaranteed | (888) 88-SOURCE | www.artisantg.com Data Analysis Page: Multiple Data Analsyis Functions (IC50/EC50, Cellindex doubling time, Slope) Message Board Page: Monitor the Quality of Sensor Device and Experiment Process 1.3.3 MP Software Functions Page 1-7 Artisan Technology Group - Quality Instrumentation ... Guaranteed | (888) 88-SOURCE | www.artisantg.com The RT-CES MP software was developed based on RT-CES SP software with additional functions to facilitate the measurement of up to six E-Plates. For each E-Plate, there are six functional pages (Experimental Note Page, Layout Page, Test Time Page, Cell Index Page, Plot Page, Message Page), which are the same as those in SP software as described in Sections 1.3.1 and 1.3.2 above. Note that the Data Analysis Page is not included for RT-CES MP software. For data analysis with MP system, please contact ACEA Biosciences for additional software. The main differences of the MP software from the SP software are: A motor control and plate status page is added for controlling the status of six motor-modules and for displaying the measurement status for each plate. For each E-Plate, a 96-graph page is added for displaying the cell index curves for each individual well. Page 1-8 Artisan Technology Group - Quality Instrumentation ... Guaranteed | (888) 88-SOURCE | www.artisantg.com 1.4 Requirement and RT-CES Software Installation 1.4.1 Requirement Hardware: • CPU speed • RAM • Hard Drive free space • Monitor Resolution > > > = 1GHz 256MB 100MB 1024 x 768 or higher Important Notes: 1) Since RT-CES is a real-time data measuring system, the computer power scheme must be set as follows: (Never turn off hard disks, Never standby, Never hibernates). Set “Turn off monitor to Never” is optional. Page 1-9 Artisan Technology Group - Quality Instrumentation ... Guaranteed | (888) 88-SOURCE | www.artisantg.com 2) Do not put laptop or other heating sources on Analyzer directly. Use a laptop stand or other rack to prevent Analyzer from being overheated. Page 1-10 Artisan Technology Group - Quality Instrumentation ... Guaranteed | (888) 88-SOURCE | www.artisantg.com Software: • • Windows2000, Windows XP MS Office 2003 (optional, for better data analysis performance) Important Notes: 1) If the computer is connected to a network, the login user must have sufficient right to Create/Rename/Move/Delete folders or files. Set the login user to “Local Administrator” is strongly recommended. Also make sure the Time Zone of local computer is set to be the same as that of network server. 2) Regional and Language Options should be set to English (United States), Date / Time / Number should also be set to U.S. styles. 1.4.2 Installation Following example shows the installation for RT-CES SP 5.3. Follow similar procedure for installation of RT-CES MP software. 1. Insert the RT-CES software CD into the computer’s CD drive Page 1-11 Artisan Technology Group - Quality Instrumentation ... Guaranteed | (888) 88-SOURCE | www.artisantg.com The Setup.exe will start automatically. If not, double click on Setup.exe on the software CD to launch it. 2) Follow the instruction, in most cases just click on “Next>” to finish the setup. 1.4.3 Removal To remove the software click “Start” on Windows toolbar, then follow the steps shown below: Start Æ Settings Æ Control Panel Æ Add or Remove Programs, then highlight RT-CES SP v5.3, click Remove. Page 1-12 Artisan Technology Group - Quality Instrumentation ... Guaranteed | (888) 88-SOURCE | www.artisantg.com 1.4.4. Getting Started After the software installation, RT-CES SP v5.3 icon is added to Windows desktop and programs menu. Double click the icon on the desktop or click on the icon in the programs menu to launch ACEA RT-CES SP v5.3. Page 1-13 Artisan Technology Group - Quality Instrumentation ... Guaranteed | (888) 88-SOURCE | www.artisantg.com Section 2: Start the Program (Notes Page) 2.1 Launch the Software on the desktop to launch the application. The Double click the ACEA Icon application opens to the “Exp Notes” page for recording experimental information. 2.2 Experiment Record The Experiment Notes Page is where the investigator records experimental information. The system can run the experiment with a blank “Exp Notes” page. The information on the Experiment Note Page will be automatically saved when the user clicks the “Start” button. It can be changed while the experiment is running or after the experiment has finished. User should save this page manually after the experiment has been started when a change or additional information has been added. To manually save page simply go the “File” menu, click on “Save Current Page”. A “Save As” window will pop up with a default page name in the file name box. Replace the existing file with the new file by selecting the “Enotes” Page, which will transfer the name to the text name box. Click the “Save” button and you will be prompted to replace existing file, select “Yes”. Exp Notes Tab Page 2-1 Artisan Technology Group - Quality Instrumentation ... Guaranteed | (888) 88-SOURCE | www.artisantg.com Note: The cursor must be inserted into a text box by left clicking the mouse. Once the curser has been inserted into a text box, the tab key can be used to move from text box to text box or the mouse can be used to insert the cursor in each text box. 2.3 Information Text Boxes: ¾ User: Type user name here, move the cursor to the text box. ¾ Experiment Date: The date will default to the current date. To change the experiment date, click the drop down button in the date box. A calendar will appear and then select the date. ¾ Experiment Name: User defined information. Use the mouse or tab key to move the cursor to the text box. ¾ Device Part No.: Serial number of devices should be entered to track quality and any possible issues with devices. This is highly recommended. ¾ Experiment Purpose: User defined information. Use the mouse or tab key to move the cursor to the text box. ¾ Experiment Procedure: User defined information. Use the mouse or tab key to move the cursor to the text box. ¾ Experiment Conclusion: User defined information to be entered after experiment has finished. Use the mouse or tab key to move the cursor to the test box. Mostly likely this would be done after the experiment has stopped so in order to save the added information go to “File” from the menu and select “Save current Page”. This will prompt you to save it but select the file folder of your experiment if not already displayed and select the existing file labeled “Enotes” and over-write it with modified page. ¾ File Directory: Defaults to the C:\RT-CES Data Folder but can be changed to direct the folder into another location on the computer or a network by using the “Browse” button to locate and open the folder. ¾ Experiment ID: Defaults to current date (numbers) and time (asterisks). The experiment ID will be automatically saved as a file name once the experiment starts. Note: the asterisks following the number will be translated into hours and minutes at the time you click the start button, and therefore, please make sure that date and time settings in your computer are correct. Note: The information recorded or edited into ExpNote page is optional for running an experiment. We do however, recommend to include such information. Page 2-2 Artisan Technology Group - Quality Instrumentation ... Guaranteed | (888) 88-SOURCE | www.artisantg.com 2.4 Example 2.5 Check Software Version Right click on the symbol in the header on the software program and then use the menu to select “About RT-CES”. This will activate a pop up box to appear displaying the version that is installed on the system. Page 2-3 Artisan Technology Group - Quality Instrumentation ... Guaranteed | (888) 88-SOURCE | www.artisantg.com Section 3: Design Experiment Please note that there are several ways to access functions in this software program. The user guide describes one method and a user should familiarize themselves with the other methods in case there is a preference for “rightclicking”, “menus” or “icons’. 3.1 Experiment Layout Click on the Layout Page Tab (shown in the figure below) to display the “layout” page. The experiment Layout Page allows user to enter the detailed information about each well. Correct information in each well is essential to monitor experimental data in the plot page correspondingly during the experiment. If there is no change in Experimental Layout between two experiments, then user can open the existing Layout file. To do so, select Setup and then “Open Setup” in Pull-down menu. Then locate the existing layout file (typically named as “MmDdYyHhMmLayout.pge”) and open. In fact, if the user has some frequently-used layouts, we recommend to place such Layout files in a separate folder and then each time when one of the Layouts is used, the user can simply open such Layout file using the method above. Such Layout files have to be named to include “****Layout.pge”, for example, CmpdScreenLayout.pge, or Mthd1Layout.pge. Generally, RT-CES software would save Layout page automatically when experiment starts. The user does not need to save Layout files. On the other hand, if the user wants to save a Layout page that has been edited for “re-use”, then page can be saved by following method. Select File and then select “save current page”, a dialogue window will pop-up so that the user can change the file name and change where (to which experimental folder) the Layout page can be saved. Click “save” and the software will save Layout page in appropriate folders. Note: the information in the boxes can’t be changed when the experiment is running. However, the user is allowed to make the changes before the experiment starts and after the experiment is completed. For small changes, the user can edit the existing layout page. To do so, open the experiment layout page, and then edit the layout page that matches the actual experiment design. Once you have the changes made, select file, and “save current page”, then replace the current page by clicking “save”. For major changes, it is easier to start with a new layout page and replace the existing one. To do so, open second application of RT-CES software, and make a new experiment layout on the layout page. To save the new layout page to the original experiment file, select File, and “save current page, then locate the existing file and open. Select the existing “Layout” file by clicking on it which will move the file name to the text naming box and now click “save”. It will ask you Page 3-1 Artisan Technology Group - Quality Instrumentation ... Guaranteed | (888) 88-SOURCE | www.artisantg.com whether you want to replace this file click yes. The new layout page has now replaced your old layout page and the data can be viewed using the new Layout Page. To prevent unexpected data, do not add/remove wells from Layout page. Layout Page Tab 3.2 Enable Wells Enable wells by highlighting the box or boxes (click on one box and drag across the others of interest) that correspond to the positions to which you will be adding devices onto the device station (located in incubator). The selected cells will show navy blue color then the edit text boxes can be used to define the conditions of each well. Once all information of interest is completed and click the “Apply” button. After the “Apply” button has been clicked the wells that are enabled are light purple-blue in color and will contain the information that was typed in the edit text boxes. 3.3 Enter Experiment Information To enter the necessary information for specific boxes (wells): Page 3-2 Artisan Technology Group - Quality Instrumentation ... Guaranteed | (888) 88-SOURCE | www.artisantg.com • Highlight the box in the map by clicking on one box and dragging across the others of interest. Clicking a column number will highlight the entire column of boxes. Clicking a column number, holding and dragging mouse will highlight multiple columns. Clicking a row letter will highlight the entire row of boxes. Clicking a row letter, holding and dragging mouse will highlight multiple columns. • Go to the information text boxes and type in the information like cell type, compound type, concentration etc. • Click the “Apply” button to transfer the information from the text boxes to the well map. (Note: right click will provide drop down menu with apply function.) Important: If you accidentally click outside one of the text boxes the highlighted section disappears however if look at the upper text box called “well ID” the selected wells are still active so continue. 3.4 Information Boxes The system can be operated without any well information, but activated wells on the “Layout Page”. ¾ Cell Type: Enter the name of a cell line you are using if desired. ¾ Cell Number: Enter starting cell number if desired. ¾ Apply Button: Use to transfer information from the test boxes to the well map. Note: If you forget to apply the information will be lost. ¾ Compound No.: Compounds can be assigned a number if multiple compounds are to be used for the same culture well. However, the user must select the number that is assigned to that compound and the well in the layout map will display each compound in a column (one beneath the previous). ¾ Compound Name: Enter compound name or names if desired. ¾ Concentration: Enter compound concentration if desired. This function can also be used to denote your highest concentration and then dilutions are made from this starting point. Note: To use for dilutions it must be used in conjunction with the Dilution Factor, Dilution Repetition, Dilution High From and Along functions. Page 3-3 Artisan Technology Group - Quality Instrumentation ... Guaranteed | (888) 88-SOURCE | www.artisantg.com ¾ Unit: Select a unit for your compound or you can add your own unit by selecting “Ur Unit” and typing in the text box what you prefer. ¾ Dilution Factor: User defined. User must enter the dilution factor that will be used (e.g. 2 fold dilution from well to well in a column, enter 2). The default value is 1 if nothing is entered in the text box. ¾ Dilution Repetition: User defined. If a replicate of a dilution is desired enter that number here. Replicates can be down column or across row. The default value is 1 if nothing is entered in the text box. ¾ Dilution High From: This text box will default to the first well in the selected wells where the highest concentration is entered. It can be manually changed. To do so, indicate the starting point of the dilution series by selecting the wells. ¾ Along: User can select rows or columns to have the dilutions performed along. 3.5 Example of Completed Layout Page Example of a complete experiment layout Information has been applied Drop down Menu for units Page 3-4 Artisan Technology Group - Quality Instrumentation ... Guaranteed | (888) 88-SOURCE | www.artisantg.com 3.6 Example of Dilution Factor and Dilution Repetition Conc. #1 Conc. #2 Conc. #3 Conc. #4 The first 2 wells in column 1 are 100uM and then the next 2 wells are 50uM as indicated by the dilution factor of 2. The repetition factor of 2 repeats the first concentration 2 times then the next concentration 2 times down the column since “along column” was selected. Note: If you need to change the information inside the “Layout” map you must reselect the cells that need to be changed and then right click and select “Turn off wells”. The wells will now contain no information and you can re-enter the correct information. If you need to add another compound to the map you can select the wells and then type in the compound information and click apply. A pop-up box will appear. Select “Yes”, if you want to add a new compound at the current “Compound No” by using the “Compound Name” text box. Select “cancel” if you do not make changes. Page 3-5 Artisan Technology Group - Quality Instrumentation ... Guaranteed | (888) 88-SOURCE | www.artisantg.com 3.7 Scan Plate Function Scan Plate Button The scan plate function is used to verify that the device connections to the Device Station are operating properly. Once you have activated any cells in the layout page the scan plate button will become active (lettering turns black). You can use it at any point as long as there is a device (or devices) on the Device Station in the positions you have selected. The button is disabled when the analyzer is collecting data. The message page will display the results indicating if there are any possible connection issues by listing the specific positions that did not test properly. Under the events log the scan plate function is recorded if activated before or during the experiment. The scan data are saved to C:\RT-CES Data\PlateScanningMmDdYyHhMm.txt Where MmDdYyHhMm stands for Month, Date, Year, Hour, Minute respectively. Page 3-6 Artisan Technology Group - Quality Instrumentation ... Guaranteed | (888) 88-SOURCE | www.artisantg.com 3.8 Example of Results from Scan Plate Message page showing that the Scan Plate function was used and the event was recorded with” connection OK”. “Connection OK” displayed if all connections are fine. Scan Plate Recorded Page 3-7 Artisan Technology Group - Quality Instrumentation ... Guaranteed | (888) 88-SOURCE | www.artisantg.com Scan plate function used and potential connection issues found Connection issues found, positions are listed Scan Plate recorded along with other events 3.9 Handle Connection Issues If there are connection issues: ¾ For 96X E-Plate: It is always recommended that the user scans 96x E-Plate before starting the experiment and each time after the device has been removed from the station and then placed back on the station. Verify that the handle is in the locked position (towards bottom on station). If the handle is not locked correctly, then lock the handle (please refer to RT-CES User Guide for details) and re-perform Scan Plate function. If the handle was locked correctly, then remove the e-plate. Re-insert the same device back into the E-Plate station and use the scan plate function to check the device connection again. It is recommended that you should clean connector pads on the bottom side of 96x E-Plates with alcohol-wetted cloth before re-positioning E-Plates for another “scan plate” test. If the e-plate continues to have the same wells with connection-issues, please note the position and you can continue experiments with the plate noting which well might have unacceptable data. You may want to report such incident to ACEA Biosciences Sales Team or Technical Support and send appropriate data files. ¾ Page 3-8 Artisan Technology Group - Quality Instrumentation ... Guaranteed | (888) 88-SOURCE | www.artisantg.com ¾ Note: For further instruction for handling 96x E-Plate connection issues, please refer to RT-CES User Guide for Important Tips for Using RT-CES System and for Trouble Shooting. ¾ For 16X E-Plate: Scan plate is recommended before starting the experiment and can be used if devices are removed and replaced. However due to the difference in connection design between the 16X and 96X device stations, it is not as critical as with the 96X device. Open incubator and look at the connection socket to see if all the connectors are inserted in to the socket correctly and if the latch on the 16x E-Plate station is in lock position. If not, re-lock the latch and re-perform Scan Plate function. If they are, remove the 16x E-Plate in question. Re-insert the same plate back into the E-Plate station and use the scan plate function to check the connection again. It is recommended that you should check 16x E-Plate connector pins (are they clean and straight ?) before re-inserting E-Plates for another “scan plate” test. In addition, take 16x resistor plate and place back into the socket position where the 16x E-Plate in question was to check whether the connection problem was caused by the E-Plate station. If the e-plate continues to have the same wells with connectionissues, please note the position and you can continue experiments with the plate noting which well might have unacceptable data. You may want to report such incident to ACEA Biosciences Sales Team or Technical Support and send appropriate data files. ¾ ¾ Note: For further instruction for handling 16x E-Plate connection issues, please refer to RT-CES User Guide for Important Tips for Using RT-CES System and for Trouble Shooting. ¾ Page 3-9 Artisan Technology Group - Quality Instrumentation ... Guaranteed | (888) 88-SOURCE | www.artisantg.com 3.10 Copy / Paste Layout Settings For users’ convenience, SP/MP software offers “Copy” | “Paste” functions for setting up layout page. The following steps/figures show how these functions work. Step 1 Copy Source Well(s) Use mouse left key to highlight source well(s)Æ right-click and select Copy from the menu. Step 2 Paste to Target Well(s) Use mouse left key to highlight target well(s) Æ right-click and select Paste from the menu. Note: the numbers of source and target well(s) can be different. Page 3-10 Artisan Technology Group - Quality Instrumentation ... Guaranteed | (888) 88-SOURCE | www.artisantg.com Section 4 Test Time Setting Please note that there are several ways to access functions in this software program. The software manual describes one method and users should familiarize themselves with the other methods in case there is a preference for “right-clicking”, “menus” or “icons’. Click the Test Time Setting Tab to display the test time setting page. This page allows • Adding (or deleting) experiment steps • Setting test time for each steps Test Time Setting Tab 4.1 Add Steps There are several ways to add steps to the Test Time page. • Click the “Step” icon on the toolbar. • Click “Steps” form menu then select “add step”. Page 4-1 Artisan Technology Group - Quality Instrumentation ... Guaranteed | (888) 88-SOURCE | www.artisantg.com • Right click mouse and select “Add a Step” from the pop up menu. Once the Step is added, step icon will appear in the left column labeled as “Step 1” for the first step and “Step 2” for second step and so on. To rename the step, move the cursor into the Steps box, highlight the word such as “Step 1”, type the desired step name and click “Apply”. Note: For simplicity, always edit the test time including intervals and sweeps of the current step before adding next step. 4.2 • • • 4.3 Set Test Time for Each Steps Enter interval time (duration between two measurements) by moving the cursor to the interval box, and entering the interval time, and then select the hour or minute or second by clicking the appropriate “radio button.” Enter the number of sweeps to the “Sweeps” text box. Click the “Apply” button to confirm the setting. Once the setting is confirmed the detailed setting information will appear in the “List Table” below, including step status, Sweep status, Sweeps, Interval, and Total test time for the step. Change the Preset Test Time of a Step Click the step in the table or click the step icon, move the cursor to the text box and then make the changes. To confirm the changes, click the Apply button. The new settings will appear in the table. 4.4 Delete Steps Click the step icon and then click the button. (Can also use drop-down menu or right click mouse for pop-up menu.) 4.5 Insert Steps To insert a step, click the Step Icon below which you want to insert the step (e.g. click Step 2 if you want to insert a step between Step 2 and 3) and then go to menu “Steps”, and select “Add a Step”. (Alternatively, right clicking mouse will bring pop-up menu with access to the function “Add a Step”.) The newly inserted step with be named to “Step X_a”, where “Step X” is the step highlighted, “a” means “after”. The user can change the given name. 4.6 Set up Multiple “test time setting” in the Same Step The system allows setting multiple “test time setting” for the same step so that the system will continue to perform measurements with Page 4-2 Artisan Technology Group - Quality Instrumentation ... Guaranteed | (888) 88-SOURCE | www.artisantg.com different time intervals for a given step without user manual intervention. To use this function, simply click the step (left click on mouse on either the icon in the left hand margin or in the table) to which you want to set up multiple “test time setting”, and then rightclick on test time page, and then select “Add a SubStep” from the menu. If initially there were no settings (time interval and sweep number are empty) for the selected Step, then “Add a SubStep” function will lead to one (1) being the sweep number and one (1) minute being the time interval for this Step, rather than have a SubStep added. If the selected Step has time interval and sweep number entered, then the added SubStep will have the same sweeps and intervals as those for the highlighted step. If the user wants to change the settings for any of SubSteps, the user can click the SubStep (left click on mouse on either the icon in the left-hand margin or in the table) and then enter the information such as intervals and sweeps into the corresponding boxes and click the “Apply” button. The information will be transferred into the Table. 4.7 Set up a Background Step It is recommended that you set up a background or reference step as its own step (i.e. step 1) before starting any other experiment steps. The first step (step 1) will be for “background” or “reference” data collection, which must be performed for all e-plate devices with cell culture media added but before cells are added. For this purpose, when a user adds the first step, the software sets its sweep to one (1) and interval to one (1) minute automatically. The user can change this setting, if needed. Important Note: It is recommended that the user add one more step than what the experiment calls for. This will ensure that if the experiment finishes the last actual experimental step while unattended the analyzer will become idle and then the user can decide if they want to terminate the experiment or continue it. This allows more flexibility for the user. Although the resume function can be used if an additional step is not added, we recommend adding the additional step for more experimental flexibility. After a step has been started, it cannot be edited. 4.8 Text Box and Button Function ¾ Interval: Time duration between two measurements, user defined value. ¾ In: Determine the time duration in hours or minutes or seconds, user defined. ¾ Sweeps: Number of times that the interval will be repeated for data collection, user defined. Page 4-3 Artisan Technology Group - Quality Instrumentation ... Guaranteed | (888) 88-SOURCE | www.artisantg.com ¾ Steps: Defaults to numerical assignment but can be user defined by typing the text box. ¾ Apply: Confirms and transfers the information from the text boxes to the Table beneath it. The apply function also generates the step Icon in the left-hand margin. 4.9 Example of Multiple “Test Time Settings” In the example below the system will run step 1, once the “start” button has been clicked, and then wait for the user to click the “Start Step” button to begin step 2. Once the “Start Step” button is activated, the system will run step 2, which consists of 2 sub-steps. Even though there are 2 “test time setting”, the system will automatically run both “test time setting” consecutively since they are both labeled step 2. When step 2 is complete the system will wait (in idle mode) for the user to click “Start Step” in order to run step 3. Example: Multiple “Test Time Setting” of the same step, which the system is programmed to run consecutively. Multiple “test time settings” 4.10 Saving Setup(s) As described in Sections 2, 3 and Section 4 above, RT-CES software allows the users to edit/enter various set up information. If certain set up information is Page 4-4 Artisan Technology Group - Quality Instrumentation ... Guaranteed | (888) 88-SOURCE | www.artisantg.com frequently used, we recommend that, to save time for editing or entering various information or parameters, the user should save such set up information in a separate folder so that the user can load such set up information into RT-CES software each time when a new experiment is performed. Note: RT-CES software would save all set up information automatically when experiment starts. The user does not need to manually save such information if not for the purpose of “re-use” of them for additional experiments. There are four settings for RT-CES software, including, Exp Notes, Layout, Test Time and Frequency Setting. Editing information for Exp Notes, Layout and Test Time setting has been described in Section 2, 3 and 4 above. Frequency Setting can be changed, if needed, by selecting Setup from the Menu, Clicking Frequency Item and Selecting between Default Frequency (where three frequencies are used for measurement) or Single Frequency (where one frequency is used for measurement). The user can save all set-up information after editing and/or changing all settings. Select “Setup” from the menu, and then select “Save All Setups” to save all current settings. A dialog box will appear prompting the user to choose where/which folder to save the setting files. Default file names will be MmDdYyENotes.pge, MmDdYyLayout.pge, and MmDdYyETimes.pge. If desired, the “MmDdYy” format can be changed to any other “text or numbers”. Click on “Save” on the dialogue box, the software will save three files associated with the setup. The user can also save individual set-up information. At each of Exp Note page, Layout page or Test Time page, Select File and then select “save current page”, a dialogue window will pop-up so that the user can change the file name and change where (to which experimental folder) the corresponding page can be saved. Click “save” and the software will save the corresponding page in appropriate folders. 4.11 Opening a Set-up File The user can open a previously saved setup file or files from an existing experiment by selecting “Setup” from the menu bar, and then choose “Open Individual Setup” or “Open All Setups”. A dialog box will appear. The user can map to the previously saved directory for opening the setup file(s). If “Open Individual Setup” is used, select the file to be opened and click “Open” to open the individual setup file. If “Open All Setup” is used, select one file (for example 0628060858Layout.pge) and click “Open” to open all set-up files with associated names (for example, 0628060858Layout.pge, 0628060858ETimes.pge, 0628060858ENotes.pge) Those files are now loaded into the software. Note: Open Experiment button (Open) is for Opening an existing experiment, not for opening setup-up file(s). Page 4-5 Artisan Technology Group - Quality Instrumentation ... Guaranteed | (888) 88-SOURCE | www.artisantg.com .Section 5: Start Experiment • “Layout Page” and “Test Time Page” must be set-up before the experiment can be started. Once these two pages have been set, the “Start” button in upper left hand corner will be enabled. Click on the Start button to start the experiment. • Check the system connection before starting the experiment to ensure that all plugs and cables are securely plugged into the instruments. Start Button 5.1 Start Experiment Click the start button, and the system will initiate the measurements automatically. The system starts from the first step. Once the experiment starts, the start button becomes disabled. Warning: When the experiment starts, the software measures background first. Please DO NOT remove the E-Plate while the software is measuring the background. Otherwise, the experiment result will be incorrect. 5.1.1 Resume Experiment If the experiment is accidentally terminated, the whole experiment can be resumed. To resume experiment, run the software application and go to Page 5-1 Artisan Technology Group - Quality Instrumentation ... Guaranteed | (888) 88-SOURCE | www.artisantg.com “File” and select “open”. Select the experiment file folder that is the terminated experiment and click the “open” button. After the software successfully loads the terminated experiment, the “Start” button becomes the “Resume” button if there are any unfinished test time settings left to run. The system automatically continues the measurements using the existing “reference” file folder and saves the data under the original experiment ID file folder. Note: Do not use this function if the experiment was terminated before the initial background readings were completed. Re-set up experiment. Resume Button 5.2 Stop Experiment Click the “stop” button to stop whole experiment. Since the experiment data are automatically saved in real time into the file folder labeled as the experiment ID, you don’t need to save the data file folder before terminating the experiment. 5.3 Start Steps The system will stay idle after a step is completed. To move to the next step, click the “Start steps” button, and the system will automatically initiate the next step. There is no defined idle time period that for the instrument to wait between steps. Page 5-2 Artisan Technology Group - Quality Instrumentation ... Guaranteed | (888) 88-SOURCE | www.artisantg.com 5.4 Stop Steps To terminate a current step, click the “Stop steps” button. You can terminate the current step and initiate the next step any time depending on the experiment requirement. Note: “Stop” performs a pause action, so the user can do something, such as adding compounds, checking connections, etc. without data collection. And later on, the user can resume the rest sweeps of the same step. “Stop Step” stops the experiment and discards the rest sweeps of current step. So the user cannot resume this step. The user can start Next Step if there is an additional step ahead. 5.5 Monitor the Current Experiment Status Status Bar on the bottom on the software states the current running status. It will say “Ready”, or “Waiting for next step”, or displays the well that the system is collecting data from (for example A2). Note: All separately numbered steps like step 1, step 2 and step 3 will need to be manually started by clicking the Start Step button. However, in the same step, you can have multiple “test time setting”, and the system will run consecutively with no user assistance. Page 5-3 Artisan Technology Group - Quality Instrumentation ... Guaranteed | (888) 88-SOURCE | www.artisantg.com Section 6: Monitor Experiment Real Time measurements will be recorded and presented as arbitrary units, cell indexes on the Cell Index Page. The index table shows the most recent measurement. The previous collected data can be viewed by using drop down list beside “Time”. Cell Index Tab 6.1 Menu Functions • Time: Click the corner arrow to display data at collected time points. If more than nine (9) time points exist then the scroll bar may need to view hidden time points. • Calculations: There are 3 calculation methods for cell indexes that can be viewed using the drop down menu. Cell Indexes are calculated based on the electronic readout from the RT-CES ® Analyzer for quantifying the biological status of cells on the sensors’ surfaces. Page 6-1 Artisan Technology Group - Quality Instrumentation ... Guaranteed | (888) 88-SOURCE | www.artisantg.com • Cell Index – Most commonly used units. This calculation uses the relative difference between the electronic readout ( Rcell ( f i ) ) collected at intervals and the reference electronic readout collected at the beginning of the experiment. The reference reading is the background reading ( Rbackground ( f i ) ) of the e-plate device with cellfree media added. The formula for calculating Cell Index is given by: ⎛ R ( f ) − Rbackground ( f i ) ⎞ ⎟⎟ Cell Index = max⎜⎜ cell i i 15 ⎝ ⎠ Where i = 1, …N with N being the number of the frequencies used for the measurement (for example, i=1, 2 and 3 when there are three measurement frequencies (N=3)). • Cell Index II – Used for more advanced data analysis. This calculation uses the absolute electronic readout changes at each collection interval relative to the original background value. The formula for calculating Cell Index II is given by: Cell Index II = max ( Rcell ( f i ) − Rbackground ( f i )) i • Cell Index III – Used for more advanced data analysis. This calculation uses the average absolute electronic readout changes at a collection interval from multiple frequency points. The formula for calculating Cell Index III is given by Cell Index III = ∑ (R cell ( f i ) − Rbackground ( fi )) i N Where N is the total number of the frequencies used for the measurement. Please contact ACEA Technical Services for more details of Cell Index Calculation. (858) 724-0928 or (858)-361-1758. Page 6-2 Artisan Technology Group - Quality Instrumentation ... Guaranteed | (888) 88-SOURCE | www.artisantg.com Time Drop Down Menu Cell Index Scroll Bar Page 6-3 Artisan Technology Group - Quality Instrumentation ... Guaranteed | (888) 88-SOURCE | www.artisantg.com Section 7: Plot Experiment Data The plot page displays and analyzes the collected data. To plot a single well from the experiment data, double click the well button that represents the well position on the Well Map and the chart will display the curve. To display multiple data points on the chart, click on one well and drag across the desired selection of wells. The selected wells show dark blue color, and then click the button “Add >>” located to the left on the Well Map. The experiment data collected from the selected wells will be plotted in the Chart Plot. Plot Selection Plot Tab Curve Options Chart Plot Well Map Scale Well Button Curve Selection Table Page 7-1 Artisan Technology Group - Quality Instrumentation ... Guaranteed | (888) 88-SOURCE | www.artisantg.com 7.1 Plot Selection ¾ X-axis: User can select different units for the x-axis of chart. Define the X-axis by using the drop menu, and select the unit of interest. ¾ Y-axis: User can select Cell Index or Normalized Cell Index for y-axis by using the drop down menu. If Normalized Cell Index is selected, a time point must be chosen to normalize the data to. Thus, Normalized Cell Index would equal to 1 (one) for all wells at the normalization time point. Using the drop down menu under Curve Options and Time can choose the time point that you would like to normalize the data to. ¾ Curve: User selects Linear (default) or Log scale. By clicking the function dot button, the corresponding plot curves will automatically appear in the Plot Chart. ¾ Line Weight: User can change the symbol size that the chart is displaying for plotting curves. To change the size of a curve the well button that correspond to the curve of interest must be selected (well or wells will turn dark blue indicating it is selected). Once the wells are selected then go to the Line Weight test box and enter a smaller or larger value than is currently displayed. Smaller numbers will make the lines appear thinner and larger numbers will make the lines appear thicker. ¾ Line Marker: User can change the symbol shape that the chart is displaying for plotting curves. Before the user can change the symbol of the curve the well button or well buttons that correspond to the curve of interest must be selected (the well button or buttons will turn dark blue indicating it is selected), and then select the symbol using the drop down menu. Page 7-2 Artisan Technology Group - Quality Instrumentation ... Guaranteed | (888) 88-SOURCE | www.artisantg.com Example Notice the dark blue color of well buttons A5, B5, C5 and D5 in the Well Map thus indicating they are selected. Once selected as in the above example then the “Add>>” button was clicked and the four selected wells are displayed. 7.2 Curve Options ¾ Time: Drop down menu displays data from all time points, which have been collected from experiment. This function is used in conjunction with the Normalized Cell Index under Plot Selection and the Y-axis drop down menu options. Page 7-3 Artisan Technology Group - Quality Instrumentation ... Guaranteed | (888) 88-SOURCE | www.artisantg.com ¾ Cell Type: If the Layout page is completely set up the user can select to view experiment data only from particular cell type in the experiment. ¾ Cell Number: If multiple cell numbers were used, then this function facilitates viewing of data generated from a particular cell number by using the drop down menu. ¾ Compound: If multiple compounds were used then this function facilitates viewing of data generated from a particular compound by using the drop down menu. ¾ Concentration: If multiple compound concentrations were used then this function facilitates viewing of data generated from a particular concentration by using the drop down menu. 7.3 Scale ¾ Steps: If the experiment consists of multiple steps than this function will facilitate viewing of selected steps only. For example, to view data from step 2 to step 5 first click the step box and then select step 2 in the “From” text box and then select 5 in the “To” test box. ¾ Auto Y: When the check mark is in front of the word “Auto” the auto scaling function is on. To turn it off click on the box and the check mark will be removed. The scale can be manually changes by using the up or down arrows next to the number. 7.4 Curve Selections ¾ Change Background: Click on this button and select the chart background color from the pop-up box with color choices. Once your selection is made, click “OK”. ¾ Change Curve Color: Select a well by clicking on it with the cursor and then click the change curve button. A pop up box with color choices will appear, make selection then click “OK”. The color pop-up box will appear when the “Changed Curve Color or Change Background” buttons are clicked. To change a specific data point curve color you must first select the well button on the Well Map by clicking on it which will cause it to turn dark blue. When you have finished selecting a new color, click “OK”. Page 7-4 Artisan Technology Group - Quality Instrumentation ... Guaranteed | (888) 88-SOURCE | www.artisantg.com 7.5 Other Function Buttons ¾ Average: The data on the chart that is labeled the same from the Layout Page can be averaged when the “Average” button is selected. Note: If the original layout page does not reflect the actual experiment, it is recommended that you create a new layout page. (Refer to section 3.1) ¾ Draw STDev: When the “Draw STDev” button is selected, it will add error bars to averaged data on the chart. ¾ Draw: This button is used to refresh a chart or if no chart is displayed after selecting wells and clicking the “Add>>” button. Simply click the “Draw” button to refresh the screen. ¾ Add>>: Once a well button or buttons are selected, click the “Add>>” button which will add the curves based on selected wells. ¾ Add All: The “Add All” button plots all wells that were activated in the Layout page and display on Chart Plot. ¾ Remove<<: Once a well button or buttons are selected the “Remove<<” button “removes” the curves from the Chart Plot. ¾ Remove All: The “Remove All” button “removes” all curves from the Chart Plot. 7.6 Well Map On the Plot page the well map in the lower right hand corner can be used to select the well button or buttons of interest that will be displayed on the chart above it. Click on an individual well button or perform multiple selections by clicking and dragging across the desired well buttons. Single wells can be double clicked to add the data to the chart. Note: The light purple color on the well map indicates that the wells have been selected in the “Layout” page for this experiment. Page 7-5 Artisan Technology Group - Quality Instrumentation ... Guaranteed | (888) 88-SOURCE | www.artisantg.com 7.7 Example of Adding Data Points to Chart Wells have been selected for graphical display but the “Add>>” button has not been clicked yet. Selected wells Each well is graphically represented by a color on chart. Page 7-6 Artisan Technology Group - Quality Instrumentation ... Guaranteed | (888) 88-SOURCE | www.artisantg.com 7.8 Example of Average Function Averaged data points for the selected wells. (Average button was selected) (Software Version 2.4.5) The average button calculates the average of identically labeled wells from the “Layout Page” at each time point and displays them as the same color for the well bottom and the curve. STDev Check box selected Both colored “red” are average on Chart Plot 7.9 Example of Log Scale The data is displayed in log scale when the “Log” button is selected. Page 7-7 Artisan Technology Group - Quality Instrumentation ... Guaranteed | (888) 88-SOURCE | www.artisantg.com 7.10 Zoom In / Zoom Out Use mouse left key to drag a rectangle area on the plot. The curve within this area will be zoomed in. Press Esc key to zoom out. Zooming Area (Before Zoom In) (After Zoom In) Note: Zoom In may take long time if there are too many data points in the zoom in area. Page 7-8 Artisan Technology Group - Quality Instrumentation ... Guaranteed | (888) 88-SOURCE | www.artisantg.com Section 8: Export Experiment Data 8.1 Export Experiment Data to Microsoft Excel There are two ways to export data to Microsoft Excel: • Open the experiment folder under RT-CES data directory, and then double click the MmDdYyHhMmindex1.idx (your experiment ID). Once the file is opened, one can see that the data is saved in a 96-well format (8 rows by 12 columns) for different time points. Just copy and paste the data to Excel for analysis. • Open the RT-CES program, if the experiment is not already open, select the Plot tab and highlight the wells that you want to analyze. Once the graph is displayed right click the mouse, click Copy Data on Chart (see Section 8.3 for additional details), and then open Microsoft Excel file. To paste the data to excel, click Paste on Edit drop down menu. 8.2 Copy Graphic Chart or Data on Chart To copy graphic chart to Microsoft PowerPoint, Microsoft word and Microsoft Excel (open the RT-CES program and have experiment open and data selected) • Select the Plot tab and right click the mouse • Click the Copy Chart or other items from the menu • Open the program (typically MS Word/Excel/Power Point etc.) to which you want to paste the chart or data • Select the paste on the Edit drop down menu Note: The charts are imported as pictures only curves and labels cannot be modified. If the chart is to be modified use the “copy data from chart” function to paste the data into Excel and use Excel’s graphing function to plot the data. 8.3 Example of Right Mouse-Click Menu On Plot page, Right Click Menu • • • Copy Chart: Copy the chart only as a picture. Copy Data on Charts: Copy only the data that is currently being displayed on chart. Copy Cell Index of Charts: Copy the cell indexes for the selected wells and for time points currently displayed on chart. Page 8-1 Artisan Technology Group - Quality Instrumentation ... Guaranteed | (888) 88-SOURCE | www.artisantg.com • • • Copy All Cell Indexes of Charts: Copy all cell indexes from the entire experiment for the wells selected displayed on chart. Copy All Normalized Cell Indexes: Copy normalized cell indexes for all wells and for the time points displayed on the chart. Copy Selected Chart Normalized Cell Index: Copy normalized cell indexes for the selected wells and for the time points displayed on the chart. After clicking one of the above menu items, user can go to Excel to paste all the copied data. Right click menu Page 8-2 Artisan Technology Group - Quality Instrumentation ... Guaranteed | (888) 88-SOURCE | www.artisantg.com Section 9: Data Analysis Data Analysis Page is used to analyze data obtained by RT-CES System and to calculate relevant parameters for the cell-based assays. Major functions include • • • • • Calculate and display IC50/EC50 for experimental data where a series of compound concentration is used. Various methods are used to derive IC50/EC50 values. Calculate and display Cell Index Slope and Doubling Time within a given time period. Calculate and display time-dependent IC50 values. Export Dose-Response-Curves and other graphs to MS Office Excel / Power Point and other applications. Export curve-fit data to MS Office Excel and other applications. 9.1 User Interface Data Analysis Page is divided into mainly contains mainly 4 areas, Tool Bar Buttons, Graph Plot, Curve Type/Parameter Selection, and IC50/EC50 Summary Table Tool Bar Buttons Graph Plot Curve Type Selection IC50/EC50 Summary Page 9-1 Artisan Technology Group - Quality Instrumentation ... Guaranteed | (888) 88-SOURCE | www.artisantg.com 9.2 Experimental Data for Analysis Data Analysis can be performed with the experiment running and the software acquiring data in background. Alternatively, Software User can open an existing RT-CES data folder for analysis. Follow these steps to load existing experiment data: 1) click File|Open in the main menu, 2) Map to a directory where the desired experiment data is saved in, 3) Click Open to load a set of experiment data to RT-CES SP software. 9.3 Well Selection for Analysis After loading a set of experiment data,go to Plot page and select wells which will be used for data analysis. Note: 1) For IC50/EC50 calculation, selected wells must have a same compound name. 2) If wells have more than one type of compounds, check the box “√”next to “compound” in Plot page and select interested Compound Name. Then, add wells of the interest. Select Compound EGF Page 9-2 Artisan Technology Group - Quality Instrumentation ... Guaranteed | (888) 88-SOURCE | www.artisantg.com 9.4 An Example of Data Analysis: Dose-Response-Curve (DRC) at a Time Point After well selection at Plot page, go to Data Analysis page. For obtaining a dose-response-curve at one time point, following items need to be Selected: 1) Select “DRC (CI at a time point vs conc)” from Curve Type dropdown list, 2) Choose Sigmoidal dose-resposne from Formula dropdown list 3) Select a Time Point from Time dropdown list or on tool bar. A dose-response curve (x-axis: concentration; y-axis: Click cell index or normalized cell index, same as the Y-axis of Plot Page) is shown on the graph with discrete points for selected wells. Furthermore, the software performs a curve-fitting of selected “sigmoidal dose response equation (see Section 9.5.2) to the experimental data points and calculates IC50/EC50 values and values for other parameters in the equation. IC/EC50 values are shown on the Table listed on the right-hand side of the Page. Notes: The number close to a curve in a yellow box stands for the order of the curves that have been drawn/added to the graph area. It is used to distinguish between different curves on the graph area. The corresponding details for the curves are shown in the Table. There is a checkbox in the lower left of Data Analysis page. The default value of this checkbox is unchecked. If it is checked (√), a blue line (start time) and a red line (end time) are shown on Plot Page, which represents the time period for calculation. If the selected curve type is DRC at a time point, only the red line is shown to indicate the time point selected on Plot Page. To show curve fitting details, move cursor on to the curve, the formula, Curve Type, Time Point, and fitted parameters are shown in a beige area. See the illustration below. Page 9-3 Artisan Technology Group - Quality Instrumentation ... Guaranteed | (888) 88-SOURCE | www.artisantg.com 9.5 Curve Types and Curve-Fit Formula 9.5.1 Curve Types There are 8 curve types available: 1、DRC (CI at a time point vs conc) 2、DRC (max in a time period vs conc) 3、DRC (min in a time period vs conc) 4、DRC ((max-min) in a time period vs conc) 5、DRC (area-under-curve in a time period vs conc) 6、Time dependent EC50 7、Slope 8、Doubling time Special Note: All calculations and curve fitting on Data Analysis page are performed using Cell Index or Normalized Cell Index values that have been selected as y-axis on Plot Page. For example, if Normalized Cell Index is selected as y-axis in Plot page, all calculations would use Normalized Cell Index values. DRC (CI at a time point vs conc):Show dose response curve (x-axis: compound concentration; y-axis: cell index or normalized cell index, same as yaxis on Plot Page) for all selected wells and perform curve fitting using chosenformula to calculate IC50/EC50 at the chosen time point. Page 9-4 Artisan Technology Group - Quality Instrumentation ... Guaranteed | (888) 88-SOURCE | www.artisantg.com DRC (max within a time period vs conc) :Show dose response curve (xaxis: compound concentration; y-axis: maximum of cell index or normalized cell index in the chosen time period) for all selected wells and perform curve fitting using chosen-formula to calculate IC50/EC50 for such DRC. DRC (min in a time period vs conc) :Show dose response curve (x-axis: compound concentration; y-axis: minimum of cell index or normalized cell index in the chosen time period) for all selected wells and perform curve fitting using chosen-formula to calculate IC50/EC50 for such DRC. DRC ((max - min) in a time period vs conc) :Show dose response curve (x-axis: compound concentration; y-axis: maximum subtracted by minimum of cell index or normalized cell index in the chosen time period) for all selected wells and perform curve fitting using chosen-formula to calculate IC50/EC50 for such DRC. DRC (area-under-curve in a time period vs conc) :Show dose response curve (x-axis: compound concentration; y-axis: area-under-curve for cell index or normalized cell index in the chosen time period) for all selected wells and perform curve fitting using chosen-formula to calculate IC50/EC50 for such DRC. Time Dependent IC50: Automatically extract 20 time-points in the chosen time period, calculate IC50/EC50 at each of these points and draw a curve showing the time-dependent of IC50 or EC50 values (x-axis: time point; yaxis: IC50/EC50 values). If the time points in the chosen period is < 20, then IC50 for all the points are calculated. Please see illustrated example below. Slope: For each selected well, calculate the slope of cell index (or normalized cell index) curve in the chosen time period by performing a linear-line fit. The slope values are shown in the bar chart. Please see illustrated example below. Page 9-5 Artisan Technology Group - Quality Instrumentation ... Guaranteed | (888) 88-SOURCE | www.artisantg.com Doubling Time:For each selected well, calculate the doubling-time for cell index (or normalized cell index) in the chosen time period by performing a curve fit to an exponential equation. The doubling-time is the time required for cell index (or normalized cell index) to double based on the curve-fit. If Doubling Time is negative, it means that cell index (or normalized cell index) decreases with time. In this case, the Doubling Time is the time required for cell index (or normalized cell index) to halve based on the curve-fit. The calculated Cell Index Doubling Time values are shown in the bar chart. Please see illustrated example below. 9.5.2. Curve Fit Formula There are two formulas available for calculating IC50/EC50 values. Page 9-6 Artisan Technology Group - Quality Instrumentation ... Guaranteed | (888) 88-SOURCE | www.artisantg.com (1) Sigmoidal dose-response Y = Bottom + (Top – Bottom)/(1 + 10^(Log EC50 – X)) (2) Sigmoidal dose-response(Variable slope) Y = Bottom + (Top – Bottom)/(1 + 10^((Log EC50 – X)*HillSlope)) In above formulas, EC50 is used for illustration. For IC50 calculation, same formulas as those above are used, except where EC50 is replaced with IC50. Depending on specific applications, a user can choose either EC50 or IC50 in formulas by clicking either one of the two radio buttons at lower left of the Data Analysis Page. If EC50 is selected, then EC50 would be used in the formulas and the calculated results are termed EC50 (for example, the sixth curve type is called Time Dependent EC50). Same is true when IC50 is selected. The choice of EC50 or IC50 simply affects how the results are termed and shown (for example, in the Table on the right-hand side of the Page), but does not affect the results themselves. 9.6 Data Analysis on Averaged Data for Replicate Wells Data Analysis page can process averaged cell index or averaged normalized cell index for replicate wells. On Plot page, select wells that have same Cell Type and same Compound Name. In addition, some of the selected wells have exactly same concentration. Check the STDev checkbox and click on Average button. A graph showing averaged cell index curves (or averaged normalized cell index curves) with standard deviations is displayed on Plot page. In the example below, data for corresponding wells in column 1 and column 2 (for example, A1 and A2) is averaged. Standard deviation at each time point for corresponding wells of a same condition is also calculated and plotted. Page 9-7 Artisan Technology Group - Quality Instrumentation ... Guaranteed | (888) 88-SOURCE | www.artisantg.com In this case, switch to Data Analysis page and draw or add DRC at a time point, a dose-response-curve with standard deviation for each concentration point will be shown. Furthermore, if the cursor on the monitor is moved to a point, then a small box is displayed, showing the (x, y) coordinate of the point with the standard deviation for the y-axis value. Page 9-8 Artisan Technology Group - Quality Instrumentation ... Guaranteed | (888) 88-SOURCE | www.artisantg.com 9.7 Compare Dose-Response-Curves and Corresponding EC50/IC50 values for Selected Wells at Different Time Points To compare DRC and corresponding EC50/IC50 values at different time points: 1) Select wells on Plot Page; 2) Go to Data Analysis Page, Choose “DRC at a time point” Curve Type and to draw the first curve. select a time point, click 3) Without altering well selection and Curve Type choice, select another time point, click to add another curve. 4) If needed, Repeat 3) to add more curves for comparison. The IC50/EC50 data is shown in the table on the right-hand side of the Page. Please see illustrated examples below. Page 9-9 Artisan Technology Group - Quality Instrumentation ... Guaranteed | (888) 88-SOURCE | www.artisantg.com 9.8 Compare Dose-Response-Curves and Corresponding EC50/IC50 Values for Different Wells at A Same Time Point To compare DRC and corresponding EC50/IC50 values for different wells at a same time point: 1) Select a first group of wells on Plot Page; 2) On Data Analysis Page, Choose “DRC at a time point” Curve Type and select to draw a first curve. a time point, click 3) Select a second group of wells on Plot Page; 4) On Data Analysis Page, Without altering well selection and time point selection, click to add another curve. 5) If needed, Repeat 3) and 4) to add more curves for comparison. The IC50/EC50 data is shown in the table on the right-hand side of the Page. Please see illustrated examples below. Page 9-10 Artisan Technology Group - Quality Instrumentation ... Guaranteed | (888) 88-SOURCE | www.artisantg.com 9.9 Compare Cell Index Slopes (or Cell Index Doubling Times) To compare cell index Slopes or cell index Doubling Times for a same group of wells in different time periods: 1) Select a group of wells on Plot Page; 2) On Data Analysis Page, Choose “Slope” (or “Doubling Time”) and select a first to draw a Slope bar set of time points (beginning time and end time), click chart; 3) On Data Analysis Page, Without changing curve type, select a second set of time points (beginning time and end time), click to add a new Slope chart on existing graph. 4) If needed, Repeat 3) to add more time-periods for comparison of Slopes or Doubling Times. See following examples showing comparison of Slopes and comparison of Doubling Time. Page 9-11 Artisan Technology Group - Quality Instrumentation ... Guaranteed | (888) 88-SOURCE | www.artisantg.com Page 9-12 Artisan Technology Group - Quality Instrumentation ... Guaranteed | (888) 88-SOURCE | www.artisantg.com 9.10 Tool Bar Button Definitions 9.10.1 Draw Curve Three buttons , Add Curve and Clear Curve Curve on tool bar are used to Draw, Add, and Clear curves. • , Draw Curve. After drawing parameters are selected, click will first clear all curves on the graph area, then draw the new curve on the area. • , Add Curve. After drawing parameters are selected, click will add curve(s) to the existing graph. This button is usually used for curves comparison. , Clear Curve. Click will clear all the curves and corresponding data on the Graph Plot and Summary Table respectively. • . 9.10.2 Copy Curve and Copy Data are used to copy curves and data on Data Analysis page to Two buttons Windows clipboard. • Copy Curve. Click will copy curve(s) to Windows clipboard. Then they can be pasted to other applications, such as Excel, Word, Paint Brush, etc. An example is shown below. • Copy Data. Click will copy curve data (parameters, curve-fit equation, source data, curve-fit data points (240 points)) to Windows clipboard. Then they can be pasted to other applications, such as Excel, Word, Paint Brush, etc. Page 9-13 Artisan Technology Group - Quality Instrumentation ... Guaranteed | (888) 88-SOURCE | www.artisantg.com Section 10: Message Board The message board provides two kinds of information: 10.1 Messages about Experiments In the top message box, messages about issues and problems of RT-CES experiments are displayed. Two types of messages are included. One is the message for “Scan Plate” function, either showing that “connection is OK” or showing that “please check connections on the positions: well ID”. If you have wells showing connection problems, please check RT-CES User Guide to determine how you may trouble-shoot the problems. The other message is shown when the experiment was started. It would list the wells which may have background problems. Such message was provided to help the user in laying out the experiment. The user may decide to avoid using the “background problem” wells for critical test. On the other hand, “background problem” wells do not necessarily have a serious problem to affect the data from such a well. If you have many problematic wells, please check the connection of the device, and/or contact ACEA customer service and send in appropriate data files (see RT-CES User Guide for details). 10.2 Experiment Monitoring Events In the bottom message box, the events that occur within each experiment are summarized. The recorded information include the start and stop time of the each step, the time for scan plate, the time for resuming the experiment, etc. Page 10-1 Artisan Technology Group - Quality Instrumentation ... Guaranteed | (888) 88-SOURCE | www.artisantg.com 10.3 Example of Message Page For MP software, after the experiment started, each of motor movements is recorded in the Events section. This will help the user to track the plate activities during the experiment. Page 10-2 Artisan Technology Group - Quality Instrumentation ... Guaranteed | (888) 88-SOURCE | www.artisantg.com Section 11: RT-CES ® MP Software ACEA RT-CES MP Software is designed and developed for ACEA Multiple EPlate System. The concept and operation of MP are similar to SP except motor controls, user management, and plate measurement sequence queues. Section 11 here focuses on new functions of MP and the differences between SP and MP. Users are advised to get familiar with functions and operations of SP system and software, as described in previous Sections. 11.1 RT-CES MP System Components RT-CES MP system consists of PC with MP software, MP Station, and Analyzer. The PC to run MP needs 2 COM ports. One (COM Port A) connects to Analyzer for data collection, the other (COM Port B) to MP Station for motor control. If the PC does not have 2 COM ports, USB-COM port adapters are required. Since different USB slot may bring different COM port, make sure which COM port(s) are available at the PC before start hardware connections and configurations. To check what COM port(s) available, follow the steps shown below. Page 11-1 Artisan Technology Group - Quality Instrumentation ... Guaranteed | (888) 88-SOURCE | www.artisantg.com 1) Right Click on My Computer icon on the desktop; Select Properties 2) Select Hardware Tab and click on Device Manager Page 11-2 Artisan Technology Group - Quality Instrumentation ... Guaranteed | (888) 88-SOURCE | www.artisantg.com 3) Click on Ports (COM & LPT), then the available COM ports are shown as follows. (In this example, COM4 is available) 11.2 Brief Instruction to RT-CES MP Hardware Setup. Please refer to RT-CES User Guide for details for “Set up RT-CES Analyzer and MultE-Plate (MP) Station”. Here is a brief summary for the setting up: 1. Connect the RT-CES analyzer to the computer Connect RT-CES analyzer to Computer COM-Port (COM Port 1 is recommended) using the DB9-to-DB9 cables (both ends are female). 2. Place the MP station into an incubator 1. There are three cables/wires that are connected to MP Station: a round grey cable with DB9 (male) and Lemo connector (12 connections) between RT-CES analyzer and MP station, a round grey cable with DB9 (female) and Lemo connector (8 connections) between a computer port and MP Page 11-3 Artisan Technology Group - Quality Instrumentation ... Guaranteed | (888) 88-SOURCE | www.artisantg.com station, and a DC power plug to MP station from an AC adaptor. The three cables/wires should go into the incubator through an access port typically located at the back or the side of an incubator: Lemo connectors (12 and 8 connections) and the DC power plug inside the incubator. 2. Wipe MP Station with 70 - 75% alcohol or another sterilizing agent. 3. Place MP Station into the incubator. Note: MP station is rather heavy and please take care during this process. It just fits inside the incubator. Cares should be taken to avoid scratching of the MP station chassis by the interior parts of the incubator. Two people are recommended in placing MP station into the incubator. Connect the Power Cord and Cables to the MP station The three cables inside the incubator should be connected to the MP station sockets. 1. Attach the DC plug to MP station DC power socket (the right-hand side socket on the MP station back panel). 2. Plug the 8-connection Lemo connector to the middle socket on the MP station back panel. This connector is connected to the computer for Motor control either through a second COM port or through a USB-toserial port converter. Note: Make sure that the Lemo connector is oriented correctly to the socket on the MP station. Hold the metal cover of the Lemo connector and gently push into the socket. Do not force the Lemo connector in. Otherwise, it will damage the connector. Similarly, when you want to unplug the Lemo connector, hold the outmost metal cover on the connector, gently pull the connector. Do not pull the cable out. The outmost metal cover is slightly movable with respect to the cable and that’s how the connector can be fully engaged onto the socket. Directly pulling the cable will result in the damage of the connector and the cable. 3. Plug the 12-connection Lemo connector to the left-hand side socket on the MP station back panel. This connector is connected to the RT-CES analyzer. Note: Make sure that the Lemo connector is oriented correctly to the socket on the MP station. Hold the metal cover of the Lemo connector and gently push into the socket. Do not force the Lemo connector in. Otherwise, it will damage the connector. Similarly, when you want to unplug the Lemo connector, hold the outmost metal cover on the connector, gently pull the connector. Do not pull the cable out. The outmost metal cover is slightly movable with respect to the cable and that’s how the connector can be fully engaged onto the socket. Directly pulling the cable will result in the damage of the connector and the cable. Page 11-4 Artisan Technology Group - Quality Instrumentation ... Guaranteed | (888) 88-SOURCE | www.artisantg.com Connect the Cables to RT-CES Analyzer and to a Second Computer COM Port Two grey cables connected to MP stations inside the incubator are for connections to RT-CES analyzer and to 2nd computer Com port, respectively. 1. Connect DB9 connector with male end to the back of RT-CES Analzyer. 2. Connect DB9 connector with female end to a 2nd COM Port on computer either directly or through a USB-to-serial Port converter. The USB-toserial Port converter is provided, if the computer does not have a 2nd serial COM port. In such a case, connect the USB connector to a computer USB Port. Attach the Power cord to RT-CES Analyzer and Computer 1. Attach the DC power plug of the AC adaptor (with attached power cord) to Laptop computer and connect the power cord to an AC outlet. DO NOT TURN ON the computer. 2. Attach the power cord to the Analyzer and plug it into an AC outlet. DO NOT TURN ON the RT-CES analyzer. 3. Turn on the computer. The PC to run MP needs 2 COM ports. One connects to Analyzer for data collection, the other to MP Station for motor control. If the PC does not have 2 COM ports, the USB-to-Serial Port converter is used (as mentioned above). Since different USB slots may be allocated to different COM port numbers, make sure which COM port(s) are available at the PC before starting experiment or running the MP software. To check what COM port(s) available, follow the steps shown below. 1) Right Click on My Computer icon on the desktop; Select Properties 2) Select Hardware Tab and then click on Device Manager 3) Click on Ports (COM & LPT), then the available COM ports are shown (for example, it would indicate: USB serial port (COM4)). The port number is needed for RT-CES MP software to communicate properly with MP station. 4. Turn on the analyzer (the power switch is located on the back of the Analyzer). The front panel display of the analyzer reads: READY ACEA BIOSCIENCES INC 5. Turn on MP station (the power switch is located to the right of the front keypad panel). The Power LED should be ON and motor-status LEDs should indicate the UP or DOWN position of each motor module. There are six motor modules (or plate positions) in two rows. The positions in the bottom row are 1, 2 and 3, counting from left and the positions in the top row are 4, 5 and 6, counting from left. You can use the Keypad to Move up or Down the motor module (plate holder). At any moment, only one motor can be activated. Page 11-5 Artisan Technology Group - Quality Instrumentation ... Guaranteed | (888) 88-SOURCE | www.artisantg.com For example, you can Move UP the Position 1. Put a 96x resistor board on the Plate Pocket on Position 1. Move Down the Position 1. 11.3 Launch /Exit RT-CES MP Software 11.3.1 Launch MP Software MP software and an associated database (which defines initial hardware conditions and other parameters) are located in C:\Program Files\ACEA\MP folder. Simply click the MP software ICON on the desktop, then the software will start. A number of users are predefined, including “user1”, “user2”, …, “user6” as USER Names (Password is the same as the USER Name). These User Names and Passwords are included in the Database. The USER Name and Passwords can be changed in the MP software after you launch it. Refer to11.4.2 Configuration and User Management for details. When MP starts, a login window is shown. A user needs to provide correct User Name and Password to continue. Note: 1) The default User Name is “Administrator” and its Password is “acea” when MP is shipped to customers. 2) When MP starts again, the last time login user will be displayed in the user name box. Key-in correct password and click on Enter to login. Current version has the following build-in users: Note: If MP has been launched already, a user cannot launch another MP. Page 11-6 Artisan Technology Group - Quality Instrumentation ... Guaranteed | (888) 88-SOURCE | www.artisantg.com 11.3.2 Exit MP Click on close button (window up-right “x”), or select FileÆExit from menu to quit MP. Note: When MP is logout, it cannot be closed. Only a valid user login first, then the user can exit MP. 11.4 Configuration and User Management Select Settings from Setup menu to open Settings window. In Settings window, the user can: • Change system settings • Change login password • Add / Delete users (only Administrator has this right) Page 11-7 Artisan Technology Group - Quality Instrumentation ... Guaranteed | (888) 88-SOURCE | www.artisantg.com 11.4.1 Change system settings • Change the setting value(s) Recommended COM Port for analyzer is Port 1. If you connect the analyzer to another port, for example, COM 2 if it exists, then the user can change the number “1” to “2”. Note: We do not recommend the user to change such settings. The COM Port for Motor Control depends on the computer configuration and on which port the MP station is connected. For Laptop, normally a USB-to-Serial COM port converter is used for Motor Control. Depending on which USB port that is used, different Serial Port number will be shown. Please refer to Section 11.1 for details for finding out the correct Serial port number. For Desktop computer, the user may also choose between using an existing 2nd serial COM port or using a USB-to-Serial Port converter. • • Click “OK” to save the configuration and close the Settings window. Click “Cancel” to close the Settings without save 11.4.2 Change login password • • • • • Type old password in Old Password box Type new password in New Password box Re-Type new password in Re-Type New Password box (Then the “Change” button will be enabled) Click “Change” to change password 11.4.3 Add / Delete users (Only Administrator has this right) To add a new user: • Type a user name in User Name box • Click on “Add User”. If the user name does not exist, a new user with the key-in user name will be added to MP. Its default password is the same as the user name. If the user name is already in the MP, the software will show a message box telling the existing of the user. To delete a user • Type the user name in User Name box • Click on “Delete User” If the user is in MP already, it will be deleted. If not, a notify message window will be shown. Page 11-8 Artisan Technology Group - Quality Instrumentation ... Guaranteed | (888) 88-SOURCE | www.artisantg.com 11.5 MP Status and Motor Control 11.5.1 View MP Status After a user login to MP, MP Status Page is shown as below. In this example, all six plates are at top position. The MP Status Page is an important page. Most MP functions, different from SP, are accessible from this page. In MP Status Page, a user can: • Overview All 6 E-Plate Status • Reserve / Release E-Plate(s) • Move E-Plate(s) Up / Down • Reset E-Plate(s) • Start All / Stop All experiment(s) • View all 96-well graph of a selected E-Plate In the above-shown example • there are currently 3 users using MP, “Administrator”, “User1”, and “User2” • 5 E-Plates are occupied, only One (Plate6) is left • Current login User is “User1” (down-right box is shown current login user) Page 11-9 Artisan Technology Group - Quality Instrumentation ... Guaranteed | (888) 88-SOURCE | www.artisantg.com 11.5.2 Reserve / Release Plate If a plate is not occupied, its “Reserve/Release” button will show “Reserve”. Otherwise the button shows “Release”. Click on the button to Reserve or Release the plate. Reserve a Plate: a user can reserve for his/her use even if he is not using this plate for doing the experiment. If a Plate is reserved, other users cannot be access this plate. The Administrator, however, can login and access such reserved plate and even release any user’s reserved plate. A plate will be reserved for a user if he starts editing Layout Page and/or Test Time Page. Release a Plate: a user can release a plate so that other users can access this plate. When a plate is release, all the information in Layout Page and Test Time Page will become blank. Note: • The login user can reserve unoccupied plate(s), and release his/her occupied plate(s) • Click “All Release” will lease all occupied plates of the login user • Administrator can reserve / release all 6 plates 11.5.3 Motor Control Click “Up” or “Down” to move a plate individually. Click “All Up” or “All Down” to move all reserved plate(s) of the login user. If the login user is “Administrator”, click “All Up” or “All Down” will move all 6 plates up or down. 11.5.4 All Start / All Stop Experiments A login user can set up experiments for more than one plates, then click “All Start” to launch all the experiments at a time. A login user can stop all his/her experiments by click “All Stop” If the login user is “Administrator” and “All Stop” is clicked, MP will stops all ongoing experiments regardless who started those experiments 11.5.5 View All 96-Well Graphs During or after the experiment, click on “Well Graph” tab (shown on above MP status page) will display 96-well graph of a plate (see next page for an example). In the “Well Graph” page, user can click on a individual well or a group of wells to magnify the graph in the up-left picture box. Click on “EPlate” to return to previous view. Page 11-10 Artisan Technology Group - Quality Instrumentation ... Guaranteed | (888) 88-SOURCE | www.artisantg.com Well Graph example 11.6 Tool Bar Buttons Overview This section explains the functions of each Tool Bar Buttons. Open This button opens an exist experiment. Click it and map to a subdirectory where the experiment is stored in. Note: • If user opens MP experiment, the data will go to the plate which is given by the experiment ID. For example, if the experiment ID is : 2003041234P4, the data will be shown in Plate4. If user opens SP experiment, the data will always go to Plate1. • If a plate is running experiment, user cannot open data to that plate. Page 11-11 Artisan Technology Group - Quality Instrumentation ... Guaranteed | (888) 88-SOURCE | www.artisantg.com Save This button saves ENote, Layout, and Test Time before experiments start. It is enabled after user made changes at those pages. Note: When experiments start, and during the experiments are running, all the data are saved automatically. User does not need to click this button to save data. Print This button prints current page of current plate. To print all page of current plate, use menu: File Æ Print All Pages. Cut This button Cut selected data to Windows clipboard for paste. Copy This button Copy selected data to Windows clipboard for paste. Paste This button Pastes data to given field from Windows clipboard. Add Step This button adds a step to Test Time page. It is enabled only when current page is Test Time. Note: The max steps are 9. If there are 9 steps in Test Time page, this button is disabled. Delete Step This button deletes a step from Test Time page. It is enabled when a step in Test Time page is selected. Stop Step This button stops current running step. It is enabled when experiment is running. Page 11-12 Artisan Technology Group - Quality Instrumentation ... Guaranteed | (888) 88-SOURCE | www.artisantg.com Start Next Step This button starts next available step. Show Motor / All 6 Plates This button switch to Motor page which shows all 6 plates’ status. Show Plate 1 This button switch to Plate 1, make Plate 1 current Plate. Show Plate 2 This button switch to Plate 2, make Plate 2 current Plate Show Plate 3 This button switch to Plate 3, make Plate 3 the current Plate Show Plate 4 This button switch to Plate 4, make Plate 4 the current Plate Show Plate 5 This button switch to Plate 5, make Plate 5 the current Plate Show Plate 6 This button switch to Plate 6, make Plate 6 the current Plate Logout This button logout MP. After logout, all buttons are disabled except Login button. Note: If MP is logout, no one can quit MP. Only a valid user login first, then the user can quit MP. Page 11-13 Artisan Technology Group - Quality Instrumentation ... Guaranteed | (888) 88-SOURCE | www.artisantg.com Login This button login to MP. Only a valid user with valid password can login to MP. It is disabled when MP is in login. All Start This button starts all the plates if they belong to the login user and their Layout and Text Time have been set properly. Note: If a plate is at its top position, that plate cannot be started. All Stop This button stops all under going experiments which belong to the login user. Move All Motors Up This button moves all motors up, those motors belong to the login user. Move All Motors Down This button moves all motors down, those motors belong to the login user. Reset All Motors This button resets all motors. It is available only for Administrator. 11.7 Running a Quick Experiment Note: Before running the quick experiment, make sure that all the following items are checked: (1) RT-CES MP System is properly installed (see Section 11.1 and 11.2 for details and see RT-CES User Guide). The three cable connections (between computer and RT-CES analyzer, between RT-CES analyzer and E-Plate station, and between computer and E-Plate station motor) are properly linked. (2) If during checking the item (1), certain connection is re-done, perform resistor board verification again (Check RT-CES User Guide for details). Also, if the system has not been used for over a month, perform resistor board verification again. (3) RT-CES analyzer is turned on. The front panel shows Page 11-14 Artisan Technology Group - Quality Instrumentation ... Guaranteed | (888) 88-SOURCE | www.artisantg.com READY ACEA BIOSCIENCES INC If anything else displayed, please press RESET button to show above display. (4) E-Plate station motor is turned on. 6 motors’ position lights (green) indicate motors current position (top or bottom) After checking and confirming the items (1) to (4), ACEA MP is ready for running experiments. Suppose two users use MP to do their own two plates experiments respectively. A cell titration experiment on a 96X E-Plate device is used for illustration purpose. Procedure for two users running their own two experiments include: (both User1 and User2 prepare plates) 1) Add Culture Media to the 96X E-Plate 2) Insert the 96X E-Plates to the station (User1) 3) Start the RT-CES MP program 4) Login 5) 6) 7) 8) Select a Plate (1~6) Setup ExpNotes Page, Layout Page, Test Time Page Start Experiment (Start Step 1) Remove the 96X E-Plate and Add Cells into the E-Plate Wells 9) Re-Insert the 96X E-Plate and Start Step 2 (Repeat 5~9 to run Plate 2) (User1 logout, then User2 login to run he/she experiments [start from 4]) 10) Check and Plot the Cell Index Data Details for running the two users quick experiment are provided below. Add Culture Media to the 96X E-Plate 1. Add 50 or 100 uL of cell culture media into each of 96 wells in the 96X E-Plate. For better results, leave the E-Plate in the tissue culture hood Page 11-15 Artisan Technology Group - Quality Instrumentation ... Guaranteed | (888) 88-SOURCE | www.artisantg.com for 15 minutes at Room Temperature so that the culture media and EPlate surface achieve equilibrium. Special Note: the 96 wells within 96X E-Plate are organized so that each column of 8 wells are divided into TWO 4-well groups. During the experiment, to achieve consistent and accurate data, it is necessary to use the wells within a group in the same experiment. Examples of such 4-well groups are: A1, B1, C1 and D1 as a group; E3, F3, G3 and H3 as a group, A7,B7,C7,D7 as a group. Insert the 96X E-Plate 2. Press “Up” button on the motor control panel to move E-Plate’s frame to it “Top” position. Insert the 96X E-Plate one of the ZIF connector sockets E-Plate Station. Press “Down” button to move the E-Plate to its test position (bottom). The bottom green light should be “on” if connected properly. Close the door of the incubator. Start the RT-CES MP program 3. Start the RT-CES MP program by double clicking the ACEA RT-CES MP program icon on the desktop (if the program is already open, close it and reopen the program). Login the RT-CES MP program 4. When RT-CES MP program is launched, Login Window is shown. If RTCES MP program is running and logout, a user needs to click on “Login” button to active login window. Enter user name and password, and then click on “Enter” to login to RT-CES MP program. Login window Select a Plate (1~6) 5. Select a plate by click on the plate icon located on the top-right. Page 11-16 Artisan Technology Group - Quality Instrumentation ... Guaranteed | (888) 88-SOURCE | www.artisantg.com Select Plate (Plate2 is selected) Setup ExpNote Page, Layout Page, Test Time Page 6. Setup ExpNote Page, Layout Page, Test Time Page 6.1. Setup ExpNote Page. This page records experiment-related information such as User, Experiment Date, Experiment Name, Experimental Purpose, Experimental Procedure, Experimental Conclusion and the Devices you used in this experiment. Simply type in any information you like to record into appropriate spaces. The information will be saved when the experiment is started. You can also use BROWSE to choose a File Directory into which the experimental files will be saved. Further details about setup EXPNote Page are provided later in this manual. Experiment Note Page. 6.2. Setup Layout Page. This Page shows the Experiment Layout and records experiment details about each well, including name and number of Page 11-17 Artisan Technology Group - Quality Instrumentation ... Guaranteed | (888) 88-SOURCE | www.artisantg.com cells, name and concentration of compounds added into wells. Follow these steps to set up this page. Select the wells to be edited. Select a single well. Move the mouse-pointer to the well to be selected, click the left-mouse button. The selected well is highlighted. The well ID such as D1:D1 is automatically filled into the Well IDs Box if D1 is selected. Or simply type in ID of the selected well to the Well IDs Box. If B2 is selected, type in B2:B2 into Well IDs Box. The selected well will be highlighted when you move the mouse-pointer from the Well IDs Box to another box such as Cell Type. Select multiple wells. Move the mouse-pointer to the first well to be selected, click and hold the left-mouse button, drag across other wells to the last well to be selected, then release the mouse button. All selected wells are highlighted, the well’s ID such as A1:D2 is automatically filled into the Well IDs Box if all wells between A1 and D2 are selected. Note the text in the Well IDs box has the format First well ID: Last well ID. Or simply type in IDs of the selected wells to the Well IDs Box in the format of First well ID : Last well ID. For example, if all wells between A1 and H2 are selected, and then type in A1:H2 into Well IDs Box. The selected wells will be highlighted when you move the mousepointer from the Well IDs Box to another box such as Cell Type. Select entire row(s) or column(s). To select an entire row (or column), move the mouse-pointer to row ID (e.g. A or E) or column ID (e.g. 1 or 3), click the left mouse button. To select adjacent multiple-rows or multiple columns, click and hold the left mouse button, drag across row IDs or column IDs. Type text information into appropriate information edit boxes, and click APPLY button to apply the text to the wells selected. Examples for Information added into edit boxes are: Cell Type – MDA231 Cell Number – 5000. Use of other boxes including Compound No., Compound Name, Concentration, Unit, Dilution Factor, Dilution Repetition, Dilution High From, Along Column or Row is described later in this manual. Page 11-18 Artisan Technology Group - Quality Instrumentation ... Guaranteed | (888) 88-SOURCE | www.artisantg.com Experiment Layout Page. 6.3. Setup Test Time Page. This page is used to program the experimental procedure. Generally, experiment can be divided into multiple steps, and each step consists of one or multiple sweeps. Each sweep is one measurement across all the selected wells. There is a pre-determined Time Interval between neighboring sweeps within a step. After completing a current sweep, the RT-CES system automatically counting down the time interval and starts next sweep. After completing all the sweeps within a step, the RT-CES system will NOT move into next step until the user manually instructs the program. Thus, there is always a manual intervention for the system to move from one step to next one. Generally, each time user needs to take the E-Plates out, there should be one separate step. Furthermore, the user can flexibly and manually stop a current step before the system completes all pre-set sweeps. (However, it is forbidden to manually stop a current step in the Page 11-19 Artisan Technology Group - Quality Instrumentation ... Guaranteed | (888) 88-SOURCE | www.artisantg.com middle of a measurement sweep. Violating this rule may cause the system instability and loss of all data.) Step 1 is usually (but not necessarily) for background test in which on cells are present in the wells. Step one is typically set as “One Sweep, One minute”. (To add Step 1, move the mouse pointer to the Steps column on the left side of this page and left click Add a Step Icon (or go to the pull-down Steps menu and click Add a Step. Step 1 is added. Step Status is idle. All other buttons are blank. Edit Intervals and Sweeps box by typing proper numbers. Choose the Interval Units in Hour and Minute. Simply click Apply, appropriate Time Intervals with a Unit and Sweeps will be added to the boxes. Sweep Status is automatically set to 0. During the running of experiment, Test Status for corresponding steps will be changed to Test or Done, respectively, for this step is in progress or complete. Sweep Status box will automatically update and display the number of the sweep that has been complete.) Step 2 is usually the first step after cell addition. Depending on specific experiment, one can set appropriate sweep numbers and proper time intervals (for example, 200 sweeps, 30 minutes). As described above, it is OK to set a LARGE sweep number and manually stop this step before completing all the sweeps. Please refer to paragraph above for the details of Adding a Step, editing Intervals and Sweeps. Step 3 is usually a step after certain treatment (for example, compound addition) to the cells is performed. Depending on specific experiment, one can set proper sweep numbers and time intervals. For example, for measurement of rapid kinetics of cell responses to treatment, time interval of one minute can be set. Within a step, one can have sub-steps in which different time intervals can be used. For example, Step three can consists of 200 sweeps having one minute time interval and another 200 sweeps having 15 minutes time intervals. To remove a step, highlight the step and click the Delete a Step icon (shown as a large X) or go to pull-down Steps menu, click Delete a Step. Further details for setup the Test Time Page are shown previous sections of this software manual. Page 11-20 Artisan Technology Group - Quality Instrumentation ... Guaranteed | (888) 88-SOURCE | www.artisantg.com an example of Test Time Page. Start Experiment (Start Step 1) 7. Start Step 1 by clicking the “Start” button. During the test, you will note that on the bottom of the program window, it shows “testing column 0, 1”, and the RT-CES analyzer shows “Measurement in Progress”. After completing the Step 1, RT-CES analyzer will display a message “Next step to be started …” and the bottom-left of the main window will display “Ready for Next Step. Please Click Next Step to start”. Step 1 measures the background impedance of cell culture media. The data is then used as reference impedance for calculating Cell Index values. Remove the 96X E-Plate and Add Cells into the E-Plate Wells. 8. Remove the 96X E-Plate from the E-Plate Station by pulling the latch forward. The light will go off and you can slide the pins of the resistor boards out of the socket and remove the E-Plate to outside the incubator. Add 100 uL of cell suspensions into each well. The cell suspension has properly prepared cell concentrations and each well now has proper cell numbers. Leave the E-Plate in the tissue culture hood for 15-20 minutes at room temperature so that cells can settle down to the bottom of the well. Re-Insert the 96X E-Plate and Start Step 2 9. Insert the 96X E-Plate to the same ZIF connector socket (20-holes each) as used in Step 1. Lock the E-Plate to the connector by pushing small lever located on the socket 90 degrees to the right. The green light should be “on” if connected properly. Close the incubator door. Start Step 2 by clicking the “Start Next Step” button. During the test, you will note that on the bottom of the program window, it shows “testing column 0, 1”, and the RT-CES analyzer shows “Measurement in progress …”. After completing each sweep, the RT-CES analyzer will display “Waiting for next sweep …” . And the bottom-left of the main window will count-down and display the time to the start of Next Sweep (for example, “The time left is 0:05:36 for starting sweep 3, step 2”). Page 11-21 Artisan Technology Group - Quality Instrumentation ... Guaranteed | (888) 88-SOURCE | www.artisantg.com (At this point, User1 started his/her first plate’s 2nd step. In doing Step 4-9, User1 can perform very similar operations so that his/her plate 1 and plate 2 can be run simultaneously. Alternatively, after doing first plate, repeat 4~9 to run 2nd plate. Then, User 1 can logout and protect his/her experiments not being interrupted by others) Here is an example of User1 Login, wehre User1 is on Test Time Page of Plate 2. After User1 logout, the RT-CES MP is now available for other users. Here is an example of Logout. User2 can login by click on “Login” button. Here is an example of Login, showing that positions of E-Plate 3 to E-Plate 6 are available, since E_Plate a and E-Plate2 are used by User 1. User2 can perform Steps 5~9 to run his/her 2 plate experiments. After starting his/er experiment, User 2 can Logout or can switch to Motor Page to view both User1 and User2 experiments. Page 11-22 Artisan Technology Group - Quality Instrumentation ... Guaranteed | (888) 88-SOURCE | www.artisantg.com Here is an example of MP status Page, showing all six plates at bottom. Check and Plot the Cell Index Data 10. During or after the experiment, check the Cell Index Page or Plot Page. In Cell Index Page, move to different Test Time Points (the time corresponds to the time since the start of the experiment) and cell index values at the time point are shown in boxes. In Plot page, user can plot the cell index as a function of time for a well by highlighting the selected well, and click ADD button. To add another well, just repeat above process. Further details of Checking and Plotting Cell Index Data can be found in Section 6 and Section 7 of this manual. Check Well Graph 11. During or after the experiment, at MP status page, click “Well Graph” to view all 96-Well graphs of a plate. (Refer to 11.5.5 for details) Page 11-23 Artisan Technology Group - Quality Instrumentation ... Guaranteed | (888) 88-SOURCE | www.artisantg.com Intended for distribution with RT-CES/CIM System Only Copyright ACEA Biosciences 2006 Version 12192006 Artisan Technology Group - Quality Instrumentation ... Guaranteed | (888) 88-SOURCE | www.artisantg.com Artisan Technology Group is your source for quality new and certified-used/pre-owned equipment • FAST SHIPPING AND DELIVERY • TENS OF THOUSANDS OF IN-STOCK ITEMS • EQUIPMENT DEMOS • HUNDREDS OF MANUFACTURERS SUPPORTED • LEASING/MONTHLY RENTALS • ITAR CERTIFIED SECURE ASSET SOLUTIONS SERVICE CENTER REPAIRS Experienced engineers and technicians on staff at our full-service, in-house repair center WE BUY USED EQUIPMENT Sell your excess, underutilized, and idle used equipment We also offer credit for buy-backs and trade-ins www.artisantg.com/WeBuyEquipment InstraView REMOTE INSPECTION LOOKING FOR MORE INFORMATION? Visit us on the web at www.artisantg.com for more information on price quotations, drivers, technical specifications, manuals, and documentation SM Remotely inspect equipment before purchasing with our interactive website at www.instraview.com Contact us: (888) 88-SOURCE | [email protected] | www.artisantg.com