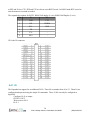
1
User Manual
ezLCD-3xx Product Family
November 1, 2012
Requires Firmware Version 2.00 or Later
1
3184-J Airway Avenue, Costa Mesa, CA 92626
(949) 248-2333
Table of Contents
1 Introduction............................................................................................................................................6
1.1 About This Manual.........................................................................................................................7
1.2 One Hundred Dollars - The ez way!...............................................................................................7
2 How the ezLCD-3xx Works...................................................................................................................8
3 Installation and Getting Started..............................................................................................................9
3.1 Connect the ezLCD USB to Your PC.............................................................................................9
3.2 Verify the ezLCD USB Flash Drive Operation............................................................................10
3.2.1 Installing the USB Driver on a Windows 7 Operating System...........................................10
3.2.2 Installing the USB Driver on a Windows XP Operating System.........................................11
3.3 Run the “Termie” Terminal Program............................................................................................13
3.4 Verify Connection.........................................................................................................................13
3.5 Flash Drive Access ......................................................................................................................13
4 Command your ezLCD with EarthSEMPL.........................................................................................15
4.1 ezLCD-3xx Grammar...................................................................................................................15
4.2 Creating and Saving Macros........................................................................................................16
4.3 ezLCD-3xx Command Port..........................................................................................................16
4.4 Command Port Management........................................................................................................17
4.5 Always Comment.........................................................................................................................17
5 EarthSEMPL........................................................................................................................................18
5.1 Macros..........................................................................................................................................18
5.1.1 STARTUP.EZM - Your Most Important Macro....................................................................19
5.2 IO Definitions...............................................................................................................................20
5.2.1 IO Usage...............................................................................................................................20
5.2.1.1 Analog IO......................................................................................................................20
5.2.1.2 Digital IO......................................................................................................................21
5.2.1.3 Peripheral IO.................................................................................................................21
5.2.1.3.1 BEEPER (BUZZER).............................................................................................21
5.2.1.3.2 UART....................................................................................................................22
5.2.1.3.3 Mode......................................................................................................................23
5.2.1.3.4 Expander Modes....................................................................................................23
5.2.1.3.5 SPI MASTER........................................................................................................24
5.2.1.3.6 I2C Master.............................................................................................................25
5.2.1.3.7 TOUCH_INT.........................................................................................................26
5.2.1.3.8 BUSY....................................................................................................................26
5.2.1.3.9 USB_DTR.............................................................................................................26
5.2.1.3.10 USB_RTS............................................................................................................27
5.2.1.3.11 USB_RX..............................................................................................................27
5.2.1.3.12 USB_TX..............................................................................................................27
5.2.1.3.13 ONEWIRE..........................................................................................................27
5.2.1.3.14 PWM...................................................................................................................27
5.2.1.3.15 SERVO................................................................................................................27
2
3184-J Airway Avenue, Costa Mesa, CA 92626
(949) 248-2333
5.3 EDK Usage...................................................................................................................................28
5.3.1 Serial RS232/485..................................................................................................................28
5.3.2 Temperature..........................................................................................................................28
5.3.3 BEEPER...............................................................................................................................28
5.3.4 Reading Ambient Light.........................................................................................................29
5.4 Expander Usage............................................................................................................................29
5.4.1 IO..........................................................................................................................................30
5.4.2 Serial.....................................................................................................................................32
5.4.3 Power....................................................................................................................................32
6 Images..................................................................................................................................................33
6.1 Resizing Images...........................................................................................................................33
6.1.1 Photoshop.............................................................................................................................33
6.1.2 Windows Paint......................................................................................................................34
7 Commands...........................................................................................................................................36
7.1 Colors...........................................................................................................................................36
7.1.1 COLOR.................................................................................................................................36
7.1.2 COLORID............................................................................................................................36
7.2 STRINGS.....................................................................................................................................38
7.3 Drawing........................................................................................................................................40
7.3.1 XY........................................................................................................................................40
7.3.2 Plot........................................................................................................................................40
7.3.3 Line.......................................................................................................................................40
7.3.4 LINETYPE...........................................................................................................................41
7.3.5 LINEWIDTH........................................................................................................................41
7.3.6 Box........................................................................................................................................41
7.3.7 Circle.....................................................................................................................................41
7.3.8 Pie.........................................................................................................................................41
7.3.9 Arc........................................................................................................................................42
7.4 Fonts.............................................................................................................................................43
7.4.1 FONT....................................................................................................................................43
7.4.2 FONTO.................................................................................................................................43
7.4.3 PRINT...................................................................................................................................44
7.5 I2C Master....................................................................................................................................44
7.5.1 I2COUT( address, variable list )...........................................................................................44
7.5.2 I2CIN( address, variable list )...............................................................................................44
7.5.3 I2CACK................................................................................................................................45
7.6 Misc Commands...........................................................................................................................45
7.6.1 SNAPSHOT..........................................................................................................................45
7.6.2 CLIPAREA...........................................................................................................................46
7.6.3 CLIPENABLE......................................................................................................................46
7.6.4 RECORD..............................................................................................................................46
7.6.5 LOOP....................................................................................................................................47
7.6.6 PAUSE..................................................................................................................................47
7.6.7 SPEED..................................................................................................................................47
7.6.8 WAIT....................................................................................................................................47
7.6.9 SECURITY...........................................................................................................................47
3
3184-J Airway Avenue, Costa Mesa, CA 92626
(949) 248-2333
7.6.10 CALIBRATE......................................................................................................................47
7.6.11 FORMAT............................................................................................................................48
7.6.12 TOUCH...............................................................................................................................48
7.6.13 LIGHT................................................................................................................................48
7.6.14 BEEP..................................................................................................................................48
7.6.15 BRIDGE.............................................................................................................................49
7.7 DOS Commands...........................................................................................................................50
7.7.1 CWD.....................................................................................................................................50
7.7.2 CHDIR..................................................................................................................................50
7.7.3 MKDIR.................................................................................................................................50
7.7.4 RMDIR.................................................................................................................................50
7.7.5 TYPE....................................................................................................................................50
7.7.6 DEL......................................................................................................................................50
7.7.7 REN......................................................................................................................................51
7.7.8 HELP....................................................................................................................................51
8 Widget Themes.....................................................................................................................................52
8.1 FONTW........................................................................................................................................52
8.2 THEME........................................................................................................................................53
8.3 Diagrams of Widget Themes........................................................................................................55
9 Widgets.................................................................................................................................................60
9.1 WSTATE.......................................................................................................................................61
9.2 WVALUE.....................................................................................................................................63
9.3 AMETER......................................................................................................................................64
9.4 BUTTON......................................................................................................................................67
9.5 TOUCHZONE..............................................................................................................................69
9.6 CHECKBOX................................................................................................................................70
9.7 CHOICE.......................................................................................................................................72
9.8 DIAL............................................................................................................................................73
9.9 DMETER......................................................................................................................................74
9.10 GBOX.........................................................................................................................................76
9.11 PROGRESS................................................................................................................................77
9.12 RADIO.......................................................................................................................................79
9.13 SLIDER......................................................................................................................................81
9.14 STATIC.......................................................................................................................................83
10 Procedural Commands.......................................................................................................................85
10.1 LET.............................................................................................................................................85
10.2 IF................................................................................................................................................85
10.3 FOR............................................................................................................................................86
10.4 WHILE.......................................................................................................................................88
10.5 REPEAT.....................................................................................................................................88
10.6 GOTO.........................................................................................................................................89
10.7 GOSUB......................................................................................................................................89
10.8 RETURN....................................................................................................................................89
10.9 ON..............................................................................................................................................90
10.10 PRINT or CPRINT...................................................................................................................90
10.11 INPUT......................................................................................................................................92
4
3184-J Airway Avenue, Costa Mesa, CA 92626
(949) 248-2333
10.12 REM.........................................................................................................................................92
10.13 DATA........................................................................................................................................92
10.14 READ.......................................................................................................................................93
10.15 RESTORE................................................................................................................................93
10.16 Variables...................................................................................................................................93
10.17 Expressions...............................................................................................................................94
10.18 Added Fonts..............................................................................................................................94
10.19 Restrictions of EarthSEMPL V2..............................................................................................94
10.20 Strings and stuff........................................................................................................................94
11 Flash Drive File Structure................................................................................................................101
12 Understanding LCD Types...............................................................................................................102
13 Start Something with your ezLCD-3xx...........................................................................................103
14 Warnings, Errata and Gotchas..........................................................................................................104
15 Gratis (a note from Randy Schafer).................................................................................................105
Appendix A: ezLCD-3xx Connector Pinout..........................................................................................106
Appendix B: ezLCD-3xx Model Descriptions and Drawings...............................................................107
15.1 ezLCD-3xx Electrical...............................................................................................................107
15.2 ezLCD-3xx Mechanical............................................................................................................110
15.2.1 ezLCD-301........................................................................................................................110
15.2.2 ezLCD-302........................................................................................................................111
15.2.3 ezLCD-303........................................................................................................................112
15.2.4 ezLCD-304 No Bezel........................................................................................................113
15.2.5 ezLCD-304 With Bezel.....................................................................................................114
15.2.6 ezLCD-313........................................................................................................................115
Appendix C: EarthSEMPL Colors.........................................................................................................116
16 Appendix D: EarthSEMPL Command Reference Guide.................................................................117
Appendix E: Upgrading the ezLCD-3xx Firmware...............................................................................122
Appendix F: Installing & Using on a Mac (OS X Lion (10.7)..............................................................124
Appendix G: Installing & Using with Linux.........................................................................................125
16.1 Installing CuteCom...................................................................................................................125
16.2 Installing Minicom...................................................................................................................127
5
3184-J Airway Avenue, Costa Mesa, CA 92626
(949) 248-2333
1 Introduction
The ezLCD-3xx reflects the most intense effort of our eighteen year history in the LCD industry and
ninth year of ezLCD production. We hope you are as excited about this product as we are! I’d
personally like to dedicate this manual to Michal Sieluzycki, our first ezLCD engineer. He started this
product line in 2003 with his winning of a Circuit Cellar Design contest, submitting a design that used
an 8-bit micro to drive a color TFT display. Michal passed on to the “big lab in the sky” in the spring
of 2011. I know he’s probably smiling down at us as he adapts the ezLCD-3xx into that CNC mill he
was always tinkering with in his garage.
We sincerely hope you enjoy using your ezLCD-3xx as much as we’ve enjoyed creating it!
Randy Schafer
CEO & Fire Starter
EarthLCD
6
3184-J Airway Avenue, Costa Mesa, CA 92626
(949) 248-2333
1.1 About This Manual
Congratulations on the purchase of your ezLCD-3xx, the easiest way to embed a color LCD with (or
without) touchscreen into your existing application, project or new product design. Note, while this
manual refers to ezLCD-3xx it is a family manual for the entire ezLCD-3xx family of products. The
appendix will describe the different models. All ezLCD-3xx models support the same I/O connector
pin out and command set. The difference is the LCD panel size, resolution, number of displayable
colors, and whether a touchscreen is included. The ezLCD-3xx is the third generation of ezLCD
developed by EarthLCD, a dba of Earth Computer Technologies, Inc. This manual contains software,
hardware and driver installation instructions and the ezLCD-3xx command list. This manual assumes
you are running Microsoft Windows 7 or Windows XP SP3 on your computer system. For Mac OS X
10.7 (Lion) and Linux see the Appendix sections for more information.
We’ve written this manual to introduce a whole new generation of ezLCD products not just to our
existing customer base, but also to the Arduino enthusiast, the Maker crowd as well as engineering
students who are excited about making their projects as dynamic and exciting as the smart phone they
carry in their pocket. Advanced users may want to go straight to section 4.0. If so, check and see if
there is an application note for your host micro on the ezLCD-30x product page at
www.EarthLCD.com/ezLCD-30x.
1.2 One Hundred Dollars - The ez way!
Technical documentation at EarthLCD is a continuous process. Our goal is to provide easy to use and
well documented products. During our twenty year history, our best ideas have come from our
customers. We appreciate your suggestions. Please email [email protected] with the title of this
manual in your subject line and give us suggestions for making the manual better or general corrections
and you will be entered into a quarterly drawing for $100 Earth purchase credit!
7
3184-J Airway Avenue, Costa Mesa, CA 92626
(949) 248-2333
2 How the ezLCD-3xx Works
The ezLCD-3xx smart LCD consists of an LCD module and a controller board containing the graphics
processor (GPU), memory and interfaces. The ezLCD-3xx contains USB, serial ports, I2C, SPI and
I/O pin interfaces. A four megabyte USB flash drive on the controller board is used for storing macros,
fonts, and images. The drive also includes drivers, utilities and product documentation. To develop
projects and configure the ezLCD-3xx, you simply need a terminal program running on a computer set
to 115,200 baud rate, 8 data bits, no parity, one stop bit, local echo and CR=CR+LF. Plugging the
ezLCD-3xx into a USB port achieves the following:
• Powers the ezLCD-3xx
• Connects the ezLCD USB flash drive to your computer (enumurates)
• Opens a USB CDC COM port connection (If used)
The ezLCD-3xx is driven by ASCII commands sent to the Command Port. The Command Port can be
either the USB CDC device or one of two serial ports on the ezLCD I/O connector.
[Note: By default the Command Port is set to USB by the STARTUP macro in the \SYS\MACROS
directory of the ezLCD-3xx FlashDrive]
The ezLCD-3xx is capable of running as a standalone controller. However, many ezLCD-3xx
customers will use the ezLCD-3xx as the user interface in their design and use a dedicated microcontroller chip or board (PIC, ARM, AVR, Arduino, BASIC Stamp, SBC) to do their control functions.
The micro-controller would typically communicate to the ezLCD-3xx through a serial port. The
ezLCD-3xx is designed to require the least amount of system-dependent software in order to develop
programs as quickly as possible. ASCII commands allow any standard terminal program to talk to the
ezLCD for demonstrating and learning. By configuring a terminal program to talk to the ezLCD CDC
device (COM Port) you are able to use your PC to send commands directly to the command port with
no new drivers. The flash drive allows for bitmaps, macros and fonts to be stored on the ezLCD-3xx
for rapid access. This makes graphics performance independent of host speed.
A standard USB flash drive interface is automatically configured on most computers with a USB port
using the built-in MSD driver. The serial interface uses a built-in CDC driver when connected through
the USB. The CDC driver is already installed in most computers. Under Windows the driver only
requires the EarthLCD.inf file (which is included on the ezLCD-3xx flash drive) for configuration.
Unlike LCD’s with built in frame buffers, the ezLCD is a full-blown smart LCD client. With its
versatile programmability, built in widgets, flash-based fonts and bitmaps you can create an analog
meter readout for your project in minutes while only using a 100 bytes of your host micro-controller
board! Performance is not limited by your host!
8
3184-J Airway Avenue, Costa Mesa, CA 92626
(949) 248-2333
3 Installation and Getting Started
You will need the following before proceeding:
• ezLCD-3xx Smart LCD
• ezLCD-3xx USB cable or an ezLCD-3xx EDK board with USB cable
• A computer with a USB connection (Host)
The 6 steps to install your ezLCD-3xx are:
1. Connect the ezLCD-3xx USB to Your PC
2. Verify the ezLCD-3xx USB flash drive operation
3. Install the USB CDC driver
4. Run the terminal program
5. Verify connection
6. Flash drive access
3.1 Connect the ezLCD USB to Your PC
Connect the USB cable to the ezLCD-3xx and then to your PC. The ezLCD-3xx will power up and
display the splash screen (Figure 1). The splash screen appearance will vary depending on your
firmware version and ezLCD model.
Figure 1: Splash Screen
Figure 1 is for a ezLCD-301 with typical firmware 1.1 and file system E. Your firmware revision will
vary.
9
3184-J Airway Avenue, Costa Mesa, CA 92626
(949) 248-2333
3.2 Verify the ezLCD USB Flash Drive Operation
When you plug the ezLCD-3xx into your PC, a window labeled AutoPlay (Figure 2) will appear on
your computer screen. Select the Open Folder to View Files option.
Figure 2: AutoPlay
After clicking on Open Folder to View Files, you will see a directory for the contents of your ezLCD3xx flash drive. This verifies that the USB flash drive is connected.
3.2.1 Installing the USB Driver on a Windows 7 Operating System
Note: You must be the computer’s administrator or have the password to install windows drivers.
Once the ezLCD-3xx fails to install automatically, open up the Device Manager. The device should be
listed under Other Devices with an exclamation mark next to EarthLCD ezLCD-3xx. Right click this
item and select Update Driver Software.
On the next screen, select Browse my computer for driver software. Next, click the Browse button
and select the flash drive labeled ezLCD-3xx that was automatically installed earlier. Click the OK
button and click the Next button. This will begin installing the software.
10
3184-J Airway Avenue, Costa Mesa, CA 92626
(949) 248-2333
Windows Security may prompt you that Windows can’t verify the publisher of this driver software.
Select the Install this driver software anyway option. After a moment, the device should be installed
successfully.
When you click the close button, the device manager should display your device with a COM port in
parenthesis next to it (Figure 3). Make a note of this for the next step.
3.2.2 Installing the USB Driver on a Windows XP Operating System
The Welcome to Found New Hardware Wizard will come up first. Click Close to exit the install.
The flash driver will install automatically and the Autoplay window will come up. Close the Autoplay
window and open up the Device Manager. The device should be listed under Other Devices with an
exclamation mark next to Earth LCD ezLCD-3xx. Right click this item and select Update Driver. On
the following screen, select No, not this time and click the Next button.
Select Install from a list or specific location and click the Next button.
Click the Browse button and select the flash drive labeled ezLCD-3xx that was automatically installed
earlier.
Click the OK button and click the Next button. This will begin installing the software.
The Hardware Installation may prompt you that the device has not passed Windows logo testing to
verify its compatibility with Windows XP. Click the Continue Anyway button. After a moment, the
device should be installed successfully.
When you click the Finish button, the device manager will display your device with a COM port in
parenthesis next to it (Figure 3). Make a note of this COM port number to use in configuring the
“Termie” Terminal program in Chapter 4.4.
11
3184-J Airway Avenue, Costa Mesa, CA 92626
(949) 248-2333
Figure 3: Device Manager
12
3184-J Airway Avenue, Costa Mesa, CA 92626
(949) 248-2333
3.3 Run the “Termie” Terminal Program
Figure 4: Serial Port Settings
Locate the “TERMIE.EXE” serial terminal software program which is located on the ezLCD-3xx USB
flash drive and copy the program to your PC then click on it to run it. Click settings and select the
COM Port number discussed in section 4.3 (Figure 4). Set the baud rate to 115200, the Data bits to
8, the Parity to None, the Stop bits to One, and make sure to uncheck Monospaced font and Local
Echo. Select OK.
For purposes of this manual it is assumed that you are using ‘Termie’, but most other ASCII terminal
programs will work as long as you use the same comparable settings.
If you do not remember the COM port, look in Control Panel/Device Manager/Port (Figure 3).
3.4 Verify Connection
At the bottom of the Termie program window you will see a SEND text box. Type CLS in that box
and press Enter. The ezLCD-3xx screen will turn black. Type PLAY STARTUP and press Enter.
The ezLCD-3xx splash screen will re-appear. Your connection test is now complete and you can begin
programming your ezLCD-3xx.
3.5 Flash Drive Access
When accessing the flash drive on the ezLCD-3xx you need to be careful with flash drive access.
1) To avoid problems, do not have the flash drive open on the PC while you are modifying the contents
with serial commands.
13
3184-J Airway Avenue, Costa Mesa, CA 92626
(949) 248-2333
2) When you finish updating the flash drive contents on the PC, make sure you eject the drive. The
drive may be ejected from the PC by right clicking the ezLCD drive letter and clicking EJECT in
Windows Explorer.
3) The flash drive file system uses DOS 8.3 format that allows filenames up to 8 characters followed by
a period and a 3 character extension. If you create a file from the PC with a file name longer that the 8
characters, the ezLCD-3xx you will not be able to access the file without knowing the DOS filename
the PC used to store it. Using the DIR (directory) command from “Termie” will display the DOS file
names for you.
4) If files are changed on the flash drive using the internal ezLCD-3xx capability, you must press F5 or
refresh to see the changes on your PC. An example would be “rename serif48.ezf serif50.ezf”. The PC
would continue to show serif48.ezf until you press F5, refresh or reboot the ezLCD-3xx at which time
the PC will then show serif50.ezf.
5) For more information on the Flash File System please see section 13.0.
14
3184-J Airway Avenue, Costa Mesa, CA 92626
(949) 248-2333
4 Command your ezLCD with EarthSEMPL
Your ezLCD-3xx is really a computer and like all computers it has a language that allows
communication. The ezLCD-3xx uses the simplest of languages, which we call Earth Simple
Embedded Macro Programming Language, or EarthSEMPL for short. We will use the terms
EarthSEMPL program and macro interchangeably in this manual.
4.1 ezLCD-3xx Grammar
The syntax or grammar for EarthSEMPL commands is:
COMMAND {PARAMETER1} {PARAMETER2}...{PARAMETERn}<CR>
EarthSEMPL source code is a free-form ASCII text-line-based language which allows arbitrary use of
white space (spaces or tabs) to format code, rather than column-based or text-line-based restrictions.
ASCII allows almost any editing program to be used for writing your code.
We have had good luck with notepad++. Its free to download and we provide the ezLCD.XML file for
the User Defined Language system included in NotePad++. It can be found at
http://notepad-plus-plus.org
Note: ezLCD commands are not case sensitive (can be upper or lower case letters) except for the
‘Upgrade ezLCD’ command. Comments may appear either at the beginning of the line or after a
command and must be preceded by a single apostrophe ( ‘ ) or the command COMMENT.
In the syntax above, COMMAND is one of the commands from Appendix D.
The PARAMETER can be a number, string, index or comment. Between every COMMAND and
PARAMETER you must leave a space, comma or tab.
a) Numbers and indexes inputs are 16 bits and can be decimal, binary (0b100110111) or hex
(0x3456 or 0h7E54). Any number over 16 bits will be truncated.
b) Strings can be any combination of ASCII characters and should be enclosed by a double
quote ("String 1”). A string may also use the back slash as a lead in to an escape character
sequence. Current escape characters supported are:
\n Line Feed
\r Carriage Return
\” Double quote
For example to print a word in quotes on the string you would print “\“hello\””.
You would see “hello” on the screen.
c)
Comments start with single quote (') and continue until the end of the line <CR>.
'this is just a comment<CR>
Note: OFF or ON can be used for most commands instead of 0 and 1 for readability.
Finally the <CR> represents a carriage return. Note that in your terminal program the carriage return is
sent when you press enter and is not shown on the screen. If you use a micro-controller it should send
the carriage return byte (13 decimal or 0D hex) after each command. The carriage return tells
EarthSEMPL to immediately execute the command you just typed. Your terminal program must send a
15
3184-J Airway Avenue, Costa Mesa, CA 92626
(949) 248-2333
carriage return after each line of a command and when you write macros in a text editing program your
editor must insert a carriage return after each line of text (Notepad, Wordpad and almost all editors do).
In the included Termie program, it’s important that you select the Append CR option in SETTINGS.
For firmware 1.1 and after, you should select the Append CR-LF option.
4.2 Creating and Saving Macros
EarthSEMPL is an interpreter. This means that the code you write is executed immediately which
allows for testing and changing your program immediately. Although commands run instantly in
command line, they are not saved unless you assemble them into a file. There are two ways to save a
macro. One way is to RECORD it with the ezLCD-3xx and the other is to type or paste the commands
into an editor on your PC and save as an .ezm file on the ezLCD flash drive in the \EZUSER\MACROS
directory. See Section 6.0 for detailed information on writing macros.
The ezLCD-3xx can be used as a display running off a PC or even as a standalone device. When used
as a client the ezLCD will be controlled and communicated to by a host through one of its ports,
sometimes referred to as I/O (input/output) ports. One of the ezLCD ports will be hooked to the
compatible port on a host.
The host can be a micro-controller like an AVR, PIC or ARM micro-controller. The host can also be a
PC as it is in the examples we’ve shown up to now. More specific examples of embedding and
connecting the ezLCD-3xx to other micro-controllers can be found on the ezLCD-3xx product page at
www.EarthLCD.com/ezLCD-3xx. We suggest that beginners take a look at the Arduino application
notes.
4.3 ezLCD-3xx Command Port
Ports are how the ezLCD-3xx talks to the outside world. Ports on the ezLCD-3xx currently include
USB and Serial. In the examples provided earlier in the manual, your command port is set to USB. As
with previous generations of the ezLCD, most customers will use the provided tools and their PC to
develop their user interface.
In a typical application, the ezLCD is connected to a micro-controller through one of its ports. The
CMD command will let you set the command port to another besides the factory default USB. Most
ezLCD application notes will use serial port 2 which is set by the following command:
First configure the GPIOs to the pins you are using for the serial. Typically this is;
cfgio 4 serial2_tx 115200 N81
'Configure IO 4 to SERIAL2 TX
cfgio 3 serial2_rx 115200 N81
'Configure IO 3 to SERIAL2 RX
cmd serial2
'Now change the command port to the serial2 uart
You could have used serial1, 2 or 3 in this example.
Note: You cannot communicate with the ezLCD with any terminal program unless the command port
is set to the correct COM port and baud rate. If you want to use the USB port type the command:
CMD CDC
When using the CDC (USB) the baud rate and mode bits don't matter.
16
3184-J Airway Avenue, Costa Mesa, CA 92626
(949) 248-2333
In this manual we showed you how to use the ezLCD-3xx using the full ASCII long command. Every
ezLCD-3xx command has two formats: long and short. On your micro-controller, which may have a
limited amount of memory, you may want to use the short form which is a numeric ASCII string taking
only one to three bytes (1-999) as shown in Appendix B.
Warning: Do not change the CMD port in the startup.ezm file located in the \EZSYS\MACROS
folder. Instead, make a copy of it in \EZUSER\MACROS and modify it there.
4.4 Command Port Management
Setting the command port to another port besides USB can cause problems if you cannot set it back.
That is the reason we recommend to never change the startup.ezm file in the \EZSYS\MACROS
directory or any files in the \EZSYS directory.
To change your command port when you have the terminal program hooked to the USB port (when
your ezLCD is plugged into a PC) you can simply type the appropriate CMD command shown above
to switch back and forth.
For testing without USB hooked up just create a startup.ezm file with the CMD to switch the command
port to your micro-controller host in the \EZUSER\MACROS directory. The \EZUSER\MACRO
directory will be searched at power up or reset first and that startup.ezm will be run.
To get the ezLCD back to the USB command port host simply delete or rename the
\EZUSER\MACROS\startup.ezm file causing the default startup.ezm (SYS\MACROS\startup.ezm)
to switch your command port back to USB!
If for some reason you do not want the startup macro to execute on power up or reset, pressing the
touchscreen during power up or reset will bypass the startup macro from running. This gives you the
chance to modify the startup.EZM to correct issues before it runs.
4.5 Always Comment
While the Hello Earth program may be simple to read and understand for an experienced programmer,
courteous programmers put a comment on every line. A single quote in a command line tells the
ezLCD-3xx command processor to ignore all text after the quote in that line. Your comment should be
a brief description of what that line of code does. So, the Hello Earth program should like this:
‘ezLCD-3xx Hello Earth Program
‘Written 9/10/11 by James Harrell
CLS BLACK
‘Clear screen to black
COLOR WHITE
‘Set drawing color to white
FONT SANS72
‘Set font to SANS72
XY 100 40
‘Set cursor x=100 y=40
PRINT “HELLO”
‘Print Hello
XY 100 110
‘Set cursor x=100 y=110
PRINT “EARTH”
‘Print Earth
17
3184-J Airway Avenue, Costa Mesa, CA 92626
(949) 248-2333
5 EarthSEMPL
5.1 Macros
A macro is a group of commands and can be as short or as long as you’d like. Macros can be created
on your ezLCD-3xx by using the RECORD command. When all the required commands are typed in
for a macro use the STOP command to stop recording the macro and to save the file.
Studying existing EarthSEMPL macros is the easiest way to learn about your ezLCD. Your
ezLCD includes many examples stored in the \EZSYS\MACROS directory demonstrating the
various commands. The latest can be downloaded as part of the file system for your ezLCD-3xx
model on it’s product page at the EarthLCD website. The ezLCD-3xx latest file system is located
at http://www.earthlcd.com/ezLCD-3xx . Note: Substitute your model number for ezLCD-3xx.
The macros can also be created in a text editing program. The Windows application Wordpad works
great for this. To create a macro, open a new document in your text editor and type commands just as
you would in the terminal window. When you think you’ve got it right, save the file to the
USER/MACROS folder on your ezLCD-3xx USB flash drive as a “.txt” file, but use “.ezm” as the file
suffix. Make sure that the file name is 8 characters or less, (not including the “.ezm” file suffix).
For example, if you wanted to save the Hello Earth program from earlier as a macro, you would enter
the lines of code as they appear in the manual in your text editor and save it. Calling it “Hello.ezm” is
a good choice, since the word Hello has only 5 characters.
To run the macro, go back to your terminal program and type PLAY HELLO. HELLO EARTH will
appear on your screen exactly as it did when you typed the program in line-by-line. To run other
macros just type PLAY and the macro name. You could also RUN the macros with version 2.0 of the
firmware. This has extra benefits. See Procedural Commands.
One benefit of creating macros with a text editor is that it gives you the opportunity to test your
programs with the trial-and-error method. For example, if you’re working out the placement of an item
on screen, you can enter the XY values, save the macro and run it. If the item placement is off, adjust
the XY values, save the macro and try again.
Once you’ve written a program and saved it as a macro, you can use that macro as a starting point or
template for other macros. You can open up a macro that you’ve created in your text editor, modify the
code, save it under a new name and you’ve got a brand new macro.
In addition, there are a number of factory-supplied macros on your ezLCD-3xx USB flash drive. Some
are demos and some are tools to help understand the features and capabilities of your ezLCD-3xx.
Remember, when you start creating new macros from existing ones, always make a copy of the macro
into the USER directory before you change anything.
IMPORTANT NOTE: Sometimes bad macros or not stopping macros by using STOP or the RESET
command will cause the USB port to crash. If you do a lot of development this way a separate USB to
serial adapter talking to the ezLCD serial port is recommended. One has been built into the optional
ezLCD-3xx-EDK development board.
18
3184-J Airway Avenue, Costa Mesa, CA 92626
(949) 248-2333
5.1.1 STARTUP.EZM - Your Most Important Macro
The most important macro on your ezLCD-3xx is the start-up macro, startup.ezm. This macro, which
automatically runs every time the ezLCD-3xx is powered on or is reset. (If you are familiar with
MSDOS it is similar to autoexec.bat!)
It may also be used to set default fonts, themes, colors and other ezLCD parameters. Application notes
by EarthLCD will assume you are using the factory default macro.
Never change the default start-up macro.
Instead copy the original \EZSYS\MACROS\STARTUP.EZM into the \EZUSER\MACROS
directory and then customize it for your application. For images, fonts and macros, including
startup.ezm files, the ezLCD-3xx will check the \EZUSER\MACROS directory first. If it does not
find it there it will then look in the \EZUSER directory.
In rare cases you may make your ezLCD inoperable by what you put in startup.ezm, so we highly
suggest that when you make a copy of it in the \EZUSER\MACROS directory and name it to test.ezm
and run it manually a few times before changing the name to startup.ezm. Typically when you develop
an application you will put it in a macro such as myprog.ezm and during testing run it manually (type
‘play myprog’ in termie). When done and you are ready to distribute the program you would add this
line to your startup.ezm in the user directory: play myprog.
An interesting feature of the ezLCD-3xx at startup is alternate startup macros. There are 5 alternate
startup macros.
At reset, pressing the touchscreen will bypass the normal startup. The screen is divided into 5 zones.
Each corner has a 50 by 50 area that counts as a zone. Therefore each corner count as 4 zones and the
rest of the screen is the fifth zone.
The upper left zone is zone 1 and the proceed clockwise, 2, 3 ,4 and 5 in the center.
The zones relate to executing separate startup files.
Startup files are:
STARTUP.EZM
'Normal startup.
STARTUP1.EZM
'Startup upper left.
STARTUP2.EZM
'Startup upper right.
STARTUP3.EZM
'Startup lower right.
STARTUP4.EZM
'Startup lower left.
STARTUP5.EZM
'Startup for any press not covered above.
19
3184-J Airway Avenue, Costa Mesa, CA 92626
(949) 248-2333
5.2 IO Definitions
Before use, each IO pin must be assigned a function. An internal driver will configure and execute any
commands related to that IO. IO pins may be Analog, Peripheral, Digital or not used (Input).
Analog: Used to measure analog voltage up to 3.3volts.
Peripheral: Used to assign various internal peripherals to the pin. (ex UART)
Digital: Used as a general purpose IO that can be used as an input (IN) or output (OUT). Outputs can
also be read.
All IO on the Expander is Digital. (10-33)
EDK Default: The jumper default locations but may be easily changed as needed.
IO
Analog
Peripheral
Digital
EDK Default
1
No
No
Yes
I2CCLK
2
Yes
Yes
Yes
I2CDTA
3
No
Yes
Yes
UARTRX
4
No
Yes
Yes
UARTTX
5
Yes
Yes (Input only)
Yes
UARTRX232/485
6
Yes
Yes
Yes
UARTTX232/485
7
No
No
Yes
Buzzer
8
Yes
Yes
Yes
VINB
9
Yes
Yes
Yes
VINA
10 to 33
No
No
Yes
None
5.2.1 IO Usage
Usage is with the CFGIO command. An IO must be configured before it is used. Then use the IO
command to read or write the IO.
CFGIO [pin] [function]
An ERROR 1 is returned if the configuration is not valid when reading or writing an IO.
5.2.1.1 Analog IO
The analog pin is configured with:
CFGIO 2 ANALOG
20
3184-J Airway Avenue, Costa Mesa, CA 92626
(949) 248-2333
Followed by
IO 2
Will return the analog voltage times 1000. 2400 means the voltage is 2.4Volts. You can not write to
this pin. The accuracy is dependent on the user power supply. 3.3Volts is assumed.
5.2.1.2 Digital IO
Digital pins can be configured for IN or OUT. Possible configurations are IN, INPUT, INBYTE, OUT,
OUTPUT and OUTBYTE. The INBYTE and OUTBYTE are only usable with the expander board.
The Digital pin OUT is configured with:
CFGIO 2 OUT
Followed by
IO 2 1
Will return the state of that pin. You can read and write the state of that pin.
Digital pin IN is configured with:
CFGIO 2 IN
Followed by
IO 2
Will return the state of that pin. You can not write to this pin.
5.2.1.3 Peripheral IO
The most complex of the IO's are the peripherals.
Possible commands:
5.2.1.3.1
BEEPER (BUZZER)
Generates a waveform on the configured pin for the time specified. If no time is specified it defaults to
1000msec. If the IO was configured with:
CFGIO 7 BEEPER
BEEP 2000 2000
'BEEP FREQUENCY, TIME (in millisec)
The circuit below is on the Expander board and EDK Board.
21
3184-J Airway Avenue, Costa Mesa, CA 92626
(949) 248-2333
Figure 5: Typical Buzzer circuit connected to IO7
5.2.1.3.2
UART
There are 3 UARTs in the GPU and any of them can be assigned as needed. They can be assigned to
any of the peripheral capable pins. Clock speed and other options are added on same line after the pin
assignment. If assigning TX and RX of same UART the first parameters are not used.
If the IO 3 and 4 was used for UART2 as in the default startup, the following would apply:
'assigns IO 4 to UART2 TX with baudrate and mode
CFGIO 4 SERIAL2_TX
'assigns IO 3 to UART2 RX with baudrate and mode
CFGIO 3 SERIAL2_RX 115200 N81 RS232
22
3184-J Airway Avenue, Costa Mesa, CA 92626
(949) 248-2333
'assigns UART2 as the command port
CMD SERIAL2
These commands can be assigned related to UARTs.
SERIAL1_TX
SERIAL1_RX
SERIAL1_CTS
TBD
SERIAL1_RTS
TBD
SERIAL2_TX
SERIAL2_RX
SERIAL2_CTS
TBD
SERIAL2_RTS
TBD
SERIAL3_TX
SERIAL3_RX
SERIAL3_CTS
TBD
SERIAL3_RTS
TBD
Further related options are mode and Expander options
5.2.1.3.3
Mode
Mode (Parity, Data Bits, and Stop Bits)
Supported mode options are: N81, N82, E81, E82, O81, O82, N91, N92
5.2.1.3.4
Expander Modes
Additional options are type of use. Upto 3 options are supported.
Supported type options are: LOOP, LOOPT, RS232, RS485H, RS485F, TERM, SLEW.
LOOP is loopback at the UART.
LOOPT is loopback at the expander.
RS232 assumes expander connected and RS232 level signals.
RS485H assumes expander connected and RS485 half duplex. (2 wire)
RS485F assumes expander connected and RS485 full duplex. (4 wire)
23
3184-J Airway Avenue, Costa Mesa, CA 92626
(949) 248-2333
TERM assumes expander connected and enables terminator.
SLEW assumes expander connected and limits the driver speed to ~250khz.
5.2.1.3.5
SPI MASTER
There is 1 SPI Master in the GPU available. The IO can be assigned to any of the available peripheral
capable pins. Clock speed and mode options are added on the same line as the clock pin assignment.
SPI select active level is input on the SPI_SS configuration.
Input options are:
CFGIO {pin} SPI_CLK [divider] [mode] [bit width]
The SPI clock rate is input as a divider value. The clock frequency is calculated by dividing 16MHz
by an input value from 1 to 8. Default is 4MHz.
Divider
SPI Clock Frequency (MHz)
1
16
2
8
3
5.33
4
4
5
3.2
6
2.67
7
2.29
8
2
Mode can be 0-3
The SPI bit width can be 8 or 16bits.
Default is 4000kHz, Mode 0 and 8 bits.
Key words are: SPI_CLK, SPI_DO, SPI_DI and SPI_SS.
If IO 5, 6, 8 and 9 was used for SPI, the following would apply:
'assigns IO 6 to SPI clock pin divider of 2 (8MHz) and mode of 0
CFGIO 6 SPI_CLK 2 0 8
24
3184-J Airway Avenue, Costa Mesa, CA 92626
(949) 248-2333
'assigns IO 9 to SPI data out
CFGIO 9 SPI_DO
'assigns IO 5 to SPI data in (Note: IO 5 can only be assign as input)
CFGIO 5 SPI_DI
'assigns IO 8 to SPI select output
CFGIO 8 SPI_SS LOW
For more information on SPI we recommend referring to:
wikipedia.org/wiki/Serial_Peripheral_Interface_Bus
Example:
'spi test
CFGIO 9 SPI_DO
CFGIO 5 SPI_DI
CFGIO 6 SPI_CLK 2 0 8 '8MHz clock, mode 0, 8bit transfer
CFGIO 6 SPI_CLK
'would be the same using default values
CFGIO 8 SPI_SS LOW
LET A=&h55
SPISTART
LET N=SPI(A)
SPIEND
'Drives SPI_SS active
'Sends out the value of A on SPI_DO
'reads SPI_DI into N
'Drives SPI_SS inactive
Note: The transfers could be 8 or 16 bits as configured by the SPI_CLK IO assignment.
5.2.1.3.6
I2C Master
There is only one I2C master. It can be assigned to any of the Digital IO. Clock speed is fixed as
100kHz.
Option key words are: I2CCLK, I2CDTA
If the IO 1 and 2 were used for I2C, the following would apply.
CFGIO 1 I2CCLK
CFGIO 2 I2CDTA
'assigns IO 1 to I2C clock pin
'assigns IO 2 to I2C data pin
25
3184-J Airway Avenue, Costa Mesa, CA 92626
(949) 248-2333
Example:
CFGIO 1 I2CCLK
CFGIO 2 I2CDTA
LET A=&h90
I2COUT(A,0x00)
'Sends out address of 'A' followed by data 00
LET B=i2cack
'check i2cack 1=ACK 0=NACK
CPRINT "i2cack -> ";B
'print the result of ACK to console
I2CIN(&h91,C,D) 'Input data from I2C device 0x91 to variable C and D.
5.2.1.3.7
TOUCH_INT
The TOUCH_INT command configures an IO to indicate (with a pulse) when the user is pressing any
of the active widgets. The pulse may be active HIGH or LOW. Default is active LOW. The second
option is the QUIET option. Adding the QUIET option stops the widgets from sending status to the
current command port. (ex. BP2)
'assigns IO 9 to TOUCH_INT
CFGIO 9 TOUCH_INT HIGH QUIET
Pressing any active widget will activate the IO assigned to TOUCH_INT. The HIGH option set the IO
high
5.2.1.3.8
BUSY
Busy is used to indicate the current status of the command processor to a host.
CFGIO 8 BUSY HIGH
5.2.1.3.9
'assign IO 8 as BUSY status
USB_DTR
This pin is configured with the USB as DTR. Typically this is used for resetting an Arduino CPU.
CFGIO 7 USB_DTR
'assign IO 7 as USB_DTR signal
With this configuration the Arduino IDE can reset and reprogram the Atmel CPU without an external
programmer.
The follow lines in the startup.ezm will configure for an Arduino host.
'just so we know what mode we are in display it on the screen
CLS
color white
print "Arduino Mode"
'This is the serial port connected to the Arduino
'Using the software serial on the Arduino
'SoftwareSerial ezLCD(10, 11); // RX, TX
CFGIO 3 SERIAL2_RX 19200 N81
CFGIO 4 SERIAL2_TX 19200 N81
CMD SERIAL2
26
3184-J Airway Avenue, Costa Mesa, CA 92626
(949) 248-2333
'This will setup serial 1 and the Arduino for programming and debug
CFGIO 2 SERIAL1_TX 57600 N81
CFGIO 6 SERIAL1_RX 57600 N81
CFGIO 7 USB_DTR
'Setup usb bridge to serial
BRIDGE USBSERIAL1
'setup ezLCD GPU to pull int0 on the Arduino when there is a touch event ie. button
CFGIO 9 touch_int low quiet
5.2.1.3.10
USB_RTS
This pin is configured with the USB as RTS. Typically this is only used for resetting a BASICStamp
CPU.
'CFGIO 7 USB_RTS
With this configuration the Basic Stamp IDE can reset and reprogram the CPU without an external
programmer.
5.2.1.3.11
USB_RX
TBD
5.2.1.3.12
USB_TX
TBD
5.2.1.3.13
ONEWIRE
TBD
5.2.1.3.14
PWM
TBD
5.2.1.3.15
SERVO
TBD
27
3184-J Airway Avenue, Costa Mesa, CA 92626
(949) 248-2333
5.3 EDK Usage
5.3.1 Serial RS232/485
Configuring the RS232 serial on the EDK:
CFGIO 4 SERIAL3_RX 115200 N81
CFGIO 3 SERIAL3_TX 115200 N81
CMD SERIAL3
Jumper JP2 pin 1 to 2
Configuring the RS485 full duplex serial on the EDK:
CFGIO 4 SERIAL3_RX 115200 N81
CFGIO 3 SERIAL3_TX 115200 N81
CMD SERIAL3
Jumper JP2 pin 2 to 3
5.3.2 Temperature
'Read the temp off the edk board
CFGIO 1 I2CCLK
CFGIO 2 I2CDTA
LET A=&h90
I2COUT(A,0x00)
LET B=i2cack
'check i2cack 1=ACK 0=NACK
CPRINT "i2cack -> ";B
loop:
I2CIN(&h91,T,Z)
LET B=i2cack
LET A=ctof(T)
'convert Celsius to Fahrenheit
CPRINT "Temp in Celsius ";T;" in Fahrenheit ";A,B
GOTO loop
5.3.3 BEEPER
CFGIO 7 BEEPER
'BEEP FREQUENCY, TIME (in millisec)
'beep for 2 seconds at 2KHZ
BEEP 2000 2000
28
3184-J Airway Avenue, Costa Mesa, CA 92626
(949) 248-2333
5.3.4 Reading Ambient Light
The following routine will demonstrate the functionality of the ambient light sensor on the EDK as well
as some structured coding. The ISL29003 spec can be found at:
http://www.intersil.com/content/dam/Intersil/documents/fn74/fn7464.pdf
'basic i2c test
'read the light sensor on the edk board
verbose off
cls
color white
theme 2 0 3 3 0 1 1 9 0 0 0
cfgio 1 I2CCLK
cfgio 2 I2CDTA
cfgio 7,beeper
font 0
xy 0 0
print "ezLCD EDK Ambient Light Sensor Demo"
a=&h88
i2cout(&h88,0x00,&h83,&h00)
let b=i2cack 'check i2cack 1=nak 0=nack
if b=0 then goto NoAck
progress 1 20 55 200 35 1 15 100 2
loop:
i2cin(&h89,e,f,g,h,i,j,k,l,m)
b=i2cack
progress_value 1 h*6
'only one we want
pause 1000
goto loop
NoAck:
color red
print "No ACK from sensor"
print "check jumpers on EDK"
end
5.4 Expander Usage
The expander is a small add on board that plugs into any of the ezLCD3xx display boards. The board
is configured using the I2C controller from the display. Therefore IO 1 must be configured as I2C CLK
and IO 2 must be configured as I2C DATA. IO 7 is connected to a buzzer with a driver. Therefore IO
7 must be configured as a buzzer.
IO 3 should be configured as serial TX and IO 4 should be configured as serial RX. IO 5 is configured
29
3184-J Airway Avenue, Costa Mesa, CA 92626
(949) 248-2333
as RTS and IO 6 as CTS. RTS and CTS are driven out in RS232 mode. In RS485 mode RTS is used to
turn the transceiver around as needed.
The expander has options for RS232, RS485 Full duplex (4 wire), RS485 Half Duplex (2 wire).
Pin
P1
P2
1
GND
CTS
2
RX
PWRIN
3
RX-
GND
4
TX
-
5
TX-
-
6
RTS
-
JP1 is the IO connector.
5.4.1 IO
The Expander has support for an additional 24 IO. These IO are number from 10 to 33. These IO are
configured and operated using the simple IO commands. These 24 IOs can only be configured as
digital IO.
'Configure IO 11 as output
CFGIO 11 OUT
'Write a one to IO 11
IO 11 1
30
3184-J Airway Avenue, Costa Mesa, CA 92626
(949) 248-2333
'Read IO 11
IO 11
'Configure IO 12 as input
CFGIO 12 IN
'Read IO 12
IO 12
The expander brings out IO 1 and 2 (which is I2C) for external connections if needed. The expander
also has a buzzer connected on IO 7 for use by the user.
'Configure IO 7 as buzzer
CFGIO 7 BUZZER
Two IO pins have been brought out directly from the display (8 and 9). These pins can be Digital,
Analog or connected to most peripherals supported on the display. IO 8 is pin 3 of JP1. IO 9 is pin 7
of JP1.
Figure 6: Expander
31
3184-J Airway Avenue, Costa Mesa, CA 92626
(949) 248-2333
When IO 8 of the display is configured as ANALOG, an analog voltage on PIN 3 of JP1 can be used to
measure an external voltage. IO 9 can also be used to measure voltage. In addition a resistor R1 may
be installed on the expander board to measure current on IO 9. R1 is connected from pin 7 to ground.
As a voltage is applied to JP1 pin 7 current will flow through resistor R1. The value of the resistor is
configured as needed by the user to indicate current using simple ohms law. E=I * R.
The wattage of the resistor and voltage applied must be considered prior to installing R1. Max input
into the pin is ~VCC. Exceeding this could damage the display.
Installing a 1k ohm resistor at R1 and connecting a circuit that draws 3ma to flow through R1 will
show a voltage of 3volts on IO 9. Current should be limited to 100mA. The power on the resistor is
3mA x 3 volts = 9milliWatts.
5.4.2 Serial
The expander board has a serial transceiver designed to convert IO 3 and IO 4 of the display into
RS232 or RS485 compatible signal levels.
The RS232 is 2 wire. P1 pin 2 is receive and pin 4 is transmit. Pin 1 is ground.
The RS485 can be 2 wire multidrop With + being P1 pin 2 and – being P1 pin 4.
If the RS485 is configured as 4 wire, P1 pin 2 is RX+ and pin 3 is RX-. P1 pin 4 is TX+ and pin 5 is
TX-.
See the CFGIO commands for configuration of the serial and IO pins for operation.
5.4.3 Power
The expander is designed to run off most any power source. Input can be AC or DC from 4.5 to
48Volts. This power supply generates the power to drive the display as well as the transceiver. Power
is connected to P2 pin 2 and pin 3 is ground.
Figure 7: Expander power supply
32
3184-J Airway Avenue, Costa Mesa, CA 92626
(949) 248-2333
6 Images
The ezLCD-3xx can display .jpg, .gif and .bmp image files. Example image files are located in your
\EZSYS\IMAGES directory. Image files must be kept in your \EZUSER\IMAGES directory. To
display an image file, type the command PICTURE or IMAGE into your terminal window followed by
the image name, including the file suffix. The image should match the pixel width and height and
number of colors of the display characteristics of your ezLCD30x model. To display properly at fullscreen on an ezLCD-301 all images should be 400 pixels wide by 240 pixels tall, 16 bit color. Images
saved in .gif format offer the smallest file size and fastest load time.
The BMP driver does not support RLE encoded pictures.
6.1 Resizing Images
6.1.1 Photoshop
This example is for the ezLCD-301. Other displays would be slightly different.
Open the image in Photoshop and select the crop tool from the toolbar. With the crop tool selected, set
the width and height ratio of your crop. At the top of the screen are two boxes labeled width and
height. Set the width value to 4 and the height value to 2.4.
Drag the crop tool across your photo diagonally and resize the crop window by grabbing the corner
handles. When you’re happy with the selected crop area, press Enter to crop the image.
Go to the Image drop-down menu and select Image Size. A dialog box will appear.
Set the Width value to 400 pixels and the Height value to 240 pixels and select OK (Figure 5).
Go to the File menu and select Save for Web & Devices. A dialog box will appear.
Set image type to GIF, leave the Transparency button unchecked and set colors to 128. Leave all
other settings at default.
Select Save and save to your \EZUSER\IMAGES folder on the ezLCD-3xx USB flash drive.
33
3184-J Airway Avenue, Costa Mesa, CA 92626
(949) 248-2333
Figure 8: Image Size
6.1.2 Windows Paint
Open the image in Windows Paint. Make sure that under the Paint dropdown menu, Image Properties
the Units option is set to pixels.
Use the Rectangular Selection Tool to select the area of the image that you want to crop. Paint does not
allow for fixed cropping ratios. To overcome this, you’ll have to watch the pixel dimensions of your
selection box (displayed at the bottom of the window) as you size it. To avoid image distortion during
the resize process, do your best to achieve a ratio of 4:2.4. Once you’ve achieved the desired size,
select the Crop button.
Next, select the Resize button. A dialog box will appear entitled Resize and Skew (Figure 6). Select
Pixels and uncheck the Maintain Aspect Ratio box. Enter 400 as the horizontal value and 240 as the
vertical value. Select OK.
34
3184-J Airway Avenue, Costa Mesa, CA 92626
(949) 248-2333
To confirm that your image has been sized properly, open the Image Properties dialog box again.
Figure 9: Resize and Skew
When you’re happy with the appearance of your image, go to the Paint dropdown menu and select
Save As. Remember that your file name is limited to 8 characters. Save the image to your
\EZUSER\IMAGES folder as a .gif to ensure the smallest file size possible and fastest load time on
your ezLCD-3xx.
35
3184-J Airway Avenue, Costa Mesa, CA 92626
(949) 248-2333
7 Commands
7.1 Colors
The ezLCD-3xx has the ability to display up to 65,535 colors simultaneously. This is referred to as 16bit color. You may input 24-bit colors which the ezLCD-3xx converts internally to 16-bit. To ease
color selection, an index of 200 customizable colors are provided internally (see COLORID). The first
168 colors have been preset in your ezLCD-3xx, with the remaining colors available for your own
custom colors. Each color has been assigned an index number. The first 16 colors can be referenced
by name or by index. For example, the following two commands will both clear the screen to red:
CLS RED
'Clear screen to red using color name RED
CLS 4
'Clear screen to red using color index number 4
7.1.1 COLOR
To set the current color, type COLOR [C] into your terminal program, where {C} is either the color
name or color index number. The current color will remain active until you change it.
Typing COLOR without any color will return the current color.
Verbose ON
Get Color: R=31 G=63 B=31
Verbose OFF
31 63 31
7.1.2 COLORID
The COLORID command allows you to set custom colors by entering their RGB values. The first 16
COLORIDs are not changeable.
COLORID [id][R][G][B]
To set a custom color, an index number [id] and RGB values [R][G][B] must be assigned. Use IBM
blue as an example. We know that the RGB values of IBM blue are Red=83, Green=120, and Blue=179
on the RGB scale. To assign IBM blue to color index number 180, type the following command:
COLORID 180 83 120 179
To test it enter:
CLS 180
The first 168 color values are pre-defined. While it is possible to change the color values from 16
through 168 with the COLORID command, it is not recommended. Instead, use index 169 through
199 for your custom colors. A full list of preset colors with their respective index numbers and color
names can be found in Appendix C.
36
3184-J Airway Avenue, Costa Mesa, CA 92626
(949) 248-2333
A macro has been included on your ezLCD-3xx which shows the 16 most commonly used colors along
with their color index numbers. Type PLAY COLORS in your terminal program to run this macro.
Color_ID[ 0 ] = BLACK;
Color_ID[ 1 ] = GRAY;
Color_ID[ 2 ] = SILVER;
Color_ID[ 3 ] = WHITE;
Color_ID[ 4 ] = RED;
Color_ID[ 5 ] = MAROON;
Color_ID[ 6 ] = YELLOW;
Color_ID[ 7 ] = OLIVE;
Color_ID[ 8 ] = LIME;
Color_ID[ 9 ] = GREEN;
Color_ID[ 10 ] = AQUA;
Color_ID[ 11 ] = TEAL;
Color_ID[ 12 ] = BLUE;
Color_ID[ 13 ] = NAVY;
Color_ID[ 14 ] = FUCHSIA;//Magenta
Color_ID[ 15 ] = PURPLE;
37
3184-J Airway Avenue, Costa Mesa, CA 92626
(949) 248-2333
7.2 STRINGS
Strings are pointers to memory where the user can store “text strings”. The reason text strings exists
are to simplify each command which uses strings. The user would typically setup the strings needed up
front and then issue commands that uses various strings.
Strings are defined as 128 characters. There are 64 strings (0 to 63).
String 61-63 are used by the CHOICE command.
String 64 is temp location.
String 65 is the product string
String 66 is the firmware string
The user is free to use the
CLS
COLOR WHITE
STRING 0 “Hello World”
XY CC
PRINT STRING 0
When using the interpreter they are called strings.
cls
color white
string 0 "string 0"
string 1 "string 1"
string 2 "string 2"
let d$="string 3"
let e$="string 4"
let f$="string 5"
Let x = 0
Let y = 30
XY x y
For i = 0 to 5
let z$=strings(i)
print i,strings(i),z$
Let y = y + 30
XY x y
Next
In this case you would RUN the commands from a macro file.
When using the interpreter string A$-Z$ are mapped to use the same memory as strings 0-25.
Some strings are initialized on reset for use by various commands internally.
38
3184-J Airway Avenue, Costa Mesa, CA 92626
(949) 248-2333
String 0 = “Hello World”
String 1 = “Options”
String 61 = “Yes”
String 62 = “No”
String 63 = “Cancel”
String 64 = “0”
String 65 = productid
String 66 = versionid
Note: To create multi-line text, use \n in the string contents. Example: string 5 “Wrap\nText” will
appear on 2 lines.
39
3184-J Airway Avenue, Costa Mesa, CA 92626
(949) 248-2333
7.3 Drawing
The ezLCD-3xx has the ability to draw individual pixels, lines, boxes, circles, circle sections and arcs.
Successive shapes will appear to be layered on top one another if drawn in the same location. All
shapes are drawn with the current color. To see a demo of some shape examples, type PLAY SHAPES
into your terminal program. For more detailed options see the command table in Appendix B.
7.3.1 XY
XY 100 50
'set the cursor to 100 pixels from left and 50 pixels down.
XY
'returns the current X and Y location of cursor.
Returns
100 50
To draw on the display you must first set the current position of the pointer [x][y]. This is done with
the XY [x][y] or XY [align] command. [align] options are LT (Left Top), CT (Center Top), RT (Right
Top), LC (Left Center), CC (Center Center), RC (Right Center), LB (Left Bottom), CB (Center
Bottom), RB (Right Bottom). You can type XY <cr> and it will tell you the current XY position so try
the different Align options and see what XY is set to. For the ezLCD-301, XY CC followed by XY
will return 199 119. This is the center of the screen vertically and horizontally.
Before any drawing, the position must be set. It also can be set from a previous command. Default is
0,0 (upper left corner) after CLS.
7.3.2 Plot
PLOT [x] [y]
PLOT
'Modifies the pixel at the current position to the current color.
PLOT X Y
'Modifies the pixel at X and Y to the current color.
Attempting to modify a pixel outside the display area will return a '1'.
7.3.3 Line
LINE [x][y]
LINE X Y
line type.
'draws a line from the current xy position to x y, using the current color and
40
3184-J Airway Avenue, Costa Mesa, CA 92626
(949) 248-2333
7.3.4 LINETYPE
LINETYPE [option]
LINETYPE 0
'Sets the current linetype to 0 (solid)
Options: 0 = solid, 1= dotted (1 pixel spacing between dots), 2 = dashed (2 pixel spacing
between dashes)
7.3.5 LINEWIDTH
LINEWIDTH [width]
LINEWIDTH 3
'sets the line width to 3
The LINEWIDTH command allows you to draw either a thin line (width = 1) or a thick line (width =
3). Only [width] = 1 or 3 are available.
7.3.6 Box
BOX [w] [h] [f]
BOX 50 50 F
'draws a box 50 50 starting at current position and filled
The BOX command draws a box at current xy position. Replace [w] and [h] with the desired width
and height of the box, in pixels. Replace [f] with either a 0, 1 or f. 0 or no value dictates an open box,
1 or F dictates a filled box.
7.3.7 Circle
CIRCLE [r][f]
CIRCLE 50 F
'draws a circle at current position with radius of 50 and filled
The CIRCLE command draws a circle at current position. Replace [r] with the desired radius, in
pixels. Replace [f] with either a 0, 1 or f. 0 or no value dictates an open circle, 1 or f dictates a filled
circle.
7.3.8 Pie
PIE [r][s][e]
PIE 50 45 270
'draws a pie section with radius of 50, starting at angle of 45
and ending with angle of 270.
The PIE command draws a section of a circle (pie slice) at current xy position. Replace [R] with the
desired radius of the section, in pixels. Replace [S] with the start angle at which you want the section
to start. Replace [e] with the end angle at which you want the section to end.
41
3184-J Airway Avenue, Costa Mesa, CA 92626
(949) 248-2333
7.3.9 Arc
ARC [R][S][E][F]
ARC 75 90 270
ending at angle 270.
'draws an arc with radius of 75, starting at angle 90 and
The ARC command draws an arc at current XY position. Replace {R} with the desired radius of the arc, in
pixels. Replace [S] with the start angle at which you want the arc to start. Replace [E] with the end angle at
which you want the arc to end. Replace [F] with either a 0, 1 or F. 0 or no value dictates an open
circle, 1 or F dictates a filled arc.
Note; An ARC that is filled is the same as the PIE command.
42
3184-J Airway Avenue, Costa Mesa, CA 92626
(949) 248-2333
7.4 Fonts
Your ezLCD-3xx comes with a selection of different fonts pre-installed. Type the command PLAY
FONTS into your terminal program to run a macro that displays the factory installed fonts in their
available sizes. The number designation in the font name refers to the height of the font in pixels.
Therefore, the font SANS48 is 48 pixels tall when displayed on the screen of the ezLCD-3xx.
System Fonts are located at \EZSYS\FONTS.
User Fonts can be put at \EZUSER\FONTS.
There are also internal fonts 0 and 2. They are very fast.
The ezLCD-3xx font converter for windows will allow you to create and customize new ezLCD fonts
from TrueType and OpenType fonts. Look carefully at the fonts you are generating to make sure they
are not too tall and waste a lot of display space. The converter lets you conveniently adjust the fonts as
you want.
It is available for free download at www.earthlcd.com/ezLCD-301.
7.4.1 FONT
To set the current font, type the command FONT [font] into your terminal program, where [font] is the
name of the font. It is not necessary to include the font suffix (.ezf). Only *.ezf can be used.
To test your font, type the following into your terminal program:
XY CC
‘goto the center of the screen
FONT NEURO72
‘select your font file to use
PRINT “HELLO” ‘display the string to screen
The word HELLO will appear in the center of the screen and display in the NEURO font 72 pixels
tall.
FONT 2
‘select an internal font file to use
PRINT “HELLO” ‘display the string to screen
7.4.2 FONTO
FONTO [option]
FONTO 0
'set the current font orientation to horizontal.
The FONTO command will change the orientation or direction the text prints.
[option] 0 = horizontal orientation, 1 = vertical orientation
Since the vertical orientation is relatively uncommon, it is a good idea to set the orientation back to
horizontal, when exiting a macro, otherwise other macros might behave incorrectly.
43
3184-J Airway Avenue, Costa Mesa, CA 92626
(949) 248-2333
7.4.3 PRINT
The PRINT command always displays text on the screen of the ezLCD-3xx at the current XY position.
When using the PRINT command, be sure to place double quotes around the text you want to appear.
In addition to printing at the current XY position, text can also be positioned automatically to 9
positions relative to the current XY: LT (Left Top), CT (Center Top), RT (Right Top), LC (Left Center),
CC (Center Center), RC (Right Center), LB (Left Bottom), CB (Center Bottom), RB (Right Bottom).
Note: To understand this command visualize your text string as a bitmap or box with characters in it
and this command is positioning the box. Default position is LT.
To use this feature, enter the position information at the end of the PRINT command. For example, we
can set the current position to the center of the screen (XY CC) and then print the text using text
justified to the center (PRINT “Hello” CC):
XY CC ‘set current position to center of screen
PRINT “HELLO” CC ‘print to screen with CC option
will print the text at the horizontal and vertical center of the screen. This command will justify the text
referencing the center of the text because of the CC option. You can also justify text placement with
the other 8 options. It is an easy way of placing text without computing font heights and widths. To
see a macro that demonstrates this, type PLAY ALIGN in your terminal program.
See the PRINT and CPRINT in the Procedural Commands section for further info.
7.5 I2C Master
The I2C command is used to communicate with slave I2C devices connected to IO on the external
connector. I2C communicates with 2 wires. It uses a bus architecture with an address for each device
on the bus.
Note: I2C master is only useful if running the interpreter. Remember to first setup the IO pins
connecting to the I2C device.
7.5.1 I2COUT( address, variable list )
Address is the I2C address to which the data is to be sent.
Note: The address must have bit 0=0.
Variable list can be as many bytes as you want to send. Constants can be sent as well.
7.5.2 I2CIN( address, variable list )
Address is the I2C address to which the data is requested from.
Note: The address must have bit 0=1.
Variable list can be as many bytes as you want to read.
44
3184-J Airway Avenue, Costa Mesa, CA 92626
(949) 248-2333
7.5.3 I2CACK
This command returns the ACK state of the last I2C transaction. 1=ACK 0=NACK
Example:
Communicating with the temperature sensor on the optional EDK board.
'basic i2c test
'read the temp off the edk board
cfgio 1 I2CCLK
cfgio 2 I2CDTA
cfgio 7,beeper
let a=&h90
i2cout(a,0x00)
let b=i2cack 'check i2cack 1=ack 0=nack
cprint "i2cack -> ";b
loop:
i2cin(&h91,t,z)
let b=I2CACK
let a=CTOF(t) 'convert Celsius to Fahrenheit
cprint "temp in Celsius ";t;" in Fahrenheit ";a,b
goto loop
7.6 Misc Commands
7.6.1 SNAPSHOT
The Snapshot command is a lot like taking a screen shot.
This command was originally only created to make it easy to do screen shots and documentation.
Some found it very useful for other things, so we are documenting it. Since it uses large amounts of
flash disk space, the user is warned it can easily cause problems. Depending on how your PC caches
disks, your results will vary and it is difficult for us to predict how it will work on any system.
You have been warned......
First, you need to display something onto the screen what you would like to take a snapshot of. Then
you use the command SNAPSHOT to capture and save it to a file. This command always saves the file
as a 24bit BMP file regardless of how it was placed on the screen. This command may take as much as
10 seconds to capture the image if its a large area. After the command completes you may need to reset
your ezLCD to resync the PC your connected to. You can then open the \USER\IMAGES file to see
your snapshot on the PC.
REMEMBER to reset your ezLCD which is most easily done by unplugging the USB from the computer
or pressing the reset button if using an EDK board.
NOTE: As a precaution, take one picture and reset, continue this cycle however needed. Also consider
the picture consumes large amounts of flash disk space.
45
3184-J Airway Avenue, Costa Mesa, CA 92626
(949) 248-2333
snapshot [x][y][width][height][filename]
Example:
PLAY FACE
SNAPSHOT 0 0 400 240 PIC
A file named PIC.BMP is saved in the \EZUSER\IMAGES directory of the ezLCD flash drive.
The SNAPSHOT command has five different values.
The [x] and [y] values designate the starting XY coordinate at the upper left corner.
The [width] and [height] values designate the area of the screen for SNAPSHOT to capture.
Dimensions have to be even numbers, excluding hundred's digit. When taking an image of a widget, be
sure to leave plenty room around the widget in the dimensions. ex. if the dimensions are not big enough
for a button, the image will be distorted to fit the dimension.
The [filename], PIC, is the name of the saved image. You do not have to specify the type of image it
will be. It will be saved as a 24-bit bitmap image in the \EZUSER\IMAGES directory. Be careful to not
use the same name as other images. Otherwise the image will save over the other.
7.6.2 CLIPAREA
CLIPAREA[left][top][right][bottom] allows you to designate a rectangular/box area that you can
draw in. Any surrounding area will be protected and no changes can be made to it. (ex. CLIPAREA 50
30 200 150 )
7.6.3 CLIPENABLE
CLIPENABLE[enable] is a command to turn on or off clipenable. 0/off = disable, 1/on = enable
7.6.4 RECORD
RECORD[name] allows you to record your commands to a macro, [name]. You will have to use this
command first and then all the following commands will be recorded. To stop recording, use command
STOP.
46
3184-J Airway Avenue, Costa Mesa, CA 92626
(949) 248-2333
7.6.5 LOOP
LOOP[on/off] command allows you to run a macro over and over. To stop looping, either hit Ctrl+C
or reset your ezLCD. When you activate loop in the console/terminal, you will not be able to input any
commands until you have stopped the macro. Therefore, you will need to put LOOP OFF in the macro
you are looping.
7.6.6 PAUSE
PAUSE[ms] stops the macro for any [ms] milliseconds and then continues. It is important to use
pauses in between widget commands, such as changing values. For a widget, you would draw an initial
state and without pauses, the changes will be visually instantaneous. By adding pauses, you will be able
to see the changes in value.
7.6.7 SPEED
SPEED[ms] The command allows you to determine how fast the commands are processed in
milliseconds. The smaller [ms] is, the faster the commands are processed. 100 = 1/10 second, 1000 = 1
second
7.6.8 WAIT
WAIT[option] stops a macro and waits for an event to happen.
[options] are T = touch, !T = No touch, TR = Touch and Release, IO[1-9] = wait for 1, !IO [1-9] = wait
for 0.
For options IO[1-9] or !IO[1-9] you can assign the IOs to a button or such for the wait command. Then
once the event happens, the macro will continue to run. IOs 10-33 can be used with the expander
board.
7.6.9 SECURITY
SECURITY[option][password] allows you to to lock the flash drive so that it will be inaccessible
from the PC until you unlock it.
[option] Set = set the password, Reset = to enter password/unlock it
For the [option], it is important that you capitalize the first letter otherwise it will not work. Also, it is
important that you put quotes around [password]. (ex. SECURITY Set “ezlcd”)
7.6.10 CALIBRATE
CALIBRATE is used to make sure your “touches” on the ezLCD will be precise. This command will
prompt you to press at different positions on the screen to help align the coordinates with the display.
47
3184-J Airway Avenue, Costa Mesa, CA 92626
(949) 248-2333
7.6.11 FORMAT
FORMAT “ezLCD” “EarthRules” is a command that will format and erase all your files on your
flash drive. This is useful when to clean up corrupt files you may have. Be sure to type the command
exactly as it is shown. The parameters need to be in quotes as well as have the appropriate letters
capitalized.
7.6.12 TOUCH
TOUCHX Returns the last touchscreen X position.
TOUCHY Returns the last touchscreen Y position.
TOUCHS Returns the current touchscreen status.
0 = not currently pressed
3= pressed
4 = released
7.6.13 LIGHT
LIGHT brightness[,delay][,sleep brightness]
brightness will set the backlight level (0-100%). If present, delay will setup a timer to change the sleep
brightness after delay in seconds.
LIGHT 100,5,50
Will set backlight to 100% and after 5 minutes will turn the backlight to 50%. Any touchscreen or
serial activity on the command port will wake up the display. To turn off the timeout use a delay of
255.
7.6.14 BEEP
BEEP [frequency][,duration]
Will generate a simple tone of the frequency and duration provided.
If frequency and duration are not provided it will default to 4000, 1000.
Before using the beeper it must be configured to match the hardware you are using.
For the expander board IO7 is used.
CFGIO 7,BEEPER
BEEP 4000,2000
48
3184-J Airway Avenue, Costa Mesa, CA 92626
(949) 248-2333
7.6.15 BRIDGE
BRIDGE [port]
The bridge command will bridge one peripheral to another.
Options are:
USBSERIAL1
Connect USB to UART1
USBSERIAL2
Connect USB to UART2
USBSERIAL3
Connect USB to UART3
DEBUGSERIAL1 Connects Console IO to UART1
DEBUGSERIAL2 Connects Console IO to UART2
DEBUGSERIAL3 Connects Console IO to UART3
DEBUGUSB
Connects Console IO to USB
Its up to the user to avoid bridging IO improperly. The CFGIO command should be used to assign port
pins to the peripherals as needed.
Example1:
CMD CDC
'Configure Command Port to USB CDC
cfgio 4 serial2_tx 115200 N81
'Configure Command Port to SERIAL2
cfgio 3 serial2_rx 115200 N81
BRIDGE DEBUGSERIAL2
This configuration will allow you to use either the USB or UART2 as command port. It is most useful
when debugging a connection to a microprocessor through UART2. You can see what commands the
microprocessor is sending to the ezLCD-3xx.
If you were using the SERIAL2 as your console connection you could use
BRIDGE DEBUGUSB
This would allow the user to DEBUG the UART2 interface.
Example2:
cfgio 4 serial2_tx 115200 N81
cfgio 3 serial2_rx 115200 N81
cfgio 6 serial1_tx 9600 N81
cfgio 2 serial1_rx 9600 N81
CMD SERIAL2
BRIDGE USBSERIAL1
'Configure Command Port to SERIAL2
'Configure Command Port to SERIAL1
This would allow the UART2 as the console port and USB and UART1 are bridged together (not
console). This configuration can be used to program an Arduino or Basic Stamp in circuit. You must
also enable DTR and RTS to reset those products during programming.
49
3184-J Airway Avenue, Costa Mesa, CA 92626
(949) 248-2333
7.7 DOS Commands
7.7.1 CWD
CWD displays the current directory you are in. One of its uses is that before making any changes to it,
you would type CWD in the console port to make sure your are in the correct one. The default directory
you are in is \EZSYS\FONTS.
7.7.2 CHDIR
CHDIR[name] or CD[name] changes to a directory, [name]. This is useful when you want to make
new files or changes to them, because you need to be located at that directory the files are in. [name]
needs to be in double quotes. If you want to move to a directory that is within another directory, you
will need to show each directory paths with a \ in front. (ex. Chdir “\EZUSER\MACROS”)
7.7.3 MKDIR
MKDIR[name] or MD[name] makes a directory. On your ezLCD, there are already directories named
“EZSYS” and “EZUSER”. You can create your own using these commands. However, if you want to
make a directory/folder within another, you will need to show the paths. (ex. MD “\EZUSER\new”)
Before every directory, include \ in front. It is also important to put [name] in quotes.
7.7.4 RMDIR
RMDIR[name] or RD[name] removes/deletes a directory. [name] needs to be in double quotes. To
delete the directory, you need to either be in the directory it is located in, or show the paths. (ex.
\EZUSER\TEST).
7.7.5 TYPE
TYPE[name] or MORE[name] command shows you the contents of the file you specified to the
console port. This is useful when you want to look at a file without having to go into the flash drive and
finding the file. The name needs to have its file extension and must have quotes around it. (ex. more
"ameter.ezm") Make sure to change to the directory the file is in before trying to view it.
7.7.6 DEL
DEL[name] or ERASE[name] is used to delete or erase files that are in a directory without having to
locate them in the flash drive. [name] needs to be in double quotes. You will also need to make sure
you change to the directory the file is in. Also, include the file type/extension.
50
3184-J Airway Avenue, Costa Mesa, CA 92626
(949) 248-2333
7.7.7 REN
REN[original][new] changes the file's [original] name to [new] name. It names to be in double quotes
as well as have file extension/type at the end. With the rename command, not only can you change the
name, but also the file type. (ex. REN “droid.bin” “droid.ezm”)
7.7.8 HELP
HELP[command] command displays the help file for the command you specified to the console port.
This is useful when you want to look up the syntax for a command without a manual handy. The
command file assumes the help file is in \ezSYS\Help and has an extension of .EZH. The commands is
case insensitive.
51
3184-J Airway Avenue, Costa Mesa, CA 92626
(949) 248-2333
8 Widget Themes
8.1 FONTW
The Widget Font (FONTW) command is a way of describing the font characteristics of themes. The
unit supports upto 16 different widget fonts. The same font may be used with different themes as
needed.
Eight widget fonts are preset in the startup macro:
fontw 0 serif24
‘set theme 0 font for widget to serif24 (serif24.ezf font file in \SYS\FONTS\)
fontw 1 serif24
fontw 2 serif24
fontw 3 serif24
fontw 4 serif24
fontw 5 serif24
fontw 6 serif24
fontw 7 serif24
52
3184-J Airway Avenue, Costa Mesa, CA 92626
(949) 248-2333
8.2 THEME
The THEME command is a way of describing color and font characteristics of widgets. Themes are
introduced here but you may want to proceed to the Widgets section and play with widgets and refer
back to here when you want to customize the themes for the examples. Different widget types can use
the same color theme to make your GUI look consistent. The THEME command sets the theme but
when we discuss them we may use the term themes in the manual. The ezLCD-3xx supports 16 themes
(0-15). The first eight widget themes (0-7) and widget fonts are preset in the startup macro:
'
A
B
C
D
E
F
G
H
I
J
K
theme 0
1
2
0
155
2
3
130
1
0
0 'white
theme 1
155
152
3
130
0
0
1
147
153
1 'black
theme 2
4
20
3
130
2
5
22
16
31
2 'red
theme 3
78
66
3
0
0
9
8
65
70
3 'green
theme 4
7
3
0
155
0
6
39
41
40
4 'yellow
theme 5
126
118
3
0
0
36
37
46
42
5 'Orange
theme 6
111
106
3
130
0
13
12
101
100
6 'blue
theme 7
58
55
3
130
0
15
14
54
50
7 'purple
(Note: The above themes were shipped starting with firmware version 1.1 and File System
Release E. Please confirm the themes in your startup file to avoid confusion and remember
ezLCD-3xx will be using themes from the \USER\MACROS\STARTUP.EZM directory if it
exists otherwise themes set in \SYS\MACROS\STARTUP.EZM.)
You must set the widget font with the FONTW command before setting the theme. By having themes
set by the startup.ezm macro it avoids having to send them from your host and saves memory on your
host. These themes will work with any widget that you create. Changing the default themes 0-7 may
cause examples in this manual and demo macros on your flash drive to not display correctly. If it’s ever
necessary to reset to the default themes simply type RESET and startup.ezm macro automatically runs
reloading the default themes. If you create new themes for your project it is recommended you use
theme ID’s 8-15. The widget themes contain values for:
Theme [ID][EmbossDkColor][EmbossLtColor][TextColor0][TextColor1]
[TextColorDisabled][Color0][Color1][ColorDisabled][CommonBkColor][Fontw].
To see this in context, type the following into your terminal program:
THEME 5 126 118 3 3 3 35 35 35 35 2
Don’t worry about damaging the default settings - these are the default values for theme 5. You can
change the settings and see the results by using the BUTTON command as outlined in Section 12.0.
The command THEME 5 references theme 5.
53
3184-J Airway Avenue, Costa Mesa, CA 92626
(949) 248-2333
The [EmbossDkColor] and [EmbossLtColor] values, 126 and 118, designate the colors that act as the
highlight on the upper left edge and the shadow on the lower right edge of each button, respectively.
These look best when the highlight is a few shades lighter than the main button color and the shadow is
a few shades darker.
The [TextColor0], [TextColor1] and [TextColorDisabled] values, 3, 3 and 3, designate the color of
the text when the button is at rest, being touched or is disabled. They’re set by default to be the same
colors, but can be changed to give a visual indication of the button’s state.
The [Color0], [Color1] and [ColorDisabled] values, 35, 35 and 35, designate the color of the face of
the button when it is at rest, being touched or is disabled. They’re set by default to be the same colors,
but can be changed to give a visual indication of the button’s state.
The [CommonBkColor] value, 35, designates the common background color. This is also set by
default to match the button’s face.
The [Fontw] value, 2, specifies the font to be used with the theme. The font MUST be defined
BEFORE defining the theme using the FontW command.
For more details on widget themes, see the command list in Appendix B. Further information can be
found by opening the buttons.ezm macro in a text editor.
54
3184-J Airway Avenue, Costa Mesa, CA 92626
(949) 248-2333
8.3 Diagrams of Widget Themes
Text Color 1
Text Color
Disabled
Color 0
Color 1
B
C
D
E
F
G
x
bot
top
top
bot/button
bot
bot
top
x
x
x
x
top
bot
bot
top
top
top
bot
x
x
frame
x
up
check/text
check/text
x
x
x
text
x
text
text
Label
down
x
x
x
text
x
x
text
x
x
x
disabled
disabled
disabled
x
x
x
x
text
x
disabled
Back
up
box
circle
dial
button
slider
Back
frame
x
x
H
Top Text
Option 3
down
x
x
x
x
handle
foreground
x
frame
x
Common
Background
Color
Text Color 0
A
Color
Disabled
Emboss
Light Color
AMETER
BUTTON
CHECKBOX
RADIO
DIAL
CHOICE
SLIDER
PROGRESS
STATIC
DMETER
GBOX
Emboss
Dark Color
WIDGET
ID
The Theme effects each widget differently. The table below documents the actions of each parameter.
I
J
x
disabled
box
circle
dial
x
slider
x
x
x
x
x
x
back
back
x
K=Font
x
x
back
back
back/text
Table 1: Widget Parameters
55
3184-J Airway Avenue, Costa Mesa, CA 92626
(949) 248-2333
Figure 10: Analog Meter
Figure 12: Button
Figure 13: Button
(Pressed)
Figure 11: Button
(Disabled)
56
3184-J Airway Avenue, Costa Mesa, CA 92626
(949) 248-2333
Figure 15: Disabled Checkbox
Figure 14: Filled/Checked Checkbox
Figure 16: Radio Button
Figure 17: Dial
57
3184-J Airway Avenue, Costa Mesa, CA 92626
(949) 248-2333
Figure 18: Choice
Figure 20: Slider
Figure 19: Slider (Scroll Bar
Option)
58
3184-J Airway Avenue, Costa Mesa, CA 92626
(949) 248-2333
Figure 21: Progress Bar
Figure 22: Static Text (Box)
Figure 23: Static Text (Box Framed)
Figure 24: Digital Meter
59
3184-J Airway Avenue, Costa Mesa, CA 92626
(949) 248-2333
9 Widgets
A widget is a reusable screen object of a graphical user interface that displays an information
arrangement and provides standardized data manipulation. Widgets allow you to create an interactive
user interface that is small, fast and easy!
There are user input widgets and output widgets. Input widgets takes the user input and outputs a result
to the command port. These include the button and slider widget. Most of the input widgets require
touchscreen input to be useful and may have limited use for ezLCD-3xx displays with no touchscreen.
Output widgets send out status events when changed to the command port. They usually have an
element that can take a separate input from a widget value command to update just the part of the
widget that shows the value like the needle on the AMETER widget. Control widgets like checkbox,
radio button, and slider will send out status events when changed to the command port. This provides a
faster and more dynamic user interface.
You could program your ezLCD with a startup macro that draws a meter widget in one line and then
your host would only need to send 6 bytes to update the needle position! Button and checkbox widgets
send 3 bytes when a button is pressed/released or checkbox is checked/unchecked. The ezLCD-3xx
has various widgets that simplify the creation of objects on the screen. The CLS command clears all
current widget references. Widgets are powerful in that they can be drawn typically by just issuing the
command followed by the parameters and this can take as little as 11 bytes! Widgets use preset (but
customizable) themes. Widgets that have values like progress bar and meters can be updated by
sending the appropriate widget value command. Every widget has a unique ID and this value should be
different for every widget you use in an application regardless of the type. The current widgets are
Analog Meter, Button, Check Box, Choice, Dial, Digital Meter, Group Box, Progress Bar, Radio
Button, Slider, TouchZone and Static Text.
Your ezLCD-3xx has the ability to display custom-themed buttons. There are eight preset widget
themes installed that can be used for various button shapes. See Section 11.0 for more information
about widget themes.
IMPORTANT WIDGET NOTES & ERRATA:
1. You must be sure that the [Width] and [Height] parameter values fit on your screen or the
widget may not be drawn!
2. Widgets do not support internal fonts at this time.
3. Your ezLCD contains documented examples of all the widgets in the \EZSYS\MACROS
directory of its flash drive. The file will have the same name as the command such as
DIAL.EZM and AMETER.EZM.
4. Widget IDs must be a number [1-99] and unique from other widgets.
5. Some of the widgets require touch screen input to be useful and may have limited use for
ezLCD-3xx displays with no touchscreen.
6. If you decide to modify or create a theme remember you need to send the Fontw command
before sending the theme!
60
3184-J Airway Avenue, Costa Mesa, CA 92626
(949) 248-2333
9.1 WSTATE
The widget state command is used to view and change the state of a widget.
WSTATE [ID] [options]
[ID] must be the same as the ID of the widget you want to change.
[Options] are: 0 = delete, 1 = enable, 2 = disable, 3 = redraw
0 = Delete the widget. This option redraws the widget to the common background color and then
unlinks the widget ID from further processing. Once a widget is deleted its state can no longer be
modified.
1 = Enable the widget. This option will enable a previously created widget that has been disabled.
The Widget is redrawn with the enable colors in the Theme.
2 = Disable the widget. This option will disable a previously created widget that is enabled. The
Widget is redrawn with the disable colors in the Theme.
3 = Redraw the widget. This option will redraw a previously created widget. This is useful if the
widget has been over written by other text or if the string has been modified and needs to be redrawn
on the widget.
Values over 3 use the definitions in table below.
Examples:
cls white
'clears the screen to white
string 1 "testing"
'the word will appear at the bottom of the widget
fontw 0 sans24
'widget font needs to be set before the theme
theme 0 0 1 2 3 4 5 6 7 8 0 'colors are to distinguish different parts of widget
static 1 10 25 220 25 5 0 1
'draws a static widget
pause 2000
'waits for 2 seconds
string 1 “tested”
'change the string to “test”
wstate 1 3
'changes the string to “test” without having to redraw entire
61
3184-J Airway Avenue, Costa Mesa, CA 92626
(949) 248-2333
Static Text
Progress Bar
Slider
Rotary Dial
Analog Meter
Digital Meter
Radio Button
Group Box
Check Box
Touch Zone
Button
Data Bit
9
8 7
6 5
4
Right
Disabled ~
FirstChecked
Disabled ~
Disabled ~
CCW
Right
Toggle Pressed
1 0
Disabled ~
Center
2
3
Disabled
(949) 248-2333
3184-J Airway Avenue, Costa Mesa, CA 92626
Center
~Frame
~
~
~ ~ ~
~
Update
~
Draw
Disabled ~
Hide
12 11 10
~ Vertical
~
~
~
~ ~ ~
~
Redraw
~
Draw
~
Hide
Disabled ~
~
~Scroll Bar Vertical
~
~
Draw FocusDraw Thumb ~ ~
~
Draw
~
~
Hide
~
Disabled ~
~
~
~Frame
CW
~ ~ ~
~
~
~
Disabled ~
~
~
~
~
~
~
~Checked
Disabled ~
~
Draw
~
~
~
~
~
~ Pressed
~
Hide
Update ~ ~
~
~
~
~
~
Disabled ~
Redraw
~ ~ ~
~
~
~
~
Ring
Update Text
~
~
~
~
~ Accuracy
Draw
Draw Focus Draw Check ~ ~
~
~
~
~
Hide
Draw
~ ~ ~
~
~
Disabled ~
Hide
Draw
Draw Focus Draw Check ~ ~
~
Right
Hide
Draw
~ ~ ~
Draw Focus
Center
Hide
Draw
Draw Focus
Draw
13
~
Hide
Draw
Hide
14
~ ~ ~No Panel Two Tone TopBottomLeft Right
Hide
15
Defaults Hide Draw Draw Focus Redraw
WSTATE Bit Definitions
62
9.2 WVALUE
The widget value command is used to view and change the values of a widget.
WVALUE [ID] [value]
[ID] must be the same as the ID of the widget you want to change.
[value] is the value to apply to the widget. The widget will be redrawn.
Example:
AMETER 1 50 30 200 200 1 10 0 120 0 1 'ameter
WVALUE 1 50
'ID must be same as the ID of ameter you're changing
If RUNNING:
LET A=WVALUE(1)
63
3184-J Airway Avenue, Costa Mesa, CA 92626
(949) 248-2333
9.3 AMETER
The AMETER widget allows you to display an analog meter which looks like a car speedometer. It’s
companion command, AMETER_VALUE, allows you to set the needle value without redrawing the
whole meter. Also, the AMETER_COLOR command allows you to change the colors of the number
and line indicators that form an arc around the meter. The AMETER.EZM file in the
\EZSYS\MACROS directory contains an example of this widget. It can be invoked by typing PLAY
AMETER from your terminal program.
ameter [ID][x][y][width][height][options][value][min][max][theme][stringID][type]
ameter_value [ID][value]
ameter_color [ID][color1][color2][color3][color4][color5][color6]
EXAMPLE:
cls white
'clears the screen to white
string 1 "testing"
'the word will appear at the bottom of the widget
fontw 0 sans24
'widget font needs to be set before the theme
theme 0 0 1 2 3 4 5 6 7 8 0
'colors are to distinguish different parts of widget
ameter_color 101 3 2 1 151 155 156
'use ID = 101 when stated before widget
ameter 1 50 30 200 200 1 10 0 120 0 1
'ameter
pause 2000
'pauses 2 seconds before changing value from 10 to 50
ameter_value 1 50
'ID must be same as the ID of ameter you're changing
64
3184-J Airway Avenue, Costa Mesa, CA 92626
(949) 248-2333
Images of AMETER Widget Options:
Option 1= Draw
Option 2 = Disabled
Option 3 = Ring
Option 4 = Accuracy
Option 1= Draw
Option 2 = Disabled
Option 3 = Ring
Option 4 = Accuracy
Option 1= Draw
Option 2 = Disabled
Option 3 = Ring
Option 4 = Accuracy
The AMETER command contains ten different values.
The [ID] value 1-99, is the ID number of this particular widget. You can create many different widgets
as long as each ID is unique regardless of widget type. For ameter_color, the ID should be the same as
the ameter you want to change. However if you want to set the ameter_color before the ameter widget
has been defined, use ameter_color ID = 101 to set the default.
The [x] and [y] values designate the location of the widget on the screen as the XY coordinate of the
upper left corner.
The [width] and [height] values designate the width and height of the widget in pixels.
65
3184-J Airway Avenue, Costa Mesa, CA 92626
(949) 248-2333
The [options], designates the DRAW options of the analog meter. To delete the widget, use the
command CLS. For option 2 (disabled), the widget looks as it does for option 1.
Option choices: 1=draw, 2=disabled, 3=ring, 4=accuracy.
Draw prints the widget to screen.
Disabled draws a widget that can no be affected or changed.
Ring draws the widget with an arc'ed bar around numbers.
Accuracy allows you to display numbers with a decimal point for more exact numbers.
The [value] designates the initial value setting of the needle on the meter. For ameter_value, [value]
is the value you want the ameter to change to.
The [min] designates the minimum value on the meter scale.
The [max] designates the maximum value on the meter scale.
The [theme] sets the widget to theme 5.
The [stringID] designates the ID number of the text string that you’d like displayed below the meter.
[color 1-6] changes the colors of the 6 “zones” of indicating the lines and numbers of the meter arc.
The zones start at 1 at the left end of the arc and 6 being the right end of the arc.
For half meter type only colors 3-6 are used. For quarter meter type only colors 5 and 6 are used.
The [type] is the meter type/style you want to use. By default, the meter type is set to full. For the half
sized ameter, you will need to adjust [width] to make the meter proportional. For full and quarter
0=full, 1=half, 2=quarter.
66
3184-J Airway Avenue, Costa Mesa, CA 92626
(949) 248-2333
9.4 BUTTON
A button widget (sometimes known as a push button or command button) is a user interface element
that provides the user a simple way to trigger an event. You can draw/make a variety of buttons
making them round or square by adjusting the [radius] parameter. This is the ideal replacement for a
switch in an embedded application. Your ezLCD-3xx has the ability to display custom-themed buttons.
button [ID][x][y][width][height][options][align][radius][theme][stringID]
Example:
cls white
'clears the screen to white
string 1 "testing"
'the word will appear at the center of the widget
fontw 0 sans24
'widget font needs to be set before the theme
theme 0 0 1 2 3 4 5 6 7 8 0
'colors are to distinguish different parts of widget
button 1 10 10 100 100 1 0 50 0 1 'red when unpressed and yellow when pressed
Images of Widget Options:
Option 1 = Draw
Align 0 = Center
Option 3 = Pressed
Align 1 = Right
Align 2 = Left
Option 2 = Disabled
Align 4 = Top
Align 3 = Bottom
Pressing a button will send information to the command port indicating the action. Buttons have 3
actions. Button Press is indicated by “BP” followed by the button ID. In this case BP1. Button release
is indicated by BR1. For the case where you press a button and then move your finger off the button
before you release it, you will get BC1. This is button cancel.
The button command contains ten different values.
The [ID] value 1-99, is the ID number of this particular button. You can create many different buttons,
and therefore button IDs, as you’d like.
67
3184-J Airway Avenue, Costa Mesa, CA 92626
(949) 248-2333
The [x] and [y] values designate the location of the button on the screen as the XY coordinate of the
upper left corner.
The [width] and [height] values designate the width and height of the button in pixels.
The [options] designates the state of the button, whether it is pressed, disabled, and etc.
Option choices: 1=draw, 2=disabled, 3=toggle pressed, 4=toggle not pressed, 5=toggle pressed
disabled, 6=toggle not pressed disabled.
The [align] value, designates the alignment of the text as it appears on the button.
Alignment choices: 0=centered, 1=right, 2=left, 3=bottom, 4=top.
The [radius] value, designates the corner radius of the button corners in pixels. A value of 0 achieves
a square corner, while a value that is half the length of one side will give a round button. To see some
different shapes for buttons, run demo buttons.ezm.
Example for a square button: button 1 10 10 100 100 1 0 10 0 1
The [theme] value designates the widget theme. Type PLAY BUTTONS into your terminal program to
see a macro example of the 8 included widget themes as well as some different button shapes.
The [stringID], designates the ID number of the text string that you’d like displayed on the button. You
can save as many different text strings as you’d like. To write a text string, type the following:
STRING 0 "HELLO" and the word HELLO will appear on any button that designates text string 0.
Note: To create multi-line text on buttons, use \n in the string contents. Example: string 5 “Wrap\nText”
will appear on 2 lines.
68
3184-J Airway Avenue, Costa Mesa, CA 92626
(949) 248-2333
9.5 TOUCHZONE
A touchzone widget is a user interface element that provides the user a simple way to trigger an event
just by press an area of the screen defined by a box. You can also draw graphics of any kind onto the
screen and place a hot spot around it with touchzone.
touchzone [ID][x][y][width][height][options]
Example:
touchzone 1 10 10 100 100 1
Pressing the touchzone will send TZP1 to the Command Port and releasing it will send TZR1 to the
Command Port. Moving off the touchzone before releasing will generate TZC1.
The touchzone command contains six different values.
The [ID] value 1-99, is the ID number of this particular touchzone. You can create many different
touchzones but they should not over lap.
The [x] and [y] values designate the location of the touchzone on the screen as the XY coordinate of the
upper left corner.
The [width] and [height] values designate the width and height of the touchzone in pixels.
The [options] designates the state of the touchzone, whether it is pressed, disabled, and etc.
Option choices: 1=enable, 2=disabled.
69
3184-J Airway Avenue, Costa Mesa, CA 92626
(949) 248-2333
9.6 CHECKBOX
The CHECKBOX widget allows you to display a check box with a string next to it. This permits the
user to make a choice. When a CHECKBOX state changes (it is checked or unchecked) a status
change is sent to the host via the current Command Port. When a check box with widget ID 1 is
checked a CC1 is transmitted and when it is unchecked a CU1 is sent to the Command Port. A check
box can also be viewed as a single state switch that can be set on (checked) or off (unchecked).
The CHECKBOX.EZM file in the \EZSYS\MACROS directory contains an example of this widget. It
can be implemented by typing PLAY CHECKBOX from your terminal program. The ezLCD-3xx has
the ability to display custom-themed checkboxes.
checkbox [ID][x][y][width][height][options][theme][stringID]
Example:
cls white
'clears the screen to white
string 1 "testing"
'the word will appear at the bottom of the widget
fontw 0 sans24
'widget font needs to be set before the theme
theme 0 0 1 2 3 4 5 6 7 8 0
'colors are to distinguish different parts of widget
checkbox 1 30 30 225 50 1 0 1
'draws unchecked initially, checked when pressed
Images of Widget Options:
Option 1 =
Unchecked
Option 2 = Disabled
Option 3 = Checked
If the user presses a checkbox when its unchecked, it will check it. On the command port the user will
get “CC” and the widget ID. Typically CC1.
If the user presses a checkbox when its checked, it will uncheck it. On the command port the user will
get “CU” and the widget ID. Typically CU1.
If the user presses a checkbox when it is disabled, nothing will happen.
The CHECKBOX command contains eight different values.
The [ID] value is the ID number of this particular widget. You can create many different widgets as
long as each ID is unique regardless of widget type.
The [x] and [y] values designate the location of the widget on the screen as the XY coordinate of the
upper left corner.
70
3184-J Airway Avenue, Costa Mesa, CA 92626
(949) 248-2333
The [width] and [height] values designate the width and height of the widget in pixels.
The [options], designates the initial state of the checkboxes.
Option choices: 1=draw unchecked, 2=draw disabled, 3=draw checked, 4=redraw
The [theme] changes the colors on the widget.
The [stringID] designates the ID number of the text string that you’d like displayed next to the text
string.
71
3184-J Airway Avenue, Costa Mesa, CA 92626
(949) 248-2333
9.7 CHOICE
The CHOICE widget allows you to print a string and display buttons for the user to choose a response.
The default CHOICE reply buttons are “yes”, “no”, or “cancel”. This widget is useful for asking
simple “yes or no” questions without having to tediously figure out coordinates, sizes, and etc. for
buttons and strings. The ezLCD-3xx has the ability to display custom-themed CHOICEs. However,
you will not be able to change the shapes of the buttons.
Note: The user can modify the strings prior to calling CHOICE to show any 3 strings.
choice [string][theme]
Example:
fontw 0 sans24
'widget font needs to be set before the theme
theme 0 0 1 2 3 4 5 6 7 8 0
'theme for buttons; has no affect on background
CHOICE "Got Milk?" 0
‘quotes around string
Images of Widget Options:
Pressing the YES, NO or CANCEL button will output a 1, 0 or -1 respectively to the Command
Port.
The CHOICE command contains two different values.
[string] “Got Milk?”, will be printed above the buttons. Please make sure to put the string in
quotations marks. Also, the string cannot be substituted with a String ID.
Responses/Return Values: 0=no, 1=yes, -1=cancel
The [theme] only affects or will only change the colors for the buttons of the widget.
String 61 is defaulted to Yes and is used for the first button.
String 62 is defaulted to No and is used for the center button.
String 63 is defaulted to Cancel and is used for the last (right) button.
The user should be careful to use strings that will fit into the buttons.
Button height is 60. Width is 80. Spacing is MaxX/10.
72
3184-J Airway Avenue, Costa Mesa, CA 92626
(949) 248-2333
9.8 DIAL
The DIAL widget allows you to display a dial that looks like an analog volume control found in
modern cars. The DIAL.EZM file in the \EZSYS\MACROS directory contains an example of this
widget. It can be invoked by typing PLAY DIAL in TERMIE.
dial [ID][x][y][radius][option][resolution][value][max][theme]
Example:
cls white
'clears the screen to white
theme 0 0 1 2 3 4 5 6 7 8 0
'colors are to distinguish different parts of
widget
dial 1 100 85 75 1 1 25 100 0
'draws a dial
Images of Widget Options:
Dial
If the user moves the dial in either direction the value of the dial will increase or decrease. The change
in value will be sent to the command port as “RD” and the widget ID of the dial. Typically RD1 17.
The DIAL command contains nine different parameters.
The [ID] value 1-99, is the ID number of this particular widget. You can create many different widgets
as long as each ID is unique regardless of widget type.
The [x] and [y] values designate the location of the widget on the screen as the XY coordinate of the
center of the dial.
The [radius] values means that the radius of the dial is 75, which the diameter will be 150.
The [option] designates the state of the dial. Option choices: 1=draw, 2=disabled.
The [resolution] designates the increments in the range. A resolution of 1 will be a value of every
number, such as, 10,11,12,13,14,15.... has a resolution of 1. A resolution of 3 for instance will show a
value of 10,13,16,19.
The [value] designates the initial dial value.
73
3184-J Airway Avenue, Costa Mesa, CA 92626
(949) 248-2333
The [max] value designates the largest value of the dial’s input.
The [theme] value sets widget theme. Note: Themes 0-7 are predefined in the STARTUP.EZM macro.
9.9 DMETER
The Digital Meter widget DMETER allows you to display a digital meter as in a panel meter. It’s
companion command the DMETER_VALUE command allows you to set the read out value without
redrawing the meter. The DMETER.EZM file in the \EZSYS\MACROS directory contains an example
of this widget. It can be invoked by typing PLAY DMETER in your terminal program.
Note: If using negative numbers make sure your font has a minus sign. Some larger fonts only have
numbers 0-9.
dmeter [ID][x][y][width][height][option][value][digits][dp][theme]
dmeter_value [ID][value]
Example:
cls white
'clears the screen to white
fontw 0 sans24
'widget font needs to be set before the theme
theme 0 0 1 2 3 4 5 6 7 8 0
'colors are to distinguish different parts of
widget
dmeter 1 50 50 200 160 14 0120 4 1 0
'background is green with a thin yellow frame
pause 2000
'pauses for 2 seconds
dmeter_value 1 123
'changes value
Images of Widget Options:
Option 1 = Left
Option 3 = Right
Option 4 = Center
Option 11 = Left
Framed
Option 13 = Right
Framed
Option 14 = Center
Framed
The DMETER command contains ten different values.
74
3184-J Airway Avenue, Costa Mesa, CA 92626
(949) 248-2333
The [ID] value 1-99, is the ID number of this particular widget. You can create many different widgets
as long as each ID is unique regardless of widget type. For dmeter_value the ID must be the same ID
as the dmeter you want to change.
The [x] and [y] values designate the location of the widget on the screen as the XY coordinate of the
upper left corner.
The [width] and [height] values designate the width and height of the widget in pixels.
The [option] determines the alignment of the digits and whether the box is framed.
Option choices: 1=left, 2=disabled, 3=right, 4=center, 11=left framed, 12=disable framed, 13=right
framed, 14=center framed, 6=redraw.
The [value] designates and displays the initial setting of the readout as it appears on the meter.
The [digits] value designates the number of digits displayed on the meter.
The [dp] value designates the position of the decimal point from the ‘right’ most number.
The [theme] value sets widget theme.
75
3184-J Airway Avenue, Costa Mesa, CA 92626
(949) 248-2333
9.10 GBOX
The groupbox widget GBOX generates a border/box and by changing the options positions the header
text at different alignments. Group boxes help visually distinguish related items by framing them. The
Groupbox consists only of the frame, title, and a title background. The GBOX.EZM file in the
\EZSYS\MACROS directory contains an example of this widget. It can be invoked by typing PLAY
GBOX from your terminal program.
gbox [ID][x][y][width][height][options][theme][stringID]
Example:
cls white
'clears the screen to white
string 1 "testing"
'the word will appear at the bottom of the widget
fontw 0 sans24
'widget font needs to be set before the theme
theme 0 0 1 2 3 4 5 6 7 8 0
'colors are to distinguish different parts of
widget
gbox 1 20 30 300 200 1 0 1
Images of Widget Options:
Option 3 = Right
Option 1 = Left
Option 4 = Center
The GBOX command contains eight different values.
The [ID] is the ID number 1-99 of this particular widget. You can create many different widgets as long
as each ID is unique regardless of widget type.
The [x] and [y] values designate the location of the widget on the screen as the XY coordinate of the
upper left corner.
The [width] and [height] values designate the width and height of the widget in pixels.
The [options] determines the header alignments. (The options do not affect the contents' alignment)
Option choices: 1=left,2=disabled,3=right,4=center
The [theme] value sets widget to theme 2.
The [stringID] designates the ID number of the string you want as a header of the box.
76
3184-J Airway Avenue, Costa Mesa, CA 92626
(949) 248-2333
9.11 PROGRESS
The PROGRESS widget allows you to display a progression bar at an initial state. To change the
values to show progression or regression, use the PROGRESS_VALUE command.
PROGRESS_VALUE command does not re-draw the entire bar, but changes the value. The
PROGRESS.EZM file in the \EZSYS\MACROS directory contains an example of this widget. It can
be invoked by typing PLAY PROGRESS in Termie. The ezLCD-3xx has the ability to display customthemed progress bars. Changing the PROGRESS_VALUE setting (25) will update the BAR and
without having to redraw the whole widget.
progress [ID][x][y][width][height][option][value][max][theme][char]
progress_value [ID][value]
Example:
cls white
'clears the screen to white
fontw 0 sans24
'widget font needs to be set before the theme
theme 0 0 1 2 3 4 5 6 7 8 0
'colors are to distinguish different parts of widget
progress 1 50 100 180 40 1 10 100 0
'draws a progress bar, background = red
pause 2000
'pauses for 2 seconds
progress_value 1 26
'changes value from 10 to 26
Images of Widget Options:
Option 1 = Horizontal
Option 3
= Vertical
The PROGRESS command contains nine different values and PROGRESS_VALUE contains two
values.
The [ID] value 1-99, is the ID number of this particular widget. You can create many different widgets
as long as each ID is unique regardless of widget type. In order to change the value of a specific
progress bar, you must use its ID number. If the progress ID is 1 then the Progress_Value ID must be 1.
77
3184-J Airway Avenue, Costa Mesa, CA 92626
(949) 248-2333
The [x] [y] values designate the location of the widget on the screen as the XY coordinate of the upper
left corner.
The [width] [height] values designate the width and height of the widget in pixels.
The [option] designates the option of the progress bar.
Option choices: 1=draw horizontal, 2=horizontal disabled, 3=vertical, 4=vertical disabled,
5=redraw horizontal, 6=redraw horizontal disabled, 7=redraw vertical, 8=redraw vertical
disabled
The [value] value designates the initial value. By using the PROGRESS_VALUE command changes
the initial value to a different one.
The [max] value, 100, designates the maximum value that can be reached.
The [theme] value, 1, sets widget to theme 1.
The [char] character is appended to the end of the number.
78
3184-J Airway Avenue, Costa Mesa, CA 92626
(949) 248-2333
9.12 RADIO
The RADIO button widget allows you to display buttons for making a selection. Radio buttons differ
from checkboxes in that only one button can be filled in at a time, while checkboxes can have many
filled in. Therefore, radio buttons are interconnected. If one button is checked then the others will go to
or remain as an ‘unchecked’ state. The RADIO.EZM file in the \EZSYS\MACROS directory contains
an example of this widget. It can be invoked by typing PLAY RADIO from your terminal program.
radio [ID][x][y][width][height][option][theme][stringID]
Example:
cls white
'clears the screen to white
string 1 "testing"
'the word will appear at the bottom of the widget
fontw 0 sans24
'widget font needs to be set before the theme
theme 0 0 1 2 3 4 5 6 7 8 0
'colors are to distinguish different parts of widget
radio 1 25 50 230 35 5 0 1
radio 2 25 95 230 35 1 0 1
Images of Widget Options:
If the user presses a radio button the command port would get “RB” followed by the widget ID. Any
radio button that is disabled can not be pressed.
If the user had 3 buttons configured as radio buttons and they were all enabled. pressing top, middle or
bottom button would send either a RB0, RB1 or RB2, respectively, to the Command Port.
The RADIO command contains eight different values.
The [ID] value 1-99 is the ID number of this particular widget. Although radio buttons are connected as
a group, each button still needs its own ID number.
The [x] and [y] values designate the location of the widget on the screen as the XY coordinate of the
upper left corner.
The [width] and [height] values designate the width and height of the widget in pixels. The [width]
79
3184-J Airway Avenue, Costa Mesa, CA 92626
(949) 248-2333
and [height] are not the dimensions for the radio button, but it is the area which the button and string
will be in. The size of the radio button itself is defined by the height of the button.
The [options] available allow you to draw radio buttons checked, unchecked, or disabled. By disabling
a button, the user will not be able to change its state. Options 4 (first checked) and Options 5(first
unchecked) help specify that it is the first button in a group. Options 4 & 5, therefore, allows you to
have more than one group of buttons occupying the screen at the same time. When Options 4 or 5 are
specified in a radio button command, the following buttons are in the same group as the first until
another "first" button is defined. Then the buttons created after will be in the second group. If you
make a button “first unchecked” remember to draw one button in the group as “checked”.
Option choices: 1=unchecked, 2=disabled, 3=checked, 4=FIRST unchecked, 5=FIRST checked
The [theme] is the theme ID you want to use. Theme will change the colors of the buttons and text of
the widget
The [stringID] designates the ID number of the text string that you’d like displayed by the button.
80
3184-J Airway Avenue, Costa Mesa, CA 92626
(949) 248-2333
9.13 SLIDER
The SLIDER widget allows you to display a vertical or horizontal slider bar that looks like a light
dimmer. The SLIDER widget components are the slider and a handle, also known as the thumb or
indicator. The SLIDER.EZM file in the \EZSYS\MACROS directory contains an example of this
widget. It can be invoked by typing PLAY SLIDER in TERMIE.
slider [ID][x][y][width][height][option][range][resolution][value][theme]
Example:
cls white
'clears the screen to white
fontw 0 sans24
'widget font needs to be set before the theme
theme 0 0 1 2 3 4 5 6 7 8 0
'colors are to distinguish different parts of widget
slider 1 20 30 100 50 1 75 5 25 0
Images of Widget Options:
Option 1 = Horizontal
Option 3
= Vertical
Option 5 = Horizontal
Scroll Bar
Option 7
= Vertical
Scroll Bar
Pressing and sliding the slider thumb (handle) will update the slider value and image (without
redrawing the whole widget) and output the setting to the Command Port. The output would be “SL”
followed by the widget ID. Typically SL1 19.
The SLIDER command contains ten different values.
The [ID] value 1-99 is the ID number of this particular widget. You can create many different widgets
as long as each ID is unique regardless of widget type.
The [x] and [y] values designate the location of the widget on the screen as the XY coordinate of the
upper left corner.
The [width] and [height] values designate the width and height of the widget in pixels.
The [option], 1, designates the options of the slider.
Option choices: 1=draw horizontal, 2=horizontal disabled, 3=vertical, 4=vertical disabled,
5=horizontal slider, 6=horizontal slider disabled, 7=vertical slider, 8=vertical slider disabled
81
3184-J Airway Avenue, Costa Mesa, CA 92626
(949) 248-2333
The [range] value designates that the minimum and maximum value is 0-75.
The [resolution] value designates the increments in the range. So the indicator, or the thumb, will be a
value of every other 5 numbers, such as, 10,15,20,25,30,35...75
The [value] value designates the initial value of the indicator.
The [theme] is the ID of the theme you want to use.
82
3184-J Airway Avenue, Costa Mesa, CA 92626
(949) 248-2333
9.14 STATIC
The STATIC widget generates a framed text box with a header string at different alignments. This
command changes text within a box without having to overwrite its background. The STATIC.EZM
file in the \EZSYS\MACROS directory contains an example of this widget. It can be invoked by
typing PLAY STATIC in your terminal program.
static [ID][x][y][width][height][option][theme][stringID]
static_value [ID][string]
Example:
cls white
'clears the screen to white
string 1 "testing"
'the word will appear at the bottom of the widget
fontw 0 sans24
'widget font needs to be set before the theme
theme 0 0 1 2 3 4 5 6 7 8 0
'colors are to distinguish different parts of widget
static 1 10 25 220 25 5 0 1
'static box w/ green background & yellow frame
Images of Widget Options:
Option 5 = Left Framed
Option 1 = Left
Option 3 = Right
Option 7 = Right Framed
Option 4 = Center
Option 8 = Center Framed
The STATIC command contains eight different values.
The [ID] value 1-99, is the ID number of this particular widget. You can create many different widgets
as long as each ID is unique regardless of widget type. For static_value the ID needs to be the same
ID as the static box you want to change.
83
3184-J Airway Avenue, Costa Mesa, CA 92626
(949) 248-2333
The [x] and [y] values designate the location of the widget on the screen as the XY coordinate of the
upper left corner.
The [width] and [height] values designate the width and height of the widget in pixels.
The [option], designates the mostly the alignments of the STATIC widget. Redraw clears the
background of the assigned area then rewrites the text.
Option choices: 1=left, 2=disabled, 3=right, 4=center, 5=left framed, 6=disabled framed, 7=right
framed, 8=center framed, 9=redraw
The [theme] is the ID of the theme you want to use.
The [stringID] designates the ID number of the text string that you’d like displayed.
84
3184-J Airway Avenue, Costa Mesa, CA 92626
(949) 248-2333
10 Procedural Commands
While we choose syntax similar to Basic by Dartmouth and we would like to acknowledge their work
EarthSEMPL is not and will not become a full compatible version of that Basic. There is no perfect
programming language. EarthSEMPL Language (Simple Embedded Macro Programming Language)
is a procedural language. Procedural languages change the state or memory of the machine by a
sequence of statements. Users who are familiar with the BASIC language should have no trouble
learning EarthSEMPL quickly. Because line numbering consumes considerable resources, line
numbering was not incorporated or used. Functionally was replaced with labels for jumps and
procedures to encourage easier and more flexible design.
Labels must be in the left most position followed by :. Labels are case insensitive.
Label: laBel: and LABEL: are all the same label.
When providing the label in a statement the : is not used. "GOTO label"
A procedural language requires variables to be valuable so we added variables to EarthSEMPL V2.
Note: Any macros written with procedural commands requires it to be RUN instead of PLAY.
“RUN macro” will RUN a macro.ezm. All the previous commands used with PLAY work the same
under RUN but also can be used with additional functionality.
10.1 LET
LET: assigns a value (which may be a constant or the result of an expression) to a variable. Let is also
optional.
NOTE: variables are the letters A to Z, and are case insensitive. Variables are 16 bit signed numbers,
and can range from 32767 to -32768
Variables can also be strings. A string is indicated by following the variable name with a $. Therefore
A$ is the first string variable.
Let j = 123 Assigns the value of 123 to the variable j
let k = j – 1 Assigns the value of j – 1 to the variable k
Let H$ = "hello world"
K$=A$+C$
Program flow control
10.2 IF
IF ... THEN ... ELSE … ELSEIF … ENDIF
is used to perform comparisons or make decisions. THEN is used only on single line commands.
IF 5 > 4 THEN PRINT "TRUE"
85
3184-J Airway Avenue, Costa Mesa, CA 92626
(949) 248-2333
in this case the complete if construct starts and ends on a single line. THEN is used and ELSE,
ELSEIF and ENDIF are not available.
INPUT “Input Grade”,G
IF G > 50
PRINT "Your grade is “,G,“ you passed"
ELSE 'else is optional
PRINT "Your grade is “,G,“ you failed”
ENDIF
The operators < (less than), > (greater than), <=(less than or equal to), >=(greater than or equal to), =
(equals), <> (not equal to) are accepted here.
The variable G represents the grade on a test, if the grade is greater than 50, “you passed” will print,
while if the grade is 50 or less, “you failed” will be printed
IF t < 70
PRINT "It is pretty nice."
ENDIF
Here the variable t represents the temperature. If the temperature is less than 70, the following
statement is executed, if 70 or more the program starts executing at the first statement after the ENDIF
statement.
10.3 FOR
FOR ... TO ... {STEP} ... NEXT: Loop a section of code a given number of times. A variable that acts
as a counter is available within the loop.
This loop can be a simple one. The following example prints the numbers 1 to 10.
FOR i = 1 to 10
PRINT "i = ",i
NEXT
The output =
i = 1
i = 2
i = 3
i = 4
i = 5
i = 6
i = 7
i = 8
i = 9
i = 10
86
3184-J Airway Avenue, Costa Mesa, CA 92626
(949) 248-2333
Here, NEXT increments the variable i, and then goes back to the beginning of the loop. When i = 10,
the program prints i = 10, and exits (goes to the NEXT statement after “NEXT”)
Another example: This loop prints the odd numbers numbers 1,3,5,7,9
FOR i = 1 TO 10 STEP 2
PRINT "i = ",i
NEXT
The output =
i = 1
i = 3
i = 5
i = 7
i = 9
Another example: This loop prints the odd numbers going backwards: 11,9,7,5,3,1
FOR i = 11 TO 1 STEP -2
PRINT "i = ",i
NEXT
i
i
i
i
i
i
=
=
=
=
=
=
11
9
7
5
3
1
Loops can be nested, which means that there can be a loop within a loop. For each complete iteration
of the inner loop, the outer loop executes one time.
FOR i = 1 TO 2
FOR j = 1 TO 3
PRINT "i = ",i
PRINT "j = ",j
NEXT
NEXT
This is the output of this loop:
i = 1
j = 1
i = 1
j = 2
i = 1
j = 3 End of inner loop, i increments from 1 to 2
87
3184-J Airway Avenue, Costa Mesa, CA 92626
(949) 248-2333
i
j
i
j
i
j
i
j
i
j
i
j
=
=
=
=
=
=
=
=
=
=
=
=
2
1
2
2
2
3 End of inner loop, i increments from 2 to 3
3
1
3
2
3
3
10.4 WHILE
WHILE ... WEND repeats a section of code while the specified condition is true. The condition is
evaluated before each iteration of the loop. Unlike the FOR loop, which automatically
increments/decrements the loop variable, with the WHILE/WEND loop, the loop variable must be
explicitly calculated to exit the loop.
Note : WHILE/WEND may not execute the loop if the condition is false.
REM To generate an array of green gradient colors, from color 16 to color 78
REM set red and blue to zero, calculate the green values
LET i = 16
LET r = 0
LET b = 0
LET g = 4
WHILE i < 79
colorid i r g b
LET g = g + 4
LET i = i + 1
WEND
this same loop can also be implemented as
LET r = 0
LET g = 4
LET b = 0
LET i = 16
10.5 REPEAT
REPEAT ... UNTIL: repeats a section of code while the specified condition is true. The condition is
evaluated after each iteration of the loop (UNTIL).
Note: REPEAT/UNTIL will always execute at least once.
REPEAT
88
3184-J Airway Avenue, Costa Mesa, CA 92626
(949) 248-2333
colorid i r g b
LET g = g + 4
LET i = i + 1
UNTIL i = 78
10.6 GOTO
GOTO: jumps to a labeled line in the program. Good programming practice dictates that GOTO’s be
kept to a minimum. “All programs” can be written using some combination of the three “structured
programming” constructs:
1. Executing one subprogram, and then another subprogram (sequence).
2. Executing one of two subprograms according to the value of a boolean variable (selection),
such as an IF statement.
3. Executing a subprogram until a boolean variable is true/false/zero (repetition), such as a
REPEAT...UNTIL loop.
10.7 GOSUB
GOSUB: Causes the program to temporarily jump to a labeled line, returning to the following line after
executing the subroutine (RETURN). Good programming practice looks to decompose a larger
program into a series of smaller programs, called subroutines. Ideally, these subroutines are re-usable
from one program to another with labels that describe there function.
See example after the RETURN command
10.8 RETURN
RETURN Command. This is used to implement a return from subroutines.
This example covers both GOSUB and RETURN. In the following, “GOSUB add” is a calling
statement and “add:” is a subroutine. When “GOSUB add” is executed, the program jumps to the
subroutine add:, where x & y are added. The program then returns to the next statement after the
original calling statement, which is yet another calling statement “GOSUB multiply”. After the
subroutine multiply is executed, the program returns to the print statement, which prints the sum and
product of x & y
(NOTE ~ the colon : is needed on the label where the subroutine is defined. The calling statement does
not use the colon),
GOSUB add
GOSUB multiply
PRINT "sum ="; s, ", product ="; p
END
add:
LET s = x + y
89
3184-J Airway Avenue, Costa Mesa, CA 92626
(949) 248-2333
RETURN
multiply:
LET p = x*y
RETURN
10.9 ON
ON ... GOTO/GOSUB: chooses where to jump based on the specified input.
1 is first label. 0 or less than 0 is an error.
LET A=3
ON A GOTO BEGINNING MIDDLE FINISH
END
BEGINNING:
REM put the code for A=1 here
END
MIDDLE:
REM put the code for A=2 here
END
FINISH:
REM put the code for A=3 here
END
REM in this example there are only 3 labels provided. if A is less than 1 or greater than 3 an error will
be generated, indicating no label is available. The number of labels is limited to the space on one line.
10.10 PRINT or CPRINT
PRINT expression [[,;]expression] ...
PRINT outputs text to the LCD screen. These statements can be for normal program output, or they
can be used during debugging to print out internal variables of interest.
CPRINT is the same as PRINT however it print to the console.
PRINT statements can be formatted in order to both print both a text string and/or a label.
A debugging PRINT statement could print out the variable “x” as (x=12345)
PRINT “The variable x = “; x
'which would print as
90
3184-J Airway Avenue, Costa Mesa, CA 92626
(949) 248-2333
The variable x = 12345
Multiple expressions if used, must be separated by either a:
•
Comma (,) which will output a tab character.
•
Semicolon (;) which will not output anything. It is only used to separate expressions.
A semicolon (;) at the end of the expression list will suppress the automatic output of a carriage return
(CR) and newline (LF) at the end of a print statement. PRINT alone can be used to move to the next
line.
A “compound” print statement could print multiple text and/or variables, as: (s=99, p=2420)
PRINT "sum ="; s, ", product ="; p
which would print as
sum =99 , product =2420
To define and print an indexed string, use the following syntax
STRING 2="Printing string”
PRINT C$
OR
LET C$="Printing string”
PRINT C$
Printing string
PRINT also has a justification option to avoid the user from doing complicated font size math.
By using a justification option at the end of a PRINT statement the user can avoid complications.
EXAMPLE:
XY CC
A$=”Hello World”
PRINT A$ CC
'this positions the cursor to the center of the screen
'this assigns A$ with a nice message
'print A$ to the screen and use the center of the message
The justification option are:
LT
CT
RT
'Left top
'Center top
'Right top
91
3184-J Airway Avenue, Costa Mesa, CA 92626
(949) 248-2333
LC
CC
RC
LB
CB
RB
Left center
Center center
Right center
Left bottom
Center bottom
Right bottom
Note that there are 2 different aspects of justification.
1)
Relative to the screen.
“XY CC” centers the cursor vertically and horizontally
2)
Relative to the message.
“PRINT A$ CC” centers the message vertically and horizontally relatively to the previous
position and prints the message. In this case the message is in the exact center of the screen.
10.11 INPUT
INPUT: asks the user to enter the value of a variable. The statement may include a prompt message.
The following asks the user a question, which is displayed on the screen. The number the user types in,
is assigned to the variable following the question, which can be a part of an internal computation.
INPUT "What is your Height, in inches?", i
INPUT "What is your weight?", w
10.12 REM
REM: holds a programmer's comment; often used to give a title to the program and to help identify the
purpose of a given section of code. The REM statement must be aligned at the first column. The
program will ignore anything on comment line.
REM This macro specifically tests...
REM
REM the colorid and color commands
REM the xyid and xy commands
10.13 DATA
DATA constant[,constant]...
Stores numerical and (string ?) values to be recalled by READ. String constants do not need to be
quoted unless they contain significant spaces, the comma or a keyword (such as THEN, WHILE, etc).
Numerical constants could be expressions such as 5 * 60. See also RESTORE and READ (for
example).
92
3184-J Airway Avenue, Costa Mesa, CA 92626
(949) 248-2333
10.14 READ
READ variable[, variable]...
Reads values from DATA statements and assigns the values read to the variables. The variable types
must match the data type in the DATA statements as they are read. See also RESTORE and DATA.
Example: computes and prints the numbers 0 to 15 using different colors (in data statement), in a
rectangular array
DATA 3,0,0,0, 3,3,0,3, 0,3,0,0, 3,3,0,3
LET z = 0
FOR y = 40 TO 88 STEP 48
FOR x = 22 TO 358 STEP 48
READ w
COLOR w
XY x y
PRINT z
LET z = z + 1
NEXT
NEXT
10.15 RESTORE
RESTORE Resets the line and position counters for DATA and READ statements to the top of the
program file.
10.16 Variables
There are two types of variables: Numeric integer variables and string variables.
Integer variables are the letters A to Z, case insensitive and are stored as 16 bit signed numbers and
can range from 32767 to -32768. They allow for the storage and manipulation of integer numbers
which can be used to set values of widgets, setting and retrieving values for input and output functions,
counters in for next loops and for integer math in expressions.
String variables are only used as an index into an array of text strings to print on the LCD screen and
to the terminal console. Here, 0, 1, and 2 are indices and can be used in a widget or a print statement.
The two ”\n” (“new line”) separators shown below causes the string to print on 3 lines
STRING 1 "RPM"
STRING 34 "Waiting"
STRING 30 "Option 3\n= Draw\nRing"
STRING 2 "Printing string”
93
3184-J Airway Avenue, Costa Mesa, CA 92626
(949) 248-2333
A$ is the same string as string 0. B$ is the same string as string 1. This continues for A$-Z$.
Note: Variables are always global.
10.17 Expressions
Expressions are combinations of variables, along with the 4 arithmetic operands, add (+), subtract (-),
multiply (*), and divide (/). They follow the usual rules of precedence , i.e. multiply and divide are
evaluated before addition and subtraction, e.g. if A = 11, B = 22, C = 33, D = 44, then
A*B + C*D = 1694, and is computed as A*B (242), added to C*D (1452)
Similarly, if A = 1111, B = 22, C = 3333, D = 44,
A/B + C/D = 50 + 75 = 125 (integer math, the results are truncated to full integers)
A*B/C*D or A + B - C + D can be evaluated in any order
In developing arithmetic expressions, one must be mindful of the limitations of 16 bit math (32767 to
-32768). For example, when dividing 13 by 23, using integer math, the results will be zero. But by
scaling, you can find out what the decimal digits are. So 13000/23 = 565, which means that 13/23 =
0.565 (pre-multiplying by 1000 gives 3 digits of accuracy, while pre-multiplying by 10,000 gives 4
digits of accuracy ~ assuming no overflow occurs. Overflow means exceeding the dynamic range of
32767 to -32768)
10.18 Added Fonts
Character module fonts
sans20 and sans24
10.19 Restrictions of EarthSEMPL V2
100 labels upto 32 characters
100 data entrys (for the DATA statement)
FOR loops can be upto 5 at a time
GOSUB can be 10 deep
REPEAT and WHILE can not be nested
10.20 Strings and stuff
hex values use &h as the prefix &hFE
strings a$-z$
string commands
LEFT$ 'returns the left number of chars from string
94
3184-J Airway Avenue, Costa Mesa, CA 92626
(949) 248-2333
LET a$=”EarthLCD”
LET b$=left$(a$,5) ‘b$ will be “Earth”
RIGHT$ 'returns the right number of chars from string
LET a$=”EarthLCD”
LET b$=right$(a$,5) ‘b$ will be the “LCD”
MID$ returns the middle chars from string
LET a$=”EarthLCD”
LET b$=mid$(a$,2,5) ‘b$ will be “rthLC”
CHAR$ will return a string of ascii number
LET a$=char$(65) ‘ a$ will have a letter a
LEN will return the length of a string
LET a$="Earth Lcd ezLCD-301"
LET a=len(a$) ‘ a will be 19
VAL will return the value of a string
LET a$=”12345”
LET b=val(a$) ‘ b will equal 12345
ASC will return the ascii value of a string
LET a$=”a”
LET b=asc(a$) ‘ b will equal 97
SHIFTR binary shift of a varable to the right
LET a=&hAA
LET b=shiftr(a,1) ‘ b will equal &h55
SHIFTL binary shift of varable to the left
LET a=&h55
LET b=shiftr(a,1) ‘ b will equal &hAA
BUTTON 14 300 0 40 240 1 0 10 2 0
LET a=WSTATUS(14) ‘ a will have status of button pressed ect ..
SLIDER 13 350 0 50 240 7 100 5 50 1
LET a=WSTATUS(13) ‘a will have slider value
CTOF(13) converts celsius to fahrenheit
FTOC(13) converts fahrenheit to celsius
DEBUG display debug information
V - command will display all variables and strings in Ascii and hex to display individual
string call DEBUG t$
95
3184-J Airway Avenue, Costa Mesa, CA 92626
(949) 248-2333
F - command will display file table. any open files or ports will be displayed
OPEN open files or ports from read/write supported ports SERIAL1 SERIAL2 SERIAL3 CDC I2C
SPI
OPEN "SERIAL2,230400,9N1,S100,485" as #1
‘ will open serial 2 230400 baud 9 bit rs485 slave address 100 as file #1 to write
to Files or ports used with open use
PRINT #1,a$ ‘to send a$ to SERIAL2
INPUT #1,a$ ‘to get data from SERIAL2
CLOSE closes files opened with the open command
LIGHT brightness,{delay},{sleep}
will set back light level 0-100, backlight timeout and sleep brightness. light 100,5,50 ‘will set back
light to 100 and have a 5 minute timeout. After timeout it will change to 50, any touch or serial activity
will turn it back on
BEEP {frequency}, {duration}
Will generate a simple tone of the frequency and duration provided. If frequency and duration is not
provided it will default to 4000, 1000. Before using the beeper it must be configured to match the
hardware. For the expander board the beeper is dedicated on IO 7. For the EDK the beeper can be
connected to various IO pins but we recommend IO 7.
CFGIO 7,beeper
BEEP 4000,2000
TOUCHX
returns the last touchscreen X position
TOUCHY
returns the last touchscreen Y position
TOUCHS
returns the last touchscreen status
0 = not currently pressed
3 = pressed
4 = released
TOUCHZONE id x y width height options
Creates hot zones on the screen similar to buttons but the user provides the graphics. There is no builtin animation as with a button. Any visual effects would be user generated. Pressing a touchzone will
generate a TZP{id} for press and TZR{id} for release. Moving off the touchzone before releasing will
generate TZC{id}.
Option 0=remove,1=draw unpressed,2=disabled.
96
3184-J Airway Avenue, Costa Mesa, CA 92626
(949) 248-2333
Sample code
strings test
CFGIO 7,beeper
CLS white
COLOR black
LET a=1024
LET b=4096
LET a$="12345"
LET b$="abcde"
LET d$=left$(b$,1)
LET e$=right$(a$,1)
LET f$=mid$(c$,5,4)
LET g$=chr$(75)
PRINT
PRINT "a$ = 12345"
LET a=val(a$)
PRINT "a$ as a Variable is ";a
PRINT "b$ = abcdef"
LET b=asc(b$)
PRINT "b = the first ascii char of b$ is ";b
LET g$=chr$(b)
PRINT "g$ = chr$(b) and g$ = ";g$
LET c$="Earth Lcd ezLCD-301"
PRINT c$
LET l=len(c$)
PRINT
PRINT "c$= ";c$
PRINT "The Length of c$ is ";l
LET k=5
LET x$=left$(c$,k)
LET z$=right$(c$,k)
LET w$=mid$(c$,5,10)
PRINT "the left ";k;" number of chars of c$ is ";x$
PRINT "the right ";k;" number of chars of c$ is ";z$
CPRINT "the 10 chars from 5 in are ";w$
LET h=74
LET h$=hex$(h)
CPRINTt "h=";h;" h$=hex$(h) and h$ = ";h$
BEEP
97
3184-J Airway Avenue, Costa Mesa, CA 92626
(949) 248-2333
open test
OPEN "serial2,230400,9N1,S100,485" as #1
OPEN "serial3,230400,n81,m,485" as #2
OPEN "serial1,2400,n81" as #3
OPEN "CDC" as #5
OPEN "I2C" as #4
OPEN "SPI,1000" as #10
OPEN "PIPE,cdc,serial1"
LET a$="logger.txt"
OPEN a$ for output as #6
LET b$="ken.tst"
OPEN b$ for append as #8
OPEN "test.txt" for input as #7
PRINT #6,"logger.txt -> test file"
LET c$="this is a long text string printed to a file"
LET k=&h55
LET a=10
LET b=5150
LET c=4321
PRINT #8,c$,a,b,c,(a+b)-c
LET t=&h90
LET l=10
PRINT #4,&h90,0
INPUT #4,t$
DEBUG t$
'PRINT &haa
'PRINT hex$(k)
LET m=shiftr(k,1)
LET h$=hex$(m)
PRINT h$
LET m=shiftl(k,1)
LET h$=hex$(m)
PRINT h$
DEBUG t$
LET t$="test"
CLOSE #4
LET g=1
LET f=10
CLOSE #7
LET h=500
CLOSE #8
PRINT g,f,h
CLOSE #6
OPEN a$ for input as #6
INPUT #6,a$
PRINT a$
98
3184-J Airway Avenue, Costa Mesa, CA 92626
(949) 248-2333
CLOSE #6
INPUT " enter string -> ",b$
PRINT b$
PRINT "done "
99
3184-J Airway Avenue, Costa Mesa, CA 92626
(949) 248-2333
touch zone test
cfgio 7,beeper
cls
b$="ezLCD-301"
picture pad.gif
touchzone 1 15 12 42 42 1
touchzone 2 15 75 42 42 1
touchzone 3 15 129 42 42 1
touchzone 4 15 183 42 42 1
touchzone 5 68 12 42 42 1
touchzone 6 68 75 42 42 1
touchzone 7 68 129 42 42 1
touchzone 8 68 183 42 42 1
touchzone 9 118 12 42 42 1
touchzone 12 118 75 42 42 1
touchzone 10 118 129 42 42 1
touchzone 11 118 183 42 42 1
touchzone 15 171 12 73 42 1
touchzone 16 171 75 73 42 1
touchzone 17 171 129 73 42 1
touchzone 18 171 183 73 42 1
slider 13 350 0 50 240 7 100 5 50 1
button 14 300 0 40 240 1 0 10 2 0
light 50
lab1:
for t=1 to 18
let a=widget(t)
if a=1 then beep l,100
if t=13 then gosub setlight
next
goto lab1
setlight:
let l=light
if a=l then return
light a
let a=l
return
100
3184-J Airway Avenue, Costa Mesa, CA 92626
(949) 248-2333
11 Flash Drive File Structure
The ezLCD-3xx USB flash drive appears as a removable storage device on the Host computer. In
Windows, click on Start, then Computer and your ezLCD-3xx USB flash drive will appear. By double
clicking on it you may access the ezLCD-3xx memory content which includes two directories:
EZSYS - system configuration default files (do not alter)
EZUSER - storage of user’s custom fonts, images and macros
Note: It is recommended to make a copy of the EZSYS directory on your PC hard drive in case of
accidental alteration of that directory on your flash drive. The EZSYS default directory is also
available for download on the EarthLCD website.
EZSYS\FONTS - default font files (.ezf)
EZSYS\IMAGES - default image files (.gif, .jpg, .bmp)
EZSYS\MACRO - demonstration EarthSEMPL macro files (.ezm)
EZSYS\HELP – default help files (.ezh)
EZUSER\FONTS - storage of user-added fonts
EZUSER\IMAGES - storage of user-added images
EZUSER\MACRO - storage of user-added EarthSEMPL macro files
101
3184-J Airway Avenue, Costa Mesa, CA 92626
(949) 248-2333
12 Understanding LCD Types
There are 3 types of LCD construction.
1) Reflective (ezLCD302)
Good for outdoor reading or high ambient light. Not good indoors or low light.
2) Transflective (ezLCD313)
Good indoors and outdoors.
3) Transmissive (ezLCD301,303,304)
Good indoors. Not good outdoors or high ambient light.
102
3184-J Airway Avenue, Costa Mesa, CA 92626
(949) 248-2333
13 Start Something with your ezLCD-3xx
The best way to get familiar with a new computer program or product is to look at other people’s
examples. Look at the included macros in the \EZSYS\MACROS directory. Study them and run them
to see what they do. Copy them to the \EZUSER\MACROS directory and then rename and modify
them. We went through extra effort to document them as examples to learn from.
The possibilities and applications for the ezLCD-3xx are well beyond the scope of this manual.
However, in the coming months the staff, consultants, customers and maybe even you will develop
application notes that will be available on the product web page at www.earthlcd.com/ezLCD-3xx.
File updates, firmware and examples will also be provided there, so please bookmark it and check back
often.
103
3184-J Airway Avenue, Costa Mesa, CA 92626
(949) 248-2333
14 Warnings, Errata and Gotchas
• Always eject the flash drive before unplugging your ezLCD from your PC. Also eject after
copying or modifying any flash drive files from your PC.
• Close COM port before closing your terminal program.
• Never open Termie from the flash drive.
• As with any new technology product there will be bugs or opportunities for improvement: If
you find something that you think should be changed, fixed or enhanced, send it to
[email protected] and it will be addressed ASAP.
• Do not play a macro of the same name within itself.
• When modifying the startup file, copy it from the SYS/MACRO directory to the
USER/MACRO directory and name it something like TEST.ezm. Modify this file as you want.
Then run the macro with PLAY TEST. After your changes are confirmed working like you want,
then rename the macro to STARTUP.ezm. Debugging a live startup file can cause you serious
grief if you modify something that locks you out of the comm port or flash drive or causes a
crash. You may no longer get the chance to repair the problem in the startup. Updating
firmware can not repair a bad startup file.
In firmware 1.45 and later a new feature has been added to allow you to bypass the startup
execution. Press and hold the touch screen during reset or power up.
104
3184-J Airway Avenue, Costa Mesa, CA 92626
(949) 248-2333
15 Gratis (a note from Randy Schafer)
There are more than a few people who put up with my continuous banter about making this product
right: Mark Eck, our VP of Sales and Marketing who’s never short of new ideas. Our graphics artist
and Maker enthusiast James Harrell. Rich Obermeyer, our renaissance engineer and VP of Engineering
who left the ASIC world to come to Earth and make one more great product because I guaranteed him
it would be fun. Also my wife Kate and Rich’s wife Phyllis are to be commended for having patience
with their geek husbands’ absence while this product was developed. To all the employees, consultants
and interns that help wring out the bugs on the prototypes, thank you! And last but not least, the
customers of the last two generations of ezLCD who always held us accountable and inspired us to
increase the passion in our work and make ezLCD better and ez-ER.
Enjoy your new ezLCD-3xx!
105
3184-J Airway Avenue, Costa Mesa, CA 92626
(949) 248-2333
Appendix A: ezLCD-3xx Connector Pinout
The interface connector is shown as P1 for the ezLCD301, 302. It is P2 on the ezLCD303, 304 and
313 that use a convertor board to connect the LCD to the CPU board.
Figure 25: Connector
Note: Connector is DF11-16DP-2V. Mating Connector DF11-16DS-2C or DF11-16DS-2DSA
See the hirose data sheet for options www.hirose.co.jp/cataloge_hp/e54305002.pdf
106
3184-J Airway Avenue, Costa Mesa, CA 92626
(949) 248-2333
Appendix B: ezLCD-3xx Model Descriptions and Drawings
15.1 ezLCD-3xx Electrical
Item
Symbol
Min.
Typ.
Max.
Unit
Vcc
3
3.3
3.6
V
USBVcc
4.5
5
6
V
MCLR pulse width (low)
Tmcl
2
Power-On Reset Delay
Tpor
1
I/O High Z from MCLR
Tioz
Input High Voltage
Vih
0.25Vcc+
0.8
Input Low Voltage
Vil
Input Leakage Current
Power Supply
uS
10
uS
100
nS
-
5.5
V
0
-
0.15Vcc
V
Iil
-
-
+/-1
uA
Output Low Voltage 25c (6mA)
Vol
0
0.4
V
Output High Voltage 25c (3mA)
Voh
3
V
Output High Voltage 25c (6mA)
Voh
2.4
V
3.3V/25c
0
Width/Height
56.4
Ivcc
55
Luminance (Transmissive)
(Light=100)
156
ezLCD-302 (active area)
Width/Height
57.6
Ivcc
115
150
Luminance (Reflective)
(Light=100)
3.3
5
ezLCD-303 (active area)
Width/Height
70.08
Ivcc
55
130
Luminance (Transmissive)
(Light=100)
280
350
ezLCD-304 (active area)
Width/Height
95.04
Ivcc
65
180
Luminance (Transmissive)
(Light=100)
350
400
ezLCD-313 (active area)
Width/Height
71.52
Ivcc
55
130
(Light=100)
60
80
Display Characteristics
ezLCD-301 (active area)
Current Consumption
Current Consumption
Current Consumption
Current Consumption
Current Consumption
Luminance (Transflective)
5
75
100
Light
33.84
mm
135
190
mA
182
-
nits
38.4
mm
160
mA
nits
52.56
mm
180
mA
nits
53.86
mm
250
mA
nits
53.64
mm
180
mA
Nits
1 nit = 1 cd/m2
107
3184-J Airway Avenue, Costa Mesa, CA 92626
(949) 248-2333
The first 7 I/O pins have an I/O protection circuit to prevent display damage from external
sources. I/O 1 and I/O 2 have internal 4.7k pullup resistors for potential I2C operation. I/O
8 and 9 do not have any protection circuitry other than built-in to the GPU and must be used
with care.
Figure 26: I/O Protection Circuit
The ezLCD-3xx can also be driven from the USB power. Each display has a linear
regulator for this. It can also be used to connect to a 5Volt power source. The schematic of
the regulator circuit is shown below. Note: Component location designators will vary by
product.
Figure 27: USB regulator Early Rev Boards
108
3184-J Airway Avenue, Costa Mesa, CA 92626
(949) 248-2333
Figure 28: USB Regulator ezLCD-301 Rev D
109
3184-J Airway Avenue, Costa Mesa, CA 92626
(949) 248-2333
15.2 ezLCD-3xx Mechanical
15.2.1 ezLCD-301
Drawing 1: 400 x 240 2.6” 64k color transmissive TFT with resistive touchscreen.
110
3184-J Airway Avenue, Costa Mesa, CA 92626
(949) 248-2333
15.2.2 ezLCD-302
Drawing 2: 240 x 160 (4:3) 4096 reflective color TFT (sunlight readable - NO touchscreen)
111
3184-J Airway Avenue, Costa Mesa, CA 92626
(949) 248-2333
15.2.3 ezLCD-303
Drawing 3: 320 x 240 64k color transmissive TFT with resistive touchscreen.
112
3184-J Airway Avenue, Costa Mesa, CA 92626
(949) 248-2333
15.2.4 ezLCD-304 No Bezel
Drawing 4: 480 x 272 Wide 64k color transmissive TFT with resistive touchscreen.
113
3184-J Airway Avenue, Costa Mesa, CA 92626
(949) 248-2333
15.2.5 ezLCD-304 With Bezel
Drawing 5: 480 x 272 Wide 64k color transmissive TFT with resistive touchscreen.
114
3184-J Airway Avenue, Costa Mesa, CA 92626
(949) 248-2333
15.2.6 ezLCD-313
Drawing 6: 320 x 240 64k color transflective TFT with resistive touchscreen.
115
3184-J Airway Avenue, Costa Mesa, CA 92626
(949) 248-2333
Appendix C: EarthSEMPL Colors
116
3184-J Airway Avenue, Costa Mesa, CA 92626
(949) 248-2333
16 Appendix D: EarthSEMPL Command Reference Guide
A quick reference guide of the EarthSEMPL command set that can run on the ezLCD-3xx are listed
below.
Input values can be an integer between -32768 and 32767. Strings can be up to 64 characters.
Examples and descriptions are provided for each command in the table. Note that this command list is
updated from time to time and you should check the ezLCD-3xx product page at EarthLCD.com for the
latest documentation.
TABLE 1
COMMAND
SHORT
FORM
SYNTAX
EXAMPLE
ARC
21
ARC [radius][start][end][f ill]
ARC 50 100 120 1
BOX
19
BOX [w idth][height][f ill]
BOX 50 50 F
calibrate
calibrate
CD [directory]
CD "\EZUSER\MA CROS"
Change to directory
CFGIO 1 0
Conf igure GPIO as input (0) or
output (1), serial, SPI, I2C
CALIBRATE
CD
CFGIO
CHDIR
52
37
CFGIO [GPIO][type]
DESCRIPTION & OPTIONS
Draw ARC w ith Radius, Start
angle and End angle. Fill=1 or F to
f ill arc. Angle of 0 is on the right.
Place a box f rom current XY w ith
specif ied w idth and height.
Fill=1or F to f ill box or string
starting w ith F. Box must be > 1
pixel w ide
This is used to make sure your
touches w ill be precise.
37
CFGIO 1 IN
Can use IN f or direction
37
CFGIO 4 OUT
Can use OUT f or direction
52
CHDIR [directory]
CHDIR "\EZUSER\MACROS"
Change to directory
Draw circle at current XY w ith
radius. Fill=1 or F to f ill circle.
ClipArea to protect the
surrounding area f rom change.
CIRCLE
20
CIRCLE [radius][f ill]
CIRCLE 75 1
CLIPAREA
47
CLIPAREA [left][top][right][bottom]
CLIPAREA 50 30 200 180
CLIPENABLE
46
CLIPENABLE [enable]
CLIPENABLE ON
CLS
2
CLS [color]
CLS RED
CMD
62
CMD [interface]
CMD SERIAL2
6
COLOR [ID]
COLOR 0
6
COLOR
COLOR
Return current color
7
COLORID [ID][R][G][B]
COLORID 1 45 56 64
[R][G][B] can be values of 0-255
7
COLORID [ID]
COLORID 1
Return color values of COLORID
index
COMMENT
50
COMMENT
COMMENT Anything
Same as remark
COPY
56
COPY [name1][name2]
COPY "Droid.bin" "Droid.ezm"
Copy f ile name1 to f ile name2
CWD
51
CWD
CWD
Display current w orking directory
COLOR
COLORID
Turn on clip enable area
Clear screen to COLORID[color].
This command also clears
w idgets.
Select command to interface.
CDC, USB, SERIAL1, SERIAL2,
SERIAL3
Set current color to
COLORID[index] (0-199)
117
3184-J Airway Avenue, Costa Mesa, CA 92626
(949) 248-2333
DEL
58
DEL [name]
DEL "Droid.ezm"
Delete f ile name
DIR
55
DIR [mask]
DIR *.ezm"
Returns directory using mask
ECHO [mode]
ECHO of f
Sets mode 0 = OFF or 1 = ON
ECHO
Delete f ile name. Must be in the
directory the f ile is located in.
Use internal f ont (f actory)
Currently 0 and 2 = def ault
medium f ont
ERASE
58
ERASE [name]
ERASE "Droid.ezm"
FONT
10
FONT [f ont]
FONT 0
10
FONT [f ont]
FONT "med_36"
Use programmable f ont (ezf f ile)
from f lash drive
12
FONTO [orientation]
FONTO 0
Set f ont orientation 0=horizontal,
1=vertical
12
FONTO
FONTO
Return f ont orientation
FONTO
FONTW
11
FONTW [ID][f ont]
FORMAT
60
FORMAT [passw ord]
[volume_label]
HELP
IO
Use programmable w idget f ont
FONTW 0 “med_36”
(ezf file) f rom flash drive f or each
of 16 Themes.
Formats by removing f iles in f lash
FORMA T "ezLCD" "EarthRules" drive. Type the command exactly
as it is show n in example.
Prints command's syntax and
HELP ameter
some inf ormation about it to the
terminal.
HELP [f ilename]
IO [GPIO][DATA]
38
IO [GPIO][DATA]
5
LIGHT [brightness]
LIGHT 87
5
LIGHT
LIGHT
LINE
18
LINE [x][y]
LINE 75 70
LINETYPE
14
LINETYPE [type]
LINETYPE 2
14
LINETY PE
LINETYPE
Returns line type
13
LINEWIDTH [pixel]
LINEWIDTH 1
Sets line w idth to pixel w idth. 1 or
3 pixels w ide
13
LINEWIDTH
LINEWIDTH
Returns line w idth
LIGHT
LINEWIDTH
IO 1 0
IO w rite GPIO (1-9) w ith DATA.
Write data to peripheral if
conf igured.
IO READ GPIO. Return DATA f rom
peripheral if conf igured.
38
Backlight level to brightness w hen
brightness is 0 to 100%. Default is
75%
Return current backlight level
setting
Place a line f rom current XY to
X,Y w ith current color and
current w idth and current type
Sets line type to solid, dot or
dash. 0=solid, number increases
spacing betw een dots
LOOP
34
LOOP [ON]/[OFF] or [0]/[1]
LOOP ON
Crtl+C to stop loop or put LOOP
OFF in macro
MD
53
MD [directory]
MD "MAPS"
Make directory
MKDIR
53
MKDIR [directory]
MKDIR "FARMS"
Make directory
MORE
59
MORE [name]
MORE "Droid.ezm"
Sends the content of the f ile name
to the current console port
PAUSE
33
PAUSE [ms]
PAUSE 500
Delay in milliseconds
PICTURE
24
PICTURE [x][y][options][index]
PICTURE 0 0 3 1
24
PICTURE [x][y][options][f ile]
PICTURE 0 0 3 "Boats.gif "
Display PICTURE ID index on the
LCD. File can be JPG, GIF or BMP
X Y is the upper lef t corner of the
image w hen no options are
applied. Options of 1=align to
center of screen, 2=dow n scale
image to screen, 3=both.
Display PICTURE f ile on the LCD.
File can be JPG, GIF or BMP
118
3184-J Airway Avenue, Costa Mesa, CA 92626
(949) 248-2333
Draw PIE w ith Radius, Start
Angle, and End angle Angle of 0
is on the right.
PIE
22
PIE [radius][start][end]
PIE 55 120 140
PING
3
PING
PING
PLAY
31
PLAY [name]
PLAY "Droid"
PLOT
17
PLOT
PLOT
17
PLOT [x][y]
PLOT 12 44
25
PRINT [ID][alignment]
PRINT 1
25
PRINT [string][alignment]
PRINT "Hello Earth" CC
RD
58
RD [directory]
RD "FARMS"
Remove directory
RECORD
30
RECORD [name]
RECORD "Droid"
Record macro "name" to internal
f lash drive under
\EZUSER\MACROS
REM
50
REM
REM Does not matter
Remark also ' ," ,#
REN
57
REN [name1][name2]
REN "Droid.bin" "Droid.ezm"
Rename file name1 to name2
RESET
29
RESET
RESET
Reset ezLCD as if just turned on
RMDIR
54
RMDIR [directory]
RMDIR "MAPS3"
SECURITY
40
SECURITY [option][passw ord]
security Set "ezlcd123"
PRINT
security Reset "ezlcd123"
Asks LCD to send acknow ledge
w ith PONG
Play macro "name", Looks in
directory \EZUSER\MACROS first
and if not found it looks in
\EZSYS\MACROS
Place a pixel at current XY w ith
current color
Place a pixel at X Y w ith current
color
Print string in String Array pointed
to by index to the display. 9 font
justifications: LT, CT, RT, LC, CC,
RC, LB, CB, RB
Print string to the display at
current X Y. 9 font justifications:
LT, CT, RT, LC, CC, RC, LB, CB,
RB
Remove directory from current
directory
Lock the flash drive so it can not
be accessed from the PC
Set = set passw ord and locks the
flash drive. Reset = put in
passw ord to unlock. Set/Reset
must have the first letter
capitalized.
Takes a picture of the specified
SNAPSHOT 30 30 50 50 “test” area. File name must be in double
quotes.
SNAPSHOT
48
SNAPSHOT [x][y][w idth][height]
[filename]
SPEED
35
SPEED [ms]
SPEED 100
STOP
32
STOP
STOP
STRING
16
STRING [ID][string]
STRING 1 "Randy"
16
STRING [ID]
STRING 1
THRESHOLD
105
THRESHOLD [value]
THRESHOLD 256
TYPE
59
TYPE [name]
TYPE "Droid.ezm"
Sends the content of the file name
to the current console port
VERBOSE
106
VERBOSE [ON] or [OFF] or [0] or
[1]
VERBOSE ON
Sets verbose (command echo)
mode on(1) or off(0)
Delay betw een macro line
processing in milliseconds
Stops recording you macro and
closes file
Store string in the string array
using index. Index=0-61
Recall string from string array
using index
Value used for sensitivity of
touch screen.
Default is 256
119
3184-J Airway Avenue, Costa Mesa, CA 92626
(949) 248-2333
Wait for events. Options: “T” =
Touch, “!T” =No Touch, “TR” =
Touch and release, “IO[1-9]” =
Wait for 1 (choose a pin number
[1-9]), “!IO[1-9]” = Wait for 0. No
option = Touch and Release
Set draw ing cursor to location x,y
on screen. x and y are checked
to make sure they can fit on the
screen. 9 font justifications: LT,
CT, RT, LC, CC, RC, LB, CB, RB
offers convenient screen
placement options.
WAIT
102
WAIT [Option]
WAIT T
XY
15
XY [x][y]
XY 50 50
15
XY
XY
41
XYID [ID][1]
XYID 1 1
41
XYID [ID]
XYID 1
Widget
Commands
SHORT
FORM
SYNTAX
EXAMPLE
DESCRIPTION & OPTIONS
AMETER
76
AMETER [ID][x][y][w idth][height]
[options][value][min][max][theme]
[tringID]
AMETER 1 25 25 400 240 1
200 0 500 1 2
Options: 1=draw , 2=disabled,
3=ring, 4=accuracy.
AMETER_ COLOR
78
AMETER_COLOR [ID][color1]
[ color2][color3][color4 ][color5]
[color6]
AMETER_COLOR 1 4 5 6 blue
green yellow
Change the colors used for the 6
analog meter quadrants.
AMETER_ VALUE
77
AMETER_VALUE [ID][Value]
AMETER_VALUE 1 55
Update the value of an Analog
Meter and redraw it.
BUTTON
70
BUTTON [ID][x][y][w idth][height]
[options][align][radius ][theme]
[stringID]
BUTTON 1 25 25 75 75 1 0 0 2
1
Options: 1=draw , 2=disabled,
3=pressed, 4=toggle. Align
0=centered, 1=right, 2=lef t,
3=bottom, 4=top.
CHECKBOX
71
CHECKBOX [ID][x][y][w idth]
[height][option][theme][stringID]
CHECKBOX 1 30 30 225 50 1
203
Options: 1=draw , 2= disabled,
3=checked, 4=redraw .
XYID
Return current x,y location
Save X and Y into XY array using
index
Restore X and Y f rom XY array
using index
CHOICE
89
CHOICE [string ][theme]
CHOICE “Ready to fire!” 1
Question String to display w ith
scheme and get response.
Response: 1=yes, 0=no and
-1=cancel
DIAL
80
DIAL [ID][x][y][radius][options]
[ resolution][value][max][theme]
[stringID]
DIAL 1 200 120 75 1 1 15 100
2
Options: 1=draw , 2=disable.
DMETER
74
DMETER [ID][x][y][w idth][height]
[option][value][digits][DP][theme]
DMETER 1 50 50 100 50 1 3 2 1
2
Options: 1=left,
2=disabled, 3=right, 4=center,
11=left framed,
12=disabled framed, 13=right
framed,
14=center framed, 6=redraw .
DMETER_VALUE
75
DMETER_VALUE [ID][value]
DMETER_VALUE 2 57
Update the value of a Digital Meter
and redraw it.
GROUPBOX
72
GBOX [ID][x][y][w idth][height]
[options ][theme][stringID]
GBOX 3 0 0 300 200 4 2 1
Options: 1=lef t, 2=disabled,
3=right. 4=center aligned
PROGRESS
85
PROGRESS_VALUE
86
PROGRESS [ID][x][y][w idth][height]
Options: 1=horizontal, 2=H
PROGRESS 4 0 100 399 139 3
[options][value][range][theme]
disabled, 3=vertical, 4=V disabled,
45 50 2 %
[char]
5=redraw bar.
PROGRESS_VALUE [ID][value]
PROGRESS_VALUE 1 46
Update the Value of a progress
bar and redraw it.
120
3184-J Airway Avenue, Costa Mesa, CA 92626
(949) 248-2333
RADIO BUTTON
73
RADIO [ID][x][y][w idth][height ]
[option][theme][stringID]
SLIDER
82
SLIDER [ID][x][y][w idth][height]
[options][range][resolution][value]
[theme]
STATIC
87
STATIC [ID][x][y][w idth][height]
[option][theme][stringID]
STATIC_VALUE
88
THEME
90
WSTATE
92
STATIC_VALUE [ID][string]
THEME [ID][EmbossDkColor]
[EmbossLtColor][TextColor0]
[TextColor1][TextColorDisabled]
[Color0][Color1][ColorDisabled]
[CommonBkColor][ Fontw ]
WSTATE [ID][options]
Options: 1=draw , 2=disabled,
3=checked, 4=first, 5=first and
checked.
Options: 1=draw hori, 2=hori
disabled, 3=vert, 4=vert disabled,
SLIDER 1 20 30 100 50 1 75 5
5=hori scrollbar, 6=hori scrollbar
25 1
disabled, 7=vert scrollbar, 8=vert
scrollbar disable.
Options: 1=left, 2=disabled ,
3=right , 4=center, 5=left framed,
6=disabled framed, 7=right
STATIC 1 25 25 200 75 1 2 1
f ramed, 8=center framed ,
9=redraw text.
RADIO 4 50 50 100 50 4 2 1
STATIC_VALUE 1 “Hello”
Update the text of a Static Text
Box and redraw it
THEME 0 1 2 3 4 5 6 7 9 10
Set Widget Theme Info. Note:
Fontw requires Firmw are Version
1.06 or later!
WSTATE 1 3
Options: 0 = delete, 1 = enable, 2
= disable, 3 = redraw
THE ezLCD-3xx SOFTWARE AND HARDWARE IS PROVIDED TO YOU "AS IS," AND WE MAKE NO EXPRESS OR IMPLIED WARRANTIES WHATSOEVER WITH RESPECT TO ITS
FUNCTIONALITY, OPERABILITY, OR USE, INCLUDING, WITHOUT LIMITATION, ANY IMPLIED WARRANTIES OF MERCHANTABILITY, FITNESS FOR A PARTICULAR PURPOSE, OR
INFRINGEMENT. WE EXPRESSLY DISCLAIM ANY LIABILITY WHATSOEVER FOR ANY DIRECT, INDIRECT, CONSEQUENTIAL, INCIDENTAL OR SPECIAL DAMAGES,
INCLUDING, WITHOUT LIMITATION, LOST REVENUES, LOST PROFITS, LOSSES RESULTING FROM BUSINESS INTERRUPTION OR LOSS OF DATA, REGARDLESS OF
THE FORM OF ACTION OR LEGAL THEORY UNDER WHICH THE LIABILITY MAY BE ASSERTED, EVEN IF ADVISED OF THE POSSIBILITY OR LIKELIHOOD OF SUCH
DAMAGES.
121
3184-J Airway Avenue, Costa Mesa, CA 92626
(949) 248-2333
Appendix E: Upgrading the ezLCD-3xx Firmware
A Windows PC is required to upgrade the firmware on an ezLCD-3xx. There are two parts to
upgrading the ezLCD-3xx firmware.
1) Putting the ezLCD in firmware upgrade mode.
2) Run the Firmware Loader to load the firmware from your PC to the ezLCD-3xx using the USB
port.
Before starting an upgrade be sure you have downloaded the ezLCD30x Firmware Loader and
installed it. The latest firmware can be found at www.EarthLCD.com/ezLCD-3xx.
IMPORTANT: Never use any upgrade firmware that is not designed for the display you have. Only
ezLCD-3xx firmware should be installed. Using the wrong firmware will make your unit inoperable
and leave no way to install the correct firmware.
Before upgrading you ezLCD firmware you should backup any macros you have created by copying
them from the ezLCD-3xx flash drive to your computer.
Have your ezLCD-3xx installed and running with the terminal program as shown in the ezLCD-3xx
Getting Started section of this manual.
NOTE: Once you put the ezLCD in firmware upgrade mode it cannot come out of this state until new
firmware is programmed using the provided program even if you unplug it!
Step 1. Put the ezLCD in Firmware Upgrade Mode. Type in the following command line: Upgrade
ezLCD. The command must be typed exactly and is case sensitive.
You should receive the message:
Upgrade Firmware Enabled.
Step 2. Close your terminal program.
Step 3. Unplug the ezLCD from the USB port.
Step 4. Run the ezLCD-3xx Firmware Loader program (should already be running).
Step 5. Plug the ezLCD-3xx back into USB. It will only display a dim gray screen when in upgrade
mode. The ezLCD-3xx Firmware Loader program will beep and the text box should display Device
attached.
Step 6. Click Open Hex File in the ezLCD-3xx Firmware Loader program.
Step 7. Navigate to your ezLCD-3xx firmware file and click on it (does not show file is loaded).
Step 8. Click Program/Verify in the ezLCD-3xx Firmware Loader program. The ezLCD-3xx Firmware
Loader text box should display several status messages followed by Erase/Program/Verify completed
Successfully.
122
3184-J Airway Avenue, Costa Mesa, CA 92626
(949) 248-2333
Step 9. Click Reset Device in the ezLCD-3xx Firmware Loader program. It should sign back on with
the firmware version you loaded displayed in the bottom left corner of the ezLCD-3xx splash screen.
If you get the ‘ FSINIT FAILED’ instead of the splash screen you will need to reformat the ezLCD
flash drive. Format the ezLCD, using quick format by right clicking the drive in file manager and
selecting the button "Restore Device Defaults".
Step 10. Load the new file system if you re-formatted or downloaded a new file system from the
EarthLCD website.
Step 11. Reconnect your terminal program and enjoy your firmware upgrade.
123
3184-J Airway Avenue, Costa Mesa, CA 92626
(949) 248-2333
Appendix F: Installing & Using on a Mac (OS X Lion (10.7)
The ezLCD-3xx requires OS X version 10.7 or later to run on a Mac. The good news there are no
drivers or utilities to install.
Step 1. Run the Mac Terminal program
Use spotlight or navigate in Finder to the Applications/Utilities folder and run the Terminal
application.
Step 2. Determine the ezLCD-3xx USB device name.
Plug in your ezLCD-3xx to the USB port. At the Terminal command prompt type LS /dev/tty.*
(note: /dev/tty MUST be lower case). All your tty compatible devices will list including one that starts
with ‘usbmodem’. That is your usb device name for the ezLCD-3xx. It will be different on different
computers like /dev/tty.usbmodemfa132 for example. If you see more then one USB device you can
unplug your ezLCD-3xx to see which one goes away and then plug it back in to get the device name.
Step 3. Set the terminal mode to serial port mode using the screen command (usbmodemfa132 should
be replaced with the result of Step 2):
screen /dev/tty.usbmodemfa132
Step 4. Type CLS and the ezLCD-3xx screen should clear and you can goto section 4.6 of this manual
to continue learning how to use your ezLCD-3xx.
Editing macros with TextEdit program on your Mac, You may use TextEdit that comes with your Mac
to create and modify ezLCD macro files but you need to be sure that you use text format not rich text
format (rtf). To assure this, navigate in Finder to any file ( like demo.ezm in \EZSYS\MACROS and
press Option on your keyboard and right click your mouse at the same time and choose ‘Open With’
and select TextEdit.
124
3184-J Airway Avenue, Costa Mesa, CA 92626
(949) 248-2333
Appendix G: Installing & Using with Linux.
Using your ezLCD with Linux
For this manual I will be using kubuntu version 12.04 LTS but should be about the same for
other versions .
We are going to install two different serial terminal programs one GUI Based and one text
based.
16.1 Installing CuteCom
open a terminal and type the following.
sudo apt-get install cutecom
Your terminal should look like the image below.
After installing now type
sudo cutecom
CuteCom should start and adjust the setting's to match the ones in the picture below,
the ones in red are the important ones.
125
3184-J Airway Avenue, Costa Mesa, CA 92626
(949) 248-2333
Then click Open Device and you should be good to go .
Just type your commands on the line that says input .
126
3184-J Airway Avenue, Costa Mesa, CA 92626
(949) 248-2333
16.2 Installing Minicom
open a terminal and type the following.
sudo apt-get install minicom
Your terminal should look like the image below.
Now we can setup minicom, type
sudo minicom -s
Go down to the serial port setup section and set them like this .
The important ones are Serial Device and Hardware Flow Control
Press ESC to return to main menu
127
3184-J Airway Avenue, Costa Mesa, CA 92626
(949) 248-2333
Next the Modem and Dialing screen .
The important ones are Init String and Reset String make them both blank.
Now onto Screen and keyboard
The important ones are Add Linefeed and Local Echo
After all of that at the main menu do Save Setup as dfl then exit Minicom and
restart it
sudo minicom
And you should be done now type dir to test.
If you have any questions email me [email protected]
128
3184-J Airway Avenue, Costa Mesa, CA 92626
(949) 248-2333