1
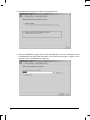
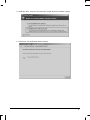
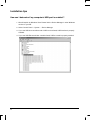
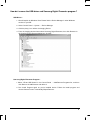
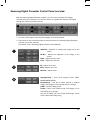
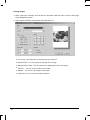
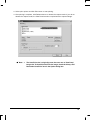
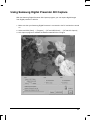
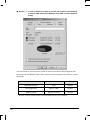
SAMSUNG TECHWIN
Samsung Digital Presenter
UF-130DX/ST
Software User’s Guide
Contents
Installing Samsung Digital Presenter Software········································ 1
System requirements ·································································································· 1
Installing software ······································································································· 2
Connecting Samsung Digital Presenter to PC······················································ 2
Installing USB driver ····························································································· 3
Installing Samsung Digital Presenter program ····················································· 6
Installation tips ············································································································ 8
How can I determine if my computer’s USB port is enabled ?······························ 8
How do I remove the USB driver and Samsung Digital Presenter program ? ······ 9
Running Samsung Digital Presenter Program ······································· 10
Samsung Digital Presenter View Panel overview ····················································· 11
Samsung Digital Presenter Control Panel overview ················································· 15
Capturing/Saving/Printing images············································································· 17
Quick Save([F2] key) ································································································ 20
Using Samsung Digital Presenter TWAIN Driver ··································· 21
Scanning Images ······································································································ 23
Keyboard Map ·········································································································· 24
Using Samsung Digital Presenter AVI Capture ····································· 25
Troubleshooting ····················································································· 29
i
Installing Samsung Digital Presenter Software
After connecting Samsung Digital Presenter with computer, you can save the image into the
computer and print it. You can control Samsung Digital Presenter on the PC.
After installing Samsung Digital Presenter program with a CD provided together with the
product, you may connect both computer and digital presenter with USB cables for use.
System requirements
To install the Samsung Digital Presenter software, your computer must have at least the
following system configuration :
y Pentium 4 1GHz or higher processor(Pentium 4 1.3GHz or higher recommended)
(Case AVI Capture : Pentium 4 2GHz or higher. Don’t run other programs, when you
capture AVI files)
y Windows 2000 or later
- List of supported windows: Windows 2000/Windows XP/Windows Vista
y RAM: 256MB or higher RAM(512MB or higher recommended)
y USB 2.0 interface connector
y Display : XGA(1024 x 768), 65536 colors or higher
- Video RAM 256MB or higher recommended
- SXGA or higher recommended
y CD-ROM drive
✔ Note : • USB 2.0 PCI Cards or USB 2.0 PCMCIA Cards are not formally supported.
• It cannot perform at regular speed when you use PCI/PCMCIA type USB
2.0 card.
1
Installing software
To install the software
1. Connect your Samsung Digital Presenter to the PC with USB cable. See the current page.
2. Install the USB driver. See page 3
3. Install the Samsung Digital Presenter control program. See page 6.
Follow the instructions below to complete the installation:
Connecting Samsung Digital Presenter to PC
1. Make sure that both the Samsung Digital Presenter and a computer are turned on.
2. Plug one end of the USB cable into the USB port on the Samsung Digital Presenter.
3. Plug the other end into the USB port on the computer.
✔ Caution : • We recommend to connect to USB port which is attached on computer
main board. (It can make troubles in extended front-side USB port or
USB hub without power depending on computers.)
You have to connect Pc to Samsung Digital Presenter using USB cable
within 4 meters.
2
Installing USB driver
1. The Add New Hardware Wizard dialog box appears. (Case of Windows Vista)
2. After selecting first option, you can watch the question about connecting Windows update
sites, and you should select the third option ‘Don’t search online’.
3
3. Click “Browse my computer for driver software(advanced)”.
4. Insert the SAMSUNG program CD into your CD-ROM drive, then put a checkmark on the
CD-ROM drives box and Include this location in the search box then type x:\ (where x is the
drive letter for the CD-ROM drive). Click Next.
4
5. Install the driver, select the Second option ‘Install this driver software anyway’.
6. Click Finish. The USB driver will be inserted.
5
Installing Samsung Digital Presenter program
1. Insert the Samsung Digital Presenter Program CD in a CD-ROM drive and the install
program will be auto-run. And then select ENGLISH.Click Next.
2. The InstallShield Wizard window opens.
3. You can select components you want to install.
4. Choose installing MPEG-4 Video Codec for compressing AVI file in UF130 AVI Capture
Program. If you do not install MPEG-4 Codec, You cannot compress AVI file. We
recommend to install codec.
6
5. After installing Samsung Digital Presenter Program, you can watch the dialog.
If you want to use AVI Capture program, follow this path.
[Start] -> [Programs] -> [UF130 USBViewer] -> [UF130 AVI Capture] and click UF130 AVI
Capture icon.
6. After the Samsung Digital Presenter software is properly installed, you can see the
Samsung Digital Presenter icon in the [Start] Menu and the desktop and Software manual
shortcut in the [Start] Menu.
7
Installation tips
How can I determine if my computer’s USB port is enabled ?
1. We will explain by Windows Vista. Please find the Device Manager in other Windows
version for yourself.
2. Select Control Panel → System → Device Manager
3. If you see USB host controllers and a USB root hub listed, USB interface is properly
enabled.
4. If you see USB Enhanced Host controller listed, USB 2.0 mode is properly enabled.
8
How do I remove the USB driver and Samsung Digital Presenter program ?
USB Driver :
1. We will explain by Windows Vista. Please find the Device Manager in other Windows
version for yourself.
2. Select Control Panel → System → Device Manager
3. Click the plus(+) icon before the Imaging Device.
4. From the Imaging devices items select Samsung Digital Presenter, then click Remove. In
the Confirm Device Removal dialog box, click OK.
Samsung Digital Presenter Program :
1 Select “UF130 USB Viewer” in the Control Panel → Add/Remove Programs list, and than
click Remove in Add/Remove and delete it.
2. Run Install Program again as you’ve installed before. Follow the install program and
choose Remove button of the Modify/Repair/Remove.
9
Running Samsung Digital Presenter Program
1. Make sure that your Samsung Digital Presenter is connected to the PC and both are
turned on.
2. Double-Click the ‘UF130 USB Viewer’ icon (automatically placed on the Windows desktop
when you install). You can also select Samsung Digital Presenter program by clicking
[Start] → [Program] → [UF130 USB Viewer] → [UF130 USB Viewer].
3. Samsung Digital Presenter View Panel and Control Panel are opened.
4. You can watch live images what presenter output, and you also control this images using
control panel.
✔ Note : • Samsung Digital Presenter program does not run if the Presenter is not
connected to the PC or not turned on.
• Screen Full and Full mode is fit to 1280x960 or 1280x720 resolution
according to display mode.
• If the whole view of the Samsung Digital Presenter View Panel dose not
appear, check your PC resolution.
(According to your display mode you need width 1024, height 720 or
higher resolution on PC.)
Open the [display setting], and select width 1024, height 720 or higher
resolution.
✔ Caution : • While viewing, capturing or printing images on the program or TWAIN
Driver, do not turn off power of the presenter or remove the USB
cable off the PC.
It may cause the presenter or the PC to make trouble.
10
Samsung Digital Presenter View Panel overview
View Area
You can see the images presented from the presenter in this view area.
When you adjust the image using the Samsung Digital Presenter Control Panel or remote
controller, you can see the applied result in this area.
11
View Panel button
Exit button
Exits program
Screen Full mode
Change the image size 1280x960 or 1280x720 according to display mode , and
you are able to select 2 option (1:1 original ratio, stretch mode – 4:3 or
16:9(according to mode) resolution). View panel window is closed and you can
control images using control panel.
(Recommended : 1280x960/1280x720 or higher resolution, To select SCREEN
FULL mode : Press [Alt+Enter] Key.)
Full mode
Change the image size 1280x960 or 1280x720 according to display mode, and
View panel is extended. It is 1:1 rate input image to output image. Click one more
time, return to HALF mode.
[According to the full mode, if your monitor is low resolution than input
image(1280x960/1280x720), you would not use this function.]
Option
Change the optional functions about images
(For details, See page 13.)
Minimize
Hide View Panel and you can not watch images, but program is alive.
About
Show the information of production.
Wide/Tele
Reduces or enlarges the image size on the screen.
AF
Adjusts auto focus.
Q-SAVE
Captures and saves images by hotkey [F2] or Q-SAVE button.
(For details, See page 20.)
CONTROL PANEL
Reactivates the Control Panel Window.
12
Option Dialog
1. Current Q-SAVE folder path
You can change Q-SAVE folder to save images when you press Q-SAVE button or [F2]
key. (For details about Q-SAVE, see page 20.)
2. Auto-Hide Control Delay
You can adjust the time you want to display Control Panel in SCREEN FULL mode. The
default value is 5 seconds. The value ranges 0 to 30. When you set 0 seconds the Control
Panel is always visual.
3. Always Full Resolution Save/Print
Though in any mode(HALF, FULL
or SCREEN FULL), the image is applied to maximum
size(1280x960/1280x720 according to display mode) when you press SAVE/QSAVE/PRINT buttons.
4. Safe Mode
Making use of some Low-end PC(include DVMT type graphic card) makes trouble with
displaying images.
The program can operate slower less than 10 frame/sec.
13
5. Screen Full Mode
You can choose 2 options
[1:1 original ratio, Stretch mode(4:3(1280x960)/16:9(1280x720)resolution)]
6. Topmost
Always View Panel is on Topmost.
✔ Note : • Just make sure to restart the viewer program when you check the 'Always
Full Resolution Save/Print' item.
• If you use low resolution monitor than input resolution, you would watch
distortion image. If you don’t want, you should select 1:1 original ratio
option.
• If you use mode function on the UF-130ST, the application would be quit.
• When user changes the monitor resolution, restart the viewer application.
14
Samsung Digital Presenter Control Panel overview
With the Samsung Digital Presenter program, you can control and adjust the images
presented from your presenter. You can also save it as a graphic file and print the images
through the printer connected to the PC.
1
7
3
4
2
6
5
1. You can control capture, save and print images on the Control Panel.
2. The buttons on the Control Panel are the same as buttons on Samsung Digital Presenter
or those of a remote controller.
(For details, refer to Samsung Digital Presenter User’s Manual.)
Wide/Tele : Reduces or enlarges the image size on the
screen.
Br-/Br+ : Adjusts the brightness of the image on the
screen.
B-/B+ : Adjusts the blue color.
R-/R+ : Adjusts the red color.
AF : Adjusts auto focus.
AWC : Adjusts auto color.
Near/Far : Adjusts focus.
Aper(Aperture) : Turns on/off aperture mode. (TEXT
MODE/IMAGE MODE)
Ext.(External) : Use this to select internal or external
image. The images on the View Panel do not change.
LAMP : Turns the lamp On/Off.
Freeze : Turns on/off Freeze mode. The images on the
View Panel do not change.
(On the UF-130ST you can’t freeze USB image, freeze
VGA or DVI output image only.)
15
Psav(Preset Save) : Allow to save the customized user
setting(Wide/Tele, Focus, Brightness, Adjusting Color).
Press number keys from 1 through 4.
Pexe(Preset Execution) : Allow to activate the preset
user setting(Wide/Tele, Focus, Brightness, Adjusting
Color). Press number keys from 1 through 4.
Displays the status of Control function(freeze, aperture,
internal/external, lamp).
AVICapture : Capture digital
images from Digital
presenter to AVI file.
ACTIVATE : When display mode is single(For details, see
user’s manual), if Live Viewer will be off, buttons of
USBViewer were not available, and Activate button was
available. When you press the Activate button, buttons of
USBViewer are available(UF-130DX only).
16
Capturing/Saving/Printing images
You can save the image currently displayed in the View Panel as a BMP or JPEG format
graphic file. You can print the image to printer.
1. Samsung Digital Presenter View Panel displays
image currently presented from Samsung Digital
Presenter. When the desired image is displayed in
the View Panel, click Capture button.
2. When you press [Capture] button, [Save] / [Print]
buttons are available.
Saving Images
1. Click [Save] button to save captured image in the Capture mode.
2. Specify the file name, file format, and file path. Then, click Save in the Save As dialog box.
The image is saved as a selected file format.
3. When completed press Release button to release the Capture mode. The Release button
disappears and Capture button is available.
17
Printing images
1. When capturing is complete, the Print button is activated. Click Print button, then the Print page
Setup dialog box prompts.
2. Select Paper Size/Print Position/Print Size/Orientation etc.
18
■
Fit to page : The image is fit to the page size you selected.
■
Specified size : You can specify the printing size of image.
■
Maintain aspect ratio : You can maintain the width/length ratio of the image.
■
Position :
■
Margins : You can set the margins of the paper.
■
Orientation: You can set the printing orientation.
You can set the location of the image.
3. Select print options and click Print button to start printing.
4. After printing is complete, click Release button to release the capture mode. If you do not
release the capture mode, the View Panel remains occupied with the captured image.
✔ Note : • The Save/Print size is originally set to the same one as View Panel
image size. To Save/Print the Full size image, check the ‘Always Full
Resolution Save/Print’ item in the Option dialog box.
19
Quick Save([F2] key)
You can save quickly by button or hotkey. The image file path can be set in Option dialog box.
(The default path is located where the Samsung Digital Presenter program is installed +
QuickCap.)
How to Q-SAVE
1. When the closed image is displayed in the View Panel, Click Q-SAVE button or press
[F2] key to save quickly.
2. In ‘QuickCap’ folder under the directory where your program is installed, the captured
image is saved as JPEG format.
(ex> C:\Program Files\UF130 USBViewer\QuickCap or specified directory which you
have set in the option dialog box)
3. The file is named automatically as YYYYMMDD_HHMMSS.jpg type.
(ex> 20080630_152340.jpg)
✔ Note : • In Capture mode the Q-SAVE is not available.
• The default capture size is the same as one of the image on the View
Panel.
If you have checked ‘Always Full Resolution Save/Print’ item in the Option
dialog box the image is saved as full size.
• In the FULL/SCREEN FULL mode, the only hotkey [F2] is available to
execute Q-SAVE function.
• If you execute Q-SAVE two or more in a second, the last image is only
saved in Quick Cap folder.
20
Using Samsung Digital Presenter TWAIN Driver
1. System requirement
• Samsung Digital Presenter USB device driver(See page 3 for details.)
• TWAIN (version 1.6 or later) supported application program.(ex> Photoshop, ACDSEE
etc,.)
※ To use TWAIN driver your PC had been installed Samsung Digital Presenter USB
device driver.
2. Install Samsung Digital Presenter TWAIN driver
• Refer to install Samsung Digital Presenter program (See page 6 for details.)
• If you’ve not installed TWAIN driver in InstallShield program you have to install it
separately.
• If installing a TWAIN Driver as user’s installation and standard installation but the file is
not deleted, you must execute Installation Shield of the CD and install it as recovery
item again.
3. Running TWAIN driver in your Application Software(case by case)
1) Adobe Photoshop : [File] → [Import] → [Presentation station TWAIN Data Source]
2) JASC Paintshop Pro :
[File] → [Import] → [TWAIN] → [Select Source…] → Then select UF130 TWAIN
[File] → [Import] → [TWAIN] → [Acquire…]
3) Microsoft Office :
[Insert] → [Image] → [Scanner or Digital Camera …]
Select [UF130 TWAIN], then select [Custom Insert].
4) In the other TWAIN supported application software refer to application manual.
4. Scan images through UF130 TWAIN driver
Samsung Digital Presenter TWAIN driver operates almost same as Samsung Digital
Presenter USB program. Refer to that program description(page 15) except TWAIN
function.
✔ Note : • In the digital presenter, TWAIN Driver, you can capture or scan image of
the FULL (1280x960 or 1280x720) size in the preview status with
HALF(640x480 or 640x360).
21
✔ Caution : • Samsung Digital Presenter TWAIN Driver cannot support Q-SAVE
function.
•
Because some graphic softwares have program bug in TWAIN
acquisition, it may make an error while scanning Presentation
Station TWAIN driver. Download and install the latest software
update patch, or request technical support of software vendor.
22
Scanning Images
1. The images from a presenter are displayed on the View Panel.
When iamge is captured, size will be 640x480/640x360 on HALF mode and
1280x960/1280x720 on SCREEN FULL or FULL mode.
2. Press Capture button to scan in application program.
3. When completed Capture, the TWAIN Scan button activates. If you click the button, the
captured image is transferred to the application program.
4. For more information about TWAIN Driver, refer to the graphic application software manual.
✔ Note : • In FULL / SCREEN FULL mode, you can scan FULL(1280x960 or
1280x720) size image only.
You cannot scan HALF(640x480 or 640x360) size image in FULL/Screen
Full Preview mode.
23
Keyboard Map
Keys
[Alt + Enter]
Description
Set the window SCREEN FULL mode.
[While displaying]
[ESC]
Return to HALF size mode
[While capturing]
Release captured image
You can specify the path your Q-SAVE images are saved.
[F2]
(See page 20.)
For operating Q-SAVE the other functions are temporarily
unavailable.
[Alt + F4]
24
Exits this program.
Remark
Using Samsung Digital Presenter AVI Capture
With the Samsung Digital Presenter AVI Capture program, you can capture digital images
from Digital presenter to AVI file.
1. Make sure that your Samsung Digital Presenter is connected to the PC and both are turned
on.
2. Select and Click [Start] → [Program] → [UF130 USB Viewer] → [UF130 AVI Capture]
3. AVI Capture program is available in Windows 2000/XP/Vista or higher
25
✔ Caution : • In case of FAT32 file system of your PC, the single file size limited by
maximum 4 GB. Check your Windows file system in volume property
dialog.
You must format or convert your file system to capture more than 4 GB on single file. We
recommend to use MPEG-4 video Codec. (Ask the technical support to use Format, Convert
command)
FAT32
NTFS
Maximum File Size
4GB
No limit
No Compression
Approx. 6 Min
No limit
MPEG-4 (Xvid)
Approx. 12 Hours
No limit
※ 'No limit' of NTFS system means "File size limited only by size of volume"
26
4. Using AVI Capture Program
(1)
Capture Time Limits
You can set capture time limits to capture AVI file for a fixed period by minute.
Program will show required HDD space approximately based on the Compression
Mode.
✔ Note : • The Captured AVI file size may be different from approximate captured file
size because of the amount of motion of images or dropped frames.
Expected capacity displayed must be based on status that movement of
image is much.
(2)
Compression Mode
Video
1> No Compression
- The captured AVI file will not be compressed about image.
- You can capture best quality AVI file without the distortion of image.
- Dropped frames can occur frequently if HDD is low-speed device.
2> Compression (Xvid)
- The Captured AVI file will be compressed using Xvid Codec.
- You can capture fast-motion image with High-quality MPEG-4 Codec.
Audio
1> No Compression
- The captured AVI file will not be compressed about audio.
- You can capture best quality AVI file without the distortion of audio.
2> Compression (ADPCM, MS)
- The captured AVI file will be compressed using ADPCM.
✔ Note : • If your CPU is low-end device, Dropped frames can occur frequently, the
time length of captured AVI file may be different from real time sequence.
(3)
Viewer
Run UF130 USBViewer program.
(4)
Capture Status
Once You've started recording, status lamp turns on red light and capturing time
displays below status lamp.
27
(5)
Rotate image 180 degrees
According to digital lens position, preview images can be reversed. So using rotate
image 180 degrees, you can capture the right direction image.
(6)
Display local time in AVI file
You can display local time in top-left of AVI playback file by this option.
(7)
Display user caption in AVI file
You can display user caption in top-left of AVI playback file by this option.
You can type under 50 word. When word and time are displayed same time, word are
on the right-side of time text.
(8)
Capture
After setting all the parameters for your AVI file, you may start recording by clicking
Capture button. Specify the file name and file path. Then, click Save in the Save As
dialog box. The capture process will be stated as a elected file.
(9)
Stop
Stop button will be activated when capture process stated, you may save AVI file
safely by clicking Stop button.
(10) Exit
Exits AVI capture program.
✔ Caution : • While capture processes, Do not turn off power of the presenter or
remove the USB cable off the PC. It may cause the presenter or the
PC to make trouble.
•
While capture processes, [Exit] button would not finalize AVI file. For
•
AVI capture program and USB Viewer program aren't executed at the
saving AVI file safely, Push [Stop] button first.
same time.
For controlling images on AVI Capture program, use remote control
or function key on Samsung digital presenter.
28
Troubleshooting
Symptom
Solution
Fails to run Samsung Digital
There is a communication error between Samsung Digital
Presenter program
Presenter and the computer.
• Check the USB cable connection.
• Close other unnecessary software programs that are
running(especially programs related to USB
communication and which occupy many system
resources).
• If you turn the unit off, turn it back on after at least 10
seconds.
The following error message:
There is a communication error between Samsung Digital
"There is a problem in
Presenter and the computer.
communication of USB. Exit
• Check the power condition of digital presenter or
Samsung Digital Presenter
program."
connection of USB port to presenter.
• If you use specific control card, you should update your
device software at the Web site.
• Update the latest patch file for USB 2.0 control card at the
MS Web site.
• Check the length of USB cable.(within 4 meters)
• If you have run many programs on your system, you
would have many problems about communication of
imaging because of shortage of memories or resources.
The following error message: "The
• Run the program after minimum 3 seconds.
Program is already running."
• In case of Abnormal Off, disconnect the plug of USB and
reconnect it or reboot the PC
When the recognition of
equipment is failed
• When the recognition of digital presenter, reboot the PC
and retry. After that, if you have same problem, you
should reinstall device driver(For details, see page 6).
29
Symptom
Solution
The following error message: "Fail
The error occurs in the following cases.
to save image."
• In case you have selected the Q-SAVE folder to CDROM
drive or write-protected storage driver.
• In case you didn’t save image as a BMP or JPEG file
format.
• In case the libraries related to save image are deleted or
damaged.
When the file you captured cannot
be played
30
(Re)Install the codecs included with a CD.
SALES NETWORK
SAMSUNG TECHWIN CO.,LTD.
145-3, Sangdaewon-dong, Jungwon-gu,
Seongnam-si, Gyeonggi-do, 462-120, Korea
Tel: +82-31-740-8160 Fax: +82-31-740-8145
SAMSUNG TECHWIN EUROPE CO., LTD.
SAMSUNG TECHWIN AMERICA Inc.
Samsung House, 1000Hillswood Drive, Hillswood Business Park
Chertsey, Surrey, UNITED KINGDOM KT16 OPS
Tel: +44-1932-45-5308 Fax: +44-1932-45-5325
1480 Charles Willard St. Carson, CA 90746, UNITED STATES
Tel: +1-310-632-1234 Fax: +1-310-632-2195
www.samsungtechwin.com
www.sasmsungpresenter.com
P/No.: Z6806.0941.01A