1
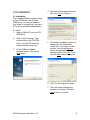
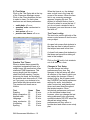
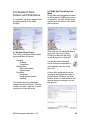
Contemporary’s
Skill
Assessment
Modules for TABE
®
9 & 10
User Manual
Contemporary’s
Skill Assessment Modules
Table of Contents
1.0 Overview
1.1
1.2
About the Program
Requirements and Settings
2.0 Installation
2.1
2.2
2.3
Installation
Adding SAMs Levels
Adding SAMs to Start>All
Programs
3.0 Login
3.1
3.2
3.3
3.4
3.5
Passwords
Administrator Login
Teacher Login
Student Login
Shared or Exclusive Mode
4.0 Administrator:
Classroom Manager
4.1
4.2
4.3
4.4
4.5
Teacher Setup
Exporting Teacher Lists
Adjusting Data Field Width
Data Manager
Resource Manager
5.0 Teacher:
Classroom Manager
5.1
5.2
5.3
5.4
5.5
5.6
Class Setup
Exporting Class Lists
Test Setup
Student Setup
Exporting Student Data
Importing Student Data
Skill Assessment Modules v 1.0
6.0 TABE Sessions
6.1
6.2
6.3
6.4
6.5
6.6
Viewing TABE Sessions
Importing TABE Sessions
Deleting TABE Sessions
Reformulating Study Plans
Manual Entry of TABE Data
Using the Program without
TABE Data
7.0 Test and Study Plan
Manager
7.1
7.2
Reading the SAMs Skill
Tests and Study Plans
Screen
Reading Practice Test
Results
8.0 SAMs Skill Test
Study Plans and
Resource Lists
8.1
8.2
Creating a SAMs Skill Test
Study Plan
Customizing the Study Plan
Resource List
9.0 Student Home Screen
and Submenus
9.1
9.2
9.3
9.4
9.5
Student Home Screen
SAMs Skill Test Study Plan
Menu
Skill Tests Menu
Skill Test Progress Markers
Practice Tests and Practice
Test Study Plans
3
10.0 Taking Tests
10.1
10.2
10.3
10.4
10.5
10.6
10.7
10.8
Sample Test Questions
Answering Test Questions
Navigating the Test
Test Passages
Graphics
Before Test Scoring
Test Feedback/Test Review
Practice Tests
11.0 Student Records
11.1
11.2
11.3
11.4
End-of-Assessment Report
Skill Tests Menu Report
Accessing SAMs Skill Test
Study Plans
Using SAMs Skill Test
Study Plans
12.0 Help
12.1
12.2
12.3
Help Menu
Bubble Help
System Help
Appendix 1:
Uninstalling the Program
Appendix 2:
Skills Tested by Level
Copyright © 2005 by The McGraw-Hill Companies, Inc. All rights reserved. No part of this manual
may be reproduced, stored in a retrieval system, or transmitted in any form or by any means,
electronic, mechanical, photocopying, recording, or otherwise, without prior permission of the
publisher.
Skill Assessment Modules v 1.0
4
1.0 Overview
1.1 About the Program
The Skill Assessment Modules
(SAMs) program is designed to
improve students’ performance on
the TABE® tests. In addition to
targeting skill deficiencies with
personalized study plans and skill
assessments, the program provides
multiple opportunities for students to
polish their test-taking skills.
You may install on and run the
program from the following servers:
• Windows NT, Service Pack 4.0
and above
• Windows 2000
• Windows 2003
• Novell Netware 6.0 and above
SAMs has four levels of tests (E, M,
D, A) in seven subject areas:
reading, vocabulary, math
computation, applied math,
language, language mechanics, and
spelling. The skills that make up
each subject are the basis of the Skill
Assessment Modules.
Ideally, teachers import students’
TABE results to place students in the
SAMs program. After students
complete the study plans, they take
skill tests and demonstrate skill
mastery. Then they retake the TABE,
advancing through each level to
achieve their educational goals.
1.2 Requirements and Settings
To install and run the program you
need
• Windows 98, 2000, or XP
• 64 MB RAM
• Color monitor
• 8x or better CD-ROM drive
• Sound card
• Free Disk Space — 100 MB
• 800 x 600 screen resolution
• 256 colors (minimum), thousands
of colors (preferred)
Skill Assessment Modules v 1.0
5
2.0 Installation
4. Read the license agreement and
then click Yes to continue.
2.1 Installation
The complete SAMs program comes
on four CD-ROMs, one for each
TABE level. You can purchase all
four levels or a single level, but each
CD must be installed independently.
To install
1. Insert a SAMs CD into your CDROM drive.
2.
3.
Click on My Computer. Then
double-click on the CD-ROM
drive. From the CD contents,
double-click the setup icon.
On the SAMs installation
welcome screen, click on the
Next button.
5. The default installation location is
displayed in the Destination
Folder box. If you want another
location, click on the Browse
button and navigate to the
desired location. Click OK. Then
click the Next button to continue.
6. WAIT for the program to install.
7. The next screen displays the
program file location. Click the
Next button to continue.
Skill Assessment Modules v 1.0
6
8. The next screen displays all
SAMs levels currently installed.
These are the test levels to which
students will have access. Click
Finish when done. See section
2.2 of this manual for instructions
on how to install additional levels.
IMPORTANT! If you are installing
SAMs to a Windows NT server, you
MUST run the installation from a
workstation and, when the installer
asks you to choose an installation
location, choose the mapped server
drive/folder.
IMPORTANT! After you have
installed SAMs to a Windows 2003
Server, you must change
permissions on the Management
folder within the Skill Assessment
Modules folder to Full Control.
2.2 Adding SAMs Levels
Each of the four levels in the SAMs
program must be installed
separately. Install additional levels
from the same computer you used to
install the original program.
After opening the CD and clicking on
Setup.exe, choose Install/Repair
from the InstallShield Wizard screen.
Follow the on-screen directions.
2.3 Adding SAMs to
Start>All programs
If the program was installed to a
network server from a workstation,
the setup for that computer is
finished. For other computers, follow
these steps:
1. From each workstation use My
Computer to navigate to the
location where the program was
installed. If you do not have
access to that drive/folder, see
your network administrator.
2. Find and click on the file named
ClientSetup.exe. It adds the
program to the Start>All
Programs menu.
IMPORTANT! You will only need
to complete this process for the
first level installed. All levels use
the same launch icon.
Skill Assessment Modules v 1.0
7
3.0 Login
The user login screen appears after
the user has launched the program
(from a desktop shortcut or from
Start>All Programs) and the title
screen has played.
3.2 Administrator Login
A valid administrator user name and
password will take the user to the
administrator home screen. The
default administrator username is
admin. The default password is
999999999.
The login for administrators,
teachers, and students is identical.
The user enters his/her user name
and password and then clicks
Submit. The “smart” login recognizes
the user’s level of accessibility and
takes the user to the appropriate
screen.
3.3 Teacher Login
A valid teacher user name and
password will take the user to the
teacher home screen.
An audio/text prompt will tell the user
if an invalid user name or password
was entered.
3.1 Passwords
The program auto-generates a nineletter password for each user. Users
can change assigned passwords
from the dropdown menu Edit>My
Account. Passwords can be
alphanumeric with a minimum of 5
characters and a maximum of 15
characters.
Skill Assessment Modules v 1.0
8
3.4 Student Login
A valid student user name and
password will take the student to the
student home screen.
3.5 Shared or Exclusive Mode
When you log in, the program checks
to see who else is using the
program. If you log in as the
administrator or the teacher and no
one else is signed into the program,
you will be asked whether you wish
to work in Shared or Exclusive Mode.
If other users are logged in the
program when a teacher or
administrator logs in, the program
will default to Shared Mode, but it will
instruct the teacher or administrator
how to use the program in Exclusive
Mode if need be.
Skill Assessment Modules v 1.0
Shared Mode
Shared Mode means that you are
sharing the use of the program’s
databases with at least one other
user. Students always work in
Shared Mode. Teachers and
administrators will find that all test
and study plan management is most
conveniently done in Shared Mode.
Exclusive Mode
If a teacher or administrator is
planning to add, import, modify, or
delete more than one or two student
records or resource entries, these
actions should be performed in
Exclusive Mode. This mode allows
the user sole access to the
program’s databases and greatly
enhances the response time.
In addition, these administrative
functions must ALWAYS be
performed in Exclusive Mode:
• Management data: compact,
backup, restore
• Resource data: import, backup,
restore
9
4.0 Administrator:
Classroom Manager
After the administrator logs into the
program, the Administrator Home
screen appears. In general, teachers
and administrators have the same
options. The options discussed in
section 4 are unique to the
administrator.
Note: The administrator should read
section 5.0 Teacher: Classroom
Manager of this manual for additional
information.
Editing teacher information
To edit teacher information, click on
the teacher in the list on the left and
alter the information in the fields on
the right. Click Save to add your
changes to the database.
Deleting teacher information
To delete teacher information, click
on the teacher in the list on the left
and then click on the Delete button.
You will be asked to confirm your
choice.
IMPORTANT! Before deleting a
teacher from the list, make sure that
you have reassigned all classes to
another teacher.
4.2 Exporting Teacher Lists
Administrators can export the data in
the teacher list to an MS Excel file.
Click on the Export Teacher List
button at the bottom of the screen.
When the Save dialog box appears,
decide where to save the file and
what to name it. Saved files can be
edited and combined with other files.
4.1 Teacher Setup
From the Administrator Home
screen, click on the Classroom
Manager button and choose the
Teacher Setup tab at the top of the
screen.
Adding a teacher
To add a teacher, click the Add
Teacher button. Type the teacher's
first and last names. A username
and password will automatically be
generated; you can edit them if you
wish. When you click Save, the
teacher will be added to the teacher
list at the left.
Skill Assessment Modules v 1.0
4.3 Adjusting Data Field Width
You can adjust the width of data
fields in the teacher, class, and
student lists by holding your cursor
over the line between each column
header until a double-headed arrow
appears. Then click and pull left or
right.
10
4.4 Data Manager
The Data Manager options allow the
administrator to compact, backup,
and restore all data related to
teachers, classes, and students.
•
The Print Resources button prints
out the study plan entries for a
single skill or a single subject.
Compacting data allows for more
efficient data handling.
Backing up data, which should be
done on a regular basis, provides a
data safety net in the event of an
emergency.
Restoring data replaces damaged
or corrupt data with reliable data if
backup data has been created.
4.5 Resource Manager
The Resource Manager allows the
administrator to customize the
resource lists used to create student
study plans. Administrators may edit,
backup, update, and restore
resource lists.
Editing resource lists
Use the Resource Editor to delete or
customize entries in the supplied
database and to add new
educational materials that correlate
to the SAMs/TABE objectives.
•
•
•
To edit a resource, click in the
fields and alter the information.
When finished editing, click the
Save Changes button.
To add a resource, click the Add
Resource button. Enter and save
your information.
To delete a resource, click the
box to the left of each title so that
it is checked. Then click the
Delete Checked button. You can
check and delete more than one
title at a time.
Skill Assessment Modules v 1.0
Backing up resource lists
If you have made changes to the
Resource database, a backup of this
file will ensure that you can restore it
in case of emergency. Click on
Backup Resources and browse to
select a backup file location.
Importing resource lists
From the Resource Options tab,
select Import Resources. The
program will check the
Contemporary website for the
updated resource database and will
download it automatically.
IMPORTANT! Importing the new
resource database will overwrite any
edits you made to the list through the
Resource Editor.
Restoring resource lists
Use this function to restore damaged
or altered resource lists to 1) the
entries contained on the original
program CD-ROM or 2) the
customized entries saved in a
resource file backed up by the
administrator. Click on Restore
Resources from the Data Manager
tab. Use the browser to find the
original database or your backup file.
11
5.0 Teacher:
Classroom Manager
When a teacher logs into the
program, the Teacher Home screen
appears. In general, teachers and
administrators have the same
options. The administrator, however,
sees all of teachers, classes, and
students enrolled in the program.
The teacher sees information
pertaining to his or her own classes
only. Additionally, the Test Setup tab
is not available to the administrator.
Deleting a class
Start by making sure there are no
students enrolled in the class you are
deleting. If students are enrolled,
transfer them to another class and/or
teacher. Select the class name in the
list at the left and click the Delete
button at the bottom of the screen.
Editing class information
Edit the class information by clicking
on the class in the list at the left and
altering the information in the fields
at the right. Click Save to finalize
these changes.
5.1 Class Setup
From the Classroom Manager
screen, choose the Class Setup tab.
Adding a class
Click the Add Class button. Type the
name of the class and associate it
with a teacher selected from the
dropdown list box. Click Save and
the class will appear in the list at left.
Note: If you are signed in as a
teacher, you will not choose a
teacher from the dropdown list.
Skill Assessment Modules v 1.0
5.2 Exporting Class Lists
Both teachers and administrators
can export class data to an MS Excel
file. However, administrators have
access to data about all teachers
and classes. Individual teachers can
export data pertaining to their
classes only.
Click on the Export Class List button
at the bottom of the screen. When
the Save dialog box appears, decide
where to save the file and what to
name it. Saved files can be edited,
combined with other files, and
printed.
12
5.3 Test Setup
Click on the Test Setup tab at the top
of the Classroom Manager screen.
Click on the Class dropdown list box
to select a class. For each class,
teachers can set these preferences:
•
•
•
•
audio help: off or on
question order: randomized or
standard
test review: off or on
practice test timers: off or on
When the timer is on, the student
sees a clock icon in the lower left
corner of the screen. When the time
limit is up, a warning message
appears, stopping the test. The
student is informed that no time is
left and is asked to score the test. If
you do not want a student’s test to
be stopped, you must choose to turn
the timer off.
Test Form Locking
The test locks on the right side of the
screen control access to test forms in
every subject.
An open lock means that students in
the class are free to take all tests in
that subject area and in that form.
A closed lock means that students in
that class are barred from taking all
tests in that subject.
Practice Test Timers
When a student has successfully
completed assigned skill tests in a
subject area, the practice test offers
simulated TABE experience. This
survey-length test lets students
check their skill mastery. Practice
tests may be timed, but by default
the practice tests timers are off. Click
on if you want your students to be
timed while they take practice tests.
The practice test times are as
follows:
Test
Reading
Math computation
Applied math
Language
Lang. mechanics
Vocabulary
Spelling
Items
25
25
25
25
20
20
20
Time
25 min.
15 min.
25 min.
25 min.
14 min.
14 min.
10 min.
Skill Assessment Modules v 1.0
Click on the All lock to lock students
out of all tests for a form.
Changes in Test Setup
You can change test setup
preferences at any time. Any
changes to the test setup will affect
all member of the class to which you
are making the changes. When a
student logs in, the program reads
the CURRENT test setup preference
settings for audio, test question
order, review test, and practice test
timers and uses those throughout
that student session. Since
lock/unlock preferences can be set
on the individual student level,
however, when you change the test
setup preference locks, previously
enrolled students DO NOT adopt the
altered test setup locking
preferences until they move to
another level and obtain a new study
plan.
13
5.4 Student Setup
Once a class has been set up, the
teacher can enroll students in it.
Choose the Student Setup tab at the
top of the Classroom Manager
screen.
Adding a student
To add a student, click the Add
Student button. Type the student’s
first and last names. A username
and password will be automatically
generated; edit if necessary. From
the dropdown menu, assign the
student to a teacher/class. Click
Save, and the student will be added
to the class list at the left.
Deleting a student
To delete a student, select the
student name in the list at left by
clicking on it. Then click on the
Delete button.
active/inactive status to a student,
click on the appropriate button.
Archiving student data
To archive inactive student records,
create a class named Archive+date
and transfer your inactive students
into it. The administrator may create
and save dated archive files
containing multiple classes.
Demographics
When a student name is selected in
the student list, a Demographics
button appears. Click on it to bring
up a demographic data form. The
fields will be filled in if the information
is supplied as part of a TABE import;
if not, the data can be entered.
Editing student information
To edit student information, click on
the student in the list at left. Make
changes in the fields at right and
click Save.
5.5 Exporting Student Data
Both teachers and administrators
can export student data to an MS
Excel file. However, administrators
have access to data for all teachers,
classes, and students. Individual
teachers can export data pertaining
to their classes and students only.
Activating students
Students can be enrolled but
inactive. All active students in a class
roster have green checks by their
names. Inactive students cannot log
into the program. To assign
Click on the Export Student Data
button at the bottom of the screen.
When the Save dialog box appears,
decide where to save the file and
what to name it. Saved files can be
edited and printed.
Skill Assessment Modules v 1.0
14
5.6 Importing Student Data
If TABE PC or TestMate TABE files
are available, the data can be
imported to provide enrollment and
performance information.
Once the import is finalized, the
student is enrolled. Exit the import
session, select the student name
from the roster at left, and click
TABE Sessions to review the TABE
performance data.
To access the import function, click
the Import Student button from the
Student Setup tab. Browse to find
the desired TABE file, select it, and
click Open. From the list at the left,
choose the name of the student
whose data you wish to import.
Verify that the information you want
appears in the fields at the left and
click Finalize Import.
Note: The teacher/class dropdown
list box for imports will remain blank
after an import. Be sure to associate
the imported student with a
teacher/class.
Skill Assessment Modules v 1.0
15
6.0 TABE Sessions
Administrators and teachers are able
to electronically import or manually
input TABE data from TABE PC and
TestMate TABE programs. The
TABE Sessions function can be used
in three ways:
• to view a student’s TABE session
history
• to supply TABE data for a student
who is already enrolled
• to update a student’s TABE data
the student and test date you wish to
import and click on it. Then click on
the Import TABE Session button.
A warning box asks you to confirm
that you are importing the correct
person's TABE session data for the
correct date. Click OK after
confirming the information.
6.1 Viewing TABE Sessions
Start by selecting a student’s name
in the student list. Then click on the
TABE Sessions button. From the
TABE sessions screen, click on a
session date in the list at left to view
the test details at right. Choose View
for more information.
6.2 Importing TABE Sessions
Start by choosing the student’s name
from the student list. Then click on
the TABE Sessions button. From the
TABE sessions screen, click the
Import Session button to supply
TABE data for a student who is
already enrolled or to update a
student’s TABE data. Browse to find
and open the TABE data file. Choose
Skill Assessment Modules v 1.0
6.3 Deleting TABE Sessions
Occasionally you may want to delete
TABE sessions if too many sessions
are listed or if you have imported a
session in error.
To delete:
1) In the list box, click on the date of
the session you want to delete.
2) Verify you have selected the
session you want.
3) Click the Delete button.
IMPORTANT! TABE sessions act
as guides for SAMs study plans and
skill tests. If you delete a current
TABE session, you break this link
and the SAMs assignments are no
longer valid.
16
6.4 Reformulating Study Plans
You can recreate SAMs tests and
study plans from a previous session.
To reformulate, choose the desired
TABE session date and click the
Reformulate button.
Note: Reformulated study plans do
not include any custom changes or
notes that may have existed in that
study plan previously.
6.5 Manual Entry of TABE Data
If you don’t have access to electronic
TABE data files, you can transfer the
information from a printed TABE
report into the SAMs program.
Select a student from the student list
and click the TABE Sessions button.
At the bottom of the TABE Sessions
screen, click on the Manual Session
Input button.
Once you have your information
assembled, click on a subject area
tab at the top of the screen. Transfer
the TABE session information to the
SAMs program by clicking on the
appropriate mastery status button for
each TABE skill. Click Formulate
Study Plan when ALL SUBJECT
TABS are completed.
To input TABE scores manually, you
will need to know the student’s
mastery status for each skill in a
TABE subject area. If you need to
score paper tests, the Scoring
Guides button provides access to
PDFs that will help you calculate
mastery status.
Supply the TABE session date, the
appropriate level for each subject
area, and the subtests taken. Click
Save when finished.
Skill Assessment Modules v 1.0
6.6 Using the Program without
TABE Data
If you don’t have any TABE data, you
can still use the program. Set up
teachers, classes, and students as
described elsewhere in this manual.
All tests and forms will be available;
the default level for every student will
be set to the lowest level installed.
You can reset student access to
forms, tests, and levels as needed
through the Test and Study Plan
Manager.
17
7.0 Test and Study Plan
Manager
Administrators and teachers can use
the Test and Study Plan Manager to
track student progress through the
SAMs program.
On the Home screen, choose Test
and Study Plan Manager. Click on
SAMs Skill Tests and Study Plans,
and use the dropdown list boxes to
select a particular student and class.
Current TABE level
The student’s current TABE level is
shown at the left side of the screen
near the top. Teachers can promote
students who show mastery to the
next TABE level. Click on the Edit
button next to the current level.
A window will pop up. Choose the
new level for the student. Click Save.
IMPORTANT! If you move a student
to a SAMs level that you do not own
or have not installed, the student will
not have access to the SAMs tests
for that level. However, study plans
for all levels are always available.
TABE session data
If TABE data is available, +, -, or P
buttons will display, showing the
mastery status of each skill in the
subject area. Click on a mastery
status button to see information
about that skill.
Click on the TABE Report button to
see detailed information about that
TABE Session.
7.1 Reading the SAMs Skill Tests
and Study Plan Screen
The SAMs Skill Tests and Study
Plans screen allows administrators
and teachers to monitor student
progress through the SAMs program.
The question mark buttons on the
page provide situational
helps explaining the
screen’s many functions.
Student/Class list boxes
In the upper left side of the screen,
dropdown list boxes allow users to
easily switch between students and
classes.
Subject area tabs
Seven tabs allow switching between
subjects.
Skill Assessment Modules v 1.0
18
Study Plans
The buttons in the Study Plan
column show if a study plan has
been formulated for the
student. Skills with study
plan assignments show this
icon. Click on any assigned study
plan icon to access the study plan for
a particular skill.
Skills without study plans
assignments show this icon.
Generally this means the
skill has been mastered.
Skill names
The next column shows the skills
covered in SAMs and TABE. To see
the skill names for a different subject,
click that subject tab at the top of the
screen.
Yellow arrow
test in progress
Red X
test taken and failed
Click on a progress marker for
details of test performance.
SAMs test results
Bar graphs offer a quick visual of
student performance and progress.
Each pair shows the scores and
forms of the two most recent SAMs
skill tests.
Current SAMs status
This column refers to the SAMs skill
tests; the buttons show which tests
have been assigned to the student.
An A appears for tests that have
been assigned but not begun, and a
U appears for tests that have not
been assigned.
Click on the button to toggle between
Assigned and Unassigned. These
buttons are linked to the study plan
icons. A change in the status of a
SAMs test from active to inactive (or
vice versa) also changes the status
of the corresponding study plan.
Once a student begins or finishes a
test, these buttons display these
progress markers:
Green check
test taken and
passed
Skill Assessment Modules v 1.0
Lock/unlock forms
The columns at far right allow you to
change form access test-by-test for
an individual student.
IMPORTANT! For the individual
student, changes to form locks in the
Test and Study Plan Manager
override the form locks teachers may
have set for the entire class in
Classroom Manager: Test Setup.
Click on each lock to change its
status. A closed lock symbol means
that the test is unavailable for the
student. An open lock means that the
student can take the test.
19
Click on the “All” lock symbol at the
top of the columns to close or open
all tests in the subject area form.
When both forms are unlocked, the
student alternates between forms for
each test session.
7.2 Reading Practice Test Results
If a student has taken a practice test,
review his or her results by choosing
Practice Test from the Test and
Study Plan Manager. Use the
dropdown list boxes to select a class
and a student.
When the practice test screen
appears, use the dropdown list box
to choose a practice test session.
The report fills in with general test
information on the left and a skill-byskill breakdown on the right.
Click on the Review Test button at
the bottom of the screen for a
screen-by-screen review of the
student’s practice test. Use the Study
Plan button to open the practice test
study plan.
Skill Assessment Modules v 1.0
20
8.0 SAMs Skill Test
Study Plans and
Resource Lists
Generated by the user’s TABE
results, the study plan lists print and
software learning materials that
target the user’s skill deficiencies.
Administrators and teachers can
access student study plans by
selecting Test and Study Plan
Manager on their home screens and
choosing SAMs Skill Tests and
Study Plans. Select a class and
student from the dropdown menus,
and click on an assignment sheet
icon in the study plan column to bring
up that student's study plan.
In addition, the teacher can control
assignments by simply clicking on
the study plan button, changing it
from A (assigned) to U (unassigned)
or vice versa.
8.2 Customizing the Study Plan
Resource List
The program administrator can add,
delete, or modify resources on the
master resource list. Updates to the
master resource list, including the
newest textbooks and software, are
available for download. The
administrator can also backup and
restore the resource list. See the
Administrator: Classroom Manager
section of this manual for more
details.
8.1 Creating a SAMs Skill Test
Study Plan
The basic study plan is automatically
generated by the program based on
a student's TABE scores. Instructors
can review and personalize study
plans by
• assigning specific titles
• adding notes specific to each
assignment
• adding comments addressed
specifically to the student
Skill Assessment Modules v 1.0
21
9.0 Student Home
Screen and Submenus
For students, the home screen is the
navigational hub of the SAMs
program.
9.1 Student Home Screen
The home screen lists three subject
areas and their skill areas:
Reading
Reading
Vocabulary
Mathematics
Math computation
Applied math
Language
Language
Language mechanics
Spelling
The student starts by selecting a
subject area and skill area. Then the
student can take a skill test or see a
study plan for that skill area.
Skill Assessment Modules v 1.0
9.2 SAMs Skill Test Study Plan
Menu
Study plans are assignments based
on the student's TABE performance
(if available). All skills related to the
subject area are listed on the study
plan submenu.
Skills that are not mastered show a
study plan icon next to them.
Clicking on that icon will bring
up the study plan for that skill.
If a skill has been mastered
and is therefore unassigned, a
slash appears over the study
plan icon.
A study plan assignment lists the
resources and pages that target a
particular skill. Students can read
teacher notes on each resource and
general teacher comments for the
assignment.
22
Students should regularly check their
study plans because teachers may
update them at any time. When
assignments have been completed,
the teacher may direct students to
continue practicing for TABE by
taking the corresponding skill tests.
9.3 Skill Tests Menu
Like the study plans, skill test
assignments are based on the
student's TABE performance (if
available). Only the tests covering
areas of skill deficiency are shown in
the menu. If a student has mastered
a particular skill, that skill does NOT
appear in the skill test menu, unless
that skill test has been reassigned to
the student.
Green check
test taken and
passed
Yellow arrow
test in progress
Red X
test taken and failed
9.5 Practice Tests and Practice
Test Study Plans
When a student has successfully
completed assigned skill tests in a
subject area, the practice test offers
simulated TABE experience. This
survey-length test lets students
check their skill mastery. Each time a
practice test is taken, the program
generates a new test, calling on the
program’s large database of
questions.
Practice tests have their own study
plans. These are different from the
skill test study plans, since they take
in the entire range of skills covered in
a skill area.
The skill tests are 20-item multiplechoice tests that directly target TABE
skills. Click on a circle beside the
skill area to take the test.
9.4 Skill Test Progress Markers
As the student works through the
tests, progress symbols will appear
in the Skill Assessments Menu
beside the skill name:
Clear circle
no activity
Skill Assessment Modules v 1.0
23
10.0 Taking Tests
The student can access skill tests
and practice tests from the student
home screen in the subject area
submenu. Teachers and
administrators can access SAMs
tests from the View Skill Tests option
on their home screens.
Each SAMs skill test contains 20
multiple-choice questions that target
a single skill group tested by TABE.
The tests provide students with testtaking practice while assessing their
mastery of specific skills.
The SAMs program provides two
versions of each skill test, Form 1
and Form 2. If neither form is locked,
the test sessions will alternate
between the two forms. This
alternation, combined with the
randomization of test items, prevents
student exposure to the same test
items over and over again.
10.1 Sample Test Questions
When students begin tests, they are
offered the option of viewing the
sample questions. These tutorials
show a typical test question and
explain how to answer it. Except in
practice tests, users can access
sample questions at any time from
the Help dropdown menu.
10.2 Answering Test Questions
The user answers a question by
clicking on the letter button (A, B, C,
D, E or F, G, H, J, K) corresponding
to an answer choice. (The Math
Computation tests have five answer
choices; all other tests have four
answer choices.)
Skill Assessment Modules v 1.0
The user may change any answer at
any time, answer the questions in
any order, and skip questions.
10.3 Navigating the Test
There are three ways to navigate in
the test: the button bar, the number
bar, and the drop-down menus.
The button bar (bottom right of the
screen)
From left to right, this bar includes
• the left end arrow that takes the
user back to the beginning of the
test
• the left arrow that takes the user
to the previous question
• the answer buttons (A, B, C, D, E
or F, G, H, J, K) that the user
clicks to indicate an answer
choice
• the right arrow that takes the user
to the next page and submits the
chosen answer
• the right end arrow that takes the
user to the end of the test
The number bar (right side of
the screen)
The user can click on the
numbers in the number bar to
move from question to question
in any order. Answered
questions show up as gold
numbers on the number bar.
Unanswered questions appear
white. The number of the
question currently displayed is
boxed in gold. In tests of more
than 20 questions (practice
tests), the top and bottom
arrows become active, allowing
the user to move between sets
of questions (1–20, 21–40, etc.).
24
The dropdown menus (top of the
screen)
Options here give access to:
• File>Quit
• GoTo>Home
o New Test
• Help>Samples
o About
If an option takes the user out of the
test, answers are saved and the
user’s place is bookmarked in the
test.
10.4 Test Passages
Many test questions are
accompanied by text. If the text
passage is long, a scroll bar appears
on the right side of the text box,
allowing the user to scroll down to
read the entire text.
10.5 Graphics
Many test questions have a graphic
component (diagram, photograph,
illustration, etc.). If the graphic is too
small or too detailed to be read
clearly, a magnifying glass icon
appears at lower left part of the
screen. Click on the icon to access a
full-screen graphic.
10.6 Before Test Scoring
Upon clicking the right arrow on the
last question, the user is informed
that there are no more questions and
is prompted:
• to check test answers
• to return to and answer any
unanswered questions
• to click the Score Test button
when completely finished
Skill Assessment Modules v 1.0
10.7 Test Feedback/Test Review
Teachers determine whether or not
students should be able to review
completed tests. If a student is
allowed to review tests, a Review
Test button appears after the test
has been scored.
Feedback includes:
• the answer chosen
• the correct answer
• an explanation of the answer
10.8 Practice Tests
Each SAMs skill area includes a
practice test of 20–25 items. These
practice tests can be accessed from
the skill test menus. Like the TABE
survey tests on which they are
modeled, practice tests cover all or
most of an area’s skills. (See
Appendix A for skill lists.)
Because the practice tests are made
up from a random selection of the
skill test questions, each practice test
is unique. For example, the 25-item
Reading practice test is made up
from a pool of 200 questions.
25
Practice Test Timers
Teachers determine whether or not a
practice test should be timed. When
tests timers are on, students have
the following time limits:
Test
Reading
Math computation
Applied math
Language
Lang. mechanics
Vocabulary
Spelling
Items
25
25
25
25
20
20
20
Time
25 min.
15 min.
25 min.
25 min.
14 min.
14 min.
10 min.
The students see a clock icon in the
lower left corner of the screen. The
user can click on the icon to see time
remaining.
When the time limit is up, a warning
message appears, stopping the test.
Students are informed that no time is
left and are asked to score the test.
Skill Assessment Modules v 1.0
26
11.0 Student Records
Students can access progress
reports and study plans from
• the end-of-assessment report
• the skill area menus
11.1 End-of-Assessment Report
At the end each skill test and
practice test, students see a
performance summary that includes
• the name of the test
• the date the test was taken
• the level of mastery
• the number of correct answers
• the percent of correct answers
• the amount of time spent taking
the test
A student can access an end-ofassessment report by selecting any
previously completed test from the
skill test menu.
If students are allowed to review
tests, the Review Test button will
appear here. If the test status is less
than mastery, students can go
directly to their study plan by clicking
Study Plan. Clicking on Take Test
starts the skill test.
11.3 Accessing SAMs Skill Test
Study Plans
Students can access skill test study
plans in three ways:
If students are allowed to review
tests, the Review Test button will
appear here. If the test status is less
than mastery, students can go
directly to their study plan by clicking
Study Plan. Clicking on SAMs Skill
Tests returns students to the skill
area menu.
From the subject area submenu
The students can access study plans
from the subject area submenu.
11.2 Skill Tests Menu Report
Skill Assessment Modules v 1.0
27
From the end of a skill test
At the end of each skill test, students
can choose to go directly to their
study plan.
From the skill test menu
When students choose to retake a
skill test, they are offered the option
of reviewing their study plan.
11.4 Using SAMs Skill Test Study
Plans
The student study plan is displayed
on screen, but users may find it more
convenient to print a study plan.
Simply click the Print button at the
bottom of the screen.
Once the completed assignments
have been reviewed by the
instructor, the student is ready to
demonstrate skill mastery by taking
the appropriate SAMs skill test.
Skill Assessment Modules v 1.0
28
12.0 Help
The SAMs program employs three
main methods to help users navigate
and use the program. These are the
Help Menu, Bubble Help, and
System Help. Each serves a different
function.
12.1 Help Menu
The Help Menu is available on any
screen within the SAMs program.
Simply click on the Help dropdown
menu at the top of the screen.
Contact Us
Click this option to display the tollfree telephone numbers for technical
support and general information. A
link to a Web-based question form is
also available.
12.2 Bubble Help
Bubble help buttons provide
situational help throughout the
program. Roll the mouse
pointer over these buttons
to display screen-specific
information.
12.3 System Help
System Help displays relevant
information about the current SAMs
installation and the computer on
which it is installed. Use it to check
computer settings or to help
diagnose problems experienced with
the program. Access System Help by
clicking on Start>All Programs>MHC
Interactive>Skill Assessment
Modules>System Help.
Scoring Guide
Click this option to bring up the PDF
scoring guides for manual TABE
input.
Login Modes
Click this option to obtain an
explanation of the difference
between Shared and Exclusive
Modes. Shared Mode allows the
person logging in to share the use of
the program’s databases with at
least one other user. Exclusive mode
allows the user sole access to the
program’s databases and greatly
enhances the response time.
About
Click this option to display the
version number of the installed
SAMs program.
Skill Assessment Modules v 1.0
29
Appendix 1:
Uninstalling the Program
The InstallShield Wizard will appear.
Click on the button beside Remove.
Then click Next.
To uninstall the SAMs program, go to
Start>Control Panel. Double-click on
Add or Remove Programs.
Scroll down the list to find MHC Skill
Assessment Modules for TABE 9 &
10. Click on the Change/Remove
button.
A box will appear asking you if you
are sure you want to remove the
program. Click OK. WAIT while the
program uninstalls. Then click Finish.
Note: Removing programs using the
InstallShield Wizard removes only
those files that were installed
originally. This means that data files
created by use of the programs are
NOT removed. If you would like to
remove all of the files, you must
delete the Skill Assessment Modules
folder from the installation location. If
you do so, no data files from this
previous installation will be available
if you reinstall.
IMPORTANT! If you need to reinstall
this program once it has been
removed, make sure you return to
the computer from which you
originally installed. Unless you have
purchased additional levels, you will
only need the disk for one level
because all previously existing levels
will be available after one level is
reinstalled.
Skill Assessment Modules v 1.0
30
Appendix 2:
Skills Tested by Level
Math Computation
Level E
Addition of Whole Numbers
Subtraction of Whole Numbers
Multiplication of Whole Numbers
Division of Whole Numbers
Decimals
Level M
Addition of Whole Numbers
Subtraction of Whole Numbers
Multiplication of Whole Numbers
Division of Whole Numbers
Decimals
Fractions
Level D
Multiplication of Whole Numbers
Division of Whole Numbers
Decimals
Fractions
Integers
Percents
Level A
Decimals
Fractions
Integers
Percents
Order of Operations
Algebraic Operations
Skill Assessment Modules v 1.0
Applied Mathematics
Level E
Number and Number Operations
Computation in Context
Estimation
Measurement
Geometry and Spatial Sense
Data Analysis
Statistics and Probability
Patterns, Functions, Algebra
Problem Solving and Reasoning
Level M
Number and Number Operations
Computation in Context
Estimation
Measurement
Geometry and Spatial Sense
Data Analysis
Statistics and Probability
Patterns, Functions, Algebra
Problem Solving and Reasoning
Level D
Number and Number Operations
Computation in Context
Estimation
Measurement
Geometry and Spatial Sense
Data Analysis
Statistics and Probability
Patterns, Functions, Algebra
Problem Solving and Reasoning
Level A
Number and Number Operations
Computation in Context
Estimation
Measurement
Geometry and Spatial Sense
Data Analysis
Statistics and Probability
Patterns, Functions, Algebra
Problem Solving and Reasoning
31
Reading
Vocabulary
Level E
Interpret Graphic Information
Words in Context
Recall Information
Construct Meaning
Evaluating/Extending Meaning
Level E
Word Meaning
Multimeaning Words
Words in Context
Level M
Interpret Graphic Information
Words in Context
Recall Information
Construct Meaning
Evaluating/Extending Meaning
Level D
Interpret Graphic Information
Words in Context
Recall Information
Construct Meaning
Evaluating/Extending Meaning
Level M
Word Meaning
Multimeaning Words
Words in Context
Level D
Word Meaning
Multimeaning Words
Words in Context
Level A
Word Meaning
Multimeaning Words
Words in Context
Level A
Interpret Graphic Information
Words in Context
Recall Information
Construct Meaning
Evaluating/Extending Meaning
Skill Assessment Modules v 1.0
32
Language
Language Mechanics
Level E
Usage
Sentence Formation
Paragraph Development
Capitalization
Punctuation
Writing Conventions
Level E
Sentences, Phrases, Clauses
Writing Conventions
Level M
Usage
Sentence Formation
Paragraph Development
Capitalization
Punctuation
Writing Conventions
Level D
Sentences, Phrases, Clauses
Writing Conventions
Level D
Usage
Sentence Formation
Paragraph Development
Capitalization
Punctuation
Writing Conventions
Level A
Usage
Sentence Formation
Paragraph Development
Capitalization
Punctuation
Writing Conventions
Level M
Sentences, Phrases, Clauses
Writing Conventions
Level A
Sentences, Phrases, Clauses
Writing Conventions
Spelling
Level E
Vowel
Consonant
Structural Unit
Level M
Vowel
Consonant
Structural Unit
Level D
Vowel
Consonant
Structural Unit
Level A
Vowel
Consonant
Structural Unit
December 13, 2004
Skill Assessment Modules v 1.0
33