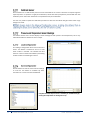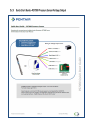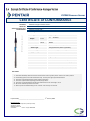
1
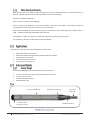
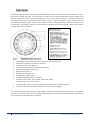
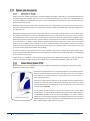
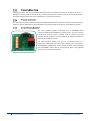
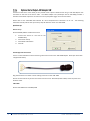
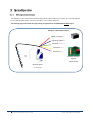
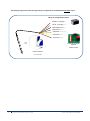
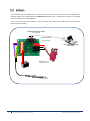
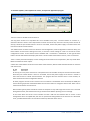
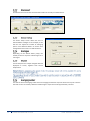
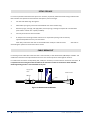
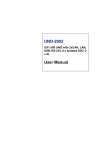
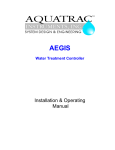
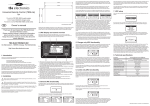
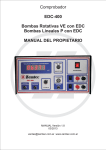
PENTAIR ENVIRONMENTAL SYSTEMS Version 1.1 Thank you for purchasing the Greenspan Pressure Sensor Model PS7000. This manual provides a guide to the configuration, operation and maintenance of these sensors to provide long term reliable and accurate monitoring. The Greenspan PS7000 is fully submersible Pressure Measurement Sensor designed for remote applications. It utilises a sophisticated capacitive ceramic pressure sensitive diaphragm. Its special features include high overload protection (up to 60 times nominal pressure) corrosion resistance and long term stability. The change in the capacitive element varies with applied pressure. This variation is measured by an electronic circuit and converted into an analogue output. The sensor can be supplied in a variety of standard ranges. The PS7000 has a standard, 2-wire, loop powered, 4-20mAoutput with an option for 0-2.5Vdc suitable for a wide range of Data Loggers, Process Controllers and other third party devices. New features include the ability to rerange the sensor as well as adjust the fluid density and gravity to suit specific applications. The instrument is packaged in a small, robust, stainless steel housing fully sealed against moisture penetration and is hardwired to either vented or non-vented cable supplied by Greenspan. The sensors are suitable for applications in harsh remote applications including groundwater, streams and rivers, water storage bodies including stratification studies, hydrological run off studies and industrial process monitoring. Along with this manual, there are several other documents that may assist in the successful configuration and operation of the Greenspan PS7000 Sensor. These should be maintained on file as a permanent reference as to the features, applications and use of the PS7000. Greenspan PS7000 – Specifications Brochure Greenspan PS7000 – Certificate of Conformance Greenspan PS7000 – Quick Start Guide The PS7000 sensors are assembled and tested in accordance with Greenspan’s ISO 9001 Quality Certified System. Following calibration the sensors undergo a range of additional control processes to ensure that all specifications are consistent and documented. The instrument is visually inspected, marked and labelled. The complete sensor calibration record is archived for reference, and batch number information is kept on file for statistical analysis. An individual Certificate of Conformance is issued to the customer. All Greenspan Sensors are made to order and are individually calibrated and inspected. This ensures that they leave the factory in a working condition. On receipt, the customer should inspect the packaging and contents for any signs of damage during transportation. The customer should also check that all items on the delivery note have been received. Please contact the factory in case anything has been damaged or missing. A full set of documentation including Certificate of Conformance, Quick Start Guide, and User Manual will be provided with all equipment – either in hard copy format or in electronic format on the USB shipped with the goods. The 316 Stainless Steel, PS7000 sensor should only be used in relatively low EC situations. Stainless steel has excellent anti-corrosion properties but care should be taken against possible corrosion in high Chloride or Ferric solutions, water with high iron or sulphate reducing bacteria, or low dissolved oxygen. Greenspan offer a PS1000 Sensor fitted with an Acetal body which provides superior corrosion protection in a wide range of chemically active waters. Because an individual sensor may be used in a variety of locations, media compatibility should be checked before installing and advice sought from Greenspan if any doubt exists. Checking the Model Number and Range Before installing your Greenspan PS7000 sensor check the information on the label is correct to confirm you have received the instrument you have ordered. The label will look similar to this. MODEL PS7000 RANGE 0 – xx m S/N 012345 The customer is advised to keep a record of the serial numbers in case the sensor is lost or the label damage. Greenspan keeps records of all sensors sold including a calibration history. Greenspan warrants all new Greenspan products against defects in materials and workmanship for 12 months from the date of invoice. Products that prove to be defective during the warranty period will be repaired or replaced at the discretion of Greenspan. Under Greenspan warranty conditions; it is the responsibility of the customer to cover shipping charges back to the factory. Upon repair/replacement Greenspan will cover the return shipping charges to the customer. This warranty does not apply to products or parts thereof which have been altered or repaired outside of the Greenspan factory or other authorised service centre; or products damaged by improper installation or application, or subjected to misuse, abuse neglect or accident. This warranty also excludes items such as reference electrodes and Dissolved Oxygen membranes that may degrade during normal use. Greenspan will not be liable for any incidental or consequential damage or expense incurred by the user due to partial or incomplete operability of its products for any reason whatsoever or due to inaccurate information generated by its products. All Warranty service will be completed as soon possible. If delays are unavoidable customers will be contacted immediately. Any sensor should not be dismantled unless under instruction from Greenspan Technical Service staff. Incorrect handling will void the warranty. The correct choice of sensor and assistance with field installation can be provided by Greenspan and their sales offices. A correct choice of equipment, together with technical advice and field experience should result in long term success in the field. Greenspan Technical Services is dedicated to customer support and provides assistance in the selection, installation, deployment and commissioning of sensors with a full range of consulting services. All Greenspan products are designed, developed and manufactured in Australia and can be supplied at short notice. If for some reason sensors are required to be returned to our factory or your sales representative, please note the model and serial number, Describe the problem, including how and under what conditions the instrument was being used at the time of malfunction. Clean the product and cable. Decontaminate thoroughly if used in toxic or hazardous environment. Carefully pack product in original packaging if possible & include a statement certifying product and cable have been decontaminated with supporting information. Products returned for repair must be accompanied by a completed GRA (Goods Return Advice) form. All sensors returned for service and repair work must be properly decontaminated prior to return. A cleaning charge may be applied to sensors that require further decontamination. Service work will not commence until the quotation has been accepted by the customer. A purchase order for all repair and service work will be required before work is carried out. 1.8 Contact Us ASIA / PACIFIC: [email protected] + 61 1300 797 246 AUSTRALIA New South Wales 268-292 Milperra Rd. Milperra, NSW 2214 Phone: +61 2 9792 0201 Fax: +61 2 9772 2960 Queensland 240 Lavarack Ave Eagle Farm, QLD 4009 Phone: +61 7 3866 7850 Fax: +61 7 3260 1916 Western Australia 70 Cleaver Tce Belmont, WA 6104 Phone: +61 8 9477 1188 Fax: +61 8 9479 6727 ASIA 390 Havelock Road, #04-01, King’s Centre, Singapore. 169662 Phone: +65 6869 8916 USA / REST OF WORLD: [email protected] + 1 407 886 3939 NORTH AMERICA 2395 Apopka Blvd. Apopka, FL 32703 United States Office: 1.407.992.5592 Fax: 1.866.260.0753 7 PENTAIR ENVIRONMENTAL SYSTEMS PS7000 USER MANUAL The PS7000 Pressure Sensor utilizes a ceramic-based, capacitive element as the transducer. This is designed to be of rugged construction and incorporates active electronics as an integral part of the transducer substrate to enhance reliability and accuracy. Force applied to the ceramic element, due to the pressure, deforms its shape. This deformation causes a change in capacitance which can be measured by the electronics. The inherently stability and toughness of the ceramic ensures the repeatability and long term accuracy of the readings are maintained under the harshest field conditions. The on board microprocessor converts the transducer output voltage to a digital signal and also measures the transducer temperature. This information is used to temperature compensate the sensor over the range 0 - 50°C. The result is converted to an analogue output of typically 4-20mA. Benefits of the Ceramic Capacitance Sensors over other types of sensors are: Extremely high overload limit (typically up to 10 X overload protection) Absolute resistant to wear High temperature stability Excellent Long term stability Excellent Repeatability and linearity No hysteresis effects normally associated with Strain Type Sensors Corrosion resistant – Other sensors require contact of stainless steel face Not subject to mechanical fatigue that may affect strain gauge type sensors Low power consumption suitable for remote monitoring & control units When pressure sensors are used for depth readings of any fluid, the density becomes an important parameter. In Australia a standard describes the relationship between force and water depth: Australian Standard AS1376-1996 * 1kPa = 102.15 mm of pure water. @20degC There is typically a 3% difference in the density between pure water and seawater. This difference should be considered when particular measurement accuracy’s are required. Another factor affecting calibration accuracy is gravity. The departure from standard gravity in Warwick, Qld is – 0.17%. at latitude 27.973 deg, height 458m above sea level. The PS7000 has a feature to adjust the fluid density and gravity to suit specific applications. *For conditions, see Clause 1.3.8.3 Australian Standard AS1376 Applications in which the Greenspan PS7000 can be used include: Monitoring of streams and rivers. Monitoring of water storage bodies including stratification studies. Hydrological run off studies. Ground and bore water analysis. Industrial process monitoring. The Greenspan PS7000 consists of the following primary elements: Ceramic capacitance transducer with Acetal protective nose cone 22.5mm outer diameter Stainless steel body material Moulded cable entry 22.5mm OD 316SS Body Ceramic capacitance transducer Acetal protective nose cone Double O Ring connections Power and Data Cable Moulded Cable Entry All Greenspan Sensors utilise a specially designed Polyurethane Cable. The cable contains 12 x conductors, 1 x drain wire, and an internal vent tube. The outer jacket is made from UV stabilized Polyurethane and is suitable for all external, underwater or harsh environment applications. This common cable construction is utilized for vented and non-vented sensors and all Greenspan Water Quality Sensors. Cables are generally factory fitted at time of manufacture in specified lengths. Cables can be joined or repaired in the field providing a waterproof connection can be maintained. Alternatively, cables can be terminated in waterproof junction boxes where cabling to other devices or longer cable runs are required. 6 5 4 6 3 2 1 Specially Manufactured Greenspan Cable with 12 cores and Internal Vent High chemical resilience and abrasive resistance Conductor cross section : AWG 24, Electrical Resistance 9 ohm per 100m (per conductor) Operating temperature: 85°C (max.), Bending radius (static) : 6 , Bending radius (dynamic) 12. Max Operating voltage : 250V Jacket Printing (white colour each meter) Conductor colour codes : green, yellow, white, black, brown, turquoise, violet, pink, red, blue, grey Tensile Strength is sufficient to self-suspend the Greenspan Sensor to depths of 300m. Long term creep due to temperature effects or tensile loading is negligible. The moulded cable is fitted to the sensor using a double o ring seal and located using 2 x grub screws. The length of the cable is not critical to the long term calibration and operation of the sensor (provided the electrical requirements such as minimum supply voltage are maintained). Gauge Sensors are vented to atmosphere so that the effects of changes in barometric or atmospheric pressure do not affect water level readings. Sensors that are not vented to atmosphere are referred to as Absolute Sensors. The primary difference between the two types of sensors is the effect of atmospheric pressure on the water level measurements they provide. Barometric Pressure acts on both sides of a Gauge sensor (i.e. via the water on one side and via the vent tube on the other). The Barometric pressure is cancelled out and has no effect on the water level readings. Gauge Sensors will read zero in air. Barometric atmospheric pressure acts only on one side of a non-vented or Absolute Sensor (on the water side). Any changes in Atmospheric pressure will be detected by the sensor and measured as changes in water pressure. As the Barometric pressure varies, these changes will be measured as water level changes even though the actual water level may have remained steady. Typical variations in Barometric Pressure when converted to head of water are in the order of +/- 100mm. A large change in Weather Pattern (Storm Front) may cause a drop in Barometric Pressure by up to 20Hpa which would cause an error of 200mm. Water level variations caused by Barometric Pressure can be removed by monitoring barometric pressure (e.g. via a weather station or barometric sensor) and then post processing the absolute water level readings. The lowest, standard range, absolute pressure sensor offered is 20m, which is suitable for measuring water levels of up to approximately 10m. Absolute sensors will read zero in a perfect vacuum and around 10m in air depending on the atmospheric pressure. Gauge sensors are suitable for most monitoring applications where water level readings are required. Absolute sensors are suitable for applications where a vented cable is not desirable (e.g. Battery pack only sensors). When pressure sensors are deployed, there can be a difference between the atmospheric temperature and the temperature of the sensor at depth. This temperature differential causes a pumping effect to occur whereby moist air from the surface is drawn into the sensor through the vent line. This moisture can condense on sensitive electronic components due to warm surface air cooling inside the sensor. Sealing the system against exposure to the atmosphere and conditioning the existing air in the vent tube can alleviate this problem. Silica desiccant crystals easily absorb moisture thereby drying the air and are used in the closed loop venting system 7CVS-001. 7CVS-001 Closed Vent System For all gauge (vented sensors) a Closed Vent System must also be fitted (pictured left). A single 7CVS-001 is designed to handle sensor cable lengths up to 70 metres. Multiple units may be joined together for greater capacity. Please refer to the Engineering Note in the appendix section on the manual for detailed instructions on the installation of the 7CVS-001. Dimensions (including filter): length x width x height 16cm x 7cm x 5cm. A protective copper nose cone (Greenspan Part # 092-1037) can be fitted to the pressure transducer to inhibit biological or marine growth on the sensor face. Similarly Greenspan also offer a sacrificial zinc anode (Greenspan Part # 092-1031) to protect the sensor if deployed in a corrosive environment. A ¼” G Process connector (Greenspan Part # 092-1038) can be fitted to the pressure transducer when monitoring pressure in process applications. (Such applications may include, pipeline monitoring, gas bubblers and tanks). The serial breakout adaptor (Greenspan Part # 085-0080) allows connection between the PS7000 and a sensor and PC. The user is able to communicate with the sensor in RS232 mode to perform user field adjustments and calibration via the PS7000 Utility Software (supplied on USB with all PS7000’s purchases). The serial breakout adaptor can also be connected directly to a multimeter, enabling the user to check the analogue inputs on the sensor. The 085-0080 is supplied with a serial communications cable (Greenspan Part # 087-0088). Please refer to the Engineering Note in the appendix section of the manual for information. A feature of the sensor is the ability to also provide serial output in SDI12 format using a small SDI Adapter unit connected to the end of the sensor cable. The SDI12 Adapter unit (Greenspan Part # 7SDI-1000) provides a standard 3 wire SDI12 output for connection to a third party Data Logger or Process Controller. Please refer to the 7SDI-1000 User Manual for more comprehensive instructions on its use. The following information briefly outlines the quick set-up steps for both the sensor and 7SDI-1000. Quick Set Up Sensor set up Set the PS1000/7000 as a RS232 instrument 1. 2. 3. 4. Connect the sensor to a PC and run the PS7000 utility. Click Sensor Set Up Click RS232 radio button Click OK Provide physical connections There is a cable available to assist connecting a bare wire sensor to the 7SDI-1000 adapter. Greenspan Part # 5CC770 (pictured below) Plug the Hirschman connector into the mating connector on the 7SDI-1000 Use the screw terminals to join the bare wires from the sensor. Red to Red, Blue to Blue, Yellow to yellow and Violet to Violet. 7SDI-1000 Set the 7SDI-1000 for the PS1000/7000 The sensor is assembled and calibrated to the required range using Ruska Digital Pressure controllers which are externally calibrated in NATA certified laboratories. The sensor is calibrated at multiple points over its pressure and temperature range (typically 36 points). o The calibration is validated at multiple different points (typically 25 points). o Accuracy and linearity is calculated from the validation data. An extensive range of final calibration and inspection tests are carried out on every sensor. The sensor is visually inspected and packed, ready for despatch. The complete calibration records, sensor history and batch number are placed on file and archived. The PS7000 is a 2 wire, loop powered 4-20mA output sensor with an option for 0-2.5Vdc. It is normally powered by an 8-30V DC power supply – which can be battery, solar or Mains Plug Pack. The following diagram illustrates the typical wiring arrangement for the PS7000 with 4-20mA output. Wiring for 4-20mA Output Sensor 8-30VDC (+ve Supply) red Signal Output 4-20mA blue Cable Shield yellow/green Serial comms yellow Serial comms purple Vent tube Serial Breakout Adaptor (optional) Software on USB Closed Vent System Part # 7CVS-001 The following diagram illustrates the typical wiring arrangement for the PS7000 with VOLTAGE output. Wiring for Voltage Output Sensor 8-30VDC (+ve Supply) red Ground (-ve Supply) green Signal Output 0-2.5V blue Signal Ground brown Cable Shield yellow/green Serial comms yellow Serial comms purple Vent tube Serial Breakout Adaptor (optional) Software on USB Closed Vent System Part # 7CVS-001 Typically the sensor will be connected to a Data Logger or Process Controller which will provide the power and ground connections and provide connections for serial SDI12 output. The Power requirements of the sensor are detailed in the Specifications Brochure. Bare Wire to SDI-12 Adapter cable (included with 7SDI-1000) Sensor cable with Bare Wire connection SDI-12 Adapter Part # 7SDI-1000 (+ ve Supply) red Ground (-ve Supply) black Signal comms white Greenspan Analogue Sensor Model PS7000 or PS1000 Data Logger or controller with SDI Input Communication with the PS7000 Sensor is performed through the PC’s RS232 serial port via the 085-0080 serial breakout adaptor and supplied software: PS7000 Utility (PS7000 Utility is supplied free of charge on all PS7000 orders Greenspan Part # 7USB-SENSOR) To use the full functions of the software a fully operational sensor with power supply and all communications leads should be available. PS1000/PS70000 Breakout Adaptor Part # 085-0080 Serial Comms Cable Part # 087-0088 PC or laptop running PS7000 Utility program Multimeter to check analogue outputs To Load the Software, Place Software CD in drive, and open the Application (exe) file. The main screen is divided into three sections. The top panel consists of a drop-down-list of all available serial ports, a Connect button to connect to / disconnect from the sensor and a Help button to access the online help. These are the only active controls at start-up, select the port number where a sensor is connected, ensure that power supply is turned on then click Connect to initiate communications. The middle section contains three more buttons: Load Configuration, Save Configuration and Sensor Setup; use these buttons to load sensor settings from a file, to save the current settings to a file or to access the sensor configuration screens. These controls remain disabled until a connection is established. To the right of these buttons are two text fields which display the sensor’s serial number and firmware revision, if one is connected. There is a data panel which displays current readings for both Pressure and Temperature; but only visible when RS232 is selected as sensor output. A status bar at the bottom shows the current state of the interface, while the LEDs indicate activities on transmit and receive lines. At start-up, the only active controls are a drop-down-list of all available serial ports and the Connect button. Select the port number where a sensor is connected, ensure that power supply to the sensor is turned on then click Connect to initiate communications. The program will first read the sensor’s serial number, its status and then the entire configuration data file. All other program controls remain inactive until a connection is established. Once connected, the COM port control will be greyed out and disabled while the ‘Connect’ button is changed to ‘Disconnect’ which can be used to terminate the current session. Data transfer typically takes around 10 seconds to complete. It may take longer if there are errors occurred during data transfer; the interface will retry up to three times before reporting an error message. In the event when the sensor’s serial number has been read but the interface fails to receive a valid configuration due to corrupted data, the user can upload new configurations to the sensor from a file stored on PC, provided that the file’s serial number matches up with that of the sensor. Click Disconnect to terminate communications with the currently connected sensor. The Sensor Setup screen allows the user to select between analogue or serial output; it also lets the user adjust the number of averaging points. Click advanced button to access more configuration items and to re-calibrate sensor. Depending on the default factory setup, the sensed pressure is output as 4-20mA signal or 02.5V signal The sensed pressure is output as digital data and displayed on screen, together with current temperature. . This sets the level of averaging. Lower levels of averaging will decrease response times but may also increase the level of noise. The factory default is 120 which give a response time of approximately 1 second. The Advanced Sensor Configuration screen allows the user to modify parameters such as Local Gravity, Specific Gravity and customized engineering units; it also lets the user to re-calibrate the pressure sensor using single point or two-point calibration. Enter a new value directly into the text field. There are two alternatives in specifying a value: Where no temperature compensation is required, deselect Use Full Density Polynomial and enter a fixed value to the Specific Gravity field. The user can specify the coefficients of a fourth-order density polynomial for temperature compensation. To do this, select Use Full Density Polynomial and enter the desired coefficients in the corresponding fields; The Specific Gravity field will be greyed out and changed to value of 1. The interface also lets the user enter customized engineering units, together with offset and gain for both pressure and temperature readings; note that these unit settings only affect digital outputs displayed on the main screen. Use Reset All to return to unity gain, zero offset, meters of water and degrees Celsius. Use this button to re-calibrate the pressure sensor and follow the on-screen instructions to step through the required process. To perform a single-point calibration, select 'NO' when prompted to proceed with the next calibration point. Select 'YES' otherwise to complete the two-point calibration. The user may need to repeat the calibration procedure to fine tune the offset and gain factors when large changes are made. The bottom section of the screen displays current readings for both pressure and temperature; this is only visible when RS232 is selected as sensor output. For loading a configuration file stored on PC to the sensor. This button is enabled as soon as a valid serial number is received. The interface will first check for a serial number match before proceeding to data transfer and resetting the sensor. Use this button to save the current sensor settings to a PC file. This button is enabled only after connection to a sensor has been established. Fully Documented Help Function is available for PS7000 Utility by clicking the Help button or hitting the F1 key 1. Edge of river/stream/lake embankment. 2. Side of boat/vessel. 3. Mounted within a stilling well off stream from main flow. 4. Mounted within drainage channels/pipes. 5. Suspended from dam walls or floating pontoon. 6. Sensor anchored to bed of lake/stream. The sensor is anchored or held in position or located so it is not subject to any movement during normal operations. Sensor is protected from direct sunlight to avoid high temperature fluctuations Sensor is protected against high turbulence and possible debris loading during flow events Care should be taken with installation and field servicing to ensure the cable is not subjected to persistent pulling snagging or severe compression. Cyclic loading of the cable should also be avoided through careful sensor deployment. Additional stilling wells or mounting brackets may be required to prevent sensor movement which may cause long term cable movement. Where cable runs are required which may be subject to environmental effects (heat, water movement, sunlight, flood debris etc.) it is advisable to protect the sensor cable inside a slightly larger diameter conduit such as PVC, steel or polyethylene. This also allows the sensor cable to be pulled out – should a sensor change-over be required at the site. Maximum cable runs up to several hundred meters are possible without affecting electrical signals. The maximum cable length is dependent on the capability of the com port of the computer. Most computers should be capable of driving a 150 to 200m cable length. 1. Edge of river/stream/lake embankment. 2. Side of boat/vessel. 3. Mounted within a stilling well off stream from main flow. 4. Mounted within drainage channels/pipes. 5. Suspended from dam walls or floating pontoon. 6. Sensor anchored to bed of lake/stream. The sensor is anchored or held in position or located so it is not subject to any movement during normal operations. Sensor is protected from direct sunlight to avoid high temperature fluctuations Sensor is protected against high turbulence and possible debris loading during flow events Environmental compatibility should be checked before using the sensors and advice sought from Greenspan if any doubt exists. The sensor utilises some 316 stainless components that are suitable in a majority of situations but care should be taken against possible corrosion in high Chloride, Sulphate or Ferric solutions. The body should always be totally immersed under the water to ensure that the sensor is at water temperature and to also avoid any possible anodic/cathodic action taking place on the components at the water-air interface. If using clamps to mount the sensor – these should be of a type that evenly clamps the sensor body without excessive loading that could damage the sensor body. The sensor may be cleaned using a soft cloth, mild detergents and warm water. If the sensor shows signs of marine growth a light biocide can be used to clean and kill any biological growth on the sensor. PS7000 Pressure Sensor CERTIFICATE of CONFORMANCE Customer: Model No. Sales Order Reference: Serial Number: "Click here & type Customer name" PS7000 Pressure Sensor (Pentair Environmental Systems material # 700-7000) "Click here & type SO Reference" "Click here & type S/N" Product Information PS7000 Pressure Sensor Range Output "Type Range here" H20 FS Current 20.00mA Zero 4.00mA Serial RS232 Accuracy +/- 0.1% FS (over 0-50C) * Sensor Type Gauge/Absolute (delete applicable) Cable Length "Click here & type Cable length" M Supply Voltage 8 - 30 VDC Connection +ve Red Signal Output Blue Connection Code Cable Shield Green/Yellow Serial Yellow & purple BW4 *Combined temperature and repeatability User Notes 1. 2. 3. 4. 5. 6. 7. Australian Standard, AS1376 is used to convert kPa to metres of water (1kPa = 102.15 mm water) at 20°C Dismantling of the sensor will void the warranty. Contact your agent for technical advice. The sensor is protected against reverse polarity connection. The sensor is fitted with a lightning protector/surge device. The sensor is compensated for temperature induced errors over the range 0 -50C. All sensors include a protective nose cone Warm up time to stable reading is 0.15 seconds. Full accuracy at 1 second. st Inspected By: _________________________________ 1 January 2009 Manufactured By: Pentair Environmental Systems (Greenspan Plant) 22 Palmerin Street WARWICK QLD 4370 AUSTRALIA Phone: + 61 (0)7 46601888 PS7000 Pressure Sensor CERTIFICATE of CONFORMANCE Customer: Model No. Sales Order Reference: Serial Number: "Click here & type Customer name" PS7000 Pressure Sensor (Pentair Environmental Systems material # 700-7000) "Click here & type SO Reference" "Click here & type S/N" Product Information PS7000 Pressure Sensor Range Output "Type Range here" H20 FS Voltage 2.5V Zero 0V Serial RS232 Accuracy +/- 0.1% FS (over 0-50C) * Sensor Type Gauge/Absolute (delete applicable) Cable Length "Click here & type Cable length" M Supply Voltage 8 - 30 VDC Connection +ve Red Ground Green Signal Output Blue Signal Ground Brown Cable Shield Green/Yellow Serial Comms Yellow & Purple Connection Code BW6 *Combined temperature and repeatability User Notes 8. Australian Standard, AS1376 is used to convert kPa to metres of water (1kPa = 102.15 mm water) at 20°C 9. Dismantling of the sensor will void the warranty. Contact your agent for technical advice. 10. The sensor is protected against reverse polarity connection. 11. The sensor is fitted with a lightning protector/surge device. 12. The sensor is compensated for temperature induced errors over the range 0 -50C. 13. All sensors include a protective nose cone. 14. Warm up time to stable reading is 0.15 seconds. Full accuracy at 1 second. st Inspected By: _________________________________ 1 January 2009 Manufactured By: Pentair Environmental Systems (Greenspan Plant) 22 Palmerin Street WARWICK QLD 4370 AUSTRALIA Phone: + 61 (0)7 46601888 ENGINEERING NOTE RELEASE DATE: 06th JUNE 2006 SUBJECT: EDITION 1.6 CVS-001, Closed Venting System for Vented Sensors INTRODUCTION When pressure sensors are deployed, there can be a difference between the atmospheric temperature and the temperature of the sensor at depth. This temperature differential causes a pumping effect to occur whereby moist air from the surface is drawn into the sensor through the vent line. This moisture can condense on sensitive electronic components due to warm surface air cooling inside the sensor. Sealing the system against exposure to the atmosphere and conditioning the existing air in the vent tube can alleviate this problem. Silica desiccant crystals easily absorb moisture thereby drying the air and are used in the closed loop venting system CVS-001. The effectiveness of the closed venting method is compromised if the system is disassembled. Therefore, once installed or reassembled, some time is required for trapped air to become dry again. One advantage of this method is that the volume of air being dried is always constant therefore the desiccant crystal will not become saturated. INSTALLATION Suggested Installation Only The unit is fitted with a DIN clip for fitting to standard DIN rail installations. Sensor cable wires are terminated in suitable DIN rail screw terminal blocks available from electrical suppliers. A vent tube joiner (supplied) is fitted between the CVS-001 and the cable vent line. See Figure 1. A single CVS-001 is designed to handle sensor cable lengths up to 70 metres. Multiple units may be joined together for greater capacity. For example, if a 140 metre cable is used, two units connected via a ‘T-Piece’ (available from Greenspan, Part, 071-9112) and extra joiner tubing (071-0008) are connected as per Figure 2. Note that there are many ways of installing CVS-001, these are only suggestions. Terminal Block DIN Rail Green CVS- Blue 001 Cable Vent Tube NOTE: Number of cable wires will vary depending on sensor type. Cut here Cut & remove tip before use Heat sealed end Cable Wires Sensor Cable Millipore Filter Air Inlet Inlet Joiner Tube Cable Vent Tube Figure 1. Single Installation, (Suggestion Only) Remove the seal by cutting the end of the joiner tube with a sharp knife prior to connection. See inset, figure 1. Terminal Block Cable Wires G re e n CVS-001 Bl G ue DIN Rail Sensor Cable T-Piece Cable Vent Tube Joiner Figure 2. Multiple Units CVS-001 SETUP FOR USE For correct operation of the desiccant system it is necessary to partially inflate the breather bag inside the CVS001 to enable it to expand and contract with atmospheric pressure changes. 1. Cut vent tube below tag. See Figure 1. 2. Attach 60ml syringe to joiner tube and withdraw all air from breather bag. 3. Remove syringe, recharge, and apply 60ml, remove syringe, recharge and repeat for a further 60ml (total 120ml = half of max. capacity of 240ml). 4. Connect joiner tube to cable vent tube. 5. If multiple units are being used the volume of air required for priming must increase by approximately120ml for every unit connected. Note: Only remove the inlet seal on the CVS-001 when ready to install the sensor dismantling the system ensure that the inlet is sealed. vent tube. If CABLE BREAKOUT For existing sensor cables where the vent tube is not accessible, a cable breakout kit (CBR-001) is available. This enables the vent tube to be separated from the wire cores and the junction sealed against moisture. For cables with connectors already fitted, (HS7, CX18) it is necessary to cut the cable to remove the connector. It is important to leave a length of cable attached to the connector to allow re-termination within CBR-001. Good Engineering practice is recommended for all joins. Flying Power Leads CX18 Connector G CBR-001 Joiner Figure 3. With Breakout CBR-001