1
ocs.com
http://www.replacementd
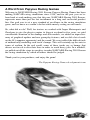
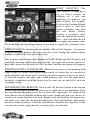
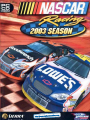
NASCAR® Racing 2003 Season
by
©2003 Sierra Entertainment, Inc. All Rights Reserved. Sierra and the Sierra logo are trademarks of Sierra Entertainment, Inc. Papyrus and the Papyrus logo are trademarks of
Papyrus Racing Games, Inc. NASCAR® Racing 2003 Season is officially licensed by
NASCAR. NASCAR is a registered trademark of the National Association for Stock Car
Auto Racing, Inc. Any other trademarks are the property of their respective owners.
® designates trademarks registered in the USA which may be registered in certain other
countries.
Table of Contents
Installation ............................................................................................4
Controller Configuration ........................................................................4
Options ....................................................................................................6
The Main Menu ....................................................................................7
Action Modes..........................................................................................8
User Modes ............................................................................................8
A Quick Spin ..........................................................................................9
Basic Driving Tips ................................................................................12
The Drivers Meeting ..........................................................................13
Setting Up Races ..................................................................................13
The Race Weekend Menu ....................................................................16
Rules Of The Road ..............................................................................18
In Car Controls......................................................................................21
The Dashboard ......................................................................................22
Function Key Displays..........................................................................22
Instant Replays......................................................................................28
Going For It All ....................................................................................35
Player Info ............................................................................................36
Opponent Manager................................................................................36
The Paint Shop......................................................................................37
Multiplayer – Taking On The World
............................................39
The Garage ..........................................................................................43
Tuning The Car ....................................................................................45
Appendices ..........................................................................................47
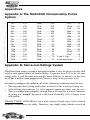
Appendix A: The NASCAR® Championship Points System ..............47
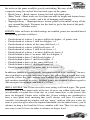
Appendix B: Sierra.com Ratings System ............................................47
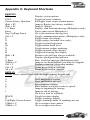
Appendix C: Keyboard Shortcuts ......................................................50
CONTACTING SIERRA....................................................................57
A) Customer Service, Support And Sales ............................................57
B) Technical Support ............................................................................59
C) Sierra Warranty And Legal Information ..........................................61
2
A Word From Papyrus Racing Games
Welcome to NASCAR® Racing 2003 Season. Papyrus Racing Games has been
making NASCAR racing simulations since 1994, and for the past year we’ve
been hard at work making sure that this one, NASCAR® Racing 2003 Season,
represents more than just the last installment in a long and successful product
line. Our goal was to set a new standard of excellence in the racing simulation
genre, and we knew we couldn’t do that while merely resting on our laurels.
So, what did we do? Well, for starters we worked with Jasper Motorsports and
Goodyear to give the physics engine its biggest overhaul in five years, we paid
considerable attention to the damage and aero models, we added an impressive
array of graphical updates and new gameplay features, and we did a lot of work
on the AI (computer opponents) and the sound. We even tackled the difficult task
of authentically modeling each track’s bumps. This will certainly up the ante in
terms of realism. In the real world, some of these tracks are so bumpy that
drivers are forced to alter their lines in order to avoid heavy jolts. In a nutshell,
we pulled out all the stops in our drive to make NASCAR® Racing 2003 Season
the racing simulation by which all others should be judged.
Thank you for your purchase, and enjoy the game!
- The Papyrus Racing Games development team
3
Installation
Close all other programs before you begin installing NASCAR Racing 2003
Season. Place the CD-ROM in its drive. The installation process should begin
immediately. If it doesn’t, click on the START button and choose RUN. Type
D:\Setup (substitute “D:” with the correct drive letter of your CD-ROM drive if
it’s different) and choose OK. The installation will now begin.
Enter the correct CD Key located on the NASCAR Racing 2003 Season CD
jewel case. After a brief system test is performed, you must choose the destination
hard drive and folder location for your NASCAR Racing 2003 Season
program files. Use the default drive and folder presented, or click on the Browse
button if you’d prefer to install in a different location.
When the basic installation process is complete, NASCAR Racing 2003 Season
will test your video card’s capabilities. Choose a 3D acceleration format (renderer), a display adapter, and a graphics mode, and click the Finish button to begin
the test. You can reconfigure these settings at any time from inside the game by
going to the Main Menu and choosing the Configure 3D Graphics option. From
outside the game, use the Windows START button to open the PROGRAMS
folder that contains NASCAR Racing 2003 Season, and choose the Configure 3D
Graphics option. Alternatively, you can open the MY COMPUTER window on
your Windows operating system and then navigate to the game folder and
double-click on the “Config.exe” file.
Controller Configuration
The first time you run NASCAR Racing 2003 Season, you will be taken to the
Controls tab on the Options screen, where you may be asked to calibrate your
controller. There are three main steps to getting your controller to work with
NASCAR Racing 2003 Season:
1. Plug in and configure your control device (joystick, wheel, pedals or gamepad) using the Windows Control Panel first! Follow your control device
manufacturer’s installation instructions.
4
2. Calibrate your controller in NASCAR Racing 2003 Season. NOTE: NASCAR Racing 2003 Season uses its own calibration routines, so you must
calibrate from within the game - even if you have already calibrated your
controller in Windows. The first time you run the game, the calibration box
may pop up automatically. If it does not, simply click on the Options button
located on the Main Menu, and then select the Controls Tab. Follow the
on-screen prompts to calibrate your controller. You should see the calibration
meters on the screen react to your movements. If you don’t, your controller
has not been recognized and may not be installed correctly.
3. Assign the controls. This is perhaps the most overlooked step in getting a
controller properly set up. You need to tell NASCAR Racing 2003 Season
what each controller movement actually does. The Controller Assignment and
Gear Selection items are on the left side of the Controls Menu. Simply click
the mouse in the highlighted area to the right of a particular function, and
when prompted to do so, make the controller movement or press the button
you want to assign to that function. For example, to assign the Accelerator to
a pedal or button, click on the Accelerator item on the Controls Menu and then
simply depress the pedal or button you would like to use as an accelerator.
Keep in mind that you can assign any of these functions to the keyboard as
long as the key you select isn’t already being used to perform some other
game function. The program will prevent you from attempting to assign any
controller movement or keyboard key that is already in use. You’ll have to
re-assign one of the control movements to another function before exiting the
Controls Menu.
You can re-configure or re-calibrate your controller at any time by visiting the
Options screen and clicking on the Controls tab. You can get to Options from the
Main Menu, from the Race Weekend screen, or even while you’re inside the racecar.
If your controller supports Force Feedback, NASCAR Racing 2003 Season
allows you to adjust the strength, damping, and latency of the response.
Experiment with different settings until the controller has the ‘feel’ that you
want. For more information, right click on any of the force feedback settings
located in the upper right area of the Controls tab.
There are a couple of other settings on the Controls tab you may want to tweak
before hitting the track. The first is Steering Linearity. Most people who steer
with a wheel find that they get the best results with a high Linearity setting (70%
or above), while joystick and keyboard users find that a lower setting (20% or
5
less) usually does the trick for them. Naturally, everyone is different, so experiment
with this setting until you find your comfort zone.
If you’re using a digital controller or the keyboard, a vast array of options is
available to help you achieve the smoothest response. You can find these
adjustments under the Advanced button on the Controls tab.
Finally, in the lower right corner of the Controls tab, you’ll see a list of the
various driving aids that are available in the game. For details on how a particular
driving aid works, right click on its name. Many of these aids are turned on by
default because driving a 750HP stock car at the limit isn’t always easy. As you
gain speed and confidence, you’ll want to gradually turn the aids off; while the
aids were designed to help novice drivers control their cars more easily, they have
also been designed to be a disadvantage to the experienced racer. For example,
turning on automatic shifting can give a beginner less to worry about while
racing, but the gear changes won’t happen with the same kind of speed or precision that an advanced driver can get by shifting gears manually.
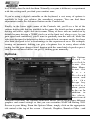
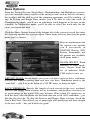
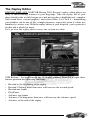
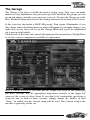
Options
The Options
Menu is
available
from the
Main Menu,
from the
R a c e
We e k e n d
screen, and
v i a t h e
Escape key
interface
when you’re
in the car. In
addition to
the aforementioned
controller selections, the Options Menu also allows you to tweak many different
graphics and sound settings so that you can customize NASCAR Racing 2003
Season to your liking. From the Options Menu, simply click on the appropriate
tab control at the top of the screen – Controls, Graphics, Sound or Other - and
6
tweak to your heart’s content. If you’re not sure what a particular option does,
right-click with your mouse on its name, and a pop-up help bubble will provide
an explanation. Pop-up help is available for most menu options throughout
NASCAR Racing 2003 Season.
The game initially sets many of the graphics and sound options automatically,
based on what it detects your system can handle. You can adjust any of these
settings to your liking, but use some common sense! Each of these items affects
the overall animation speed of the game, so cranking one item up may mean
you’ll need to reduce another item to keep the frame rate flowing smoothly. The
bottom line is simple: a choppy game means sluggish control movements, and
sluggish control movements usually result in losing control of the car.
The Main Menu
NASCAR Racing 2003 Season’s Main Menu is the heart of the user interface,
and serves as your launching point into the NASCAR garage and every track on
the circuit. The Main Menu is broken up into two sections: Action Modes and
User Modes.
7
Action Modes
The various Action modes are listed on the left side of the screen. Here’s a quick
rundown on what they are:
Testing Session: Just you and the track. Testing Sessions give you the opportunity
to learn in private on any track you choose, without any other cars to distract you.
Single Race: Pick a track and set up a race. You can compete in an entire race
weekend, which consists of four race sessions: Practice, Qualifying, Happy Hour,
and Race. Or, if you’d prefer, you can skip straight to the race and try to win from
the back of the field.
Championship Season: An entire season’s worth of racing, as you accrue championship points based on your finishing position in each race. Will your name be
the next one emblazoned on the NASCAR trophy? See if you’ve got what it
takes!
Multiplayer: Time to “put up or shut up.” NASCAR Racing 2003 Season’s
unparalleled multiplayer mode allows you to compete against an entire field of
living, breathing human opponents via the Internet. Don’t have enough racing
buddies to fill out the field? That’s OK, throw some computer opponents onto the
track if you’d like. Just remember to bring your modem, LAN, or Internet
connection along for the ride!
Exit: Returns you to the Windows desktop.
User Modes
The User Modes are located on the right side of the screen, and they give you
total control over the simulation environment. Here’s what these items do:
Driving Lessons: Click here to check out a series of driving lessons and tactical
tips that were made with the simulation’s Replay Editor (we’ll show you how to
make your own later on). The lessons cover everything from the basics of car
control up through advanced subjects like racing strategy.
Player Info: Click here to change personal settings such as your name and the car
you drive. Specify a car to drive offline, and one to race online.
8
Opponent Manager: Here’s where you can adjust ratings for computer
opponents, use the Paint Shop to recreate your favorite teams and cars, and where
you manage rosters of opponents to race against.
Options: This is where you’ll adjust your controls, graphics, and sound
preferences. Remember, you can also access this menu from other areas within
the game, including while you’re at the racetrack itself.
Replay Studio: Lets you view and edit your saved replay files. The ability to edit
replay files is a powerful feature in NASCAR Racing 2003 Season, giving you
the capability to build and share highlight reels with all your friends.
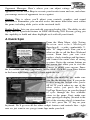
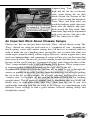
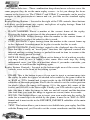
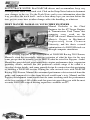
A Quick Spin
From the Main Menu, click Testing
Session and select Michigan
Speedway® - a wide, comfortable, 2mile “D” shaped track. Now you’re at
what we like to call the Race Weekend
screen. From here you can view
replays, check standings and lap times,
and control the entire slate of racing
sessions. Notice the various buttons on
the screen that allow you to visit the
Garage to adjust your racecar, Pause
the live action, and most importantly, hit the track! Click the green Drive button
in the lower right corner and let’s climb inside the car.
Before you mash the gas, make sure
you like the driving view. If you prefer
to drive using the cockpit view, you’re
all set. If you’d rather try one of the
other views, just press the Page
Up/Page Down keys on your keyboard
to cycle through the five available
views in the game. Next, make sure
your speed/gear display (located to the
left of the steering wheel) is turned on.
If it isn’t, press the “S” key on your
keyboard. We’ll go over all the other cockpit features and controls later - right
now we just want to see you get some laps under your belt.
9
Shift to first gear and gently begin accelerating. Try to shift into second gear and
keep the RPM’s below 6,000 until you
reach the backstretch. (Did you already
spin out? A real stock car’s tires are cold
and don’t have as much grip. Remember,
start slowly and keep the car under control
until the tires warm up – which usually
takes 2-3 laps). Steer the car on the apron
of the track, staying along the bottom of
the pavement through Turns One and Two. When you reach the back straightaway,
merge onto the track, shift to third and increase the throttle.
Work your way up the gearbox quickly until
you reach fourth gear, about the same time
your car approaches Turn Three. As the
pavement darkens, release the accelerator
and try to aim for the middle of the turn. At
this point you should be off the gas entirely.
Let the car glide into the corner as the RPM’s
fall off - gradually add about 50% braking
and keep turning the car in the proper direction, which at this point, should still be left!
You’ll have to concentrate to keep the car
from drifting down the front straightaway.
Re-apply the throttle in a smooth, gradual
manner as your car exits Turn Four. The
front straightaway at Michigan is a long,
sweeping left bend that requires supreme
concentration. Try to keep the car in the
darkened “groove” as you cross the
start/finish line; when you approach Turn
One keep the car high on the track, lift off
the gas early and let it drift down near the bottom on its own. Stay off the gas
until you feel like the car is about halfway through the turn. Gradually reapply
throttle and power up off the bottom of the track as you exit Turn Two. Avoid the
urge to stomp on the gas- even at high speeds this could cause the rear wheels of
your car to spin out. Down the back straightaway, keep the car near the outside
wall; you’ll probably have to steer toward the right somewhat in order to
achieve this.
10
Approaching Turn Three, stay
high and lift off the accelerator
early, again letting the car drift
down toward the bottom of the
track. Coast around the bottom of
Turns Three and Four until you
reach the halfway point, then ease
back onto the throttle and drive
back toward the flag stand. Take
some more laps and get acquainted
with your racecar, and press the
ESC key when you’re done.
An Important Word About Chassis Setups
Chances are, the car you just drove used the “Easy” default chassis setup. The
“Easy” default car setup for each track is a “symmetrical” one - meaning the
shock, spring, caster, and camber settings have all been set to neutral values in
order to make the car’s handling more predictable and act more like what you
would expect from the family station wagon. However, station wagons don’t win
stock car championships, and symmetrical setups will not give you the fastest lap
times on oval tracks. On an oval, you’ll be turning in only one direction - left, and
because of that you’ll want an “asymmetrical setup” more along the lines of the
“Fast” setups included with NASCAR Racing 2003 Season. These setups feature suspension that is tuned differently on the right side vs. the left.
Asymmetrical setups will help the car turn left in order to get it through the
corners as quickly as possible, but they have the annoying side effect of pulling
the car to the left on the straights. As a result, you may find that you need to
“counter steer” to the right on the straights in order to keep the car tracking
straight ahead. This is perfectly normal, and is something that real NASCAR
drivers have to deal with every time they climb into the car. If you feel
comfortable tinkering with the car setup in the Garage, try experimenting with
different Caster settings to find a good balance between turning ability and
straight-line control.
11
Basic Driving Tips
Now that you’ve run some laps and become more comfortable with the feel of
your stock car, let’s cover some of the basics that will help you become a
competitive NASCAR driver. First of all, a word about chassis setups: Any
NASCAR driver will tell you that in order to win a championship, you’ve got to
have good setups for every track. But while a car set up to your liking can help
you drive faster, it won’t necessarily make you drive better. Here are some ways
to improve your driving skills quickly:
• Study other drivers, whether computer opponents or humans on the Internet.
Watching them will give you a good understanding of the fundamentals and
will serve as a solid foundation upon which you can build your skills. Pay
close attention to the racing lines they drive, as well as their speeds and
braking points.
• Concentrate on one track at a time. Don’t jump around from track to track
each time you launch NASCAR Racing 2003 Season. Learn your way around
one track comfortably; try to turn competitive laps in the preferred groove, but
also practice running alternate lines - both high and low. Successful
drivers know how their car will behave on every part of a specific track.
• Get comfortable in traffic. Skip qualifying and take a provisional (start in last
place). Try to patiently pick your way through traffic and work your way
toward the front of the field.
• Study the tape. Save and review replays of your escapades on the track. Be
sure to analyze the action using the various camera angles to learn as much as
possible. The helicopter view is particularly useful for finding the fastest way
around a speedway, and for spotting a problem with a particular chassis setup.
• Listen to your car. Squealing those tires through every corner? Run some
practice laps to learn how fast you can drive through each corner at a
particular track without squealing the tires. Some tire scrubbing is to be
expected, but if you’re laying down enough rubber to resurface the entire city
of Daytona, you’ll need to learn to drive with a bit more finesse. Try braking
a little earlier going into a corner; this technique will often allow you to power
out of that turn with much more authority, while conserving precious rubber.
12
The Drivers Meeting
In this section we’ll give you all the info you’ll need to get around in NASCAR
Racing 2003 Season, including everything from how to compete in various types
of races to how to paint your car.
Setting Up Races
At the Main Menu, choose the type of event you’d like to drive in. Select Testing
Session if you want to have an empty track all to yourself. Click on Single Race
if you want to pick a track and compete offline against computer recreations of
real NASCAR drivers. If you’re experienced enough to battle the NASCAR pros
on a variety of tracks, go for the Championship. Finally, there’s Multiplayer –
stop trash talking and just bring it! Time to show your skills to the world, baby!
13
Race Options
From the Testing Session, Single Race, Championship, and Multiplayer screens,
you can customize many aspects of the racing action, such as the race distance,
the weather, and the skill level of the computer opponents you’ll be battling – if
any. In Testing and Single Race modes, you’ll be able to select the track. In
Championship mode, you’ll race on whichever track happens to be next on the
schedule. In Multiplayer mode, you’ll be able to select the track only for the
races you create and host.
Click the Show Options button at the bottom left of the screen to reveal the entire
list of racing options that you can adjust. These items will vary based on the game
mode you’ve chosen.
Here are explanations for
the various race options
you’ll encounter in
NASCAR Racing 2003
Season. Remember, not
all options are available
in all game modes.
TRACK SELECT: From
bullrings to super speedways, choose from the
list of authentic NASCAR tracks to race on.
DRIVING MODE: Arcade mode gives you a car that’s easier to drive, with more
traction and maneuverability than real race cars have. Simulation mode is the
“real deal” – you’ll be at the helm of a 750 HP beast, so hang on tight!
RACE WEEKEND: Specify the length of each session in the race weekend.
Practice and Happy Hour sessions are set in minutes, and the Race session is set
as a percentage of the actual 2003 race distance. Run a short 5% sprint race, or
lock the door, take the phone off the hook and run a full 100% marathon – just
like the big boys do. To skip the Practice and Happy Hour sessions, check the
Quick Race box. This allows you to jump right into qualifying and then straight
to the race itself – but you’d better be good!
Use the Pit Stop Frequency option to modify the tire and fuel usage rate for your
race. At the default value of 1x, fuel and tires are consumed in real time. At 2x, they
are consumed at double the normal rate, etc. The purpose of this option is to be able
to create shorter races that force players to make pit stops. At 1x, it can take up to
35% race distance before a stop becomes necessary, while at the maximum value
of 4x, players will probably have to make a stop in order to finish a 10% race.
COMPUTER OPPONENTS: This section of the options list allows you to adjust
the computer-controlled competition to match your skill level. Use the roster
selector to specify the group of opponents you want to race against; the rosters
themselves are organized using the Opponent Manager screen. Decide how many
other cars you want to oppose. Use the Strength control to either manually adjust
the overall strength of your computer opponents, or use the Auto setting. When
using the Auto setting, NASCAR Racing 2003 Season uses data based on your
performance at each track, and comes up with a recommended opponent strength
value in the “Auto” field. Remember, the Auto setting is based on your performances
at each individual track; if you were to race five times at Daytona and the Auto
strength climbs to 95%, then you decide to make your first visit to Talladega, the
Auto level will drop back down to the default (70) because you haven’t raced
there yet.
ADAPTIVE SPEED CONTROL: AKA “Catch-Up Mode”. This is a feature that
basically serves to always keep your car in the middle of the racing action. As
you drive faster (or slower) laps, the computer opponents will compensate to
match your speed. This differs from the “Auto Strength” setting discussed
earlier, in that Adaptive Speed Control is dynamic, ever-changing as you race; the
Auto Strength feature is updated only at the end of each race.
DAMAGE: Choose from three different damage settings: None, Moderate, or
Realistic. With damage set to None, your car becomes impervious to collisions.
At Moderate, your car will sustain minimal damage during hard collisions.
Ready to take the rookie stripes off your bumper? Then choose Realistic
damage, but realize that a heavy collision usually spells the end of your day.
Remember that this setting refers to collision damage only – it’s still possible to
ruin the engine and blow tires due to abuse, regardless of the damage setting
you’ve chosen.
RULES: Here’s where you can change the various rules for the race weekend.
Checking the Full Pace Lap box will cause the pre-race pace lap to start in the
pits, just like it does in real life. The tradeoff is that it can take a long time to
complete a full pace lap, especially at the road courses. If you’d prefer an
abbreviated pace lap that starts on the racing surface, leave this box unchecked.
The Yellow Flags box controls whether or not a yellow caution flag will be waved
in the event of a hazardous condition on the track – as is the case in real life.
Without yellow flags, the race will go by faster, but things can get pretty hairy
with cars barreling full-steam through the scene of an accident. The Double File
Restarts setting is only applicable if the Yellow Flags box is checked. If Double
File Restarts are enabled, cars that aren’t on the lead lap are allowed to line up
on the inside of the race leaders during cautions. Regardless of this
setting, per NASCAR rules double file restarts are not used at the road courses,
and they aren’t used during the last ten laps of a race.
There are a few rules that are available only in Multiplayer races. For example
Hardcore Mode was designed to help provide as level a playing field as possible
during online contests by forcing all drivers to use the cockpit view and have
certain realistic visual effects enabled. Lastly, the Fixed Setup option forces
everyone to race with the same car setup, leveling the playing field. The race host
determines which chassis setup is going to be used.
WEATHER: Often overlooked, weather conditions have a profound effect on
your car’s handling. Cooler air is less dense than warmer air, so when the
mercury drops you can expect your car’s engine to “breathe” more efficiently.
Drag is also reduced in cooler, thinner air. Hotter weather tends to stress your
car’s systems and increase the amount of drag. Also, remember that tires grip
better when they’re warmer, just below their peak operating temperature of 225˚
Fahrenheit. The wind can also have a marked effect on the car’s handling. A tailwind will push it down the straights and tend to make it loose in the corners,
while a stiff headwind will slow it down on the straights and cause a severe push
in the corners. Clicking the Realistic box will set the weather based on average
local conditions for each track, but if you’d rather set the weather to your own
specifications, just uncheck that box and go for it. NOTE: The prominent flags at
each track are animated, and their animation direction and rate matches the current wind settings, so keep an eye on the flags to help gauge the wind.
The Race Weekend Menu
The Race Weekend Menu is the place where you navigate amongst the various
tasks at the track. From taking the car into the garage for tweaking, to navigating
among the sessions of the event, to viewing standings and replays, the Race
Weekend Menu is your NASCAR track pass!
16
Click on the various tabs on the Race Weekend Menu to view items like general
race information, a chronology of lap times, the current standings, and the race
entry list. Use the replay controls (as described later) to view highlights. Visit the
garage for adjustments, change game options, or drive the car - all by clicking on
the buttons found on the Race Weekend Menu.
NASCAR Racing 2003 Season allows you to easily jump to the start of any session
during the race weekend by using the session navigation controls. As each
session progresses, a timer bar will “grow” from left to right underneath that
session’s name. To go to the start of a session, simply click on the arrow control
above the session name. You can go forward or backward through time – so you
not only can skip ahead to future sessions, you also can go back to the start of a
previous session or the current session. Keep in mind that if you decide to re-run
a session, you’ll be starting from scratch, not only for that session, but also for
future sessions in the weekend as well. For example, let’s say you’ve completed
Practice, finished Qualifying (let’s say you qualified 8th), and are halfway
through Happy Hour when you decide to jump back to the start of Practice. By
doing so, you erase not only the results of the original Practice session, but the
results of Qualifying and Happy Hour as well.
17
Rules Of The Road
Every driver needs to know the basic rules of stock car racing before the flag
drops. Penalties are disabled in Practice and Happy Hour (except for reckless
driving). Your spotter will still let you know when you’ve committed an infraction,
but there won’t be any consequences. However the officials won’t be so lenient
in the Race session itself. Break a rule then, and those officials will dole out
penalties faster than a motorcycle cop in a foul mood!
With that in mind, here are the rules:
• No passing under yellow, including the pace car. When the yellow flag comes
out, the leader is instructed to race back to the start/finish line. Once the
leader has crossed the start/finish line, all traffic behind the leader must also
slow and line up according to the rules. However, if a car is going too slowly,
this rule is tossed out. Your spotter will tell you what to do. The penalty is a
black flag, and you must stay in your pit stall long enough to offset any advantage you gained.
• No speeding in the pits. You can’t exceed the pit road speed limit. The
speeding penalty varies depending upon the situation: if you are caught
speeding on pit road (whether en route to the stall or exiting the pits) under
green flag conditions, you will be black-flagged and must come back and
drive through the pits (you CANNOT stop in your pit stall) without breaking
the speed limit. Failure to adhere to the speed limit during this drive-through
will result in a second black-flag, but this time you’ll have to serve a stop-andgo penalty. If the pit road speed limit is broken under yellow flag
conditions, there is no black flag, but you must go to the end of the longest
pacing line for the restart.
• You must merge properly when exiting the pits. The rule is to stay on the
apron (or as far away from the racing line as possible) until the spotter says,
“O.K., merge when you can.” That doesn’t necessarily mean that it’s SAFE to
merge, it just means that you may legally merge at any time. Some tracks, like
Indianapolis, have pit exit roads that you must follow if you want to avoid this
penalty. The penalty is a black flag stop and go under green, or a simple “go
to the end of the longer line” with no black flag under yellow.
• You must enter the pits properly. Cutting across the grass in an attempt to
avoid having to slow down to the pit speed limit is a no-no. You must cross
the line that marks the beginning of the pit stall area. At Homestead, you need
to use the pit access road in order to avoid this penalty. If you break this rule
under green flag conditions, you’ll be black-flagged and you’ll need to come
18
•
•
•
•
•
•
•
in and serve a 30 second penalty. Under yellow, you won’t be black-flagged,
but you’ll have to go to the end of the longer pacing line.
You can’t cut across the Inner Loop at Watkins Glen or the hairpin at Infineon
Raceway without stopping. If you perform either action and fail to come to a
stop before you merge with traffic, you’ll be penalized. You’ll be black
flagged and forced to serve a stop-and-go penalty.
You can’t pass the leader before the start/finish line on a start or restart. There
is a “fudge factor” built in to keep you (when leading) from intentionally
being able to cause a violation for someone else. If a car is going too slowly,
this rule is tossed out. The spotter will let you know if it’s OK to pass. Keep
in mind that in races with double-file restarts, the leader on a restart is the first
car in the OUTSIDE line. If you break this rule, you’ll be black-flagged and
you’ll have to come in and serve a stop-and-go penalty.
You can’t pass a car in the same pacing line on the inside before you reach the
start/finish line. You can pass on the outside, but not the inside. Again, if a car
is going too slowly, this rule is tossed out, and your spotter will let you know
that it’s OK to pass. If you break this rule, you’ll be black-flagged and you’ll
have to come in and serve a stop-and-go penalty.
You can only pit on the appropriate lap(s). Only the cars on the lead lap may
pit the first lap the pits open. Everyone else must wait until the next lap. The
penalty for entering a closed pit is a trip to the end of the longer pacing line.
Your spotter will tell you where to go.
You can’t continue to race with heavy damage. If your car is damaged to the
point that the engine is smoking heavily or your car is dropping debris or
fluids, you’ll be black-flagged. To clear the black flag, you must pit and get
the car repaired at least to the point that NASCAR feels it’s safe. If the car is
too heavily damaged, it’s possible that the crew won’t be able to fix it well
enough for you to continue, and you won’t be allowed back on the track.
You can’t drive in the wrong direction. If you do, you’ll get disqualified.
Driving in the wrong direction can be done either forwards or backwards, so
be careful.
You can’t pass the official at the end of pit road if he’s showing the stop sign.
If you pass the official when he’s showing the stop sign, you’ll have to go to
the end of the longest line. This rule is only applicable to races with yellow
flags.
19
MULTIPLE PENALTIES: For the sake of convenience, if you have multiple
penalties, you only need to come into the pits once. For each penalty beyond the
first one, an additional time penalty is tacked onto the time normally associated
with the infraction. This is done to simulate the additional time it would have
taken you to serve the penalties on separate trips to the pits.
POST-RACE PENALTIES: If you have un-served penalties when the checkers
fall, you’ll receive a post race penalty of 1 lap per outstanding infraction.
SERVING PENALTIES: If you get black-flagged, you must report to the pits
where the NASCAR official will detain you in your stall for however long it takes
to serve your penalty. However, you can only clear a black flag (for
non-damage related issues) under green flag conditions, and even then you can’t
clear a black flag on a restart. If you happen to be on pit road when the yellow
comes out, you may proceed to your stall and legally serve the penalty and clear
the black flag. You’ll have four green flag laps to come in and clear the black
flag; if you choose to ignore the black-flag, you’ll be disqualified.
A few final items of note:
• In Qualifying, your time will be tossed and you’ll be given a provisional
starting position at the rear of the grid if you cut the Inner Loop at Watkins
Glen or the final hairpin at Infineon.
• When yellow flags are turned on, it is possible for the start or restart to be
“waved off” in the event of a mishap. If this occurs, the start/restart will be
delayed by one lap.
• In Arcade Mode, the rules are relaxed. Speeding on pit road, passing under
yellow, passing the pace car, reckless driving, and cutting the Inner Loop at
Watkins Glen or the hairpin at Infineon are the only rules enforced.
20
In Car Controls
Now that you’ve got
some laps under your belt
and you’re an expert at
creating and customizing
race events (you did
study all of the previous
pages didn’t you?), let’s
cover all of the items
you have access to
whenever you’re in
the driver’s seat. These
in-car controls include
the instrumentation of
your stock car, as well as
the keyboard keys that allow you to communicate with your pit crew.
Are you one of those drivers who prefer to adjust the seat as soon as you climb
into a car? The Field of View can be adjusted from both inside the car or at the
Options Menu. Press CTRL-F/ALT-F to zoom in or out to your liking.
The “S” key on your keyboard toggles on/off the speed/gear/flag display shown
just beside the driver’s side window. The Function keys on your keyboard
(F1-F9) toggle on/off the various pit radio displays, superimposed over the
lower-right corner of the cockpit. The rearview mirror keeps you abreast of what
(or who) is behind you.
21
The Dashboard
• Tachometer: Measures engine RPM. It’s the biggest dial on the dash, because
real stock cars don’t have speedometers and the driver relies on the tachometer
to calculate speeds. If the engine revs higher than 8,500 RPM, it’s time to shift.
• Secondary dials: These instruments provide information about your car’s
current health. Fuel Pressure should hold steady at around 9 PSI, until you start
to run low on gas; after that it will start to drop pretty quickly. Water
Temperature should hover at around 220 degrees. If the water temperature is too
hot, you’ve probably got too much tape over the grille (or heavy front end
damage). Oil Pressure and Oil Temperature are reflective of your engine’s
stress. If the pressure drops or the temperature rises, either you already have an
engine problem, or you’re about to have one. This could be the result of improper
car setup (gears), an abusive driving style, or as the result of damage.
• Warning lights: The critical gauges each have a warning light (sometimes
called an “idiot light”) adjacent to them. These lights will start to blink to let
you know that something’s wrong.
THE MIRROR: Press the “M” key on your keyboard to toggle through the
various levels of mirror detail. If the action seems too “choppy” you might be
able to make things run a little smoother by reducing the mirror detail. In
addition, you can press the “N” key on your keyboard to remove the cockpit
reflections, including the back of your roll cage.
DRIVING VIEWS: You can cycle through the various driving views by pressing
the Page Up/Page Down keys on your keyboard. There are five views to choose
from while driving. Try them all and pick the one that keeps you on the track. In
Multiplayer races in which the race host has checked the “Hardcore Mode”
option, you’ll have to race using the cockpit view, as the Page Up/Page Down
keys will be disabled.
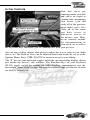
Function Key Displays
The various function key displays are available only while you’re driving the car.
They serve as the means by which you’ll request pit service, view up-to-themoment standings, and keep tabs on how many laps are left in the race, so take
the time to learn how these keys work. To call up one of these displays, press the
appropriate function key on the keyboard (F1-F9). To switch to a different
display, press that display’s function key, and it will replace the current display
if one is already on-screen. To toggle the function key display window off, press
the function key associated with the current display being shown. So, if you have
the F3 display turned on, press F3 again to turn the function key window off.
22
Here’s what each function key allows you to see/do:
F1: Session Info - Here, you’ll find information concerning your lap speeds or
times, as well as your position in the current session, the current lap, the
remaining number of laps (or time) in the session, and the amount of time cars
immediately in front of and behind you in the standings are away from you. Not
all of this information is available during every session. The F1 display will
update each time you cross the start/finish line.
F2: Standings - Each time you invoke the standings display, your car’s position
will appear in the center of the window. To scroll through the complete list of
drivers, use the up/down cursor arrow keys on your keyboard. You can always
reset the standings display by simply toggling the window off and then on again
with the F2 key. The F2 display has two modes, and you can use the Spacebar to
toggle between them both. The first mode is displayed by default, and it shows
the session standings based on your most recent trip across the start/finish line.
The second mode is a real-time display that shows you which cars are immediately ahead of you and behind you on the track – regardless of their position in the
standings. In this mode, cars listed in white are on the same lap as you, those
listed in red are one or more laps ahead of you, and those in green are one or more
laps behind you. If a car is coming up from behind to lap you, its F2 display line
will start to flash, letting you know that the leaders are closing in on you!
F3: Fuel - This window gives you the car’s current fuel status, including the
estimated* amount of fuel remaining and the approximate number of laps you can
complete before your tank runs dry. At the bottom of the window, you can tell your
Crew Chief how many cans of fuel to put into the car during your next pit stop. Each
can holds up to 11 gallons of 110-octane racing fuel. The choices you have are 2
cans (22 U.S. gallons, complete fill-up), 1 cans, 1 can, can, a “splash”, or none.
A splash of fuel will give you approximately an eighth of a tank of gas - perfect for
the closing laps of a race when you can’t afford a lengthy pit stop. The crew will
always stop fueling the car once the tank has been filled up to its 22-gallon capacity.
Use the left/right cursor arrow keys on your keyboard to request the desired
amount of fuel. Since the default is usually 2 cans, the crew will always top off
your tank unless otherwise specified. The default value is set by the crew chief,
and is based on the estimates you see in the F3 box.
* The fuel calculations performed by your crew are ESTIMATES ONLY. They
may be too high, or they may be too low. Since real-life crew chiefs tend to err
on the side of caution, your crew chief will do the same. So, if you don’t feel
23
confident with his estimates, pit earlier and/or take more fuel than
he recommends.
F4: Tire Temps - Perhaps the most important data available, the F4 display
reveals your current tire temperatures. This display gives you the Inner (I),
Middle (M) and Outer (O) temperatures of each tire as you drive. Every
NASCAR driver will tell you that the fastest car on the track is not necessarily
the one with the most horsepower, but the car with the best grip. That’s where the
tire temperatures display becomes vital. As you drive your car at high speed, each
tire undergoes a certain amount of stress. The more a tire is stressed, the higher
the temperature rises in that tire and the shorter its lifespan will be. In general,
you’ll want to aim for similar temps across the tire in order to enjoy maximum
grip and tire-life. Use the information shown here to adjust tire pressures and/or
suspension components like camber and caster in order to achieve balanced
temperatures in your setup.
F5: Tire Change - Here you can specify which tires you’d like changed during
the ensuing pit stop, and you can check the current remaining life of each tire;
you can also use this window to specify any tire pressure adjustments you’d like
made during your next pit stop. A status bar that shows you each tire’s current
lifespan is displayed beneath the pressures. Each tire’s status bar will gradually
become shorter with wear. Fresh tires have a full green status bar; as a tire wears,
this bar will shrink and turn yellow. The yellow bar will then shorten and
eventually turn red. When a tire reaches red status, it can blow at ANY TIME, so
unless the race is on the line, you should make every effort to pit for fresh
rubber immediately.
Use the Spacebar on your keyboard to select which tire(s) you want to have
changed. Your choices are to have all 4 tires changed, right-sides only, left-sides
only, or no tires changed. Each tire shown in the Tire Change window has a box
next to it. A check mark fills the box of each tire that will be changed.
To have your crew perform tire pressure adjustments, use the up/down cursor
arrow keys on your keyboard to select a specific tire. The current tire will appear
highlighted in yellow. Use the left/right cursor arrow keys to instruct the crew to
raise/lower the cold pressure of each tire. The hot pressure (the operating
pressure, indicated by “H”) of each tire is indicated just below the cold pressure
value. Once you’ve specified the new pressure value, your crew will make the
necessary pressure adjustments during your next pit stop.
24
Pressure adjustments are often the first thing a race team does to correct
handling problems, because it is the least drastic solution. Reducing the pressure
in a tire may help it grip better during corners, but may also create more “rolling
drag,” thus robbing the car of some straightaway speed.
F6: Wedge – Wedge, or cross weight, is a common adjustment teams make
during the race to change the car’s handling. Adding wedge will increase the
amount of chassis weight applied to the right front and left rear corners of the car;
conversely, negative values shift weight toward the left front and right rear of the
car. Adding wedge may help cure a loose condition, but it will also increase the
load on the right front wheel, which is usually the most heavily stressed tire to
begin with. Removing wedge will have the opposite effect and will tend to
loosen up the car.
Use the left/right cursor arrow keys to make wedge adjustments in five pound
increments. The changes you specify will be implemented during your next pit
stop.
F7: Track Bar – You can also change the car’s handling by adjusting the track bar.
Although you can adjust both sides of the bar from the Garage Menu, you can
only adjust the right side when you’re in the pits. Raising the right side of the
track bar will loosen the rear suspension; lowering the right side of the track bar
will tighten up the rear end.
Use the left/right cursor arrow keys to specify the amount of track bar adjustment
you’d like made during your next pit stop.
F8: Grille Tape – It’s common for teams to use heavy-duty tape to cover a
portion of the front grille. The percentage display represents how much of the
front grille is covered; thus, a 20% tape setting means that 80% of the grille is
still open. The more tape you add to the grille, the more you cause the air to be
funneled around the nose of the car rather than into its radiator. More tape means
less drag and more front downforce (which means a faster car) but it also means
less cool air is getting to the radiator. The object is to try and get away with as
much tape as you can without overheating the engine. Watch that water
temperature gauge, and if the needle starts to peg you’ll know you’ve got too
much tape on that grille.
25
Keep in mind that during Qualifying, you’ll only need to run a couple of fast laps,
so in many cases, you’ll be able to get away with a fully-taped (100%) grille for
that session.
Use the left/right cursor arrow keys to instruct the crew to add or remove tape
during the next pit stop.
F9: Pit Summary – This display is a summary of all of the changes that will be
made to the car during your next pit stop. If you specified changes to the tire
pressures, for example, you’ll see those changes listed here. You’ll also see how
many tires will be changed and how much fuel will be added.
The F9 display is also the place where you tell your crew whether to make repairs
to your car or not. If your car has been damaged, the Repair option at the bottom
of the window will automatically read YES, meaning that when you come in for
service your crew will try to repair your car. If you’d rather not have the pit crew
fix your damage, press the Spacebar to toggle the Repair display to say NO.
While you’re in your pit stall under repairs, your crew will work as long as necessary (sometimes a minute or more) in order to repair the car to the best of their
ability. If you want the crew to stop repairing the car – in order to avoid losing a
lap, for example – press the Spacebar and toggle the Repair status to No. After a
couple of seconds, they’ll cease repairs, lower the jack and let you leave the stall.
THE ESC INTERFACE: Anytime
you want to stop driving, or return
to the pits, or simply take a break
and watch some replays, just press
the ESCape key. The game will
pause (except in Multiplayer
mode), and you’ll be presented
with a list of options that will vary
based on the game mode and the
current session. Use the up/down
cursor arrow keys to select the item
you want, and then press the Enter key. Sometimes you won’t be able to access
the ESC interface unless your car is completely stopped (for example, while in
the middle of a race session online). If this is the case, you’ll see a warning
message appear on the screen instructing you to bring the car to a complete stop
before using the ESCape key. Just pull into the pits, or pull over to the side of the
track, stop the car, and try the ESCape key again.
26
Most of the options in the ESC interface are self-explanatory, but here are some
of the items that may not be as obvious:
•
•
•
Get Out of Car – Takes you back to the Race Weekend screen.
Retire – Takes you out of the race and back to the Race Weekend screen. You
will NOT be able to re-join the race - your day is done.
Call Tow Truck - Takes you to your pit stall. Before your pit crew can begin
working on your car, a simulated towing countdown takes place.
THE PAUSE KEY: Press the Pause key on your keyboard to pause or resume the
action, whichever the case may be. The Pause key does not work during
Multiplayer races.
27
Instant Replays
Relive all of your moments of glory with NASCAR Racing 2003 Season’s elaborate
instant replay system. Replays are viewable using a multitude of camera angles, and
in most cases, you’ll be able to watch the action from any car on the track!
NASCAR Racing 2003 Season even includes an editing feature that will allow you
to add your own sounds, artwork, and effects to your replay highlight reels!
You can view a replay from several different menus in the game. If you’re at the
Race Weekend screen or in the car, you’ll have limited replay functionality – you
can watch and manipulate replay footage from the current race, and you’ll be
able to save footage, but you can’t use any of the replay editing functions on the
fly. In order to have access to the full arsenal of replay system features, you’ll
need to go to the Main Menu and select the Replay Studio option.
REPLAY CONTROLS: Once you’ve chosen to view a replay, you’ll see the
Replay Viewing window. If you know how to use a standard VCR you’ll find the
replay controls to be relatively simple. Use the controls found at the bottom of
the screen to rewind the footage to its beginning, start and pause the replay, or
fast-forward to the end. Use the Cut button to chop longer clips into small
highlight reels that you can save. Click on the timeline or drag its slider to queue
the footage to a specific point.
28
Rewind to Beginning: One click does it!
Rewind: Click once to rewind at normal (1x) speed. Each subsequent
click causes the footage to rewind continuously faster.
Step Backward: Each click of this button steps backward, one frame at
a time. Click and hold the mouse button to produce a low-speed rewind.
Play/Pause: Click once to un-pause action that’s frozen (roll tape). Click
again to freeze the footage. Note that you are NOT pausing the game
world, you’re only pausing the replay.
Step Forward: Each click of this button advances the footage forward,
one frame at a time. Click and hold the mouse button down to roll the
footage forward at a low speed.
Slo-Mo Control: Click this button to view the action in slow motion; each
subsequent click of this button slows the footage down another notch.
Fast Forward: Click once to fast forward at normal (1x) speed. Each subsequent mouse click increases the speed of the fast forward action.
Forward to End: Click once to jump to the end of the footage.
Cut: Use this button to cut and save shorter highlights. Queue the footage to a specific point and click this button once to select a starting point
for the highlight; now go to the point where you’d like the highlight to
end and click the Cut button a second time. You will then be prompted
to save the new edited version in your REPLAY folder.
Save: Click this button to save the current replay in its entirety in your
REPLAY folder.
Toggle Replay Window Size: When viewing replays from the Race
Weekend Menu, each click of this button toggles between Full Screen
and Inset Window views. When viewing replays from the cockpit of
your car, clicking this button exits the replay viewer and returns you to
the driver’s seat.
29
Toggle Replay Standings Display: Pressing the “S” key on the keyboard brings
up a standings rundown during replays. The Replay Standings Box will have up
to three different modes of display depending upon which race session you are
in. Use the left/right cursor arrow keys to toggle among these display modes.
CHANGING CAMERAS AND DRIVER VIEWS: NASCAR Racing 2003
Season gives you many different camera angles you can view the action from. In
replays of Multiplayer races however, you won’t typically be able to view action
from every driver’s car at any given time.
• In the full screen view, change replay camera angles by clicking on the
controls next to the Camera heading. To view the replay from another
driver’s vantage point, use the controls next to the Driver button.
• From the Race Weekend view, select the camera and driver with the controls
located below the 3D window and above the session navigation area.
• Alternatively, you can use the keyboard shortcut keys to select cameras and
cars while in any replay viewing window.
REPLAY STUDIO: NASCAR Racing 2003 Season makes it easy for you to
amass an incredible collection of replays. From the Main Menu, choose Replay
Studio. You’ll be taken to a screen that lists all of the replay clips that are stored
in your REPLAY folder, organized by track. From here, you can quickly jump to
any replay, recorded at any track. Click on the column headings to sort the list to
your liking. You can also use the drop-down controls at the top of the screen to
filter the list to include replays from one particular player and/or one particular
track. Use the Delete button at the bottom of the screen to trash old clips you no
longer want.
Click on the Edit button to access NASCAR Racing 2003 Season’s replay editor.
This tool allows you to lay aside your helmet and driving gloves and become a
sports television director. Select a replay file you want to edit, click the Edit
button, and start creating your own highlight reel!
30
The Replay Editor
EDITING REPLAYS: NASCAR Racing 2003 Season’s replay editor places an
array of moviemaking features at your fingertips. Take the replay file of your
photo finish in the weekly league race and put together a highlight reel, complete
with sound bites, custom graphics, and screen fades. Let’s face it – humiliating
your buddies can be one of life’s simple pleasures, especially when it’s done in a
harmlessly creative way. With the replay editor at your disposal, you’re poised to
do that and a whole lot more.
Let’s go over the replay editor screen, one section at a time.
VCR Buttons – Located beneath the 3D display window. From left to right, these
buttons perform the following functions:
•
•
•
•
•
•
•
Rewind to the beginning of the replay
Rewind. Clicking more than once will increase the rewind speed.
Rewind one frame
Play/Pause
Advance one frame
Advance. Clicking more than once will increase the advance speed.
Advance to the end of the replay.
31
Car/Camera Selectors – These combination drop-down/arrow selectors serve the
same purpose they do on the main replay screen – to let you change the focus
camera or the focus car. The C/Shift C and V/Shift V commands can be used to
navigate to the previous/next camera and car, just like on the standard replay
screen.
Replay Editing Buttons – Located to the right of the VCR controls, these buttons
will allow you to perform cuts, copies, and splices of replay footage. From left
to right, the buttons are as follows:
• PLACE MARKER: Places a marker at the current frame of the replay.
Pressing the button again cancels the placement of the first marker.
• CUT FOOTAGE: Deletes footage from the marker to the current frame. A
marker must be in place in order for this to work.
• COPY FOOTAGE: Copies footage from the marker to the current frame up
to the clipboard. A marker must be in place in order for this to work.
• PASTE FOOTAGE: Pastes footage copied to the clipboard into the replay.
Note that this is really an “insert paste” function; the clipboard contents are
inserted and any existing footage is pushed forward in time to resume at the
end of the newly-pasted section.
• SAVE AS: Saves your changes. When you’re doing a lot of work on a replay,
you may want to save it under a new name after each step. By using
incremental saves, you’ll be in a position where if you make a mistake, you
won’t have to start from the beginning again.
Replay Feature Controls - Located in the bottom right area of the screen, these
controls serve as the heart of the editing system.
• STAMP: This is the button to press if you want to insert a custom image into
the replay. In order for a piece of artwork to be usable by the game it must be
in .BMP or .TGA format and it must reside in the EXPORTS_IMPORTS
subfolder of the main program. You’ll also be asked to set the screen position
(in pixels) where the image will appear; 0,0 is the upper left corner of the
screen, and 800,600 is the lower right. Finally, you’ll be asked to specify the
fade (the time it takes the image to fade on- and off-screen) and the duration
(the total time you want the image to appear on-screen) times in seconds.
• SOUND: This button allows you to insert your own audio into the replay. In
order for a sound clip to be usable by the game, it must be in .WAV or .OGG
format and it must reside in the EXPORTS_IMPORTS subfolder of the main
program.
• TEXT: This button allows you to insert a text bubble into your replay. Just like
with the Stamp tool, you’ll need to set the screen coordinates and the fade and
32
•
•
•
•
•
•
•
•
duration times here as well. You’ll also have the option to specify the maximum pixel width of the bubble; the smaller the number, the narrower the
bubble. Finally, at the bottom of the pop-up box is the area in which you type
the text that will appear.
FADE: This powerful feature lets you insert fade effects. Fades are
particularly useful for covering up portions of a replay that have been
heavily edited. You’ll need to decide whether you’d like to perform a fade-in
or a fade-out, and you’ll need to specify the fade’s lifespan, or the time in
seconds it will take the fade to complete.
CAMERA: Switches the replay to the specified camera. If you have the TV1
camera active, pressing this button will cause the replay to switch to the TV1
view when it reaches that point in time.
CAR: Switches the replay to the specified car. Each time the replay reaches
that point in time, the camera will switch to appropriate car.
PLAYBACK: Lets you change the speed of the footage. A playback rate of 1
is normal speed. Going to a higher number will speed up the replay. By
checking the 1/x box, you can use slow motion. Selecting a playback rate of
0 will pause the replay. Specify the duration of the pause in the Lifespan area.
VOLUME: This control lets you fade the volume of the game sounds in the
replay – useful if you want to include voice-overs from a camera view that is
inherently loud (the cockpit, for example), and you don’t want them to be
drowned out. Use the slider control to specify the volume level you want, and
use the lifespan field to specify how long it will take to reach that level. A
level of 25% works well when using voice-overs on top of “loud” cameras.
CHAPTER: This allows you to place chapter breaks in a replay. Currently,
chapter navigation is supported only in the Driving Lesson Viewer. Make sure
that you place the chapter break in advance of any events you want triggered
in that chapter. Otherwise, they will not trigger.
TOGGLE: Lets you turn on or off various effects like the ideal racing line, the
racing groove, and car telemetry.
SUMMARY: This feature is limited to the Driving Lessons area of the game.
The text you include in the provided box will appear on the right side of the
screen when you select that replay file.
33
You’ll notice that most of these buttons have arrow controls located to their left
side. Pressing a given function’s left arrow will take you to the previous spot in
the replay in which you used that function, while pressing the right arrow will
take you to the next spot in which you used that function. For example, if you are
at the very beginning of the replay and you press the right arrow control next to
the Sound button, the replay will advance to the first sound file trigger point. If
you’re at the end of the replay and press the left arrow next to the Camera
button, the replay will rewind to the last camera change trigger point.
Making Changes – Modifying your changes (or getting rid of them entirely) is
all done via the command list, which is located in the upper left portion of the
screen. It shows which replay editor commands are active at the current point of
the replay. Once a command has been completed, it will disappear from the list.
This means that commands that take just a single frame to complete (like camera
switches) will be on the list for a fraction of a second, while something like a
10-second camera fade will be visible for, well, 10 seconds.
To make changes to a particular command, or to remove it entirely, you’ll need
to navigate through the replay and get to a point at which that command is
active, and therefore appears on the list. This isn’t as daunting a task as it may
seem. By using the arrow controls next to the individual replay feature buttons,
you’ll be able to track down any command quickly and easily.
Once the command appears on the list, click on its information line to select it,
and then click the appropriate button at the bottom of the list: Edit or Delete.
Some commands, like camera switches, cannot be edited; they can only be deleted.
Art Resources List – So you don’t have any custom artwork ready to insert into
your replays? Never fear. NASCAR Racing 2003 Season includes several pieces
of ready-made artwork that you may find useful. The art resources list is on the
left side of the screen, beneath the command list. To use one of these items, select
it and then click the Insert button at the bottom of the list.
34
Going For It All
Ever wonder what it takes to claw your way to the top during a complete
NASCAR season? From the Main Menu, click on Championship Season to see if
you’ve got the mojo to bring home the coveted NASCAR championship trophy.
The Championship is decided using a points system. You earn points according
to how well you finish in each race. If you want to wear the champion’s crown,
you’ll have to put together a season filled with consistent top ten finishes. Win
ten or twelve races but crash out and finish last in ten or twelve, and you’ll find
yourself out of the running, because consistency wins the NASCAR title.
Start by setting all of the parameters that will control your season. Race length,
opponent strength, realism options and rules can all be set up the way you want,
but once your season is underway, these settings cannot be changed. Events are
raced in the order they appear on whatever schedule file you use. For example, if
you select the 2003 season schedule, you’ll start in Daytona and end at
Homestead, just like the big boys do.
The Standings and Results buttons on this screen allow you to view individual
race results as well as season totals. Naturally, if you haven’t completed a certain
race, there won’t be any results for that event, so the Results button will appear
grayed out.
Win the race, and you’ll receive at least 180 points (175 points for finishing first,
and a 5 point bonus for leading at least one lap). For a complete breakdown on
how the NASCAR points system works, see Appendix A.
35
Player Info
Kind of boring being referred to
as “The Player,” don’t you think?
Personalize your player settings
by using the Player Info Menu.
To get there, simply go to the
Main Menu and click on the
Player Info button in the right
column. From here you’ll be able
to change your driver’s name,
select which car(s) you’ll drive,
and check out your track records.
Notice how there are separate car selections for Single Player (i.e. the Testing,
Single Race, and Championship game modes) and Multiplayer. Be sure to take
the time to make selections for both categories, since the car you race offline may
not be the same car you want to drive in your weekly Internet league. Keep in
mind that in order for other drivers on the Internet to see you racing in your own
personal car, they’ll need to have a copy of your car file residing on their hard
drive.
Opponent Manager
Use the Opponent Manager Menu to build and maintain lists of drivers (called
rosters) for your races. The Opponent Manager screen also provides you with
access to the NASCAR Racing 2003 Season’s Paint Shop.
The original game CD comes
with a roster called “Cup2003”,
and it consists of all the licensed
drivers in the game, plus several
fictional cars that are used to fill
out the 43-car starting field. You
can create your own rosters by
simply clicking the New button
underneath the Roster heading at
the top left of the screen, and
then selecting the drivers you
want added to it by clicking in
the checkbox next to their names. You can build as many rosters as you want. You
can also create new drivers from the Opponent Manager screen. To do so, just
36
click the New button beneath the Driver heading on the right side of the screen,
and fill in all of the pertinent car/team information.
Finally, by clicking the Ratings button underneath the Driver heading, you’ll be
able to edit the driver ratings of any car that exists on your system. These ratings
affect the performance of each car and can be adjusted to reflect the most current
statistics, but they won’t affect the speed and handling of your own car, or of any
human-controlled online opponents.
The Paint Shop
Want to keep your collection of cars up to date with the latest and/or commemorative paint schemes of the series? NASCAR Racing 2003 Season gives you the
brushes and design tools to paint or repaint any racecar in the game, whenever
you wish!
To enter the Paint Shop, go to the Main Menu and click on the Opponent
Manager button. To begin painting a car, just select it from the driver’s list on the
left, and then click on the Enter Paint Shop button.
Many of the controls found in the Paint Shop will seem familiar to those of you
who have previously used any other artistic software packages. The Detail Shop
allows you to paint the car itself, while the Team Shop offers you the ability to
customize the look of your crew’s uniforms and accessories. To move back and
forth between the Detail Shop and the Team Shop, simply click on the
appropriate tab controls.
37
BASIC PAINTING: The
basic process of painting a
car or object consists of
clicking on a tool and
applying it to whatever you
want to paint. For example,
click on the Freehand Brush
tool to select it, and then
choose a primary color with
the left mouse button.
Choose a secondary color
with the right mouse button.
Next, click and hold the left
mouse button as you drag it across the car or crew object to apply the primary color.
Click and hold the right mouse button as you drag it to apply the secondary color.
USING TOOLS: By checking the box labeled “Show Tools Options” you can see
all of the pop-up windows each time you select a tool. Change the values in these
windows to affect the tool you want to use.
Like so many other buttons and elements of NASCAR Racing 2003 Season, each
tool in the painting toolbox has pop-up help - just right-click on any button, or
hover the cursor over the tool for a few seconds, and the description will appear.
STARTING WITH A CLEAN SLATE: There are two ways to start painting with
a nice clean car: create a new driver from scratch, or choose the car you wish to
paint and select the Eraser tool. Click the left mouse button on the car or object
to clear the textures and start with a solid primary color. Use the right mouse
button in conjunction with the Eraser tool to clear the car and fill it with the
secondary color.
PREVIEWING THE RESULTS: Click on the 3D Preview button at the bottom
of the screen to open a window that lets you see what you’ve accomplished. Click
the Auto Rotate checkbox to let the car spin 360˚ repeatedly. Or, uncheck the
Auto Rotate box to stop the rotation and reveal a hand tool that you can use to
turn the car in any direction you wish. Simply click and hold the left mouse button while you rotate the car with the hand tool. Click and hold the right mouse
button to zoom in and out. Click the Auto Rotate checkbox once again to let the
car spin on its own, using the new viewing angle you selected.
38
COLOR AND TOOL TIPS: When mixing colors, you can left-click your mouse
on the primary or secondary color swatch boxes to reveal additional color
controls that allow you to create the exact color you’re looking for. You’ll
notice that many of the tool buttons within the Paint Shop can be expanded to
reveal multiple functions. These tools are denoted by a small triangle in the lower
right corner of the tool button.
IMPORTING AND EXPORTING ARTWORK: The Paint Shop also gives you the
ability to Import and Export artwork to and from your car. Got a nice logo graphic
you want to bring in? No problem, save it as a Targa file (.TGA extension) and
import it using the Import button at the bottom of the Paint Shop screen. Likewise,
use the Export button to send the entire car or team shop window to a Targa file.
Open the Targa file in your favorite third-party painting application and touch it up
the way you want. When your finished, save your work and bring it back into
NASCAR Racing 2003 Season by using the Paint Shop’s Import feature.
Multiplayer – Taking On The World
There’s nothing quite like competing against up to 42 living, breathing, carbonbased opponents. If you want to see how you stack up against other drivers from
around the world, NASCAR Racing 2003 Season gives you a license to thrill! A
licensed copy of the game CD and a LAN or Internet connection are all you need.
CONFIGURING YOUR CONNECTION: Click the Multiplayer button on the
Main Menu. If you’re racing on the Internet, you’ll need to connect to it BEFORE
you launch the game - ALT-TABbing out of the game, connecting to the Internet,
and ALT-TABbing back won’t work. Once you’ve connected to the Internet, you
need to make sure the game can detect your Internet connection properly. Click
on the Join control at the top of the screen and look in the Select Connection
Method area on the left side of the screen. If your Internet (TCP/IP) connection
is listed, you’re all set. If it is NOT listed, you’ll need to press the Configure
button at the bottom of the screen, check the “Find Network Addresses a
Different Way” box, and your connection should be listed.
Local Area Network Users – Note that if you’re racing on a LAN, you will likely
see your connection device (i.e. your network card) listed twice in the Select
Connection Method list on the Join tab, and also in the Connection Methods
Allowed area on the Host tab. This is because your network card supports both of
the network protocols supported by the game: IPX and TCP/IP. If you are presented
with this choice, pick IPX, because it has less restrictive bandwidth concerns and
you’ll be able to see many more opponent cars than you can with TCP/IP.
39
RACING ON SIERRA.COM: Racing on Sierra.com is the easiest way to find
some online NASCAR action. Sierra.com will help you find racers of every skill
level, and chances are you’ll be able to hop into a race at any hour of the day or
night. Sierra.com also has a rankings system that is used to group drivers by
ability level. The details of this ranking system are explained in Appendix B.
To connect to Sierra.com, click on the “Race on Sierra.com” icon at the top right
area of the Multiplayer screen. The racing doesn’t cost a thing – all it takes is a
free membership to get you out onto the track. Don’t have a Sierra.com account
yet? NASCAR Racing 2003 Season will allow you to create an account, right
from within the game. After you click the Race on Sierra.com button, click the
“Create Account” tab and follow the on-screen prompts. If you already have a
Sierra.com account, simply click on the “Login” tab and enter your sign-on
information.
JOINING AND HOSTING: Most drivers will Join multiplayer races. That is,
they’ll participate in races that are created by someone else. To join a race, check
the Join tab at the top of the screen. If you have a LAN connection available and
there are races being held on the LAN, you’ll see them listed in the Local Area
Network Races area at the bottom of the screen. To enter one of those races, just
click on the one you want, then hit the Start button. Some races may be protected
by a password (which you’ll need to know in advance if you expect to enter the
race). In addition, you won’t be able to join any race that has already advanced
to its Qualifying session.
An alternative would be to type in the IP address or the phone number (if you’re
connecting via direct modem only) of the host’s machine. Do this in the area
directly beneath the Select Connection Method drop-down control. By the way,
if you race against the same competitors regularly, you may find the Address
Book will come in handy and save you from having to manually input address
information every time you connect to a particular machine.
If you have a great Internet connection, you might want to Host some races.
Using a dedicated server to host (a separate computer that is set aside to do
nothing more than host the race) is the best bet. To host a race, check the Host
box and set limits on what types of connections you’ll allow. As the race host,
you can use the Max Latency selectors to prevent drivers who have poor Internet
connections from joining.
In addition to picking the track, rules, and race weekend parameters, you can also
decide how many drivers you’ll allow to connect your race. Each person that
40
connects to the server requires about 22K of bandwidth. That means that on a
56K modem, you can reliably host 2 or 3 people. Once you exceed 3, things will
start to degrade noticeably. DSL or cable modem users can reliably host from
10-15 or even more, depending on the amount of bandwidth available. Keep in
mind that it’s the upstream data rate that counts, not the typically MUCH faster
downstream data rate. Once you have that number (in kilobytes), divide it by 22
and you’ll have the maximum number of clients your machine will be able to
reliably host. Now if you’re one of the lucky folks who happen to have access to
a T1 line, you’ll be able to host a full field of cars without breaking a sweat.
HARDCORE MODE: Mainly intended for league-based racing, this setting
forces all players to race from the Cockpit View, with the Smoke, Realistic
Windshield, and Solar Effects graphics options enabled. This way all drivers are
faced with the same “field of view” challenges. Because it forces the use of several
high-end graphics options, Hardcore Mode can have a significant impact on
performance, particularly on slower machines.
CHATTING: Online, you’ll want to sometimes “chat” with other drivers. Notice there are
several Chat buttons sprinkled throughout NASCAR Racing 2003 Season’s various
Multiplayer screens, most notably the Race Weekend Menu. When you’re racing
online, you can click a Chat button that opens up a pad for typing messages to your competitors. Just type your message and press the Enter key to send it to the race field.
You can also type messages from scratch (not a good idea at 180 mph) by pressing the
“T” key on your keyboard, typing your message and hitting the Enter key. Send
private chats to other drivers in the race by pressing the “T” key, and adding a forward
slash, pound sign and car number before your message. It should look something like this:
/#12 Curtis, don’t drive it so low into turn one!
AUTO CHATTING: While racing in the car online, press any numeric key across
the top of your keyboard (1-0) to display the appropriate Autochat message
stored on your system. Hit the Enter key to send the message after you select the
Autochat you want. It’s a good idea to reserve Autochat messages for necessary
comments such as passing instructions, alerts to other drivers that you’re going
to pit, etc.
To edit the default set of Autochat messages however you want, go to the Options
Menu (either from the Main Menu, the Race Weekend Menu, or by pressing
ESCape while driving the car). From the Options Menu, click on the Other tab;
just click on an Autochat message and type in whatever you want. Here’s a tip:
41
if you place a dollar sign “$” at the end of an Autochat message, you won’t have
to press the Enter key to send the message. Just press the number key and the
message is sent immediately.
ONLINE RACING ETIQUETTE: Online racing spawns many friendships, and
often the actual racing itself can even take a back seat to the camaraderie
experienced by its participants. If you want to get the most out of racing online,
here’s the best piece of advice for you: don’t be a jerk! Cause an intentional
wreck, or curse a fellow driver out and display poor character traits, and you’ll
soon discover it hard to find races to enter, because you’ll be banned from a lot
of servers. Sure, you’re allowed to make mistakes, you’re allowed to be slow, and
you’re allowed to be human, but you’ll find that most racers online have little
tolerance for immature temper tantrums, threats and general poor sportsmanship.
Remember: actual NASCAR drivers have been known to compete in online races
too; have fun racing and chatting with them while leaving the grade-school
behavior to your little brother.
You’ll quickly discover that if you can keep your temper in check and befriend
those you race with, it really doesn’t matter whether you’re the fastest driver on
the planet or not. People will get to know you as a fun, friendly, respectful and
safe competitor, and when it comes to online racing, being safe is more important
than being fast, because it only takes one unsafe driver to cause a massive wreck
that ruins the race for everyone.
Racing online fosters new friendships, but it does something else too. It will
make you faster. Just by joining races and watching replays of the world’s fastest
drivers, you’ll learn how to get through that corner a little bit faster.
So where do you start? Here are some things to do:
• Join a league. Visit the newsgroups or do a quick Internet search for
NASCAR Racing 2003 Season. Most leagues have monikers like HAL,
HGNS, VRW and SSCA. Many leagues also have their own Web pages.
Rodney Arndt runs a league called SASCAR (www.sascar.com) that consists
of varied divisions, depending upon your experience.
• Join a team. Many drivers have formed teams in order to trade secret chassis
setups and driver notes.
• Get Information on the Web. Use your favorite search engine and try inputting
NASCAR Racing 2003 Season, or keywords like “virtual racing,” “N2K3,”
“Papyrus,” “racing league,” or “sim racing.”
42
The Garage
The Garage is the place to build the perfect racing setup. Your crew can make
minor race day adjustments for you in your pit stall, but inside the garage you can
tweak and adjust virtually every aspect of your car. To enter the Garage go to the
Race Weekend Menu and click on the Garage button at the bottom of the screen.
Is this your first trip inside a NASCAR garage? Don’t panic! Remember, if you
don’t know what something means or what will happen if you make changes, just
right click on any item you see on the Garage Menu and you’ll be enlightened
via a pop-up help bubble.
Click on any of the three tab controls (Suspension, Drivetrain/Aero, Weight Bias)
to see the various components available for adjustment.
SETUP SELECTIONS: If you want specific setups to be used for the Qualifying
and Race sessions, use the appropriate drop-down controls in the upper left
corner of the screen to select them. If you don’t feel comfortable specifying a
setup for one or both of those sessions, simply change the field(s) to read
“None”, in which case the Current setup will be used. The Current setup is the
one that is presently on the car.
43
SETUP/TRACK NOTES: Real NASCAR drivers and crewmembers keep very
thorough notes about every track visit. Click on the Setup Notes button to document
your changes to the car. Use the Track Notes pad to save information about the
way you drive the track itself - such as how many laps you can turn before the
tires get too worn, how weather changes affect the handling, or whatever
MEET MANUEL DASKALOS, YOUR CHIEF ENGINEER
Manuel Daskalos is the Chief
Engineer for the #77 Jasper Engines
& Transmissions Ford Taurus that
competes every week on the
NASCAR circuit. Manual received a
Master’s Degree in Mechanical
Engineering from Clemson
University, and his thesis covered
optimization of a NASCAR stock car
through computer simulation.
While assisting Papyrus in the development of NASCAR Racing 2003 Season,
Manuel’s work has essentially been an extension of what he does for his race
team, except that he actually gets to DRIVE what he tested for Papyrus – haha!
Manuel has provided real wind tunnel data, engine performance data, suspension
geometry details, anti-roll bar (his professors would cringe if he called it a
swaybar) design details, and some general design & construction data pertaining
to building a NASCAR racecar. During his own on-track tests with NASCAR
Racing 2003 Season, Manuel also examined performance data extracted from the
game, and compared it to data from his real-world team’s tests. Manuel and the
Papyrus development team would then do some tweaking until the performance
of the two converged. All of this work has gone into providing you with the most
accurate NASCAR setup & driving experience available on PC!
44
Tuning The Car
OK, you’ve got all of these settings that you can tweak, so where do you start?
Needless to say, if you want to go fast, you’ve got to make adjustments to the car
that suit your driving style.
You’ll find a complete chassis setup tutorial on the NASCAR Racing 2003
Season CD, prepared by Manuel Deskalos. Look for it in the JASPER folder on
the game disk.
This document covers the specifics, but here are a few general tips that you’ll find
helpful:
• Change one thing at a time. This makes it much easier to “undo” a mistake.
• You want the tires to be at the correct camber while cornering. The best grip
is obtained with the tire leaning a bit into the turn (i.e. negative camber on the
outside wheel, positive on the inside).
• The tires grip best when they are each shouldering their fair share of the load.
• You want the car to be neutral in handling - neither pushing nor loose. You
can really tell by checking the front-to-back tire temps- if they are nearly
equal, then the car is good.
• Mechanical changes (springs, shocks, track bar, camber, etc.) affect the car at
all speeds. Aerodynamic changes (spoiler, grille tape) affect the car mostly at
higher speeds (140+ mph).
• Going below optimal tire pressure can help put heat into a tire that isn’t
reaching a good temperature. There is no single ‘perfect’ pressure- it’s always
a matter of tradeoffs to arrive at whatever makes the car work.
• If you’re not comfortable making suspension changes, stick to the sway bars
and stay away from the shocks.
• When it comes to springs, softer is better. Softer springs will generally do a
better job of gripping bumpy pavement than stiff springs, and all pavement is
bumpy to some degree. Just make sure you don’t go too far and make them
so soft that the car “bottoms out” and scrapes the pavement in the corners.
• When the car is cornering, weight shifts to the outside tires, and more weight
will shift at the end of the car that is stiffer.
• At short tracks, less front weight makes sense. Keep it close to 50% front
weight.
• You generally want fourth gear to just barely trip the rev warning light on
your dashboard at the end of the longest straightaway.
• To change a single gear ratio without affecting the others, change the
transmission ratio.
• For qualifying, use as much grille tape as you possibly can. Remember, your
car only needs to last for a couple of laps!
45
Appendices
Appendix A: The NASCAR® Championship Points
System
1st...............175
2nd..............170
3rd ..............165
4th ..............160
5th ..............155
6th ..............150
7th ..............146
8th ..............142
9th ..............138
10th ............134
11th ............130
12th ............127
13th ............124
14th ............121
15th ............118
16th ..............115
17th ..............112
18th ..............109
19th ..............106
20th ..............103
21st...............100
22nd................97
23rd ................94
24th ................91
25th ................88
26th ................85
27th ................82
28th ................79
29th ................76
30th ................73
31st ..........70
32nd.........67
33rd .........64
34th..........61
35th..........58
36th..........55
37th..........52
38th..........49
39th..........46
40th..........43
41st ..........40
42nd.........37
43rd .........34
Lead 1 Lap ...............5
Lead most laps .........5
Appendix B: Sierra.com Ratings System
The Sierra.com ratings system is designed to make it easy for players of any skill
level to race against others of similar ability. It operates on a 0-10 scale. As your
rating rises, it will become increasingly more difficult to advance to the next
level, but it will become progressively easier to drop to the previous level.
In order for ratings to be updated, all of the following conditions must be met:
• The race must have rating restrictions in effect for the track type being run.
• At least four player drivers (i.e. not computer opponents) must start the race.
• The race winner must complete enough laps to account for at least 10 minutes
of racing at a “normal” lap speed at this track. Generally, 10% or longer races
will qualify.
TRACK TYPES: NASCAR races on a wide variety of track types, each of which
demands a different set of skills. Therefore, one single rating which covered all
46
the tracks in the game would be grossly misleading. Because of this, you’ll have
a separate rating for each of the four track types in the game:
• Road Course - Road courses feature left and right-hand turns.
• Short Track - Short tracks are less than one mile in length and feature heavy
braking zones, heavy traffic, and a lot of bumping and banging.
• Superspeedway – Superspeedways feature pedal-to-the-metal racing all the
way around the track. You must use the draft to get to the front of the pack.
• Speedway – All other tracks.
POINTS: After each race in which ratings are enabled, points are awarded based
on finishing position as follows:
•
•
•
•
•
•
•
•
•
•
•
•
Finish ahead of a driver 2 or more skill levels higher: +5 points each
Finish ahead of a driver 1 skill level higher: +4
Finish ahead of a driver of the same skill level: +3
Finish ahead of a driver 1skill level lower: +2
Finish ahead of a driver 2 skill levels lower: +1
Finish ahead of a driver 3 or more skill levels lower: 0
Finish behind a driver 3 or more skill levels higher: 0
Finish behind a driver 2 skill levels higher: -1
Finish behind a driver 1 skill level higher: -2
Finish behind a driver of the same skill level: -3
Finish behind a driver 1 skill level lower: -4
Finish behind a driver 2 or more skill levels lower: -5
In addition, there is a 3-point penalty for being involved in an “incident”. An incident is defined as an event that either triggers the yellow flag or would have triggered the yellow flag had cautions been enabled. It is possible to be given multiple incident penalties in a race. Incident points are assigned without regard to
who instigates an incident, and who is a victim.
SKILL LEVELS: You’ll start out with a zero rating at all track types. The game
averages your 8 best point totals of the last 10 races run within each track type
(occasionally everyone has a bad day, or a bad connection, so the lowest two
races are dropped). Future races within this 10-race window are considered to
have a zero point total, meaning that you’ll always will have 10 results to
consider, even though the window will not “move” until an 11th race is run. As
soon as your average reaches the required threshold (see the tables below), you’ll
advance or drop a level and the 10-race window will clear. Thus it is not always
necessary to run 10 races in order to advance or drop a level.
47
Examples:
1. Player A gets 20 points in his first race. His 10-race window consists of a 20
and nine zeroes. The two worst results are dropped (two zeroes), leaving a
total of 20 points, for an average of 2.5 (20/8).
2. Player B gets -15 points in her first race. Her 10-race window consists of a 15 and nine zeroes. The two worst results are dropped (the -15 and a zero),
leaving a total of 0 points, for an average of 0 (0/8).
Table 1: Average Points Needed to Advance a Skill Level
SKILL LEVEL:
0-2
3-4
5-6
7-8
AVERAGE POINTS:
6
15
24
33
9
45
Example - Player A has just risen to a Superspeedway rating of 3. His 10-race
window clears. His next three superspeedway races yield point totals of 40, 50,
and 20. This puts him at 110 total points in his new window. He needs to average
15 points in order to advance to level 4. In his next race, he gets 15 more points.
His new point total is 125, and his best 8 results in the window are 50, 40, 20, 15,
0, 0, 0, and 0 - an average of 15.625. That’s enough to go up a level! His
Superspeedway rating rises to 4 and his window clears.
Table 2: Average Points Needed to Drop a Skill Level
SKILL LEVEL:
1-2
3-4
5-6
AVERAGE POINTS:
-45
-33
-24
7-8
-15
9-10
-6
Example - Player B has just completed the arduous journey to a Road Course
rating of 10! Her 10-race window clears. She struggles in her next few road
course races, getting point totals of -20, -40, -30, and -20. Her best 8 results are
now 0, 0, 0, 0, 0, 0, -20, and -20, for a total of -40 and an average of -5. In
looking at the table, a level 10 player needs to average -6 in order to drop a level.
Her next race is another tough one, a -10. This puts her total at -50, for an
average of -6.25. Player B’s Road Course rating drops to 9 and her window
clears. It’s tough at the top!
48
Appendix C: Keyboard Shortcuts
DRIVING
ESC
Display session options
F1-F9
Toggle pit/status windows
Cursor Arrows, Spacebar
Set/toggle items on pit window menus
Shift + F2
Jump to Replay (not always available)
Shift + F3
Jump to Options
1-0, Enter
Display, send Autochat message (Multiplayer only)
Pause
Pause game (not in Multiplayer)
Page Up/Page Down
Go to previous/next driving view
Ctrl + C
Toggle communication meters (Multiplayer only)
F
Toggle frame rate display
G
Toggle gauges (external views only)
H
Toggle in-game help menu
M
Toggle mirror detail level
N
Toggle mirror cockpit rendering
O
Toggle trackside object density
R
Toggle ideal racing line display
Shift + R
Return to pit stall (not always available)
S
Display speed/gear/flag indicator
T, Enter
Start, send chat message (Multiplayer only)
V/Shift + V
Jump to car ahead/behind (you must be stopped)
Ctrl + V
Return to your car (if viewing another)
Ctrl + F
Zoom in-car field of view out
Alt + F
Zoom in-car field of view in
REPLAY
NOTE: These controls work with the alpha-numeric keypad only
4
6
5
8
7
1
.
SPACE
S
Left/Right Cursor Arrows
C/Shift + C
V/Shift + V
Press and hold to rewind
Press and hold to advance
Pause/unpause footage
Slow motion (each press reduces speed)
Jump to beginning of footage
Jump to end of footage
Go to live feed (if available)
Toggle letterbox display
Toggle standings display
Toggle standings mode (if standings are on)
Go to next/previous camera
Go to next/previous driver
49
NASCAR® Racing 2003 Season - PAPYRUS RACING GAMES
DESIGN & PRODUCTION DIRECTOR
Richard Yasi
PRODUCERS
Eric Busch
David Chait
Steve Myers
Richard Yasi
ASSOCIATE DESIGNER
Greg Hill
TECHNICAL LEAD
David Chait
ART DIRECTOR
Dave Flamburis
GENERAL MANAGER
Rich Reily
PRINCIPAL ENGINEER
Randy Cassidy
ENGINEERING
William Farquhar
Matt MacKenzie
Grant Reeve
ADDITIONAL ENGINEERING
David Kaemmer
GAMEPLAY PRODUCTION
Eric Busch
Greg Hill
Kevin Iannarelli
Steve Myers
Richard Yasi
ADDITIONAL PRODUCTION
Rodney Arndt
Jeff Pinard
Bob Stanley
50
Jay Taylor
PRODUCTION ASSISTANTS
Dan Reade
Jim Robinson
USER INTERFACE ART
Michelle Balkan
LEAD 3D CAR ARTIST
John Carbone
3D ART
George Grimshaw
Mat Matera
David “Monkey#3” Sweet
Sean Thompson
2D ART
Dave Flamburis
George Grimshaw
Peter Inglis
Mat Matera
David “Monkey#3” Sweet
John Beatty
Kirill Kryukov
Brian Simpson
ART INTERNS
Nick Gauthier
Alec Moody
ADMINISTRATIVE ASSISTANT
Darlene Balkan
SYSTEMS/IT
Kerry MacDonald
Hieu Tran
ADDITIONAL SOUND DESIGN
Greg Hill - Soundwave Concepts
PAINTKIT PROGRAMMING
Misha Tchekmarev
TECHNICAL ADVISORS
Lyndon Amick
Manuel Daskalos
Hank Parker, Jr.
51
Elton Sawyer
Mike Stackpole
BETA TESTERS
Rodney Arndt
Hughston Caldwell
Nim Cross
Chad Fales
Kevin Gibson
Mike Guzik
John Henry
Tony Kelley
Troy Leonard
Joe Lomas
Angel Medina
Billy Murphy
John Nelson
Jeff Pinard
Chris Salmon
Kevin Schmidt
Mark Schoennagel
Cornel Schuler
Brian Simpson
Bob Stanley
Joe Tamborski
Brian Tate
Bobby Terrell
Dave Thomas, Jr.
Steve Vandergriff
CW Webster
Jeff Weltz
Shannon Whitmore
CREW CHIEF
Jon St. John
SPOTTER
Ryan Drummond
MUSIC
Tony Trippi
DRIVING LESSONS
Written by Richard Yasi, David Kaemmer, and Steve Myers
Constructed by Steve Myers, Greg Hill and Richard Yasi
Narrated by David Kaemmer
GAME MANUAL
Steve Vandergriff - http://www.manualoverdrive.com
52
SIERRA ENTERTAINMENT
BRAND MANAGER
Tabitha Hayes
PR MANAGER
Annie Eckles
MARKETING DIRECTOR
Charles Holtzclaw
LICENSING AGENT
Keystone Marketing
CREATIVE SERVICES TEAM
Steve Parker
Neal Johnson
Egil Gloersen
Ron Walters
Mike Bannon
Nathan Gruppman
Emilia Serrano
Prema Ray
Elisabeth Han
VIVENDI UNIVERSAL GAMES INTERACTIVE MARKETING
Jennifer Haddix
Julie Thomas
Amy Chen
VIVENDI UNIVERSAL GAMES WEB SERVICES
David Hall
David Merager
Angela Milton
Conrad Walton
QA DIRECTOR
Gary Stevens
QA SUPERVISOR
Ken Eaton
QA LEAD TESTER
Tharlie Richardson
QA TESTERS
Michele Armstrong
Erinn Hamilton
Dave Jordan
Sue Lowe
Chad Martin
Marc Nagel
Lester Stocker
53
HARDWARE AND SOFTWARE COMPATIBILITY TESTING
IBeta, www.ibeta.com
SPECIAL THANKS TO:
Manuel Daskalos - Chief Engineer - Jasper Motorsports
Bob Dodge - Engine Tuner - Jasper Motorsports
Rick Carpenter - Director of Marketing - Jasper Motorsports
Phil Jimenez - Team Engineer - Andy Petree Racing
Joey Joulwan - Director of Marketing - Andy Petree Racing
Mike Stackpole - Advanced Engineering, Race Tire Development - Goodyear Tire & Rubber
COMPANY
Greg Stucker - Motorsports Marketing Director - Goodyear Tire & Rubber Company
Geoff Ulrich - Team Lowes
Matt Linderman - Racing Champions
Lyndon Amick
Hank Parker, Jr.
Elton Sawyer
John Henry
Marianne Plant - Intel
Kathleen Rogers - Intel
Dave Thomas, Jr. - Thomas Enterprises
Kurt Culbert - Keystone Marketing
Rick Wainright - Keystone Marketing
David Scheumann - Keystone Marketing
Mike Thompson - Relay Sports and Event Marketing
McDera O’Brien - Relay Sports and Event Marketing
Jamie Rodway - Roush Racing
Mike Nicolino - Sierra Entertainment
Dave Naney - Sierra Entertainment
James Shaw - Sierra Entertainment
Fastrack Racing - www.fastrackracing.com.au
AN EXTRA SPECIAL THANKS TO OUR FAMILY AND FRIENDS:
Jennifer, Alexandrea, Katherine and Ryan Farquhar
Kate Laskowski, Fred, Theckla, Dave, and Ermioni Myers, the Laskowski Family
Ed Haigh, Brian Henze, Chris Rowan, and Aaron Shiffer
Ron, Haley & Joey Balkan
Bob, Judy, Rich, Tammy, Christina, & Michael Sweet, & Helen Gores
Juggernaut
54
Legal Notices
John Andretti name and/or likeness used under license by Petty Marketing Company LLC.
The General Mills trademarks used under license. The ‘Valvoline’ trademarks, and Johnny
Benson’s name and/or likeness used by authority of MBV Motorsports, LLC, Concord,
NC ©2003 MBV Motosports/JB Enterprises, Inc. Grainger and Grainger Racing are
registered trademarks of W.W. Grainger Inc. The “W.W. Grainger” trademarks, Roush
Racing and Greg Biffle’s name and/or likeness used by authority of Roush Racing,
Livonia, Michigan. Jasper Engines and Transmissions, Dave Blaney and #77 marks used
under license authorization by Jasper Motorsports, LLC. The Hooters trademark and logo
insignia pictured on this product are trademarks which are the exclusive property of HI
Limited Partnership and may not be reproduced without the written consent of HI Limited
Partnership. The CITGO trademarks, and Jeff Burton’s name and/or likeness used by
authority of Roush Racing, Livonia, MI. Ward Burton, and Bill Davis Racing trademarks
and likenesses are used under license from Caterpillar Inc. CAT, CATERPILLAR and
their design marks are registered trademarks of Caterpillar Inc. ©2003 Caterpillar Inc.
Roush Racing’s and Kurt Busch’s name and/or likeness used by authority of Roush
Racing, Livonia, Michigan. Name, signature and likeness of Ricky Craven are licensed by
Hawk Sports Management, L.L.C. ©2003 Hawk Sports Management, L.L.C. All rights
reserved. The Bullseye Design and the Downy Design are trademarks used under license
from The Procter & Gamble Co. PPI, PPI Motorsports and the stylized numeral 32 are trademarks of PPI Motorsports, L.L.C., and are used under license. © 2003 Evernham
Motorsports, LLC. The likeness of the #8 Chevrolet driven by Dale Earnhardt, Jr. is used
under license from Dale Earnhardt, Inc. Bill Elliott trademarks licensed by CMG
Worldwide. Dodge® is a registered trademark of DaimlerChrysler Corporation. The
name, likeness and signature of Jeff Gordon and the likeness of the Hendrick Motorsports
#24 DuPont Chevrolet are used under license granted by JG Motorsports, Inc. ©2003 JG
Motorsports, Inc. The Stylized “31”, the likeness of the Number 31 Race Car and the RCR
Checkered Flag Logo are Trademarks of Richard Childress Racing Enterprises,
Incorporated, and are used under license from Richard Childress Racing Enterprises,
Incorporated. The name, likeness and signature of Robby Gordon are trademarks of Team
Gordon, Incorporated, and are used under license from Team Gordon, Incorporated.
“Cingular”, “Cingular Wireless” and the Cingular Logo are Trademarks of Cingular
Wireless LLC, and are used under license from Cingular Wireless LLC. The Stylized
“30”, the likeness of the Number 30 Race Car and the RCR Checkered Flag Logo are
Trademarks of Richard Childress Racing Enterprises, Incorporated, and are used under
license from Richard Childress Racing Enterprises, Incorporated. The name, likeness and
signature of Jeff Green are trademarks of Jeff Green Enterprises, Incorporated, and are
used under license from Jeff Green Enterprises, Incorporated. “America Online”, “AOL”,
“AOL TV” and the AOL Logo are registered Trademarks of America Online, Incorporated,
and are used under license from America Online, Incorporated. The Stylized “29”, the
likeness of the Number 29 Race Car and the RCR Checkered Flag Logo are Trademarks
of Richard Childress Racing Enterprises, Incorporated, and are used under license from
Richard Childress Racing Enterprises, Incorporated. The name, likeness and signature of
Kevin Harvick are trademarks of Kevin Harvick, Incorporated, and are used under license
from Kevin Harvick, Incorporated. The Trademarks “Goodwrench” and “GM” are used
55
under license from General Motors Corporation. UPS®, UPS.COM®, UPS Racing logo®
and the UPS logo® are registered trademarks of United Parcel Service of America, Inc.
and used under license. Dale Jarrett and Robert Yates Racing trademarks are used under
license. The name, likeness and signature of Jimmie Johnson and the likeness of the
Hendrick Motorsports #48 Lowe’s Home Improvement Warehouse Chevrolet are used
under license granted by JG Motorsports, Inc. ©2003 JG Motorsports, Inc. Copyrightã
2002, 2003 DeWalt. The DeWaltâ trademarks, Roush Racing and Matt Kenseth’s name
and / or likeness used by authority of Roush Racing, Livonia, MI. The yellow/black color
scheme is a trademark for DeWalt(r) Power Tools and Accessories: The yellow and black
color scheme; the “D” shaped air intake grill on tools; the array of pyramids on the handgrip; the kit box configuration; and the array of lozenge-shaped humps on the surface of
the tool. Likeness of the #18 Joe Gibbs Racing Winston Cup Car, including “Interstate”
“Interstate Batteries™”; “Joe Gibbs Racing, Inc.®”; #18™; “Bobby Labonte™”; made
under license from Redline Sports. © 2003 Redline Sports. ©2003 America’s Dairy
Farmers and Milk Processors. got milk?® is a registered trademark of the California Milk
Processor Board.; ®#5 design, ®Hendrick Motorsports. Used under license/utilize sous
license/bajo licencia; ©2003 Hendrick Motorsports. Roush Racing’s and Mark Martin’s
name and/or likeness used by authority of Roush Racing, Livonia, Michigan. ©2003
Evernham Motorsports, LLC. Ray Evernham® is a trademark and service mark of Ray J,
LLC.; Made under license from Evernham Motorsports, LLC.; Jeremy Mayfield™; Ray
Evernham®; 19™; Evernham Motorsports™; Legal Notice: ©2003 Evernham
Motorsports, L.L.C. Dodge® is a registered trademark of DaimlerChrysler Corporation.
“Hendrick Motorsports®”; “25®”; ©2003 Hendrick Motorsports. Jerry Nadeau Name and
Likeness Licensed by ©2003 MB2 Motorsports/J.N. Racing, Inc. Permission to use these
insignia, marks or logos in no way implies endorsement of products, services, events or
organizations by the Department of the Army or any other component of the Department
of Defense. ©2003 U.S. ARMY. Penske Racing South, Inc. trademarks, including the #12
and the likeness of the racecar, and Ryan Newman’s name and/or likeness are granted by
license from Penske Racing South, Inc. ALLTEL marks are registered trademarks of ALLTEL Corporation. The likeness of the #1 Pennzoil Chevrolet driven by Steve Park is used
under license from Dale Earnhardt, Inc. Kyle Petty name and/or likeness used under license by Petty Marketing Company, LLC. The ‘Ford Motorcraft’ trademarks, ‘Wood Brothers
Racing’ and ‘Ricky Rudd’s” name and/or likeness used by authority of Roush Racing,
Livonia, MI. TM/(R) M&M’S, M and the M&M’S Characters are trademarks of Mars,
Incorporated and its affiliates. (C) Mars, Inc. 2003. Manufactured and distributed under
license by Sierra Entertainment, Inc. Elliott Sadler and Robert Yates Racing are used
under license. Mike Skinner name and likeness, KODAK PERFECT TOUCH and Trade
Dress are trademarks licensed to Sierra Entertainment, Inc. by Eastman Kodak Company.
Design 4 is a trademark of Morgan-McClure Motorsports, Inc. Likeness of the #20 Joe
Gibbs Racing Winston Cup Car, including “The Home Depot®”; “Joe Gibbs Racing,
Inc.®”; #20™; “Tony Stewart™”; made under license from Redline Sports. © 2003
Redline Sports. Licensed by Bill Davis Racing, Inc. 2003. The stylized 23, the Bill Davis
Racing logo and the likeness of the #23 car are trademarks of Bill Davis Racing, Inc. The
Stacker 2® logo is a registered trademark of NVE Pharmaceuticals, Inc. The likeness of
56
the #15 NAPA Chevrolet driven by Michael Waltrip is used under license from Dale
Earnhardt, Inc. © 2003 Licensed by Rusty Wallace Inc. and Penske Racing South Inc.
Goodyear and the winged foot design are registered trademarks of the Goodyear Tire &
Rubber Company. Used with permission.
Pocono Raceway® is a registered trademark of Pocono International Raceway, Inc.
Atlanta Motor Speedway, Bristol Motor Speedway, Lowe’s Motor Speedway, Infineon
Raceway, Texas Motor Speedway, Las Vegas Motor Speedway are trademarks of
Speedway Motorsports, Inc., Officially Licensed by Speedway Motorsports, Inc.,
www.gospeedway.com. California Speedway®, Darlington Raceway®, DAYTONA
INTERNATIONAL SPEEDWAY®, Homestead - Miami Speedway®, Kansas
Speedway®, Michigan International Speedway®, North Carolina Speedway®, Phoenix
International Raceway®, Talladega Superspeedway®, and Watkins Glen International®
used under license from International Speedway Corporation.
General Motors Trademarks used under license to Papyrus Racing Games. Dodge is a trademark of DaimlerChrysler Corporation. Dodge Intrepid and its trade dress are used under
license by Sierra Entertainment, Inc. ©DaimlerChrysler Corporation 2003. ©2003 Ford
Motor Company, “Ford Taurus” trademarks used under license from Ford Motor
Company.
57
Technical Support / Customer Service
Tel: 08456 023 057
Monday-Friday, 9:00 A.M. - 5:00 P.M.
Fax:(0118) 987 5603
Lines open 24 hrs, 365 days a year, using our automated technical support attendant. This
system includes answers to all commonly posed questions and problems with our new
and major titles. It is set up in a friendly and easy to use menu system that you navigate
through using a touch tone telephone. If the answer to your question is not in our
automated system, then you will be transferred to a technician between the hours of 9am
and 5pm Monday to Friday.
If you would prefer to write to us, please send your mail to:
Vivendi Universal Games UK
Customer Services / Mail Order / Tech Support Department
PO Box 2510, Reading, RG2 0ZJ
United Kingdom
**
Hintline: 09063 63 62 61 (UK callers only)
24hr automated service. Calls cost 60p/min from landlines.
For Technical Support enquiries in Australia
Phone: 1902 222 213
Calls charged at $1.98* inc GST per min. Higher rate applies from mobile or public
phones. Call charges subject to change without notice.
58
WARRANTY
YOU SHOULD CAREFULLY READ THE FOLLOWING END USER LICENSE AGREEMENT BEFORE
INSTALLING THIS SOFTWARE PROGRAM.
This software program, any printed materials, any on-line or electronic documentation, and any and all
copies and derivative works of such software program and materials (the "Program") are the
copyrighted work of Sierra Entertainment, Inc. its subsidiaries, licensors and/or its suppliers.
All use of the Program is governed by the terms of the End User License Agreement which is provided
below ("License").
The Program is solely for use by end users according to the terms of the License.
Any use, reproduction or redistribution of the Program not in accordance with the terms of the License
is expressly prohibited.
END USER LICENSE AGREEMENT
1. Limited Use License.
Sierra Entertainment, Inc. ("the Licensor") hereby grants, and by installing the Program you thereby
accept, a limited, non-exclusive license and right to install and use one (1) copy of the Program for your
use on either a home or portable computer, or if applicable on your console (regular or handled). You
may not network the Program or otherwise install it or use it on more than one computer at a time,
except if expressly authorised otherwise in the applicable documentation which you should refer to if :
(a) The Program contains a Level Editor (“Editor”) that allows you to create custom levels or other
materials for your personal use in connection with the Program (“New Materials”).
(b) The Program has a multi-player capability
The Program is licensed not sold. Your license confers no title or ownership in the Program.
2. Ownership.
All title, ownership rights and intellectual property rights in and to the Program and any and all copies
thereof (including but not limited to any titles, computer code, themes, objects, characters, character
names, stories, dialog, catch phrases, locations, concepts, artwork, animations, sounds, musical
compositions, audio-visual effects, methods of operation, moral rights, any related documentation, and
"applets" incorporated into the Program) are owned by the Licensor or its licensors.
The Program is protected by the English copyright laws , international copyright treaties and
conventions and any other applicable laws. All rights are reserved. The Program may contain certain
licensed materials and the Licensor's licensors may act to protect their rights in the event of any
violation of this Agreement.
3. Responsibilities of End User.
A. Subject to the Grant of License herein above, you may not, in whole or in part, copy, photocopy,
reproduce, translate, reverse engineer, derive source code, modify, disassemble, decompile, create
derivative works based on the Program, or remove any proprietary notices or labels on the Program
without the prior consent, in writing, of the Licensor.
B. The Program is licensed to you as a single product. Its component parts may not be separated for
use on more than one computer.
C. You are entitled to use the Program for your own use, but you are not be entitled to:
(i) sell, grant a security interest in or transfer reproductions of the Program to other parties in any
way, nor to rent, lease or license the Program to others without the Licensor prior written consent ;
(ii) publish and/or distribute the computer images, sound, files, fonts, graphics, clipart, animations,
photographs, databases or other content of the Program use any of the computer images related
to identifiable individuals or entities in a manner which suggests their association with or
endorsement of any product or services ;
(iii) exploit the Program or any of its parts, computer images, sound files, fonts, graphics, clipart,
animations, photographs, databases or other content in the Program, for any commercial purpose
including, but not limited to, use at a cyber café, computer gaming centre or any other locationbased site.
59
(iv) host or provide matchmaking services for the Program or emulate or redirect the communication
protocols used by the Licensor in the network feature of the Program, through protocol
emulation, tunnelling, modifying or adding components to the Program, use of a utility program
or any other techniques now known or hereafter developed, for any purpose including, but not
limited to network play over the Internet, network play utilising commercial or non-commercial
gaming networks or as part of content aggregation networks without the Licensor prior written
consent .
4. Program Transfer.
You may permanently transfer all of your rights under this License, provided the recipient agrees to the
terms of this License and you agree to remove the Program from you home or portable computer.
5. Termination.
This License is effective until terminated. You may terminate the License at any time by destroying the
Program and any New Material. The Licensor may, at its discretion, terminate this License in the event
that you fail to comply with the terms and conditions contained herein. In such event, you must
immediately destroy the Program and any New Material.
6. Export Controls.
The Program may not be re-exported, download or otherwise exported into (or to a national or resident
of) any country to which the U.S. has embargoed goods, or anyone on the U.S. Treasury Department’s
list of Specially Designated National or the U.S. Treasury Department’s Table of Denial Orders. By
installing the Program, you are agreeing to the foregoing and you are representing and warranting that
you are not located in, under the control of, or a national or resident of any such country or on any
such list.
7. Customer Service/Technical Support.
Licensor agrees to provide Customer Service and Technical Support for this Program until such time as
the Program is “out of publication.” The Program shall be considered “Out of Publication” one (1) year
following the date that the Program is no longer manufactured and/or distributed by Licensor, or its
licensors. “Customer Service” as used herein may be provided to you by Licensor representatives by
telephone and/or by electronic message (e-mail). “Technical Support” may be provided to you by
Licensor by telephone, electronic message (e-mail), or by posting of information related to known
technical support issues on a website. Unless otherwise stated in the Program’s packaging or in the
Program’s user manual, nothing herein shall be construed so as to place a duty upon Licensor to
provide Customer Service or Technical Support via a toll free telephone number for an unlimited period
of time.
8. Duration of the “On-Line” component of the Program.
If this Program contains an ‘on-line’ component that allows you to utilize the Product over the internet
utilizing servers and software maintained or authorized by Licensor. Licensor agrees to provide the
servers and software technology necessary to utilize the “on-line” component of the this Program until
such time as the Program is Out of Publication, as defined above. Thereafter, Licensor may, in its sole
discretion, continue to provide the servers and software technology necessary to utilize the “on-line”
component of the this Program, or Licensor may license to third parties the right to provide the servers
and software technology necessary to utilize the “on-line” component of this Program. However,
nothing contained herein shall be construed so as to place an obligation upon Licensor to provide the
servers and software technology necessary to utilize the “on-line” beyond the time that the Program is
Out of Publication.
9. Limited Warranty.
THE LICENSOR EXPRESSLY DISCLAIMS ANY WARRANTY FOR THE PROGRAM, EDITOR, AND
MANUAL(S). THE PROGRAM, EDITOR AND MANUAL(S) ARE PROVIDED "AS IS" WITHOUT
WARRANTY OF ANY KIND, EITHER EXPRESS OR IMPLIED, INCLUDING, WITHOUT LIMITATION, THE
IMPLIED WARRANTIES OF MERCHANTABILITY, FITNESS FOR A PARTICULAR PURPOSE, OR NONINFRINGEMENT.
The entire risk arising out of use or performance of the Program, Editor and Manual(s) remains with you ,
However the Licensor warrants that the media containing the Program shall be free from defects in
material and workmanship under normal use and services and the Program will perform substantially
in accordance with the accompanying written materials, for a period of 2 (two) years from the date of
your purchase of the Program.
60
In order to enforce the above mentioned warranty Publisher should be informed of the defect at least 2
(two) months following its discovery.
In the event that the media proves to be defective during that time period, and upon presentation to the
Licensor of proof of purchase of the defective Program, the Licensor will then be able to choose
between the following possibilities 1) correct any defect, 2) provide you with a product of equal value,
or 3) refund your money.
Some states/jurisdiction do not allow limitation on duration of an implied warranty, so the above
limitation may not apply to you.
This Limited Warranty does not affect the application of any legal warranty provided by the applicable
laws and regulations.
In case you would like to exchange the product or refund you money, notably if the product is
defective, please refer to the “Technical Support Policy” herein included.
10. Limitation of Liability.
NEITHER THE LICENSOR , ITS PARENT, SUBSIDIARIES, AFFILIATES OR LICENSORS SHALL BE LIABLE
IN ANY WAY FOR LOSS OR DAMAGE OF ANY KIND RESULTING FROM THE USE OF THE PROGRAM
OR EDITOR INCLUDING, BUT NOT LIMITED TO, LOSS OF GOODWILL, WORK STOPPAGE, COMPUTER
FAILURE OR MALFUNCTION, OR ANY AND ALL OTHER COMMERCIAL DAMAGES OR LOSSES.
Some countries do not allow the exclusion or limitation of incidental or consequential damages, or
allow limitations on how long an implied warranty lasts, so above limitations or exclusion may not apply
to you.
11. Equitable Remedies.
You hereby agree that the Licensor would be irreparably damaged if the terms of this License were not
specifically enforced, and therefore you agree that the Licensor shall be entitled, without bond, other
security, or proof of damages, to appropriate equitable remedies with respect to breaches of this License,
in addition to such other remedies as the Licensor may otherwise have available to it under applicable
laws.
12. Miscellaneous.
The License shall be deemed to have been made and executed in England, and any dispute arising
hereunder shall be resolved in accordance with the English law. This License may be amended, altered
or modified only by an instrument in writing, specifying such amendment, alteration or modification,
executed by both parties.
In the event that any provision of this License shall be held by a court or other tribunal of competent
jurisdiction to be unenforceable, such provision will be enforced to the maximum extent permissible
and the remaining portions of this License shall remain in full force and effect.
The terms and conditions of a paper printed licence eventually accompanying the Program prevail on
any terms and condition of a license eventually included in the Program and that could appear on
screen.
You hereby acknowledge that you have read and understand the foregoing License and agree that the
action of installing the Program is an acknowledgement of your agreement to be bound by the terms
and conditions of the License contained herein. You also acknowledge and agree that this License is the
complete and exclusive statement of the agreement between the Licensor and you and that the License
supersedes any prior or contemporaneous agreement, either oral or written, and any other
communications between the Licensor and you including any inconsistent written license agreement or
on-line help accompanying the Program.
61
TECHNICAL
SUPPORT POLICY
Attention : The technical support will only be available for private use complying with
the terms of the End User License Agreement attached to the Product and to which you
have agreed. Consequently, the technical support will not, in any case, be available for
commercial or professional use of the Product.
Exchange Procedure for faulty CD-Rom, or DVD-Rom
If during the warranty period described in the End User License Agreement, following
your purchase of the product, you notice that the CD-Rom or DVD-Rom or floppy disk is
defective or scratched, the technical support will be able to exchange the Product free of
charge, if you:
• send the faulty CD-Rom or DVD-Rom back to the address indicated in the manual
• send a dated proof of purchase of the defective product (e.g. purchase ticket)
Please, do not forget to join in your letter, your name, address and a phone number
where it is possible to reach you during the day.
After this warranty period, if you want to exchange the CD-Rom or DVD-Rom (from a
defective or scratched material only), thank you for sending back to the address
indicated in the manual, the said CD-Rom or DVD-Rom and to join to your letter a £6-00
cheque for each defective material established to VIVENDI UNIVERSAL INTERACTIVE
PUBLISHING UK Ltd.
Please address your letters to the Technical Support *
Exchange Procedure for the manuals
IIf you have lost or torn your manual or documentation associated to the product, the
technical support will be able to send you new ones, under the following conditions:
Thank you for sending to the technical support a copy of the floppy disk #1, the CD-Rom
or DVD-Rom and to join a £6-00 cheque established to Vivendi Universal Interactive
Publishing UK Ltd. with your letter.
Please, do not forget to join in your letter, your name, address and a phone number
where it is possible to reach you during the day.
The technical support’s address and phone number are indicated in the manual or on
the Product packaging.
* We recommend that you send a letter by registered mail.
The Technical Support won’t be responsible for any loss or damage caused by the mail
delivery services.
Any shipping charge will be at your own expense
62
Notes: ....................................................................................................................
..............................................................................................................................
..............................................................................................................................
..............................................................................................................................
..............................................................................................................................
..............................................................................................................................
..............................................................................................................................
..............................................................................................................................
..............................................................................................................................
..............................................................................................................................
..............................................................................................................................
..............................................................................................................................
..............................................................................................................................
..............................................................................................................................
..............................................................................................................................
63
Notes: ....................................................................................................................
..............................................................................................................................
..............................................................................................................................
..............................................................................................................................
..............................................................................................................................
..............................................................................................................................
..............................................................................................................................
..............................................................................................................................
..............................................................................................................................
..............................................................................................................................
..............................................................................................................................
..............................................................................................................................
..............................................................................................................................
..............................................................................................................................
64