1
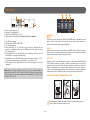
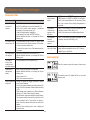
SPYP INT SURVEILLANCE CAMERA | ADVENTURE SERIES Adventure series · série USER MANUAL Models : BF-6ECLYPSE BF-8M8 HD-7C6 2N1 v1.5 e s SPYP INT THANK YOU FOR CHOOSING A SPYPOINT PRODUCT. ABOUT US This manual will guide you through all the features of your device so that you will get optimal use out of your SPYPOINT product. GG Telecom’s mission is to offer products that are easy to use, innovative, affordable and of exceptional quality. Our SPYPOINT products are mainly used for hunting and residential/commercial surveillance. They are distributed and shipped all over the world and the market never stops growing. Prosperous and respected, GG Telecom is a company that constantly keeps abreast of new technologies and listens to its customers to deliver cutting-edge products with practical solutions that improve hunting and outdoor activities. Our priority is to provide outstanding customer service. If you need support for your product, please contact the SPYPOINT technical service or visit our website. CONTACT 1-888-779-7646 JOIN THE SPYPOINT COMMUNITY [email protected] www.spypoint.com facebook.com/spypoint facebook.com/spypoint facebook.com/spypoint youtube.com/spypointtrailcam youtube.com/spypointtrailcam twitter.com/SpypointCamera CAMERAS WITH CELLULAR TRANSMISSION • If you need information or would like to subscribe to mySPYPOINT service, go to www.myspypoint.com. • For the latest version of the activation procedure, go to support.spypoint.com/activation. youtube.com/spypointtrailcam twitter.com/SpypointCam vimeo.com/spypointxcelcam Table of contents Package contents.......................................................................... 4 Limited warranty 2N1...............................................................................................27 BF-6, BF-8, HD-7, ECLYPSE, M8, C6...................................................28 Components.................................................................................. 5 Power............................................................................................ 7 Repair service 2N1...............................................................................................27 BF-6, BF-8, HD-7, ECLYPSE, M8, C6...................................................28 Memory card ................................................................................ 9 Flash unit (2N1)............................................................................. 9 "BUSY" DEL................................................................................... 9 Settings........................................................................................10 Distance.......................................................................................12 Sound recording (BF-8, HD-7, ECLYPSE, M8)....................................13 File transfer to a computer...........................................................14 Troubleshooting...........................................................................15 Error messages............................................................................15 Available accessories....................................................................16 Specifications BF-6..............................................................................................18 BF-8..............................................................................................19 HD-7.............................................................................................20 2N1...............................................................................................21 ECLYPSE.........................................................................................22 M8................................................................................................23 C6.................................................................................................24 Regulation 2N1...............................................................................................25 BF-6, BF-8, HD-7, ECLYPSE, M8.........................................................26 3 Package contents SPYP 1 INT Surveillance camera Adventure series Adventure series Série aventure Abenteuer-Serie serie de aventura serie di avventura Expedition series Série Expédition Expedition Serie models: Series expedición BF-6/S-BF-6 BF-8/S-BF-8 Serie spedizione Get started CompoNENTS Pro series Série pro Pro-Serie Serie pro Serie pro HD-7 2N1 ECLYPSE M8 Smart series Série Smart Smart serie Smart serie Smart serie 1 2 3 SPYPOINT Camera Settings 3 Error messages 4 Complete instructions 5 6 7 8 11 16 12 17 10 Buttons to set the camera. ON/OFF Allows the user to turn on/off the camera. 15 Battery case Insert 6 alkaline or lithium AA batteries or a rechargeable lithium battery pack (LIT-09/ LIT-C-8, sold separately). 16 TV OUT To view photos/videos directly on TV. 17 USB port To transfer or view photos/videos to a computer. 18 SD card slot An SD card is required to record videos/ photos. The camera is compatible with SD/ SDHC memory card, up to 32 GB capacity (not included). 19 DISTANCE dial Allows the user to adjust the distance of detection and the sensitivity of the detector. See DISTANCE section for more details. 13 12V power jack Tripod mount Fixation for a standard ¼-20” tripod mount. Microphone To record sound, lift the rubber cap and turn it slightly to completely clear the microphone receiver. Solar panel jack Allows the user to connect a solar panel (SP-12V) to maintain the charge of the lithium battery pack (LIT-09/LIT-C-8), sold separately. 9 INT Caméra de surveillance Série Adventure Adventure series Série aventure Abenteuer-Serie serie de aventura serie di avventura Expedition series Série Expédition Expedition modèles: Serie Series expedición BF-6/S-BF-6 BF-8/S-BF-8 Serie spedizione 1 Pour commencer pratique! Détacher une section et l'insérer dans la pochette prévue à cet effet à l’intérieur du boîtier de la caméra. CompoSANTS Pro series Série pro Pro-Serie Serie pro Serie pro HD-7 2N1 ECLYPSE M8 2 3 5 6 7 35 black LEDs and Flash Battery switch Allows the user to select the power source according to the type of batteries used. 11 Configuration screen To see battery level, date, number of recorded files, error messages and settings options. 12 BUSY LED Lights up when the camera is recording. 2 Lentille photo Capteur d’image et filtre infrarouge DEL noires invisibles ou DEL infrarouges Éclairage de nuit pour obtenir des photos et vidéos en noir et blanc. (selon la caméra) Tiny series Live series Clignote en mode SET/TEST lors d’une 3 Lumière de (située détection et clignote 60 secondes en mode Série Tinytest Série Live en haut à PHOTO/VIDÉO pour permettre à l’utilisateur Tiny-Seriedroite pour Live-Serie de quitter les lieux sans être photographié modèles à ou filmé. Live Serie Tinyles Series 35 LED) Serie Tiny Serie Live 4 Lentille fresnel Située devant le détecteur de mouvement, elle rend celui-ci plus sensible et permet d’élargir la zone de détection. 8 5 Prise 12V La caméra peut être alimentée au moyen d’une source externe de 12V telle qu’une batterie 12V ou un adaptateur 12V, vendus séparément. 6 Support pour trépied Fixation pour trépied standard de ¼-20”. 7 Microphone (si applicable) Pour enregistrer le son, soulever le capuchon et le tourner légèrement pour que le trou du microphone soit complètement dégagé. 8 Prise pour panneau solaire Permet de brancher un panneau solaire (SP-12V) qui maintient la charge du bloc pile lithium (LIT-09/LIT-C-8), vendus séparément. 9 35 DEL noires et Flash Modules interchangeables (voir section INSTALLATION DU mODULE FLASH pour plus de détails) 10 Commutateur Permet de sélectionner la source d’alimentation selon le type de piles utilisées. 4 9 v1.2 11 16 12 17 10 Pour commencer 13 (si applicable) Programmation 18 14 3 Messages d’erreur 4 Instructions complètes (si applicable) 15 19 www.spypoint.com SPYP 1 INT Überwachungskamera Adventure-Serie Adventure series Série aventure Abenteuer-Serie serie de aventura serie di avventura Expedition series Série Expédition Expedition Serie modelle: Series expedición BF-6/S-BF-6 Serie spedizione BF-8/S-BF-8 1 Starten 2 praxistip! Trennen Sie einen gewünschten Abschnitt dieser Anleitung ab und platzieren Sie diesen im Kameragehäuse. KompoNENTEN Pro series Série pro Pro-Serie Serie pro Serie pro HD-7 2N1 ECLYPSE M8 Smart series Série Smart Smart serie Smart serie Smart serie 1 2 3 5 6 7 Fotolinse Bildsensor und Infrarot-Filter. Unsichtbare schwarze LEDs oder Infrarot-LEDs Nachtbeleuchtung für Schwarz/weiß Fotos und Videos. (anhängig von der Kamera) 3 Test-LED Tiny series (befindet sich Série Tiny oben rechts bei modellen Tiny-Serie mit 35 LEDs) Serie Tiny Fresnel-Linse Serie 4Tiny 8 Schnellstartanleitung 9 v1.2 11 16 12 17 1 Starten 2 Einstellungen 13 3 Fehlermeldungen 14 10 Installation strap 4 1 INT Telecamera per sorveglianza Adventure series Adventure series Série aventure Abenteuer-Serie serie de aventura serie di avventura Expedition series Série Expédition modelli: Serie Expedition BF-6/S-BF-6 Series expedición SerieBF-8/S-BF-8 spedizione Pro series Série pro Pro-Serie Serie pro Serie pro 1 2 3 6 8 9 v1.2 Avvio 2 Impostazioni 3 Messaggi d’errore 4 11 16 12 17 10 1 1 INT Cámara de vigilancia Adventure series Adventure series Série aventure Abenteuer-Serie serie de aventura serie di avventura Carte SD nécessaire pour enregistrer des vidéos/photos. La caméra accepte les cartes mémoires de type SD/SDHC jusqu’à une capacité de 32Go (non-incluse). 19 Roulette DISTANCE Permet d’ajuster la distance de détection et la sensibilité du détecteur. Voir section DISTANCE pour plus de détails. 11 KonfigurationsBildschirm Zeigt den Akkuladezustand, Datum, Anzahl der aufgenommenen Dateien, Fehlermeldungen und Einstellungsmöglichkeiten an. 12 BUSY-LED Leuchtet auf, wenn die Kamera aufnimmt. 13 Bedienschaltfläche Tasten zum bedienen der Kamera. 14 ON/OFF Ermöglicht das Ein/Ausschalten der Kamera 15 Batteriefach Verwenden Sie 6 Alkaline oder Lithium AABatterien (LR6) oder einen wiederaufladbaren Lithium-Akku-Pack (LIT-09/LIT-C-8, separate erhältlich). 16 TV-Ausgang Um Fotos/Videos direkt auf einem Fernseher zu sehen. 17 USBAnschluss Um Fotos/Videos auf Ihren Computer zu übertragen. 18 SD-Kartensteckplatz Für Foto/Video-Aufnahmen wird eine SDKarte benötigt. Die Kamera ist kompatibel mit SD/SDHC Speicherkarten, bis zu 32GB (nicht enthalten). 19 DISTANCE RAD Regelt die Weite der Erfassung und die Empfindlichkeit des Bewegungsmelders.Im DISTANZAbschnitt finden Sie weitere Informationen. Illuminazione notturna per immagini e video in bianco/nero 12 BUSY-LED Si accende, quando la telecamera riprende. Live series nella modalità SET/TEST, se Lampeggia la telecamera rileva un movimento. Nella Série Live modalità Photo/Video il LED lampeggia 60 Live-Serie secondi, per permettere all’utilizzatore di allontanarsi Series Live senza essere ripreso. Serie Live Ampia l’area di sorveglianza del sensore di movimento ed aumenta la sensibilità della telecamera. 5 Attacco 12V Questa telecamera può essere alimentata dall’entrata esterna 12-V-DC, ad esempio con batteria 12V o adattatore 12V (ottenibile separatamente). 6 Filettatura per treppiede Possibilità di fissaggio standard ¼-20”. 7 Microfono (se Per riprese audio, alzate la protezione in gomma e ruotatela sul lato per liberare il microfono. 8 Entrata pannello solare (se corrisponde) Permette di attaccare un pannello solare (SP-12V), per mantenere la carica del pacco batteria al lithio (LIT-09/LIT-C-8) (ottenibile separatamente). 35 Black-LED e Flash Moduli sostituibili (vedasi parte relative a modulo flash per ulteriori dettagli) Interruttore batteria Selezionate la fonte d’energia riferita al tipo di batteria. Lentes fotográficas Sensor de imágenes y filtro de infrarrojos. LED invisibles de color negro o Luz de prueba Iluminación nocturna para fotos y vídeos en blanco y negro. 9 corrisponde) (se corrisponde) con Expedition series Série Expédition modelos: Expedition Serie BF-6/S-BF-6 Series expedición BF-8/S-BF-8 Serie spedizione 1 Para empezar ¡Consejo práctico! recorte el fragmento deseado de este manual y guárdelo en el bolsillo de la carcasa destinado para ello. CompoNENTES Pro series Série pro Pro-Serie Serie pro Serie pro HD-7 2N1 ECLYPSE M8 (dependiendo de la cámara) Smart series Série Smart Smart serie Smart serie Smart serie 1 2 3 5 6 7 Tiny series Luz de prueba Série3 Tiny (colocada en el extremo Tiny-Serie superior Serie Tiny derecho en los modelos Serie Tiny con 35 LEDs) Ajustes 3 Mensajes de error 4 Instrucciones completas www.spypoint.com www.spypoint.info 11 16 12 17 10 Permite ampliar el área de detección del sensor de movimiento y aumentar la sensibilidad de la cámara. 5 Conexión 12V Esta cámara puede ser alimentada por la entrada externa de 12 voltios DC, por ejemplo con baterías de 12V o un adaptador de 12V (disponible por separado). 6 Trípode Fijación para un inserto roscado estándar de ¼-20”. Micrófono Para realizar grabaciones de audio levante la funda de plástico y dele la vuelta ligeramente para dejar el micrófono libre. Entrada del panel solar Permite instalar un panel solar (SP-12V), para mantener la carga de la batería de litio (LIT-09/LIT-C-8) (disponible por separado). LEDs 35 negras y Flash Módulos intercambiables (véase la sección módulo de flash para más detalles) 7 8 13 9 15 (si está disponible) (si está disponible) 18 14 Serie Live Lente Fresnel 9 v1.2 Live series Parpadea en el modo SET/TEST cuando la Série Live cámara ha detectado un movimiento. En el Live-Serie modo PHOTO/VIDEO la luz LED parpadea durante 60 segundos para permitir al usuario Series Live retirarse sin ser fotografiado. (si está disponible) 19 10 4 Interruptor de la batería Seleccione la fuente de energía dependiendo del tipo de baterías empleadas. ALK • LIT-09* • 12V + LIT-09* • Panneau solaire + LIT-09* (pour caméra compatible avec un panneau solaire) LIT-09 ou RECH (selon le modèle de caméra) *Bloc pile lithium rechargeable, vendu séparément (LIT-09) ou avec un chargeur (LIT-C-8). iNSTALLATioN DE LA CArTE mémoirE Insérer une carte mémoire de type SD/SDHC (jusqu’à une capacité de 32Go) dans la fente pour carte SD. La carte est correctement insérée lorsqu’un clic se fait entendre. Audio-video cable (BF-8, HD-7, ECLYPSE, M8) Avant d’insérer ou de retirer une carte mémoire, toujours mettre la caméra à OFF pour éviter que les images présentes sur la carte soient supprimées ou endommagées. Il n’est pas possible de prendre des vidéos de nuit avec le module Flash. Schalterstellung abhängig (von der Energiequelle) Energiequelle Schalterstellung • 6 AA • 12V • 12V + 6 AA ALK • LIT-09* • 12V + LIT-09* • Solarpanel + LIT-09* (für Kameras kompatibel mit dem Solarpanel) LIT-09 oder RECH (anhängig von der Kamera) * Wiederaufladbarer Lithium-Akku-Pack (LIT-09) oder mit Ladegerät (LIT-C-8), separat erhältlich. SpEiChErKArTEN iNSTALLATioN Legen Sie eine SD/ SDHC (bis zu 32GB) in den Kartenschlitz. Wenn ein klicken zu hören ist, wurde die Karte korrekt eingelegt. Vor dem Einsetzen oder Entfernen einer Speicherkarte, schalten Sie die Kamera immer vorher aus, um einen Verlust oder eine Beschädigung von den bereits vorhandenen Aufnahmen zu verhindern. EiNSETZEN DEr bATTEriEN bLiTZLiChT-moDUL iNSTALLATioN (falls zutreffend) Installieren Sie das Blitzlicht-Modul, um bei Tag und Nacht Farbaufnahmen zu erhalten. Flash unit 6 Alkaline AA-Batterien Lithium-Akku-Pack LIT-09/LIT-C-8 Es ist nicht möglich mit dem BlitzlichtModul Videos in der Nacht aufzunehmen. Wir empfehlen, neue Batterien zu verwenden, um die maximale Leistung aus Ihrer Kamera herauszuholen. Weiterhin wird die Verwendung von wiederaufladbaren AA-Batterien nicht empfohlen. (2N1) 13 Telecomando Tasti per impostare la telecamera. 14 ON/OFF Interruttore per della telecamera 15 Vano batterie Utilizzate 6 batterie alcaline oppure al litio AA (LR6) oppure un pacco batteria ricaricabile al litio (LIT-09/LIT-C-8, ottenibile separatamente). 16 Uscita TV Per visualizzare foto/video direttamente nel televisore. 17 Presa USB Per inviare foto/video sul suo computer. 18 Lettore SD Per registrazioni foto/video si necessita di scheda SD. La telecamera è compatibile con SD/SDHC fino a 32 GB (non compresa). 19 RUOTA DISTANCE Regola l’area di rilevazione e la sensibilità del rilevatore di movimento. Nella parte DISTANZA trovate ulteriori informazioni. filettatura 4 8 manual de inicio rápido Para empezar 2 Position du commutateur • 6 AA • 12V • 12V + 6 AA Bloc pile lithium LIT-09/LIT-C-8 LED neri invisibili o LED infrarossi Lente Fresnel Source d'alimentation Installer le module Flash pour obtenir des photos couleur de jour comme de nuit. 6 piles AA alcalines Indica lo stato di carica delle batterie, data, numero di file registrati, messaggi d’errore e modalità d’impostazione. LED test Position du commutateur (selon la source d’alimentation) Nous recommandons l’utilisation de piles neuves afin d’assurer un rendement maximal de la caméra. Les piles AA rechargeables sont déconseillées. Schermata di configurazione (si trova in alto a destra nelle telecamera con 35 LED) It is not possible to take videos at night with the Flash unit. iNSTALLATioN DU moDULE FLASh (si applicable) ¼-20”- (in base alla telecamera) Install the Flash unit to obtain color pictures by day and night. iNSTALLATioN DES piLES 11 10 4 2 Pour transférer ou visionner les photos/vidéos à un ordinateur. Fente pour carte SD accensione/spegnimento Posizione interruttore (dipendente dalla fonte d’energia) Fonte d’energia Posizione interrutore • 6 AA • 12V • 12V + 6 AA ALK • LIT-09* • 12V + LIT-09* • Pannello solare + LIT-09* (per telecamere compatibili con pannelli solari) LIT-09 o RECH (in base alla telecamera) * Pacco batteria ricaricabile al litio (LIT-09) o con caricabatteria (LIT-C-8), ottenibili separatamente. iNSTALLAZioNE SChEDE mEmoriA Inserisca una scheda memoria SD/ SDHC (fino a 32GB) nell’apposita fessura. Se è udibile un click la scheda è stata inserita correttamente. Prima di inserire o di togliere una scheda memoria, spegnete sempre la telecamera, per evitare il danneggiamento o la perdita di dati registrati. iNSErimENTo DELLE bATTEriE iNSTALLAZioNE moDULo FLASh (se corrisponde) Installate il modulo flash per avere immagini a colori sia di notte che di giorno. 6 pile alcaline AA Non è possibile registrare video di notte con il modulo flash. Pacco pile Lithio LIT-09/LIT-C-8 Consigliamo di utilizzare batterie nuove, per avere il Massimo della telecamera. Inoltre si sconsiglia l’uso di batterie ricaricabili. www.spypoint.com www.spypoint.info SPYP 1 Pour visionner les photos/vidéos directement sur un téléviseur. Port USB 18 Sensore d’immagine e filtro infrarossi. 15 Istruzioni complete Sortie TV OUT 17 Lente fotografica 14 19 16 Wählen Sie die Energiequelle, bezüglich der verwendeten Art von Batterien. 2 Insert an SD/SDHC memory card (up to 32 GB capacity) in the card slot. The card is inserted correctly when a click is heard. (BF-6, 2N1, C6) Austauschbare Module (siehe Blitzlicht-Modul Installation Abschnitt, für weitere Details). 13 18 Insérer 6 piles AA alcalines ou lithium ou un bloc pile lithium rechargeable (LIT-09/LIT-C-8, vendus séparément). Permet d’allumer ou d’éteindre la caméra. Batterieschalter Tiny series 3 Série Tiny Tiny-Serie Serie Tiny Serie Tiny4 7 Compartiment à piles 35 Black-LEDs und Lichtblitz (falls zutreffend) 5 ON/OFF 15 Boutons pour programmer la caméra. (falls zutreffend) 9 4 manuale d’istruzione per avvio veloce 14 S’allume lorsque la caméra enregistre un fichier. Ermöglicht ein Solarpanel (SP-12V) anzuschließen, um die Ladung des Lithium-AkkuPack (LIT-09/LIT-C-8) aufrechtzuerhalten (separate erhältlich). 10 Smart series Série Smart Smart serie Smart serie Smart serie Permet de voir le niveau des piles, la date, le nombre de fichiers enregistrés, les messages d’erreur et les options de programmation. SolarpanelEingang (falls zutreffend) mEmorY CArD iNSTALLATioN Video cable Für Tonaufnahmen, heben Sie die Gummiabeckung an und drehen diese zur Seite, damit das Mikrofon frei liegt. 1 CompoNENTi HD-7 2N1 ECLYPSE M8 Boutons de réglage Mikrofon 19 Consiglio pratico! Staccate la parte desiderata di queste istruzioni ed applicatela all’interno della carcassa della telecamera. Lumière BUSY 13 7 18 Avvio Écran de configuration 12 Befestigung für Gewindeeinsatz. www.spypoint.com www.spypoint.info SPYP 11 Diese Kamera kann über den externen 12-Vold-DC-Eingang betrieben werden, z.B. mit einer 12V Batterie oder einem 12V Adapter (separat erhältlich). 8 LIT-09 or RECH (depending on the camera) * Rechargeable lithium battery pack, sold separately (LIT-09) or with a charger (LIT-C-8). We recommend the use of new batteries to ensure a maximum performance of the camera. Rechargeable AA batteries are not recommended. Stativgewinde Standart ALK • LIT-09* • 12V + LIT-09* • Solar panel + LIT-09* (for cameras compatible with solar panel) Lithium battery pack LIT-09/LIT-C-8 12V-Anschluss einen Switch position • 6 AA • 12V • 12V + 6 AA Before inserting or removing a memory card, always turn off the camera to prevent loss or damage of the pictures already recorded. Series Live Erweitert den Erfassungsbereich des BeweSerie Live gungsmelders und erhöht die Empfindlichkeit der Kamera. Power source FLASh UNiT iNSTALLATioN (if applicable) 6 alkaline AA batteries 6 15 Vollständige Instruktionen Blinkt SET/TEST Modus, wenn die Kamera Liveimseries eine Bewegung erfasst hat. Im PHOTO/ Série Live VIDEO modus blinkt die LED 60 Sekunden, um dem Anwender zu ermöglichen sich zu Live-Serie entfernen, ohne fotografiert zu werden. Switch position (depending on the power source) bATTErY iNSTALLATioN 5 4 USB cable Interchangeable units (see FLASH UNIT INSTALLATION section for more details) 10 1 Smart series Série Smart Smart serie Smart serie Smart serie 1 Guide de démarrage rapide 2 This camera can be powered from an external 12-volt DC input such as a 12V battery or a 12V adapter, sold separately. (if applicable) (if applicable) 19 Series Live Serie Live Located ahead of the motion sensor, it makes it more sensitive and allows to expand the detection area. 5 18 15 Flashes SET/TEST mode when there is Liveinseries detection and flashes 60 seconds in PHOTO/ Série Live VIDEO mode to allow the user to leave withoutLive-Serie being photographed or recorded. 6 (if applicable) 14 Quick start guide 1 Switch panel 14 8 www.spypoint.com SPYP 13 Night lighting to obtain black and white photos and videos. 9 v1.2 2 Image sensor and infrared filter. (depending on the camera) 7 Quick start guide Get started Photo lens Invisible black LEDs or Infrared LEDs Test light Tiny3series (located at Série Tiny the top right for models Tiny-Serie with 35 LEDs) Serie Tiny Serie4 Tiny Fresnel lens 4 1 1 2 Useful! Detach a section and insert it into the sleeve provided for this purpose within the housing for the camera. 11 Pantalla de configuración Muestra el estado de la batería, la fecha, el número de archivos almacenados, los mensajes de error y las opciones de ajustes. 12 BUSY-LED Se ilumina cuando la cámara graba. 13 Botones de ajustes Botones para utilizar la cámara. 14 ON/OFF Permite apagar y encender la cámara. 15 Compartimento de las pilas Utilice 6 pilas alcalinas o de litio AA (LR6) o una batería de litio recargable (LIT-09/ LIT-C-8, disponibles por separado). 16 Salida de TV Para poder visualizar fotos y vídeos directamente en la televisión. 17 Conexión USB Para poder transferir fotos y vídeos a su ordenador. 18 Ranura de la tarjeta SD Para realizar grabaciones de vídeo o fotografías es necesaria una tarjeta SD. La cámara es compatible con tarjetas de memoria SD/SDHC de hasta 32GB (no incluidas). 19 RUEDA DE DISTANCE Permite ajustar la distancia de detección y la sensibilidad del detector. Véase la sección DISTANCE para más información. CoLoCACiÓN DE LAS bATErÍAS Posición del interruptor (en función de la fuente de energía Fuente de energía Posición del interruptor • 6 AA • 12V • 12V + 6 AA ALK • LIT-09* • 12V + LIT-09* • Panel solar + LIT-09* (para cámaras compatibles con panel solar) LIT-09 o RECH (dependiendo de la cámara) * Batería de litio recargable (LIT-09) o mediante cargador (LIT-C-8), disponibles por separado. CoLoCACiÓN DE LA TArJETA DE mEmoriA Inserte una tarjeta de memoria SD/SDHC (de hasta 32GB) en la ranura para tarjetas. Cuando oiga clic esto significará que la tarjeta ha sido correctamente colocada. Antes de insertar o retirar la tarjeta de memoria, apague la cámara para prevenir que las imágenes ya tomadas sean dañadas o borradas. CoLoCACiÓN DEL FLASh (si está disponible) Instale el módulo de flash, para poder hacer fotografías a color de noche y de día. 6 pilas alcalinas AA Una batería de litio LIT-09/LIT-C-8 Le recomendamos emplear nuevas pilas para obtener los mejores resultados de su cámara. Además, no se recomienda el uso de baterías AA recargables. No es posible grabar vídeos con el módulo de flash por la noche. Infrared unit (2N1) Components 14 2 21 16 6 17 22 3 10 8 4 5 20 15 13 1 9 18 11 19 23 7 12 1 Photo lens 2 Invisible LEDs or Infrared LEDs (HD-7) 3 Test light (located at the top right for models with 35 LEDs) 4 Light sensor 5 Fresnel lens 6 Slot for installation strap 7 Cable lock hole 8 12V power jack 9 Tripod mount 10 Microphone (BF-8, HD-7, ECLYPSE, M8) 11 Solar panel jack (BF-8, HD-7, ECLYPSE, M8, C6) 12 35 invisibles LEDs and Flash (2N1) 5 13 Access to the time battery 20 TV OUT 14 Battery switch 22 SD card slot 15 Configuration screen 16 BUSY Led 17 Switch panel ON/OFF 18 19 Battery case 21 USB port 23 DISTANCE dial Components 1 Photo lens 13 Access to the time battery Battery that keeps the time and date in memory (p.8). 2 Invisible LEDs or Night lighting to obtain black and white Infrared LEDs (HD-7) photos and videos. 14 Battery switch Allows the user to select the power source according to the type of batteries used (p.7). 3 Test light (located at the top right for models with 35 LEDs) Flashes in SET/TEST mode when there is detection and flashes 60 seconds in PHOTO/ VIDEO mode to allow the user to leave without being photographed or recorded. 15 Configuration screen To see battery level, date, number of recorded files, error messages and settings options (p.10). 4 Light sensor Allows the lighting of the LEDs panel at night. 16 BUSY LED Fresnel lens Expands the detection area and increases the sensitivity of the camera’s motion sensor. Lights up when the camera is recording (p.9). 5 17 Switch panel Buttons to set the camera (p.10). 6 Slot for installation strap Allows the user to install the camera using the installation strap included (p.10). 18 ON/OFF Allows the user to turn on/off the camera. 19 Battery case 7 Cable lock hole Allows the user to install a CL-6FT cable lock, sold separately (p.17). Case for AA batteries or a rechargeable lithium battery pack (p.7). 20 TV OUT 8 12V power jack This camera can be powered from an external 12-volt DC input such as a 12V battery or a 12V adapter, each sold separately (p.16). Allows the user to view or delete photos/ videos directly on TV (p.11). 21 USB port To transfer photos/videos to a computer (p.14) 9 Tripod mount Standard ¼-20" tripod mount. 22 SD card slot 10 Microphone Record sound in video mode (p.13). An SD card is required to record photos/ videos (p.9). 23 DISTANCE dial 11 Solar panel jack Allows the user to connect a solar panel (SP-12V) to maintain the charge of the lithium battery pack (LIT-09/LIT-C-8), sold separately (p.16). Allows the user to adjust the distance of detection and the sensitivity of the detector (p.12). 12 35 invisible LEDs and Interchangeable units (p.9). Flash (2N1) (BF-8, HD-7, ECLYPSE, M8) (BF-8, HD-7, ECLYPSE, M8, C6) Image sensor and infrared filter. 6 Power EXTERNAL (12V) This camera can also be powered by an external 12-volt DC input such as a 12-volt battery (KIT-12V, BATT-12V or KIT6V/12V) or a 12-volt adapter (AD-12V), sold separately (p.16). During the installation of a 12-volt connection, slide the battery switch to ALK (the AA batteries can remain safely inside the camera). If combined with a lithium battery pack, slide the battery switch to LIT-09 or RECH (depending on the camera). For the 12V available accessories, see p.16. The battery level is shown on the LCD screen. When a single line remains, the camera will continue to take photos but we strongly recommend to change the AA batteries or charge the lithium battery pack before they are empty (see figure below). If a video is being recorded and the batteries level reaches 0%, the camera saves the file before shutting down. SOLAR PANEL (BF-8, HD-7, ECLYPSE, M8, C6) This camera also offers the possibility to connect a solar panel (SP-12V sold separately, p.16) to maintain the charge of the lithium battery pack (sold separately, p.16). While installing the rechargeable lithium battery pack, slide the battery switch to LIT-09 or RECH (depending on the camera) to activate the charging system of the solar panel. AA BATTERIES This camera requires 6 AA batteries (1.5V). The use of alkaline or lithium batteries is strongly recommended. During the installation of the AA batteries, slide the battery switch to ALK (i.e. alkaline). Insert the batteries as indicated inside the battery case. Battery polarity must be followed. Battery switch position (depending on the power source) 6 alkaline AA batteries Power source Battery switch position • 6AA • 12V • 12V + 6AA ALK • LIT-09* • 12V + LIT-09* LIT-09 or RECH • Solar panel + LIT-09* (depending on the camera) (for cameras compatible with solar panel) Please note that the voltage of rechargeable AA batteries (1.2V) is insufficient to power the SPYPOINT camera. We also recommend the use of new batteries to ensure maximum performance of the camera. LITHIUM BATTERY PACK This SPYPOINT camera can be powered by a rechargeable lithium battery pack LIT-09/LIT-C-8 (sold separately, p.16). This type of battery is less affected by cold temperatures and lasts up to 3 times longer than an alkaline batteries. During the installation of the lithium battery, slide the battery switch to LIT-09 or RECH (depending on the camera). * Rechargeable lithium battery pack, sold separately (LIT-09) or with a charger (LIT-C-8). Lithium battery pack LIT-09/LIT-C-8 7 Power TIME BATTERY The camera has a CR2032 lithium button battery which saves the time and date. To replace the battery: 1. Turn off the camera and remove it from the housing. 2. Using a flat screwdriver, push the tab to the right. 3. While pushing the tab, remove the compartment of the camera. 4. Replace the battery, the polarity must be respected (side + facing up). 8 Memory card/ Flash unit/ "BUSY" LED INSERTING THE MEMORY CARD Insert an SD/SDHC memory card (up to 32 GB capacity) in the card slot. The card is inserted correctly when a click is heard. MEMORY CARD A memory card is required to record photos and videos. The camera is compatible with SD/SDHC memory cards, up to 32 GB capacity. (sold separately, p.16). Before inserting or removing a memory card, always turn off the camera to prevent loss or damage of the photos already recorded. When the camera is ON and no memory card is used, the screen displays "CArd" meaning to insert one. When the SD card is full, the screen displays "FUL". Here is a table of the approximate number of photos and length of videos that can be recorded with different memory card capacities. Many photo and video resolutions are noted, see those corresponding to the camera. 4 GB 8 GB 16 GB 32 GB 3 MP 4100 8200 16400 32800 4 MP 3800 7600 15200 30400 5 MP 3400 6800 13600 27300 6 MP 3200 6300 12600 25300 7 MP 2700 5500 10900 21800 8 MP 2400 4800 9500 19000 10 MP 1900 3800 7600 15200 12 MP 1600 3200 6300 12600 320 x 240 4h 8h 16 h 32 h 640 x 480 2h10 4h10 8h20 16h40 40 min 1h20 2h40 5h20 REMOVING THE MEMORY CARD Lightly press the memory card into the camera once to pop it out of the slot and remove it. Photo FLASH UNIT (2N1) Install the Flash unit to obtain color photos by day and night. It is not possible to take videos at night with the Flash unit. Video 1280 x 720 "BUSY" DEL The "BUSY" light, located to the right of the screen lights up when the camera records a file. 9 Settings 1 A 2 3 B C D 4 A: Photo quality (High/ Low) B: Number of recorded files C: Date/Time (MM/DD/YY, hh:mm) D: Temperature (Celcius/Farenheit)(BF-6, BF-8, HD-7, M8, C6) 1. 2. 3. 4. 5. 6. 7. 1 MODE PHOTO Allows the user to take photos. When the PHOTO mode is selected, the test light in front of the camera will flash for 60 seconds to allow the user to leave the area without being photographed. Turn OFF the camera. Set the switch MODE to SET/TEST. Turn ON the camera. Press MENU/OK. An "H" will flash on the screen to indicate that the camera is in High Resolution. Use the DOWN button if you want to reduce the resolution to "L". Press MENU/OK to set the date and time (mm/dd/yy, hh/mm). Use UP and DOWN to change the blinking digit. If applicable, press MENU/OK to go to the next option. Choose "F" or "C" to display the temperature in Fahrenheit (°F) or Celsius (°C). Once finished, press MENU/OK and turn OFF the system to save the changes. VIDEO Allows the user to take videos. When the VIDEO mode is selected, the test light in front of the camera (see above) will flash for 60 seconds to allow the user to leave the area without being recorded. SET-TEST Allows the user to test the detection system of the camera. When the SET/ TEST mode is selected, no photo or video is recorded. Pass in front of the camera from left to right. When the camera detects a motion, the test light blinks to indicate that the camera would normally have saved a photo or video. If the system does not detect the movement, increase the detection distance using the DISTANCE wheel or realign the system differently. Note: When the photo resolution is set to "L", the video resolution is automatically set to 320 x 240 or 640 x 480 (HD-7) and if the photo resolution is set to "H", the video resolution is automatically set to 640 x 480 or 1280 x 720 (HD-7). INSTALLATION WITH THE SUPPLIED STRAP 1. Insérez l’extrémité de la courroie dans la fente qui se trouve au dos du mécanisme. 2. Insérez la courroie dans la fente sous le levier et faites-la ressortir en arrière. 3. Créer une tension sur la courroie en la tirant vers la droite, puis rabattez vers la gauche le levier pour maintenir la position. Recommended installation height: about 3 feet above the ground. Do not place the camera facing the sun. 10 Settings VIEW Allows the user to view or delete recorded photos and videos directly on a television. Here are the different moon phases that can be printed on photos. 1. 2. 3. Waxing Crescent: (BF-6, BF-8, HD-7, 2N1, M8, C6) New moon: Turn OFF the camera. Set the switch MODE to VIEW. Connect the yellow end of the RCA cable (supplied) into the VIDEO IN of the TV and the other end into the TV OUT of the camera. First Quarter: Waxing Gibbous: Full moon: Waning Gibbous: Last Quarter: RCA Waning crescent: 2 DELAY Allows the user to choose the time interval between each detection before the camera records the next photo or video. 4. Turn ON the camera and the last recorded photo or video will appear. To change the photo or the video, use the UP or DOWN button. Additional setting: It is possible to decrease the delay between detections to 10 seconds (instead of 1 minute) by using the following procedure. Note that the battery life will be affected. Here are the options available by pressing MENU/OK: View Date/Time: Allows the user to view the date and time printed on the photo. Protect: Allows the user to protect a photo or video to prevent it from being deleted by selecting "Erase All". Erase one: Allows the user to erase the photo or the video seen on the screen from the memory card. Erase all: Allows the user to erase all stored photos and videos, with the exception of protected photos and videos from the memory card. Format: Allows the user to erase the entire contents of the memory card, including the protected files. Language: Allows the user to change the display language. Exit: Allows the user to exit the menu to return to the viewing screen. 1. Turn OFF the camera. 2. Press and hold the UP button, turn the camera on. "10_S" appears on the screen meaning the 1 minute delay has been replaced by a 10 second delay. 3. To reset the camera to 1 minute delay, follow the same procedure. "1_M" appears on the screen (see figure below). 10_5 10 s delay 1 min delay 3 MULTI-SHOT Takes up to 4 consecutive shots at each detection, with a 10 second delay between each photo. For the cameras with a Flash unit, the delay between each photo will be 15 seconds. This option allows the user to get up 4 photos from different angles when the camera is in PHOTO mode. 4 VIDEO LENGTH Allows the user to select the duration of the recording when the camera is set in VIDEO mode. 11 Settings DISTANCE Turn the DISTANCE dial to the right to increase the detection distance and the sensitivity of the detector. The camera is equipped with a detector sensitive to infrared. The system will only detect a heat source in motion. The greater the mass of heat, the more sensitive the system is. The range of detection is between 5 and 65 feet. The best way to adjust the distance is to set the camera to SET/TEST mode. Make sure to have the least amount of objects possible in front of the camera during positioning. This will prevent photos being taken by the camera when oriented towards the sun at the same time an object moves in front of the camera (e.g. a branch). Here is a table of approximate detection distances and width of the detection area according to the DISTANCE dial setting. The data can be affected by the size of the subject and the outside temperature. Note that this data is for illustrative purposes only. Value on dial Sensitivity MIN. 6 8 MAX. Width of the detection area (ft) CAMERA 5-30 2 4 Detection distance (ft) 3 3 Gradually increases 30-50 15 15 50-65 30 30 12 Sound recording (BF-8, HD-7, ECLYPSE, M8) The SPYPOINT camera offers the possibility to record sound in VIDEO mode. When the VIDEO mode is selected, the camera automatically records the sound. Under the camera, you will find a rubber cap with the inscription MIC. If the user does not want to record the sound, the rubber cap needs to stay in place. If sound recording is required, the user must lift the rubber cap and turn it slightly so that the microphone receiver is completely cleared (See figure below). 13 File transfer to a computer To transfer photos/videos to a computer: 1. Turn OFF the camera. 2. Connect the USB cable (supplied) from the camera to a computer USB 3. The computer will detect the camera and install the driver automatically. 4. Click on "My Computer" and select "Removable Disk". 5. Then click on "DCIM" and "100DSCIM" to find all recorded photos and videos. 6. Drag or save the files to the desired location. Taking the memory card out (sold separately, p.16) of the camera and inserting it into the computer slot will achieve the same results. Note: Videos in .MP4 format require the use of a compatible video player software such as VLC, Windows Media Player or QuickTime. 14 Troubleshooting/ Error messages TROUBLESHOOTING Problem Possible solutions Impossible to turn on the camera • Verify if there are batteries in the camera. • Verify if the batteries are correctly installed (p.7) •Verify if the battery switch position is positioned according to the power source (p.7). • Install the latest update (available on www.spypoint.com under SUPPORT section). •Replace alkaline batteries or recharge the lithium battery pack. The screen of the camera turns off •The camera may be set to PHOTO or VIDEO mode and the screen turns off after a period of 60 seconds in order to preserve battery life. •To return to the screen, turn off the camera and turn it on again. The camera does not respond •Remove the batteries and reinstall them (p.7). •Replace alkaline batteries or recharge the lithium battery pack. The camera works, but is losing its time and date settings • The time battery must be replaced (p.8). Impossible to take photos/ videos •Verify if there are batteries in the camera. •Replace alkaline batteries or recharge the lithium battery pack. •Memory card is full. •Verify if the camera is turned on. Red light in front of the camera blinks • MODE switch is in SET/TEST. •MODE switch is in PHOTO or VIDEO. The red light in front of the camera flashes for 60 seconds to allow the user to leave without being photographed or recorded. The photos/ videos do not appear on the television •Verify if the camera is correctly connected to the television using the RCA cable (p.11). • Verify if the memory card contains photos/videos. The computer does not recognize the camera •Verify if the camera is properly connected to the computer using the USB cable (p.14). The computer can’t play videos •The .MP4 video format requires the use of a video player software compatible such as VLC, Windows Media Player or QuickTime. ERROR MESSAGES There is no memory card in the camera, insert a card. The memory card is full, delete the files or use a new memory card. No person/animal •Sunrise or sunset can trigger the sensor. Camera on photos must be re-orientated. •At night, the motion detector may detect beyond the range of the IR illumination. Reduce distance setting (p.12). •Small animals may trigger the unit. Reduce distance setting (p.12) and/or raise height of camera. • Motion detector may detect animals through foliage. •If a person or animal moves quickly, it may move out of the camera’s field of view before the photo is taken. Move the camera further back or redirect the camera. •Make sure the mounting post or tree is stable and does not move. 15 Available accessories To obtain more information on the available accessories, www.spypoint.com. Here are the main accessories available: go to POWER 12V DC Power cable #CB-12FT, 12 ft power cable with alligator clips at one end to connect a 12V battery to a camera. Lithium battery pack & charger #LIT-C-8, Rechargeable lithium battery pack and AC charger with charge indicator light. Fits most SPYPOINT products. 12-volt Adaptor #AD-12V, AC adaptor (6V to 12V). Powers the camera from an electrical outlet. Rechargeable 6V-12V battery, charger & housing kit #KIT6V-12V, Universal kit with two 6V rechargeable batteries (2.8Ah), with 6V (5.6Ah) and 12V (2.8Ah) output configuration and AC charger. Water resistant ABS plastic case, 12 ft power cable and strap included. Camo pattern. Compatible with all SPYPOINT products equipped with a 12V power jack. Lithium battery pack #LIT-09, Additional rechargeable lithium battery pack fits most SPYPOINT products. Rechargeable 12V battery & charger set #BATT-12V, 12-volt 7.0Ah rechargeable battery and AC charger to power the camera. Rechargeable 12V battery, charger & housing kit #KIT-12V, 12-volt 7.0Ah rechargeable battery with a water resistant ABS plastic case, AC charger, 12 ft power cable (#PW-12FT) and carrying strap included. Compatible with all SPYPOINT products equipped with a 12V power jack. Solar panel (BF-8, HD-7, ECLYPSE, M8, C6) #SP-12V, Solar panel with adjustable steel mounting kit. Maintains the charge of the lithium battery pack directly into compatible devices. Can also be combined with any 12-volt battery. 9 ft power cable. MEMORY CARD SD Memory card 8GB #SD-8GB, SDHC memory 8 GB, High speed Class 6. 16 card Spare power cable #PW-12FT, Spare 12 ft power cable, to connect the camera to the KIT-12V. Available accessories INSTALLATION AND SECURITY Cable lock #CL-6FT, 6 ft cable lock fits all SPYPOINT cameras. INFRARED BOOSTER Invisible LEDs IR-Booster #IRB-W-B, 100 invisible LEDs (completely invisible to the naked eye) wireless infrared module that allows the user to amplify the infrared lights at night for clearer shots. Compatible with REMOS technology. When used with REMOS compatible cameras, the transmitter is not necessary. Steel security box #SB-91, Steel box to secure the camera against theft. It also prtects it from breakage caused by bears or other animals. Fits all SPYPOINT 5.1" W x 6.9" H x 2.6" D cameras (except TINY, LIVE, SMART and SUMMIT PRO series). Also available in black. Camera mount #MA-360, Adjustable mounting arm, fits all cameras that have a standard ¼-20” tripod mount. It can rotate 360° and tilt approx +/90°. Also available in black. Tripod #TP-CAM, SPYPOINT Lightweight tripod, in black aluminum, with a unique anchor system and a removable quick release plate. Max. height: 4.9 ft (1.5 m), min. height: 1.7 ft (0.5 m), max. load weight: 11 lbs (5 kg). Fits most SPYPOINT products. 17 IR-Booster #IRB-W, 100 LED wireless infrared module that allows the user to amplify the strength of the infrared lights for clearer night shots. Specifications (BF-6) Photo recording Night time illumination system 3 MP, 6 MP LEDs 35 LEDs File format JPG Type Invisible LEDs Multi-shot mode Up to 4 photos per detection Exposure Automatic infrared level adjustment Stamp (only on photos) Date, time, temperature (°C/°F) and moon phase Optical field of view Color by day, black and white by night Dimensions Photo resolution Capture mode 50° Video recording 5.1” W x 6.9” H x 2.6” D Video resolution 320 x 240, 640 x 480 Recommendations File format AVI Operating temperature (-4 °F to +122 °F) (-20 °C to + 50 °C) Sequence length Adjustable from 10 to 90 s Storage temperature (-22 °F to +167 °F) (-30 °C to + 75 °C) Capture mode Color by day, black and white by night Memory storage Support •Internal memory : none •External memory : SD/SDHC card (up to 32 GB) Viewing TV output Composite video (PAL/NTSC) Computer output USB 2.0 Power source Accessories sold separately, p.16 Alkaline or lithium batteries 6 x AA Lithium battery pack Rechargeable battery pack (LIT-09/LIT-C-8) External (12V jack) 12V battery (KIT6V-12V, KIT-12V, BATT12V) or 12V adapter (AD-12V) Detection system Motion sensor PIR Detection angle 30° Detection range Adjustable from 5 to 65 ft Delay between each detection Adjustable from 1 to 15 min *Additional 10 s setting 18 Specifications (BF-8) Photo recording Detection system 3 MP, 8 MP Motion sensor PIR File format JPG Detection angle 30° Multi-shot mode Up to 4 photos per detection Detection range Adjustable from 5 to 65 ft Stamp (only on photos) Date, time, temperature (°C/°F) and moon phase Delay between each detection Adjustable from 1 to 15 min *Additional 10 s setting Capture mode Color by day, black and white by night Night time illumination system Photo resolution LEDs 46 LEDs 320 x 240, 640 x 480 Type Invisible LEDs File format AVI Exposure Automatic infrared level adjustment Sequence length Adjustable from 10 to 90 s Optical field of view Capture mode Color by day, black and white by night 50° Video recording Video resolution Audio Dimensions Sound recording Mono (Automatically recorded in video mode) Recommendations 5.1” W x 6.9” H x 2.6” D Memory storage Support •Internal memory : none •External memory : SD/SDHC card (up to 32 GB) Viewing TV output Composite video (PAL/NTSC) Computer output USB 2.0 Power source Accessories sold separately, p.16 Alkaline or lithium batteries 6 x AA Lithium battery pack Rechargeable battery pack (LIT-09/LIT-C-8) External (12V jack) 12V battery (KIT6V-12V, KIT-12V, BATT-12V) or 12V adapter (AD-12V) Solar panel Solar panel (SP-12V) combined with rechargeable battery pack (LIT-09/LITC-8) 19 Operating temperature (-4 °F to +122 °F) (-20 °C to + 50 °C) Storage temperature (-22 °F to +167 °F) (-30 °C to + 75 °C) Specifications (HD-7) Photo recording Detection system 3 MP, 7 MP Motion sensor PIR on the camera File format JPG Detection angle 30° Multi-shot mode Up to 4 photos per detection Detection range Adjustable from 5 to 65 ft Stamp (only on photos) Date, time, temperature (°C/°F) and moon phase Delay between each detection Adjustable from 1 to 15 min *Additional 10 s setting Capture mode Color by day, black and white by night Night time illumination system Photo resolution LEDs 46 LEDs 640 x 480, 1280 x 720 (HD 720p) Type Infrared LEDs File format AVI Exposure Automatic infrared level adjustment Sequence length Adjustable from 10 to 90 s Optical field of view Capture mode Color by day, black and white by night 50° Video recording Video resolution Audio Dimensions Sound recording Mono (Automatically recorded in video mode) 5.1” W x 6.9” H x 2.6” D Recommendations Memory storage Support • Internal memory : none • External memory : SD/SDHC card (up to 32 GB) Viewing TV output Composite video (PAL/NTSC) Computer output USB 2.0 Power source Accessories sold separately, p.16 Alkaline or lithium batteries 6 x AA Lithium battery pack Rechargeable battery pack (LIT-09/LIT-C-8) External (12V jack) 12V battery (KIT6V-12V, KIT-12V, BATT-12V) or 12V adapter (AD-12V) Solar panel Solar panel (SP-12V) combined with rechargeable battery pack (LIT-09/LITC-8) 20 Operating temperature (-4 °F to +122 °F) (-20 °C to + 50 °C) Storage temperature (-22 °F to +167 °F) (-30 °C to + 75 °C) Specifications (2N1) Photo recording Detection system 3 MP, 5 MP Motion sensor PIR File format JPG Detection angle 30° Multi-shot mode Up to 4 photos per detection Detection range Adjustable from 5 to 65 ft Stamp (only on photos) Date, time and moon phase Delay between each detection Capture mode Color by day and night (with flash) Black and white by night (with IR) Adjustable from 1 to 15 min *Additional 10 s setting Night time illumination system Photo resolution Video recording LEDs 35 LEDs Note: It is recommended to use the IR unit when the camera is set to VIDEO mode. Type Invisible LEDs Flash Flash unit Video resolution 320 x 240, 640 x 480 File format AVI Exposure Automatic infrared level adjustment Sequence length Adjustable from 10 to 90 s Capture mode Color by day, black and white by night (with IR) *Video available at night with the IR unit only Optical field of view 50° Dimensions 5.1” W x 6.9” H x 2.6” D Recommendations Memory storage Support • Internal memory : none • External memory : SD/SDHC card (up to 32 GB) Viewing TV output Composite video (PAL/NTSC) Computer output USB 2.0 Power source Accessories sold separately, p.16 Alkaline or lithium batteries 6 x AA Lithium battery pack Rechargeable battery pack (LIT-09/LIT-C-8) External (12V jack) 12V battery (KIT6V-12V, KIT-12V, BATT-12V) or 12V adapter (AD-12V) 21 Operating temperature (-4 °F to +122 °F) (-20 °C to + 50 °C) Storage temperature (-22 °F to +167 °F) (-30 °C to + 75 °C) Specifications (ECLYPSE) Photo recording Detection system 3 MP, 5 MP Motion sensor PIR File format JPG Detection angle 30° Multi-shot mode Up to 4 photos per detection Detection range Adjustable from 5 to 65 ft Stamp (only on photos) Date, time Delay between each detection Capture mode Color by day, black and white by night Adjustable from 1 to 15 min *Additional 10 s setting Photo resolution Night time illumination system Video recording Video resolution 320 x 240, 640 x 480 File format AVI Sequence length Adjustable from 10 to 90 s Capture mode Color by day, black and white by night Recommendations Viewing USB 2.0 Power source Accessories sold separately, p.16 Alkaline or lithium batteries 6 x AA Lithium battery pack Rechargeable battery pack (LIT-09/LIT-C-8) External (12V jack) 12V battery (KIT6V-12V, KIT-12V, BATT-12V) or 12V adapter (AD-12V) Solar panel Solar panel (SP-12V) combined with rechargeable battery pack (LIT-09/LITC-8) Automatic infrared level adjustment 5.1” W x 6.9” H x 2.6” D • Internal memory : none • External memory : SD/SDHC card (up to 32GB) Computer output Invisible LEDs Exposure Dimensions Memory storage Composite video (PAL/NTSC) Type 50° Sound recording Mono (Automatically recorded in video mode) TV output 35 LEDs Optical field of view Audio Support LEDs 22 Operating temperature (-4 °F to +122 °F) (-20 °C to + 50 °C) Storage temperature (-22 °F to +167 °F) (-30 °C to + 75 °C) Specifications (M8) Photo recording Detection system 3 MP, 8 MP Motion sensor PIR File format JPG Detection angle 30° Multi-shot mode Up to 4 photos per detection Detection range Adjustable from 5 to 65 ft Stamp (only on photos) Date, time, temperature (°C/°F) and moon phase Delay between each detection Adjustable from 1 to 15 min *Additional 10 s setting Capture mode Color by day, black and white by night Night time illumination system Photo resolution LEDs 46 LEDs 320 x 240, 640 x 480 Type Invisible LEDs File format AVI Exposure Automatic infrared level adjustment Sequence length Adjustable from 10 to 90 s Optical field of view Capture mode Color by day, black and white by night 50° Video recording Video resolution Audio Dimensions Sound recording Mono (Automatically recorded in video mode) Color 5.1” W x 6.9” H x 2.6” D Special hunting camouflage pattern officially licensed LOST CAMO® Memory storage Support Recommendations • Internal memory : none • External memory : SD/SDHC card (up to 32 GB) Viewing TV output Composite video (PAL/NTSC) Computer output USB 2.0 Power source Accessories sold separately, p.16 Alkaline or lithium batteries 6 x AA Lithium battery pack Rechargeable battery pack (LIT-09/LIT-C-8) External (12V jack) 12V battery (KIT6V-12V, KIT-12V, BATT-12V) or 12V adapter (AD-12V) Solar panel Solar panel (SP-12V) combined with rechargeable battery pack (LIT-09/LITC-8) 23 Operating temperature (-4 °F to +122 °F) (-20 °C to + 50 °C) Storage temperature (-22 °F to +167 °F) (-30 °C to + 75 °C) Specifications (C6) Photo recording Night time illumination system 3 MP, 6 MP LEDs 46 LEDs File format JPG Type Invisible LEDs Multi-shot mode Up to 4 photos per detection Exposure Automatic infrared level adjustment Stamp (only on photos) Date, time, temperature (°C/°F) and moon phase Optical field of view Color by day, black and white by night Dimensions Photo resolution Capture mode 50° Video recording 5.1” W x 6.9” H x 2.6” D Video resolution 320 x 240, 640 x 480 Operating temperature (-4 °F to +122 °F) (-20 °C to + 50 °C) File format AVI Storage temperature (-22 °F to +167 °F) (-30 °C to + 75 °C) Sequence length Adjustable from 10 to 90 s Capture mode Color by day, black and white by night Memory storage Support • Internal memory : none • External memory : SD/SDHC card (up to 32 GB) Viewing TV output Composite video (PAL/NTSC) Computer output USB 2.0 Power source Accessories sold separately, p.16 Alkaline or lithium batteries 6 x AA Lithium battery pack Rechargeable battery pack (LIT-09/LIT-C-8) External (12V jack) 12V battery (KIT6V-12V, KIT-12V, BATT12V) or 12V adapter (AD-12V) Solar panel Solar panel (SP-12V) combined with rechargeable battery pack (LIT-09/LITC-8) Detection system Motion sensor PIR Detection angle 30° Detection range Adjustable from 5 to 65 ft Delay between each detection Adjustable from 1 to 15 min *Additional 10 s setting 24 Regulation FCC REGULATIONS FCC Part l5 This equipment has been tested and found to comply with the limits for a Class B digital device, pursuant to Part 15 of the Federal Communications Commission (FCC) rules. These limits are designed to provide reasonable protection against harmful interference in a residential installation. This equipment generates, uses and can radiate radio frequency energy and, if not installed and used in accordance with the instructions, may cause harmful interference to radio communications. However, there is no guarantee that interference will not occur in a particular installation. If this equipment does cause harmful interference to radio or television reception, which can be determined by turning the equipment off and on, the user is encouraged to try to correct the interference by one or more of the following measures: • Reorient or relocate the receiving antenna. • Increase the separation between the equipment and receiver. • Connect the equipment into an outlet on a circuit different from that to which the receiver is connected. • Consult the dealer or an experienced radio/TV technician for help. Changes or modifications to this equipment not expressly approved by the party responsible for compliance could void the user’s authority to operate the equipment.This device complies with Part 15 of the FCC rules. Operation is subject to the following two conditions: (1) this device may not cause harmful interference, and (2) this device must accept any interference received, including interference that may cause undesired operation. Hereby, GG Telecom declares that this camera is in compliance with the essential requirements and other relevant provisions of Directive 99/5/EC. The user can obtain a copy of the Declaration of Conformity by e-mail at [email protected]. 25 Regulation FCC REGULATIONS FCC Part l5 This equipment has been tested and found to comply with the limits for a Class B digital device, pursuant to Part 15 of the Federal Communications Commission (FCC) rules. These limits are designed to provide reasonable protection against harmful interference in a residential installation. This equipment generates, uses and can radiate radio frequency energy and, if not installed and used in accordance with the instructions, may cause harmful interference to radio communications. However, there is no guarantee that interference will not occur in a particular installation. If this equipment does cause harmful interference to radio or television reception, which can be determined by turning the equipment off and on, the user is encouraged to try to correct the interference by one or more of the following measures: • Reorient or relocate the receiving antenna. • Increase the separation between the equipment and receiver. • Connect the equipment into an outlet on a circuit different from that to which the receiver is connected. • Consult the dealer or an experienced radio/TV technician for help. Changes or modifications to this equipment not expressly approved by the party responsible for compliance could void the user’s authority to operate the equipment.This device complies with Part 15 of the FCC rules. Operation is subject to the following two conditions: (1) this device may not cause harmful interference, and (2) this device must accept any interference received, including interference that may cause undesired operation. Hereby, GG Telecom declares that this camera is in compliance with the essential requirements and other relevant provisions of Directive 2004/108/EC. The user can obtain a copy of the Declaration of Conformity by e-mail at [email protected]. 26 Limited warranty and repair (2N1 only) This SPYPOINT product designed by GG Telecom, is covered by a one (1) year warranty for 2N1 cameras purchased before 2014; two (2) years warranty for 2N1 cameras purchased from 2014. This Material and Workmanship warranty applies from the original date of purchase. The sales receipt is your proof of purchase and must be presented if warranty service is needed. This warranty will be honored in the country of purchase only. INSTRUCTIONS FOR REPAIR SERVICE GG Telecom will repair the product without charge or replace it at its discretion with an equivalent product, if it has a manufacturing defect covered by the warranty described previously. We will pay the shipping costs only for the return of the products covered by the warranty. The shipping costs for an item sent to us will be assumed by the costumer. This warranty does not cover any GG Telecom product which has been subjected to misuse, neglect and accidents or has been improperly used or maintained. In addition, this warranty is not applicable for all products purchased online from an unauthorized dealer. Any modification or tampering of the product will affect its operation, performance, durability and voids this warranty. Repairs for damages not covered by the warranty will be subject to a reasonable charge. The customer will pay all shipping costs. 1. BEFORE sending a product for repair, please contact our technical support team at 1-888-779-7646 or [email protected]. Clearly describe the problem and give a phone number where we can reach you. It happens regularly that some problems can be solved over the phone. 2. If a product needs to be sent, an RMA number will be given to the customer (Return Merchandise Authorization). 3. Prepare a package for GG Telecom and include the original receipt or a copy. 4. Write the RMA number on the outside of the package and send it to: CANADA GG Telecom 120 J.Aurèle-Roux Victoriaville, QC G6T 0N5 United States GG Telecom 555 VT route 78 Swanton, Vermont 05488 IMPORTANT: Under no circumstances will GG Telecom accept returned products without a Return Material Authorization number (RMA). It is essential to contact us before making a return. The customer is liable for loss or damage to the product that may occur during the transport to GG Telecom. We recommend you to use a traceable method of shipping to ensure your protection. WWW.SPYPOINT.COM 27 Limited warranty and repair This SPYPOINT product designed by GG Telecom, is covered by a one (1) year warranty on material and workmanship starting from the original date of purchase. The sales receipt is your proof of purchase and must be presented if warranty service is needed. This warranty will be honored in the country of purchase only. INSTRUCTIONS FOR REPAIR SERVICE GG Telecom will repair the product without charge or replace it at its discretion with an equivalent product, if it has a manufacturing defect covered by the warranty described previously. We will pay the shipping costs only for the return of the products covered by the warranty. The shipping costs for an item sent to us will be assumed by the customer. This warranty does not cover any GG Telecom product which has been subjected to misuse, neglect and accidents or has been improperly used or maintained. In addition, this warranty is not applicable for all products purchased online from an unauthorized dealer. Any modification or tampering of the product will affect its operation, performance, durability and voids this warranty. Repairs for damages not covered by the warranty will be subject to a reasonable charge. The customer will pay all shipping costs. 1. BEFORE sending a product for repair, please contact our technical support team at 1-888-779-7646 or [email protected]. Clearly describe the problem and give a phone number where we can reach you. It happens regularly that some problems can be solved over the phone. 2. If a product needs to be sent, an RMA number will be given to the customer (Return Merchandise Authorization). 3. Prepare a package for GG Telecom and include the original receipt or a copy. 4. Write the RMA number on the outside of the package and send it to: CANADA GG Telecom 120 J.Aurèle-Roux Victoriaville, QC G6T 0N5 United States GG Telecom 555 VT route 78 Swanton, Vermont 05488 IMPORTANT: Under no circumstances will GG Telecom accept returned products without a Return Material Authorization number (RMA). It is essential to contact us before making a return. The customer is liable for loss or damage to the product that may occur during the transport to GG Telecom. We recommend you to use a traceable method of shipping to ensure your protection. WWW.SPYPOINT.COM 28