1
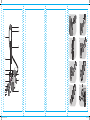
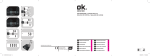
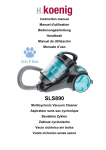
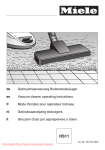
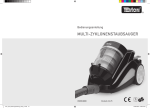
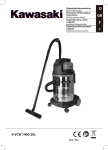
9
10
OVC 105
xxx // Vacuum Cleaner //
xxx // xxx
12
13
14
15
16
DO
NO
T
PR
IN
T
11
IM_OVC105_141113_V01
www.ok-online.com
IM_OVC105_141113_V01_HR.indb 1
Imtron GmbH
Wankelstraße 5
D-85046 Ingolstadt
www.imtron.eu
DE GEBRAUCHSANWEISUNG
xx
IT MANUALE DELL’UTENTE
xx
EL ΟΔΗΓIΕΣ ΧΡΗΣΗΣ
xx
NL GEBRUIKSAANWIJZING
xx
EN USER MANUAL
xx
PL INSTRUKCJA OBSŁUGI
xx
ES MANUAL DE INSTRUCCIONES
xx
PT MANUAL DE UTILIZAÇÃO
xx
FR MODE D’EMPLOI
xx
SV BRUKSANVISNING
xx
HU FELHASZNÁLÓI KÉZIKÖNYV
xx
TR KULLANIM KILAVUZU
xx
14/11/14 3:54 PM
1
2
3
4
5
6
7
8
O
N
A
M
B
C
L
D
K
E
F
G
J
H
IM_OVC105_141113_V01_HR.indb 2
I
14/11/14 3:54 PM
DE
3
Herzlichen Glückwunsch!
Vielen Dank, dass Sie sich für ein Produkt von ok. entschieden haben. Bitte lesen Sie diese Anleitung
sorgfältig durch und bewahren Sie sie für späteren Gebrauch auf.
WICHTIGE SICHERHEITSANWEISUNGEN. BITTE AUFMERKSAM DURCHLESEN UND FÜR
SPÄTEREN GEBRAUCH AUFBEWAHREN.
1.
2.
3.
4.
5.
6.
7.
8.
9.
10.
11.
12.
13.
14.
15.
16.
Dieses Produkt kann von Kindern ab 8 Jahren und Personen
mit verminderten körperlichen, sensorischen oder geistigen
Fähigkeiten oder fehlender Erfahrung und Kenntnis benutzt
werden, wenn sie zum Gebrauch des Geräts von einer für
ihre Sicherheit verantwortlichen Person angeleitet und
beaufsichtigt wurden und sie verstehen, das Gerät sicher zu
benutzen.
Kinder dürfen nicht mit dem Produkt spielen.
Reinigung und die Wartung durch den Benutzer dürfen nicht
durch Kinder vorgenommen werden, es sei denn, sie sind 8
Jahre oder älter und werden beaufsichtigt.
Ein beschädigtes Netzkabel darf nur vom Hersteller,
einer von ihm beauftragten Werkstatt oder einer ähnlich
qualifizierten Person ersetzt werden, um Gefährdungen zu
vermeiden.
Beachten Sie das Kapitel Reinigung und Pflege.
Lesen Sie diese Bedienungsanleitung vor dem ersten Gebrauch gründlich durch und geben Sie
sie zusammen mit dem Produkt weiter. Beachten Sie die Warnungen auf dem Produkt und in
dieser Bedienungsanleitung. Sie enthält wichtige Sicherheitshinweise sowie Gebrauchs- und
Wartungsanleitungen für das Produkt.
Lassen Sie das Produkt nie unbeaufsichtigt, solange es eingeschaltet ist.
Stellen Sie keine Gegenstände auf das Produkt.
Tauchen Sie elektrische Teile des Produktes während des Reinigens oder des Betriebs nie in Wasser
oder andere Flüssigkeiten. Halten Sie das Produkt nie unter fließendes Wasser.
Reparieren Sie das Produkt auf keinen Fall selbst (z.B. wenn das Netzkabel beschädigt ist oder
das Produkt fallengelassen wurde, etc.). Lassen Sie Wartungen und Reparaturen nur von einem
autorisierten Kundendienst durchführen.
Die Netzspannung muss mit den Angaben auf dem Typenschild des Produktes übereinstimmen.
Nur der Netzstecker kann das Produkt vollständig vom Stromnetz trennen. Achten Sie darauf, dass
der Netzstecker immer gut zugänglich und erreichbar ist.
Vermeiden Sie die Beschädigung des Netzkabels durch Knicken und Kontakt mit scharfen Kanten.
Halten Sie das Produkt, einschließlich Netzkabel und Netzstecker, von Hitzequellen, wie z. B.
Heizkörpern, Öfen und anderen Hitze erzeugenden Produkten, fern.
Ziehen Sie den Netzstecker nur am Netzstecker selbst aus der Steckdose. Ziehen Sie nicht am
Netzkabel.
Ziehen Sie den Netzstecker aus der Steckdose, ...
-- wenn das Produkt nicht benutzt wird,
-- wenn Funktionsstörungen auftreten,
-- bevor Sie Zubehör anbringen / entfernen und
-- bevor Sie das Produkt reinigen.
IM_OVC105_141113_V01_HR.indb 3
14/11/14 3:54 PM
DE
17.
18.
19.
20.
21.
22.
23.
24.
25.
26.
27.
28.
29.
30.
4
Verwenden Sie das Produkt nur in trockenen Innenräumen, niemals im Freien.
Dieses Produkt ist nicht für kommerziellen Gebrauch geeignet. Es ist nur für die Nutzung im
Haushalt konzipiert.
Lassen Sie das Produkt nicht unbeaufsichtigt arbeiten.
Achten Sie darauf, dass die Motoreinheit und das Netzkabel nicht nass werden.
Kein Zubehör benutzen, welches nicht mit diesem Gerät mitgeliefert wurde oder vom Hersteller
empfohlen wird!
Dieses Produkt eignet sich nur für den Gebrauch im Haushalt.
Das Produkt immer ausschalten, bevor es vom Netz getrennt wird.
Das Produkt hinreichend abkühlen lassen, bevor es verstaut wird.
Das Produkt während des Betriebs nicht zudecken. Brandgefahr!
Keine Flüssigkeiten mit dem Produkt aufsaugen. Auch keine rauchenden Zigaretten, heiße Asche,
Streichhölzer o. ä. aufsaugen. Brandgefahr!
Keine leicht enflammbaren oder explosive Stoffe und Gase aufsaugen. Das Produkt darf keinesfalls
in Räumen mit explosiven Gasen oder Flüssigkeiten verwendet werden.
Besondere Vorsicht walten lassen beim Saugen auf Treppen.
Das Produkt während des Betriebes von der Kleidung und vom Körper (Finger, Haare, Gesicht)
fernhalten
Keine Menschen oder Tiere absaugen.
BESTIMMUNGSGEMÄSSE VERWENDUNG
Das Produkt ist nur für das Saugen von trockenem Staubgut gedacht. Jeglicher anderer kann zu Schäden
am Produkt oder Verletzungen führen.
BAUTEILE
A.Saugschlauch
B. Teleskoprohr
C.Kabelaufwicklungstaste
D.Ein-/Ausschalter
E. Saugrohrhalterung
F. Netzkabel mit Stecker (Kabelaufwicklung)
G.Bodendüse
H.Polsterdüse mit integrierter Fugendüse
I. Rad
J. Staubbehälter und Filtereinheit
K.Saugschlauchanschluss
L. Tragegriff
M.Teleskoprohrarretierung
N.Nebenlusftkappe
O.Saugrohrgriff
Vor dem ersten Gebrauch
Entfernen Sie das Produkt und Zubehör vorsichtig aus der Originalverpackung. Es empfiehlt sich,
die Originalverpackung für späteres Verstauen aufzubewahren. Möchten Sie die Originalverpackung
entsorgen, so tun Sie dies nach den geltenden gesetzlichen Bestimmungen. Haben Sie Fragen zur
richtigen Entsorgung, fragen Sie bei Ihrer örtlichen Behörde nach.
Überprüfen Sie den Verpackungsinhalt auf Vollständigkeit und Beschädigungen. Sollte der
Verpackungsinhalt unvollständig oder sollten Beschädigungen feststellbar sein, kontaktieren Sie
umgehend Ihre Verkaufsstelle. Reinigen Sie das Produkt nach dem Auspacken; siehe Abschnitt
Reinigung und Pflege.
IM_OVC105_141113_V01_HR.indb 4
14/11/14 3:54 PM
DE
5
ZUSAMMENBAU DES STAUBSAUGERS
1 Stecken Sie den Saugschlauch in den Saugschlauchanschluss und drehen ihn nach rechts
(Bajonettverschluss). Stellen Sie sicher, dass er eingerastet ist.
2 Stecken Sie die Bodendüse auf das untere Ende und den Saugrohrgriff auf das obere Ende des
Teleskoprohres.
3 Stellen Sie das Teleskoprohr auf die gewünschte Länge ein, indem Sie die Arretierung nach unten
drücken und dann das Teleskoprohr raus- oder zusammenschieben.
Verwendung des mitgelieferten Zubehörs
Kombidüse
4 Zum Saugen von Hartböden den Kippschalter nach unten drücken.
5
Zum Saugen von Teppichböden nochmals auf dem Kippschalter drücken, um die Bürsten zu
versenken.
Polsterdüse
6 Zum Absaugen von Polstermöbeln, Matratzen, Kissen, Vorhängen usw.
Fugendüse
7 Zum Aussaugen von Falten, Fugen und Ecken.
BEDIENUNG
8 Ziehen Sie das Anschlusskabel bis zur gewünschten Länge heraus und stecken den Netzstecker in
eine Steckdose.
9 Drücken Sie den Ein-/Ausschalter, um den Staubsauger ein-/auszuschalten. Stellen Sie mit dem
Saugleistungsregler die gewünschte Saugleistung ein.
Hinweis: Lässt sich der Staubsauger wegen zu hoher Saugkraft nur schwer über Teppichböden
führen regeln Sie die Saugleistung herab, indem Sie mit dem Saugleistungsregler die Leistung
verringern oder die Nebenluftklappe am Handgriff öffnen.
10 Schalten Sie den Staubsauger nach Gebrauch aus und ziehen Sie den Netzstecker wenn Sie Ihre
Arbeit beendet haben.
11 Wickeln Sie das Netzkabel auf die Kabelaufwicklung indem Sie den Schalter zur automatischen
Kabelaufwicklung drücken. Halten Sie dabei ggf. das Netzkabel etwas straff.
Parksystem für Saugpausen
12 Sie können das Teleskoprohr mit der Kombidüse für kurzzeitige Saugpausen am Staubsauger
abstellen. Stecken Sie die Kombisdüse mit den Parknocken in das Parksystem.
Transport und Lagerung
13 Zum Tragen fassen Sie in die Mulde im Staubbehälterdeckel. Zum Abstellen des Staubsaugers
kann das Saugrohr mit der Bodendüse in aufrechter Position an der Rückseite des Staubsaugers
eingehängt werden.
IM_OVC105_141113_V01_HR.indb 5
14/11/14 3:54 PM
DE
6
REINIGUNG UND PFLEGE
Vorsicht
Verwenden Sie zur Reinigung keinesfalls Lösungs- und Scheuermittel, harte Bürsten,
metallische oder scharfe Gegenstände. Lösungsmittel sind gesundheitsschädlich und
greifen die Plastikteile an; scheuernde Reiniger und Hilfsmittel zerkratzen die Oberfläche.
Vorsicht
Tauchen Sie elektrische Teile des Produktes während des Reinigens nie in Wasser oder
andere Flüssigkeiten. Halten Sie es nie unter fließendes Wasser.
Entleeren des Staubbehälters
14 Wenn die Saugleistung nachläßt, dann muss der Staubbehälter entleert und die Filter gereinigt
werden.
Entfernen Sie den Saugschlauch vom Staubbehälter. Drücken Sie die Entriegelung und
entnehmen Sie das Filter nach vorn. Zum Entleeren des Staubbehälters drücken Sie lediglich die
Bodenentriegelung, sodass der Boden des Behälters sich öffnet und der Staub herausfällt. Halten
Sie den Staubbehälter dabei über einen Mülleimer.
Reinigen des Hauptfilters
15 Lösen Sie den Filterdeckel und entnehmen Sie den kompletten Filtereinsatz aus dem Staubbehälter.
Zerlegen Sie die Filtereinheit in alle Einzelteile. Reinigen Sie alle Teile gründlich. Klopfen Sie den
Staub aus dem Filter.
Reinigen des Motorfilters
16 Entnehmen Sie das Motorfilter und klopfen Sie den Staub aus. Setzen Sie es danach wieder ein.
Warnung: Betreiben Sie den Staubsauger nie ohne Motorfilter, da sonst der Motor schnell
verschmutzt und verschleißt. Ist der Motorfilter verschmutzt lässt die Saugleistung nach.
Montieren Sie alle zuvor entnommenen Komponenten. Die Montage erfolgt in umgekehrter
Reihenfolge.
Reinigen des Abluftfilters
17 Öffnen Sie die Klappe, nehmen Sie das Filter heraus und klopfen Sie den Staub aus. Die Montage
TECHNISCHE DATEN
Nennspannung
Nennleistung
Schutzklasse
220 - 240 V~ 50/60 Hz
1000 W
II
• Dies ist ein Mehrzweckstaubsauger.
• Der Erp-Test wurde anhand EN 60312-1:2013 durchgeführt
• Siehe Website unten für detaillierte technische Informationen oder bitten Sie den Händler um ein
technisches Datenblatt. www.ok-online.com
ENTSORGUNG
Das Symbol „durchgestrichene Mülltonne” erfordert die separate Entsorgung von Elektro- und
Elektronik-Altgeräten (WEEE). Elektrische und elektronische Geräte können gefährliche und
umweltgefährdende Stoffe enthalten. Dieses Gerät nicht im unsortierten Hausmüll entsorgen.
An einer ausgewiesenen Sammelstelle für Elektro- und Elektronik-Altgeräte entsorgen. Dadurch
tragen Sie zum Schutz der Ressourcen und der Umwelt bei. Für weitere Information wenden Sie
sich bitte an Ihren Händler oder die örtlichen Behörden.
IM_OVC105_141113_V01_HR.indb 6
14/11/14 3:54 PM
3
EN
CONGRATULATIONS
Thanks for your purchase of an ok. product. Please read this manual carefully and keep it for future
reference.
Important safety instructions. READ CAREFULLY AND KEEP FOR FUTURE REFERENCE.
1.
2.
3.
4.
5.
6.
7.
8.
9.
10.
11.
12.
13.
14.
15.
16.
17.
18.
19.
20.
21.
22.
23.
24.
25.
26.
This product can be used by children aged from 8 years and
above and persons with reduced physical, sensory or mental
capabilities or lack of experience and knowledge if they have
been given supervision or instruction concerning use of the
appliance in a safe way and understand the hazards involved.
Children shall not play with the product.
Cleaning and user maintenance shall not be made by
children unless they are older than 8 and supervised.
A damaged power cord may only be replaced by the
authorised service agent in order to avoid hazards.
Follow the instructions in the chapter Cleaning and care.
Read this user manual thoroughly before first use and pass it on with the product. Pay attention to
the warnings on the product and in this user manual. It contains important information for your
safety as well as for the use and maintenance of the equipment.
Never leave the product unsupervised while it is switched on.
Do not place heavy objects on top of the product.
Never immerse electrical parts of the product in water during cleaning or operation. Never hold the
product under running water.
Do not under any circumstances attempt (e.g. damage in power cord, product is dropped, etc.) to
repair the product yourself. For servicing and repairs, please consult an authorised service agent.
The mains voltage must match the information on the rating label of the product.
Only unplug from the power socket can separate the product completely from the mains. Please be
sure that the power plug is in operable condition.
Avoid damages to the power cord that may be caused by kinks or contact with sharp corners.
Keep this product including power cord and power plug away from all heat sources like for
example, ovens, hot plates and other heat-producing products/objects.
Only unplug from the power socket by the plug itself. Do not pull on the cord.
Unplug the product ...
-- when the product is not being used,
-- in case of malfunctions,
-- before attaching / detaching accessories and
-- before cleaning the product.
Use this product in dry indoor areas only and never outdoors.
This product is not intended for commercial use. It is designed for household use only.
Do not allow the product to operate unsupervised.
Make sure that the motor unit and supply cord do not become wet.
Use accessories supplied with the device or recommended by the manufacturer only!
This product is suitable only for private use.
Always switch the product off before disconnecting it from mains supply.
Let the product cool down sufficiently before storing.
Do not cover the product while in use. Fire hazard!
Do not suck up liquids with the product. Do not suck up lit cigarettes, hot ashes, matches, etc. Fire
hazard!
IM_OVC105_141113_V01_HR.indb 3
14/11/14 3:54 PM
EN
27.
28.
29.
30.
4
Do not suck up inflammable or explosive materials and gases. The product must not be used in
rooms with explosive gases or liquids.
Be especially careful when cleaning the stairs
When in use, keep the product away from clothes and body parts (fingers, hair, face).
Do not try to clean people or animals with the product.
INTENDED USE
The vacuum cleaner is designed only to vacuum dry dust and dirt. Using it for anything else can damage
the device or cause injury.
COMPONENTS
A.Suction hose
B. Telescopic tube
C.Cable retraction button
D.On/Off button
E. Suction tube bracket
F. Power cable with plug (retractable cable)
G.Floor nozzle
H.Upholstery nozzle with integrated
crevice nozzle
I. Wheel
J. Dust canister with filter unit
K.Suction hose connection
L. Carrying grip
M.Telescopic tube locking mechanism
N.Auxiliary air flap
O.Suction tube handle
BEFORE FIRST TIME USE
Remove the product and accessories carefully from the original packaging. It is recommended to keep
the original packaging for storage. If you wish to dispose of the original packaging, please observe
applicable legal provisions. Should you have any questions regarding proper disposal, contact your local
waste management center.
Inspect the delivery contents for completeness and damages. Should the delivery contents be
incomplete or damaged, contact your sales outlet immediately. After unpacking, please refer to chapter
Cleaning and care.
IM_OVC105_141113_V01_HR.indb 4
14/11/14 3:54 PM
5
EN
ASSEMBLING THE VACUUM CLEANER
1 Insert the suction hose into the hose connection and rotate it to the right (bayonet lock). Make sure
that it has clicked into place.
2 Place the floor nozzle on the lower end and the suction tube handle on the upper end of the
telescopic tube.
3 Adjust the telescopic tube to the desired length, by pressing the locking mechanism down and
then pushing the telescopic tube out or squeezing it together.
Use of the accessories provided
Combination nozzle
4 To vacuum hard floors, press the toggle switch down.
5
To vacuum carpeted areas, press the toggle switch again in order to retract the brushes.
Upholstery nozzle
6 For vacuuming upholstered furniture, mattresses, cushions, curtains, etc.
Crevice nozzle
7 For vacuuming folds, crevices and corners.
OPERATION
8 Pull out the connection cable to the desired length and insert the power plug into a receptacle.
Press the On/Off switch to turn the vacuum cleaner on/off. Use the suction power control to set the
desired suction power.
Tip: If the vacuum can only be guided with difficulty over carpeted areas due to excessively high
suction power, adjust the suction power down, by reducing the power by means of the suction
power control or by opening the auxiliary air flap on the handle.
10 Switch the vacuum cleaner off after use and unplug it when you have finished working.
9
11 Wind the power cable around the cable storage device by pressing the automatic cable retraction
switch. While you are doing this keep the cable taut, if possible.
Parking system for pauses in vacuuming
12 You can store the telescopic tube with the combination nozzle on the vacuum cleaner for short
pauses in vacuuming. Insert the combination nozzle with the parking attachments into the parking
system.
Transport and storage
13 To carry your vacuum cleaner grasp it by the handle in the hollow in the dust canister lid. To store
your vacuum cleaner, the suction tube with the floor nozzle can be mounted on the back of the
vacuum cleaner in an upright position.
IM_OVC105_141113_V01_HR.indb 5
14/11/14 3:54 PM
EN
6
CLEANING AND CARE
Warning!
When cleaning, never use solvents or abrasive materials, hard brushes, metallic or sharp
objects. Solvents are harmful to human health and can attack plastic parts, while abrasive
cleaning mechanisms and tools may scratch the surface(s).
Warning!
Never immerse any electrical parts of the product in water or in other liquids during
cleaning. Never place it under running water.
Emptying the dust canister
14 If the suction power diminishes, the dust canister must be emptied and the filters must be cleaned.
Remove the suction hose from the dust canister. Press the unlocking device and remove the filter
by bringing it forward. To empty the dust canister, simply press the release on the bottom so that
the bottom of the canister opens and the dust falls out. Hold the dust canister over a rubbish
container whilst you are emptying it.
Cleaning the main filter
15 Loosen the filter lid and remove the entire filter insert from the dust canister. Break down the filter
into all of its individual parts. Clean all of the parts thoroughly and tap the filter to remove the dust.
Cleaning the motor filter
16 Remove the motor filter and tap it to remove the dust. Then re-insert it.
Warning: Never use the vacuum cleaner without a motor filter, as otherwise, the motor will soon
get dirty and will be subject to wear. If the motor filter gets dirty, the suction power will diminish.
Reassemble all of the components that have previously been removed. Assembly is carried out in
reverse order.
Cleaning the exhaust air filter
17 Open the flap, take the filter out and tap it to remove the dust. Assembly is carried out in reverse
order. Insert the filter in the right direction so that the correct side is facing the motor.
SPECIFICATION
Rated voltage
Rated power input
Protection class
220 - 240 V~ 50/60 Hz
1000 W
II
• This is a general purpose vacuum cleaner
• The Erp test method is according to EN 60312-1:2013
• Please refer to below website for detail technical information, or contact the manufacturer for
technical document: www.ok-online.com
Disposal
The crossed-out wheeled bin logo requires the separate collection of waste electric and
electronic equipment (WEEE). Electric and electronic equipment may contain dangerous and
hazardous substances. Do not dispose of this appliance as unsorted municipal waste. Return it
to a designated collection point for the recycling of WEEE. By doing so, you will help to conserve
resources and protect the environment. Contact your retailer or local authorities for more
information.
IM_OVC105_141113_V01_HR.indb 6
14/11/14 3:54 PM