1
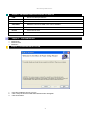
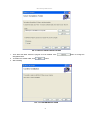
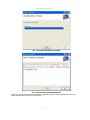
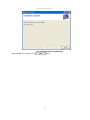
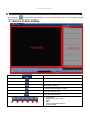
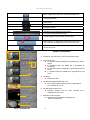
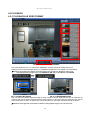
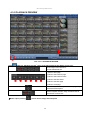
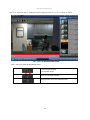
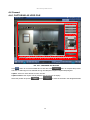
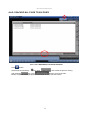
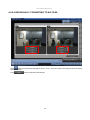
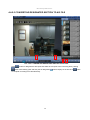
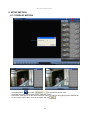
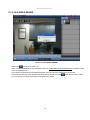
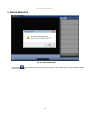
Micro D Player Manual V.3.0 Micro D Player User’s Manual Micro D Player Manual V.3.0 ※ The contents of the manual can be modified without prior notice to customers Chapter 1: REQUIRED SPECIFICATION OF PC AND OS PC REQUIREMENTS 03 Chapter 2: SUPPORTED O/S SUPPORTED OPERATING SYSTEMS 03 Chapter 3: PROGRAM INSTALLATION HOW TO INSTALL MICRO D PLAYER Chapter 4: 03 HOW TO USE MICRO D PLAYER 4.1 MICRO D PLAYER SCREEN 07 4.2 OPEN 09 4.2-1 OPEN FILES 09 4.2-2 OPEN FOLDER 10 4.3 PLAYBACK 11 4.3-1 PLAYBACK AS SDR2 FORMAT 11 4.3-2 PLAYBACK PREVIEW 12 4.3-3 PLAYBACK /SEARCH BY CALENDAR 14 4.4 CONVERT 15 4.4-1 CAPTURING IN JPEG FILE 15 4.4-2 CONVERTING TO AVI FILE 16 4.4-2-1 BACKUP ALL FILES TO AVI FILES 17 4.4-2-2 INDIVISUALLY CONVERTING TO AVI FILES 18 4.4-2-3 CONVERTING DESIGNATED PART TO AVI FILE 19 4.4-3 CONVERTING TO WMV 20 5. BACKUP 21 6. SETUP MOTION 23 6.1-1 DISPLAY MOTION 23 6.1-2 FILE INDEX RENEW 24 7. MEMORY INFORMATION 25 8. ERROR MESSAGE 26 2 Micro D Player Manual V.3.0 Chapter 1: REQUIRED SPECIFICATION OF PC AND OS ITEM Recommended Specifications CPU Main Memory Intel Pentium 4 CPU more than 3.00GHz 1GB VGA CARD MEMORY: More than 64MB / DAC: Above 350MHz O/S* Windows XP , Windows Vista, Windows 7 DirectX Above DirectX 9.0C Resolution More than 1,024 X 768 Chapter 2: 9 9 9 SUPPORTED O/S Windows XP Windows Vista Windows 7 Chapter 3: PROGRAM INSTALLATION PIC. 3.1 MICRO D PLAYER SETUP WIZARD 1. 2. 3. Insert the installation CD into your PC. Click a setup file and the install shield wizard window will appear. Click ‘Next’ Button. 3 Micro D Player Manual V.3.0 PIC. 3.2 SELECT INSTALLATION FOLDER 1. Then select the folder where the program is to be installed. Click designated folder. 2. To install in the default folder, click 3. Start Installing button. PIC. 3.3 CONFIRM INSTALLATION 4 Button to change the Micro D Player Manual V.3.0 PIC. 3.4 INSTALLING MICRO D PLAYER PIC. 3.5 MICRO D PLAYER INFORMATION Users who is using windows Vista or Windows 7 Operating System without Administrator’s account should register OCX as shown in the picture 3.5. 5 Micro D Player Manual V.3.0 PIC. 3.6 INSTALLATION COMPLETED button. When installation is completed click 6 Micro D Player Manual V.3.0 Chapter 4: HOW TO USE MICRO D PLAYER After installation, icon will appear on the desktop of your PC. Double-click the icon to run the Program, and then program will run as shown in [Pic. 4.1-1] below. 4.1 MICRO D PLAYER SCREEN SCREEN FILE LIST CONTROL BAR PIC. 4.1-1. PLAYER SCREEN Minimize Window / Maximize Window / Close Window Open the selected File Folder Open the selected files Screenshot (JPEG file) Convert to AVI file (section A and B) Setup AVI File End Point Setup AVI File Start Point ① ② ③ ④ ⑤ ⑥ ① ② ③ ④ ⑤ Frame Back Rewind(-2X/-4X/-8X/-16X) Pause Play Fast Forward(2X/4X/8X/16X) Frame Forward ⑥ 7 Micro D Player Manual V.3.0 Show images at the interval of 1/2/3/5/10/20/30/60 Sec Change Video Ratio Alarm Event Motion Event Emergency Event Time Event Shift the file list to Backward and Forward ( Current list Page/ Entire list Page) A scale displays at the intervals of 5 min/10min Event indicator: It displays the points where events occur. The events can be triggered by motion or sensor input. Sound control bar. MICRO D PLAYER MENU ① ① Thumbnail: The first frame is used as thumbnail image. ② ③ ② File Property Icon A: Activated when the SDR2 file is generated by sensortrigger. R: Activated when the SDR2 file is generated by emergency M: Activated when the SDR2 file is generated by motion event. T: Activated when the SDR2 file is generated by time event. ③ File Name Display file name ④ ④ File Recording Started Date and Time File recording started Date and time is displayed as ‘YYYY-MM-DD hh:mm:ss. ⑤ File Playback Duration Time Playback duration time for each recorded file is displayed as ‘XX m XX s'. ⑤ ⑥ Resolution and Framerate Resolution and Framerate is displayed as ‘XXX x XXX (XXFPS)’ ⑥ PIC. 4.1-2. MOVIE LIST 8 Micro D Player Manual V.3.0 4.2 OPEN 4.2-1 OPEN FILES 1. Remove the SD card from the Micro DVR. 2. Insert the SD card into the SD card reader on your PC. 3. Click the 4. Choose an ‘sdr2 file’ from SD card or a folder from the pc. button and select ‘File Open’. PIC. 4.2-1 OPEN FILES 9 Micro D Player Manual V.3.0 4.2-2 OPEN FOLDERS PIC. 4.2-2 OPEN FOLDERS Click button to bring data from PC or USB drive. 10 Micro D Player Manual V.3.0 4.3 PLAYBACK 4.3-1 PLAYBACK AS SDR2 FORMAT PIC. 4.3-1 PLAYBACK SDR2 FORMAT LIST FILE displays as pic.4.3-1 when open SDR2 files. Click the thumbnail to playback the file. Displays Time of current playback file by ‘YYYY/MM/DD HH:MM:SS’ on the middle of the table below. ※Attention: Click right mouse button on the time display area and choose ‘Read from right to left’. Time display status changes from ‘YYYY/MM/DD HH: MM: SS’ to’ HH: MM: SS’ YYYY/MM/DD’ PIC. 4.3-2 DRAG BY MOUSE PIC. 4.3-3 EXTENDED STATUS User can see the extended playback image by using mouse left button. Designate the area for extension by using left side mouse button and blue square tool box appears on the part where user selected. Click the left side mouse button to return to original size. The smaller the size, the larger extended area will be shown. ※ Attention: Click right side mouse button onetime on the playback image to see it in full screen. 11 Micro D Player Manual V.3.0 4.3-2 PLAYBACK PREVIEW PIC. 4.3-2-1 PLAYBACK PREVIEW Click button for ‘Playback Preview’. Refer to the table below for the details of each icon Show images at the interval of 1/2/3/5/10/20/30/60 Sec ① Move to First page ② Move to the Previous page ③ Move to the Previous frame ① ② ③ ④ ⑤ ④ Move to the Next frame ⑥ ⑤ Move to the Next page ⑥ Move to Last page Automatically rotates ‘Playback Preview’ page as per selected Preview Speed Select ‘Playback Preview’ Page Transition Rate at the interval of 1/2/3/5 sec ※Notice: Upon pressing , please choose Image Interval Speed. 12 Micro D Player Manual V.3.0 Click on a desired image on ‘Playback Preview’ page and then Pic. 4.3-2-2 is shown as below. ① ① ② PIC. 4.3-2-2 PLAYBACK SINGLE FILE Use ① and ② to check file images per frame. ① Go to Previous frame ① ② ② Go to Next frame Return to ‘Playback Preview’ Playback from the current selected frame. 13 Micro D Player Manual V.3.0 4.3-3 PLAYBACK /SEARCH BY CALENDAR Click and find the relevant data according to the date & time. PIC. 4.3-3 -1 PLAYBACK /SEARCH BY CALENDAR ① Click and check the files categorized by date ② Below the calendar, time table and relevant data files display the recording contents. ③ Click the thumbnail to playback. 14 Micro D Player Manual V.3.0 4.4 Convert 4.4-1 CAPTURING AS JPEG FILE PIC. 4.4-1 CAPTURING AS JPEG FILE Click button to convert the SDR2 file into JPG file. Click button to complete the process. The size of JPG image can be selected among 704*480(704*576)/352*240(352*288)/Original. Caption: Users can insert the title for each JPG file. Caption Position: the caption can be placed at one of 8 corners of display. Select the position and press . Press to save the JPG file in the designated folder. 15 Micro D Player Manual V.3.0 4.4-2 CONVERTING TO AVI FILE PIC. 4.4-2 CONVERTING TO AVI FILE button. And it includes two monitor windows as 1. ‘Video Export’ window opens when click on shown in [Pic. 4.4-2]. ① Go to the First Frame ② ④ ⑤ ① ③ ② ③ ④ ⑤ 1 Min: Go to the Previous(Next) 1 Minute Image 10 Sec: Go to the Previous(Next) 10 second Image 1 Sec: Go to the Previous(Next) 1 second Image. Go to the Last Frame 2. Select the section for converting to AVI FILE If users click button , designated section A to B is saved as one independent file in AVI format. 16 Micro D Player Manual V.3.0 4.4-2-1 BACKUP ALL FILES TO AVI FILES PIC. 4.4-2-1 BACKUP ALL FILES TO AVI FILES Click button. Selected file is indicated by icon. Click and choose the place for saving. AVI, press button to save as AVI files. After selecting Backup completed massage appears in the screen once the process is done. 17 Micro D Player Manual V.3.0 4.4-2-2 INDIVISUALLY CONVERTING TO AVI FILES PIC. 4.4-2-1 INDIVISUALLY CONVERTING TO AVI FILES button and selected file will appear as PIC. 4.4-2-1. User can export a recording file to AVI format by Click selective section. Click button to export the selected file. 18 Micro D Player Manual V.3.0 4.4-2-3 CONVERTING DESIGNATED SECTION TO AVI FILE PIC. 4.4-2-3 CONVERTING DESIGNATED SECTION TO AVI FILE Click button to designate the start point and select the end point of AVI converting file by clicking button. After starting point and end point is designated, to complete converting to AVI file selectively. 19 marks display on the bar.Click button Micro D Player Manual V.3.0 4.4-3 CONVERTING to WMV FILE PIC4.4-3-1 CONVERTING to WMV FILE Click button. WMV and press button to start backup as WMV file. Choose Backup completed massage appears on the screen once the process is done 20 Micro D Player Manual V.3.0 5. BACKUP Thumbnail Circled PIC 5.1 BACKUP ‘Thumbnail Circle’ turns to white once user selects the thumbnail check button. Click 21 button. Micro D Player Manual V.3.0 PIC5.2 BACKUP Choose all the files Undo the ‘Select All’ Book mark Choose the format for exporting ; SDR2/ AVI/WMV file Selected file is indicated by icon. Designate the files for saving after clicking After selecting WMV, press button to save as AVI files. Once procedure starts, progress appears on the screen in red as Check the backup file from designated area after whole process is completed. 22 button. Micro D Player Manual V.3.0 6. SETUP MOTION 6.1-1 DISPLAY MOTION PIC. 6.1-1 DISPLAY MOTION and check to activate the motion mark. Click setup button Check the checkbox’ to activate the motion mark and ‘confirm’ Red motion marks appear on the screen whenever there is movement during playback the selected file. To remove the motion marks, undo the checkbox and click 23 Micro D Player Manual V.3.0 6.1-2 FILE INDEX RENEW PIC 6.1-2-1 FILE INDEX RENEW Press button as shown in [Pic.6.1-2]. The ‘FILE INDEX RENEW tool’ has the same function as ‘SUB MENU>FILE INDEX RENEW’ provided as OSD menu from MICRO DVR. The index file is automatically generated and stored in the SD card when inserted into the Product. If the index file does not match the files with stored files in the SD card, click synchronizing, the process percentage is displayed on the screen. 24 button to synchronize. While Micro D Player Manual V.3.0 7. LOADED FILE INFORMATION To check the MICRO D PLAYER’s data information, click PIC 7.1 MEMORY INFORMATION The information of current data appears. You can check; A. B. C. - File Information Total Number of Files Total Memory Size Video Information Total Recording Time Total Recording Period Start Time End Time Remove individual files. Event Information(File Count) Event A Event M Event E Event T 25 Micro D Player Manual V.3.0 8. ERROR MESSAGE PIC 8.1 ERROR MESSAGE button without choosing the appropriate folder in which SDR files are existed dialog message If user clicks is shown as [Pic 8.1] 26