1
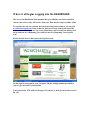
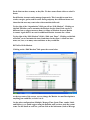
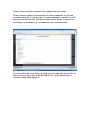
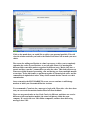
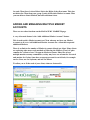
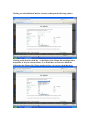
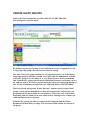
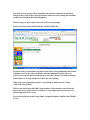
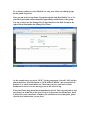
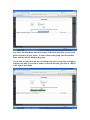
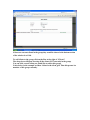
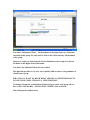
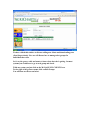
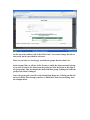
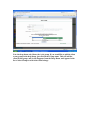
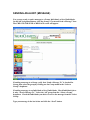
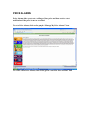
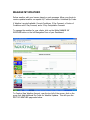
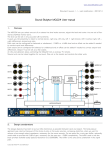
WELCOME TO THE MARKETS ON CELL USERS
GUIDE FOR CORPORATE ACCOUNTS.
Support [email protected]
TABLE OF CONTENTS (Listed by first page of section)
OVERVIEW...................................................................................................................... 2
ADDING A NEW CLIENT.............................................................................................. 5
CREATE AND MANAGE A CAMPAIGN CODE ..................................................... 11
MANAGE MY MARKETS ........................................................................................... 13
SETTING AUTO SEND TIMES................................................................................... 18
ADDING AND MANAGING MULTIPLE MARKET ACCOUNTS........................ 19
DEFAULT MARKETS .................................................................................................. 21
ALERT GROUPS AND ALERTS OVERVIEW......................................................... 24
CREATE ALERT GROUPS ......................................................................................... 25
MANAGING EXISTING GROUPS ............................................................................. 30
SENDING AN ALERT (MESSAGE)............................................................................ 37
PRICE ALARMS............................................................................................................ 38
MANAGE MY WEATHER........................................................................................... 42
SUMMARY AND THANKS.......................................................................................... 45
OVERVIEW
You can now manage client communications from one central point. You can send
alerts, markets, cash prices, and price alarms to your clients by text message or
email.
If you have other needs such as audio broadcasting we do a variety of custom
solutions for many companies. Just ask.
As folks enter the text to phone business sometimes they start out with a group
email. Then they find the client needs other messages. Now they have 2 groups. As
soon as they have many clients things spiral out of control in trying to keep things
organized. Also, as a person starts sending text to a handful of clients there are
usually very few issues and it is easy to manage. Then as the numbers of recipients
increase, you find messages are not being delivered and there seems to be no logical
reason. In the industry today, every carrier runs some kind of spam filter, and as
soon as a certain level is reached the filter is triggered.
Today, we offer a seamless package to send alerts, general messages, cash prices,
futures prices, stocks, option prices, and price alarms from a central platform. We
also do a variety of custom platforms for folks.
Markets on Cell provides an easy to use DASHBOARD. Everything can be found in
one place. We start with a basic tenant that you have a client. You add the client,
and then you can mange that client seamlessly for all of our products. Best of all,
you can manage each client from a group perspective, or from an individual
perspective. Manage Groups, Markets, Autosend Times, Cell Phones, or Carrier
Each is only a click away.
Another huge advantage to our system, is when you add a client they also
immediately have their own mini version of your DASHBOARD, where they can
manage their own account. (Only you can manage their Cash Prices and Groups.)
This can take a lot of the burden of management off of your shoulders if you like.
This also fulfills a FCC rule that states the client must have access to shut off their
text messages if they desire.
Markets on Cell can provide great value to your clients by providing them with
Markets, whenever and wherever they are. The value to you, the provider, besides
providing this relationship building tool, is the added ability to communicate with
the client via alerts.
Whether you are sending Markets, Cash Prices, Alerts, or Price Alarms you can
also have your Banner on each Message. Markets on Cell gives you the ability to
change your Banner thru the DASHBOARD at any time, and even use multiple
Banners if you like.
Where it all begins Logging into the DASHBOARD
The core of the Dashboard is the premise that you will add your clients, and then
choose what services they will receive from you. Thus the first step is to add a client.
To sign into our web site you may have been provided a direct link or you can visit
www.marketsoncell.com. Once at the site, there are 2 large Icons at the top of the
main window. The first is for New Users. Most likely your account has already been
set up and you are a Returning User which is the Grey Returning Users Sign In
icon.
Please click the Icon to take you to the Sign In screen.
On the Sign In screen put in your Corporate ID (the 10 digit number provided to
you), or give us a call if you need this.
Your password is 1234 until you change it. If you lose it, then give us a call to reset it
for you.
Once you have entered your ID number and Password please click Sign In
If this is your first time to sign in you will be asked to review your Profile
information and make any corrections necessary. This will only happen the first
time you visit your Admin account. After the first visit you can always change your
Profile information with the Manage My Profile button on your Dashboard.
After the first sign in you will go to the Main Dashboard on Sign In.
On the First View of the Dashboard there are two information sections. Please check
these for any updated information.
There are System Messages which will notify you of any changes in our overall
Dashboard.
There is a section also for General Messages/What’s New which contains
information on recent changes.
Once the System Messages and General Messages are reviewed you can begin to use
the Dashboard. At any time you can click on the Icons on the left to move to another
area. PLEASE DO NOT USE THE BACK BUTTON ON YOUR BROWSER. Each
operating system is different, so please use the functions on our page to avoid any
unnecessary issues. Also when done please LOG OFF using the Icon on the Left or
the LOG OFF on the top right of the Brower Window.
ADDING A NEW CLIENT
The first step will be to add a new client. For this Click on the Mange My Clients
Icon. It is the Dark Blue icon.
Clicking the Mange My Clients Icon will take you to the Manage My Clients main
page. If you already have Clients they will be listed. Normally you would at least
have your own Corporate Account listed. If your Corporate Account is not in your
list please let us know so we can move that for you.
At this screen you can:
1. Add a new client.
2. Change a current client profile such as phone or carrier info.
3. Manage alert groups for the Client.
4. Download your complete client list.
5. Organize your clients on screen by First Name, Last Name, Cell Number.
6. Search for clients by First Name, Last Name, and Cell Number.
Once on the MANAGE MY CLIENTS main page, to add a New Client click on the
Add New Client Link in the top left corner. (Just to the right of the Orange Button)
This will open a Window where you will put in the 10 digit cell number for the new
client.
Just use the 10 digits only.
There is no “1” in the front.
There should not be any dashes or other characters.
The system will check the number to see if it already exists.
There are 3 possible out comes.
1. The number exists and they are already a client of yours. A message in Red will
appear on the screen to inform you of such. If so it will not allow you to add them a
second time. You can manage their profile to the right of their name.
Click on the Close on the top left of the pop up screen to close the window and
return to MANAGE MY CLIENTS.
2. The number exists elsewhere in our system, but you can still add them under your
profile. You will know this as the Name and Info in our system will pop up on the
screen.
The client info will be in Ghost image (light grey and you will not be allowed to
make any changes at this point to the Client info.) You can still add them to your
account by clicking continue. This can happen as we have thousands of current
clients and many products. If you feel the client info is incorrect at this point please
give us a call to correct their info. Items you may feel are wrong would be items like
spelling of their name and cell carrier.
3. The third situation, is that the client is not in our Database. In this case you will
have to Enter the First Name, Last Name, Pick a Campaign Code from your Drop
Down of current Campaign Codes, and Chose a Carrier from the Drop Down list of
over 300 that we work with. Note the cell number was already in the top of the
Window from the previous time you typed it. I can be changed at this point but it is
preferred that you do not change it here. If you realize it is incorrect, you would be
better to close the window on the top Left, and start the process over with the
Correct cell number.
PLEASE PUT IN FIRST AND LAST NAME IN ALL CAPS. THIS WAY WE ARE
CONSISTENT.
For the Carrier you can scroll thru the complete list, or type in the first letter of the
Carrier and it will go to that area of the List. Then you can use your arrows or
scroll to the specific carrier.
If the client is using an email address, such as their home computer or they have a
smart phone such as a Blackberry you would select Email from the Drop Down in
the Carrier Selection. To pick Email you can Scroll thru the list, or type E to get to
the top of the E group and then scroll or arrow down to Email.
Once you click Email another box will open under the Carrier Field. This box will
say Cell Phone Email.
Please enter the Email address for the client in this box.
Then click Save as a Client.
This will open an additional entry where the client can now be added to your Alert
Groups. This feature was added because of dozens of user comments indicating it
would be nice to immediately be able to add the proper alert groups for the client.
We assign each new Client to the ALL group when you create them. We create an
ALL group and a AAA group for you when you originally set up your account. ALL
will include everyone, unless you move them out of it later. AAA is used by Markets
On Cell in testing your account in our system. You can also use it, but we prefer if
you leave it for testing.
You can also add or manage groups very easily later on. At this point, if you are a
new user, or if you do not use the Text Alerts yet, you would just click on the Save
Client tab.
If you did want to add the clients to other groups at this time, you would just select
the groups from your drop down list by clicking on each group you wish to add the
client to. Simply re-use the dropdown until you have selected all the desired groups.
Once all desired groups appear in the client’s table, click the Save Client button.
We will mention again that we have not coded to use the Back button on your
Browser, just our own Functions within our pages.
Now you have added the client.
At this time a Client Dashboard was also created. This Dashboard has fewer
features. This allows your client to do a lot of management of their account. They
can change their Markets, add additional Market Accounts, Change their auto send
times, remove and add alerts, and set price alarms. This is a huge advantage of this
system. The ability for the client to customize their account removes that burden
from you. At the same time this allows the client to have exactly what they would
like, delivered at the time that best works for them.
For those going to a direct sign up page, like if the client were to sign up themselves,
they will have a more complete sign in form. This includes Address, Email, and
other information. According to the FCC we are to have all that info, but when put
in by an ASSOC (that is you thru your corporate account), we are assuming you
have the additional information.
A key is to provide the New User a Campaign code to put in the first box, Campaign
Code. The Campaign Code is what ties the client to you. You can find your
Campaign Code in the DASHBOARD under Manage My Campaigns or give us a
call. We can provide you with links that will automatically put in your Campaign
code on request.
CREATE AND MANAGE A CAMPAIGN CODE
The Campaign Code is what ties the client to you. When your account is created, we
created a Campaign Code. You can view your Campaign Code by clicking on the
purple “Manage My Campaigns” icon.
The Manage My Campaigns screen will confirm the name of your organization and
list any existing Campaign Codes. To add a new campaign, click on the green “Add
New Campaign” link. This will open the Edit Campaign screen below:
Enter a name for the campaign code. The entry should be in ALL CAPS and should
not include any spaces nor any special characters.
Enter text for the Banner. Spaces should be represented by an underscore “_”
Keep your banner short (12-14 characters). Banners are what appear at the top of
each text you send to clients. This is your advertising space, so use it wisely.
Click the Save button.
To edit an existing campaign code, click on the green text for the existing campaign
code on the Manage My Campaigns screen. Note that you cannot change the name
of the campaign code (grayed out), but you can modify the banner and save.
MANAGE MY MARKETS
One of our core purposes is to deliver any stock, commodity, or option prices in a
custom portfolio for each client to their cell phone. We offer a number of basic
platforms. You can completely customize each client to any detail you would like.
You can also opt for a process where every client receives the same markets. You
can also work towards any level in between.
We can start with clicking the MANAGE MY MARKETS button. This will take you
to the main MANAGE MY MARKETS page. This is where you can customize
individuals markets or control default setting which could affect all clients
universally.
When you first go to the MANAGE MY MARKETS page you will see all the clients
that have current Market Accounts listed. Each line (row) constitutes a separate
Market Account.
On the line with the client name, cell phone and your organization you will also see
the first field is description. Each Market Account can have a description. This
allows folks with multiple market accounts to identify which account they are
working with. For example it is common for folks to have 2 or 3 market accounts.
Some may have a Grains and a Livestock account. Each account will result in a
separate text message. We do not charge any additional fees for multiple accounts.
Each client can have as many as they like. We have some clients with over a half a
dozen.
Each Market Account can be managed separately. This is needed as some have
stocks, energies, grains, and livestock. Each group may have different hours and
times that the user may want to have those markets delivered.
To the right of the “Organization” field you will see “Edit Markets”. Clicking on
this link will allow you to customize the Markets for the client. Each carrier is
different, but we suggest no more than 6 to 8 lines of Markets for most Market
Accounts. Again there is no cost for additional Market Accounts for a client.
To the right of the “Edit Markets” field is “Edit Auto Times”. Clicking on this link
will allow you to Customize the Auto Send times for the client. A client can have
none, one, two, or as many auto send times as they would like.
DETAIL of Edit Markets
Clicking on the “Edit Markets” link opens the screen below.
At the top center of the screen, you can change the Market Account Description to
anything you would like, or leave it as is.
On the other configurations (Multiple, Message Time, Quote Time, combo, Label,
and Delivery), we would suggest using the Defaults until you have used the system
some. For the detail on each one, you can click on the item name (Such as Message
Time) and the purpose and explanation will open on the screen. Again, at first, just
go with the defaults.
If you do make any changes you have to click the UPDATE INFO ABOVE button
before making any changes in the grid below, or your changes to the top
configuration will not be saved.
In the bottom grid you can Add a New Market to your quotes, Change a Market, or
Remove a Market. The bottom grid may have default Markets or be empty on your
first visit. If empty, just click on the Add/Change in the Change field to start adding
new Markets. Again we suggest 6-8 markets per message to begin with.
For Markets you can choose any Commodity, Stock or Option that is traded.
When you click Add/Change in the Market Selection Grid you will open another
window where you can select the Commodity or put in your Option String or Stock
Symbol.
If a Stock or Option use the boxes at the bottom of the form to put in your Option
String or Stock Symbol and then click the box to the right as it instructs.
For Commodities we use the Industry Standard Commodity categories.
Click on the Commodity Category and then all the commodities under that
Category will be listed. This is demonstrated below on the window where we used
Grains as an example.
All the Grains are shown are shown in our example in the next exhibit.
We have chosen to utilize electronic markets for most commodities, for pits only
account for about 5% of current trade. For some commodities, you may see an (E)
listed after the Market name. This denotes an Electronic Market. If you only see
one listing for a commodity, you can assume this is the electronic market
Next as shown on the screen below you would select the commodity from the list. In
this case we are going to click on KCBT WHEAT (E). All the months that are
currently trading will be displayed.
Click on the month that you would like to add to your personal portfolio. This will
close the window and take you back to the Market Selection Grid to make your next
choice.
The reason for adding one Market at a time is necessary to allow you to completely
customize the order of your Markets. As we talk with clients, it is amazing how
different folks want their markets organized in different ways. Maybe they have a
spread and they want the 2 commodities one after the other. This need took us away
from our original format of presenting a list and having you choose multiple months
at one time. In the old format, we put them together in chronological order, and the
commodities in alphabetical order. Many clients wanted further control over their
customization.
Once returned to the EDIT MARKETS screen you can continue to add/change
markets to build your Customized Market Account.
We recommend 6-7 markets for a message to begin with. Then after a few have been
sent you can tweak the markets further based on client feedback.
There are no general rules on size. Each Carrier is different, and there can even be
differences between handset models (the actual cell phone) within the same
company. We work with over 300 cellular companies, and have been delivering
messages since 1999.
Once your markets are selected please click on the Save button on the bottom of the
screen. This will return you to the client listing on the MANAGE MY MARKETS
screen.
SETTING AUTO SEND TIMES
Once you have the Markets selected you can then click on the Edit Auto Times link.
We currently offer a large number of auto send times. (Note all customers can also
call our Access Numbers at any time for our On Request service. The numbers can
be found by going to the www.marketsoncell.com web site, and clicking on the link
on the Left side of the page titled “Access Numbers”. To have the markets sent any
time 24/7 the user would just call any of the access numbers, let the phone ring, and
then hang up after the click. The users Market Portfolio will be sent to the cell
phone within seconds.)
For Auto Sends clicking on the Edit Auto Times link will open another window
showing the possible Auto Send times. You can select as many Auto Send times as
the client would like by clicking the box for each time desired.
Once the selection is complete just click the Save button to return to the MANAGE
MY MARKETS main screen.
On each Client there is also a Delete link to the Right of the client name. This does
not delete the Client from your group. It only deletes their Market Accounts. Thus
you can delete a clients Markets, but still send them Alerts.
ADDING AND MANAGING MULTIPLE MARKET
ACCOUNTS
There are two other functions on the MANAGE MY MARKETS page.
A very often used feature is the “Add Additional Market Account” feature.
This is used to add a Market account to a Client who may not have any Market
Accounts at all, or to Add Additional Market Accounts for a client that requested
additional Markets.
There is no limit to the number of Market Accounts allowed per client. Many clients
are replacing other more costly methods of following the Markets. Thus it is quite
common for a client to have 2-4 separate Market accounts. Many like to have
multiple months on many commodities, so they may have one account for Livestock
and another for Grains. Some have a separate account for each Grain, for example
one for Corn, one for Soybeans, and one for Wheat.
We allow you to fit the need of your client, whatever that need is.
Clicking on Add Additional Market Account would open the following window.
Clicking on the first Box with the – to the Right of the Clients title would provide a
drop down of all your current clients. (You would have to first have added the
Client thru the Manage My Clients window before you can give them Markets.)
Click on the client for whom you would like to add an additional or new Market
Account.
In the Campaign Code box enter your Campaign Code. (In the next release a list of
the ASSOC campaign codes will be offered. For now we just have to do it manually.)
For Market Account Description you can name this account to help you identify the
Markets in it if you have multiple Market Accounts. For example the name may be
Grains. You can just leave Primary.
On the other functions you may want to just keep the default settings. Give us a call
with any questions. Clicking on the item name will also give you a description and
purpose.
Once completed click on the UPDATE INFO ABOVE button.
Then use the previous instructions for Adding your Markets and Auto Times.
DEFAULT MARKETS
AN ADDITIONAL FEATURES UNDER MANAGE MY MARKETS IS
THE ABILITY TO MANAGE DEFAULT MARKETS FOR YOUR
CLIENTS. PLEASE REALIZE THAT SOME OF THESE CHANGES
WILL AFFECT ALL YOUR CLIENTS.
On the top left of the MANAGE MY MARKETS window, Under the bold word
“Markets”, you will find the “Manage Default Markets” link in Green letters. Click
this link to Manage your Default Markets.
Clicking on the Manage Default Markets will take you to the following window.
The first step is to Check the box on the top Left. “Check to turn default markets
on”. You can do this without any concern, as at this point your default markets will
only show up for new clients and not affect any current clients.
This is a great feature if you are adding a number of new clients, as each will start
with your default set of markets. Of course you can then customize the set for
individuals.
Once the box for “Check to turn default markets on” is checked you would just use
the Market Grid in the window to select your default markets. Use of the Market
Grid is detailed earlier.
Under the Manage Default Markets we also provide the ability to change the
Markets of all your clients with a single click. **Note** this function will change all
your client’s markets to the Default. MAKE SURE YOU WOULD LIKE TO
CHANGE ALL CLIENTS.
Under the To assign default markets to all clients, select an option from the
drop down below and click "Assign Default Markets" There are two options.
Once you choose one of the options you would then click on the “Assign Default
Markets” link to the right.
The two Options for assigning default Markets are:
1. Change all Clients that only have Single Market Accounts, that is only one
Market account and Skip any client with Multiple accounts. This is necessary
as if they have multiple accounts, we would not know which to make the
default. Also those with Multiple accounts have gone thru additional work at
selecting their markets.
2. Change All Clients to a single Default Market account. THIS WILL
DELETE ALL BUT ONE ACCOUNT FOR THOSE WITH MULTIPLE
ACCOUNTS.
As always we roll markets within a few days of the Expiration for the Commodity.
The date is usually considered either too late or too early, depending on the client.
For ideas on how to do exactly what you desire give us a call. There are ways to
make about anything work.
By request we may also be able to add the Ability to Set and Manage Default Auto
Times. As a reminder, if you do not have this feature, when you add a new client
the will get the portfolio of Default Markets, but you will still have to put in their
Auto Send Times if requested.
ALERT GROUPS AND ALERTS OVERVIEW
This product includes the most advanced alert group management system in the
industry. Why do we say that? Because most system only use groups, they make
Client Management very difficult.
If a client calls and wants to know what Groups they are in you just click on the
Client. A box will open showing the Groups to which the Client belongs, and
clicking on a drop down will show all the groups that are available for the client.
Taking a client out of a group is a one click event. The same holds true for adding
them to a new group.
Likewise, say someone in the company wants to know everyone in a group, you click
on the Group name, and it will show everyone in the group. A dropdown will then
show you all the clients not in the group. Adding clients or removing clients from the
group is only one click.
Another industry leading feature is the ability to Send a Message with One Click,
Type or Paste Your Message, and One Click to Send. That is it.
You can also send a message to a complete Group or to subset of a Group by using
the Individual Function. For example maybe you have a group of truckers and you
do not want to have 5 little groups. You can create a group with all your truckers,
and select from that group who should be sent the message when you create the
message.
WE HAVE NO RESTRICTIONS TO USE OR DELIVERY.
YES WE GO TO EMAIL ALSO. WE COVERED THIS ON MANAGE MY
CLIENT.
YES YOU HAVE UNLIMITED USE OF THE SYSTEM.
YES YOU HAVE UNLIMITED GROUPS.
YES YOU HAVE UNLIMITED CLIENTS.
CREATE ALERT GROUPS
Click on the Green button that says MANAGE MY ALERT GROUPS.
This will open a screen like below.
By default everyone gets 2 groups to start with that we create on signup. One is the
AAA group. This group is used by our tech team for testing.
The other is the ALL group, and that is a very special group for you. What makes
this group special is each time you add a new client, they are immediately included
in the ALL group. You can change it, or even delete it, but we do not recommend
that. With the ALL group you can use the Individual Function we will show you in a
bit, and text anyone. If it truly is a general message, then you could group message it
also. We do recommend you build your own All group, maybe call it GENERAL.
Thus you already had a group. Wasn’t that easy? Another reason you have both
groups, is that you can immediately see how this system works. Click on the AAA
group and you will not probably see any members. Click to the Left of the Clients
drop down, and you would see all your clients, and by clicking on any of them, you
could add them to the AAA group.
With the ALL group you will see everyone in the Client grid, and the Clients
Dropdown will most likely be empty. This is because all the Clients are already in
the group.
Now most of your groups will be somewhere in between, and thus you will show
Clients in the Group in the Client Grid, and Clients not in the Group, but available
to add to the Group in the Client Dropdown.
The first step you may want to take is to add your own groups.
Click on the Green Icon, MANAGE MY ALERT GROUPS.
Of course Your Account Name will show in the Select an Organization field, instead
of Markets on Cell. For those with Roles and thus multiple locations above an
ASSOC level you will use the Drop down to select the Location you wish to manage.
If all you have is a single location, it will be the only offering.
Under Select an Organization, there is a green link to Add your new Group:
“Add New Alert Group.”
Click on the link to open the Edit Group window. In this window you will put the
info for the new Group You are creating. It is very simple but the protocol is very
specific and can not be varied.
For each you will put in the Group Name, Group Description, and Declare if Public
or Not.
THIS IS CRITICAL. THE GROUP NAME CAN NOT BE OVER 8
CHARACTERS. IF YOU MAKE THE GROUP NAME OVER 8 CHARACTERS
IT WILL NOT WORK. WE PREFER IF IT IS ALL CAPS AND IT CAN NOT
CONTAIN ANY SPECIAL CHARACTERS SUCH AS “ , . : ; ‘ “. THE KEY FOR
WONDERFUL PERFORMANCE IS TO NOT MAKE THE GROUP NAME TO
DIFFICULT OR FANCY.
The Group Description can be whatever you like, but again please keep it is as
simple as possible (Use all caps and no special characters to be as issue free as
possible).
Then mark the “Is Public” yes or no. This is a much bigger feature that it appears
on first look. We mentioned earlier that as you create an account, the client also has
a Individual Dashboard created in case you want to give them access to it. On the
Individual Dashboard, those groups you Mark Public – yes -will be offered for the
Individual to add the alert to their account. This removes the need for you to
manage alerts which you may want to offer to anyone such as Crop Reports,
General Info, etc. Of course for most you will manage the groups for clients, but this
is an option if you choose to allow clients to add themselves to groups.
If you Mark Public – no – then the alert group will not be offered on your Client’s
Individual Dashboards. Only the Administrator ( you ) can add a Client to a Group
that is Marked – No. This would normally be the setting for groups that you would
want to completely control.
To avoid any confusion, even if Marked Yes, only your clients can add the group,
not the public in general.
Once you put in the Group Name, Group Description, and Mark Public Yes or No,
you will be presented with an immediate opportunity to add clients to the group.
You can of course use the Manage My Groups function or the Edit Groups to the
right of Each client under the Manage My Clients.
In the example above we put in “NEW” for the group name. Note all CAPS and less
than 8 characters. The Description is “NEW GROUP DEMO” and we marked it Is
Public as Yes, which would mean any Client that you have could elect on their
Dashboard to select to receive messages sent to this Alert Group.
Notice the Clients drop down that is immediately offered. This is a good point to add
any clients you would like to the New Group. You do not need to do that here, but it
is offered for your convenience. Whether you add clients or not at this point, please
click the Save button when you are done.
Note above the drop Down only shows James as the client, but when you get to this
point it will show all your clients. To Add a client to this group, just click on their
name, and they will be added to the group.
As you click on each client and they are added to the Alert Group, they will appear
as below, in a table. If you wish to remove a client in the table, just click on “Delete”
to the right of their name.
Now you have created a new group, and added clients to the group. Please click the
Save button. This will close the window.
MANAGING EXISTING GROUPS
What makes this product the choice of hundreds of companies is the ability to
manage all your text products from one platform.
When working with Alerts we take this even further in allowing you manage Alerts
from either a Group perspective or from an Individual perspective.
MANAGING EXISTING GROUPS CAN BE ACCOMPLISHED 2 WAYS.
You can manage Groups via the Groups themselves via MANGE MY ALERT
GROUPS or via Individual accounts thru the MANAGE MY CLIENTS area.
We will review the MANAGE MY ALERT GROUPS first.
To begin with click on the Green Icon – MANAGE MY ALERT GROUPS – note
above.
This will open the window below.
This is the area that we manage Clients from a Group level. At the group level you
can review which of your clients are in a group, delete clients from that group, and
add clients which are not in the group to it.
Under the Group Name, click on the Group you wish to manage. Previously we
covered how to add a new group if you need that information.
Once you click on the group you would like to manage you will see the window
below. You may or may not have clients in the group.
If there are current clients in the group they would be shown in the bottom section
of the window in a Grid.
To add clients to the group, click on the Box to the right of “Clients”:
The drop down will open, showing all the clients NOT currently in the group.
You can click on each client you would like to add to this group.
Notice below in the example we Show I client in the client grid. Thus this person is a
member of this group currently.
Note above clicking on Clients: the drop down to the right shows us a Client not
currently in this group. We only need to click on the Client and they will be added
to the group.
Likewise to remove a client from the Grid of Members to the Group is to click on
the Delete to the Right of the Client name.
Note below the additional Client has been added.
This platform provides a very easy way to quickly add or remove a large number of
clients from a group.
WHAT IF YOU WANT TO KNOW WHAT GROUPS A CLIENT BELONGS TO
IN ONE CLICK. WELL WE HAVE A VIEW FOR THAT.
To manage Groups for an Individual without having to check each group, all you
have to do is click the Blue – MANAGE MY CLIENTS icon on the left.
That will open the window below.
We have visited this window to discuss adding new clients and downloading your
client list previously. Now we will discuss how to manage alert groups for
Individuals here also.
Let’s say the grower calls and wants to know what alerts he is getting. On most
systems you would have to go to each group and check.
With our system you just click on the MANAGE MY CLIENTS icon.
To the right of the growers name, click on Edit Groups.
You will then see the screen below.
On the top of the window is all of the Client’s info. You can not change the info on
this screen, but it is provided for reference.
What you can also see, and change, would be the groups that the client is in.
In the Group Grid you will see all the Groups to which the client currently belongs.
If you wish to remove the client from the group, just click the Delete to the right of
the group name. This just deletes the client from that group. Nothing else about the
group or the client is changed.
Above the group grid, you will see the Group Drop Down box. Clicking on this will
show you all the Alert Groups you offer, to which the Client does not belong. Note
the example below.
Note the drop down only Shows the AAA group. If you would like to add the client
to any group in the drop down, just click on the Group name. This will add the
client to that group, and it will disappear from the Drop Down, and Appear in the
list of Alert Groups to which the client belongs.
SENDING AN ALERT (MESSAGE)
Now you are ready to send a message to a Group, Individual, or list of Individuals.
On the left Navigation Buttons, click the Orange “Create and Send a Message” Icon.
The CREATE AND SEND A MESSAGE screen will appear.
If sending a message to a Group, verify that “Send a Message To” is checked for
Group, then select the group by clicking one the Group name in the “Select a
Group” dropdown.
If sending a message to an Individual or list of Individuals, Check Individual where
it asks, “Send a Message To.” Select the “All”group from the “Select a Group”
dropdown. Check the Individuals you desire to receive the message from the “Select
Group.
Type your message in the box below and click the “Send” button.
PRICE ALARMS
Price Alarms allow you to set a ceiling or floor price and then receive a text
notification if the price is met or exceeded.
To set a Price Alarm, click on the purple “Manage My Price Alarms” icon.
To create a new Price Alarm, click on the green “Add New Price Alarms” link
Select the Commodity, Stock, or Option. For Example: If we are interested in
December 09 Corn:
Use the Categories to locate Dec 09 Corn under Grains, Corn, DEC9 CZ9 and click
on DEC9 CZ9. The EDIT PRICE ALARM screen appears:
Specify the Price you wish to trigger the alarm, whether the alarm is to be triggered
when the price rises above or falls below that price, and the rest value. Then click
the “Save” button
The Price should be stated in the format as the example for the commodity. For
example, for corn, $4.02 should be input as 402. Another example: 4.02 ¼ should be
input as 402.25.
The reset value should be stated in cents. For example, “$0.05” should be input as
“5.” If you wish an alarm when the price rises above $4.02 and the price rises to
$4.03, you will send an alarm and the next alarm will be sent when the price rises
above $4.08 (the reset value resets the price alarm up in value by $0.05).
If you wish an alarm when the price lowers below $4.02 and the price lowers to
$4.01, you will send an alarm and the next alarm will be sent when the price lowers
below $3.97 (the reset value resets the price alarm down in value by $0.05)
After you click the save button, you will be directed back to the Edit Price Alarms
screen. Existing Price Alarms will be displayed with green “Edit” and “Remove”
links for further modification.
MANAGE MY WEATHER
Deliver weather with your banner placed on each message. Allow your clients to
receive updated weather on request 24/7 without limitation. Unlimited Zip Codes.
4 Weather Layouts Available: Current Conditions, 5 Day Forecast, a Combo of
Conditions and 3 Day Forecast, and a 5 Day Precipitation Forecast.
To manage the weather for your clients, click on the White MANAGE MY
WEATHER button on the left Navigation Pane of your Dashboard.
To Create a New Weather Account, near the top left of the screen, click on the
green link: Add Additional Zip Codes for Weather Updates. This will open the
EDIT MY WEATHER page seen below.
To associate this weather update with a specific client, select the client from the
drop down. To associate this weather update with yourself, do not use the drop
down.
Select the appropriate Campaign Code from the drop down.
Enter the Zip Code for the selected client.
Use the radio buttons to mark yes or no for the desired weather format(s).
Click the Save Changes button.
Notice that the Weather Account will be added as a new row in the Manage
Current Weather Accounts grid of the Manage My weather page.
For each Weather format, you can access the Delivery Times by clicking on the
green Delivery Times Link under each Format Column. Select desired auto times
and click the Save Changes button.
To modify whether a weather account receives a particular weather layout,
simply click on the Select “Yes” or “No” radio buttons in any of the format
columns. Notice the Edit Weather page opens, allowing you to make multiple
format changes concurrently (radio buttons). After making your selections,
simply click the Save Changes button. Remember to set the Delivery Times for
any newly added format by clicking on the green Delivery Times Link under each
Format Column.
To delete a zip code for a client, locate the client’s zip code listing in the Manage
Current Weather Accounts grid and select the green Delete link at the end of the
row. You will be prompted with a dialog box asking you to confirm the deletion.
Click the OK button.
You can search for a client’s zip code weather listings by using the Cell Phone,
First Name, or Last Name fields at the top center of the Manage My Weather
page and clicking the search button.
SUMMARY AND THANKS
In summary this is the most robust and efficient Client Management product for
working with your clients. We can also set up any type of Custom data you would
like to send to your clients. Please call us to discuss any projects.
Some folks on first look, believe that a simple product will feel their needs. This is
often true for the first couple of weeks. Maybe you just want to send the same 4
prices to your clients three times a day. We can set this up for you if needed, but
without exception we find that the end user will demand flexibility or use our
product from some other source.
Still if you would like a simple interface we can create one. Most likely you will soon
migrate to a platform with more functionality to meet your client’s requests.
There is also a instruction manual for using our CASH PRICE SYSTEM. It is
functional and integrated into your current DASHBOARD. If you would like to do
Cash Prices to your growers, just give us a call and we can send you the Manual for
that. It will allow you to do static prices on anything, and dynamic prices bases off
of the Futures Markets by integrating our basis calculator to provide your clients
with true current Cash Prices.
We appreciate your business and feedback.
Jay Bottoms
[email protected]