1
ChemOffice.Com
®
ChemDraw
®
Chemical Structure Drawing Standard
User’s Guide
Revision 9.0.1
12/22/04
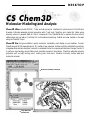
CS ChemDraw 9.0
for Windows and Macintosh
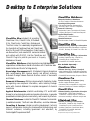
ChemDraw is a standalone application within
ChemOffice, an integrated suite including
Chem3D for molecular modeling and analysis,
BioAssay for biological data retrieval and visualization,
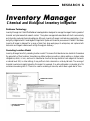
Inventory for managing and searching reagents,
E-Notebook for electronic journal and information,
ChemFinder for searching and information integration, and
ChemInfo for chemical and reference databases.
ChemDraw
Chemical Structure Drawing Standard
®
License Information
ChemOffice, ChemDraw, Chem3D, ChemFinder, and ChemInfo programs, all resources in the ChemOffice,
ChemDraw, Chem3D, ChemFinder, and ChemInfo application files, and this manual are Copyright © 1986-2004
by CambridgeSoft Corporation (CS) with all rights reserved worldwide. MOPAC 2000 and MOPAC 2002 are
Copyright © 1993-2004 by Fujitsu Limited with all rights reserved. Information in this document is subject to
change without notice and does not represent a commitment on the part of CS. Both these materials and the right
to use them are owned exclusively by CS. Use of these materials is licensed by CS under the terms of a software license
agreement; they may be used only as provided for in said agreement.
ChemOffice, ChemDraw, Chem3D, CS MOPAC, ChemFinder, Inventory, E-Notebook, BioAssay, and ChemInfo
are not supplied with copy protection. Do not duplicate any of the copyrighted materials except for your personal
backups without written permission from CS. To do so would be in violation of federal and international law, and
may result in criminal as well as civil penalties. You may use ChemOffice, ChemDraw, Chem3D, CS MOPAC,
ChemFinder, Inventory, E-Notebook, BioAssay, and ChemInfo on any computer owned by you; however, extra
copies may not be made for that purpose. Consult the CS License Agreement for Software and Database Products
for further details.
Trademarks
ChemOffice, ChemDraw, Chem3D, ChemFinder, ChemInfo and ChemACX are registered trademarks of
CambridgeSoft Corporation (Cambridge Scientific Computing, Inc.).
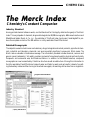
The Merck Index is a registered trademark of Merck & Co., Inc. ©2001 All rights reserved.
MOPAC 2000 and MOPAC 2002 are trademarks of Fujitsu Limited.
Microsoft Windows, Windows NT, Windows 95, and Microsoft Word are registered trademarks of Microsoft Corp.
Apple Events, Macintosh, Laserwriter, Imagewriter, QuickDraw and AppleScript are registered trademarks of Apple
Computer, Inc. Geneva, Monaco, and TrueType are trademarks of Apple Computer, Inc.
The ChemSelect Reaction Database is copyrighted © by InfoChem GmbH 1997.
AspTear is copyrighted © by Softwing.
Copyright © 1986-2004 CambridgeSoft Corporation (Cambridge Scientific Computing, Inc.) All Rights Reserved.
Printed in the United States of America.
All other trademarks are the property of their respective holders.
CambridgeSoft End-User License Agreement for Software Products
Important: This CambridgeSoft Software License Agreement (“Agreement”) is a legal agreement between you, the
end user (either an individual or an entity), and CambridgeSoft Corporation (“CS”) regarding the use of CS Software
Products, which may include computer software, the associated media, any printed materials, and any “online” or
electronic documentation. By installing, copying, or otherwise using any CS Software Product, you signify that you
have read the CS End User License Agreement and agree to be bound by its terms. If you do not agree to the
Agreement’s terms, promptly return the package and all its contents to the place of purchase for a full refund.
CambridgeSoft Software License
1. Grant of License. CambridgeSoft (CS) Software Products are licensed, not sold. CS grants and you hereby accept
a nonexclusive license to use one copy of the enclosed Software Product (“Software”) in accordance with the terms
of this Agreement. This licensed copy of the Software may only be used on a single computer, except as provided
below. You may physically transfer the Software from one computer to another for your own use, provided the
Software is in use (or installed) on only one computer at a time. If the Software is permanently installed on your computer (other than a network server), you may also use the Software on a portable or home computer, provided that
you use the software on only one computer at a time. You may not (a) electronically transfer the Software from one
computer to another, (b) distribute copies of the Software to others, or (c) modify or translate the Software without
the prior written consent of CS, (d) place the software on a server so that it is accessible via a public network such as
the Internet, (e) sublicense, rent, lease or lend any portion of the Software or Documentation, (f ) modify or adapt
the Software or merge it into another program, (g) modify or circumvent the software activation, or (h) reverse engineer the software activation so as to circumvent it. The Software may be placed on a file or disk server connected to
a network, provided that a license has been purchased for every computer with access to that server. You may make
only those copies of the Software which are necessary to install and use it as permitted by this agreement, or are for
purposes of backup and archival records; all copies shall bear CS’s copyright and proprietary notices. You may not
make copies of any accompanying written materials.
With a fixed license, the software cannot be installed on more than the number of computers equivalent to the number of fixed licenses purchased. For example, a 10-user fixed license means the software can be installed on no more
than 10 different computers. A fixed license cannot be installed on a server. With a concurrent license, the software
can be installed on any number of computers at the organization, but the number of computers using the software
at any one time cannot exceed the number of concurrent licenses purchased. For example, a 10-user concurrent
license can be installed on 20 computers, but no more than 10 users can be using it at any one time. If the number
of users of the software could potentially exceed the number of licensed copies, then Licensee must have a reasonable
mechanism or process in place to assure that the number of persons using the software does not exceed the number
of copies. CambridgeSoft reserves the right to conduct periodic audits no more than once per year to review the
implementation of this agreement at the Licensee’s site. At CambridgeSoft’s request, Licensee will provide a knowledgeable employee to assist in said audit
2. Ownership. The Software is and at all times shall remain the sole property of CS. This ownership is protected by
the copyright laws of the United States and by international treaty provisions. Upon expiration or termination of this
agreement, you shall promptly return all copies of the Software and accompanying written materials to CS. You may
not modify, decompile, reverse engineer, or disassemble the Software.
3. Assignment Restrictions. You may not rent, lease, or otherwise sublet the Software or any part thereof. You may
transfer on a permanent basis the rights granted under this license provided you transfer this Agreement and all copies
of the Software, including prior versions, and all accompanying materials. The recipient must agree to the terms of
this Agreement in full and register this transfer in writing with CS.
4. Use of Included Data. All title and copyrights in and to the Software product, including but not limited to any
images, photographs, animations, video, audio, music, text, applets, Java applets, and data files and databases (the
“Included Data”), are owned by CS or its suppliers.
· You may not copy, distribute or otherwise make the Included Data publicly available.
· Licensed users of ChemOffice Enterprise and Workgroup and the accompanying Plugin software products may
access, search, and view the Included Data and may transmit the results of any search of the Included Data to other
users of the licensed ChemOffice Enterprise and Workgroup software products within your organization only, provided
that such transmission is via an internal corporate (or university) network and is not accessible by the public.
· You may not install the Included Data on non-licensed computers nor distribute or otherwise make the Included
Data publicly available.
· You may use the Software to organize personal data, and you may transmit such personal data over the Internet provided that the transmission does not contain any Included Data.
· All rights not specifically granted under this Agreement are reserved by CS.
5. Separation of Components. The Software is licensed as a single product. Its component parts may not be separated for use on more than one computer, except in the case of ChemOffice Enterprise. ChemOffice Enterprise
includes licenses for ChemDraw ActiveX and licenses for Chem3D ActiveX. The ActiveX software products may be
installed on computers other than that one on which ChemOffice Enterprise is installed. However, each copy of the
ActiveX is individually subject to the provisions of Paragraphs 1 through 4 of this Agreement.
6. Educational Use Only of Student Licenses. If you are a student enrolled at an educational institution, the CS
License Agreement grants to you personally a license to use one copy of the enclosed Software in accordance with the
terms of this Agreement. In this case the CS License Agreement does not permit commercial use of the Software nor
does it permit you to allow any other person to use the Software.
7. Termination. You may terminate the license at any time by destroying all copies of the Software and documentation in your possession. Without prejudice to any other rights, CS may terminate this Agreement if you fail to comply with its terms and conditions. In such event, you must destroy all copies of the Software Product and all of its
component parts.
8. Confidentiality. The Software contains trade secrets and proprietary know-how that belong to CS and are
being made available to you in strict confidence. ANY USE OR DISCLOSURE OF THE SOFTWARE, OR USE OF ITS
ALGORITHMS, PROTOCOLS OR INTERFACES, OTHER THAN IN STRICT ACCORDANCE WITH THIS LICENSE
AGREEMENT, MAY BE ACTIONABLE AS A VIOLATION OF OUR TRADE SECRET RIGHTS.
CS Limited Warranty
Limited Warranty. CS’s sole warranty with respect to the Software is that it shall be free of errors in program logic
or documentation, attributable to CS, which prevent the performance of the principal computing functions of the
Software. CS warrants this for a period of thirty (30) days from the date of receipt.
CS’s Liability. In no event shall CS be liable for any indirect, special, or consequential damages, such as, but not
limited to, loss of anticipated profits or other economic loss in connection with or arising out of the use of the software by you or the services provided for in this agreement, even if CS has been advised of the possibility of such damages. CS’s entire liability and your exclusive remedy shall be, at CS’s discretion, either (A) return of any license fee,
or (B) correction or replacement of software that does not meet the terms of this limited warranty and that is returned
to CS with a copy of your purchase receipt.
NO OTHER WARRANTIES. CS DISCLAIMS OTHER IMPLIED WARRANTIES, INCLUDING, BUT NOT LIMITED TO,
IMPLIED WARRANTIES OF MERCHANTABILITY OR FITNESS FOR A PARTICULAR PURPOSE, AND IMPLIED WARRANTIES ARISING BY USAGE OF TRADE, COURSE OF DEALING, OR COURSE OF PERFORMANCE. NOTWITH-
STANDING THE ABOVE, WHERE APPLICABLE, IF YOU QUALIFY AS A “CONSUMER” UNDER THE MAGNUSONMOSS WARRANTY ACT, THEN YOU MAY BE ENTITLED TO ANY IMPLIED WARRANTIES ALLOWED BY LAW FOR
THE PERIOD OF THE EXPRESS WARRANTY AS SET FORTH ABOVE. SOME STATES DO NOT ALLOW LIMITATIONS
ON IMPLIED WARRANTIES, SO THE ABOVE LIMITATION MIGHT NOT APPLY TO YOU. THIS WARRANTY GIVES
YOU SPECIFIC LEGAL RIGHTS, AND YOU MAY ALSO HAVE OTHER RIGHTS WHICH VARY FROM STATE TO STATE.
No Waiver. The failure of either party to assert a right hereunder or to insist upon compliance with any term or condition of this Agreement shall not constitute a waiver of that right or excuse a similar subsequent failure to perform
any such term or condition by the other party.
Governing Law. This Agreement shall be construed according to the laws of the Commonwealth of Massachusetts.
Export. You agree that the Software will not be shipped, transferred, or exported into any country or used in any manner prohibited by the United States Export Administration Act or any other export laws, restrictions, or regulations.
End-User License Agreement for CambridgeSoft Database Products
Important: This CambridgeSoft End-User License Agreement is a legal agreement between you (either an individual or a single entity) and CambridgeSoft Corporation for the CambridgeSoft supplied database product(s) and may
include associated media, printed materials, and “online” or electronic documentation. By using the database product(s) you agree that you have read, understood and will be bound by this license agreement.
Database Product License
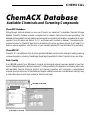
1. Copyright Notice. The materials contained in CambridgeSoft Database Products, including but not limited to,
ChemACX, ChemIndex, and The Merck Index, are protected by copyright laws and international copyright treaties,
as well as other intellectual property laws and treaties. Copyright in the materials contained on the CD and internet
subscription products, including, but not limited to, the textual material, chemical structures representations,
artwork, photographs, computer software, audio and visual elements, is owned or controlled separately by
CambridgeSoft Corporation (“CS”).
CS is a distributor (and not a publisher) of information supplied by third parties. Accordingly, CS has no editorial
control over such information. Database Suppliers (“Supplier”) individually own all right, title, and interest, including copyright, in their database—and retain all such rights in providing information to Customers.
The materials contained in The Merck Index are protected by copyright laws and international copyright treaties, as
well as other intellectual property laws and treaties. Copyright in the materials contained on the CD and internet
subscription products, including, but not limited to, the textual material, chemical structures representations, artwork, photographs, computer software, audio and visual elements, is owned or controlled separately by the Merck &
Co., Inc., (“Merck”) and CambridgeSoft Corporation (“CS”).
2. Limitations on Use. Except as expressly provided by copyright law, copying, redistribution, or publication,
whether for commercial or non-commercial purposes, must be with the express permission of CS and/or Merck. In
any copying, redistribution, or publication of copyrighted material, any changes to or deletion of author attribution
or copyright notice, or any other proprietary notice of CS, Merck, or other Database producer are prohibited.
3. Grant of License, CD/DVD Databases. CambridgeSoft Software Products are licensed, not sold. CambridgeSoft
grants and you hereby accept a nonexclusive license to use one copy of the enclosed Software Product (“Software”)
in accordance with the terms of this Agreement. This licensed copy of the Software may only be used on a single
computer, except as provided below. You may physically transfer the Software from one computer to another for your
own use, provided the Software is in use (or installed) on only one computer at a time. If the Software is permanently
installed on your computer (other than a network server), you may also use the Software on a portable or home computer, provided that you use the software on only one computer at a time. You may not (a) electronically transfer the
Software from one computer to another, (b) distribute copies of the Software to others, or (c) modify or translate the
Software without the prior written consent of CambridgeSoft, (d) place the software on a server so that it is accessible via a public network such as the Internet, (e) sublicense, rent, lease or lend any portion of the Software or
Documentation, or (f ) modify or adapt the Software or merge it into another program. The Software may be placed
on a file or disk server connected to a network, provided that a license has been purchased for every computer with
access to that server. You may make only those copies of the Software which are necessary to install and use it as permitted by this agreement, or are for purposes of backup and archival records; all copies shall bear CambridgeSoft’s
copyright and proprietary notices. You may not make copies of any accompanying written materials.
4. Assignment Restrictions for CD/DVD databases. You may not rent, lease, or otherwise sublet the Software or
any part thereof. You may transfer on a permanent basis the rights granted under this license provided you transfer
this Agreement and all copies of the Software, including prior versions, and all accompanying materials. The recipient must agree to the terms of this Agreement in full and register this transfer in writing with CambridgeSoft.
5. Revocation of Subscription Access. Any use which is commercial and/or non-personal is strictly prohibited, and
may subject the Subscriber making such uses to revocation of access to this Paid Subscription Service, as well as any
other applicable civil or criminal penalties. Similarly, sharing a Subscriber password with a non-Subscriber or otherwise making this Paid Subscription Service available to third parties other than the Authorized User as defined above
is strictly prohibited, and may subject the Subscriber participating in such activities to revocation of access to the Paid
Subscription Services; and, the Subscriber and any third party, to any other applicable civil or criminal penalties
under copyright or other laws. In the case of an authorized site license, a Subscriber shall cause any employee, agent
or other third party which the Subscriber allows to use the Paid Subscription Service materials to abide by all of the
terms and conditions of this Agreement. In all other cases, only the Subscriber is permitted to access the Paid
Subscription Service materials. Should CambridgeSoft become aware of any use that might cause revocation of the
license, they shall notify the Subscriber. The Subscriber shall have 90 days from date of notice to correct such violation before any action will be taken.
6. Trademark Notice. THE MERCK INDEX ® is a trademark of Merck & Company Incorporated, Whitehouse
Station, New Jersey, USA and is registered in the United States Patent and Trademark Office. CambridgeSoft ® and
ChemACX are trademarks of CambridgeSoft Corporation, Cambridge,Massachusetts, USA and are registered in the
United States Patent and Trademark Office, the European Union (CTM) and Japan.
Any use of the marks in connection with the sale, offering for sale, distribution or advertising of any goods and services, including any other website, or in connection with labels, signs, prints, packages, wrappers, receptacles or
advertisements used for the sale, offering for sale, distribution or advertising of any goods and services, including any
other website, which is likely to cause confusion, to cause mistake or to deceive, is strictly prohibited.
7. Modification of Databases, Websites, or Subscription Services. CS reserves the right to change, modify, suspend or discontinue any or all parts of any Paid Subscription Services and databases at any time.
8. Representations and Warranties. The User shall indemnify, defend and hold CS, Merck, and/or other Supplier
harmless from any damages, expenses and costs (including reasonable attorneys’ fees) arising out of any breach or
alleged breach of these Terms and Conditions, representations and/or warranties herein, by the User or any third
party to whom User shares her/his password or otherwise makes available this Subscription Service. The User shall
cooperate in the defense of any claim brought against CambridgeSoft, Merck, and/or other Database Suppliers.
In no event shall CS, Merck, and/or other Supplier be liable for any indirect, special, or consequential damages, such
as, but not limited to, loss of anticipated profits or other economic loss in connection with or arising out of the use
of the software by you or the services provided for in this agreement, even if CS, Merck, and/or other Supplier has
been advised of the possibility of such damages. CS and/or Merck’s entire liability and your exclusive remedy shall
be, at CS’s discretion a return of any pro-rata portion of the subscription fee.
The failure of either party to assert a right hereunder or to insist upon compliance with any term or condition of this
Agreement shall not constitute a waiver of that right or excuse a similar subsequent failure to perform any such term
or condition by the other party.
This Agreement shall be construed according to the laws of the Commonwealth of Massachusetts, United States of
America.
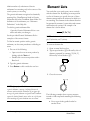
: IS IT OK TO COPY MY COLLEAGUE’S
SOFTWARE?
NO, it’s not okay to copy your colleague’s
software. Software is protected by federal copyright law,
which says that you can't make such additional copies
without the permission of the copyright holder. By
protecting the investment of computer software
companies in software development, the copyright law
serves the cause of promoting broad public availability of
new, creative, and innovative products. These companies
devote large portions of their earnings to the creation of
new software products and they deserve a fair return on
their investment. The creative teams who develop the
software–programmers, writers, graphic artists and
others–also deserve fair compensation for their efforts.
Without the protection given by our copyright laws, they
would be unable to produce the valuable programs that
have become so important to our daily lives: educational
software that teaches us much needed skills; business
software that allows us to save time, effort and money;
and entertainment and personal productivity software
that enhances leisure time.
Q
Q: That makes sense, but what do I get out of
purchasing my own software?
A: When you purchase authorized copies of software
programs, you receive user guides and tutorials, quick
reference cards, the opportunity to purchase
upgrades, and technical support from the software
publishers. For most software programs, you can read
about user benefits in the registration brochure or
upgrade flyer in the product box.
Q: What exactly does the law say about copying
software?
A: The law says that anyone who purchases a copy of
software has the right to load that copy onto a single
computer and to make another copy “for archival
purposes only” or, in limited circumstances, for
“purposes only of maintenance or repair.” It is illegal
to use that software on more than one computer or to
make or distribute copies of that software for any
other purpose unless specific permission has been
obtained from the copyright owner. If you pirate
software, you may face not only a civil suit for
damages and other relief, but criminal liability as well,
including fines and jail terms of up to one year
Q: So I'm never allowed to copy software for any other
reason?
A: That’s correct. Other than copying the software you
purchase onto a single computer and making another
copy “for archival purposes only” or “purposes only of
maintenance or repair,” the copyright law prohibits
you from making additional copies of the software for
any other reason unless you obtain the permission of
the software company.
Q: At my company, we pass disks around all the time.
We all assume that this must be okay since it was
the company that purchased the software in the
first place.
A: Many employees don’t realize that corporations are
bound by the copyright laws, just like everyone else.
Such conduct exposes the company (and possibly the
persons involved) to liability for copyright
infringement. Consequently, more and more
corporations concerned about their liability have
written policies against such “softlifting”. Employees
may face disciplinary action if they make extra copies
of the company’s software for use at home or on
additional computers within the office. A good rule to
remember is that there must be one authorized copy
of a software product for every computer upon which
it is run
Q: Can I take a piece of software owned by my
company and install it on my personal computer at
home if instructed by my supervisor?
A: A good rule of thumb to follow is one software
package per computer, unless the terms of the license
agreement allow for multiple use of the program. But
some software publishers’ licenses allow for “remote”
or “home” use of their software. If you travel or
telecommute, you may be permitted to copy your
software onto a second machine for use when you are
not at your office computer. Check the license carefully to see if you are allowed to do this.
Q: What should I do if become aware of a company
that is not compliant with the copyright law or its
software licenses?
A: Cases of retail, corporate and Internet piracy or noncompliance with software licenses can be reported on
the Internet at http://www.siia.net/piracy/report.asp
or by calling the Anti-Piracy Hotline:
(800) 388-7478.
Q: Do the same rules apply to bulletin boards and user
groups? I always thought that the reason they got
together was to share software.
A: Yes. Bulletin boards and user groups are bound by the
copyright law just as individuals and corporations.
However, to the extent they offer shareware or public
domain software, this is a perfectly acceptable
practice. Similarly, some software companies offer
bulletin boards and user groups special demonstration
versions of their products, which in some instances
may be copied. In any event, it is the responsibility of
the bulletin board operator or user group to respect
copyright law and to ensure that it is not used as a
vehicle for unauthorized copying or distribution.
Q: I'll bet most of the people who copy software don't
even know that they're breaking the law.
A: Because the software industry is relatively new, and
because copying software is so easy, many people are
either unaware of the laws governing software use or
choose to ignore them. It is the responsibility of each
and every software user to understand and adhere to
copyright law. Ignorance of the law is no excuse. If
you are part of an organization, see what you an do to
initiate a policy statement that everyone respects.
Also, suggest that your management consider
conducting a software audit. Finally, as an individual,
help spread the word that users should be “software
legal.”
Q: What are the penalties for copyright infringement?
A: The Copyright Act allows a copyright owner to
recover monetary damages measured either by: (1) its
actual damages plus any additional profits of the
infringer attributable to the infringement, or (2)
statutory damages, of up to $150,000 for each copyrighted work infringed. The copyright owner also has
the right to permanently enjoin an infringer from
engaging in further infringing activities and may be
awarded costs and attorneys’ fees. The law also
permits destruction or other reasonable disposition of
all infringing copies and devices by which infringing
copies have been made or used in violation of the
copyright owner’s exclusive rights. In cases of willful
infringement, criminal penalties may also be assessed
against the infringer.
SIIA also offers a number of other materials designed to
help you comply with the Federal Copyright Law. These
materials include:
"It's Just Not Worth the Risk" video.
This 12–minute video, available $10, has helped over
20,000 organizations dramatize to their employees the
implications and consequences of software piracy.
“Don’t Copy that Floppy” video
This 9 minute rap video, available for $10, is designed
to educate students on the ethical use of software.
Other education materials including, “Software Use
and the Law”, a brochure detailing the copyright law
and how software should be used by educational
institutions, corporations and individuals; and several
posters to help emphasize the message that unauthorized
copying of software is illegal.
To order any of these materials, please send your request to:
“SIIA Anti-Piracy Materials”
Software & Information Industry Association
1090 Vermont Ave, Sixth Floor,
Washington, D.C. 20005
(202) 289-7442
We urge you to make as many copies as you would like
in order to help us spread the word that unauthorized
copying of software is illegal.
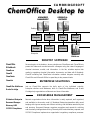
A Guide to CambridgeSoft Manuals
Includes
ChemDraw
Software
Chem3D
ChemFinder
E-Notebook Desktop
Inventory Desktop
Desktop Applications
BioAssay Desktop
ChemDraw/Excel
ChemFinder/Office
CombiChem/Excel
ChemSAR/Excel
MOPAC, MM2
CS Gaussian, GAMESS Interface
ChemOffice WebServer
Oracle Cartridge
Enterprise Solutions
E-Notebook Workgroup, Enterprise
Document Manager
Registration Enterprise
Formulations & Mixtures
Inventory Workgroup, Enterprise
Discovery LIMS
BioAssay Workgroup, Enterprise
BioSAR Enterprise
ChemDraw/Spotfire
Databases
The Merck Index
ChemACX, ChemSCX
ChemMSDX
ChemINDEX, NCI & AIDS
ChemRXN
Ashgate Drugs
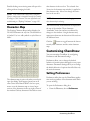
Tips
Structure Drawing Tips
Searching Tips
Importing SD Files
C
Dr
C
aw hem he
M
in
m
i
g cal
an
D
St
St
a
r
ua
nd uc ra
tu
a
rd
re w
ls
Ch
em
O
ffi
ce
Ch
em
& 3D,
EN Che
ot
eb mFi
oo nd
er
k
Ch
em
O
ffi
ce
En
t
An erp
ri
d
Da se S
o
ta
ba luti
se on
s
s
Contents by Chapter
Introduction . . . . . . . . . . . . . . . . . . . . . . . . . . . . . . . . . . 9
Appendices. . . . . . . . . . . . . . . . . . . . . . . . . . . . . . . . . . 219
Chapter 1: ChemDraw Basics . . . . . . . . . . . . . . . . 13
Appendix A: Accessing the CambridgeSoft Web
Site . . . . . . . . . . . . . . . . . . . . . . . . . . . . . . . . . . . . . . . . . 221
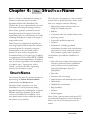
Chapter 2: Tutorials
. . . . . . . . . . . . . . . . . . . . . . . . . 31
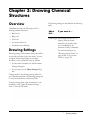
Chapter 3: Drawing Chemical Structures . . . . . 59
Chapter 4: Struct<=>Name . . . . . . . . . . . . . . . . . 73
Chapter 5: Drawing Captions and Atom Labels
Appendix B: Technical Support . . . . . . . . . . . . . 227
Appendix C: The Chemistry of ChemDraw
. 231
Appendix D: How ChemNMR Works . . . . . . . 243
. . . . . . . . . . . . . . . . . . . . . . . . . . . . . . . . . . . . . . . . . . . . . 79
Appendix E: How ChemProp Works . . . . . . . . 245
Chapter 6: Drawing Orbitals, Symbols, Arrows,
Arcs, and Other Shapes . . . . . . . . . . . . . . . . . . . . . 93
Appendix F: Shortcuts and Hotkeys . . . . . . . . . 247
Chapter 7: Manipulating Drawings . . . . . . . . . . 109
Chapter 8: Advanced Drawing Techniques . . 121
Chapter 9: Working With Structures
. . . . . . . . 137
Chapter 10: Drawing Query Structures. . . . . . 149
Chapter 11: Working With Page Layout . . . . . 177
Chapter 12: Sharing Information
. . . . . . . . . . . 191
Chapter 13: ChemDraw/Excel. . . . . . . . . . . . . . 207
ChemDraw 9
Appendix G: Document Settings . . . . . . . . . . . . 255
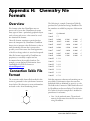
Appendix H: Chemistry File Formats . . . . . . . 267
Contents
Introduction
What’s New in ChemDraw 9.0 . . . . . . . . . . . . . . . . . . 9
Conventions . . . . . . . . . . . . . . . . . . . . . . . . . . . . . . . . . . 10
Additional Information . . . . . . . . . . . . . . . . . . . . . . . . 10
Quick Reference Card . . . . . . . . . . . . . . . . . . . . . . 10
Help System . . . . . . . . . . . . . . . . . . . . . . . . . . . . . . 10
CambridgeSoft Web Pages . . . . . . . . . . . . . . . . . . 10
Installation and System Requirements . . . . . . . . . . .
Microsoft®Windows® Requirements . . . . . . . .
Macintosh® Requirements . . . . . . . . . . . . . . . . .
Site License Network Installation Instructions
11
11
11
11
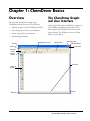
Chapter 1: ChemDraw Basics
The ChemDraw Graphical User Interface . . . . . . .
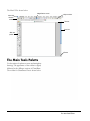
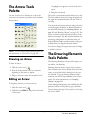
The Main Tools Palette . . . . . . . . . . . . . . . . . . . . . . . .
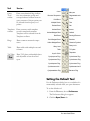
Setting the Default Tool . . . . . . . . . . . . . . . . . . . .
Tearing Off Palettes . . . . . . . . . . . . . . . . . . . . . . . .
13
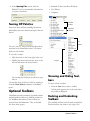
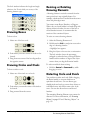
Optional Toolbars. . . . . . . . . . . . . . . . . . . . . . . . . . . . .
Showing and Hiding Toolbars . . . . . . . . . . . . . . .
Docking and Undocking Toolbars . . . . . . . . . . .
The Status Bar or Message Area (Windows) . .
The Analysis Window . . . . . . . . . . . . . . . . . . . . . .
The Chemical Properties Window . . . . . . . . . . .
The Info Window . . . . . . . . . . . . . . . . . . . . . . . . .
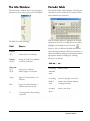
Periodic Table . . . . . . . . . . . . . . . . . . . . . . . . . . . . .
Character Map . . . . . . . . . . . . . . . . . . . . . . . . . . . .
17
17
14
16
17
17
18
18
18
19
19
20
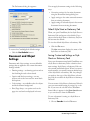
Customizing ChemDraw . . . . . . . . . . . . . . . . . . . . . . . 20
Setting Preferences . . . . . . . . . . . . . . . . . . . . . . . . 20
Document and Object Settings . . . . . . . . . . . . . . 21
Default Style Sheet or Stationery Pad . . . . . . 21
Saving Customized Settings as Style Sheets or
Stationery Pads . . . . . . . . . . . . . . . . . . . . . . . . . 21
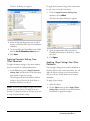
Applying Document Settings From Other Documents . . . . . . . . . . . . . . . . . . . . . . . . . . . . . . . . 22
Applying Object Settings from Other Documents . . . . . . . . . . . . . . . . . . . . . . . . . . . . . . . . . 22
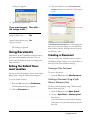
Using Documents . . . . . . . . . . . . . . . . . . . . . . . . . . . . . 23
ChemDraw 9
Setting the Default Document Location . . . . . . 23
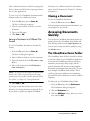
Creating a Document . . . . . . . . . . . . . . . . . . . . . . . 23
Creating a New Document . . . . . . . . . . . . . . . . 23
Creating a Document Using a Style Sheet or Stationery Pad . . . . . . . . . . . . . . . . . . . . . . . . . . . . . 23
Opening a Document . . . . . . . . . . . . . . . . . . . . . . 24
Setting the Default Open File Format . . . . . . 24
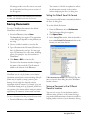
Saving Changes Automatically . . . . . . . . . . . . . . . 24
Reversing and Repeating Actions . . . . . . . . . . . . 25
Undoing Actions . . . . . . . . . . . . . . . . . . . . . . . . . 25
Redoing Actions . . . . . . . . . . . . . . . . . . . . . . . . . 25
Repeating Actions . . . . . . . . . . . . . . . . . . . . . . . . 25
Discarding Recent Changes to a Document . . . 25
Saving Documents . . . . . . . . . . . . . . . . . . . . . . . . . 26
Setting the Default Save File Format . . . . . . . 26
Saving a Document with a Different Name or
Location . . . . . . . . . . . . . . . . . . . . . . . . . . . . . . . 26
Saving a Document in a Different File Format
27
Closing a Document . . . . . . . . . . . . . . . . . . . . . . . . 27
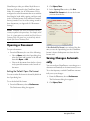
Accessing Documents Quickly . . . . . . . . . . . . . . . . . . 27
The ChemDraw Items Folder . . . . . . . . . . . . . . . 27
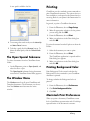
The Open Special Submenu . . . . . . . . . . . . . . . . . 28
The Window Menu . . . . . . . . . . . . . . . . . . . . . . . . . 28
Printing . . . . . . . . . . . . . . . . . . . . . . . . . . . . . . . . . . . . . . 28
Printing Background Color . . . . . . . . . . . . . . . . . . 28
Macintosh Print Preferences. . . . . . . . . . . . . . . . . 28
Optimize Pictures for High-Resolution
Non-PostScript Printing . . . . . . . . . . . . . . . . . 29
Include PostScript . . . . . . . . . . . . . . . . . . . . . . . 29
Include ChemDraw Laser Prep . . . . . . . . . . . . 29
Scripts (Macintosh) . . . . . . . . . . . . . . . . . . . . . . . . . . . . 30
Closing ChemDraw . . . . . . . . . . . . . . . . . . . . . . . . . . . . 30
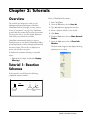
Chapter 2: Tutorials
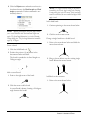
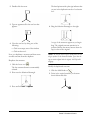
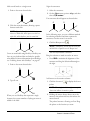
Tutorial 1: Reaction Schemes . . . . . . . . . . . . . . . . . . . 31
Tutorial 2: Drawing an Intermediate . . . . . . . . . . . . . 38
Tutorial 3: Using Rings . . . . . . . . . . . . . . . . . . . . . . . . . 41
Administrator
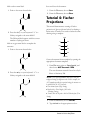
Tutorial 4: Fischer Projections . . . . . . . . . . . . . . . . . . 44
Tutorial 5: Perspective Drawings . . . . . . . . . . . . . . . . 49
Tutorial 6: Newman Projections . . . . . . . . . . . . . . . . . 53
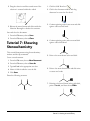
Tutorial 7: Showing Stereochemistry . . . . . . . . . . . . . 56
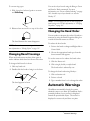
Automatic Warnings . . . . . . . . . . . . . . . . . . . . . . . . . . . 71
Chapter 3: Drawing Chemical Structures
Name=Struct . . . . . . . . . . . . . . . . . . . . . . . . . . . . . . . . 74
Converting Names to Structures . . . . . . . . . . . . 75
Insert Structure . . . . . . . . . . . . . . . . . . . . . . . . . . 75
Paste Special . . . . . . . . . . . . . . . . . . . . . . . . . . . . 75
Converting Captions to Structures . . . . . . . . . . 75
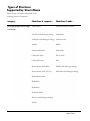
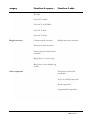
Types of Structures Supported by Struct=Name
Drawing Settings . . . . . . . . . . . . . . . . . . . . . . . . . . . . . . 59
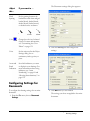
Configuring Settings for Documents . . . . . . . . . 61
Configuring Settings for Objects . . . . . . . . . . . . . 62
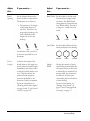
Drawing Bonds . . . . . . . . . . . . . . . . . . . . . . . . . . . . . . . 62
Multiple Bonds . . . . . . . . . . . . . . . . . . . . . . . . . . . . 62
Double Bonds . . . . . . . . . . . . . . . . . . . . . . . . . . . 63
.Double Either Bonds . . . . . . . . . . . . . . . . . . . . 63
Triple Bonds . . . . . . . . . . . . . . . . . . . . . . . . . . . . 63
Quadruple Bonds . . . . . . . . . . . . . . . . . . . . . . . . 63
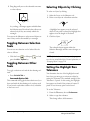
Drawing Constrained Bonds . . . . . . . . . . . . . . . . 64
Drawing with Fixed Lengths . . . . . . . . . . . . . . 64
Drawing with Fixed Angles . . . . . . . . . . . . . . . 64
Toggling Fixed Lengths and Fixed Angles . . 64
Dative Bonds and Wedged Bonds . . . . . . . . . . . . 64
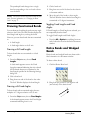
Adding a Bond by Clicking . . . . . . . . . . . . . . . . . . 65
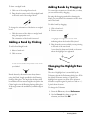
Adding Bonds by Dragging . . . . . . . . . . . . . . . . . 65
Changing the Highlight Box Size . . . . . . . . . . . . . 65
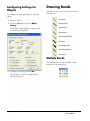
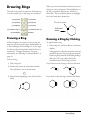
Drawing Rings . . . . . . . . . . . . . . . . . . . . . . . . . . . . . . . . 66
Drawing a Ring . . . . . . . . . . . . . . . . . . . . . . . . . . . . 66
Drawing a Ring by Clicking . . . . . . . . . . . . . . . . . 66
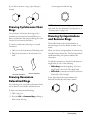
Drawing Cyclohexane Chair Rings . . . . . . . . . . . 67
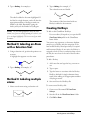
Drawing Resonance Delocalized Rings . . . . . . . 67
Drawing Cyclopentadiene and Benzene Rings . 67
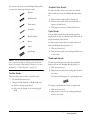
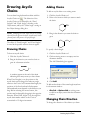
Drawing Acyclic Chains . . . . . . . . . . . . . . . . . . . . . . . . 68
Drawing Chains . . . . . . . . . . . . . . . . . . . . . . . . . . . . 68
Adding Chains . . . . . . . . . . . . . . . . . . . . . . . . . . . . . 68
Changing Chain Direction . . . . . . . . . . . . . . . . . . 68
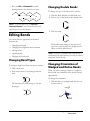
Editing Bonds . . . . . . . . . . . . . . . . . . . . . . . . . . . . . . . . . 69
Changing Bond Types . . . . . . . . . . . . . . . . . . . . . . 69
Changing Double Bonds . . . . . . . . . . . . . . . . . . . . 69
Changing Orientation of Wedged and Dative
Bonds . . . . . . . . . . . . . . . . . . . . . . . . . . . . . . . . . . . . 69
Changing Alignment of Double Bonds . . . . . . . 70
Moving Atoms . . . . . . . . . . . . . . . . . . . . . . . . . . . . . 70
Changing Bond Crossings . . . . . . . . . . . . . . . . . . . 71
Changing the Bond Order. . . . . . . . . . . . . . . . . . . 71
Chapter 4: Struct<=>Name
Struct=Name . . . . . . . . . . . . . . . . . . . . . . . . . . . . . . . 73
Auto Update. . . . . . . . . . . . . . . . . . . . . . . . . . . . . . 74
76
Chapter 5: Drawing Captions and Atom
Labels
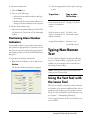
Creating a New Line and Closing Text Boxes . 79
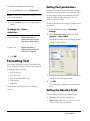
Formatting Text . . . . . . . . . . . . . . . . . . . . . . . . . . . . . . 80
Setting Font parameters . . . . . . . . . . . . . . . . . . . . 80
Setting the Baseline Style . . . . . . . . . . . . . . . . . . . 80
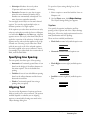
Specifying Line Spacing . . . . . . . . . . . . . . . . . . . . 81
Aligning Text . . . . . . . . . . . . . . . . . . . . . . . . . . . . . . 81
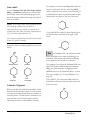
Captions . . . . . . . . . . . . . . . . . . . . . . . . . . . . . . . . 81
Atom Labels . . . . . . . . . . . . . . . . . . . . . . . . . . . . 82
Automatic Alignment . . . . . . . . . . . . . . . . . . . . 82
Changing the Default Caption or Atom Label Text
Format . . . . . . . . . . . . . . . . . . . . . . . . . . . . . . . . . . 83
Specifying Document Settings for New Text 83
Setting an Individual Text Format Before Typing . . . . . . . . . . . . . . . . . . . . . . . . . . . . . . . . . . . . 83
Changing the Spacing of Individual Text Objects . . . . . . . . . . . . . . . . . . . . . . . . . . . . . . . . . . . 83
Fractional Character Widths (Macintosh) . . . 84
Coloring Text . . . . . . . . . . . . . . . . . . . . . . . . . . . . . 84
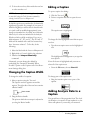
Creating Captions . . . . . . . . . . . . . . . . . . . . . . . . . . . . .
Changing the Caption Width . . . . . . . . . . . . . . . .
Editing a Caption . . . . . . . . . . . . . . . . . . . . . . . . . .
Adding Analysis Data to a Caption . . . . . . . . . .
84
85
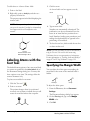
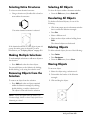
Labeling Atoms with the Text Tool . . . . . . . . . . . . .
Specifying the Margin Width . . . . . . . . . . . . . . . .
Editing Atom Labels . . . . . . . . . . . . . . . . . . . . . . .
Deleting an Atom Label . . . . . . . . . . . . . . . . . . . .
86
86
85
85
87
87
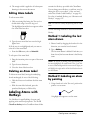
Labeling Atoms with HotKeys . . . . . . . . . . . . . . . . . 87
Method 1: Labeling the last atom drawn . . . . . . 87
CambridgeSoft
Method 2: Labeling an atom by pointing . . . . . 87
Method 3: Labeling an Atom with a Selection Tool
88
Method 4: Labeling multiple atoms . . . . . . . . . . 88
Creating HotKeys . . . . . . . . . . . . . . . . . . . . . . . . . 88
Hard-Coded HotKeys . . . . . . . . . . . . . . . . . . . . . . 89
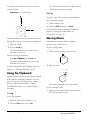
Labeling Atoms With a Bond or Ring Tool . . . . . .
Repeating an Atom Label . . . . . . . . . . . . . . . . . . . . . .
Atom Numbering . . . . . . . . . . . . . . . . . . . . . . . . . . . . .
Showing and Hiding Atom Numbers . . . . . . . .
Editing Atom Numbers . . . . . . . . . . . . . . . . . . . .
Positioning Atom Number Indicators . . . . . . . .
89
89
89
90
90
91
Using the Text Tool with the Lasso Tool . . . . . . . . 91
Using Bitmap Fonts When Available (Macintosh) . 92
Chapter 6: Drawing Orbitals, Symbols,
Arrows, Arcs, and Other Shapes
Selecting Tools From a Palette . . . . . . . . . . . . . . 93
Drawing Lines . . . . . . . . . . . . . . . . . . . . . . . . . . . . 101
The Brackets Tools Palette. . . . . . . . . . . . . . . . . . . . . 101
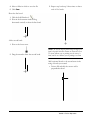
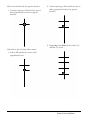
Drawing Single Brackets . . . . . . . . . . . . . . . . . . . 101
Drawing Paired Brackets . . . . . . . . . . . . . . . . . . . 101
Drawing Daggers . . . . . . . . . . . . . . . . . . . . . . . . . 101
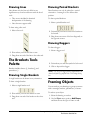
Framing Objects . . . . . . . . . . . . . . . . . . . . . . . . . . . . . 101
The Arc Tools Palette . . . . . . . . . . . . . . . . . . . . . . . . . 102
Drawing Arcs . . . . . . . . . . . . . . . . . . . . . . . . . . . . . 102
Editing Arcs . . . . . . . . . . . . . . . . . . . . . . . . . . . . . . 102
The Pen Tool . . . . . . . . . . . . . . . . . . . . . . . . . . . . . . . . 102
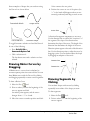
Drawing Bézier Curves by Dragging . . . . . . . . 103
Drawing Segments by Clicking. . . . . . . . . . . . . . 103
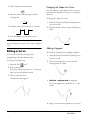
Editing a Curve . . . . . . . . . . . . . . . . . . . . . . . . . . . 104
Changing the Shape of a Curve . . . . . . . . . . . 104
Adding a Segment . . . . . . . . . . . . . . . . . . . . . . . 104
Deleting a Segment . . . . . . . . . . . . . . . . . . . . . 105
Applying a Style to a Shape . . . . . . . . . . . . . . . . . 105
Filled and Closed Styles . . . . . . . . . . . . . . . . . . 105
Shaded Style . . . . . . . . . . . . . . . . . . . . . . . . . . . . 105
Plain Style . . . . . . . . . . . . . . . . . . . . . . . . . . . . . . 105
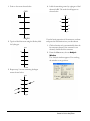
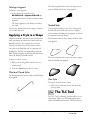
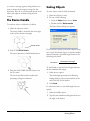
The TLC Tool . . . . . . . . . . . . . . . . . . . . . . . . . . . . . . . 105
Rf Display . . . . . . . . . . . . . . . . . . . . . . . . . . . . . . . 107
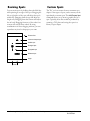
Resizing Spots . . . . . . . . . . . . . . . . . . . . . . . . . . . . 108
Custom Spots . . . . . . . . . . . . . . . . . . . . . . . . . . . . 108
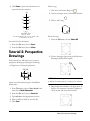
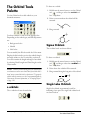
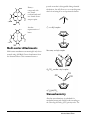
The Orbital Tools Palette . . . . . . . . . . . . . . . . . . . . . .
s-orbitals. . . . . . . . . . . . . . . . . . . . . . . . . . . . . . . . . .
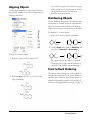
Sigma Orbitals . . . . . . . . . . . . . . . . . . . . . . . . . . . .
Single Lobe Orbitals . . . . . . . . . . . . . . . . . . . . . . .
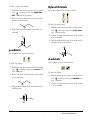
p-orbitals . . . . . . . . . . . . . . . . . . . . . . . . . . . . . . . . .
Hybrid Orbitals . . . . . . . . . . . . . . . . . . . . . . . . . . .
d-orbitals . . . . . . . . . . . . . . . . . . . . . . . . . . . . . . . . .
dz2-orbitals . . . . . . . . . . . . . . . . . . . . . . . . . . . . . . .
94
94
96
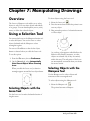
Chapter 7: Manipulating Drawings
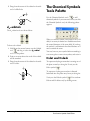
The Chemical Symbols Tools Palette . . . . . . . . . . . .
H-dot and H-dash . . . . . . . . . . . . . . . . . . . . . . . . .
Lone Pair . . . . . . . . . . . . . . . . . . . . . . . . . . . . . . . . .
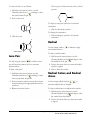
Radical . . . . . . . . . . . . . . . . . . . . . . . . . . . . . . . . . . .
Radical Cation and Radical Anion . . . . . . . . . . .
Charge Symbols . . . . . . . . . . . . . . . . . . . . . . . . . . .
Attachment Points . . . . . . . . . . . . . . . . . . . . . . . . .
Rotating a Symbol . . . . . . . . . . . . . . . . . . . . . . . . .
96
96
Using a Selection Tool . . . . . . . . . . . . . . . . . . . . . . . . 109
Selecting Objects with the Lasso Tool . . . . . . . 109
Selecting Objects with the Marquee Tool . . . . 109
Toggling Between Selection Tools. . . . . . . . . . . 110
Toggling Between Other Tools . . . . . . . . . . . . . 110
Selecting Objects by Clicking . . . . . . . . . . . . . . . 110
Setting the Highlight Box Tolerance . . . . . . . . . 110
Selecting Entire Structures . . . . . . . . . . . . . . . . . 111
Making Multiple Selections . . . . . . . . . . . . . . . . . 111
Removing Objects from the Selection . . . . . . . 111
Selecting All Objects . . . . . . . . . . . . . . . . . . . . . . 111
Deselecting All Objects . . . . . . . . . . . . . . . . . . . . 111
Deleting Objects . . . . . . . . . . . . . . . . . . . . . . . . . . 111
Moving Objects . . . . . . . . . . . . . . . . . . . . . . . . . . . 111
Using the Clipboard . . . . . . . . . . . . . . . . . . . . . . . 112
Cutting . . . . . . . . . . . . . . . . . . . . . . . . . . . . . . . . 112
94
94
95
95
95
97
97
97
98
98
98
The Arrow Tools Palette . . . . . . . . . . . . . . . . . . . . . . . 99
Drawing an Arrow . . . . . . . . . . . . . . . . . . . . . . . . . 99
Editing an Arrow . . . . . . . . . . . . . . . . . . . . . . . . . . 99
The Drawing Elements Tools Palette . . . . . . . . . . . . 99
Drawing Boxes . . . . . . . . . . . . . . . . . . . . . . . . . . . 100
Drawing Circles and Ovals. . . . . . . . . . . . . . . . . 100
Resizing or Rotating Drawing Elements . . . . . 100
Distorting Circle and Ovals . . . . . . . . . . . . . . . . 100
ChemDraw 9
Pasting . . . . . . . . . . . . . . . . . . . . . . . . . . . . . . . . . 112
Moving Atoms . . . . . . . . . . . . . . . . . . . . . . . . . . . . 112
Duplicating Objects . . . . . . . . . . . . . . . . . . . . . . . 113
Administrator
Rotating Objects . . . . . . . . . . . . . . . . . . . . . . . . . . . . . 113
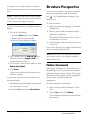
Structure Perspective. . . . . . . . . . . . . . . . . . . . . . . . . . 114
Flatten Command . . . . . . . . . . . . . . . . . . . . . . . . . 114
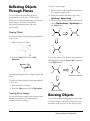
Reflecting Objects Through Planes . . . . . . . . . . . . . 115
Flipping Objects . . . . . . . . . . . . . . . . . . . . . . . . 115
Creating Mirror Images . . . . . . . . . . . . . . . . . . 115
Resizing Objects . . . . . . . . . . . . . . . . . . . . . . . . . . . . . . 115
The Resize Handle . . . . . . . . . . . . . . . . . . . . . . . . 116
Scaling Objects . . . . . . . . . . . . . . . . . . . . . . . . . . . 116
Distorting a Selection . . . . . . . . . . . . . . . . . . . . . . 117
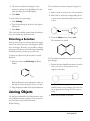
Joining Objects . . . . . . . . . . . . . . . . . . . . . . . . . . . . . . . 117
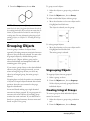
Grouping Objects . . . . . . . . . . . . . . . . . . . . . . . . . . . . 118
Ungrouping Objects . . . . . . . . . . . . . . . . . . . . . . . 118
Creating Integral Groups . . . . . . . . . . . . . . . . . . 118
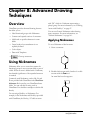
Chapter 8: Advanced Drawing Techniques
Using Nicknames . . . . . . . . . . . . . . . . . . . . . . . . . . . . . 121
Applying Nicknames . . . . . . . . . . . . . . . . . . . . . . 121
Defining Nicknames . . . . . . . . . . . . . . . . . . . . . . 122
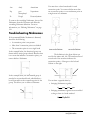
Troubleshooting Nicknames. . . . . . . . . . . . . . . . 123
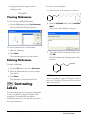
Viewing Nicknames . . . . . . . . . . . . . . . . . . . . . . . 124
Deleting Nicknames . . . . . . . . . . . . . . . . . . . . . . . 124
Contracting Labels . . . . . . . . . . . . . . . . . . . . . . . . . . . 124
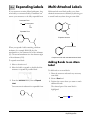
Expanding Labels . . . . . . . . . . . . . . . . . . . . . . . . . . . . 125
Multi-Attached Labels. . . . . . . . . . . . . . . . . . . . . . . . . 125
Adding Bonds to an Atom Label. . . . . . . . . . . . 125
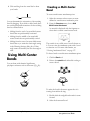
Using Multi-Center Bonds . . . . . . . . . . . . . . . . . . . . 126
Creating a Multi-Center Bond . . . . . . . . . . . . . . 126
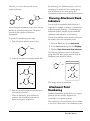
Viewing Attachment Points . . . . . . . . . . . . . . . . 127
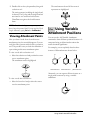
Using Variable Attachment Positions . . . . . . . . . . . 127
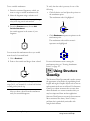
Using Structure CleanUp . . . . . . . . . . . . . . . . . . . . . 128
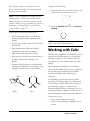
Working with Color . . . . . . . . . . . . . . . . . . . . . . . . . . . 129
Coloring Objects . . . . . . . . . . . . . . . . . . . . . . . . . . 130
Displaying the Color Palette . . . . . . . . . . . . . . . . 130
Customizing the Color Palette . . . . . . . . . . . . . 131
Windows Color Settings . . . . . . . . . . . . . . . . . . . 131
Adding or Customizing Windows Colors . . 132
Macintosh Color Settings . . . . . . . . . . . . . . . . . . 132
Adding or Customizing Macintosh Colors .
Removing Colors . . . . . . . . . . . . . . . . . . . . . . . . .
Templates and Color . . . . . . . . . . . . . . . . . . . . . .
Saving Color Palette Settings . . . . . . . . . . . . . . .
132
133
133
133
Drawing With Templates . . . . . . . . . . . . . . . . . . . . . 133
The Templates Tool . . . . . . . . . . . . . . . . . . . . . . . 133
Choosing a Template . . . . . . . . . . . . . . . . . . . . . . 134
Using Templates . . . . . . . . . . . . . . . . . . . . . . . . . . 134
Drawing a Template . . . . . . . . . . . . . . . . . . . . 134
Fusing a Template With an Existing Structure
134
Drawing with the Same Template . . . . . . . . 134
Creating Templates and Template Documents. .
134
Creating Templates . . . . . . . . . . . . . . . . . . . . .
Orientation of Templates . . . . . . . . . . . . . . . .
Resizing Template Panes . . . . . . . . . . . . . . . .
Template Panels . . . . . . . . . . . . . . . . . . . . . . . .
Saving Template Documents . . . . . . . . . . . .
135
135
136
136
136
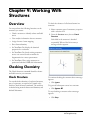
Chapter 9: Working With Structures
Checking Chemistry . . . . . . . . . . . . . . . . . . . . . . . . . . 137
Check Structure . . . . . . . . . . . . . . . . . . . . . . . . . . 137
Check Structure when Copying to Clipboard or
Exporting . . . . . . . . . . . . . . . . . . . . . . . . . . . . . . . 138
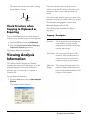
Viewing Analysis Information . . . . . . . . . . . . . . . . .
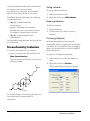
Showing Stereochemistry . . . . . . . . . . . . . . . . . . . . .
Stereochemistry Indicators. . . . . . . . . . . . . . . . .
Hiding Indicators . . . . . . . . . . . . . . . . . . . . . . .
Removing Indicators . . . . . . . . . . . . . . . . . . . .
Positioning Indicators . . . . . . . . . . . . . . . . . . .
Converting Structures to 3D . . . . . . . . . . . . . . .
138
139
140
140
140
140
141
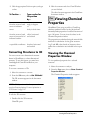
Viewing Chemical Properties . . . . . . . . . . . . . . . . . 141
Viewing the Chemical Properties Window . . . 141
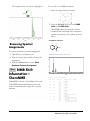
Mass Fragmentation Tool . . . . . . . . . . . . . . . . . . . .
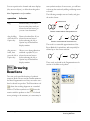
Drawing Reactions . . . . . . . . . . . . . . . . . . . . . . . . . .
Expand Generic Structures . . . . . . . . . . . . . . . . . . .
Spectrum-Structure Assignments . . . . . . . . . . . . .
Assigning Structures to Spectra . . . . . . . . . . . .
Viewing Spectral Assignments . . . . . . . . . . . . .
Removing Spectral Assignments . . . . . . . . . . .
143
144
145
146
146
146
147
NMR Shift Information—ChemNMR . . . . . . . . 147
CambridgeSoft
Chapter 10: Drawing Query Structures
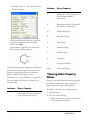
Atom Properties . . . . . . . . . . . . . . . . . . . . . . . . . . . . 149
Viewing Atom Property Values . . . . . . . . . . . . 150
Removing Atom Properties . . . . . . . . . . . . . . . 151
Atom Property Options . . . . . . . . . . . . . . . . . . . . . .
Substituents . . . . . . . . . . . . . . . . . . . . . . . . . . . . .
Implicit Hydrogens . . . . . . . . . . . . . . . . . . . . . . .
Ring Bond Count . . . . . . . . . . . . . . . . . . . . . . . .
Unsaturation . . . . . . . . . . . . . . . . . . . . . . . . . . . .
Reaction Change . . . . . . . . . . . . . . . . . . . . . . . . .
Reaction Stereo . . . . . . . . . . . . . . . . . . . . . . . . . .
Translation . . . . . . . . . . . . . . . . . . . . . . . . . . . . . .
Isotopic Abundance . . . . . . . . . . . . . . . . . . . . . .
Abnormal Valence . . . . . . . . . . . . . . . . . . . . . . .
151
151
152
152
153
153
153
154
154
155
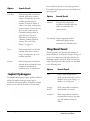
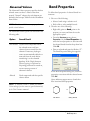
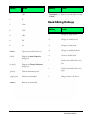
Bond Properties . . . . . . . . . . . . . . . . . . . . . . . . . . . . . 155
Viewing Bond Property Values . . . . . . . . . . . . 156
Removing Bond Properties . . . . . . . . . . . . . . . 156
Bond Property Options . . . . . . . . . . . . . . . . . . . 156
Bond Type . . . . . . . . . . . . . . . . . . . . . . . . . . . . 156
Topology . . . . . . . . . . . . . . . . . . . . . . . . . . . . . . 157
Reaction Center . . . . . . . . . . . . . . . . . . . . . . . . 158
3D Properties . . . . . . . . . . . . . . . . . . . . . . . . . . . . . . . 158
Query Tools Palette . . . . . . . . . . . . . . . . . . . . . . . . . . 159
Query Indicators . . . . . . . . . . . . . . . . . . . . . . . . . . . . 160
Viewing Query Indicators . . . . . . . . . . . . . . . 160
Hiding Query Indicators . . . . . . . . . . . . . . . . 160
Removing Query Indicators . . . . . . . . . . . . . 160
Positioning Query Indicators . . . . . . . . . . . . 160
Drawing Stereochemical Symbols . . . . . . . . . . . . . 161
Drawing Free Sites . . . . . . . . . . . . . . . . . . . . . . . . . . 161
Generic Nicknames . . . . . . . . . . . . . . . . . . . . . . . . . . 161
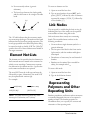
Element Lists . . . . . . . . . . . . . . . . . . . . . . . . . . . . . . . 162
Element Not-Lists . . . . . . . . . . . . . . . . . . . . . . . . . . . 163
Link Nodes . . . . . . . . . . . . . . . . . . . . . . . . . . . . . . . . . 163
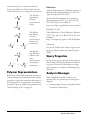
Representing Polymers and Other Repeating Units .
163
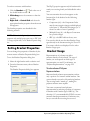
Setting Bracket Properties . . . . . . . . . . . . . . . . .
Bracket Usage . . . . . . . . . . . . . . . . . . . . . . . . . . .
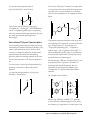
Structure-based Polymer Representations .
Source-based Polymer Representations . . .
Repeat Pattern . . . . . . . . . . . . . . . . . . . . . . . . . . .
Flip Type . . . . . . . . . . . . . . . . . . . . . . . . . . . . . . . .
ChemDraw 9
164
164
164
165
166
166
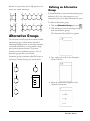
Alternative Groups . . . . . . . . . . . . . . . . . . . . . . . . . . . 167
Defining an Alternative Group . . . . . . . . . . . . . 167
Defining Attachment Points . . . . . . . . . . . . . . . 168
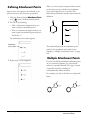
Multiple Attachment Points . . . . . . . . . . . . . . . . 168
Showing Attachment Rank Indicators. . . . . . . 169
Attachment Point Numbering. . . . . . . . . . . . . . 169
Lists. . . . . . . . . . . . . . . . . . . . . . . . . . . . . . . . . . . . . 170
Anonymous Alternative Groups . . . . . . . . . . . . . . . 170
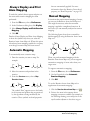
Atom-to-Atom Mapping . . . . . . . . . . . . . . . . . . . . . . 170
Always Display and Print Atom Mapping . . . 171
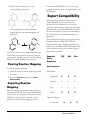
Automatic Mapping . . . . . . . . . . . . . . . . . . . . . . . 171
Manual Mapping . . . . . . . . . . . . . . . . . . . . . . . . . 171
Clearing Reaction Mapping . . . . . . . . . . . . . . . . 172
Exporting Reaction Mapping . . . . . . . . . . . . . . 172
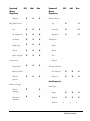
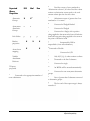
Export Compatibility . . . . . . . . . . . . . . . . . . . . . . . . . 172
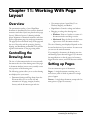
Chapter 11: Working With Page Layout
Controlling the Drawing Area. . . . . . . . . . . . . . . . . . 177
Setting up Pages . . . . . . . . . . . . . . . . . . . . . . . . . . . . . . 177
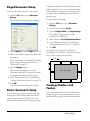
Paged Document Setup . . . . . . . . . . . . . . . . . . . . 178
Poster Documents Setup . . . . . . . . . . . . . . . . . . . 178
Creating Headers and Footers . . . . . . . . . . . . . . 178
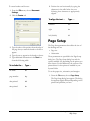
Page Setup . . . . . . . . . . . . . . . . . . . . . . . . . . . . . . . . . . . 179
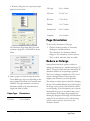
Page Orientation . . . . . . . . . . . . . . . . . . . . . . . . . . 180
Reduce or Enlarge . . . . . . . . . . . . . . . . . . . . . . . . 180
Saving Page Setup Settings . . . . . . . . . . . . . . . . . 181
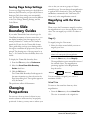
35mm Slide Boundary Guides . . . . . . . . . . . . . . . . . 181
Changing Perspectives . . . . . . . . . . . . . . . . . . . . . . . . 181
Magnifying with the View Menu . . . . . . . . . . . 181
Magnify . . . . . . . . . . . . . . . . . . . . . . . . . . . . . . . . 181
Actual Size . . . . . . . . . . . . . . . . . . . . . . . . . . . . . 181
Reduce . . . . . . . . . . . . . . . . . . . . . . . . . . . . . . . . 182
Fit to Window . . . . . . . . . . . . . . . . . . . . . . . . . . 182
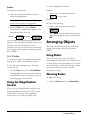
Using the Magnification Control . . . . . . . . . . . . 182
Arranging Objects . . . . . . . . . . . . . . . . . . . . . . . . . . . . 182
Using Rulers . . . . . . . . . . . . . . . . . . . . . . . . . . . . . . 182
Showing Rulers . . . . . . . . . . . . . . . . . . . . . . . . . . . 182
Hiding Rulers . . . . . . . . . . . . . . . . . . . . . . . . . . . . . 183
Using the Crosshair . . . . . . . . . . . . . . . . . . . . . . . 183
Displaying the Crosshair . . . . . . . . . . . . . . . . . . . 183
Moving the Crosshair . . . . . . . . . . . . . . . . . . . . . . 184
Aligning Objects using the Crosshair . . . . . . . . 184
Administrator
Hiding the Crosshair . . . . . . . . . . . . . . . . . . . . . . 184
Centering on a Page . . . . . . . . . . . . . . . . . . . . . . . 184
Aligning Objects . . . . . . . . . . . . . . . . . . . . . . . . . . 185
Distributing Objects . . . . . . . . . . . . . . . . . . . . . . . 185
Front to Back Ordering . . . . . . . . . . . . . . . . . . . . 185
Send to Back . . . . . . . . . . . . . . . . . . . . . . . . . . . 186
Bring to Front . . . . . . . . . . . . . . . . . . . . . . . . . . 186
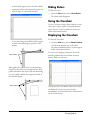
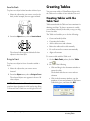
Creating Tables . . . . . . . . . . . . . . . . . . . . . . . . . . . . . . . 186
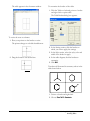
Creating Tables with the Table Tool . . . . . . . . . 186
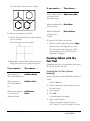
Creating Tables with the Text Tool . . . . . . . . . . 188
Creating the First Row (column headings) . 188
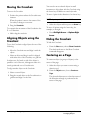
Creating a New Row . . . . . . . . . . . . . . . . . . . . 189
Adjusting Row or Column Spacing . . . . . . . 189
Moving Around In Tables . . . . . . . . . . . . . . . 189
Inserting a New Row . . . . . . . . . . . . . . . . . . . . 190
Chapter 12: Sharing Information
Using the Clipboard . . . . . . . . . . . . . . . . . . . . . . . . . . 191
SMILES and SMIRKS Strings . . . . . . . . . . . . . . 191
Creating SMILES Strings . . . . . . . . . . . . . . . . 191
Pasting SMILES from Clipboard . . . . . . . . . 192
Creating SLN Strings . . . . . . . . . . . . . . . . . . . 192
Using Drag-and-Drop. . . . . . . . . . . . . . . . . . . . . . . . . 192
Transferring Between ChemDraw Documents . . . 193
Autoscaling . . . . . . . . . . . . . . . . . . . . . . . . . . . . . . . 193
Bonds . . . . . . . . . . . . . . . . . . . . . . . . . . . . . . . . . . . . 193
Atom Labels . . . . . . . . . . . . . . . . . . . . . . . . . . . . . . 193
Captions . . . . . . . . . . . . . . . . . . . . . . . . . . . . . . . . . 194
Non-bond Objects and Color . . . . . . . . . . . . . . 194
Pasting to an Empty Document Window . . . . 194
Embedding Objects (Windows) . . . . . . . . . . . . . . . . 194
Edit Graphic Object (Macintosh) . . . . . . . . . . . . . . 195
Transferring PostScript (Macintosh) . . . . . . . . . . . . 195
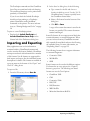
Importing and Exporting . . . . . . . . . . . . . . . . . . . . . . 196
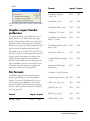
Graphics export border preference . . . . . . . . . . 197
File Formats . . . . . . . . . . . . . . . . . . . . . . . . . . . . . . 197
Bitmap (.bmp) . . . . . . . . . . . . . . . . . . . . . . . . . . 198
ChemDraw Template (*.ctp, *.ctr) . . . . . . . . 198
ChemDraw (*.cdx) . . . . . . . . . . . . . . . . . . . . . . 198
ChemDraw XML (*.xml) . . . . . . . . . . . . . . . . 198
ChemDraw 3.5 (*.chm) . . . . . . . . . . . . . . . . . . 198
ChemDraw 2.0 and ChemDraw 2.1 (*.chm) Import Only . . . . . . . . . . . . . . . . . . . . . . . . . . . . . 199
ChemDraw Stationery/Style Sheet (*.cds) .
Connection Table (*.ct) . . . . . . . . . . . . . . . . .
Chemical Markup Language (*.cml) . . . . . .
Encapsulated PostScript (Macintosh)
PostScript, *.eps (Windows) . . . . . . . . . . . .
GIF Image (*.gif) . . . . . . . . . . . . . . . . . . . . . . .
ISIS/SKC and ISIS/TGF . . . . . . . . . . . . . . .
ISIS/Reactions (*.rxn) . . . . . . . . . . . . . . . . . .
JDX (*.jdx, *.dx) Import Only . . . . . . . . . . .
JPEG (*.jpg, *.jpeg) Import Only . . . . . . . .
MDL MolFile (*.mol) . . . . . . . . . . . . . . . . . .
Molecular Simulations MolFile (*.msm) . .
PICT (Macintosh) . . . . . . . . . . . . . . . . . . . . . .
PICT scaled 4X (Macintosh) . . . . . . . . . . . . .
PNG file (*.png) . . . . . . . . . . . . . . . . . . . . . . .
SMD (*.smd) . . . . . . . . . . . . . . . . . . . . . . . . . .
SPC (.*spc) Import Only . . . . . . . . . . . . . . .
Template Style Sheet (*.cts) . . . . . . . . . . . . .
Windows Metafile (*.wmf) . . . . . . . . . . . . . . .
TIFF file (*.tif) . . . . . . . . . . . . . . . . . . . . . . . . .
Inserting Objects from Other Applications . .
199
199
199
199
200
200
200
201
201
201
201
202
202
202
202
202
202
202
203
204
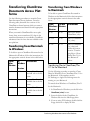
Transferring ChemDraw Documents Across
Platforms . . . . . . . . . . . . . . . . . . . . . . . . . . . . . . . . . . . 205
Transferring from Macintosh to Windows . . . 205
Transferring from Windows to Macintosh . . . 205
Transferring Files to ChemDraw/Plus 3.1 for
the Macintosh . . . . . . . . . . . . . . . . . . . . . . . . . 205
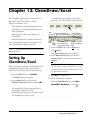
Chapter 13: ChemDraw/Excel
Setting Up ChemDraw/Excel . . . . . . . . . . . . . . . . .
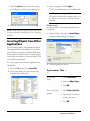
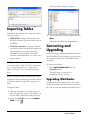
Importing Tables. . . . . . . . . . . . . . . . . . . . . . . . . . . . .
Converting and Upgrading . . . . . . . . . . . . . . . . . . . .
Upgrading Workbooks . . . . . . . . . . . . . . . . . . . .
207
208
208
208
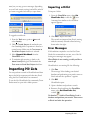
Importing Hit Lists. . . . . . . . . . . . . . . . . . . . . . . . . . . 209
Importing a Hitlist . . . . . . . . . . . . . . . . . . . . . . . . 209
Error Messages . . . . . . . . . . . . . . . . . . . . . . . . . . . 209
Exporting Tables. . . . . . . . . . . . . . . . . . . . . . . . . . . . .
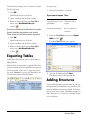
Adding Structures . . . . . . . . . . . . . . . . . . . . . . . . . . . .
Adding Structures with ChemDraw . . . . . . . . .
Adding a Structure From a File . . . . . . . . . . . .
Adding a Structure with a SMILES String . . .
Adding Structures by Name . . . . . . . . . . . . . . .
210
210
211
211
211
212
Saving Structures. . . . . . . . . . . . . . . . . . . . . . . . . . . . . 212
CambridgeSoft
Searching. . . . . . . . . . . . . . . . . . . . . . . . . . . . . . . . . . . . 212
Filter Tables . . . . . . . . . . . . . . . . . . . . . . . . . . . . . . 212
Similarity Searches . . . . . . . . . . . . . . . . . . . . . . . . 213
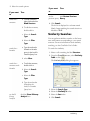
Working with Structures . . . . . . . . . . . . . . . . . . . . . .
Naming Structures . . . . . . . . . . . . . . . . . . . . . . . .
Using the Clipboard . . . . . . . . . . . . . . . . . . . . . .
Viewing Structures . . . . . . . . . . . . . . . . . . . . . . . .
Showing and Hiding Structures . . . . . . . . . .
Aligning Structures . . . . . . . . . . . . . . . . . . . . .
Resizing Structures . . . . . . . . . . . . . . . . . . . . .
Resizing Structures With a Macro . . . . . . . .
Using ChemDraw/Excel Functions . . . . . . . . . . . .
Using ChemProp Functions . . . . . . . . . . . . . . .
ChemProp Properties . . . . . . . . . . . . . . . . . . .
Inserting Functions . . . . . . . . . . . . . . . . . . . . . . .
214
214
214
214
214
215
215
215
215
217
217
218
Appendices
Appendix A: Accessing the CambridgeSoft
Web Site
Registering Online . . . . . . . . . . . . . . . . . . . . . . . . . . .
Accessing the Online ChemDraw User’s Guide .
Accessing CambridgeSoft Technical Support . . . .
Finding Information on ChemFinder.com . . . . . .
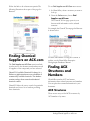
Finding Chemical Suppliers on ACX.com . . . . . .
Finding ACX Structures and Numbers . . . . . . . . .
ACX Structures . . . . . . . . . . . . . . . . . . . . . . . . . .
ACX Numbers . . . . . . . . . . . . . . . . . . . . . . . . . . .
221
222
222
222
223
223
223
224
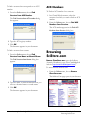
Browsing SciStore.com . . . . . . . . . . . . . . . . . . . . . . . 224
Browsing CambridgeSoft.com . . . . . . . . . . . . . . . . 225
Using the ChemOffice SDK . . . . . . . . . . . . . . . . . . 225
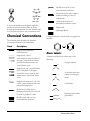
Database Conventions . . . . . . . . . . . . . . . . . . . . . . . . 231
Chemical Conventions . . . . . . . . . . . . . . . . . . . . . . . . 232
Atom Labels . . . . . . . . . . . . . . . . . . . . . . . . . . . . . . 232
Chemically Significant Text . . . . . . . . . . . . . . . . . 233
Charges . . . . . . . . . . . . . . . . . . . . . . . . . . . . . . . . . . 234
Isotopes and Elements . . . . . . . . . . . . . . . . . . . . 235
Radicals . . . . . . . . . . . . . . . . . . . . . . . . . . . . . . . . . . 235
H-Dot/H-Dash . . . . . . . . . . . . . . . . . . . . . . . . . . . 235
Complexes . . . . . . . . . . . . . . . . . . . . . . . . . . . . . . . 235
Multi-center Attachments . . . . . . . . . . . . . . . . . . 236
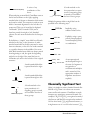
Stereochemistry . . . . . . . . . . . . . . . . . . . . . . . . . . . 236
Stereochemical Indicators . . . . . . . . . . . . . . . . 237
Stereochemical Flags . . . . . . . . . . . . . . . . . . . . . . 237
Polymer Representations . . . . . . . . . . . . . . . . . . . 238
References . . . . . . . . . . . . . . . . . . . . . . . . . . . . . 238
Query Properties . . . . . . . . . . . . . . . . . . . . . . . . . . 238
Analysis Messages . . . . . . . . . . . . . . . . . . . . . . . . . 238
Appendix D: How ChemNMR Works
ChemNMR Limitations. . . . . . . . . . . . . . . . . . . . . . . 243
Appendix E: How ChemProp Works
LogP . . . . . . . . . . . . . . . . . . . . . . . . . . . . . . . . . . . . . . . 245
Henry’s Law . . . . . . . . . . . . . . . . . . . . . . . . . . . . . . . . . 245
Molar Refractivity . . . . . . . . . . . . . . . . . . . . . . . . . . . . 246
ClogP and CMR . . . . . . . . . . . . . . . . . . . . . . . . . . . . . 246
Topological Polar Surface Area . . . . . . . . . . . . . . . . 246
Other Properties . . . . . . . . . . . . . . . . . . . . . . . . . . . . . 246
Appendix F: Shortcuts and Hotkeys
Appendix B: Technical Support
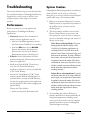
Serial Numbers . . . . . . . . . . . . . . . . . . . . . . . . . . . . . .
Troubleshooting . . . . . . . . . . . . . . . . . . . . . . . . . . . . .
Performance . . . . . . . . . . . . . . . . . . . . . . . . . . . . .
System Crashes . . . . . . . . . . . . . . . . . . . . . . . . . . .
Appendix C: The Chemistry of ChemDraw
227
228
228
228
ChemDraw Hotkeys . . . . . . . . . . . . . . . . . . . . . . . . . . 252
Appendix G: Document Settings
ChemDraw Style Sheets or Stationery Pads . . . . . . 256
Appendix H: Chemistry File Formats
Connection Table File Format . . . . . . . . . . . . . . . . . 267
ChemDraw 9
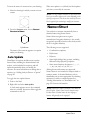
Introduction
About ChemDraw®
ChemDraw is a tool to enable professional
scientists, science students, and scientific authors to
communicate chemical structures. It is designed to
work according to conventions we found most
intuitive for such users. Our goal has been to make
ChemDraw as easy to use as possible while
providing superior drawing quality.
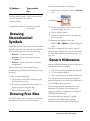
What’s New in
ChemDraw 9.0
ChemDraw 9.0 is enhanced by the following
features:
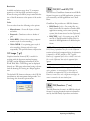
• Improved Struct=Name. Significant
•
•
•
•
improvements to the add-on that generates
systematic names for chemical structures. Now
with auto-update. See “Struct=Name” on page
73.
Improved Proton NMR predictions.
Improved display and accuracy. See “NMR
Shift Information—ChemNMR” on page 147.
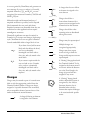
Improved TLC Plate tool. Includes support
for crescent-shaped spots, custom spots, and
transparent backgrounds. See “The TLC Tool”
on page 105.
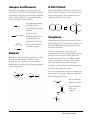
Fragmentation tools. The Mass
Fragmentation tool is quicker and smoother.
New Dissociation and Retrosynthesis tools.
See “Mass Fragmentation Tool” on page 143
and “Drawing Reactions” on page 144.
Support for more file formats. Import JPEG;
import and export GIF, TIFF, PNG, and
BMP. Import and export Chemical Markup
Language (CML).
ChemDraw 9
• Expand generic structures. Generate
collections of up to 500 molecules with the
expansion tool. See “Expand Generic
Structures” on page 145.
• Smarter chemical warnings. Support for
linear atoms and hydrogen bonds. Easier to
use—warnings now appear on tooltips.
• tPSA Calculation. An algorithm to calculate
Topological Polar Surface Areas for the
prediction of pharmaceutical transport
properties has been added to ChemProp. See
“Topological Polar Surface Area” on page 246.
• Multiple ChemDraw Items folders. See
About This User’s Guide
This User’s Manual contains information for the
ChemDraw application for Windows and
Macintosh. It assumes that you are familiar with the
basics of your Windows operating system. If you
are not, please refer to your system manual before
using the applications. Some of the material
describes tasks that must be performed in
conjuction with other integrated CambridgeSoft
products. The material on the Addins describes
tasks that must be performed in conjuction with
Microsoft Excel. If you are not familiar with this
product, please consult the relevant User’s Manual
for more detailed information.
The chapters in this guide are organized by task.
They are intended to help you familiarize yourself
with the ChemDraw applications and start using
them as quickly and efficiently as possible. New
users should read the Basics chapter to get an
overview of the product and how it works. Chapter
2 Tutorials, demonstrates most of the features of
the application. Perform the tutorials in the order
Introduction
What’s New in ChemDraw 9.0
•
9
they are presented. Experienced users can skip to
Chapter 3 and the subsequent chapters, which
provide more detailed information.
Administrator
Conventions
The following notations are used throughout this
user’s guide:
Ultra The Ultra symbol indicates that a feature
is available in the Ultra version only.
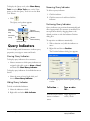
Quick Reference Card
The ChemDraw Quick Reference Cards are
located in the back of the manual. The cards
provide summaries of ChemDraw Desktop
Application commands and features. Because many
of the instructions require knowledge of the
interface elements, use the Quick Reference card as
you perform the tutorials in Chapter 2: “Tutorials”.
Help System
ChemDraw provides the following types of Help:
Pro
The Pro symbol indicates that a feature is
available in both the Pro and Ultra versions.
Features that are available in the Standard version
are not indicated by a symbol.
NOTE: Notes such as this are used to highlight
information supplemental to the main text.
When a shortcut key sequence is given, the
Windows OS sequence is listed first, with the
Macintosh OS sequence following, for example:
“Use the command: Shift+Control+G or
Shift+Command+G to ungroup objects.” For a list
of keyboard shortcuts see “Shortcuts and Hotkeys”
on page 247.
A bold font is used to indicate that you are to take
a particular action, for example: “From the Help
Menu, choose Help Contents.”
Additional
Information
Additional sources of ChemDraw information are:
• The Quick Reference Cards.
• The Help system
• CambridgeSoft Web Pages.
http://www.cambridgesoft.com/
10•Introduction
• ChemDraw Help. An HTML reference
guide.
• Context-sensitive Help (Windows). Help
topics related to user interface objects. To
access Context sensitive Help type Shift+F1.
• ToolTips. Short descriptions of user interface
objects displayed by pointing.
• Status Bar. The lower left corner of the GUI
displays useful information as you work.
CambridgeSoft Web Pages
The following table contains the addresses of
ChemDraw-related web pages.
For
information
about …
Access …
Technical
Support
http://www.cambridgesoft.
com/services
ChemDraw
Plugin
http://products.cambridge
soft.com/ProdInfo.cfm?pid
=278
http://products.cambridge
soft.com/ProdInfo.cfm?pid
=279
CambridgeSoft
Conventions
For
information
about …
Access …
Software
http://sdk.cambridgesoft.c
Developer’s kit om/
ActiveX control http://sdk.cambridgesoft.c
om/
Purchasing
CambridgeSoft
products and
chemicals
http://chemstore.cambridg
esoft.com/
Installation and
System Requirements
Before installation, see the “ReadMeFirst” and any
other ReadMe documents on the installation CDROM.
Microsoft®Windows®
Requirements
• Windows 2000 or XP.
• Microsoft® Excel add-ins require Office 2000,
2003, or XP.
• ChemDraw plugins/ActiveX® controls
support Netscape® 6.2.x and 7.x, Mozilla 1.x,
and Microsoft IE 5.5 SP2 and 6.x. The
ChemDraw 9
Chem3D ActiveX control supports IE 5.5 SP2
and 6.x only. There is no Chem3D plugin
available.
NOTE: Windows XP Service Pack 2 includes security
features that automatically block active content. This means
that by default, Internet Explorer blocks ChemDraw and
Chem3D ActiveX controls. To activate them, you must
choose the option to "allow blocked content" from the bar
appearing under the address bar notifying you that the
security settings have blocked some of the content of the page.
IE does not remember this information, so you must repeat
the activation each time you access the page.
If you visit a site frequently, you can add it to the list of
trusted sites in IE’s security settings.
• Screen resolution must be 800 x 600 or higher.
Macintosh® Requirements
• Ignore this if it shouldn’t be here. It’s
conditional text, and disappears when not
needed. Mac®OS X 10.1.x or later.
• Plugin supports Mozilla 1.0.x to 1.2..x and
Netscape 7.0.
• Screen resolution must be 800 x 600 or higher.
Site License Network
Installation Instructions
If you have purchased a site license, please see the
following web site for network installation
instructions:
http://www.cambridgesoft.com/services/sl/
Introduction
Installation and System Requirements
•
11
Administrator
12•Introduction
CambridgeSoft
Installation and System Requirements
Chapter 1: ChemDraw Basics
Overview
The information required to begin using
ChemDraw includes how to do the following:
• Identify the parts of the ChemDraw interface.
• Customize parts of the user environment.
• Create, open, and save documents.
• Set printing preferences.
The ChemDraw Graphical User Interface
Although the Macintosh and Windows versions of
the ChemDraw graphical user interface (GUI)
differ slightly, the essential GUI consists of the
same elements. The Windows version of ChemDraw is shown below.
Magnification control
Title bar
Menu bar
Object toolbar
Minimize button
Maximize button
Close button
Text style
toolbar
General
toolbar
Scroll bars
Main tool
palette
Status bar
ChemDraw 9
Resize
ChemDraw Basics
The ChemDraw Graphical User Interface
•
13
The Mac GUI is shown below.
Magnification control
Administrator
Menu bar
Object toolbar
General
toolbar
Title bar
Scroll bar
Main tool
palette
Resize
The Main Tools Palette
Use the main tools palette to create and manipulate
drawings. The appearance of the toolbar is slightly
different for the different versions of ChemDraw.
The toolbar for ChemDraw Ultra is shown below.
14•ChemDraw Basics
CambridgeSoft
The Main Tools Palette
The table below describes the functions of the tools
for all versions. Some of the tools have multiple
options that can be selected from a tool palette.
Tool
Use to…
Selection
Lasso. Select objects by dragging
around them.
Marquee. Select objects by dragging
diagonally across them.
Selected objects can be further
manipulated using menu commands.
Tool
Use to…
Arrows
toolbar
Draw arrows. Arrows of different
types can be selected from the Arrows
toolbar.
Orbitals
toolbar
Draw orbitals. Orbitals of different
types can be selected from the
Orbitals toolbar.
Drawing
Elements
toolbar
Draw annotations that lack chemical
significance, such as boxes and lines.
Drawing Elements of different types
can be selected from the Drawing
Elements toolbar.
Rotate a selected object in three
Structure
Perspective dimensions.
Fragmentation
toolbar
Dissociation tool. Breaks bonds and
draws a reaction.
Retrosynthesis tool. Breaks bonds
and draws a reaction.
Bond
Draw bonds and set bond properties.
Eraser
Delete objects. Click on an object to
delete; drag to delete multiple objects.
Multiple
Bond
toolbar
Draw multiple bonds and set bond
properties. Bonds of different types
can be selected from the Multiple
Bonds tool palette.
Text
Create atom labels and captions.
Pen
Draw freehand shapes such as custom
arrows and orbitals.
ChemDraw 9
Includes the Arc tools.
Pro
Fragmentation tool. Splits molecules across specific bonds.
Brackets
toolbar
Draw brackets, parentheses, and
braces. Brackets of different types can
be selected from the Brackets tool
palette.
Chemical
Symbols
toolbar
Draw chemically significant symbols
such as charges, radicals, and lone
pairs. Symbols of different types can
be selected from the Symbols tool
palette.
Arcs
toolbar
Draw arcs. Arcs of different degrees
can be selected from the Arcs tool
palette.
NOTE: The Arcs tool is a separate tool only
on ChemDraw Standard.
Acyclic
Chain
Draw chains of any length.
ChemDraw Basics
The Main Tools Palette
•
15
Administrator
Tool
Use to…
Query
Tools
toolbar
Draw stereochemical flags, indicate
free sites, alternative groups and
correspondences between atoms in
query structures. Various options can
be selected from the Query tool
palette.
Templates
toolbars
Rings
Table
TLC Plate
Pro
Draw structures with templates
stored in template documents.
Templates can be selected from the
Templates toolbars.
Draw common structural components.
Draw tables with multiple rows and
columns.
Draw TLC plates with multiple lanes
and adjustable solvent front and
spots.
Lasso
Marquee
Structure Perspective
Fragmentation tools
Eraser
Solid Bond
Multiple Bonds
Text
Dashed Bond
Pen
Hashed Bond
Arrows
Orbitals
Hashed Wedged Bond
Drawing Elements
Bold Bond
Brackets
Bold Wedged Bond
Chemical Symbols
Hollow Wedged Bond
Query tools
Wavy bond
Table
TLC plate
Acyclic Chain
Templates
Cyclopropane Ring
Cyclobutane Ring
Cyclopentane Ring
Cyclohexane Ring
Cycloheptane Ring
Cyclooctane Ring
Cyclohexane chair 1
Cyclohexane chair 2
Cyclopentadiene Ring
Benzene Ring
Setting the Default Tool
Use the Preferences dialog box to set which tool is
automatically selected when you open documents.
To set the default tool:
1. From the File menu, choose Preferences.
The Preferences dialog box appears.
2. Click the Open/Save tab.
16•ChemDraw Basics
CambridgeSoft
The Main Tools Palette
3. In the Opening Files section, click the
Default Tool to be automatically selected when
you open a document.
• Standard Toolbars and Show Windows
• Tool Palettes
• Templates
DefaultTool 150 dpi
standard
Tearing Off Palettes
toolbars
Some tools have toolbars extending from them,
indicated by an arrow at the bottom right of the tool
button.
information
windows
tool
palettes
You can “tear off ” these toolbars and place them
anywhere in the ChemDraw screen. You cannot
dock torn off toolbars.
To tear off a toolbar:
• Click the arrow on the lower right of the tool.
• Holding the mouse button down, point to the
templates
title bar and release the mouse button.
You can drag the toolbar by its title bar to reposition it.
You can also show or hide a toolbar by selecting it
from the Other Toolbars submenu on the View
menu.
Optional Toolbars
ChemDraw provides a number of optional toolbars
and information windows to facilitate production
of ChemDraw documents. These toolbars are
accessed from the View menu. They are divided
into three basic groups:
ChemDraw 9
Showing and Hiding Toolbars
To show or hide a toolbar:
• From the View menu, select a toolbar.
A check mark appears next to the item when
the toolbar is displayed.
Docking and Undocking
Toolbars
The standard toolbars, can be docked or undocked.
Docked toolbars can attach to any edge of the
ChemDraw Basics
Optional Toolbars
•
17
ChemDraw window. Undocked toolbars can float
anywhere in the ChemDraw screen.
See “Viewing Analysis Information” on page 138
for information on the Analysis window.
To dock a toolbar:
The Paste button inserts all selected items into the
Administrator
• Drag the toolbar to the edge of the ChemDraw
screen where you want it to dock.
• Double-click the toolbar background. This will
dock the toolbar in the default position. (All
toolbars default to the top of the ChemDraw
window, except for the Tools toolbar which
defaults to the left side.)
To undock a toolbar:
• Drag the toolbar into the position you want.
document. The
just the title bar.
button shrinks the window to
The Chemical Properties Window
Pro
The Chemical Properties window displays properties of the selected structure. When no structure is
selected, properties will be displayed only if there is
one (and only one) structure in the document.
The Status Bar or Message
Area (Windows)
The status bar or message area displays information
about the menu or toolbar you are using.
The Paste button inserts all selected items into the
The Analysis Window
The Analysis window displays the chemical analysis
of the selected structure. If nothing is selected, the
values shown are for the entire document.
18•ChemDraw Basics
document. The
button shrinks the window to
just the title bar, while leaving it active.
NOTE: CLogP and CMR values are displayed only in
ChemDraw Ultra.
CambridgeSoft
Optional Toolbars
The Info Window
Periodic Table
The Information window shows size/positioning
information about what's going on in ChemDraw.
The Periodic Table window displays a floating periodic table. It can be used both for reference and to
insert elements into structures.
The fields show the following:
Click an element symbol to highlight the element
and activate the Text tool. Drag across the table to
Shows…
highlight each element in turn. Click the
button to show or hide the detailed information.
Pointer:
X/Y
current mouse coordinates
Pointer:
dX/dY
change in X and Y coordinates
of a moved selection
After selecting an element, click in the document to
add an atom label consisting of that element and the
appropriate number of hydrogens. Labeling
behavior is as follows:
Selection:
X/Y
W/H
position of a selection
width/height of a selection
Field
Angle:
angle of a bond; rotation of a
selection
Dist:
length of a bond; distance a
selection has been moved
%
ChemDraw 9
% of original size when resizing
a selection
click on… to…
an existing
unlabeled
atom
label the atom
an existing
labeled
atom
cycle the hydrogen count (if it
matches the selected element)
or change the label
an empty
space
create a new atom
ChemDraw Basics
Optional Toolbars
•
19
Double-clicking on an existing atom will open it for
editing without changing the label.
Administrator
NOTE: Some element names conflict with ChemDraw
Hotkeys, and may not be interpreted correctly by Chemical
Warnings or Check Structure. For more information and
troubleshooting see “Defining Nicknames” on page 122.
Character Map
The floating Character Map window displays the
256 ASCII characters in any font. The default font
is Symbol. Use it to add symbols or styled fonts to
labels.‘
that character in the text box. The selected font
(shown in the character map window) is applied to
that character only. It does not change the active
font in the text box.
NOTE: You can cancel a selection by dragging to some
other character before releasing.
The 8 most recently used characters are displayed at
the top of the window. These characters
“remember” their font and are not affected by
changes to the window. A single character may
appear more than once in this section if the versions
use different fonts.
Click the
button to toggle between the 8 most
recently used characters and the entire character
map.
Customizing ChemDraw
You can customize ChemDraw by configuring
Preferences and Document Settings.
Preferences allow you to change the default
behavior of certain options that apply to every open
document. Document Settings allow you to change
the default behavior of options that will affect only
the active document.
Setting Preferences
The character map is active only when a text box is
open for editing. It will appear grayed-out at all
other Times New Roman With a text box open,
mouse over the character map to view a larger
version of the characters in the top right corner of
the window. Click any character in the table to enter
20•ChemDraw Basics
Preferences affect the way the ChemDraw application works, regardless of the document with which
you are working.
To open the Preferences dialog box:
• From the File menu, choose Preferences.
CambridgeSoft
Customizing ChemDraw
The Preferences dialog box appears:
You can apply document settings in the following
ways:
• Customize settings for the entire document
using the Document Settings dialog box
• Apply settings to the entire current document
from an existing document
• Apply settings to selected objects in the current
document from an existing document
Default Style Sheet or Stationery Pad
Preferences-Gen 150dpi
When you open ChemDraw, the last Style Sheet or
Stationery Pad used opens as the default. If you
choose another Style Sheet or Stationery Pad, that
file becomes the default.
To view the default Style Sheet or Stationery Pad:
• Click the File menu.
To restore the CambridgeSoft default settings:
• Click the Use Defaults button.
Document and Object
Settings
Document and object settings are user-definable
settings that are applied to the current document.
Settings include:
• Drawing settings—set drawing options such as
the fixed length used to draw bonds
• Caption and label text settings—set text
options such as the font used for atom labels
and captions
• Color settings—set available colors for objects
and the document background
• Print/Page Setup—set options such as the
page size used and text displayed in footers
The New menu item displays the name of the
Style Sheet or Stationery Pad.
Saving Customized Settings as Style
Sheets or Stationery Pads
Every new document created with ChemDraw uses
a Style Sheet or Stationery Pad to obtain its document settings. Style Sheets or Stationery Pads can
also contain predefined objects. When you create a
new document, you actually create an untitled copy
of the Style Sheet or Stationery Pad. Any changes
you make to the copy of the Style Sheet or Stationery Pad do not affect the Style Sheet or Stationery
Pad itself.
You can create a Style Sheet or Stationery Pad with
your own customized setting by saving it as a .cds
file. If you store the .cds file in the ChemDraw
Items folder, it appears in the Open Special menu
so you can access it from the File menu.
To save a document’s setting as a Style Sheet or
Stationery Pad:
1. Choose Save As from the File menu.
ChemDraw 9
ChemDraw Basics
Customizing ChemDraw
•
21
The Save As dialog box appears.
To apply the document settings from a document
or style sheet not listed in the menu:
Administrator
1. From the Apply Document Settings from
submenu, choose Other.
The Select document dialog box appears.
SaveAs 200 dpi
SelectSettings 200 dpi
2. Name the file and change the type (in OS X:
format) to CD Style Sheet (cds) or ChemDraw
Stationery.
3. To save the file in the ChemDraw items folder,
click the Go To ChemDraw Items button.
4. Click Save.
Applying Document Settings From
Other Documents
To apply document settings to the active window
that are contained in a different document:
• On the File menu point to Apply Document
Settings from, and then choose the document
from which to apply the settings.
The settings in the active document window
change to those found in the Style Sheet or
Stationery Pad that you choose.
NOTE: When you apply settings, they apply to the current
document only are not saved as the default for the next
document. Use Open Special from the File menu if you want
to change the default document settings.
22•ChemDraw Basics
2. Open the appropriate folder and select a
ChemDraw document or Style Sheet / Stationery Pad.
3. Click Open.
Applying Object Settings from Other
Documents
You can apply settings from another document to
selected objects in the current document. You can
apply the chosen settings to the selected objects
only, or to all new objects drawn in the current
document.
To apply object settings:
1. Select the object.
2. On the Object menu, point to Apply Object
Settings from, and then choose the document
from which to apply the settings.
CambridgeSoft
Customizing ChemDraw
A dialog box appears:
3. Click the checkbox next to Use Documents
Location and type in or browse to the location
to use.
SetDefaults 150 dpi
3. Take the appropriate action:
If you want to apply
the settings to the …
Then click …
selected object only
No
selected object and any new Yes
objects you draw
The settings are applied.
Using Documents
Documents are the ChemDraw workspace where
you create and manipulate structures. You can
create a new document or open an existing document and edit it.
Setting the Default Document Location
You can set what file location is shown in the Open
dialog box by using the Preferences dialog box.
To set the default location:
1. From the File menu, choose Preferences.
The Preferences dialog box appears.
2. Click the Directories tab.
Default document location
If Use Documents Location is not selected, the first
time you use the Open dialog box your My-Documents folder is shown. Subsequent uses show the
last directory used.
Creating a Document
You can create a new, blank document using the
ChemDraw default settings, or use a Style Sheet or
Stationery Pad with customized settings.
Creating a New Document
To create a document:
• From the File menu, click New Document.
Creating a Document Using a Style
Sheet or Stationery Pad
To create a new document using a different Style
Sheet or Stationery Pad:
1. From the File menu, click Open Special.
2. Choose a Style Sheet or Stationery Pad
from the list.
A new document is created with the settings
(and objects) stored in the Style Sheet or Stationery Pad.
ChemDraw 9
ChemDraw Basics
Using Documents
•
23
Administrator
ChemDraw provides pre-defined Style Sheets or
Stationery Pads located in the ChemDraw Items
folder. For example, the ACS Document 1996 is
configured to create documents that are set with the
bond lengths, bond width, spacing, and fonts used
in the 2-column format of all American Chemical
Society journals. For a list of the settings stored in
these documents, see Appendix G: “Document
Settings”.
2. Click Open/Save.
3. In the Opening Files section, click Use
Default File Format and choose the format
you want from the list
.
NOTE: Predefined Style Sheets or Stationery Pads may
restrict your options in unexpected ways. For example, not all
Save As... format options are available in all Style Sheets or
Stationery Pads. For general use, you should stay with the
default Style Sheet or Stationery Pad.
Opening a Document
To open a document:
• From the File menu, do one of the following:
• Choose Open, and in the Open dialog box,
select the name and location of the file and
then click Open or OK.
• Choose the document from the list of previously opened documents at the bottom of
the menu.
Setting the Default Open File Format
You can set what file format is selected by default in
the Open dialog box.
To set the default file format:
Use Default File Format
If Use Default File Format is not selected, the first
time you use the Open dialog box the ChemDraw
format is shown. Subsequent uses show the last
format used.
Saving Changes Automatically
You can configure ChemDraw to save changes to a
document automatically at the time interval you set.
To set the frequency at which ChemDraw automatically saves your changes:
1. From the File menu, choose Preferences.
The Preferences dialog box appears.
2. Click Open/Save.
1. From the File menu, choose Preferences.
The Preferences dialog box appears.
24•ChemDraw Basics
CambridgeSoft
Using Documents
3. Click the checkbox next to Autosave Every and
type or select the minutes to use.
For example, if you draw cyclohexane, create an
atom label text box, type a label, and select and
rotate the structure, you will be able to remove the
actions as follows:
1. Remove the rotation.
2. Remove atom label.
3. Remove the ring.
Autosave
At each step, the text of the Undo command indicates the action being removed.
Redoing Actions
The time starts counting down after the first change
is made.
Reversing and Repeating
Actions
ChemDraw keeps track of the actions you perform.
You can reverse actions one at a time by choosing
the Undo command. The number of actions that
can be undone or redone is limited only by the
amount of memory (RAM and virtual memory)
available for use by ChemDraw. When you save
your document the Undo queue is reset and starts
over.
Undoing Actions
To undo the last action performed:
• From the Edit menu, choose Undo.
The last action performed is reversed. The
Redo command changes to reflect the undone
action. The Undo command changes to reflect
the next action you can undo.
ChemDraw 9
When you undo an action, the Redo command
becomes active so you can reverse the effect of the
Undo command.
To redo the last action undone:
• From the Edit menu, choose Redo.
The last action undone is reinstated. The Undo
command changes to reflect that action. The
Redo command changes to reflect the next
action that can be redone.
Repeating Actions
If an action is repeatable, the name of the action
appears next to the Repeat command on the Edit
Menu.
To repeat an action:
• From the Edit menu, choose Repeat.
The last action performed is repeated.
Discarding Recent Changes
to a Document
To retrieve the last saved version of a file:
• From the File menu, choose Revert.
ChemDraw Basics
Using Documents
•
25
All changes made to the file since it was saved
last are discarded and the previous version of
the file appears.
The contents of the file are updated to reflect
the information currently in the window
without displaying the Save As dialog box.
Administrator
NOTE: You can use the Undo command in the Edit menu
Setting the Default Save File Format
to remove each individual action since the last save.
You can set what file format is selected by default in
the Save As dialog box.
Saving Documents
To save a ChemDraw document in the default
ChemDraw .cdx file format:
1. From the File menu, choose Save.
The Save dialog box appears. The appearance
of the dialog box depends on the platform you
are using.
2. Choose a folder in which to store the file.
3. Type a file name in the File name (Windows) or
Save As (Macintosh) text box. You may type
up to 255 characters for a file name, including
spaces. For example: “my first structure in
ChemDraw”.
4. Click Save or OK to create the file.
The title of the document window changes to
the name of the saved file. The file name is
added to the bottom of the File menu.
To set the default file format:
1. From the File menu, choose Preferences.
The Preferences dialog box appears.
2. Click Open/Save.
3. In the Saving Files section, click the checkbox
next to Use Default File Format and choose the
format you want from the list.
SaveFileFormats 150 dpi
CAUTION
ChemDraw uses the .cdx file format to store chemical
information accurately with a structure drawing. Other file
formats may be capable of storing a picture of your
drawing, but they might lose chemically relevant
information about the structure. For example, if you save
a ChemDraw drawing in the .eps file format, you will store
only a picture of the structure without storing the chemical
significance of the connections between atoms and bonds.
To save a document that has previously been saved:
• From the File menu, choose Save.
26•ChemDraw Basics
If Use Default File Format is not selected, the first
time you use the Save dialog box, the ChemDraw
format is shown.
Saving a Document with a Different
Name or Location
You can save a copy of your document under a
different name, location, or file format. Saving a
copy under a different name or location is useful for
keeping earlier revisions of your document. Saving
CambridgeSoft
Using Documents
a file as a different format is useful for creating Style
Sheet or Stationery Pad and for exporting information to other applications.
document, use a different name. For information
about other file formats, see Chapter 12: “Sharing
Information”.
To save a copy of a ChemDraw document under a
different name or in a different location:
Closing a Document
1. From the File menu, choose Save As.
The Save As dialog box appears.
2. Choose a new location in which to save the
document.
3. Type a new file name.
4. Click Save or OK.
Saving a Document in a Different File
Format
To save a ChemDraw document in another file
format:
1. From the File menu, choose Save As.
The Save As dialog box appears.
2. Select a folder in which to save the document.
3. Type a file name in the in the File name or Save
As box.
4. Select a file format from the File Format or
Save as Format list.
NOTE: When you select some formats, the Options button
becomes active. Click it to open a dialog box for setting
options specific to these formats. For more information about
these options, see Chapter 12: “Sharing Information”.
5. Click Save or OK.
If you type a name that already exists in the same
directory, the existing document is replaced. If you
do not want to replace the original ChemDraw
ChemDraw 9
To close a ChemDraw document:
• From the File menu, choose Close.
If the document contains unsaved information, you
are prompted to save the file.
Accessing Documents
Quickly
You can access ChemDraw documents quickly by
placing them in the ChemDraw Items folder and
then selecting them from the Open Special menu.
You can access open documents quickly by using
the Window menu.
The ChemDraw Items Folder
The ChemDraw Items Folder is located by default
in the same folder as your ChemDraw application.
It contains the ChemDraw preferences, hotkeys,
nicknames, and isotopes files; scripts, and the
generic nicknames file. It also contains template
documents and template Stationery Pads. You can
have multiple ChemDraw Items folders. This is
useful in corporate installations for maintaining
personal files such as nicknames as well as standard
templates.
To add a path to a ChemDraw Items folder:
1. From the File menu, choose Preferences.
The Preferences dialog box appears.
2. Click the Directories tab.
3. Click the Add New button, browse to a location, and click OK.
ChemDraw Basics
Accessing Documents Quickly
•
27
A new path is added to the list.
Printing
Administrator
ChemDraw uses the standard system commands to
print ChemDraw documents. The options that you
have available to you depend on the printer that you
are using. Refer to your printer’s documentation for
more information.
In general, to print a ChemDraw document:
1. From the File menu, choose Page Setup.
2. Make all appropriate selections for the printer
you are using and click OK.
3. From the File menu, choose Print.
4. Make your selections in the Print dialog box
and click OK.
4. To rearrange the search order, use the Move Up
and Move Down buttons.
5. To delete a path, click the Remove button. To
delete all added paths, click the Default Paths
button.
The Open Special Submenu
To select documents from the ChemDraw Items
folder:
• On the File menu, point to Open Special, and
select the file to open.
The Open Special submenu, listing documents
stored in the ChemDraw Items folder, appears.
The Window Menu
The Window menu lists all open ChemDraw and
Template documents. The document you choose
from the Window menu becomes the active
window.
To print a document from the Explorer or from the
Finder:
1. Select the document you want to print.
2. From the File menu, choose Print.
The ChemDraw application is opened and the
Print dialog box appears.
3. Make your selections in the Print dialog box
and click OK.
Printing Background Color
Print Background Color controls whether the
Background Color contained in your ChemDraw
document is printed.
To change whether the Background color is
printed:
1. From the File menu, choose Preferences.
2. Click Print Background Color.
3. Click OK.
Macintosh Print Preferences
When you print a document, ChemDraw creates
both a QuickDraw representation and a PostScript
representation of the document’s contents.
28•ChemDraw Basics
CambridgeSoft
Printing
QuickDraw is the graphical format that is
supported by the Macintosh Operating System.
Every printer that supports the MacOS can convert
QuickDraw representations into printed output.
However, QuickDraw does not support some
features (for example, high-resolution printing) that
are available only on some printers.
If you are transferring information to another application from which you print ChemDraw pictures,
you should consider including PostScript
commands and the ChemDraw LaserPrep File with
the pictures. For information about special situations to consider, see “Transferring PostScript
(Macintosh)” on page 195.
Optimize Pictures for High-Resolution
Non-PostScript Printing
The Macintosh High Resolution Clipboard
supports high-resolution printers. Most applications support the High Resolution Clipboard.
Because this was not always the case in the past, this
preference continues to be available for users to
turn off if an application being used does not
support the High Resolution Clipboard.
If you are unsure if the application uses a High
Resolution Clipboard, try transferring pictures with
this check box selected and deselected, and see
which picture prints with higher quality.
If you are printing to a non-PostScript printer, deselect Include ChemDraw LaserPrep and Include
PostScript to reduce the size of each picture. Do
not deselect this option if the document will ever be
printed to a PostScript printer.
Printers that use the PostScript page definition
language use the PostScript representation. The
PostScript representation describes objects by
using mathematical shapes that can be precisely
imaged at whatever resolution is used by your
printer. The PostScript representation created by
ChemDraw is composed of two parts, the PostScript commands and the ChemDraw Laser Prep.
ChemDraw 9
The ChemDraw Laser Prep contains specific
instructions that enable the printer to interpret the
PostScript commands contained in a ChemDraw
document.
Include PostScript
To transfer ChemDraw pictures to another
document that will be printed on a PostScript
printer:
1. From the File menu, choose Preferences.
2. Click Include PostScript.
3. Click OK.
When Include PostScript is deselected, no PostScript commands are generated. This usually results
in lower quality printing, particularly of drawings
cut and pasted into other applications. However,
because the representation used for printing when
Include PostScript is not selected is the same as that
used for drawing to the screen, better correspondence between the screen and printed output may
be observed.
For more information, see “Transferring PostScript
(Macintosh)” on page 195.
Include ChemDraw Laser Prep
Selecting the include ChemDraw Laser Prep allows
you to print to a printer that cannot be initialized
using ChemDraw. If you create drawings with this
option off, they will not print on PostScript printers
without the use of ChemDraw.
To Include ChemDraw Laser Prep:
1. From the File menu, choose Preferences.
2. Click Include ChemDraw Laser Prep.
3. Click OK.
NOTE: When you select Include ChemDraw Laser Prep,
you should also select Include PostScript.
ChemDraw Basics
Printing
•
29
For more information, see “Transferring PostScript
(Macintosh)” on page 195.
Administrator
Scripts (Macintosh)
The Scripts menu contains scripts that you can use
to perform tasks within ChemDraw or between
ChemDraw and another scriptable application.
Scripts, found in the Scripts menu, are created using
Apple’s Script Editor application. With the proper
script extensions in conjunction with Apple’s Script
Editor application, you can create scripts using the
AppleScript™ scripting language and add scripts to
the Scripts menu by placing them in the ChemDraw
Folder.
NOTE: Scripts not stored within the ChemDraw Folder
are not accessible from the Scripts menu.
For more information about AppleScript™ and the
Script Editor application see your system manuals.
Closing ChemDraw
To close the ChemDraw application:
• From the File menu, choose Exit ChemDraw
or Quit ChemDraw.
If you have unsaved document windows open,
you are prompted to save them before you can
close the application.
30•ChemDraw Basics
CambridgeSoft
Scripts (Macintosh)
Chapter 2: Tutorials
Overview
Create a ChemDraw Document:
The tutorials are designed to teach you the
fundamental drawing techniques available in
ChemDraw. Before you begin, you may want to
review “Conventions” on page 10 to familiarize
yourself with the terminology used in the tutorials.
You may also want to use your Quick Reference
Card while you perform the tutorials.
ChemDraw automatically checks for correct
chemical syntax as you draw. If ChemDraw finds a
potential problem, a red box is displayed around the
erroneous object. The red box is displayed on
screen only and does not print.
1. Start ChemDraw.
2. From the File menu, choose Save As.
3. Type tut1.cdx in the appropriate text box.
4. Select a folder in which to save the file.
5. Click Save.
6. From the View menu, choose Show General
Toolbar.
7. From the View menu, choose Show Info
Window.
The Info window appears and displays drawing
parameters as you draw.
To disable the automatic warning on a specific
object:
• Right-click the object and deselect Display
Warnings.
Tutorial 1: Reaction
Schemes
In this tutorial, you will draw the following
(simplified) reaction scheme:
O
OH
O
OH
2-propanone
2 moles
4-hydroxy-4-methyl-2-pentanone
1 mole
2-propanone Rx 60%
ChemDraw 9
Tutorials
Tutorial 1: Reaction Schemes
•
31
8. Click the Object menu and make sure there is a
check mark next to the Fixed Lengths and Fixed
Angles commands. If either command is not
Administrator
NOTE: The angle used when clicking to add bonds is
controlled by the Chain Angle setting in the Drawing
Settings dialog box in the File menu. If this bond angle
cannot be established, the next smaller and logical bond
angle is used.
checked, select it.
Add a third bond:
1. Continue pointing to the atom shown below.
.
NOTE: Applying fixed lengths and fixed angles enables
you to create structures with consistent bond lengths and
angles. The fixed length dimension is set in the Drawing
Settings dialog box. The fixed angle dimension increments
angles by 15 degrees.
Create a bond:
.
2. Position the pointer (+) anywhere in the
document window and click.
The bond is extended to its fixed length at a
30-degree angle.
2. Click the atom to add a bond.
Change a single bond into a double bond:
1. Point to the atom shown below and hold the
mouse button down.
1. Click the Solid Bond tool
2. Drag as shown below over the existing single
bond. Release the mouse button.
Add a second bond:
1. Point to the right atom of the bond.
Add labels to the structure:
1. Point to the atom shown below.
2. Click the atom to add a bond.
A second bond is drawn, forming a 120-degree
angle between the bonds.
32•Tutorials
CambridgeSoft
Tutorial 1: Reaction Schemes
2. Double-click the atom.
The hand pointer with a plus sign indicates that
you are in the duplication mode of a selection
tool.
isobutene
w/textbox
100%
3. Type an uppercase O in the text box that
appears.
4. Drag the Selection Rectangle to the right.
.
4. Close the text box by doing one of the
following:
• Click in an empty area of the window.
• Click another tool.
Next, you duplicate a structure and then create
another structure from the duplicate.
Duplicate the structure:
.
The last structure drawn is automatically
selected.
2. Point over the Selection Rectangle.
A copy of the structure appears as you begin
drag. The original structure remains in its
position. Release the mouse button when the
copy is clear of the original.
NOTE: When you create a copy as shown above you can
drag it anywhere in the document window. If you want the
copy to remain aligned with the original, hold Shift while
dragging.
1. Click the Lasso tool
Modify the duplicated structure:
1. Click the Solid Bond tool
.
2. Point, in the copied structure, to the atom
shown below and click.
O
3. Press and hold Ctrl or Option.
ChemDraw 9
Tutorials
Tutorial 1: Reaction Schemes
•
33
Add several bonds to a single atom:
Align the structures:
1. Point to the atom shown below.
1. Select the structures.
Administrator
2. On the Object menu, point to Align, and then
choose T/B centers.
O
You structures should appear as shown below.
O
O
2. Click the atom three times, allowing a pause
between each click.
OH
NOTE: If you click too fast, the click is interpreted
either as a double-click, which opens a text box or a
triple-click, which duplicates your last atom label.
In the following steps, you use a different method
for selecting structures and then separate the
structures to make room for an arrow.
1. Click the Marquee tool
O
.
NOTE: Alternatively, you can select the Lasso tool
and hold Alt or Option to use the Marquee tool.
Create an atom label using HotKeys. HotKeys are
keys on your keyboard that are linked to specific
atom labels. For more information about HotKeys,
see “Labeling Atoms with HotKeys” on page 87.
1. Point to the atom shown below.
The last object drawn is selected.
Drag the selection to make room for an arrow:
• Press Shift to maintain the alignment of the
structure and drag the Selection Rectangle to
the right.
O
Add arrows to the reaction scheme.
2. Type O or o.
1. Click the Arrow tool
to display the Arrow
palette.
O
NOTE: The triangle in the lower right corner of the
Arrow icon indicates it contains a palette.
OH
When you use HotKeys that represent a single
element, the correct number of hydrogen atoms is
added to the label.
34•Tutorials
2. Holding the mouse button down, move the
mouse to the palette title bar, then release the
mouse button.
The palette becomes a floating tool bar. Drag
the palette to the location you want.
CambridgeSoft
Tutorial 1: Reaction Schemes
3. Click the third arrow from the left in the top
row.
Use the Text tool to add line formula or other
captions for representing reagents and reactions.
Insert text in the drawing:
1. Click the Text tool
.
2. Point above the arrow. A text insertion point
appears as shown below.
SelectArrow
150 dpi
O
O
4. After the arrow is selected, release the mouse
button.
OH
NOTE: The arrow you choose from the palette
becomes the default arrow type. To change the arrow
type, display the arrow palette and select the arrow type
you want.
Draw the arrow you selected:
O
O
OH
1. Point after the first structure and hold down
the mouse button.
O
3. Click to create a text box.
4. Type OH.
O
O
O
OH
OH
2. Drag the Arrow to the length you want. Release
the mouse button.
O
NOTE: If you want to realign the caption, select a
selection tool and drag the caption.
Add a charge symbol using the specialized symbols
available in the Chemical Symbols tool palette:
O
1. Click the Chemical Symbol tool
OH
NOTE: If you need to change the length (or the angle
relative to the X-axis) of the arrow:
1. Hold Shift and point to the arrowhead
(a highlight box appears when you are
pointing correctly).
2. Drag the arrowhead to the length (and angle)
you want.
.
NOTE: A red box appears around the OH label
indicating an error, i.e. that you haven’t added the charge yet.
2. Holding the mouse button down, select the
circled negative charge symbol shown
below, then release the mouse button.
SelectMinus
ChemDraw 9
Tutorials
Tutorial 1: Reaction Schemes
•
35
3. Point to the center of the OH label. Moving the
cursor slightly right or left will cause either the
O or the H to be selected.
Administrator
1. Click the Text tool
.
2. Point below the first structure.
O
O
Use the Text tool to create a caption containing the
name and amount of reactant, and then center the
caption under the structure.
OH
O
OH
4. With the H selected, drag the charge symbol
around the atom to the desired position.
O
OH
O
OH
Objects added from the Chemical Symbols palette
are automatically associated with the structure they
are closest to.
Some objects, such as arrows, are not associated
automatically. You can manually group objects
using the Group command. You can then select the
grouped objects to manipulate or move them
together.
3. Click to create a text box. The default cursor is
flush left.
O
4. From the Text menu, choose Centered.
To group objects:
O
1. Click a Selection tool, the Lasso
or
tool.
Marquee
2. Hold Shift and click the arrow, the OH caption,
and the charge symbol.
The cursor moves to the center of the text box.
The Shift key allows you to add objects to a
selection without deselecting other objects.
NOTE: If you click a selected object while holding
Type the caption:
1. Type 2-propanone.
O
Shift, that object is deselected.
3. From the Object menu, choose Group.
NOTE: You can select individual objects within a
group by clicking them.
36•Tutorials
2-propanone
CambridgeSoft
Tutorial 1: Reaction Schemes
2. Press the Enter or Return key to insert a new
line.
O
If your captions are not aligned properly beneath
the structures you can move them using a selection
tool.
1. Click a Selection tool (Lasso or Marquee).
The text box is automatically selected because
it is the last object drawn.
2-propanone
3. Type 2 moles.
NOTE: The object that is automatically selected is set in the
Preferences dialog box.
2. Press the Left or Right Arrow key to center
O
the caption beneath its structure. This method
maintains the alignment created by the Tab key.
To complete the drawing, add a shadowed box
around the scheme:
2-propanone
2 moles
Create an aligned caption for the other structure.
1. Click the Drawing Elements tool
.
2. Select the shadowed box from the palette of
drawing elements.
1. Press the Tab key to create another Text box
that is aligned adjacent to the first.
SelectRectangle 150 dpi
O
3. Point to the upper left corner of the reaction
2-propanone
2 moles
NOTE: You can use the Tab key in the caption mode
of the text tool to create multiple aligned captions with
the same font, font size, style, and justification as the
previous caption.
scheme. Hold the down the mouse button and
drag diagonally downward to the right to draw
the box.
pentanone 60%
O
OH
O
2. Type 4-hydroxy-4-methyl-2-pentanone, press
the Enter or Return key, and then type 1 mole.
OH
2-propanone
2 moles
ChemDraw 9
4-hydroxy-4-methyl-2-pentanone
1 mole
Tutorials
Tutorial 1: Reaction Schemes
•
37
Save and close the document:
Delete an atom and its bonds from the ring:
1. From the File menu, choose Save.
1. Click the Eraser tool
.
2. Point to the atom shown below.
Administrator
Your document is saved.
2. From the File menu, choose Close.
Tutorial 2: Drawing
an Intermediate
In this tutorial you will draw the following
intermediate structure starting from a ring and then
add arrows with customized shapes using the Pen
tool.
3. Click the atom.
OOH
NOTE: You can delete a bond individually by pointing at
the center of the bond and clicking.
You can also drag the eraser to make multiple deletions.
Create a new ChemDraw document:
1. From the File menu, choose New Document.
2. From the File menu, choose Save As.
Add a bond:
3. Type tut2.cdx in the appropriate text box.
1. Click the Solid Bond tool
4. Select a folder in which to save the file.
2. Point to the atom shown below.
.
5. Click Save.
Draw a ring:
1. Click the Cyclohexane Ring tool
2. Point in the document window. The
Cyclohexane cursor
3. Click to add a ring.
38•Tutorials
appears.
.
3. Click to add a bond.
CambridgeSoft
Tutorial 2: Drawing an Intermediate
Add second and third bonds:
2. Drag diagonally downward over the existing
bond to create a double bond.
1. Point to the atom shown below and click to add
another bond.
2. Add a third bond by dragging to make sure it
Change the orientation of the double bond:
has the desired orientation:
a. Continue pointing to C4.
1. Point to the center of the double bond.
2. Click the bond twice to move the second line to
b. Hold the mouse button and drag diagonally
the outside.
The bond moves to the inside on the first click
and to the outside on the second click
upward toward the right.
.
c. When the bond is oriented, release the
mouse button to deposit the bond.
Create a double bond:
1. Point to the atom shown below.
NOTE: You can move a double bond by clicking it
when a bond tool is selected. The cursor corresponding
to the bond tool that is selected appears.
Add an atom label:
1. Point to the atom to label shown below.
ChemDraw 9
Tutorials
Tutorial 2: Drawing an Intermediate
•
39
2. Double-click the atom to open a text box.
3. Point near the double bond where you want to
indicate the start of electron flow.
O-
Administrator
OH
3. Type O and then type “-”.
4. Drag downward and to the left. Release the
mouse button.
OOH
Label an atom with OH:
1. Point to the atom shown below.
The hand with a “+” cursor indicates that you
are in the editing mode of the Pen tool.
5. Position the cursor where you want the
arrowhead to appear.
2. Double-click the atom to open a text box.
OOH
O-
3. Type OH.
Next you will add an arrow that is not included in
the arrow palette to indicate electron flow.
To create a customized arrow using the Pen tool.
6. Drag upward to create a curve segment.
OOH
1. Click the Pen tool
.
2. From the Curves menu, choose Arrow at
End.
40•Tutorials
CambridgeSoft
Tutorial 2: Drawing an Intermediate
Tutorial 3: Using Rings
Refine the shape of the arrow:
1. Point to the handle pointing away from and to
the right of the curve. This is a tangent handle
that controls the tangent of the curve that it
touches.
In this tutorial you will draw more complex
structures by using rings.
O
CH
2. Drag the handle upward to the right to make
the arrowhead point more inward.
Open a new ChemDraw document:
1. From the File menu, choose New Document.
2. From the File menu, choose Save As.
3. Type tut3.cdx in the appropriate text box.
4. Select a folder in which to save the file.
3. Press Esc when you are finished.
4. Create additional arrows as described above to
complete the intermediate as shown below.
O
-
5. Click Save.
Create a ring:
1. Click the Cyclohexane Ring tool
.
2. Point in an empty area of a document window.
OH
3. Click to add a ring.
NOTE: If you want to magnify the entire document so you
can see arrows or other objects that are in small places, choose
Magnify from the View menu.
Fuse a second ring to the first:
Save and close the document:
1. From the File menu, choose Save.
1. Point to the center of lower right bond in the
ring.
2. From the File menu, choose Close.
ChemDraw 9
Tutorials
Tutorial 3: Using Rings
•
41
2. Click to fuse another ring.
2. Click to fuse another ring.
Administrator
Fuse a third ring:
1. Point to the bond shown below.
Remove atoms and their bonds from the ring using
the Eraser tool:
1. Click the Eraser tool
.
2. Point to the atom shown below.
2. Click to fuse another ring. Your document
should contain the structure shown below.
Fuse a fourth ring:
A highlight box appears on the atom to be
removed.
3. Click to delete the atom and its bonds.
1. Point to the bond shown below.
42•Tutorials
CambridgeSoft
Tutorial 3: Using Rings
4. Click each of the atoms shown below to delete
3. Drag upward to draw a double bond.
the bonds.
Add another double bond:
1. Point to the bond shown below.
The resulting structure is shown below.
2. Right-click, point to Double, and then choose
Plain.
Realign the double bond so it is centered:
Add double bonds to the structure:
1. Point to the center of the upper double bond.
1. Click the Solid Bond tool
.
2. Point to the atom indicated below.
2. Right-click, point to Bond position, and then
choose Centered.
ChemDraw 9
Tutorials
Tutorial 3: Using Rings
•
43
Add a carbon atom label:
Save and close the document.
1. Point to the atom shown below.
1. From the File menu, choose Save.
2. From the File menu, choose Close.
Administrator
Tutorial 4: Fischer
Projections
2. Press the c key on your keyboard. “c” is a
Hotkey assigned to the atom label C.
The CH atom label appears with the correct
number of hydrogen atoms.
Add an oxygen atom label to complete the
structure:
1. Point to the atom shown below.
CH
This tutorial demonstrates creating a Fischer
projection of glucose (shown below) by drawing a
linear series of bonds. You can also create the same
drawing using a template.
CHO
HFischer
Glucose
HO70%
OH
H
H
OH
H
OH
CH 2 OH
Create a document from a template by opening the
appropriate document template:
1. From File menu, point to Open Special, and
then choose ACS Document 1996.
2. Press the o key on your keyboard. “o” is a
Hotkey assigned to the atom label O.
O
CH
The new document created is based on a Style
Sheet or Stationery Pad.
NOTE: These special documents allow you to have preconfigured settings for different tasks. In this example, the
ACS template provides the required settings for structures to
be published in all ACS journals:
• One-column layout (Page Setting)
• Bonds with a Fixed length of 0.2 inches
(Drawing Setting)
• Atom Labels in 10 point Arial or Helvetica font (Text
Setting)
2. From the File menu, choose Save As.
3. Type tut4.cdx in the appropriate text box.
44•Tutorials
CambridgeSoft
Tutorial 4: Fischer Projections
4. Select a folder in which to save the file.
3. Repeat step 1and step 2 three times to draw a
total of five bonds.
5. Click Save.
Draw the first bond:
1. Click the Solid Bond tool
.
2. Point in the document window. Drag
downward vertically to draw the first bond.
Add a second bond:
1. Point to the lower atom.
2. Drag downward to draw the second bond.
NOTE: When you drag the pointer along the length of the
bonds, the pointer alternates between an arrow and a cross.
The arrow indicates you are pointing over the center of a
bond, and the cross indicates you are pointing to an atom.
Add horizontal bonds to the second atom in the
string of bonds you created:
• Point to C2 and click the atom to add a
perpendicular bond.
ChemDraw 9
Tutorials
Tutorial 4: Fischer Projections
•
45
Add a horizontal bond in the opposite direction:
• Continue pointing to C2 and click the atom to
Administrator
add a perpendicular bond in the opposite
direction.
2. Continue pointing to C3 and click the atom to
add a perpendicular bond in the opposite
direction.
3. Repeat step 1 and step 2 for the fourth (C4)
Add bonds to the next three carbon atoms:
and fifth (C5) atoms.
1. Point to C3 and click the atom to add a
perpendicular bond.
46•Tutorials
CambridgeSoft
Tutorial 4: Fischer Projections
Add labels to C1 and C6:
3. Point to C6.
1. Point to C1.
2. Double-click C1 to create a text box, then type
CHO.
4. Double-click C6 to create a text box, then type
CH2OH.
CHO
5. Type Esc to deselect the label.
6. Add the H and OH labels:
ChemDraw 9
Tutorials
Tutorial 4: Fischer Projections
•
47
1. Point to the atom shown below.
CHO
4. Label the remaining atoms by typing o to label
them with OH. The result should appear as
shown below.
Administrator
CHO
H
Fischer
H OGlucose
70%
OH
H
H
OH
H
OH
C H 2O H
CH2OH
2. Type h to label the atom using the Hotkey label
for hydrogen.
View the basic properties of the structure you drew
and paste the information into your document:
1. Click a selection tool to automatically select the
last structure drawn. If the structure is not
selected, double-click the structure.
2. From the View menu, choose Analysis
Window.
The Analysis window appears. You can drag
the window to any position.
CHO
H
CH2OH
3. Repeat step 2 for the remaining hydrogen
atoms shown below.
CHO
H
H
H
H
CH2OH
48•Tutorials
CambridgeSoft
Tutorial 4: Fischer Projections
3. Click Paste to paste the information as a
caption below the structure.
1. Click the Cyclohexane Ring tool
.
2. Point in an empty area of a document window.
CHO
H
Draw a ring:
OH
HO
H
H
OH
H
OH
3. Click to add a ring.
CH2OH
C6H12O6
Exact Mass: 180.06
Mol. Wt.: 180.16
m/e: 180.06 (100.0%), 181.07 (7.1%), 182.07 (1.4%)
C, 40.00; H, 6.71; O, 53.29
Save and close the document:
Rotate the ring:
1. From the Edit menu, choose Select All.
1. From the File menu, choose Save.
2. From the File menu, choose Close.
Tutorial 5: Perspective
Drawings
In this tutorial you will learn how to create a
perspective drawing by drawing the following
α -D-glucose as a Haworth projection.
2. Point to the upper right corner of the Selection
Rectangle (the Rotation handle).
CH2OH
O
OH
OH
OH
OH
Create a new document using the ChemDraw
default style:
1. From File menu, point to Open Special, and
then choose New Document.
NOTE: The cursor changes to a curved double-sided arrow
to indicate the rotation mode of a selection tool is activated.
3. Drag the Rotation handle to the right about 30
degrees. The amount of rotation is displayed
on the screen and in the Info window.
2. From the File menu, choose Save As.
3. Type tut5.cdx in the appropriate text box.
4. Select a folder in which to save the file.
5. Click Save.
ChemDraw 9
Tutorials
Tutorial 5: Perspective Drawings
•
49
Administrator
Even though Fixed Angles is on, the angle is not
constrained. The Fixed Angles feature constrains
angles only when they are being drawn. For
example, if you created this ring by dragging instead
of clicking, the angle would be constrained when
Fixed Angles is on.
Change cyclohexane to tetrahydropyran:
4. Point to C1 again.
O
5. Drag downward to create another bond.
O
1. Click outside the structure to deselect it.
2. Point to the atom indicated below.
6. Repeat for the atoms indicated by the arrows
below.
3. Type o.
O
Add vertical bonds:
1. Click the Solid Bond tool
.
2. Point to the atom shown below.
The result appears as shown below.
O
O
3. Drag upward to create a bond.
Draw one bond upward at C5:
1. Point to the atom shown below.
O
50•Tutorials
O
CambridgeSoft
Tutorial 5: Perspective Drawings
2. Hold the mouse button and drag upward.
Distort the structure to change its aspect ratio to
give the perspective of viewing the structure along
the Z-axis.
1. Click the Lasso tool
O
.
2. Point to the Resize handle (lower right corner)
and press the Shift key.
Resize handle
For the downward bond for C5, you must turn
Fixed Lengths off or the bond will be joined to the
upward bond of C3.
You can temporarily disable Fixed Lengths using a
modifier key:
1. Point to the atom shown below.
NOTE: The cursor changes to a cross with arrows at
each end indicating the distortion function of a selection
tool.
3. Drag upwards until you have distorted the
structure to about 50%, as shown on the screen
or in the Info window.
O
2. Hold down the mouse button, press the Alt or
Option key and drag downward from C5. Stop
dragging about half the distance to the upward
bond on C3.
O
Next, you create OH labels. Because this label is
repeatedly used, you will learn how to repeat a label.
Only labels created by opening a text box are
repeatable.
1. Select the Solid Bond tool, point to the atom
shown below and double-click to open a text
box.
O
ChemDraw 9
Tutorials
Tutorial 5: Perspective Drawings
•
51
2. Type OH, move the pointer to the next atom as
shown, and triple-click to repeat the atom label.
Administrator
CH2OH
O
OH
O
OH
3. Triple-click the remaining atoms (as shown
below) to repeat the OH label.
OH
The cursor changes to a bold arrow as you
point at the bond.
OH
OH
OH
3. Click to change to the new bond type.
CH2OH
O
OH
O
OH
OH
OH
OH
OH
NOTE: If you find it difficult to place the labels
because of the size of the drawing, choose Magnify from
the View menu.
Add the CH2OH label:
OH
4. Click the Bold Wedge bond tool
CH2OH
O
OH
OH
1. Triple-click the upper atom of C5.
2. Press the Enter or Return key to open the
atom label text box and type CH2 before the
OH.
CH2OH
O
OH
OH
OH
OH
NOTE: The Enter or Return Hotkey opens a text
box for the last atom labeled. The definition for this
particular Hotkey cannot be changed.
Change the type of the front bonds:
1. Click the Bold Bond tool
.
2. Point to the center of the bond shown below.
52•Tutorials
.
5. Point to each of the bonds shown below.
OH
OH
6. For each bond, point slightly off center in the
direction that you want the wide end of the
wedge to be oriented and click.
NOTE: If you move the pointer too far, the highlight
box disappears. Choose Magnify from the View menu
if you find it difficult to place the pointer.
The resulting structure is shown below.
CH2OH
O
OH
OH
OH
OH
NOTE: If the wedge is pointed in the wrong direction,
click the bond again to flip its orientation.
CambridgeSoft
Tutorial 5: Perspective Drawings
Save and close the document:
1. From the File menu, choose Save.
2. From the File menu, choose Close.
Tutorial 6: Newman
Projections
This tutorial demonstrates how to draw a Newman
projection. You can also create the same drawing
using a template.
Create a ChemDraw document:
1. From the File menu, choose New Document.
2. From the File menu, choose Save As.
3. Type tut6.cdx in the appropriate text box.
4. Select a folder in which to save the file.
5. Click Save.
Create the first bond:
1. Click the Solid Bond tool
.
2. Point in the document window and drag
downward to create the first bond.
3. Continue pointing at the lower atom and click
again to add a second bond.
ChemDraw 9
Tutorials
Tutorial 6: Newman Projections
•
53
4. Continue pointing at the same atom and click
again to add a third bond.
2. Point to the central atom of the lower
fragment.
Administrator
5. Click the Lasso tool
.
The last structure you drew is automatically
selected.
6. Point within the Selection rectangle and hold
the Ctrl or Option key.
NOTE: When connecting existing atoms, the Fixed
Length and Fixed Angles commands are ignored.
3. Click and drag to the central atom of the upper
fragment.
4. Release the mouse button when the highlight
box over the central atom appears.
7. Hold the mouse button and drag a copy of the
structure diagonally upward to the right of the
original.
In this step, you will use the Orbital tool to draw the
hollow circle that is particular to Newman
Projections rather than an orbital.
1. Click the Orbital tool
.
2. Click the unfilled s orbital.
8. Release the mouse button and depressed key
when the copy is positioned.
Add a bond between the duplicated structures:
1. Click the Solid Bond tool
54•Tutorials
.
3. Point to the left center carbon and drag
outward.
CambridgeSoft
Tutorial 6: Newman Projections
The size of the orbital is constrained just like
bonds. The constraint is based on a percentage
of the Fixed Length setting in the Drawing
Settings dialog box.
NOTE: Orbitals are not automatically grouped with
the closest structure. If you want to group the orbital
with the existing structure so you can move them as a
unit, choose Group from the Object menu.
Rotate the selection:
1. Double-click the Rotation handle in the upper
right of the Selection Rectangle to open the
Rotate dialog box.
2. Type 180 in the text box, select degrees CW,
and then click Rotate.
Move part of the structure to the front to overlap
the orbital:
1. Click the Marquee tool
.
2. Point above the structure and drag around the
upper fragment to select the three bonds.
RotateObjectsDB 150 dpi
Change the layering of the structure so that the
selection is in front:
• From the Object menu, choose Bring to
Front.
Orient the front part of the structure to create a
Newman projection.
1. Point within the Selection Rectangle until the
pointer changes to a hand.
NOTE: Only bonds that are completely within the Lasso
area are selected. Do not select the bond connecting the two
fragments. Alternately, you can Shift+click on each bond
separately.
ChemDraw 9
Tutorials
Tutorial 6: Newman Projections
•
55
2. Drag the selection until the central atom of the
selection is centered within the orbital.
Administrator
3. Release the mouse button and click outside the
Selection Rectangle to deselect the structure.
1. Click the Solid Bond tool
.
2. Click in the document window and drag
downward to create the first bond.
3. Continue pointing at the lower atom and click
again to add a second bond.
Save and close the document:
1. From the File menu, choose Save.
2. From the File menu, choose Close.
Tutorial 7: Showing
Stereochemistry
This tutorial demonstrates using Stereochemistry
markers and the flip command.
Create a new document.
4. Continue pointing at the same atom and click
again to add a third bond.
5. Point to the atom shown below and click.
1. From the File menu, choose New Document.
2. From the File menu, choose Save As.
3. Type tut7.cdx in the appropriate text box.
4. Select a folder in which to save the file.
5. Click Save.
6. Point to the atom shown below and click twice
to create two bonds.
Draw the following structure:
O
OH
7. Pointing to the bond shown below, right-click,
point to Double, and then choose Plain.
NH2
56•Tutorials
CambridgeSoft
Tutorial 7: Showing Stereochemistry
8. Click the Wedged Bond tool, point to the atom
below, and then click.
Display the stereochemical markers.
1. Select the entire structure with the Lasso or
Marquee.
2. From the Object menu, choose Show
Stereochemistry.
The S marker appears.
Add atom labels.
O
1. With the Text tool, click the atom shown
below, and then type NH2 in the text box that
appears.
(S)
OH
NH2
3. Select the structure and from the Object menu,
choose Flip Horizontal.
The R marker appears.
O
2. With the Text tool, click the atom shown
below, and then type O in the text box that
appears.
(R)
HO
NH2
4. With the structure selected do the following:
NH2
3. With the Text tool, click the atom shown
below, and then type OH in the text box that
Click the Object menu. While holding the
mouse button, press the Alt or Shift+Option
key and choose Rotate 180° Vertical.
NH2
appears.
O
HO
(R)
O
NH2
The Wedged bond becomes hashed and the (R)
stereochemistry is preserved.
Save and close the document:
1. From the File menu, choose Save.
2. From the File menu, choose Close.
ChemDraw 9
Tutorials
Tutorial 7: Showing Stereochemistry
•
57
Administrator
58•Tutorials
CambridgeSoft
Tutorial 7: Showing Stereochemistry
Chapter 3: Drawing Chemical
Structures
Overview
ChemDraw provides the following tools for
drawing chemical structures:
• Bond tools.
• Ring tools.
• Text tools.
• An acyclic chain tool.
• Automatic error checking.
Drawing Settings
Drawing settings are document settings that affect
how bonds and other objects are drawn. You can
configure the drawing settings for an entire
document or for a particular object as follows:
The drawing settings are described in the following
table:
Adjust
this…
If you want to …
Chain Angle Set the angle (from 1 to 179
degrees) between bonds
created by the Acyclic chain
tool or modified by the
Structure CleanUp command.
For more information see,
“Drawing Acyclic Chains” on
page 68 and “Using Structure
CleanUp” on page 128.
• For the entire document, use the Document
Settings dialog box.
• For an object, use the Object Settings dialog
box.
Changes made to the drawing settings affect the
active document window only. Drawing settings can
be saved in Style Sheets or Stationery Pads.
To apply settings from other documents to your
document, select “Apply Document Settings
from...” from the File menu.
ChemDraw 9
Drawing Chemical Structures
Drawing Settings
•
59
Administrator
Adjust
this…
If you want to …
Adjust
this…
Bond
Spacing
Set the distance between the
lines in double or triple bonds.
The distance is set either as:
Bold Width Set the width of the line used
when bold and wedge bonds
are drawn. The Bold Width
setting must be greater than the
Line Width setting. The end of
a wedge is 1.5 times the bold
width.
• The percent of the length
of the bond (between 1
and 100). This allows for
proportional spacing to be
used if different bond
lengths are used in the
drawing.
If you want to …
2 Point
4 Point
8 Point
Line Width Set the width of all bonds, lines,
and arrowheads in the drawing.
10%
14%
18%
An absolute value you choose
in the units specified for your
document.
0.5 Point
Fixed
Length
Constrain the length of the
bonds drawn to the length you
specify when the Fixed Lengths
command in the Object menu
is selected (a check mark is next
to it). This also adjusts the
preferred bond length for
structures modified by the
Structure CleanUp command.
For more information see
“Drawing with Fixed Lengths”
on page 64 and “Using Structure
CleanUp” on page 128.
60•Drawing Chemical Structures
Margin
Width
1 Point
1.5 Point
Change the amount of space
surrounding all atom labels that
will erase portions of the bonds
to which they are attached. The
margin width also determines
the amount of white space
surrounding the front bonds in
a bond crossing.
For more information, see
“Editing Atom Labels” on
page 87 and “Changing Bond
Crossings” on page 71.
CambridgeSoft
Drawing Settings
The Document settings dialog box appears.
Adjust
this…
If you want to …
Hash
Spacing
Set the spacing between the
hashed lines used when wedged
hashed bonds, hashed bonds,
dashed bonds, dashed arrows,
or dashed curves are drawn.
2 Point
Color
4 Point
8 Point
Change the color in of selected
objects. For more information,
see “Customizing the Color
Palette” on page 131.
Units
Set the units used in the Object
Settings dialog box to
centimeters, inches, points, or
picas.
Atom and
Bond
Indicators
Set which indicators you want
to display in your drawings. For
more information about using
indicators, see “Atom
Numbering” on page 89 and
“Showing Stereochemistry” on
page 139.
2. Click the Drawing tab and configure the
settings.
Configuring Settings for
Documents
To configure the drawing settings for an entire
document:
1. From the File menu, choose Document
Settings.
ChemDraw 9
3. Click OK when you are finished.
The settings you chose are applied to the entire
document.
Drawing Chemical Structures
Drawing Settings
•
61
Configuring Settings for
Objects
Administrator
To configure the drawing settings for a selected
object:
1. Select the object.
2. From the Object menu, choose Object
Settings.
The Object Settings dialog box appears with
the Drawing tab displayed.
Drawing Bonds
The Main Tools palette contains the bond tools
shown below:
Solid Bond
Multiple Bonds
Dashed Bond
Hashed Bond
Hashed Wedged Bond
Bold Bond
Bold Wedged Bond
Hollow Wedged Bond
Wavy Bond
Multiple Bonds
The Multiple Bond tool on the Main toolbar
includes the following palette.
3. Configure the settings and click OK.
The settings you chose are applied to the
selected object only.
62•Drawing Chemical Structures
CambridgeSoft
Drawing Bonds
You can use the tools on the Multiple Bond palette
to create the following multiple bonds:
Double
Bold Double
Tautomeric
.Double Either Bonds
To draw a double either bond select the double
either bond tool from the Multiple Bonds palette,
or:
1. Draw a bond using the Wavy Bond tool.
2. Point to the center of the bond and click to
create a double bond
3. Click again to create a double either bond.
Aromatic
Double Either
Dative
Triple
Triple Bonds
You can draw a triple bond by drawing another
single bond on top of a double bond. All bonds in
a triple bond are solid bonds.
To draw a triple bond select the triple bond tool
from the Multiple Bonds palette, or:
1. Click any bond tool.
Quadruple
NOTE: You can also draw multiple bonds by right-clicking
over a bond and selecting the bond type from the shortcut
menu or by using the bond properties dialog box. For more
information, see “Bond Properties” on page 155.
2. Drag from one end of an existing double bond
to the other.
Quadruple Bonds
To draw a quadruple bond select the quadruple
bond tool from the Multiple Bonds palette, or:
1. Click any bond tool.
2. Drag from one end of an existing triple bond to
Double Bonds
There are three ways to draw a double bond:
the other.
The triple bond changes to a quadruple bond.
• Use the Double bond tool
• Using the Solid, Dashed, or Bold bond tool:
a. click an existing single bond.
b. drag over the length of an existing single
bond.
To change a quadruple bond into a single bond:
1. Click any bond tool.
2. Drag from one end of an existing quadruple
bond to the other.
ChemDraw 9
Drawing Chemical Structures
Drawing Bonds
•
63
The quadruple bond changes into a single
bond corresponding to the tool used to draw
over the bond.
Administrator
NOTE: You can also use the Eraser tool to reduce the bond
order. For more information, see “Changing the Bond
Order” on page 71.
Drawing Constrained Bonds
You can draw any bond length and create any angle
relative to the X-axis. The Info Window displays the
bond length and angle as you drag the bond.
However, you can draw bonds that are constrained
to:
• A fixed length
• A fixed angle relative to the X-axis
Drawing with Fixed Lengths
To draw bonds that are constrained to a fixed
length:
1. From the Object menu, choose Fixed
Lengths.
A check mark appears next to the Fixed
Lengths command indicating that it is selected.
All the bonds drawn are constrained to the
fixed length specified in the Drawing Settings
dialog box.
2. Click a bond tool.
3. Drag from one end of the bond to the other.
The Info Window displays the bond length.
Drawing with Fixed Angles
2. Click a bond tool.
3. Drag from one end of the bond to the other in
a document window.
4. Move the end of the bond to other angles.
The Info Window shows that the bond angle is
constrained to 15-degree increments.
Toggling Fixed Lengths and Fixed
Angles
If Fixed Lengths or Fixed Angles are selected, you
can temporarily deselect them.
To toggle Fixed Lengths and Fixed Angles:
• Press the Alt or Option key and drag from one
end of a bond to the other end in the document
window.
Dative Bonds and Wedged
Bonds
Dative bonds and wedged bonds are drawn with a
fixed orientation in a document window.
To draw a dative bond:
1. Click the Dative Bond tool.
2. Drag from the positive to the negative end
(arrow head) of the dative bond.
To draw bonds with constrained angles that are
multiples of 15 degrees relative to the X-axis:
1. From the Object menu, choose Fixed Angles.
A check mark appears next to the Fixed Angles
command indicating that it is on.
64•Drawing Chemical Structures
CambridgeSoft
Drawing Bonds
To draw a wedged bond:
1. Click one of the wedged bond tools.
2. Drag from the narrow end of the wedged bond
to the wide end of the wedged bond.
Adding Bonds by Dragging
To control the orientation of bonds that you draw,
you can add bonds by dragging.
By using this dragging method for drawing the
bond, you can control the orientation of the other
end of the bond.
To add a bond by dragging:
To change the orientation of the dative or wedged
bond:
1. Click a bond tool.
2. Point to an atom.
• Click the center of the dative or wedge bond
using the appropriate tool.
The orientation of the bond is inverted.
Adding a Bond by Clicking
To add a fixed length bond:
1. Select a bond tool.
2. Click an atom.
A new bond is drawn and joined to the atom
you clicked.
Bonds drawn by this method are always drawn
using the Fixed Length specified in the Drawing
Settings dialog box. The angle that the deposited
bond makes with its nearest neighbor is equal to the
Chain Angle set in the Drawing Settings dialog box.
If this angle cannot be established, a smaller angle is
used.
A highlight box appears over the atom
indicating where the bond will be joined.
3. Drag from the atom at which you are pointing
to the end of the new bond.
A new bond is drawn and joined to the atom
where the highlight box appeared.
Changing the Highlight Box
Size
The size of highlight box is controlled by the
Tolerance value in the Preferences dialog box. With
the default Tolerance setting of 5 pixels, the
highlight box appears on atoms if the pointer is
located in a square region 10 pixels on a side or +/5 pixels from the atom.
To change the Tolerance:
1. From the File menu, choose Preferences.
2. On the General tab, select or type the
tolerance, and then click OK.
ChemDraw 9
Drawing Chemical Structures
Drawing Bonds
•
65
Drawing Rings
Administrator
The Main Tools palette contains the following ring
tools that enable you to draw ring sizes and types:
Cyclopropane
Cyclobutane
Cyclopentane
Cyclohexane
Cycloheptane
Cyclooctane
Cyclohexane Chair (1)
Cyclopentadiene
Cyclohexane Chair (2)
When you point in a document window, the pointer
changes to a ring tool pointer. The highlight box on
the ring tool pointer indicates the atom that is
drawn first. The bond directly below the highlight
box is the bond that is drawn first.
First atom drawn
First bond
drawn
Benzene
Drawing a Ring
Drawing a Ring by Clicking
If Fixed Lengths is on when you draw a ring, the
length of each bond in the ring is automatically set
to the fixed length. If Fixed Angles is on, the angle
the first bond in the ring makes with the X-axis is
restricted to 15-degree increments. For more
information, see “Drawing Constrained Bonds” on
page 64.
To quickly draw a ring:
To draw a ring:
1. Click a ring tool.
• Click a ring tool, and then click in a document
window.
A ring appears in a document window centered
around the pointer. The ring is drawn using the
Fixed Length specified in the Drawing Settings
dialog box. The ring is deposited in the
orientation shown on the ring tool icon.
If you click an atom, the ring is fused to that atom.
2. Position the pointer in a document window.
The cyclohexane tool is shown below:
3. Drag from the beginning to the end of the first
If you click a bond, the ring is fused to that bond.
bond.
66•Drawing Chemical Structures
CambridgeSoft
Drawing Rings
If you click an atom in a ring, a spiro linkage is
formed.
A circle appears inside the ring.
Drawing Cyclohexane Chair
Rings
NOTE: The circle is automatically grouped with the ring
when drawn. For more information on grouping objects, see
“Grouping Objects” on page 118.
You can draw Cyclohexane chair rings in two
orientations: horizontal and vertical.When you
draw a cyclohexane chair ring by clicking, the chair
is drawn in a horizontal orientation.
Drawing Cyclopentadiene
and Benzene Rings
To orient a cyclohexane chair ring to a vertical
orientation:
The double bonds in the cyclopentadiene or
benzene ring tools can be drawn in either of two
forms.
1. Click one of the Cyclohexane Chair Ring tools.
2. Drag in the structure to the orientation you
want.
When you draw a cyclopentadiene or benzene ring
a double bond is drawn first. The Cyclopentadiene
and Benzene Ring tool pointers indicate this
orientation.
To shift the orientation so the first bond drawn is a
single bond, do one of the following:
• Shift+drag from the beginning of the first
Horizontal Orientation
Vertical Orientation
Drawing Resonance
Delocalized Rings
single bond to the end of the single bond.
• Shift+click in a document window to draw the
bond with a Fixed Length.
In the figure below, the arrow indicates the
direction in which the first bond is drawn.
Any of the ring tools, except the cyclohexane chairs,
can be drawn in a resonance delocalized form.
To draw a resonance delocalized ring:
1. Click a ring tool.
2. Press the Ctrl or Command key and drag or
click to draw the ring.
ChemDraw 9
Drawing Chemical Structures
Drawing Rings
•
67
Drawing Acyclic
Chains
Adding Chains
To add an acyclic chain to an existing atom:
Administrator
You can draw long hydrocarbon chains with the
1. Click the Acyclic Chain tool.
Acyclic Chain tool
. The behavior of the
Acyclic Chain tool is affected by the “Fixed
Lengths” and “Fixed Angles” switches on the
Object menu, and by the “Chain Angle” setting on
the Object Settings dialog box.
2. Point to the atom to which you want to attach
NOTE: Modifying the Chain Angle value for an existing
object will have no effect on that object, but new bonds/chains
sprouted from it will sprout at the specified angle.
3. Drag in the direction you want the chain to
the chain.
grow.
2
The effect of “Fixed Lengths” and “Fixed Angles”
is noted in the specific sections where it applies.
Drawing Chains
To specify a chain length:
1. Click the Acyclic Chain tool.
To draw an acyclic chain:
2. Click an existing atom or an empty area in a
1. Click the Acyclic Chain tool.
2. Drag in the direction you want the chain to
grow in a document window.
document window.
The Add Chain dialog box appears.
5
AddChain 150 dpi
A number appears at the end of the chain
indicating how many atoms you have drawn.
When Fixed Lengths is on, the pointer on the
acyclic chain can be dragged to make any angle
relative to the X-axis. At a constant chain length, the
positions of the first bond and all subsequent
odd-numbered atoms depend on the direction you
drag. Before releasing the mouse button, this
position can be changed by dragging in the opposite
direction. When Fixed Angles is on, the angle the
acyclic chain makes relative to the X-axis is
constrained to 15-degree increments.
3. Type the number of bonds in the chain.
4. Click Add.
To add another chain of the same length anywhere
in a document window:
• Alt+click or Option+click an existing atom
or click in an empty area within the document
window.
Changing Chain Direction
To change the direction of the chain as you draw:
68•Drawing Chemical Structures
CambridgeSoft
Drawing Acyclic Chains
• Press the Ctrl or Command key while
drawing chains in the direction you want.
Changing Double Bonds
To change one type of double bond to another:
1. Click the Bold, Dashed, or Solid Bond tool.
2. Point to one of the bonds in the double bond.
NOTE: If Fixed Lengths is off, use Ctrl+Alt or
Command+Option to reverse chain direction. Fixed
Angles must be on to reverse direction.
3. Click the bond.
Editing Bonds
You can modify the appearance of chemical
structures by:
• Changing bond types
• Changing bond alignment and orientation
• Moving atoms
• Layering bonds
• Changing the bond order
The double bond changes to the new bond
type. One of the bonds in the double bond is
always a solid or dashed bond.
NOTE: If you click a tautomeric bond (solid/dashed) a
second time with the dashed bond tool, you create an aromatic
double bond (dashed/dashed).
Changing Bond Types
To change a single bond from one type to another:
1. Click a bond tool.
2. Point at the center of an existing bond and
click.
Changing Orientation of
Wedged and Dative Bonds
When you draw or change a bond to a wedged or
dative bond, the orientation of the bond is chosen
appropriately.
To change the orientation:
• Click the dative or wedged bond with the tool
The bond that you click changes to the new
bond type.
used to create it.
CO2H
HO
H
CH3
ChemDraw 9
Drawing Chemical Structures
Editing Bonds
•
69
The dative or wedged bond is changed to the
opposite orientation.
CO2H
Administrator
H
HO
CH3
Changing Alignment of
Double Bonds
The bonds in a double bond can have any one of
three alignments relative to other bonds:
• Above
Hotkey
Result
l
to position a double bond
to the left (above).
r
to position a double bond
to the right (below).
Moving Atoms
You can use any of the bond tools to move an atom
within acyclic or cyclic structures. You cannot use a
ring tool.
To move an atom in a chemical structure:
• Below
1. Click a bond tool.
• Centered
2. Point at the atom to move.
To change the alignment of a double bond:
A highlight box appears over the atom.
1. Click the bond tool used to create the existing
double bond.
2. Do one of the following:
• Click the center of the double bond.
The alignment changes. Click the center of
the double bond again to change to the next
alignment.
• Right-click or Control-click, point to Bond
Position, and then choose the alignment.
3. Shift+drag the atom.
You may also use Hotkeys to change the alignment:
1. Click a bond or selection tool.
2. Point to the bond and type:
Hotkey
Result
c
to center a double bond.
70•Drawing Chemical Structures
You can convert ring types by dragging one atom
on top of an adjacent atom. For example, you can
use this method if you want to convert a
6-membered ring into a 5-membered ring.
CambridgeSoft
Editing Bonds
To convert ring types:
1. With a bond tool selected, point to an atom
and Shift+Drag.
You can also layer bonds using the Bring to Front
and Send to Back commands. For more
information, see “Front to Back Ordering” on page
185. Another way to layer bonds is to use the
Hotkey “f ”.
NOTE: You can magnify your view to make changing the
bond layering easier. For more information, see “Changing
Perspectives” on page 181
2. Release when one atom is on top of the other.
Changing the Bond Order
The bond between the atoms disappears.
You can reduce or increase the order of bonds in a
structure by using the Bond Properties dialog box
or with the shortcut menus as follows.
To reduce the bond order:
NOTE: You can also move atoms using a selection tool. For
more information see “Moving Objects” on page 111.
Changing Bond Crossings
When one bond crosses another, white space is
used to indicate which bond is in front of the other.
To change which bond is in front:
1. Click any bond tool.
2. Double-click the bond to bring it to the front.
1. Point to the bond to change and Right-click or
Control-click.
2. Choose the appropriate bond type from the
shortcut menu that appears.
To use the eraser tool to reduce the bond order:
1. Click the Eraser tool.
2. Click a single, double, or triple bond.
The bond order is reduced by one.
To change the bond order using Hotkeys:
1. Click a selection tool.
2. Point to a bond.
3. Type a number from 1 to 4 to change the order.
The bond appears in front.
Automatic Warnings
ChemDraw automatically checks for correct
chemical syntax as you draw. If ChemDraw finds a
potential problem, a wavy red box is displayed
around the questionable object. The red box is
displayed on screen only and does not print.
ChemDraw 9
Drawing Chemical Structures
Automatic Warnings
•
71
To enable the automatic display of chemical
warnings:
The Display tab appears.
• On the View menu, choose Show Chemical
Administrator
Warnings.
This setting applies to all documents.
To view a description of the problem, do one of the
following:
• Point at the warning with the mouse to display
a tool tip that describes the error.
• Right-click on the warning and choose
Explain This Warning.
• Select the structure, and choose Check
Structure from the Structure menu.
For more information, see “Checking
Chemistry” on page 137.
To select which types of chemical warnings to
display:
1. From the File menu, choose Preferences.
2. Click Display.
3. In the Chemical Warnings section, click the
types of warnings you want to display.
To disable the automatic error checking on a
specific object:
• Right-click the object and deselect Display
Warnings.
When Display Warnings is deselected for an object:
• Red boxes are not displayed for questionable
objects.
• Problems are reported by the Check Structure
command. For more information on the Check
Structure commands, see “Check Structure”
on page 137.
72•Drawing Chemical Structures
CambridgeSoft
Automatic Warnings
Chapter 4:
Ultra
Struct<=>Name
Struct<=>Name is CambridgeSoft’s package of
structure-to-name and name-to-structure
algorithms included with ChemDraw Ultra.
Together, they give you unprecedented power and
convenience in creating and naming structures.
The conversion of a structure to a name is limited
by many factors. Specifically, Struct=Name makes
little or no attempt to name the following:
• Bridged ring systems with more than one
bridge (for example, tricycles.)
Struct=Name generates systematic names for
chemical structures with support for the CahnIngold-Prelog rules for stereochemistry. It is under
continuing development to improve the range of
compounds covered.
• Radicals.
Name=Struct is a comprehensive algorithm for
converting English chemical names into chemical
structure diagrams. It is designed to interpret
chemical names as they are actually used by
chemists. In other words, it recognizes the
shorthand and slang of everyday usage, in addition
to recognizing most of the official IUPAC, IUBMB,
and CAS rules and recommendations. In addition,
it has an extensive algorithm for the identification
of common “typos” (typing errors, such as
“mehtyl”) to increase the odds of generating
structures for the names it is given.
• Polymers.
Struct=Name
You can insert the name of a selected structure as a
caption using the Convert Structure to Name
command from the Structure menu.
The Struct=Name algorithm in use since
ChemDraw 8.0 is a new proprietary naming
algorithm developed by CambridgeSoft. It replaces
Beilstein’s AutoNom algorithm used in earlier
versions of ChemDraw. In ChemDraw 9.0, an
auto-update feature has been added that renames
the structure as you modify it.
ChemDraw 9
• Compounds with non-standard valence states.
• Spiro ring systems.
• Isotopically modified compounds.
• Biochemicals. including specialized
nomenclature for amino acids, carbohydrates,
and steroids. For such compounds, only the
fully systematic organic name is produced.
Nomenclature types added in ChemDraw 9.0
include:
• Most of the most-common fused ring systems,
both those with trivial names (naphthalene,
indole) and those with systematic names
(benzo[e][1,4]diazepine, thieno[3,2b]thiophene).
• Most salts.
• Structures with a net charge.
• Simple mixtures and multicomponent systems.
• Heterochains.
• Multiplicative nomenclature.
• Ring assemblies.
• Bicyclics.
• Basic inorganics.
Struct=Name generates names with proper CIP
stereochemistry descriptors. It has no theoretical
limits to the size of the structures that can be
named.
Struct<=>Name
Struct=Name
•
73
To insert the name of a structure into your drawing:
1. Select the drawing for which you want to insert
a name.
When auto-update is on (default) the label updates
each time you modify the structure.
Administrator
NOTE: For large complex structures, it may take the new
label a few seconds to appear on the screen, depending on the
speed of your processor. You do not have to wait for the new
label to appear before continuing to modify your structure.
2. From the Structure menu, choose Convert
Structure to Name.
Name=Struct
You can draw a structure automatically from a
chemical name using Name=Struct.
Name=Struct recognizes most organic
nomenclature. Inorganic chemistry is also usually
recognized, especially when the rules closely match
those for organic chemistry.
Cyclohexane
The name of the structure appears as a caption
under your drawing.
Auto Update
ChemDraw 9.0 captions include an auto-update
feature. Data, including the chemical name and
analysis, can be included in a caption, and will
update automatically when you modify the
structure. For more information on adding data to
captions, see “Adding Analysis Data to a Caption”
on page 85.
To toggle the auto-update feature:
1. Point to the label.
2. Right-click and select Auto-update.
A check mark appears next to the command
when it is selected. Successive clicks toggle the
command on and off.
74•Struct<=>Name
The following are not supported:
• Coordination complexes
• Polyboranes
• Polymers
• Some highly-bridged ring systems, including
fullerenes and porphyrins/porphines
• Some stereochemistry designators: +, -, +/-,
+-, D, L, DL, endo, exo, syn, anti, r, t, c
Although some trade names are supported,
Name=Struct is not intended to interpret trade or
common names. A chemical database, such as
chemfinder.com, is more appropriate for obtaining
structures for trade or common names. See
“Finding Information on ChemFinder.com” on
page 222 for more information.
NOTE: Because the syntax of German is very similar to
that of English, Name=Struct can also interpret many
German names. Chemical names in other languages,
however, will generally not be recognized.
CambridgeSoft
Name=Struct
Converting Names to
Structures
If you should happen to type the name incorrectly,
Insert Structure will try to correct the error.
There are two ways to insert a name into the
document window as a structure:
• Insert Structure dialog box
• Paste Special command
Click OK to accept the suggested spelling, or click
Cancel and start again to make a manual
correction.
Insert Structure
Insert Structure is designed for typed-in entries. For
example, to insert 2-bromobenzoic acid:
Paste Special
1. Choose Convert Name to Structure from
the Structure menu.
The Paste Special command allows you to paste a
name, copied to the clipboard from another
application, as a structure in ChemDraw.
The Insert Structure dialog box appears.
2. Type 2-bromobenzoic acid.
To paste a name from the clipboard:
1. Click in the document window.
2. From the Edit menu, point to Paste Special,
and then choose Name as Structure.
The structure appears in your document.
NOTE: You can also copy a name to the clipboard
and then type Crtl+V or Command+V to paste the
name into the dialog box.
Converting Captions to
Structures
If a caption is already present in the drawing area
you can convert it to a structure as follows:
1. Select the caption.
3. Click OK.
The molecular structure and name (if “Paste
name below structure” is selected) appear in
the drawing area.
Br
O
2. Choose Convert Name to Structure from
the Structure menu.
The molecular structure and name appear in
the drawing area.
OH
2-bromobenzoic acid
ChemDraw 9
Struct<=>Name
Name=Struct
•
75
Types of Structures
Supported by Struct=Name
Administrator
Struct=Name can name compounds in the
following classes of structures:
category
ChemDraw 8 supports...
ChemDraw 9 adds...
principal groups in both rings
and chains
Acid Halides
Amide derivatives of acids
Alcohols and chalcogen analogs
Anhydrides
Aldehydes and chalcogen analogs Carbonic acids
Amides
Imides
Amines and Imines
Nitric acids
Carboxylic Acids
Peroxy acids
Carboxylic Esters
Salts
Heteroatomic acid halides
Sulfides and chalcogen analogs
Heteroatomic acids (P, B, As)
Sulfoxides and chalcogen analogs
Heteroatomic esters
Hydrazides
Hydrazines
Hydroperoxides
Ketones and chalcogen analogs
Nitriles
76•Struct<=>Name
CambridgeSoft
Name=Struct
category
ChemDraw 8 supports...
ChemDraw 9 adds...
Peroxides
S, Se and Te Amides
S, Se, and Te Acid Halides
S, Se, and Te Acids
S, Se, and Te Esters
Ringed structures
Carbomonocyclic structures
Bridged monocyclic structures
Heteromonocyclic structures
Fused polycyclic trivially-named
structures
Ring fusions of only two rings
Ring fusions of two multiple ring
systems
Other compounds
Phosphorous and Arsenic
compounds
Si, Ge, Sn, and Pb compounds
Boron compounds
Organometallic compounds
ChemDraw 9
Struct<=>Name
Name=Struct
•
77
Administrator
78•Struct<=>Name
CambridgeSoft
Name=Struct
Chapter 5: Drawing Captions and
Atom Labels
Creating Text
When Automatic Atom Labels is selected:
ChemDraw enables you to create the following
types of text:
according to the positions of any bonds
attached to the atom label.
For example, a CH3 atom label entered at the
left end of a horizontal bond would reverse
itself to H3C.
• Hydrogens will be added to or removed from
atom labels as necessary to preserve standard
valences when bonds are added or changed.
You can use HotKeys to quickly label atoms. For
more information see “Labeling Atoms with
HotKeys” on page 87.
• Caption text—Create annotations, chemical
names, chemical formulas, page titles, and
information in tables.
OH
Caption Text
phenol
• Atom label text—Identify atoms and
substructures by their chemical symbols and
formulas.
Atom Label
Text
OH
• The alignment of atom labels will adjust
You create and edit caption and atom label text with
the Text tool. You set the text format in the Document Settings or Object Settings dialog box.
ChemDraw does not install its own fonts. If a
ChemDraw document contains fonts that are not
available on a particular computer, they are substituted with available fonts.
Creating a New Line and
Closing Text Boxes
phenol
The behavior of atom labels is controlled by the
Automatic Atom Labels checkbox on the General
tab of the Preferences dialog box. This preference
controls two aspects of the behavior of atom labels.
The default preference is to use Automatic Atom
Labels.
ChemDraw 9
The default way to create a new line in a caption text
box is with the Enter or Return key. The default
way to create a new line in an atom label is with
Alt+Enter or Option+Return. To close the text
box, click outside the text box or select another
tool.
Drawing Captions and Atom Labels
•
79
To change the default do the following:
1. From the File menu, choose Preferences.
Administrator
NOTE: In Mac OS X, the Preferences dialog box is found
on the ChemDraw menu.
2. On the General tab, choose the appropriate
option:
To change the
default for …
Select …
Atom Label text
Require Alt+Enter or
Option+Return to Create
New Line in Atom Labels.
Caption text
Setting Font parameters
Changing text formats in the Document Settings
dialog box affects the current document only. You
can also change settings for individual objects by
using the Object Settings dialog box, the Text
menu, or the Style toolbar.
To edit the document text settings for captions and
atom labels:
1. From the File menu, choose Document
Settings.
2. In the Document Settings dialog box, click
Captions or Atom Labels.
The Windows Captions tab containing the text
settings is shown below.
Require Alt+Enter or
Option+Return to Create
New Line in Captions.
3. Click OK.
Formatting Text
Text settings affect how captions and atom labels
for the current document are drawn and formatted.
Formatting options include:
• Font (font type)
• Size (font size)
• Style (font and baseline style)
• Line spacing
• Alignment
These options are described in the following
sections.
3. Change the settings if desired. The options are
described in the following sections.
4. Click OK.
The formatting is applied to the current document.
Setting the Baseline Style
You can specify the following baseline styles:
• Normal—Use this for standard text.
• Superscript—Reduces the text size by about
25 percent and raises its baseline.
80•Drawing Captions and Atom Labels
CambridgeSoft
Formatting Text
• Subscript—Reduces the text by about
25 percent and lowers the baseline.
• Formula—Formats in a way that is appropriate for most chemical formulas, that is,
numbers are automatically subscripted. You
must, however, captitalize manually.
You can apply several styles to the same selected
caption. You can also apply multiple styles to
different portions of a single caption.
If the captions you select have more than one style,
when you select the text with the Lasso or Marquee
tool and select Style from the Text menu, a hyphen
appears next to each style (other than Plain) that is
applied to a portion of the selection. A check mark
appears next to each style that applies to all of the
selected text. Choosing a style other than “Plain”
adds the new style to all of the selected captions.
Previously applied styles are not affected—that is,
for example, if you select Italic for a section that is
Bold, it will be Bold Italic.
To open the object settings dialog box, do the
following:
1. Select a caption or atom label with the Lasso or
Marquee tool.
2. On the Object menu, click Object Settings.
The Object Settings dialog box appears.
Captions
You specify the caption justification and line
spacing on the Captions tab of the Object Settings
dialog box. All text in a single caption must have the
same Justification and Line Spacing.
There are four available justifications:
• Flush Left—creates left-justified caption text.
• Centered—creates centered caption text.
Specifying Line Spacing
You can specify the three types of line spacing:
• Automatic—Consistently spaced lines of text
based on the height of the tallest character in
the entire caption. This is the default line
spacing.
• Variable—Lines of text with different spacing
based on the tallest character and the lowest
descender in each line.
• Fixed—Consistently spaced lines using a
spacing that you specify.
• Flush Right—creates right-justified caption
text.
• Justified—creates right-left justified caption
text.
Aligning Text
You can set the alignment of captions and atom
labels to justify text to suit your needs. The options
available depend on whether you are aligning
captions or atom labels. Settings are made in the
Object Settings dialog box.
ChemDraw 9
Drawing Captions and Atom Labels
Formatting Text
•
81
Atom Labels
Administrator
Use the Centered, Flush Left, Flush Right, Stacked
Above, or Automatic justifications to create labels
that identify atoms and functional groups in your
chemical structure without obscuring any bonds or
other atom labels.
NOTE: When using Stacked Above justification, enter the
tokens from top to bottom using Alt+Enter or
Option+Return to go to a new line. For instance, in the
example below, enter “OMe Alt+Enter [Option+Return]
CH2 Alt+Enter [Option+Return] N“.
If you change the justification after the label is entered, it will
in most cases generate a warning.
Examples of the atom label justifications are shown
below.
OMe
CH2
N
Stacked Above
RNH
Centered
N
CH2
OMe
Flush Left
N
CH2
OMe
Flush Right
Automatic Alignment
When you justify Atom labels automatically, ChemDraw breaks the label into tokens. A token consists
of an uppercase letter followed by any numbers or
lowercase letters. The first token is attached to the
atom and the rest of the label appears without
obscuring other parts of the chemical structure.
82•Drawing Captions and Atom Labels
For example, to create N-methylpiperidine, label an
atom in cyclohexane with the atom label NCH3,
which contains the three tokens, N and C and H3. If
you label C3, the tokens are placed from left to right
because there are bonds to the left of the atom.
NCH3
If you label C5, the tokens are placed from right to
left because there are bonds to the right of the
atom:
H3CN
Pro In ChemDraw Pro, you can force an entire
multi-atom label to be a token by defining it as a
Nickname. This prevents the label from flipping
when applied to the left side of a structure.
For example, if you define the Nickname CH3, and
label C5 with the combined label and nickname
NCH3, the final orientation is CH3N instead of
H3CN. In this case, the Nickname, CH3, is a token.
For more examples, see “Using Nicknames” on
page 121.
If you label C1, the second and third tokens are
placed above the first token since there are bonds
below the atom.
CH3
N
CambridgeSoft
Formatting Text
If you label C4, the second and third tokens are
placed below the first token.
Setting an Individual Text Format Before
Typing
You can set the text format for an individual
caption or atom label before you type. The format
change is applied to the current text only.
N
CH3
Changing the Default
Caption or Atom Label Text
Format
Each new caption or atom label uses default document settings for the font, size, and style of captions
and atom labels. You can change the format by:
• Changing the document settings for subse-
quent drawings in the current document.
• Choosing a new format for an individual
caption or label from the Text menu or toolbar
before you type.
• Selecting text and applying a new format to an
individual label after you type.
Specifying Document Settings for New
Text
To specify the text settings for new captions and
atom labels in the current document:
1. From the File menu, choose Document
Settings.
2. In the Document Settings dialog box, click
Captions or Atom Labels.
To set the text format before you type:
1. Click the Text tool and then click in the docu-
ment window.
A text box appears.
2. Set the text format in one of the following
ways:
• From the Text menu, choose the format
options.
• From the Style toolbar, choose the format
options.
3. Type the text in the text box.
The format is applied to the typed text. Any
subsequent text you type is formatted
according to the default document settings for
the current document.
Changing the Spacing of Individual Text
Objects
You can change the text settings for a specific
caption or atom. The setting change is applied to
the selected object only. You can also choose
whether to have the settings applied to the selected
text and to all subsequent text you type.
To change the text settings for a specific caption or
atom label:
3. Click the appropriate options.
1. Select the text to change with a selection tool.
4. Click OK.
2. From the Text menu, select the appropriate
These settings affect all new captions or atom labels
in the current document. To use these settings in
new documents save them in a Style Sheet or Stationery Pad. For more information, see “Saving
Customized Settings as Style Sheets or Stationery
Pads” on page 21.
ChemDraw 9
options.
To change only a part of a single caption you must
use the Text tool:
• Select part of the caption with the Text tool.
Drawing Captions and Atom Labels
Formatting Text
•
83
To specify a font and size for selected text, do one
of the following:
• Choose the font and size from the Text menu.
Administrator
• Right-click and choose the font and size from
the right-click menu.
• From the Style Toolbar, select the font and size
from the drop-down menus.
Fractional Character Widths (Macintosh)
On the Macintosh, you can choose to have the
spacing between characters as close to proportional
as possible. If you are printing to a PostScript
printer, this option improves the font appearance.
To set fractional widths:
1. From the File menu, choose Document
Settings.
2. In the Document Settings dialog box, click the
Footer tab.
3. Click Fractional Widths.
Coloring Text
You can color captions and atom labels before or
after they are typed, and as a whole or in part.
To color a caption or atom label:
To color individual characters:
1. Select part of an existing caption or atom label
using the Text tool.
2. From the Color menu, choose a color.
NOTE: Macintosh: Captions that contain multiple colors
change to the foreground color when rotated. However, all
colors contained in the caption are printed.
To color several captions or atom labels at once:
1. Select the captions or labels using a selection
tool.
2. From the Color menu, choose a color.
Creating Captions
The default format options of any new captions you
create are specified in the Captions tab of the Document Settings dialog box. You may edit these
options at any time. The settings affect the current
document only.
To create a caption:
1. Click the Text tool
.
2. Point in an empty space in a document window.
A caption text box with a flashing insertion
point appears.
1. Select the Text tool.
2. Click in the position where you want to place
the text.
3. From the Color menu, choose a color.
4. Type the caption or atom label.
84•Drawing Captions and Atom Labels
3. Type a caption.
The text box widens as you type to accommodate the caption.
4. To create a new line, press the Enter or Return
key.
CambridgeSoft
Creating Captions
5. To close the text box, click outside the text box
or select another tool.
NOTE: You can verify the chemical significance of a caption
or atom label using the Check Structure command by
selecting it with the Lasso or Marquee tool.
By default, captions are considered to be chemically
significant if possible. For example, if you create a
label like CH3OH, you will be able to attach bonds
to it (and it will be modified appropriately) even
though you intended it to be a label, not a molecule.
Moreover, it’s values are included in the Analysis
Window, which could be confusing. If you try to
label structures “A”, “B”, and “C”, the “B” and “C”
labels will be marked with a red box because they
have “incorrect valences”. To fix this, do the
following:
Editing a Caption
To open a caption for editing:
1. Click the Text tool
.
2. Point at a caption and click to open the text
box.
The caption text is highlighted.
To change all of the highlighted text within an open
text box:
• Type the new caption text over the highlighted
text.
1. Select the label with the Lasso or Marquee tool.
2. Right-click or Control+click in the selection.
3. Deselect the Interpret Chemically
command.
Alternately, you can change the default by
unchecking the “Interpret Chemically When
Possible” option on the Captions tab of the Document Settings dialog box.
The highlighted text disappears as you type the
new caption.
If not all the text is highlighted and you want to
select all of the caption text:
• From the Edit menu, choose Select All.
Changing the Caption Width
To change the width of a caption:
1. Select a caption using the Text tool.
The Caption text box appears around the
caption. The right side of the text box contains
a Resize handle.
Resize handle
2. Drag the Resize handle.
The point at which the text wraps is adjusted as
you drag the Resize handle.
ChemDraw 9
To change part of the caption text:
• Drag the insertion point over a part of the
caption.
Adding Analysis Data to a
Caption
You can add any of the properties from The Analysis Window to a caption. If auto-update is on, the
values will update as you modify your structure.
Drawing Captions and Atom Labels
Creating Captions
•
85
To add values to a Struct=Name label:
1. Point to the label.
2. Right-click, point to Analysis, and choose a
3. Click the atom.
An Atom Label text box appears over the
atom.
Administrator
property from the list.
The property appears in the label displaying the
current value.
NOTE: You may need to update the window before
you can see the new value. If you don’t see it immediately,
it will appear with the next modification to the
structure.
o-xylene
Chemical Formula: C8H10
Molecular Weight: 106.16
Labeling Atoms with the
Text Tool
The default format options of any new atom labels
you create are specified in the Atom Labels tab of
the Document Settings dialog box. You may edit
these options at any time. The settings affect the
current document only.
To place an atom label on an atom:
1. Click the Text tool
.
2. Point to an atom.
The pointer changes when it is positioned
correctly over an atom to indicate that you will
create an atom label rather than a caption.
86•Drawing Captions and Atom Labels
4. Type an atom label.
Numbers are automatically subscripted. The
justification you choose determines how the
letters in an atom label are positioned on a
bond. Numbers, leading open parentheses, and
trailing closed parentheses are ignored in the
positioning of atom labels.
5. To close the text box, click outside the text box
or select another tool.
NOTE: You can use HotKeys to label an atom instead of
using the Text tool. You can also label atoms using
Nicknames that are text representations of substructures.
For more information, see “Labeling Atoms with HotKeys”
on page 87 and “Using Nicknames” on page 121.
Specifying the Margin Width
You can adjust the white space surrounding the
atom label so that some of the attached bond is
hidden.
Cl
0.278 pt
Cl
0.6 pt
To adjust the white space:
1. From the File menu, choose Document
Settings.
The Document Settings dialog box appears.
2. On the Drawing tab, type a new Margin
Width value.
3. Click OK.
CambridgeSoft
Labeling Atoms with the Text Tool
4. The margin width is applied to all subsequent
drawings in the current document.
Editing Atom Labels
To edit an atom label:
1. Click an existing label using the Text tool or
double-click using a bond or ring tool.
The highlighted atom label text appears within
the Atom Label text box.
2. Type the new atom label text over the high-
lighted text.
If all the text is not highlighted, and you want to
select all of the atom label:
• From the Edit menu, choose Select All.
To edit part of the atom label:
1. Drag the insertion point over part of the atom
label.
2. Type the new characters.
3. Close the Atom Label text box.
Deleting an Atom Label
To delete an atom label, leaving the underlying
bonds unchanged, do one of the following:
• Click the Eraser tool and then click the atom
label.
• With the atom label selected, press the
spacebar, Backspace, or Delete Key.
Labeling Atoms with
HotKeys
contains the Hotkeys provided with ChemDraw.
You can change most Hotkeys, or add new ones, by
editing the file in a text editor. (A few are hardcoded. See “Hard-Coded HotKeys” on page 89.)
For a list of standard Hotkeys, see “Shortcuts and
Hotkeys” on page 247.
TIP: You can access Hotkey Help directly from the Help
menu.
Use the following methods to label an atom with a
Hotkey.
Method 1: Labeling the last
atom drawn
1. Draw a bond by dragging the bond tool in the
direction you want the bond oriented.
2. Type a Hotkey.
The last atom drawn is labeled. Each time you
draw a bond, the last atom drawn is the Hotkey
atom.
NOTE: When you are pointing, rather than drawing, the
last atom highlighted is the atom labeled. Thus, if you click
to create a bond and linger with the cursor over the origin, you
will highlight the origin and it will be labeled rather than the
last atom drawn.
Method 2: Labeling an atom
by pointing
1. Using a bond tool or the Text tool, position the
pointer over an atom.
A highlight box appears over the atom.
Use HotKeys for rapid labeling of atoms, and
applying atom and bond properties. The file CS
ChemDraw Hotkeys in the ChemDraw Items folder
ChemDraw 9
Drawing Captions and Atom Labels
Labeling Atoms with HotKeys
•
87
2. Type a Hotkey, for example, c.
2. Type a Hotkey, for example, “c”.
The selected atoms are labeled.
H3C
Administrator
H3C
The label is added to the atom highlighted. If
the label is a single element, such as C, then the
appropriate number of hydrogen atoms are
added to the label. Repeatedly typing the
hotkey will cycle the number of hydrogens.
NOTE: The last atom highlighted is always the atom
labeled, even if you are no longer pointing to it (that is, even
if it is no longer highlighted). This is true even if you switch
documents.
Method 3: Labeling an Atom
with a Selection Tool
1. Using a selection tool, position the pointer over
an atom.
A highlight box appears over the atom.
C
H2
The element or label associated with the
Hotkey is added to the structure.
Creating HotKeys
To add or edit ChemDraw HotKeys:
Use a text editor (Notepad etc.) to open the CS
ChemDraw Hotkeys file in the ChemDraw
Items folder.
You can use any uppercase or lowercase alphanumeric key as a Hotkey with the exception of the
hard coded HotKeys listed previously. If a capital
and lowercase Hotkey do not exist, the Hotkey is
assigned to both. If a key is used more than once in
the file, the one closer to the end of the file takes
precedence.
To add a Hotkey:
1. Add a new line and type the key you want to
2. Type a Hotkey, for example, “c”.
use.
2. Type a space.
3. Type the letters to associate with the Hotkey.
C
H2
Method 4: Labeling multiple
atoms
1. Select several atoms using a selection tool.
HotKeys defined for single elements always
result in the adding of the appropriate number
of hydrogen atoms.
4. Save and close the HotKeys file.
To create a new HotKeys file:
1. Create a text file named CS ChemDraw
Hotkeys.
2. Save the file in the ChemDraw Items folder.
3. Click OK or Save.
88•Drawing Captions and Atom Labels
CambridgeSoft
Labeling Atoms with HotKeys
Hard-Coded HotKeys
An atom text label appears over the atom.
You cannot edit hard-coded HotKeys. The
following table contains a list of hard-coded
HotKeys:
Hotkey
Function
Enter or
Return
Opens the atom label text box.
space
Removes an atom label.
Delete or
Backspace
Deletes objects.
3. Type the text.
Repeating an Atom Label
You can repeat an atom label using the text, bond,
or ring tools.
To label several atoms with the same text using the
Text tool:
1. Click the Text tool.
2. Label a single atom.
NOTE: In earlier versions of ChemDraw, quite a few more
keys were hard-coded. In ChemDraw 9.0 all keys not listed
above can be customized.
Labeling Atoms With a
Bond or Ring Tool
To avoid switching back and forth between tools,
you can label atoms with a bond or ring tool.
To label an atom using a bond or ring tool:
1. Click the Bond or Ring tool.
2. Point to an atom and double-click.
3. Double-click another atom to repeat the
previous label.
To label several atoms with the same text using a
bond, ring, or Acyclic Chain tool:
1. Click the tool.
2. Triple-click an atom to repeat the previous
label.
Atom Numbering
You can add sequential numbering indicators to the
atoms in a structure. ChemDraw recognizes the
following types of indicators:
• Numbers (1, 2, 3, and so on)
• Text ending with a number (atom1)
• Greek letters in the Symbol font
• Letters (a, b, c, and so on)
The default indicator is numbers.
ChemDraw 9
Drawing Captions and Atom Labels
Labeling Atoms With a Bond or Ring Tool
•
89
Showing and Hiding Atom
Numbers
Administrator
To add Atom Numbering to an entire structure:
1. Select the structure.
show previously
assigned atom
numbers.
1. Select the atom.
2. Do one of the following:
If you want to
…
2. Do one of the following:
If you want to
…
To number individual atoms
show a previously
assigned atom
number.
Then…
• Right-click, point to
Atom, and then click
Show Atom
Number.
Any previously assigned
numbers remain
unchanged.
assign new atom
numbers.
• Type the Hotkey '
(apostrophe).
The atoms in the structure are numbered
sequentially.
Then…
• Right-click, and
choose Show
Atom Number.
A previously assigned
number is displayed.
assign an atom
number
• Type the Hotkey '
(apostrophe).
The atoms are
numbered in the
sequence you choose.
To hide Atom Numbering in a structure:
1. Select the structure.
2. Right-click, point to Atom, and then deselect
Show Atom Number.
To hide an individual atom number, do one of the
following:
6
1
5
2
4
3
1. Point to or select the atom, right-click, and then
deselect the Show Atom Number.
2. Point to or select the atom number, right-click,
and then select Hide Indicator.
To remove an atom number indicator:
• Click the indicator with the Eraser tool.
Editing Atom Numbers
You can edit the text and style of atom number indicators.
90•Drawing Captions and Atom Labels
CambridgeSoft
Atom Numbering
To edit atom number text:
1. Click the Text tool.
2. Do one of the following:
• Select the atom number indicator and type
the changes.
• Double-click the atom number indicator to
change to the next character in the sequence.
To edit the atom number style:
• Select the atom number indicator with the Text
tool and use the Text menu or Text formatting
toolbar.
Positioning Atom Number
Indicators
Atom number indicators are positioned automatically and move appropriately if a structure is modified. You can reposition them by dragging them to
the desired position or with the Position Indicators
dialog box.
To reposition an indicator numerically:
1. Right-click the indicator to move and choose
Position.
The Position Indicators dialog box appears.
2. Click the appropriate Position option, and type
a value:
To position …
Type a value
for Position …
from the atom or bond by angle or by clock
center to the indicator
center
from the atom or bond by offset—horicenter to bottom left of zontal and vertical
indicator baseline
at specified coordinates absolute—horizontal and vertical
Typing Non-Roman
Text
Use the Character Map for entering non-Roman
text, see “Character Map” on page 20. Any font
available on the computer can be entered into a
label using Character Map.
NOTE: Two-byte fonts such as Chinese may not work
reliably with the Character Map.
Using the Text Tool with
the Lasso Tool
The Text tool used in conjunction with a selection
tool enables you to perform additional edits, such as
simultaneously changing several captions or atom
labels. For more information about selection tools,
see Chapter 7: “Manipulating Drawings”.
You can toggle between the Text tool and the Lasso
tool as follows:
ChemDraw 9
Drawing Captions and Atom Labels
Using the Text Tool with the Lasso Tool
•
91
• Press Ctrl+Alt+Tab or
Command+Option+Tab.
Administrator
The text box is automatically selected when
you switch to the lasso tool.
To switch from the Lasso tool to the Text tool when
a caption or atom label is selected:
• Press Ctrl+Alt+Tab or
Command+Option+Tab.
The Text tool is selected and the text box is
opened for editing.
NOTE: Ctrl+Alt+Tab and Command+Option+Tab
will always toggle between the Lasso and last tool used.
Using Bitmap Fonts
When Available (Macintosh)
When text appears in a document on the screen, it
can appear using either a bitmap or a TrueType
font.
To use bitmap fonts if they are available:
1. From the File menu, choose Preferences.
2. Select Use Bitmap Fonts When Available.
Text drawn using Bitmap fonts looks better and
appears more quickly than text drawn using TrueType fonts. However, the size and position of text
drawn using Bitmap fonts change somewhat when
printed.
For accurate correspondence between what you see
on the screen and what is printed:
• Deselect Use Bitmap Fonts When Available.
This change affects all documents.
92•Drawing Captions and Atom Labels
CambridgeSoft
Using Bitmap Fonts When Available (Macintosh)
Chapter 6: Drawing Orbitals,
Symbols, Arrows, Arcs, and Other
Shapes
Overview
ChemDraw provides the following tools and tool
palettes that enable you to add chemical symbols
and shapes to your documents (A tool palette is
indicated by a
in the lower right corner of the
tool.):
Selecting Tools From a
Palette
Some tools have a palette containing different types
of that tool. When you choose a tool type from the
palette, it becomes the default tool. To use a
different tool type, select it.
To select a tool and use its default tool type:
• Orbital tools palette
—to draw orbitals.
• Chemical Symbols tools palette
—to
draw charges, radicals, and other symbols.
• Arrow tools palette
—to draw arrows.
• Drawing Elements tools palette
—to
draw boxes, circles, and lines.
• Brackets tools palette
—to draw
brackets, braces, parentheses, and daggers.
• Arc tools palette
—to draw arcs.
• Pen tool
—to draw freehand shapes.
• TLC tool
. to reproduce TLC
experiments.
You can use the tool palettes as extensions of the
Main Tool Palette, or you can tear them off and
place them anywhere on your screen.
ChemDraw 9
• Click the tool’s icon to select it.
To choose a different tool type from the palette:
1. Click the tool’s icon and hold down the mouse
button.
The palette appears.
2. Drag to select a tool type from the palette.
3. Release the mouse button over the tool you
want to select.
The selected tool is now displayed on the Main
Tools Palette.
To display a tools palette, do one of the following:
• From the View menu, select Other Toolbars,
then select one of the palettes.
• Click the tool’s icon and drag to the palette’s
title bar. Release the mouse button over the title
bar.
The selected palette is displayed, and can be
dragged anywhere on the screen.
Drawing Orbitals, Symbols, Arrows, Arcs, and Other Shapes
•
93
The Orbital Tools
Palette
Administrator
Use the Orbital tools to add orbitals to your
chemical structures.
To draw an s-orbital:
1. Hold down the mouse button over the Orbital
tool
and drag to select the s-orbital tool
from the palette.
2. Point to an atom where the orbital will be
centered.
3. Drag outward.
You draw orbitals so that the node appears first.
Depending on the orbital type, available fill patterns
are:
• Background color
• Shaded
Sigma Orbitals
• Solid color
The σ-orbital tools are shown below:
You can modify the fill colors with the Color menu.
Display the Info window to view the orbital’s length
and angle relative to the X-axis while you draw it.
You can constrain the length and angle of an orbital
by selecting Fixed Lengths and Fixed Angles on the
Object menu.
NOTE: Orbitals are not normally part of the structure they
are drawn near and are not selected when you double-click a
bond, atom, or atom label with a selection tool. To group the
orbitals with the structure, use the Group command from the
Object menu. For more information, see “Grouping Objects”
on page 118.
s-orbitals
The s-orbital tools are shown below:
94•Drawing Orbitals, Symbols, Arrows, Arcs, and Other Shapes
To draw a σ-orbital:
1. Hold down the mouse button over the Orbital
tool
and drag to select the σ-orbital tool
from the palette.
2. Point where the orbital will be centered.
3. Drag outward along the long axis of the orbital.
Single Lobe Orbitals
Single lobe orbitals are commonly used for
indicating a lone pair. The single lobe orbital tools
are shown below:
CambridgeSoft
The Orbital Tools Palette
Hybrid Orbitals
To draw a single lobe orbital:
1. Hold down the mouse button over the Orbital
tool
and drag to select the single lobe
orbital tool from the palette.
The hybrid-orbital tools are shown below:
2. Point to an atom where the narrow end of the
orbital is to be attached.
To draw a hybrid orbital:
3. Drag from the narrow end of the lobe to its
wide end.
1. Hold down the mouse button over the Orbital
tool
and drag to select the hybrid-orbital
tool from the palette.
2. Point to an atom where the node of the orbital
is to be attached.
3. Drag from the orbital node to the wide end of
the major lobe of the orbital.
p-orbitals
The p-orbital tools are shown below:
d-orbitals
The d-orbital tools are shown below:
To draw a p-orbital:
1. Hold down the mouse button over the Orbital
tool
and drag to select the p-orbital tool
from the palette.
2. Point to an atom where the node of the orbital
is to be attached.
3. Drag from the orbital node to the wide end of
To draw a d-orbital:
1. Hold down the mouse button over the Orbital
tool
and drag to select the d-orbital tool
from the palette.
2. Point to an atom where the node of the orbital
is to be attached.
the filled lobe.
ChemDraw 9
Drawing Orbitals, Symbols, Arrows, Arcs, and Other Shapes
The Orbital Tools Palette
•
95
3. Drag from the center of the orbital to the wide
end of a filled lobe.
The Chemical Symbols
Tools Palette
Administrator
Use the Chemical Symbols tools
to add
chemical symbols to your structure. When you click
the Chemical Symbols tool, the following palette
appears:
dz2-orbitals
The dz orbital tools are shown below:
2-
To draw a dz orbital:
2-
1. Hold down the mouse button over the Orbital
tool
and drag to select the dz2-orbital
tool from the palette.
2. Point to an atom where the node of the orbital
will be attached.
3. Drag from the center of the orbital to the wide
end of a lobe.
Symbols 94 dpi
When you attach a symbol (other than H-dot or Hdash) to an atom, it remains at a fixed distance from
the central character of the atom label. If you drag
the symbol, it will maintain that fixed distance as it
moves around the atom.
You can, however, use a symbol without attaching it
to an atom, place or move it anywhere, and resize it.
H-dot and H-dash
To represent a hydrogen atom that is coming out of
the plane toward you along the Z-axis, use the
H-dot symbol
.
To represent a hydrogen atom that is directed
backwards into the plane away from you along the
Z-axis, use the H-dash symbol
. You can draw
H-dots and H-dashes only by clicking atoms.
96•Drawing Orbitals, Symbols, Arrows, Arcs, and Other Shapes
CambridgeSoft
The Chemical Symbols Tools Palette
The lone pair is offset from the atom at a fixed
position.
To draw an H-dot or an H-dash:
1. Hold down the mouse button over the
Chemical Symbols tool
and drag to select
the symbol from the palette.
2. Point to the atom.
OH
O
To deposit a lone pair symbol in a horizontal
orientation:
O
• Click in a document window.
To change the orientation:
O
• Click and drag the symbol to the desired
3. Click the atom.
orientation.
O
Radical
H-dot symbol
O
Use the radical symbol
non-bonded electron.
O
To draw a radical symbol:
to indicate a single
Lone Pair
1. Hold down the mouse button over the
Use the lone pair symbol
to indicate a lone
pair of electrons common in Lewis structure
representations.
Chemical Symbols tool
and drag to select
the radical from the palette.
2. Point to the atom where you want the radical
symbol to appear.
3. Click to draw the symbol.
To draw a lone pair:
1. Hold down the mouse button over the
Chemical Symbols tool
and drag to select
the lone pair from the palette.
2. Point to the atom where you want the lone pair
located and drag in the appropriate direction to
position it.
3. Release the mouse button.
Radical Cation and Radical
Anion
Use the charge radical symbols
to
represent radicals that are charged.
To draw a radical cation or radical anion symbol:
1. Hold down the mouse button over the
Chemical Symbols tool
and drag to select
the symbol from the palette.
2. Point to the atom where you want the symbol
to appear.
ChemDraw 9
Drawing Orbitals, Symbols, Arrows, Arcs, and Other Shapes
The Chemical Symbols Tools Palette
•
97
3. Drag from the charge portion of the symbol to
Administrator
the radical portion of the symbol.
To quickly deposit a radical cation or radical anion
symbol in a horizontal orientation:
• Click to deposit the symbol.
four standard attachment point drawing tools that
allow you to indicate a point of attachment while
maintaining chemical meaning.
1
∗
Charge Symbols
Use the charge symbols to represent charges on
structures.
To draw a charge and associate it with a structure:
1. Hold down the mouse button over the
Chemical Symbols tool
and drag to select
the charge symbol from the palette.
2. Click to the atom to which you want the charge
to correspond.
NH3
O
H2N
H
OH
The number of hydrogen atoms increases or
decreases as appropriate for the addition of the
charge.
NH3
O
H3N
The bead tool is specifically intended to indicate
attachment to a resin, but the tools are
interchangeable. Any if these tools may be used for
variable attachments in queries (see “Using Variable
Attachment Positions” on page 127), but only the
diamond tool will show rank numbers. That is, if
you add more than one diamond to a structure, the
points will automatically number sequentially.
Rotating a Symbol
With the exception of the charge and the radical
symbols, you can rotate the symbols by selecting
and dragging the Rotation handle on the Selection
Rectangle. All symbols are rotated around the same
end from which they were originally drawn. For
example, the radical cation symbol is rotated and
resized from the charge. The Info window shows
the angle that one of the ends of a symbol makes
with the X-axis as you rotate symbols.
To rotate a chemical symbol:
1. Select the chemical symbol with a selection
H
OH
Attachment Points
The ability to indicate an attachment point is useful
in polymer-bound combinatorial synthesis, protein
chemistry, and other situations. ChemDraw has
98•Drawing Orbitals, Symbols, Arrows, Arcs, and Other Shapes
tool.
2. Drag the Rotation handle on the chemical
symbol.
For more information about rotating and resizing,
see “Rotating Objects” on page 113.
CambridgeSoft
The Chemical Symbols Tools Palette
The Arrow Tools
Palette
Use the Arrow tools to add arrows to show the
conversion of reactants to products and to indicate
electron flow.
You can resize and rotate an arrow using a selection
tool by dragging the Resize or Rotation handle on
the Selection rectangle (see “Rotating Objects” on
page 113 and “Resizing Objects” on page 115). The
resize or rotation occurs around the center of the
Selection rectangle. The Info window indicates the
percentage enlargement or reduction when you
drag the Resize handle and the number of degrees
rotated when you drag the Rotation handle.
Arrows 94 dpi
NOTE: Use the Pen tool to make customized arrows. For
more information, see“The Pen Tool” on page 102.
Drawing an Arrow
1. Click the Arrow tool
.
2. Point in the document where you want the
beginning of the arrow to appear.
3. Drag to where you want the arrowhead to be.
Editing an Arrow
To lengthen, shorten, or rotate an arrow:
.
2. Hold down the Shift key and point to the head
of the arrow.
ChemDraw 9
You cannot change the aspect ratio (ratio of height
to width) of arrows.
The Drawing Elements
Tools Palette
The Drawing Elements tools provides shapes you
can add to your drawing.
To draw an arrow:
1. Click the Arrow tool
A highlight box appears over the head of the
arrow.
3. Drag the arrowhead.
The arrow is resized and rotated relative to its end.
The Info window shows the change in length and
the angle the arrowhead makes with the X-axis as
you drag.
Drawing elements are not a part of the structure
they are drawn near. If you double-click on a bond,
atom, or atom label with a drawing tool, they are
not selected. To group drawing elements with a
structure, use the Group command in the Object
menu. For more information, see “Grouping
Objects” on page 118.
Some drawing element types are available with fill
patterns: hollow (no fill pattern), gray, and black.
You can change the type of box, circle, or oval using
the Curves menu.
Drawing Orbitals, Symbols, Arrows, Arcs, and Other Shapes
The Arrow Tools Palette
•
99
The Info window indicates the length and angle
relative to the X-axis while you use any of the
drawing element types.
Resizing or Rotating
Drawing Elements
Administrator
A drawing element is resized or rotated from the
same point that it was originally drawn. For
example, a shadowed box is resized from the corner
where the plain edges meet.
Drawing Boxes
You cannot rotate Boxes, Brackets, or Daggers.
When a box or closed bracket is rotated along with
objects within its borders, the area of the box or
closed bracket increases to accommodate the
rotation of the contained objects.
To draw a box:
To resize or rotate a drawing element:
1. Select the Drawing Element tool.
1. Select one of the box tools.
2. Hold down the Shift key and point to an end or
2. Point where you want a corner of the box to be
located.
3. Drag from one corner of the box diagonally to
the opposite corner.
Drawing Circles and Ovals
edge of a drawing element.
A highlight box appears.
3. Drag the object to the new size or orientation.
The Info window shows the percentage
enlarged or reduced when you drag the Resize
handle and the number of degrees the object
rotates when you drag the Rotation handle.
To scale atom labels when resizing:
• Hold the Control or Command key while
To draw a circle or oval:
1. Select one of the circle or oval tools.
2. Point where you want the center of the circle to
be located.
3. Drag outward from the center.
dragging to resize.
Distorting Circle and Ovals
You can distort circles and ovals (Shift+dragging
the Resize handle) to convert them into an
equivalent closed curve. You can distort gray
shaded circles and ovals to convert these objects to
solid filled curves with fill the same color as the
curve. You can also distort boxes and closed
brackets.
The remaining Drawing Element types cannot be
distorted. For more information, see “Rotating
Objects” on page 113 and “Resizing Objects” on
page 115.
100•Drawing Orbitals, Symbols, Arrows, Arcs, and Other Shapes
CambridgeSoft
The Drawing Elements Tools Palette
Drawing Lines
Drawing Paired Brackets
Lines drawn with the line tool differ in two
significant ways from bonds drawn with the bond
tools:
Paired brackets can only be placed in a vertical
orientation. A rectangle or box defines their
position.
• They are not included in chemical
To draw a paired brackets:
interpretation of the drawing
• Lines that cross appear solid
1. Select a paired bracket tool.
To draw using a line tool:
1. Select a line tool.
2. Point where you want a corner of the bracket to
be located.
3. Drag from one corner of the box diagonally to
the opposite corner.
Drawing Daggers
To draw a dagger:
1. Select a dagger tool.
2. Point where you want the line to start.
3. Drag from one end of the line to the other end.
The Brackets Tools
Palette
2. Point where you want the symbol to be located.
3. Click to deposit the dagger.
Brackets includes braces {}, brackets [], and
parentheses ().
NOTE: The size of the dagger symbol is proportional to the
Atom Label font size specified in the Text Settings dialog
box.
Drawing Single Brackets
A single bracket can be drawn in any orientation.
Framing Objects
To draw a single bracket:
1. Select a single bracket tool.
You can enclose your drawings or group structures
with a rectangle, brackets, parentheses, or braces.
2. Point where you want the bracket to start.
3. Drag from one end of the bracket to the other
end.
To enclose your object:
1. Select the drawing to enclose.
2. On the Object menu, point to Add Frame,
and then choose the type of frame to add.
ChemDraw 9
Drawing Orbitals, Symbols, Arrows, Arcs, and Other Shapes
The Brackets Tools Palette
• 101
The frame you selected is inserted in your
drawing.
Administrator
The Arc Tools Palette
Use the Arc tools to draw solid or dashed arcs of
different angles: 90°, 120°, 180°, and 270°.
Arcs 94 dpi
Drawing Arcs
Where you access the arc tools depends on which
version of ChemDraw you are using.
To draw an arc:
1. Do one of the following:
• In ChemDraw Std, point to the Arc tool
and drag in the palette to select the
angle.
• In ChemDraw Pro or Ultra, point to the
Drawing Elements tool
and drag in the
tool palette to select the angle.
2. Dragging from left to right creates a convex
arc; from right to left a concave one.
The Info window shows the length between
the ends, and the angle the clockwise end
makes with the X-axis while you draw an arc.
A highlight box appears.
3. Drag the clockwise end of the arc.
The arc is resized and rotated relative to the end
from which it was drawn. The Info window
indicates the distance between the ends of the arc
and the angle the clockwise end makes with the
X-axis.
You can resize and rotate an arc by dragging the
Resize or Rotation handle on the Selection
rectangle. The resize or rotation occurs around the
center defined by the Selection rectangle. When you
drag the Resize handle, the Info window indicates
the percentage enlarged or reduced. When you drag
the Rotation handle, the Info window indicates the
degree rotated. For more information, see
“Rotating Objects” on page 113 and “Resizing
Objects” on page 115.
The Pen Tool
Use the Pen tool to draw shapes that are not
provided in the Arrow, Orbital, or Drawing
Elements palettes. For example, you can draw
irregularly shaped arrows, curves depicting graphs
or reaction coordinate diagrams, and other
irregularly shaped solids.
The Pen tool has two modes:
Editing Arcs
To resize or rotate an arc using the Arc tool:
1. Select the Arc tool.
• Drawing—Used to create shapes. The hand
cursor appears with a “+” sign inside.
• Edit—Used to edit shapes. The hand cursor
appears without a “+” sign inside.
NOTE: To enter edit mode directly from drawing
mode, press the Esc key.
2. Hold down the Shift key and point to the
clockwise end of the arc.
102•Drawing Orbitals, Symbols, Arrows, Arcs, and Other Shapes
CambridgeSoft
The Arc Tools Palette
Some examples of shapes that you can draw using
the Pen tool are shown below.
Customized orbitals
A line connects the two points.
4. Position the cursor on one of the points (the
“+” in the hand will disappear when you are
correctly positioned) and drag to create an arc.
Unique arrows
Anchor Point
Curves and axes
Geometric shapes
To toggle between a selection tool and the Pen tool
do one of the following:
• Press Ctrl+Alt+Tab or
Command+Option+Tab
• Click a selection tool.
The last drawn curve and a selection tool are
selected.
Drawing Bézier Curves by
Dragging
A Bézier curve is a curve that is calculated to
connect separate points into a smooth line.You can
draw Bézier curves with the Pen tool by clicking
and dragging repeatedly to create curved segments.
To draw a Bezier Curve:
1. Select the Pen
tool.
2. Point to where you want the beginning of the
curve to appear and click.
An anchor point appears, and the cursor
changes from a “+” to a hand.
3. Move the cursor to another position and click.
ChemDraw 9
A direction line appears tangentially to the curve.
Use the direction line to control the “curviness” of
the segment. The slope of the direction line
determines the slope of the curve. The length of the
direction line determines the height of the curve.
Direction points appear at the ends of the direction
line. Use the direction points to adjust the curve by
dragging a point. You can further adjust the shape
by dragging an endpoint of the curve.
Direction Point
Direction Line
Drawing Segments by
Clicking
You can draw shapes with corners by clicking
repeatedly in an outline of the shape you want.
To draw segments:
1. Select the Pen
tool.
2. Point to where you want the beginning of the
curve to appear.
Drawing Orbitals, Symbols, Arrows, Arcs, and Other Shapes
The Pen Tool
• 103
Administrator
3. Click to deposit an anchor point.
Changing the Shape of a Curve
4. Move the cursor and click again to add a
Use the endpoints of the direction lines to increase
or decrease the breadth of the curve or change its
direction.
second point.
To change the shape of a curve:
1. Select the Pen tool and click the existing curve
you want to edit.
2. Drag the direction lines to create the shape you
want.
5. Continue until you have the curve you want.
6. Press the Esc key or click another tool.
NOTE: To place the fewest strategically placed control
points for obtaining the smoothest curve, work in a magnified
view.
Adding a Segment
Editing a Curve
To extend an existing curve by adding a segment:
You can edit a curve by selecting it and
manipulating it with the direction lines.
1. Select the Pen tool and click the existing curve
To select an existing curve:
2. Point to the endpoint of a curve until the
1. Select the Pen
tool.
you want to edit.
cursor appears as a hand.
2. Point at the curve.
The cursor will change from a “+” to an arrow
when you are positioned correctly.
3. Click to select the curve.
The direction lines appear.
3. Alt+click or Option+click the endpoint.
The cursor appears as a hand with a “+” sign
inside.
4. Drag to connect more segments to your curve.
104•Drawing Orbitals, Symbols, Arrows, Arcs, and Other Shapes
CambridgeSoft
The Pen Tool
The following illustration shows the shape above
with the Filled and Closed styles applied.
Deleting a Segment
To delete a curve segment:
• In the edit mode of the Pen tool,
Alt+Shift+click or Option+shift+click the
control point where you want to delete a curve
segment.
The cursor appears as the Eraser tool before
you click.
You can also delete entire curves using a selection
tool or the Eraser tool.
Applying a Style to a Shape
All curves are drawn with the last curve style chosen
until you change the selections. Certain styles are
mutually exclusive. For example, if you choose
Closed, you cannot also choose Arrow at Start.
You can use the Doubled style to represent cell
membranes. The lines are separated by twice the
Bold Width setting for the drawing. Doubled lines
cannot be dashed or include arrows.
To apply a style to a curve:
Shaded Style
You can apply shading to any curve, however the
shaded style works best with convex or slightly
concave shapes. Shading may not appear as desired
in extremely concaved shapes.
The illustration below shows shapes with the Plain
style applied.
The following illustration shows the above shapes
with the Shaded style applied.
1. Select a curve using either the Pen tool or a
selection tool.
2. From the Curves menu, choose a style.
Filled and Closed Styles
The illustration below shows a shape with the Plain
style applied.
Plain Style
To remove all styles from a curve:
• With a curve selected, choose Plain from the
Curves menu.
Pro
The TLC Tool
The TLC Tool is a drawing tool that allows you to
easily depict Thin Layer Chromatography plates
within a ChemDraw document. The tool creates a
ChemDraw 9
Drawing Orbitals, Symbols, Arrows, Arcs, and Other Shapes
The TLC Tool
• 105
rectangular plate with origin line, solvent front, and
one or more lanes. The lanes can be populated with
spots of different Rf, size, shape, or color.
Administrator
To create a TLC plate:
1. Select the TLC tool
.
2. Drag in any direction from the point of origin.
The number of lanes is a function of the width
of the plate you create.
If you want
to...
Show or hide the
origin, solvent
front, borders, or
side ticks.
then...
1. Right-click or
Control-click in the
plate.
2. Select the appropriate
action.
NOTE: Use the Transparent
option if you want to overlay the
TLC plate on a scanned plate.
Change the order of Drag the origin tick to the
new location.
lanes.
Add, delete, or
duplicate a lane.
You can manipulate parts of the plate as follows:
If you want
to...
then...
Change the height
or width of the
plate.
Drag a border or corner.
Move the origin or
solvent front.
1. Position the cursor on
the lane you want to
delete or duplicate (or
between lanes to add).
2. Right-click or
Control-click in the
plate.
3. Select the appropriate
action.
The number of lanes will
not change.
NOTE: You can also delete
lanes with the Eraser tool.
Drag the origin or solvent
front line.
Move a spot.
Drag the spot. The Rf
displays as you drag.
Duplicate a spot.
106•Drawing Orbitals, Symbols, Arrows, Arcs, and Other Shapes
Ctrl+drag or
Option+Drag the spot.
CambridgeSoft
The TLC Tool
If you want
to...
then...
If you want
to...
then...
Delete a spot.
Click on the spot with the
Eraser tool.
TLCEnlarge or
“smear” a spot.
Shift+drag the spot. When
you position the cursor on a
spot and press “Shift”, the
cursor assumes one of three
shapes, depending on how it
is positioned:
NOTE: If you erase all spots in
a lane, the lane will be deleted.
Display or set the Rf
for a spot; add a
custom spot
1. Right-click or
Control-click on a
1. Cross arrows
spot.
2. Horizontal arrow
2. Point to TLC Spots, and
3. Vertical arrow
. used
to elongate a spot or
create a crescent.
NOTE: To display Rf for all
spots, Right-click or
Control-click in the plate and
select Show Rf from the TLC
Spots submenu.
NOTE: You may want to zoom
in to make positioning easier.
Rf Display
1. Right-click or
Control-click on a
When you select Show Rf, a text label appears near
the spot showing the spot's retention factor value.
By default, the tag will show the Rf to two decimal
places. You can change the tag as follows:
spot.
2. Choose the style or
color.
NOTE: To change the style for
all spots, Right-click or
Control-click in the plate and
choose the style from the TLC
Spots submenu.
ChemDraw 9
.
used to widen a spot.
take the appropriate
action.
Change the style or
color of a spot.
. used
to enlarge a spot.
•
Select the tag with the Lasso or Marquee tool
and drag it to a new location, or Right-click or
Control-click on the tag and choose
Position...
• Select the tag with the Text tool and edit the Rf
value.
If you change the Rf the spot will move to the
new position indicated.
If you edit the Rf to have different precision,
that precision will be preserved.
Drawing Orbitals, Symbols, Arrows, Arcs, and Other Shapes
The TLC Tool
• 107
Resizing Spots
Custom Spots
Administrator
You can resize spots by holding down the Shift key
while pointing at an edge of the spot. Dragging the
left or right sides of the spot will adjust the spot’s
width only. Dragging from the top will adjust its
height only. Dragging from the bottom will adjust
the tail only. Dragging from any of the other four
corners will scale all three values. By using
combinations of these dragging motions, you can
reproduce any sized or shape spot you want.
The TLC tool can create the most common spot
shapes. Other types of spots, such as smears, can be
reproduced as custom spots. The Add Custom Spot
command allows you to insert a graphic file for a
spot. Typically, these files would be produced by
scanning a TLC plate and saving the spots in a
library of spot shapes.
Solvent front
Crescent-shaped spot
Default spot
Enlarged spot
Elongated spot
Widened spot
Origin
Lanes
108•Drawing Orbitals, Symbols, Arrows, Arcs, and Other Shapes
CambridgeSoft
The TLC Tool
Chapter 7: Manipulating Drawings
Overview
The Lasso or Marquee tools enable you to select
objects to edit. You can select objects individually
or as groups. You can then duplicate, move, resize,
rotate, or delete the selected objects.
Using a Selection Tool
To select objects using the Lasso tool:
1. Select the Lasso tool
.
2. Press the mouse button while the pointer is not
over any object.
3. Drag around a portion of a chemical structure
or other object.
You can use the Lasso or the Marquee selection tool
to select all objects. You use the Lasso to select
objects freehand and the Marquee to select
rectangular regions.
You can set ChemDraw so that the last object
drawn to selected when you click the Lasso tool.
To set this option:
1. From the File menu, choose Preferences.
2. On the General tab, select Automatically
Select Recent Objects When Choosing
Lasso.
When you click the Lasso tool, a selection
rectangle appears around the last object drawn.
As you drag, a line appears which defines the
Selection area. Bonds, structures, or other
objects are selected only if they are entirely
within this area. The end points of the Lasso
are automatically connected when you release
the mouse button.
Selecting Objects with the
Marquee Tool
Use the Marquee tool to select objects and
structures within a rectangular area.
To select objects using the Marquee tool:
1. Select the Marquee tool
Selecting Objects with the
Lasso Tool
.
The pointer becomes a Marquee.
Use the Lasso tool to make freehand selection of
irregular areas.
ChemDraw 9
Manipulating Drawings
Using a Selection Tool
• 109
2. Drag diagonally across the chemical structures
or other objects.
Selecting Objects by Clicking
To select an object by clicking:
Administrator
1. Select the Lasso or the Marquee tool.
2. Point to an object in a document window.
As you drag, a rectangle appears which defines
the Selection area. Bonds and other objects are
selected only if they are entirely within the
rectangle.
You can use the Marquee to select several objects at
once if they can be surrounded by a rectangle.
Toggling Between Selection
Tools
You can set one selection tool to behave like the
other as follows:
• Click the Lasso
or Marquee
press the Alt or Option key.
tool and
Toggling Between Other
Tools
To toggle a selection tool and the last drawing tool
used:
• Press Ctrl+Alt+Tab or
Command+Option+Tab.
This command will toggle the last selection tool you
have used with the last drawing tool you have used.
If you haven’t used either selection tool, it defaults
to the Lasso tool.
A highlight box appears over the selected
object. If you point at a bond, the highlight box
appears over the length of the bond.
3. Click the object.
The selected objects appear within the
Selection Rectangle and the cursor changes to
a hand.
NOTE: If the bond or other object is part of a group you
can select it as an individual object. For more information, see
“Grouping Objects” on page 118.
Setting the Highlight Box
Tolerance
You determine the size of the highlight box and
how close you must get to activate an object by
setting the Tolerance. The standard setting for the
Tolerance is 5 pixels. At this setting, the highlight
box appears on bonds if the pointer is located 5
pixels or less from any point on the bond.
To set the Tolerance:
1. From the File menu, choose Preferences.
2. Select or type the tolerance.
This change affects all documents.
110•Manipulating Drawings
CambridgeSoft
Using a Selection Tool
Selecting Entire Structures
Selecting All Objects
To select an entire chemical structure:
To select all objects within a document window:
• Using a selection tool, double-click a bond or
atom within the structure.
• From the Edit menu, choose Select All.
Deselecting All Objects
To deselect all selected objects, do one of the
following:
• Click in any empty area in a document window
The entire chemical structure is selected.
If the chemical structure or other object is part of a
group, the entire group is selected. For more
information, see “Grouping Objects” on page 118.
Making Multiple Selections
To make multiple selections or add more objects to
the selection:
• Press Shift and select the other objects.
You can add objects to the Selection by clicking,
double-clicking, or by using the selection tools.
Removing Objects from the
Selection
To remove an object from the selection:
that is outside the Selection rectangle.
• Press Esc.
• Select a different tool.
• Select another object without holding down
Shift.
The selected objects are deselected.
Deleting Objects
To delete selected objects, do one of the following:
• Press Delete.
• Press Backspace.
• From the Edit menu, choose Clear.
Moving Objects
To move an object:
1. Select the object using a selection tool.
2. Point within the border of the Selection
rectangle.
3. Click and drag the object.
• Press Shift and select an object contained
within the Selection rectangle by clicking,
double-clicking, or with a selection tool.
The object is removed from the selection.
NOTE: Objects may appear within the borders of the
Selection rectangle, but not be selected. Only objects that are
shimmering are selected.
ChemDraw 9
Manipulating Drawings
Using a Selection Tool
• 111
To constrain the movement to the horizontal or
vertical direction:
Shift+drag the selected objects.
The object is transferred to the Clipboard and
deleted from a document window.
Administrator
Pasting
To paste a copy of the contents of the Clipboard
into a document window:
1. Click a Selection tool.
2. From the Edit menu, choose Paste.
For information about transferring ChemDraw
pictures to other types of documents see
“Autoscaling” on page 193.
Small incremental movements are often useful for
aligning objects.To move an object a small distance:
Moving Atoms
1. Select the object.
You can move the atoms within a chemical
structure using a selection tool.
2. Press an arrow key.
To move a single atom:
The selected object moves 1 point in the
direction of the arrow.
To move in a larger increment:
Press Alt or Option plus an arrow key.
The selected objects move 10 points in the
direction of the arrow.
For more information about aligning objects, see
Chapter 11: “Working With Page Layout”.
1. Point to an atom using a selection tool.
2. Drag the atom.
Using the Clipboard
Use the Clipboard to remove the objects contained
in the Selection rectangle for later use. You can
paste the copy from the Clipboard to another
position in the same document, to another
ChemDraw document, or to a different type of
document.
Cutting
The bonds connected to the atom stretch.
To move multiple atoms:
• Select only the bonds that have atoms on both
ends that you want to move.
To use the clipboard:
1. Select the object with a Selection tool.
2. From the Edit menu, choose Cut.
112•Manipulating Drawings
CambridgeSoft
Using a Selection Tool
The unselected bonds that are attached to the
selected atoms are stretched.
NOTE: You can also move atoms using the bond tool that
was used to draw the atom. For more information, see
“Moving Atoms” on page 70.
Duplicating Objects
To duplicate objects with a selection tool:
1. Click a selection tool.
2. Select the objects.
A copy of the object is placed on the
Clipboard.
You can transfer the copy on the Clipboard by the
pasting it to the current document, another
ChemDraw document, or a different document
type.
For information about transferring ChemDraw
pictures to other types of documents see
“Autoscaling” on page 193.
Rotating Objects
To rotate objects:
1. Select the objects to rotate using a selection
tool.
The Rotation handle is located on the upper
right corner of the selection rectangle
3. Ctrl+drag or Option+drag to create a copy
and position it.
Rotation handle
2. Drag the Rotation handle clockwise or
counterclockwise.
A copy of the selected objects is moved to the
new position.
To duplicate the selected objects and constrain the
positioning of the copy to the same position as the
original objects:
2. Select the objects.
The screen and Info window indicate the
magnitude of the rotation around the center of
the Selection rectangle.
By default, atom labels do not rotate with the
structure.
3. Ctrl+Shift+drag or Option+Shift+drag to
To rotate an atom label with a structure:
1. Select a selection tool.
create a copy and position it.
To place a copy of an object on the Clipboard:
• Press Ctrl or Command while dragging the
structure.
1. Select the objects using a selection tool.
2. From the Edit menu, choose Copy.
ChemDraw 9
Manipulating Drawings
Rotating Objects
• 113
Administrator
If a single atom is unselected when a structure is
rotated, the structure rotates around the unselected
atom.
Structure Perspective
NOTE: Captions and atom labels that contain multiple
colors change to the foreground color when rotated. However,
all colors contained in the captions are printed.
tool
. The Trackball behaves similarly to the
Marquee tool.
To rotate the selected objects a specified number of
degrees:
1. Do one of the following:
• From the Object menu, choose Rotate.
• Double-click the rotation handle.
The Rotate Objects dialog box appears.
2. Type a number and click degrees CW for a
clockwise rotation or degrees CCW for
counterclockwise rotation.
3. If you want to rotate the atom label text, click
Rotate Atom Labels.
4. Click Rotate.
Objects are rotated around the center of the
Selection rectangle.
To repeat the same rotation on any object in the
document window:
1. Immediately after performing a rotation, select
the other objects to rotate.
2. From the Edit menu, choose Repeat Rotate.
114•Manipulating Drawings
You can rotate molecules or portions of molecules
through three dimensions with the Trackball
To rotate a structure:
1. Select the structure by dragging over it with the
Trackball tool.
2. Place the cursor inside the marked rectangle
and drag in any direction.
The structure will rotate on the X or Y axis, or
a combination of X and Y.
3. Use Shift+drag to limit the rotation to the X or
Y axes only.
You can also select part of a complex molecule and
rotate it around a particular bond.
NOTE: Do not try to use the Trackball to rotate objects
such as orbitals or boxes. It was designed to manipulate
chemical structures only.
Flatten Command
Although the Trackball tool is not intended to be a
3D modeling tool, it does introduce z-coordinate
information that is saved in .cdx files. This pseudo3D structure can be confusing when opening files
that have been saved after perspective
manipulation.
To remove perspective information:
1. Select a structure with the Marquee or Lasso
Tool.
2. On the Object menu, click Flatten.
All z-coordinate information is removed from
the structure.
CambridgeSoft
Structure Perspective
Reflecting Objects
Through Planes
You can reflect structures through planes
perpendicular to the X-axis or Y-axis using a
selection tool. Used with duplicating, you can create
mirror images of chemical structures for
representing racemic mixtures and other
stereoisomers.
To create a mirror image:
1. Draw a structure with defined stereochemistry,
for example, wedged bonds.
2. Select the structure and make a copy with
Ctrl+Drag or Option+drag.
3. While the copy of the structure is still selected,
choose Flip Horizontal or Flip Vertical from
the Object menu.
OH
HO
Flipping Objects
To reflect an object through a plane perpendicular
to the X-axis:
H3C
CH3
1. Select the objects to reflect.
H3C
OH
2. From the Object menu, choose Flip
Horizontal.
You can also preserve the absolute stereochemistry
while flipping by using the Rotate 180º commands
on the Object menu.
OH
Atom labels and captions do not flip along with the
object.
To reflect an object through a plane perpendicular
to the Y-axis:
HO
H3C
CH3
Rotate 180º Horizontal
H3C
1. Select the objects to reflect.
2. From the Object menu, choose Flip Vertical.
OH
Rotate 180º Vertical
Creating Mirror Images
You can create mirror images from structures with
defined stereochemistry by duplicating the
structure and then rotating it.
ChemDraw 9
Resizing Objects
You can resize objects by dragging the resize handle
of a selected object or by scaling. If all objects in the
document window are part of the selection, after
Manipulating Drawings
Reflecting Objects Through Planes
• 115
Administrator
you resize, a message appears asking whether you
want to change the document settings for that
document. If you do so, all subsequent bonds, atom
labels, and captions are drawn using the new
settings.
The Resize Handle
Scaling Objects
To resize objects with the Scale command:
1. Select the objects to scale.
2. Do one of the following:
• From the Object menu, choose Scale.
To resize an object or collection of objects:
1. Select the objects to resize.
• Double-click the Resize handle.
The Scale Objects dialog box appears.
The resize handle is located in the lower right
corner of the selection rectangle.
Resize handle
2. Point to the Resize handle.
The cursor becomes a double-headed arrow.
Use the first two options in the Scale Objects dialog
box to scale all selected objects so that the median
selected bond has a specified length based on the
following scale factor:
scale factor =
3. Drag the resize handle until the object is the
size you want.
The screen and Info window indicate the
percentage enlarged or reduced.
50%
new median bond length
current median bond length
To scale bonds so that the Fixed Length becomes
the new median bond length:
1. Select the top option.
The fixed length presently in the Drawing
Settings dialog is shown in parentheses at the
end of the line for this button.
2. Click Scale.
To scale the bonds to a new fixed length that you
specify:
1. Select the middle option.
2. Type the new median bond length in the box to
the right of the button.
116•Manipulating Drawings
CambridgeSoft
Resizing Objects
3. The current median bond length for the
selection is shown in the highlighted text box
when the dialog box initially appears.
4. Click Scale.
To scale objects by a percentage:
1. Click Scale by.
To join chemical structures along the length of a
bond:
1. Select a bond or atom in one of the molecules
2. Shift+click to select the corresponding bond
or atom on the second molecule that you wish
to fuse.
2. Type the percentage in the box to the right of
the button.
3. Click Scale.
This is the only available option when the selection
does not contain any atoms or bonds.
Distorting a Selection
In most cases, when you resize an object, the aspect
ratio of the object (the ratio of the height to width)
does not change. However, it is possible to change
the aspect ratio (distort) of certain objects including
chemical structures, circles, boxes, and ovals.
To distort an object in the horizontal or vertical
direction:
1. Select the object and Shift+drag the Resize
handle.
selected bonds
3. From the Object menu, choose Join.
The structures are joined.
To join chemical structures at one atom to create a
spiro linkage:
1. Position the two chemical structures so that the
atoms you wish to fuse are more or less
opposite each other.
Shift modifies the resize operation so that you
can distort objects along the X-axis or Y-axis.
2. Drag the Resize handle in the desired direction.
Joining Objects
Use the Join command in the Object menu to fuse
two chemical structures together. Once structures
are joined they can be easily selected by
double-clicking.
ChemDraw 9
NOTE: While you no longer have to position the
chemical structures exactly, attempts to fuse atoms that
are not approximately lined up will lead to incorrect
results.
2. Select the two atoms to be fused.
Manipulating Drawings
Joining Objects
• 117
3. From the Object menu, choose Join.
To group several objects:
1. Select the objects to group using a selection
Administrator
tool.
2. From the Object menu, choose Group.
To select an individual object within a group:
• Move the selection tool over an object until it
NOTE: When you join two differently colored bonds or
atom labels, the color of the front object becomes the color of
the resulting joined object. When you join two atoms that are
labeled, the front atom label becomes the atom label of the
resulting atom. For more information about front to back
ordering of objects, see Chapter 11: “Working With Page
Layout”.
Grouping Objects
You can group a number of objects drawn
separately. Grouping creates an association between
objects so they can be easily selected. You can select
all grouped objects by double-clicking with a
selection tool. Objects within a group can be
selected individually and manipulated while still
remaining part of the group.
If you want to group objects so that the individual
objects in the group cannot be accessed, you can
create an Integral group. When you select any
object in an Integral group, the entire group is
selected.
Grouping does not lock the position or orientation
of objects. Grouped objects maintain their relative
positions when they are centered on the page,
aligned or distributed.
Atoms and bonds making up a single chemical
structure are always grouped. If you group part of a
structure with other objects, the resulting group
contains the entire structure. If you add atoms or
bonds to a grouped structure, the new atoms and
bonds are part of the group.
118•Manipulating Drawings
is highlighted and click once.
The object is selected, not the group.
To select grouped objects:
• Move the selection tool over an object until it
is highlighted and double click
The entire group is selected.
Ungrouping Objects
To ungroup objects that are grouped:
1. Select a group, as above.
2. From the Object menu, choose Ungroup.
All the objects previously grouped become
individual objects.
Creating Integral Groups
To create a group in which individual objects
cannot be accessed:
1. Select the objects to group using a selection
tool.
2. From the Object menu, choose Group.
CambridgeSoft
Grouping Objects
3. With the group selected, right-click, point to
Group, and then click Integral.
To restore an Integral group to a regular group:
1. Select the Integral group.
2. Right-click, point to Group, and then deselect
Integral.
ChemDraw 9
Manipulating Drawings
Grouping Objects
• 119
Administrator
120•Manipulating Drawings
CambridgeSoft
Grouping Objects
Chapter 8: Advanced Drawing
Techniques
Overview
ChemDraw provides advanced drawing features
that allow you to:
• Label functional groups with Nicknames.
• Contract and expand sections of structures.
• Add bonds to specific characters in atom
labels.
• Create bonds whose attachment is not
explicitly defined.
• Color objects.
• Draw with Templates.
•
Pro
with “Ph” which is a Nickname representing a
phenyl group. For more information, see “Labeling
Atoms with HotKeys” on page 87.
You can use Generic Nicknames when drawing
query structures. For more information, see
“Generic Nicknames” on page 161.
Applying Nicknames
To use a Nickname to label an atom:
1. Create a structure.
Clean up structures.
Using Nicknames
Nicknames allow you to create short names for
functional groups to use as an atom label or part of
a label. When an atom is labeled with a Nickname,
the chemical significance of the expanded structure
is retained.
Commonly used Nicknames, such as Me, Et, and
Ph are provided with ChemDraw in the ChemDraw
Nicknames file located in your ChemDraw Items
folder. You can edit this list using tools in
ChemDraw. You should not attempt to edit this file
directly.
You can assign HotKeys to Nicknames. For
example, in the Nicknames and HotKeys provided
with ChemDraw, the Hotkey, “4” labels an atom
ChemDraw 9
NHOH
2. Double-click an atom with a bond tool or click
an atom with the Text tool.
An atom label text box appears.
NHOH
Advanced Drawing Techniques
Using Nicknames
• 121
3. Type a Nickname label such as “Et”.
Et
Administrator
NHOH
To select a Nickname to apply to an atom using a
Hotkey:
1. Point to an atom.
2. Press the Hotkey “=”.
The Choose Nickname dialog box appears.
To define a new Nickname:
1. Create a structure containing the functional
group you want to define as a Nickname.
2. Select the functional group.
You must indicate the connection point for the
functional group by selecting the new fragment
without the bond connected to the attachment
point.
NOTE: If stereochemistry is indicated in a structure that
you are defining as a Nickname, the stereochemistry is
retained.
3. From the Structure menu, choose Define
Nickname.
The number of connection points is shown by
radicals in the Formula. You can have only one
or two connection points in a nickname.
ChooseNickname 150 dpi
DefineNickname 150 dpi
3. Select a Nickname from the list.
4. Click OK.
NOTE: Nicknames are tokens and do not flip orientation
when applied to the left side of a structure when using
Automatic Justification. For example, in the absence of a
defined Nickname, the label “OTHP” appears as
“PHTO” when applied to the left side of a structure.
However, since the Nickname “THP” is defined, the label
appears as “THPO”. For more information, see “Aligning
Text” on page 81.
Pro
Defining Nicknames
To define your own Nicknames, you must have
ChemDraw Pro.
You can define Nicknames with one or two
attachment points. The attachment points must be
single bonds.
122•Advanced Drawing Techniques
4. Type a short name for the Nickname.
5. Click OK.
The Nickname is defined.
If you use a Nickname that is the same as an
element name, a message indicates that the element
is replaced with the Nickname. For example, using
Ac for an acetyl group replaces the element
Actinium. The Check Structure command
recognizes the label as an acetyl group rather than
Actinium.
ChemDraw provides the following default
Nickname/Element conflicts:
Symbol
Nickname
Element
Ac
Acetyl
Actinium
CambridgeSoft
Using Nicknames
Am
Amyl
Americium
Np
paraNitrophenyl
Neptunium
Pr
Propyl
Praeseodymium
You must leave a bond unselected for each
connection point. You cannot define more than
two connection points or one attachment point on
a single atom in a nickname.
To remove the overriding Nicknames, choose List
Nicknames from the File menu and delete the
overriding Nickname definition. For more
information, see “Deleting Nicknames” on page
124.
Troubleshooting Nicknames
If the command Define Nicknames is dimmed,
check for the following:
• A connection point is not present
• More than 2 connection points are defined
• The connection point is not a single bond
In the example below, the functional group was
drawn and the entire group selected. Because there
is no atom that indicates a connection point, you
cannot define a Nickname.
In the example below, the sulfonamide group is
attached to an unselected bond, which defines a
bond from sulfur as the connection point for the
group. This allows you to define a Nickname.
incorrect definitions
correct definitions
The definition in the figure below was
used for the amino acid, Ala. The unselected bond
at each end of the structure indicates the
connection points—Nitrogen on the left and
Carbon on the right.
You can draw a peptide chain by:
• Stringing Nicknames together.
H
Gly
Ala
OH
• Stringing Nicknames together in an atom label
as long as there is a bond attached.
H
ChemDraw 9
GlyAlaOH
Advanced Drawing Techniques
Using Nicknames
• 123
• Stringing Nicknames together and not
including bonds.
To create a contracted label:
1. Select the area of the structure to contract.
HGlyAlaOH
Administrator
Viewing Nicknames
To view the list of defined Nicknames:
• From the File menu, choose List Nicknames.
The List Nickname dialog box appears.
2. From the Structure menu, choose Contract
Label.
The Contract Label dialog box appears.
ListNicknames 150 dpi
ContractLabel 150 dpi
To insert a nickname into your document:
1. Select the nickname.
2. Click Insert.
The nickname appears in your document.
Deleting Nicknames
To delete a Nickname:
3. Type a label for the contracted structure and
click OK.
The label replaces the selected portion of the
structure.
molecule
1. From the File menu, choose list Nicknames.
2. Select the Nickname that you want to delete
from the list.
3. Click Delete.
The Nickname is removed from the list.
Contracting
Labels
Pro
NOTE: If the area of the structure you contract contains
errors, an error dialog box appears. Click Ignore to view any
other errors. Click Ignore All to ignore all errors or Stop to
end the contract process.
You can compress an area of a structure and replace
it with a text label by using the Contract Label
command. Contracted labels are similar to
Nicknames, but they are for one-time use only, in
the current document.
124•Advanced Drawing Techniques
CambridgeSoft
Contracting Labels
Expanding Labels
Multi-Attached Labels
If your structures contain defined nicknames, long
atom labels, or contracted labels, ChemDraw can
restore your structures to the fully expanded form.
Multi-attached atom labels enable you to draw
chemical structures more efficiently by allowing you
to attach bonds anywhere along an atom label.
Pro
Contracted Form
Ph
H2
C
CH2CH2CHCH3
CH2
CH3
NH
O
Expanded Form
CH3
Expanded structure
O
When you expand a label containing a divalent
nickname, for example HAlaOH, the first
attachment is to the character left of the nickname
(H). The second attachment is to the character right
of the nickname (OH).
To expand atom labels:
1. Select a selection tool.
2. Select the label to expand or double-click the
structure to expand all possible labels.
CH2CH2NHCH2CH3
Compact structure with multi-attached atom labels
Adding Bonds to an Atom
Label
To add bonds to an atom labels:
1. Draw the structure and attach any necessary
3. From the Structure menu, choose Expand
Label.
Your structure is redrawn in its expanded form.
atom label.
2. Select a Bond tool.
3. Position the cursor where you want to attach
additional bonds.
The selected part of the atom label is
highlighted.
Ph
ChemDraw 9
CH2CH2CH2CH3
Advanced Drawing Techniques
Expanding Labels
• 125
4. Click and drag from the atom label to draw
your bonds.
Creating a Multi-Center
Bond
Administrator
To create a multi-center attachment point:
Ph
CH2CH2CHCH3
1. Select the structure whose center you want
• Adding from the end of an atom label creates
defined as a multi-center attachment point.
2. From the Structure menu, choose Add
Multi-Center Attachment.
An asterisk is displayed with the fragment to
show that it contains a multi-center node.
bonds that are preferentially horizontal.
• Adding from the middle of an atom label
creates bonds that are preferentially vertical.
• Adding from the start of an atom label creates
bonds that try to attain the chain angle setting
in the Drawing Settings dialog box. If that
angle cannot be attained, the next best angle is
used.
The asterisk is not visible once a bond is drawn to
it. You can view the attachment point with a bond
or selection tool. For more information, see
“Viewing Attachment Points” on page 127.
You can determine the orientation of the resulting
bond by dragging. If you click to add a bond, there
are several preferential orientations for the resulting
bond as outlined below.
Using Multi-Center
Bonds
You can draw, with chemical significance,
polyhapto structures such as ferrocene ((Cp)2Fe).
To draw a bond to a multi-center attachment point:
1. Click the Bond tool.
2. Point to the asterisk and either click or drag to
create a bond.
Fe
Fe
To make the bond in ferrocene appear that it is
coming from within the ring:
1. Double-click the wedged bond to make it come
forward.
2. Select the downward bond.
126•Advanced Drawing Techniques
CambridgeSoft
Using Multi-Center Bonds
3. Double-click on the cyclopentadienyl ring with
a selection tool.
The entire structure, including the single bond,
is selected. The Cp ring and the single bond are
associated as one structural unit because
ChemDraw recognizes the bond between
them.
NOTE: For the best looking structure, you may need to
draw a longer than normal bond. You can toggle the Fixed
Length command by typing Ctrl +L or Command+L.
Viewing Attachment Points
After you draw a bond from the multi-center
attachment point, the asterisk disappears. You can
verify the node is present with a bond or a selection
tool. This provides a way to check the definition of
a pre-existing multi-center attachment point.
The attachment node and all the atoms it
represents are highlighted.
Fe
Using Variable
Attachment Positions
Pro
You can use the Add Variable Attachment
command to draw different positional isomers of a
compound using an abbreviated notation that
retains chemical significance.
For example, you can explicitly draw the three
isomers of dibromobenzene shown below.
To view a node with a selection tool:
• Select the selection tool and position the cursor
Br
Br
over to attachment point.
The attachment node is highlighted.
Br
Br
Br
Br
o-Dibromobenzene
To view a node with a bond tool:
• Select the bond tool and position the cursor
m-Dibromobenzene
p-Dibromobenzene
Alternately, you can express all three isomers as a
single parent structure by using a variable
attachment.
Br
over the attachment point.
Br
ChemDraw 9
Advanced Drawing Techniques
Using Variable Attachment Positions
• 127
To use variable attachment:
1. Draw the structural fragment to which you
Administrator
want to assign a variable attachment node.
2. Select the fragment using a selection tool.
TIP: To get the attachment in the center of the ring,
select just the ring, not the entire molecule.
To verify that the node is present, do one of the
following:
• Click a Selection tool and place the pointer on
the attachment point.
The attachment node is highlighted.
Br
3. From the Structure menu, choose Add
Variable Attachment.
An asterisk appears in the center of your
fragment.
• Click a Bond tool and place the pointer on the
attachment point.
The attachment node and the atoms it
represents are highlighted.
Br
Br
You can treat this attachment node as you would
treat the end of a normal bond.
1. Click a Bond tool.
2. Point to the asterisk and drag to draw a bond.
Br
For more information about viewing the
attachment points, see “Viewing Attachment
Points” on page 127.
Using Structure
CleanUp
Pro
Br
NOTE: In the example above, Fixed Lengths was disabled
using Ctrl+L, or Command+L so a bond could be drawn
extending further from the ring.
After you draw a bond from the attachment
node, the asterisk disappears.
The Structure CleanUp command is used to neaten
the appearance of molecules by regularizing bond
lengths and angles. Graphic objects such as arrows
and aromatic circles are not affected. Use Structure
CleanUp to redraw structures that you may have
drawn freehand or to neaten structures that you
may have imported from another application.
Structure CleanUp may not create the best structure.
Most structures have many “clean” forms, a
problem that is particularly noticeable with
straight-chain alkanes.
128•Advanced Drawing Techniques
CambridgeSoft
Using Structure CleanUp
If you select only part of a structure when you
choose Structure CleanUp, the other atoms and
bonds are not be affected.
NOTE: For some compounds, the Structure CleanUp
command produces a structure that extends beyond the
bounds of the page. To view the entire structure, scale the
structure or increase the size of the printed page. For more
information, see “Resizing Objects” on page 115 and
“Setting up Pages” on page 177.
Using Structure CleanUp:
1. Select the structure or part of the structure you
want to clean up with a selection tool.
2. From the Structure menu, choose Structure
CleanUp.
General Rules for Structure CleanUp are:
• The Fixed Length setting in the Drawing
•
•
•
•
•
Settings dialog determines optimum bond
lengths.
A given ring is redrawn only if all of its bonds
are selected.
Multi-attached atom labels and variable
attachment points cannot be cleaned.
Multi-center bonds cannot be cleaned.
Structures are rotated so that as many bonds as
possible are directed at a multiple of 15
degrees.
Structure CleanUp preserves stereochemical
meaning rather than the precise identity of any
wedged or hashed bonds, as shown below.
Cl
OH
O
O
HO
Before
After
Cl
NOTE: Structure CleanUp does not position molecules
relative to other objects. Overlap may occur.
Working with Color
With the color capabilities of ChemDraw, you can
create full color presentations of your chemical
drawings to appear on your monitor, print on a
color printer, or create 35mm slides using a film
printer.
Most computers can display any of 16 million
colors, but the number of colors that can appear at
any one time may be limited by the particular
monitor and display card installed in your
computer.
In ChemDraw, you can choose from a palette
consisting of a Background Color, a Foreground
Color, and up to twenty additional colors for any
given drawing. A palette is stored in every
document and Style Sheet or Stationery Pad. You
can use Style Sheets or Stationery Pads to create a
series of documents with the same color scheme.
Using color you can:
• Color atoms and bonds in a mostly
black-on-white drawing to highlight areas of
interest.
ChemDraw 9
Advanced Drawing Techniques
Working with Color
• 129
• Color parts of a structure in a reaction scheme
Administrator
to indicate where starting materials end up in
the products of a complicated mechanism.
• Use colored boxes and circles to highlight
atoms or molecules.
• Create slides that are easier to view by using
light objects on a dark background.
To view the Color palette:
1. From the File menu, choose Document
Settings.
2. Click the Colors tab.
Coloring Objects
Any object that you can select with a selection tool
can be colored. You can color individual bonds,
part or all of a chemical structure, or objects such as
boxes, curves, arrows, orbitals and reaction
mechanism symbols.
The border of objects that are shaded or filled, such
as white filled s-orbitals in the Orbitals palette, are
the same color as the shading or fill. The border of
objects that are hollow, such as circles and hollow
boxes in the Drawing Elements palette can be
colored, but the inside of the object cannot.
To color an object:
1. Select the object in a document window with a
selection tool.
2. Do one of the following:
• On the Style toolbar, click the Color
button, and select the color from the menu
that appears.
• From the Color menu, choose a color.
• In the Object Settings dialog box, on
the Drawing tab, click the Color button
, and select the color from the menu
that appears.
Displaying the Color Palette
You can use the color palette to specify the color of
objects and text in the document within the active
window.
130•Advanced Drawing Techniques
Use the Color tab to specify the following colors:
• Background Color—Fills the background of
the current document in the active window.
• Foreground Color—Default color used when
you draw a new object.
• Other Colors—Colors available in the Color
Menu for changing the color of individual
objects. The colors are represented in the same
order that they appear in the Color menu.
You can customize the Color menu. Colors can be
added, or existing colors can be changed. Changing
a color, for example Other #2, changes all objects
that are using the color.
NOTE: If you select an individual or grouped object that
contains multiple colors, there is a check mark next to each
of the colors in the Color menu. The purpose of the check
marks is to alert you that a change would affect more than
one color.
CambridgeSoft
Working with Color
Customizing the Color
Palette
You can add, remove, or change the default
foreground and background color and specify the
other colors available for coloring objects.
Changes made to the color palette affect the current
document only. You can save Color Palette settings
(foreground, background, and up to 20 other
colors) in a Style Sheet or Stationery Pad. For more
information, see “Saving Customized Settings as
Style Sheets or Stationery Pads” on page 21.
Windows Color Settings
To change the palette of colors used in the current
document:
1. From the File menu, choose Document
Settings.
The Document Settings dialog box appears.
2. Click the Colors tab.
A summary of each of the options is described in
the following table.
Option
Description
New Color
Add a new color box and set its
color using the Color Picker or
Color Wheel dialog box.
Remove
Color
Delete a color box that you have
selected in the left side of the
dialog box. Any objects using
the removed color are changed
to the Foreground color.
Set Color
3. Double-click the color to change.
The Color dialog box appears.
Change the color associated
with a color box that you have
selected in the left side of the
dialog box. Any objects using
the old color are changed to the
new color.
ColorPalette 150 dpi
ChemDraw 9
Advanced Drawing Techniques
Working with Color
• 131
4. Click a color box in the Basic Colors or the
Administrator
Custom Colors section.
A highlighted border appears around the color
you select.
5. Click OK.
The color is changed to the new color and
added to the Color menu.
Adding or Customizing Windows
Colors
To add colors or create customized colors:
Macintosh Color Settings
To change the palette of colors used in the current
document:
1. From the File menu, choose Document
Settings.
The Document Settings dialog box appears.
2. Click the Colors tab.
3. Click New Color.
The Color Picker dialog box appears.
1. In the Color dialog box, click Define Custom
Colors.
The Color dialog box appears.
Color Refiner box
Luminosity box
4. Use one of the icons on the left to select a
2. Click a color in the Color Refiner box to set the
hue and saturation.
The pointer turns into a Crosshair when you
click. You can drag to a different region to
change the hue and saturation.
3. Click in the Luminosity box to set the
brightness of the color.
4. If necessary, change the hue, saturation,
luminosity, and RGB components by typing
the values in the text boxes.
5. Click Add to Custom Colors.
132•Advanced Drawing Techniques
method of defining your color, then select a
color.
For more information about the Macintosh
color options, refer to your System
documentation.
5. Click OK.
The new color appears in the Colors tab in
place of the original color and is added to the
color menu.
Adding or Customizing Macintosh
Colors
To add a new color to the Color menu:
1. On the Color tab, click New Color or Set
Other Color.
The Color Picker dialog box appears.
CambridgeSoft
Working with Color
2. Click a color in the Color Wheel.
3. If necessary, adjust the hue, saturation,
brightness, and RGB components by typing
the values in
4. Click OK.
The new color is added to the list of Other
Colors.
Removing Colors
To remove a color from the Color menu:
1. Click the color you want to remove.
A highlight box appears around the color.
2. Click Remove Color.
The color disappears from the list of other
colors. Objects that were drawn in the removed
color are changed to the Foreground color
Templates and Color
The background and foreground colors used in a
template from the template pop-up palette are not
used when the template is drawn in a document
window. However, any other colors used in the
template are added to the color palette of the
current document if they are not already present.
This is part of the autoscale feature. For more
information, see “Autoscaling” on page 193.
template. Use an existing template instead of
drawing the structure to shorten the time required
to create documents.
The Template documents distributed with
ChemDraw are stored in the ChemDraw Items
folder in the same folder as the ChemDraw
application.
Pro In ChemDraw Pro, you can define your
own commonly used structures as templates. Any Template
documents in the ChemDraw Folder are listed in the
Windows menu (Macintosh) or Open Special on the File
menu (Windows).
NOTE:
The Templates Tool
The Templates tool contains a palette from which
you can select different types of structures or
objects. The Templates tool has two levels:
• The first level displays the available Template
documents.
• The second level displays the templates within
each Template document.
Saving Color Palette Settings
TemplateExample 150 dpi
You can save the Color Palette in a Style Sheet or
Stationery Pad. The Color Palette is saved in
addition to other document settings such as Page
Setup settings, Text settings, and Drawing settings.
Drawing With
Templates
Template documents are collections of structures
organized by structural type or functionality. A
structure in a Template document is named a
ChemDraw 9
Pro
In ChemDraw Pro the pop-up menu is
segmented if any Template documents are open for editing.
The upper segment contains Template documents that are
currently open for editing.
NOTE:
Advanced Drawing Techniques
Drawing With Templates
• 133
Choosing a Template
To choose a template from the Template palette:
Administrator
1. Hold down the mouse button over the
Templates tool
.
A menu listing the Template documents
appears.
2. Point to a Template document name.
A palette containing the available templates
appears.
3. Choose a template from the palette.
When you display the Template palette that was last
used, a blinking box appears around the currently
selected template until you drag to another
template.
Using Templates
When you draw with templates, the first bond
drawn determines the position of the template in a
document window. All remaining bonds are drawn
counterclockwise. The most nearly vertical bond on
the far-left atom is drawn first, from top to bottom.
If there are two equivalent bonds, the atoms that are
at a lower position are used to draw the first bond.
Drawing direction of template structures
• Click in a document window.
The template is drawn centered around the
pointer in the orientation that it appears in the
Templates palette.
Fusing a Template With an Existing
Structure
To draw a template and fuse it with an existing
structure:
• Click an existing bond in a document window.
To deposit a template and create a spiro-linkage
with an existing structure:
• Click an existing atom in a document window.
To draw a template in a document window and
control the size and orientation:
• Drag from the beginning of the first bond in
the template to the end of the first bond.
When you drag upwards the bulk of the
template is drawn to the left, and when you
drag downwards the bulk of the template is
drawn to the right. Templates must contain at
least one bond in order to be drawn by the
dragging method.
Drawing with the Same Template
To draw another template of the same type:
1. Click the Templates tool
.
2. Draw the template in a document window.
Templates are automatically scaled to the document
settings of the current document in the active
window. For more information, see “Autoscaling”
on page 193.
After a template is drawn in a document window,
the structures or objects can be manipulated by
standard drawing and editing methods.
Drawing a Template
To draw a template:
134•Advanced Drawing Techniques
Pro
Creating Templates
and Template Documents
In ChemDraw Pro you can create new templates
and add them to existing Template documents or
create new Template documents.
To create a new Template document:
• On the File menu, point to Open Special, and
then choose New Templates.
CambridgeSoft
Drawing With Templates
A new and untitled Template window appears. The
Template window is similar to a document window.
The Template window is divided into two halves by
a moveable, horizontal line:
• Template panel—Top half of the window
consists of individual panes where newly
created templates appear.
• Drawing area—Bottom half of the window
where you can draw new templates.
Template Panel
The structure appears in the Template pane as
you draw. The tools in the Tools palette are
used to draw a template in the drawing area of
the Template window exactly as they are used
to draw structures in the drawing area of a
document window.
To select a different Template pane:
• Click another Template pane.
When you select a Template pane, the contents
of the pane appear in the drawing area.
Pane
Resize
Handle
Drawing Area
The templates you define are not limited to atoms
and bonds. Templates can contain any ChemDraw
objects such as captions, boxes, arcs, orbitals,
arrows, reaction mechanism symbols, and curves.
The ChemDraw objects in Template documents
can be colored. However, the colors do not appear
in the Templates tool palette. You can paste pictures
from other applications into a Template pane.
Pasted objects are scaled to the current Template
document settings. For more information, see
“Autoscaling” on page 193.
Templates2 250 dpi
As you define templates they become available for
use in your document without having to save the
Template document.
To view the newly-defined Template:
• Point at the Templates tool
and hold
down the mouse button.
The name of the new Template document
appears in the menu.
Creating Templates
Orientation of Templates
To create a new template:
To make the templates that you create as easy to
draw with as possible, it is recommended that you
orient your structures so that the bond that
establishes the position of the template, for
1. Select a Template pane by clicking it.
2. Draw a structure or object in the drawing area
of the Template window.
ChemDraw 9
Advanced Drawing Techniques
Drawing With Templates
• 135
example, the bond used for fusing is left and
vertical. The most vertical left bond is drawn first.
For examples, see “Using Templates” on page 134.
Administrator
Resizing Template Panes
To resize the Template panes in the Template
panel:
• Drag the Resize handle on the lower right
corner of the Template panel.
The percentage the block of Template panes is
enlarged or reduced appears in the Info
window.
Template Panels
To increase the size of the Template panel:
• Drag the Template dividing line.
To add a row of panes to the Template panel:
1. Select a Template pane.
2. From the Edit menu, choose Add Row Before
or Add Row After.
The new row is added before or after the
Template pane you selected.
To add a column to the Template panel:
1. Select a Template pane.
2. From the Edit menu, choose Add Column
Before or Add Column After.
To delete a row of Template panes from the
Template panel:
1. Select a Template pane in the row you want to
delete.
2. From the Edit menu, choose Delete Row.
To delete a column of Template panes from the
Template panel:
1. Select a Template pane in the column you want
to delete.
2. From the Edit menu, choose Delete Column.
The column is removed and all other columns
are moved to the left.
Saving Template Documents
To save a Template document and have it available
in the Template pop-up menu and the Window
menu:
1. From the File menu, choose Save As.
The Save As dialog box appears.
Saving a Template document in the
ChemDraw Items folder makes it accessible in
the Open Special submenu and in the
Templates tools palette.
2. Type a name for the Template document and
click OK or Save.
The new column is added to the right or left of
the Template pane you selected.
136•Advanced Drawing Techniques
CambridgeSoft
Drawing With Templates
Chapter 9: Working With
Structures
Overview
You can perform the following functions on the
structures you create:
• Check a structure to identify valence and label
•
•
•
•
•
•
errors.
View analysis information about a structure.
Assign Atom-to-Atom mapping.
Show Stereochemistry.
In ChemDraw Pro, display the chemical
properties for a structure.
In ChemDraw Pro, break existing structures
across one or more bonds to mimic the
fragmentation in a mass spectrometer.
In ChemDraw Ultra, assign structures to
spectra and calculate NMR shift information.
To check the valences of all selected atoms in a
structure:
1. Select a structure, part of a structure, or caption
with a selection tool.
2. From the Structure menu, choose Check
Structure.
Each label in the structure is checked.
sequentially. When a label is incorrect, a
message window appears.
Checking Chemistry
The Check Structure command identifies valence
and label errors in your structure.
Check Structure
You can check the chemistry of a selected structure,
part of a structure, or caption (in Formula style)
with the Check Structure command. The structure
is checked using normal valences and elements, and
defined Nicknames.
To continue checking the structure when a message
appears:
• Click Ignore.
To ignore all subsequent errors in a structure:
• Click Ignore All.
To stop checking a structure when a message
appears:
• Click Stop.
ChemDraw 9
Working With Structures
Checking Chemistry
• 137
The check ends and the atom that is causing
the problem is selected.
Administrator
Values for selected objects in the document
window are shown. If nothing is selected in your
document, values for the entire document are
shown.
You can have this window open as you draw in the
document. It shows the current values as you draw.
Check Structure when
Copying to Clipboard or
Exporting
To have ChemDraw perform a check structure
analysis on any structure copied to the Clipboard:
1. From the File menu, choose Preferences.
The Decimals setting applies to Exact Mass,
Molecular Weight, and m/z only.
The following table describes the analysis
properties.
Property Description
Formula
2. Click the Check Structure When Copying to
Clipboard or Exporting check box.
The molecular formula showing the
exact number of atoms of each
element in the molecule and charges,
radicals, and isotopes.
This change affects all documents.
Viewing Analysis
Information
The Analysis window displays the chemical
formula, exact mass, molecular weight, m/z, and
elemental analysis for the entire document, a
structure, part of a structure, or a caption in
Formula style.
Exact Mass The exact molecular mass of the
structure, where atomic masses of
each atom are based on the most
common isotope for the element.
Molecular
Weight
The average molecular mass of the
structure, where atomic masses are
based on the natural abundance of all
isotopes of the element.
To view analysis information:
• From the View menu, choose Show Analysis
Window.
The Analysis window appears.
AnalysisToolbar 150 dpi
138•Working With Structures
CambridgeSoft
Viewing Analysis Information
Property Description
m/z
Mass/charge, where charge =1. The
weights of the most common
isotopes and a graphical
representation of the isotopic
abundance is shown.
The information appears as a multiline caption
below the structure. You can edit this information
with the text tool.
HO
OH HO
O
HO
The molecular weight shown takes
the isotopes for each atom and their
natural abundance into account.
Where there is more than one
abundant isotope, ChemDraw
computes multiple molecular
weights. Low abundance
combinations (whether because the
isotope is in low abundance or
because it includes many moderateabundance contributions) are not
taken into account.
NOTE: You cannot paste the graph in a
document.
Elemental
Analysis
OH
glucose
Chemical Formula: C6H12O6
Exact Mass: 180.06
Molecular Weight: 180.16
m/z: 180.06 (100.0%), 181.07 (6.9%), 182.07 (1.4%)
Elemental Analysis: C, 40.00; H, 6.71; O, 53.29
The information in the label updates automatically
as you edit the structure. You can show or hide the
information as follows:
1. Right-click in the label. It does not matter
which tool you are using.
2. Point to Analysis, and select or deselect the
item you want to show/hide.
The percent by weight of each
element in the structure.
To paste information about a structure as a caption:
1. Click the check boxes for the information that
you want to paste.
2. Click Paste.
Showing
Stereochemistry
When the Show Stereochemistry option is selected,
ChemDraw calculates the absolute stereochemistry
for tetrahedral atoms and double bonds according
to the Cahn-Ingold-Prelog (CIP) priority rules. For
more information about the CIP rules, see
“Stereochemistry” on page 236.
ChemDraw 9
Working With Structures
Showing Stereochemistry
• 139
Administrator
Only tetrahedral and double-bond stereochemistry
are supported, and only non-racemic
stereochemistry is interpreted. Stereochemical
indicators for aromatic bonds are not shown.
ChemDraw calculates and displays the following
stereochemical terms:
• (R), (S)—Standard tetrahedral
stereochemistry
• (r), (s)—Tetrahedral stereochemistry
determined by other stereochemical centers.
For example: cis-decalin and myo-inositol.
• (E), (Z)—Standard double-bond
stereochemistry
The atom label settings determine the font style and
size of the terms.
Stereochemistry Indicators
To show the stereochemistry of a structure:
• Select a structure, right-click, and then click
Show Stereochemistry.
The stereocenters are marked as shown in the
following example.
Hiding Indicators
To hide an individual indicator:
1. Select the indicator to hide.
2. Right-click and choose Hide Indicator.
Removing Indicators
To delete an indicator:
1. Click the indicator.
2. Click the eraser tool and then click the
indicator.
Positioning Indicators
Stereochemistry indicators are positioned
automatically and move appropriately if a structure
is modified. You can reposition them by dragging
them to the desired position or with the Indicator
Position dialog box.
To reposition an indicator numerically:
1. With a selection tool, click the indicator to
move.
2. Right-click and choose Position.
The Position Indicator dialog box appears.
Cholesterol 60%
(R)
(R)
(R)
H
(S)
(R)
PositionIndicators 150 dpi
(S)
(S)
H
H
(S)
HO
(Z)
cholesterol
If you make changes to the drawing that affect the
stereochemistry, the stereochemistry is
recalculated.
140•Working With Structures
CambridgeSoft
Showing Stereochemistry
3. Click the appropriate Position option, and type
a value:
To Position …
from the atom or bond
center to indicator
center
Type a value for
the position
by…
angle, in degrees
or
clock, in clock time
from the atom or bond offset, horizontal
center to bottom left of and vertical
indicator baseline
at specified coordinates
absolute, horizontal
and vertical
Converting Structures to 3D
You can convert a two-dimensional structure
drawn in ChemDraw to a three-dimensional
structure. To use this feature, you must have
CambridgeSoft Chem3D installed on your
computer.
To convert a structure to 3D:
1. Select the structure to convert.
2. From the Edit menu, choose Get 3D Model.
2. Edit the structure and close Chem3D when
you are finished.
The edited structure appears in the ChemDraw
document window.
Viewing Chemical
Properties
Pro
ChemDraw Ultra, using an add-on, ChemProp,
calculates predicted values for the physical and
thermodynamic properties of a selected structure of
up to 100 atoms. You can view the values in the
Chemical Properties window.
The properties are calculated using the most reliable
methods for calculation for the given structure.
Log P and MR values based on literature values
rather than a calculation are included in the report
file.
Viewing the Chemical
Properties Window
To view predicted properties for a selected
structure:
1. Select the structure to analyze.
2. From the View menu, choose Show Chemical
Properties Window.
The Chemical Properties window appears.
The 3D structure appears in the document
window.
NOTE: 3D Objects inserted in this way cannot be
transferred between platforms. For more information see
“File Formats” on page 197.
ChemProperties
150 dpi
To edit the 3D structure:
1. Double-click the 3D structure.
Chem3D opens.
ChemDraw 9
Working With Structures
Viewing Chemical Properties
• 141
The following basic values are displayed.
Administrator
Property
Description
Boiling Point
The boiling point for the
structure. Reported in Kelvin
at 1 atm.
Melting Point
Critical
Temperature
Critical Pressure
The melting point for the
structure. Reported in Kelvin
at 1 atm.
The temperature above
which the gas form of the
structure cannot be liquefied,
no matter the applied
pressure (Tc). Reported in
Kelvin.
The minimum pressure that
must be applied to liquefy the
structure at the critical
temperature (Pc). Reported in
bars.
Critical Volume
The volume occupied at the
compound’s critical
temperature and pressure
(Vc). Reported in cm3/mol.
Gibbs Energy
The Gibbs free energy, ∆G,
for the structure. Reported in
kJ/mol at 1 atm and 298.15K.
Henry’s Law
The inverse of the logarithm
of Henry’s law constant
[-log (H)] (no units).
Property
Description
Heat of
Formation
The heat of formation, ∆Hf,
for the structure. Reported in
kJ/mol at 1 atm and 298.15K.
tPSA
Calculation of polar surface
area based on fragment
contributions.
CLogP
The calculated
n-octanol/water partition
coefficient (log Pow).
Ultra
CMR
The calculated Molar
Refractivity
Ultra
NOTE: The CLogP and CMR algorithms incorporated in
ChemDraw are licensed from BioByte Corp, and have been
extensively tested and peer-reviewed as providing highly
accurate results. The values produced by these algorithms in
ChemDraw should be exactly the same as values produced by
the standalone CLogP and CMR applications from
BioByte.
For further information about CLogP and CMR, please
refer to the BioByte web site at:
http://www.biobyte.com
and to the manuals for ClogP and CMR at:
http://clogp.pomona.edu/medchem/chem/papers/14clogp.html
and
http://clogp.pomona.edu/medchem/chem/papers/13cmr.html
To paste the basic properties into your document:
• Click Paste.
142•Working With Structures
CambridgeSoft
Viewing Chemical Properties
To create a report and view results for other
fragmentation methods including the Broto,
Crippen, Viswanadhan, Joback, and Joback/Stein
methods:
• Click Report.
When you create a report, a detailed list of
information used for performing the calculation is
shown in a text file. The list includes additional
properties and literature references used to perform
the calculation.
Mass
Fragmentation Tool
Pro
The Mass Fragmentation tool
allows you to
break existing structures across one or more bonds.
This mimics the molecular fragmentation in a mass
spectrometer, but does not have any predictive
qualities: you must specify what bonds are to be
broken.
To fragment a structure:
• Drag the mouse across one or more bonds.
A line is drawn across the bonds that
disappears when you release the mouse button.
The operation is not final until the mouse is
released. This means you can drag the line
around holding the mouse button down to see
different possibilities, and still back out
without breaking any bonds. When the mouse
button is released, any bonds crossed by the
line are broken
If you want the line to remain on display, hold
down the Alt or Option key after drawing the line.
Chemical Formula: C3H7•
Exact Mass: 43.05
Chemical Formula: C3H7•
Exact Mass: 43.05
NOTE: The order in which you release the mouse button
and the Alt or Option key determines whether the line
remains displayed or not. Releasing the mouse button first
leaves the line displayed.
The Alt or Option key also allows you to “turn
corners” and cut more than one bond.
Chemical Formula: C4H9•
Exact Mass: 57.07
Chemical Formula: C2H5•
Exact Mass: 29.04
When the line crosses a bond, the formula and
exact mass for the fragments on either side of the
bond are displayed as if the bond were
homolytically broken. That is, a single bond turns
into a monoradical on each fragment; a double
bonds turns into a pair of diradicals. If more than
one bond is crossed, all fragments on each side of
the line are considered together. If the only bond
crossed is a ring bond, a single formula/mass pair is
displayed.
Chemical Formula: C3H7•
Exact Mass: 43.05
Chemical Formula:
C6H12••
Exact Mass: 84.09
ChemDraw 9
Chemical Formula: C3H7•
Exact Mass: 43.05
NOTE: It is possible to draw lines that tie themselves in
knots. Use this tool with caution to avoid unrealistic
fragmentation.
Working With Structures
Mass Fragmentation Tool
• 143
You can reposition the formula and mass displays
(they are text objects), or delete them altogether.
Mass Fragmentation tool procedures:
retrosynthetic analyses. In most cases, you will have
to clean up the reaction by adding or deleting atoms
or bonds.
Administrator
The following example cuts two bonds, and gives
the results shown:
operation
behavior
drag
Breaks bond(s). The action
does not take place until you
release the mouse button, so
you can “test alternatives”.
cut these bonds
drag, holding
Draws a freehand line. If you
down the Alt or release the mouse button
Option key
before releasing the Alt or
Option key, the dashed line
display remains.
drag across a
bond, then
press the Alt or
Option key.
Allows you to change direction
and draw a polyline. If you
release the mouse button
before releasing the Alt or
Option key, the dashed line
display remains.
N
R
NH2
R
+
Reaction created with the Retrosynthesis tool
NH2
N
R
Reaction created with the Dissociation tool
The result is a reasonable approximation of the
Beyer Method for quinolines, and can quickly be
cleaned up to the correct reaction:
NH2
R
N
H
O
These tools are found in the Fragmentation tools
section of the Main tools palette.
Drawing
Reactions
Two new tools speed the drawing of synthesis
reactions. Both tools are used in a similar manner to
the Mass Fragmentation tool: they are used to cut a
bond or bonds in a product. The Dissociation tool
draws the resulting fragments as a standard
draws the
reaction with the product on the left and a broad
arrow pointing to the reactants, as is customary in
144•Working With Structures
R
+
Pro
reaction. The Retrosynthesis tool
R
+
CambridgeSoft
Drawing Reactions
Expand Generic
Structures
Pro
You can generate multiple structures from an
abbreviated combinatorial structure with
ChemDraw’s Expand Labels tool . The tool is
designed for “small” expansions, and is limited to a
maximum of 500 generated structures. For large
combinatorial expansions, use CambridgeSoft’s
CombiChem for Excel. Four kinds of abbreviated
combinatorial definitions may be used:
definition example
Alternative
Groups and
R-tables
Anonymous
Alternative
Groups
Element
Lists
R1
1
definition example
Variable
Attachment
CH3
1
Definitions are expanded into multiple complete
molecules. If more than one site is present in the
selection, the expansion will include all
permutations of substitutions. Expansions are
generated into a new document.
To generate a combinatorial library:
R1
1
F
1
Cl
1
Br
1
NH2
1. Select at least one combinatorial substitution
definition.
[OMe, OH, NH2]
[I, Br, Cl, F]
NOTE: For alternative group/R-tables, both the
alternative group label and the table must be selected. If
the label is selected but not the table, the label will not
be modified by the expansion, and will appear as a label
in all generated structures.
2. Choose Expand Generic Structure from the
Structure menu.
ChemDraw 9
Working With Structures
Expand Generic Structures
• 145
The structures are generated to a new
document.
The selection rectangle surrounds the selected
objects.
Administrator
CH3
O
CH3
CH3
1
1
1
SpectrumStructure Assignments
Ultra
ChemDraw Ultra enables you to assign structures
to spectra.You can then display the structure
associated with a specific peak by placing the
pointer on that peak.
Assigning Structures to
Spectra
To assign structures to a spectrum:
1. Open a spectral file.
2. Draw the structure or structures you want to
assign to the spectrum.
3. Select specific atoms and bonds in the
structure.
4. Shift-click the peak or peaks to which you want
the structure assigned.
146•Working With Structures
10
8
6
4
2
0
PPM
5. From the Structure menu, choose Make
Spectrum-Structure Assignment.
The selected atoms and bonds in the structure
are associated with the selected spectral peaks.
Viewing Spectral
Assignments
To view the spectral assignments:
1. Click the Lasso or Marquee tool.
2. Place the pointer over a peak.
CambridgeSoft
Spectrum-Structure Assignments
The assigned atoms or bonds are highlighted.
To view 1H or 13C NMR information:
1. Select the target chemical structure.
2. From the Structure menu, choose 1H-NMR
Shifts or 13C-NMR Shifts.
ChemNMR redraws the molecule with the
estimated shifts and displays the information
and line spectrum in a new window as shown
below.
ChemNMR H-1 Estimation
Removing Spectral
Assignments
7.01
3.22
7.02
H6.39
7.02
To remove spectrum to structure assignments:
1. Click the Lasso or Marquee tool.
7.18
H
6.58
Estimation Quality: blue = good, magenta = medium, red = rough
2. Select the objects from which to remove the
assignment.
3. From the Structure menu, choose Clear
Spectrum-Structure Assignment.
NMR Shift
Information—
ChemNMR
Ultra
ChemNMR is a feature of ChemDraw Ultra only.
ChemNMR estimates and displays proton and
carbon-13 chemical shifts in ppm for a selected
molecule.
ChemDraw 9
7
6
5
4
PPM
3
2
1
Protocol of the H-1 NMR Prediction:
Node
Shift
CH
7.02
CH
7.02
CH
7.18
CH
7.01
CH2
3.22
H
6.58
H
6.39
Base + Inc.
7.26
-0.12
-0.12
7.26
-0.05
-0.19
7.26
0.04
-0.12
7.26
-0.05
-0.20
1.37
1.22
0.63
5.25
1.65
-0.32
5.25
0.09
1.05
Comment (ppm rel. to TMS)
1-benzene
1 -C=C
1 -C
1-benzene
1 -C=C
1 -C
1-benzene
1 -C=C
1 -C
1-benzene
1 -C=C
1 -C
methylene
1 alpha -1:C*C*C*C*C*C*1
1 alpha -C=C
1-ethylene
1 -1:C*C(R)*C*C*C*C*1 gem
1 -C-1:C*C*C*C*C*C*1 trans
1-ethylene
1 -1:C*C(R)*C*C*C*C*1 trans
1 -C-1:C*C*C*C*C*C*1 gem
Working With Structures
NMR Shift Information—ChemNMR
• 147
0
Administrator
148•Working With Structures
CambridgeSoft
NMR Shift Information—ChemNMR
Chapter 10:
Structures
Pro
Drawing Query
What Are Query
Structures?
For more information on query properties see
“Query Properties” on page 238, or consult the
documentation for your chemical database.
Using a query structure to specify properties for
atoms and bonds provides an efficient way to
search chemical databases such as ChemFinder,
DARC, RS3, or ISIS/Base. You can use a query
structure to narrow or broaden your search.
NOTE: ChemOffice 2005 does not prevent or warn you if
For example, creating a query structure indicating a
bond as either double or single might broaden your
search. Indicating atom properties where a
particular atom must have a charge of +3 might
narrow your search.
Because ChemDraw is not a chemical database
application, the interpretation of query structures
involves other programs. Not all databases support
the same query properties. If you use a query
structure containing properties not understood by a
given database, one of the following may happen:
• An error message appears
• The unsupported properties are ignored
To use query structures for searching you may do
either of the following:
• Paste the query structure into a database search
window and initiate a search.
• Save the structure in an appropriate file format
and open the file in the database application.
ChemDraw 9
you try to assign conflicting or nonsensical properties. For
example, you can require that one of the atoms in benzene is
not part of any ring, which is inherently impossible. The
results of such a search depend on the query system used, but
usually no matches are found.
Atom Properties
To assign properties to selected atoms in a
structure:
1. Do one of the following:
• Select a single atom by clicking it with a
selection tool.
• Select multiple atoms by Shift+clicking the
atoms.
2. Then do one of the following:
• Right-click, select the property you want,
and then click the appropriate option.
• From the Structure menu, choose Atom
Properties. The Atom Properties dialog
box appears.
Drawing Query Structures
Atom Properties
• 149
• Press the Hotkey “/ ”. The Atom Properties
dialog box appears.
Administrator
In the Atom Properties dialog box, select the
properties to associate with the selected
atom(s). Click OK.
Query indicators appear next to atoms that
have associated atom properties.
X3
T
∗2HS
C
R
S
The character that appears depends on which query
properties have been assigned. If more than one
property is assigned, more than one character
appears adjacent to the atom. For more
information, see “Query Indicators” on page 160.
The atom property indicators are shown in the
following table.
Indicator
Query Property
*
Substituents: Free Sites (followed
by the number of free sites)
Indicator
Query Property
U
Substituents: Up to (followed by
the maximum number of
substituents)
X
Substituents: Exactly (followed by
the number of substituents)
H
Implicit Hydrogens
R
Ring Bond Count
S
Unsaturation
C
Reaction Change
T
Reaction Stereo
L
Translation
I
Isotopic Abundance
(none)
Abnormal Valence
Viewing Atom Property
Values
Except for the three Substituents query properties,
the characters indicate that a given property is
applied, but not the value of that property.
To find the value of a query property setting:
1. Select the atom.
2. Do one of the following:
• Right-click, point to an atom, and then point
to the appropriate property.
150•Drawing Query Structures
CambridgeSoft
Atom Properties
• From the Structure menu, choose
Properties and view the settings on the
Atom Properties tab.
aldehyde oxygen. The double bond to the aldehyde
oxygen counts as only one substituent and
hydrogen atoms never count as substituents.
Removing Atom Properties
O
To remove all atom properties from an atom:
1. Select the atom.
2. From the Structure menu, choose Properties.
3. Click Use Defaults.
The atom properties are removed and the
characters no longer appear.
To remove specific atom properties:
1. Select the atom.
H
The substituent count atom property allows you to
specify the number of bonds to an atom in the
target structure. This includes bonds already drawn
in the query structure.
The substituent options are described in the
following table.
2. Do one of the following:
• Right-click, point to an atom, point to the
property you want, and then choose the
appropriate option.
3. From the Structure menu, choose Properties
and then click the atom property to remove.
Atom Property
Options
The following topics describe the atom properties
you can associate with an atom.
Option
Search Result
Unspecified
Default. Search is determined by
the target database. Some
databases (including ISIS) find
compounds with any
substitution at this atom and
some databases (including
DARC) find only compounds
with substitution exactly as
drawn.
Substituents
The three Substituents properties specify the
number of substituents that may be bonded to the
selected atoms. In ChemDraw, a substituent is
defined as a non-hydrogen atom connected by a
bond of any order.
For example, in the figure below, the carbonyl
carbon, indicated by the arrow in propanal, has a
substituent count of two: the alpha carbon and the
ChemDraw 9
Drawing Query Structures
Atom Property Options
• 151
Administrator
Option
Search Result
Free Sites
Finds compounds in which the
selected atoms may contain a
range of substituents up to the
number specified plus the
number of bonds as drawn. A
value of zero finds a substituent
count as drawn. You can also use
the Free Sites symbol in the
Chemical Symbols palette to
apply free sites. For more
information, see Chapter 6,
“Drawing Orbitals, Symbols,
Arrows, Arcs, and Other
Shapes” on page 93.
Up to
Exactly
Finds compounds in which the
selected atoms may contain a
range of substituents up to the
number specified.
Finds compounds in which the
selected atoms contain the exact
number of substituents as
specified, up to 15 substituents.
Implicit Hydrogens
must be filled by bonds to non-hydrogen atoms.
The implicit hydrogen options are described in the
following table.
Option
Search Result
Allowed
Default. Finds compounds
regardless of whether hydrogen
atoms are attached to the
selected atoms.
Not allowed Finds compounds with no
additional hydrogen atoms
attached to the selected atoms.
Ring Bond Count
The Ring Bond Count specifies the number of
bonds attached to an atom that are part of rings of
any size. For simple cases, this also specifies the
maximum number of rings in which an atom can
reside. The ring bond count options are described
in the following table.
Option
Search Result
Any
Default. Finds compounds in
which the selected atoms can be a
member of any type of ring, or a
member of no ring at all.
No ring
bonds
Finds compounds in which the
selected atoms are acyclic.
As drawn
Finds compounds in which the
selected atoms reside in the same
type and number of rings as
drawn.
The Implicit Hydrogens property specifies whether
additional, implicit hydrogen atoms may be
attached to the selected atoms. If implicit hydrogen
atoms are not allowed, all valences to that atom
152•Drawing Query Structures
CambridgeSoft
Atom Property Options
Option
Search Result
Simple ring
Finds compounds in which the
selected atoms is a member of only
one ring (the atom has two ring
bonds).
Fusion
Finds compounds in which the
selected atoms lies at ring fusions
(the atom has three ring bonds).
Spiro or
higher
Finds compounds in which the
selected atoms is a member of a
spiro or higher linkage (the atom
has four or more ring bonds).
Reaction Change
The Reaction Change property specifies whether a
change occurs at selected atoms after a reaction.
This property is only meaningful when searching a
database containing chemical reactions. The
reaction change options are described in the
following table.
Option
May be
anything
Default. Finds all reactions
regardless of any change to
selected atoms after a reaction.
Must be as
specified
Finds all reactions that are
changed at the selected atoms
exactly as specified by the reaction
center property in the Atom
Properties dialog box.
Unsaturation
The Unsaturation property specifies whether a
multiple bond is attached to the selected atoms. The
unsaturation options are described in the following
table.
Option
Search Result
Unspecified
Default. Finds compounds
regardless of whether a multiple
bond is attached to the selected
atoms.
Search Result
Reaction Stereo
The Reaction Stereo property specifies that the
selected atoms are stereocenters in a reaction. This
property is only meaningful when searching a
database containing chemical reactions.
The reaction stereo options are described in the
following table.
Option
Search Result
Must be absent Finds compounds that do not
have a multiple bond attached to
the selected atoms.
Any
Default. Finds all compounds
regardless of the stereochemistry
at the selected atoms.
Must be
present
Inversion
Finds compounds in which the
selected atoms have an inverted
stereo configuration after a
reaction.
ChemDraw 9
Finds compounds that have at
least one multiple bond (double,
triple or aromatic) attached to the
selected atoms.
Drawing Query Structures
Atom Property Options
• 153
Administrator
Option
Search Result
Retention
Finds compounds whose selected
atoms have an unchanged stereo
configuration after a reaction.
Translation
Isotopic Abundance
The Isotopic Abundance property gives you the
ability to distinguish between different isotopic
compounds—for example between mono- and
hexa-deuterobenzene—by specifying a nuclide at
any location.
The isotopic abundance options are described in
the following table:
The Translation property specifies what is required
to match in the structure query and possible
database hits in a Markush DARC query.
Option
The translation options are described in the
following table:
Unspecified Default
Option
Definition
Equal
Default. Matches specific to specific
or generic to generic terms.
Broad
Translates specific query atoms to
corresponding superatoms in the
database.
Narrow
Translates query superatoms to
corresponding specific atoms or
groups in the database.
Any
Translates generic or specific terms
to any term.
For more information, refer to the Markush DARC
User Manual.
154•Drawing Query Structures
Search results
Any
For ChemFinder, the same as
default. Included for
compatibility with other
systems where the default may
be different.
Natural
Indicates an isotopically
unmodified nuclide.
Enriched
Indicates a mixture of
isotopically substituted and
isotopically unmodified
nuclides.
Deficient
Indicates a depleted label, that
is, the nuclide is present in less
than the natural ratio.
Nonnatural Indicates an isotopically
substituted nuclide, that is,
essentially all the molecules of
the compound have only the
indicated nuclide.
CambridgeSoft
Atom Property Options
Abnormal Valence
The Abnormal Valence property specifies whether
selected atoms can have a valence other than
normal. “Normal” valences for each element are
defined in the Isotopes Table file in the ChemDraw
Items folder.
NOTE: The Abnormal Valence atom property does not
provide a visual indicator.
The Abnormal Valence options are described in the
following table.
Option
Search Result
Not allowed Default. Finds compounds where
the selected atoms only have
valences that are normal for that
element. If necessary, hydrogen
atoms are automatically added to or
removed from the atom before
transferring it to the chemical
database. If the Check Structure
When Copying to Clipboard or
Exporting preference is turned on,
an error message warns of
abnormal valences.
Allowed
Finds compounds with the specific
valence drawn.
NOTE: If Abnormal Valence is Allowed, any Invalid
Valence messages for those atoms are ignored automatically
by the Check Structure command.
Bond Properties
To define bond properties of selected bonds in a
structure:
1. Do one of the following:
• Select a bond using a selection tool.
• Shift+click to select multiple bonds.
2. Then do one of the following:
• Right-click, point to Bond, point to the
property you want, and then choose the
appropriate option.
• From the Structure menu, choose
Properties. On the Bond Properties tab,
select the bond properties to associate with
the selected bonds from the drop-down lists.
Click OK.
• Point to an bond and press the Hotkey “/ ”.
The Bond Properties dialog box appears.
In the Bond Properties dialog box, select the
properties to associate with the selected atoms.
Click OK.
Query indicators appear next to bonds that
have associated bond properties.
S/D
R/C
Rxn
D/A
Rng
one bond
ChemDraw 9
S/A
Any
many bonds
Drawing Query Structures
Bond Properties
• 155
Administrator
The characters that appears depends on which
query properties have been assigned. If more than
one property is assigned, more than one descriptor
appears adjacent to the atoms. For more
information, see “Query Indicators” on page 160.
The indicators are described in the following table.
Indicator
Bond Query Property
Any
Bond Type: Any
S/D
Bond Type: Single/Double
D/A
Bond Type: Double/Aromatic
S/A
Bond Type: Single/Aromatic
Rng
Topology: Ring
Chn
Topology: Chain
R/C
Topology: Ring or Chain
Rxn
Reaction Center
Viewing Bond Property
Values
The descriptor for the Reaction Center query
property indicates that the property is applied, but
not the value of the property.
To find the value of a query bond property setting:
1. Select the bond.
• Right-click, point to the bond, and then
point to the appropriate property.
• From the Structure menu, choose Bond
Properties, and view the settings of the
drop-down list boxes.
Removing Bond Properties
To remove all bond properties from selected bonds:
1. Select the bonds.
2. From the Structure menu, choose Properties.
3. Click Use Defaults.
The bond properties are removed and the
indicators are no longer adjacent to the selected
bonds.
To remove specific bond properties:
1. Select the bond.
2. Do one of the following:
• Right-click, point to the appropriate
property, and then click the property to
remove.
• From the Structure menu, choose
Properties, and then click the bond
property to remove.
Bond Property Options
The following are the atom properties that you can
associate with an atom:
Bond Type
This property specifies the bond type of the
selected bonds. The default bond type corresponds
to the current type of the bond (single, double, etc.)
as drawn.
2. Do one of the following:
156•Drawing Query Structures
CambridgeSoft
Bond Properties
The Bond Type options are described in the
following table.
Option
Search Result
Search Result
D/A
Single (all) and Finds compounds with the bond
Dative
type you select for the selected
bonds.
Finds compounds whose
selected bonds are double or
aromatic.
S/A
Finds compounds whose
selected bonds are single or
aromatic.
Option
Double or
Double Bold
Finds compounds whose
selected bonds are double.
Double Either Finds compounds whose
selected bonds are double bonds
and have either cis/trans
stereochemical configuration.
NOTE: Not all bond types are supported in all file
formats. When an unsupported bond type is saved to a given
file format, it is converted to the closest equivalent that is
supported.
Finds compounds whose
selected bonds are aromatic.
Topology
Tautomeric
Finds compounds whose
selected bonds are tautomeric.
The Topology options are described in the
following table.
Triple
Finds compounds whose
selected bonds are triple.
Quadruple
Finds compounds whose
selected bonds are quadruple.
Any
Finds compounds regardless of
the bond type of the selected
bonds.
S/D
Finds compounds whose
selected bonds are single or
double.
Aromatic
ChemDraw 9
The Topology property specifies the ring
environment of the selected bonds.
Option
Search Result
Unspecified
Default. Finds compounds
regardless of environment.
Ring
Finds compounds where the
selected bonds are part of a
ring.
Chain
Finds compounds where the
selected bonds are part of a
chain (and are specifically not
part of a ring).
Drawing Query Structures
Bond Properties
• 157
Administrator
Option
Search Result
Option
Search Result
Ring or Chain
Finds compounds where the
selected bonds are part of
either a ring or a chain.
Not Center
Finds compounds where the
selected bonds are not part of the
reaction center.
Reaction Center
The Reaction Center property specifies how the
selected bonds are affected in a reaction. This
property is only meaningful when searching a
database containing chemical reactions.
The Reaction Center options are described in the
following table
Option
Search Result
Unspecified
Default. Finds compounds
regardless of whether the selected
bonds are affected by the reaction.
Center
Finds compounds where the
selected bonds are affected by a
reaction, but the type of change is
unspecified.
Make/Break
Finds compounds where the
selected bonds are either broken
or created in a reaction.
Change
Finds compounds where the bond
order of the selected bonds
changes in a reaction.
Make&
Change
Finds compounds where the
selected bonds are formed,
broken, or undergo a change in
bond order.
158•Drawing Query Structures
Not Modified Finds compounds where the
selected bond’s orders do not
change, but which may or may not
be part of the reaction center.
Unmapped
Finds all compounds.
3D Properties
3D queries are particularly useful in
pharmacophore searching where the user is looking
for a particular 3D relationship among atoms and
bonds, for example in a series of potential receptor
ligands. To create a 3D query, you add geometries
(lines, planes, etc.) and constraints (specified as
ranges) to a query structure. For example, you
might specify that two atoms must be between 4
and 5 Å apart, or that two planes must be separated
by 80-100 degrees.
To assign 3D properties to a structure, select the
structure or sub-structure and then select one of the
following options from the Add 3D Property
entry on the Structure menu.
NOTE: Because some 3D properties specify an order, you
should use Shift+Click to select them in the proper order
rather than using the Marquee or Lasso tool to select them
all at once.
CambridgeSoft
3D Properties
In the table below, points are may be atoms,
centroids or points. Lines may be lines or Normals.
Option
Search Result
Option
Search Result
Normal
Angle
Defines an angle constraint
between three points (in order).
Indicated as a range.
Defines the normal from a
defined plane in the direction of a
point.
Point
Defines a point positioned at a
specified distance from a first
point in the direction of a second
point (in order), or in the direction
of the normal.
Centroid
Defines a point positioned at the
average position of all other points
selected.
Dihedral
Distance
Defines a dihedral (torsional)
angle constraint among four
points (in order), between two
lines, or two planes. Indicated as a
range.
Defines a distance constraint
between two points, a point and a
line, or a point and a plane.
Indicated as a range, in
Angstroms.
Line
Defines the best-fit line for the
selected points.
Plane
Defines the best-fit plane for the
selected points, or for a point and
a line.
Exclusion
Sphere
ChemDraw 9
Defines an exclusion sphere
around a point. If more than one
point is selected, the exclusion
sphere is around the first selected
point, and the subsequent points
are allowed within the exclusion
sphere when the query is
evaluated. Indicated as a range, in
Å, beginning at 0.
All constraint values can be edited with the text
tool. Only exclusion spheres show the change
visually.
When you create a point, a dialog box is displayed.
Specify the distance from the first selected point to
the calculated point. The distance may be specified
as an absolute value in Å or as a percentage of the
distance between the selected points. Negative
values indicate that the calculated point is further
from the second point than the first point is, rather
than being between them.
Geometry and constraint objects update
dynamically when you change the structure; they
cannot be moved independently. They may be used
with .cdx, .mol, .skc, and .tgf files (full read-write
compatibility); they are not compatible with other
formats. They can, however, be saved in print-only
formats such as TIFF.
Query Tools Palette
ChemDraw provides Query tools to enable you to
draw query structures.
Drawing Query Structures
Query Tools Palette
• 159
Administrator
To display the Query tools, select Show Query
Tools from the Other Tools entry on the View
menu, or click the Query Tools icon on the Main
Tool Palette:
• Click
Removing Query Indicators
To delete a query indicator:
1. Click the indictor.
2. Click the eraser tool and then click the
.
indicator.
The Query tools palette appears.
Free Site
Reaction
Atom-Atom
Map
Racemic
Stereochemistry
Alternative
Group
Absolute
Stereochemistry
Relative
Stereochemistry
Query Indicators
You can display small characters to indicate query
properties you assign to atoms and bonds.
Positioning Query Indicators
Query indicators are positioned automatically and
move appropriately if a structure is modified. You
can reposition them by dragging them to the
desired position or with the Indicator Position
dialog box.
To reposition an indicator numerically:
1. With a selection tool, click the indicator to
move.
2. Right-click and choose Position.
The Position Indicator dialog box appears.
Viewing Query Indicators
To display query indicators for a structure:
• Select a structure to which query indicators are
assigned, right-click, point to Atom or Bond,
and then click Show Query Indicator.
To display query indicators for individual atoms or
bonds:
• Select the atom or bond, right-click, and
choose Show Query Indicator.
Hiding Query Indicators
To hide an individual indicator:
1. Select the indicator to hide.
2. Right-click and select Hide Indicator.
160•Drawing Query Structures
3. Click the appropriate Position option, and type
a value:
To Position …
Type a value
for…
from the atom or bond angle, degrees or
center to indicator
clock, o’clock
center
CambridgeSoft
Query Indicators
To Position …
Type a value
for…
from the atom or bond offset, horizontal and
center to bottom left of vertical
indicator baseline
at specified coordinates absolute, horizontal
and vertical
Drawing
Stereochemical
Symbols
ChemDraw provides three types of stereochemical
flags that indicate that the molecule with which they
are associated represents one of the following:
• Racemic—A racemic mixture.
• Absolute—A pure enantiomer of known
configuration.
• Relative—A pure enantiomer of unknown
configuration.
The font and size for stereochemical flags is
determined by the default Atom Label size for the
document.
To draw a stereochemical flag:
1. On the Query tools palette, click the tool for
the flag you want to use.
2. Position the pointer next to the structure to
which you want to assign the flag.
3. Click to deposit the symbol.
Drawing Free Sites
Use the Free Sites tool to increment or decrement
the number of free sites in a query structure.
ChemDraw 9
To increment the number of Free Sites:
1. On the Query tools palette, click the Free Site
tool.
Free Site tool
2. Position the pointer over the atom to which
you want to apply free sites.
3. Click to add the symbol.
4. Continue to click the atom to increment the
free site number.
To decrement the number of free sites:
• Hold the Alt or Option key while clicking the
atom.
You can also change the free sites by using the
Atom Properties dialog box or the shortcut menu.
For more information see “Atom Properties” on
page 149.
Generic Nicknames
Generic nicknames represent a class of elements or
structural moieties. For example:
• “M” can be a generic nickname for all metals
• “X” can represent halides
• “Ary” can represent an aromatic substructure
If you are using a query system that recognizes
generic nicknames, you can use these nicknames in
your ChemDraw query structure.
You can assign Generic nicknames, like other
nicknames, to HotKeys. For information on
assigning a Hotkey to a nickname, see Chapter 9:
“Working With Structures”.
You cannot define the meaning of a generic
nickname in ChemDraw because generic
nicknames represent multiple (and perhaps an
Drawing Query Structures
Drawing Stereochemical Symbols
• 161
infinite number of) substituents. Generic
nicknames have meaning only in the context of the
search system you are using.
Administrator
The generic nicknames recognized as chemically
meaningful to ChemDraw are listed in Generic
Nicknames file in the ChemDraw Items folder. For
definitions of the nicknames, see “Nickname
Definitions” in the Help file.
To edit the generic nickname files:
Open the Generic Nicknames file in a text
editor and make your changes.
See the provided Generic Nicknames file for
examples of the correct format.
To label an atomic position with a generic
nickname, use the same procedures as labeling an
atom:
1. Do one of the following:
• Open a text box on an atom position by
clicking with the Text tool.
• Double-click on an atom position with a
Bond tool.
2. Type the generic nickname.
3. Press Return or click outside the text box.
Element Lists
You can define your search query more concisely
with the element list. By labeling an atom position
as a list of elements you specify that one of these
elements must match in the structure for which you
are searching. The elements in the element list must
be separated by commas. A space after each comma
and brackets are optional. An example of an
element list is shown below.
[S,Se,Te]
NOTE: An element list may contain only atomic symbols,
plus D (deuterium) and T (tritium).
To create an element list:
1. Open an atom label text box.
2. Type an open bracket (“[“) followed by a list of
elements separated by commas (“Cl, Br, I”),
followed by a close bracket (“]”).
[Br, I, Cl]
X
3. Close the text box.
[Br, I, Cl]
NOTE: If you perform Check Structure on a structure with
a generic nickname, a message is displayed because the
structure contains variable substituents. If you ignore this
message, the generic nicknames are ignored and ChemDraw
reports the chemical formula, mass, and so on as if the atom
label containing the generic nickname were not selected.
162•Drawing Query Structures
The following example shows a query structure
created to find compounds matching the following
criteria:
a. Non-oxygen chalcogenide bonded to
another atom.
CambridgeSoft
Element Lists
To create an element not-list:
b. Not necessarily carbon (a generic
nickname).
c. The bond type between the chalcogenide
and the other atom to be a single or double
bond.
(c)
(b)
(a)
1. Open an atom label text box.
2. Type an open bracket, the word NOT, and a
space (“[NOT”) followed by a list of elements
separated by commas (“Cl, Br, I”), followed by
a close bracket (“]”).
Link Nodes
A
S/D
[S, Se, Te]
The “A” label indicates that the atom may match
any atom except hydrogen. The mark near the bond
indicates that the bond has special properties. The
bond type specified in the Bond Properties dialog
box must be single or double, S/D. The “[S,Se,Te]”
specifies that one of these elements must match in
the target structures.
Element Not-Lists
The element not-list specifies that the elements in
the list match must not match in the structure for
which you are searching. Commas must separate
the elements in the element not-list. A space after
each comma and brackets are optional.
The word NOT must be in all-caps and must be
followed by a space. Alternatively, the word NOT
may be replaced with a minus sign.
For example:
NOT[F,Cl,Br]
NOT[F,Cl,Br,I]
[NOT C,O,N]
[NOT C,O,N]
NOTE: An element not-list may contain only atomic
elements, plus D (deuterium) and T (tritium).
ChemDraw 9
You can specify a variable-length chain or ring by
indicating that one of the atoms can be repeated
some number of times using link nodes.
Link nodes must have exactly two connecting
bonds. The atom label must conform to the
following conditions:
• No more than a single element symbol or a
generic nickname
• The last part of the label in the form: number
hyphen number, with the number and hyphen
subscripted
• Parentheses or braces may be used instead of
brackets
• Brackets can be omitted if not needed for
clarity, for example with O1-3
To create a link node:
1. Open an atom label text box.
2. Type in the following format:
[CH2]3-7
Representing
Polymers and Other
Repeating Units
Brackets, parentheses, and braces enclose structures
or structural fragments that are to be repeated a
number of times. The bracket properties in
ChemDraw allow you to specify the context and
orientation of the repeating units.
Drawing Query Structures
Element Not-Lists
• 163
To enclose structures with brackets:
1. Click the Bracket tool
Administrator
and select one of
the double bracket tools.
2. Click+drag across the structure to draw the
brackets.
3. Right-click or Control-click and select the
appropriate bracket properties from the menu
that appears.
The bracket properties are described in the
following sections.
NOTE: This method will give a default value for
component order, multiple group repeat count, or SRU label.
To change a default value, use the Bracket Properties dialog
box.
Setting Bracket Properties
You can change the properties of brackets by the
context menus or Bracket Properties dialog box.
To use the Bracket Properties dialog box:
1. Select the right bracket with a selection tool.
2. From the Structure menu, choose Bracket
Properties.
The Bracket Properties dialog box appears.
The Flip Type option appears only for brackets with
exactly two crossing bonds, and is disabled in other
cases.
You can customize the text that appears to the
bottom right of the bracket for the following
bracket types.
• Component (c#)—the Component Order
must be a non-negative integer, and is displayed
as the letter “c” followed by that integer (or “c”
alone if an order of zero is specified).
• Multiple Group (#)—the Repeat Count must
be a positive integer.
• SRU (n)—the SRU label can be any text.
You can also edit the text for these Bracket Usage
types directly in the document using the Text tool.
You cannot edit the text displayed for the other
Bracket Usage types.
Bracket Usage
Representations of polymers are either
structure-based or source-based. The type of
bracket you use depends on which type of
representation you need. For references, see
“Polymer Representations” on page 238.
Structure-based Polymer
Representations
Structure-based polymer representations enclose
only a portion or a structure within brackets. One
or more bonds cross each of the enclosing brackets.
The crossing bonds “match up”, making the
polymer structure more explicit.
You create a structure-based polymer
representation by enclosing a portion of a structure
in brackets with a bracket type of SRU (n). The
subscript “n” is recommended by IUPAC to notate
structure-based representations of unknown size,
but you can edit the text using the text tool.
164•Drawing Query Structures
CambridgeSoft
Representing Polymers and Other Repeating Units
A structure-based representation of
poly(vinyl chloride) is shown below.
Cl
You can use “Mer (mer)” brackets for components
of a copolymer where those individual components
are known not to repeat themselves or alternate
with the other components. An example is shown
below.
*
*
n
O
You can also use the Bracket Usage types
“Crosslink (xl)”, “Graft (grf)”, and “Modification
(mod)” to represent specific types of repeating
units in a structure-based representation, but they
are rarely encountered and using them is
discouraged.
Source-based Polymer Representations
Source-based polymer representations enclose an
entire discrete chemical substance in brackets. The
mode of polymerization may be obvious from
context, or it might be unknown. Source-based
representations are useful when describing
processes where the starting materials are known,
but the exact structure of the reaction product is
not.
You can create a source-based representation by
enclosing a structure in “Monomer (mon)”
brackets.
A source-based representation of poly(vinyl
chloride) is shown below.
OH
OH
HO
HO
mer
O
mer
co
Copolymers represent substances with more than
one repeating unit. In general, you can use bracket
type “Component (co)”. You can also use
“Copolymer, alternating (alt)”, “Copolymer,
random (ran)”, and “Copolymer, block (blk)” to
represent different specific types of copolymers in
a source-based representation, but they are rarely
used and their use is discouraged.
The bracket type, “Mixture, unordered (mix)” is not
for polymers, but to represent a collection of
substances that may all be present, but not
necessarily in known amounts. Bracket type
“Component (c)” indicates individual mixture
elements.
An example is shown below.
Cl
COOH
O
O
COOH
c1
c2
COOH
O
mon
O
c3
COOH
c4
mix
Bracket type “Mixture, ordered (f)” is primarily
used to describe manufacturing processes, where
the ordering of components is a critical part of the
ChemDraw 9
Drawing Query Structures
Representing Polymers and Other Repeating Units
• 165
Administrator
process (and where a different ordering might
produce a different final product. As with
Unordered Mixtures, individual elements of an
ordered mixture should be surrounded by brackets
with a bracket usage of “Component (c)”. Unlike
with Unordered Mixtures, however, components of
Ordered Mixtures must represent their ordering.
You can do this by editing the “c” label with the text
tool to include a number (“c1”, “c2”, and so on.)
You use the bracket type, “Multiple Group (#)” to
indicate that the enclosed items are repeated a
specific known number of times. Multiple Group
brackets may enclose entire structures, or may
enclose a portion of the structures only. You can
edit the numeric repeat count with the text tool.
Examples follow.
OH
HO
.
O
13
O
14
Repeat Pattern
For simple linear polymers, the repeating units may
connect head-to-tail or head-to-head (or their
repeat pattern might be a mixture or unknown).
You can also assign this property to brackets.
Because of its prevalence, the Head-to-Tail type is
assumed to be the default Repeat Pattern, and does
not receive any special annotation on the brackets,
as shown below.
O
O
calculate accurate molecular weights (and related
data) for such structures. That data is displayed in
the Analysis window as with any other structure.
O
Na+
Na+
O-
-O
O
*
2
*
=
*
=
*
O
*
O
O
hh
*
O
*
O
O
O
*
O
eu
H
H
*
3
*
=
mixture of the above, or unknown repeat pattern
Flip Type
O
O
13
14
Because Multiple Group brackets represent a
specific repeat count (unlike the unknown repeat
count of the other bracket types), it is possible to
166•Drawing Query Structures
For ladder-type polymers (those polymers with two
connecting bonds on each side), there is a potential
ambiguity in the order of the connections. You can
assign the Flip Type property to resolve that
ambiguity. This property is appropriate only for
brackets with exactly two crossing bonds, and is
disabled in other cases.
CambridgeSoft
Representing Polymers and Other Repeating Units
Because of its prevalence the No Flip type does not
receive any special annotation.
*
H
N
*
*
H
N
H
N
H
N
H
N
*
=
*
*
*
*
Defining an Alternative
Group
In ChemDraw Pro, you can create alternative group
definitions (R, G, etc.) that represent a set of
substituents, any one of which will match the query.
To define an alternative group:
flip
*
H
N
*
H
N
H
N
*
*
=
.
2. Click and drag to create an area large enough to
*
*
*
1. Click the Alternative Group query tool
N
H
N
H
*
Alternative Groups
draw the alternative groups.
The Alternative Group Title box appears.
You can create a search query that contains variable
functional groups or substructures. Instead of
submitting multiple queries on structures that share
a common substructure, you can submit a single
query with the parent structure. The parent
structure can have attachment points to a list of
alternative groups that you can define.
Alternative groups, sometimes called R-Groups or
G-Groups (Generic Groups), are shown below.
F
3. Type a title, such as R1, in the Alternative
Group Title box.
G
1
NH2
OH
ChemDraw 9
G
1
F
1
NH2
1
OH
4. Draw the substructure fragments in the
Alternative Group box.
Drawing Query Structures
Alternative Groups
• 167
Defining Attachment Points
Administrator
Specify where the fragments should bond to the
parent structure at the alternative group label:
1. Click the diamond shaped Attachment Point
tool
on the Chemical Symbols palette.
2. Do one of the following:
• Click a substructure fragment where you
want to place the attachment point.
• Point to a substructure fragment where you
want to place the attachment point and press
the Hotkey “.”.
An attachment point symbol appears.
Attachment
point symbol
When you create a parent compound that contains
an alternative group you defined, an attachment
point symbol appears next to the label. The
attachment point number matches that found in the
definition.
R1
1
R1
1
NH2
1
OH
1
F
The number displayed in the attachment point
symbol is the attachment rank order. See the
example in “Multiple Attachment Points” on page
168.
Multiple Attachment Points
3. Repeat step 2 for all fragments.
If you have well-defined multiple attachment points
on your structure fragments, you can perform
searches for specific materials. This type of search
is especially useful for searching for
conformationally similar structures.
For example, you want to find the two compounds
below:
NH2
NH2
O
168•Drawing Query Structures
CambridgeSoft
Alternative Groups
However, you are not interested in the two
compounds below:
NH2
By numbering your attachment points, you have
unambiguously specified that the methyl group
must be adjacent to the amine group. The
conformations that are not of interest are excluded.
NH2
O
By specifying the attachment points order, you can
exclude the unwanted compounds. The parent
structure below satisfies the necessary
requirements.
To specify the attachment points order:
1. Draw the parent structure shown below.
Showing Attachment Rank
Indicators
You can hide the attachment rank indicators if
required. For example, sometimes—particularly in
publication-quality drawings—the numbering of
attachment points is implicit and the numbered
attachment rank indicators are superfluous.
To hide the attachment rank indicators and remove
the numbers from the attachment points:
1. From the File menu, choose Preferences.
2. In the Preferences dialog box, click Display.
R1
NH2
2. Create an Alternative Group Box labeled “R1”.
R1
3. Deselect Show Attachment Rank Indicators.
The following illustration shows an alternative
group definition and a parent structure with the
attachment rank indicators hidden.
R1
R1
NH2
1
2
O
1
2
This change affects all documents.
O
3. Draw the structure fragments and label them
with attachment points.
When the alternative group definition is
complete, the attachment point symbols
appear in the parent compound.
ChemDraw 9
Attachment Point
Numbering
Numbered attachment points allow you to specify
precisely how the structure fragments are
connected to your parent structure.
The numbering of the attachment points is related
to the front to back order of the attachment points.
Drawing Query Structures
Alternative Groups
• 169
To set the order of the attachment points:
Examples of anonymous alternative groups follow:
• Click the ends of the bonds in order.
Administrator
The last point clicked has the highest number.
To change the ordering of the attachment points do
one of the following:
• Click the attachment points with the
Attachment Point tool.
• Select an attachment point with a selection
tool, and from the Object menu, choose Bring
to Front or Send To Back.
The attachment point numbers are highest in
the front.
Lists
You can use an R-Group table to construct a list of
molecules.
Anonymous
Alternative Groups
An anonymous alternative group is a cross between
an element list and an alternative group. Element
lists are restricted to single elements, but
anonymous alternative groups can contain any
structure that can be represented by text.
Nicknames and generic nicknames are allowed in
anonymous alternative groups. Anonymous
alternative groups are shortcut notation for regular
alternative groups, eliminating the need to specify a
name such as “R1”.
You can define your search query more concisely
with the anonymous alternative group. By labeling
an atom position as a list of substructures you
specify that one of these substructures must match
in the structure for which you are searching.
Commas must separate the items in the anonymous
alternative group. A space after each comma and
the brackets are optional.
170•Drawing Query Structures
[OMe, OPh]
[M, B, C]
[OCH3, OH]
[X, S, Se]
To create anonymous alternative groups:
1. Open an atom label text box.
2. Type an open bracket “[”followed by a list of
elements, fragments, nicknames, or generic
nicknames separated by commas, followed by a
close bracket “]”.
Atom-to-Atom
Mapping
You can create correspondences between atoms in
different structures for use in creating queries for
searching a reaction database. The reactions
mapped can be single or multi-step. You can assign
atom-to-atom mapping for creating records for a
reaction database and for creating queries for
searching a reaction database. You can assign atom
mapping in two ways:
• Automatic mapping, using the Map Reaction
Atoms command from the Structure menu.
• Manual mapping, using the Reaction
Atom-Atom Map tool
on the main tools
palette.
During either type of mapping process, the
mapping algorithm perceives and assigns a reaction
center for the reactants and products.
When a reaction map is established, you can point
to an atom in one structure with the Reaction
Atom-Atom Map tool selected to highlight the
mapped atom in the other structure.
CambridgeSoft
Anonymous Alternative Groups
Always Display and Print
Atom Mapping
To make the symbols always appear and print on
the atoms when reaction mapping has been
performed:
1. From the File menu, choose Preferences.
2. In the Preferences dialog box, click Display.
3. Select Always Display and Print Reaction
Mapping.
4. Click OK.
Deselect Always Display and Print Atom Mapping
to show the symbols only when you select the
Reaction Atom-Atom Map tool. When this option
is deselected, atom mapping symbols do not print,
even though a reaction map has been created.
In situations that require manual mapping of atoms,
you can use the Reaction Atom-Atom Map tool.
This might be necessary when the automatic
mapping is applied to complicated reactions. In
these cases you can manually readjust the reaction
mapping.
The following figure shows how to amend the
initial mapping by using the Reaction Atom-Atom
Map tool.
Rxn
7
7
O
OH
6
6
5
Rxn
1
5
2
To automatically create a reaction map:
4
2
example:
O
O
4
3
3
1. Draw the reaction you want to map. For
When you perform manual mapping with the
Reaction Atom-Atom Map tool, you can suppress
automatic re-mapping of atoms other than your
target atom.
To suppress automatic re-mapping:
Ph
Ph
Manual Mapping
1
Automatic Mapping
OSiMe3
that are automatically applied. For more
information about the Reaction Center bond
property, see “Bond Properties” on page 155.
O
2. Select the reactants and products in the
1. From the File menu, choose Preferences.
reaction.
3. From the Structure menu, choose Map
Reaction Atoms.
2. On the General tab, select Automatic
Reaction Mapping.
OSiMe3
3. Click OK.
O
O
Rxn
Rxn
Rxn
Rxn
Rxn
Ph
Ph
Rxn
Rxn
O
The symbol “Rxn” appears next to the bonds
in the reactant and product that are perceived
by the algorithm as being modified by the
reaction. These symbols are bond properties
ChemDraw 9
To use the Reaction Atom-Atom Map tool to
supplement the automatic mapping:
1. Click the Reaction Atom-Atom Map tool
.
2. Point to the atom in the reactant whose
mapping you want to establish. For example, in
the following drawing you would point to the
acyclic carbon adjacent to the ether oxygen.
Drawing Query Structures
Atom-to-Atom Mapping
• 171
3. Drag from the reactant atom to the
ChemFinder and ISIS/Base. You can also copy
mapped reactions to these same applications using
the Clipboard.
corresponding product atom.
Administrator
Export Compatibility
The remaining atoms are automatically
mapped based on the manual mapping you
performed.
Rxn
8
1
1
8
O
OH
7
2
7
6
Rxn
2
6
3
5
Because query properties are only useful in a
chemical database, you must transfer your
structures from ChemDraw into your search
system. Not all file formats support the same query
properties and not all chemical databases support
the same file formats. Consult the documentation
for your database to see which file formats are
supported.
3
4
5
4
You can continue to set or change the mapping for
other atoms in the reaction if necessary until you
get exactly the mapping you want. For this example
additional manual mapping is not necessary.
Clearing Reaction Mapping
The following table lists the query properties that
ChemDraw writes to ISIS (SKC, TGF, and
Clipboard) file formats. All query properties are
written to the ChemDraw (CDX) file format. CDX
is the preferred format to use to retain all query
properties in a drawing.
Exported
Query
Properties
ISIS
Mol
Rxn
Unspecified
X
X
X
Free Sites
b
b
b
Up to
a
a
a
Exactly
Xc
Xc
Xc
Atom Properties
To clear all reaction mapping:
1. Select the structures whose mapping you want
to remove.
2. From the Structure menu, choose Clear
Reaction Map.
Exporting Reaction
Mapping
Reaction mapping and reaction center perception
information are stored in the native ChemDraw file
format (*.cdx) for reopening in ChemDraw and the
ISIS Reaction file format for transfer to other
applications that read atom mapping, such as
Substituents
Implicit Hydrogens
Not allowed
172•Drawing Query Structures
X
X
CambridgeSoft
Export Compatibility
X
Exported
Query
Properties
ISIS
Mol
Rxn
Allowed
X
X
X
Ring Bond Count
Exported
Query
Properties
ISIS
Mol
Rxn
Reaction Stereo
Any
X
X
Any
X
X
X
Inversion
X
X
No ring bonds
X
X
X
Retention
X
X
As drawn
X
X
X
Simple ring
X
X
X
Equal
Fusion
X
X
X
Broad
Spiro or higher
X
X
X
Any
Unsaturation
Unspecified
Narrow
X
X
X
Must be absent
Must be
present
Translation
X
X
X
Abnormal Valence
Not Allowed
X
X
X
Allowed
X
X
X
Single
X
X
X
Dashed
X
X
X
Bond Properties
Reaction Change
Bond Type
May be
anything
X
Must be as
specified
X
X
X
Hashed
ChemDraw 9
d
d
d
Drawing Query Structures
Export Compatibility
• 173
Administrator
Exported
Query
Properties
ISIS
Mol
Rxn
Wedged
Hashed
X
X
X
Bold
X
Wedged
X
X
X
Wavy
X
X
X
Exported
Query
Properties
ISIS
Mol
Rxn
X
X
X
Unspecified
X
X
X
Ring
X
X
X
Chain
X
X
X
S/A
Topology
e
e
Hollow
Wedged
e
Dative
f
f
f
Unspecified
X
X
Double
Xg
Xg
Xg
Center
X
X
Make/Break
X
X
Change
X
X
Make&Change
X
X
Not Center
X
X
X
h
Aromatic
Tautomeric
Any
S/D
D/A
X
h
X
i
Triple
Quadruple
e
Reaction Center
Double Either
Double Bold
e
h
X
i
X
l
X
X
174•Drawing Query Structures
X
i
X
l
X
X
X
l
X
X
X
Other Query Attributes
Generic
Nicknames
Xj
Xj
Xj
Element Lists
Xko
Xko
Xko
Element NotLists
Xk
Xk
Xk
X
X
X
CambridgeSoft
Export Compatibility
b
Exported
Query
Properties
ISIS
Mol
Alternative
Groups
X
Xm
Anonymous
Alternative
Groups
n
n
Link Nodes
p
Rxn
c
Substituent counts of greater than 5 are
translated to “6 or more”
d
Converted to Wedged Hashed
e
Converted to Wedged
f
p
Bracket
properties
X
Atom-Atom
mapping
X
Converted to a Single, with a positive
charge applied to that atom at the base of the dative
bond and a negative charge applied to the atom at
the point of the dative bond
p
X
X
X
Variable
Attachment
Positions
3D query
properties
a
Free Sites counts of zero translated to
“Substitution as drawn”; all other Free Sites values
written as substitution counts equal to the total
current valence plus the free sites value.
Converted to the appropriate number of
exact substituents
g
Interpreted by ISIS as
unspecified cis/trans stereochemistry
h
Converted to Double
i
Converted to S/D
j
Only M, X, Q, A; others written as aliases
k
Truncated to the first 5 elements
l
Converted to single.
m
An RGFile will be created automatically.
n
Converted to non-anonymous alternative
groups.
o
Lists of greater than 5 elements converted
to alternative groups.
p
The low end of the repeat range is always
treated as 1.
ChemDraw 9
Drawing Query Structures
Export Compatibility
• 175
Administrator
176•Drawing Query Structures
CambridgeSoft
Export Compatibility
Chapter 11: Working With Page
Layout
Overview
• View menu options: Actual Size, Fit to
The presentation quality of your ChemDraw
document is determined by how well the chemical
structures and other objects are placed on the page
(layout). Effective layout of a drawing includes
proper alignment of chemical structures and other
objects, appropriate page size, and page orientation.
The page layout tools include: setup of the page and
the use of the ruler, and the grouping, layering,
aligning, and distributing commands. You can also
organize information on the page using tables.
Window, Magnify, and Reduce.
• Magnification Controls: enlarge and reduce
• Dragging to enlarge the drawing area.
• Windows: Point to a border or corner of a
document window and drag to resize.
• Macintosh: Drag the Size box in the lower
right corner of the document window.
The size of drawing area displayed depends on the
size and resolution of your monitor. In some cases
you can see the entire document.
Controlling the
Drawing Area
If you magnify a document, the drawing area size
and drawing objects become bigger. If you increase
the magnification so that the page size becomes
bigger than the screen, scroll bars become available.
The size of a document window is not necessarily
the same as the size of the drawing area of the page.
A document window, in most cases, actually covers
only a portion of the drawing area.
The following options allow you to set the drawing
area displayed on your screen.
• Document Settings and Page Setup from the
File menu allow you to set the size and
orientation of the page, margins, headers,
footers, and the document type and size.
ChemDraw 9
Setting up Pages
You can create two types of documents:
Pages—A single document containing one or
more sheets, each of which is printed on a single
piece of paper.
Posters—A single large document, composed of as
many pieces of paper as necessary.
Working With Page Layout
Controlling the Drawing Area
• 177
Paged Document Setup
To create a document with one or more page:
Administrator
1. From the File menu, choose Document
Settings.
The Document Settings dialog box appears.
ChemDraw calculates the number of pages needed
and the margin sizes. You can set registration marks,
which mark the overlap setting on each page, to use
as a guide when assembling the poster from the
separate pages.
To create a poster document:
1. From the File menu, choose Document
Settings.
2. On the Layout tab, click Poster.
3. Type the Height, Width, and Page Overlap.
2. On the Layout tab, ensure Pages is selected.
3. Specify the number of pages in the Document
Size section.
The size of the pages is determined by the Page
Setup settings. For more information, see
“Page Setup” on page 179.
4. Type the Margin settings.
The units of the margins are set in the
Preferences dialog box. The paper size minus
the margins determines the drawing area.
5. Create Headers and Footers as described in
“Creating Headers and Footers” on page 178.
6. Click OK.
A document is created using your settings.
Poster Documents Setup
You can create a poster by creating a single large
drawing area, which will be printed on as many
separate pages as necessary. When you set the
document size and how much each page overlaps,
178•Working With Page Layout
The number of pages and the margin
dimensions are calculated.
4. Select whether to Print Registration Marks.
5. Create Headers and Footers as described in
“Creating Headers and Footers” on page 178.
6. Click OK.
An example of a 19-inch by 14-inch poster,
consisting of six 8.5-inch by 11-inch pieces of paper
with a 1-inch overlap is shown below.
8.5"
1"
1"
11"
1"
19" X 14" Poster
Creating Headers and
Footers
You create headers and footers in the Document
Settings dialog box. In poster documents, only one
header and footer appear for the entire document.
CambridgeSoft
Setting up Pages
To create headers and footers:
1. From the File menu, choose Document
Settings.
2. Click the Footer tab.
6. Position the text horizontally by typing the
characters in the table below. Any text
following these characters is appropriately
aligned.
To align the text …
Type …
centered
&c
right
&r
left (default)
&l
Page Setup
3. Type the value of the position from the edge of
the page that you want the header or footer to
appear.
4. Type the text to appear in the header or footer.
5. Type additional information in the Text box
from the following table:
To include the…
Type …
file name
&f
page number
&p
date printed
&d
time printed
&t
ChemDraw 9
The Page Setup parameters that affect the size of
the drawing area are:
• Page size
• Orientation
These parameters are specified in the Page Setup
dialog box. The Page Setup dialog box and the
options available vary depending on the printer you
have chosen. For the Macintosh, the version of the
printer driver for that printer is installed in your
System Folder.
To set the paper size, orientation, and margins:
1. From the File menu, choose Page Setup.
The Page Setup dialog box appears. The dialog
box appears slightly different depending on the
printer and platform you have.
Working With Page Layout
Page Setup
• 179
A Windows dialog box for a typical postscript
printer is shown below.
Administrator
US Legal
8.5 x 14 inches
A4 Letter
21 x 29.7 cm
B5 Letter
17.6 x 25 cm
Tabloid
11 x 17 inches
International
8.5 x 12 inches
Computer
14 x 11 inches
Page Orientation
To choose the orientation of the page:
The Macintosh Page Setup dialog box with
common settings for a LaserWriter is shown
below.
• Click the vertical (portrait) or horizontal
(landscape) orientation button.
The orientation of a document window
changes to the orientation you have chosen.
This is evident when the rulers are visible.
Reduce or Enlarge
2. Select a paper size from the drop-down list.
The available page sizes vary depending on the
type of printer. Listed below are common sizes
available. The page orientation you choose
determines which of the measurements is
height and which is width:
Paper Type
Dimensions
US Letter
8.5 x 11 inches
180•Working With Page Layout
Some printers include an option to reduce or
enlarge your drawings by a variable percentage (25400%). This option scales all objects and text in the
document window by the percentage specified.
This is not a change in magnification. The size of
objects is changed relative to the paper size,
margins, and orientation you have specified.
The enlarge or reduce option is useful for changing
the size of the available drawing area, while keeping
the images on the screen at the normal size when
you are drawing. If your document is set so that the
drawing fills the page on one printer and you use
another printer that requires larger margins, the
drawing my disappear off the edge of the document
window. You can reduce the size of the drawing
with the reduce option so that it fits in the
document window.
CambridgeSoft
Page Setup
Saving Page Setup Settings
You can save Page Setup settings in a Style Sheet or
Stationery Pad. Whenever you open a Style Sheet or
Stationery Pad, these settings are automatically
used. The Page Setup settings are saved in addition
to the Text settings, Drawing Settings, and the
Color Palette.
35mm Slide
Boundary Guides
If you make 35mm slides from a hard copy of a
ChemDraw document or from a screen shot, you
can display boundary lines that appear on your
screen positioned at 7 inches and 10.5 inches to
match the 2:3 ratio for the 35 mm slide format.
These guides help you keep your drawing within
this region to maintain the proper ratio, but are not
printed. The drawing area of the page must be at
least 7 x 10.5 inches for these boundary lines to be
visible.
To display the 35mm slide boundary lines:
1. From the File menu, choose Preferences.
2. Select the Show 35mm Slide Boundary
Guides check box.
3. Click the OK button.
Two 35mm Slide Boundary Guides appear in
the same orientation you have chosen in the
Page Setup dialog box. These guides appear in
every document.
This preference affects all documents.
Changing
Perspectives
You can use a close-up view of objects in your
reaction scheme to make sure they are properly
positioned. At times, you may want to reduce your
ChemDraw 9
view so that you can move groups of objects
around the page. You can change the magnification
to perform these functions by using the Magnify
and Reduce commands in the View menu, the
Zoom tool, or the magnification controls.
Magnifying with the View
Menu
When you use the View menu to magnify or reduce,
the magnification is set to the next higher or lower
value. You can magnify up to 400% or reduce to
25%.
Magnify
To magnify using the View menu:
1. Select the object around which you want to
magnify your view.
NOTE: If you do not select an object, the last object
drawn is the center point of the magnification.
2. From the View menu, choose Magnify.
The magnification occurs around the center of
the selected object. The magnification
percentage appears in the Magnification
drop-down list.
Windows
Macintosh
You can continue to magnify your view to a
maximum of 400%.
Actual Size
To return to the actual size from any other
magnification:
• From the View menu, choose Actual Size.
The view is returned to the original size.
Working With Page Layout
35mm Slide Boundary Guides
• 181
Reduce
To use the Magnification controls:
To reduce the magnification:
Windows:
Administrator
1. Select an object around which you want to
• Select a value from the drop-down list
or type a value.
reduce the magnification.
NOTE: If you do not select an object, the last object
drawn is the center point of the magnification.
2. From the View menu, choose Reduce.
The reduction in magnification appears in the
Magnification drop-down list.
Windows
Macintosh
You can reduce the magnification until the entire
page fits on the screen. In the reduced view, you can
continue to use all of the drawing tools. In
particular, you can use a selection tool to rearrange
the drawing in order to take better advantage of the
space available.
Fit to Window
Fit to Window reduces the magnification until the
entire page is visible in the document window.
To view the entire drawing area in a document
window at once:
• From the View menu, choose Fit to Window.
The Magnification control shows the reduction
in magnification that was required to have the
entire page appear on the screen.
Using the Magnification
Control
Macintosh:
Do one of the following:
• Select a value from the drop-down list
.
• Select Other from the drop-down list. In the
dialog box that appears, type a value and click
OK.
Arranging Objects
This section describes methods for positioning,
aligning, and layering objects in a document
window.
Using Rulers
You can use the rulers to position objects a
measured distance away from some reference point
or create objects of an approximate size. The units
used for the ruler are set in the Preferences dialog
box, where you have the choice of inches,
centimeters or points.
Showing Rulers
To display the rulers:
• From the View menu, choose Show Rulers.
When you use the Magnification control, you can
display magnifications from 10% to 999% of the
normal size of your page. The magnification
control allows you to select a specific value.
182•Working With Page Layout
CambridgeSoft
Arranging Objects
A check mark appears next to the Show Rulers
command, and the rulers appear along the top
and left edges of a document window.
Hiding Rulers
To Hide the rulers:
• From the View menu, choose Show Rulers.
The check mark disappears.
Using the Crosshair
Use the Crosshair to align objects relative to each
other, and to space objects a consistent distance
apart. The axes of the Crosshair can be moved
within a document window.
Displaying the Crosshair
To show the Crosshair:
As you move the pointer, Ruler Guides appear
on each ruler, indicating the position of the
pointer.
Ruler Guides
• From the View menu, choose Show Crosshair.
A check mark appears next to the Show
Crosshair command and the Crosshair appear
within a document window.
To assist you in aligning objects, the Crosshair
includes grid lines that extend from the major
division marks on each axis.
Ruler guides also appear when you drag selected
objects. In this case, however, there are two Ruler
guides that bracket the object. With this bracketing
you can quickly establish the height and width of
the selected objects.
Ruler Guides
ChemDraw 9
You can also show the Rulers while the Crosshair
are displayed so that you can see the unit
measurement associated with each of the divisions
on the Crosshair axes.
Working With Page Layout
Arranging Objects
• 183
Moving the Crosshair
To move the Crosshair:
Administrator
1. Position the pointer where the Crosshair axes
intersect.
When the pointer is near to the center of the
Crosshair, it changes to an arrow.
2. Drag the Crosshair.
To constrain the movement of the Crosshair to the
X- or Y-direction:
• Shift+drag the crosshair.
Aligning Objects using the
Crosshair
To use the Crosshair to align objects do one of the
following:
• Move the Crosshair axes and align it with the
object.
• Select an object and drag it until it is aligned
with either axis of the Crosshair, or a grid line.
In either case, if a bond or side of the object is
parallel to one of the axis, it disappears when it is
exactly positioned over a Crosshair axis.
To align another object on the Crosshair:
1. Select a second object.
2. Drag the second object to the Crosshair axis or
grid line and align it to the first.
184•Working With Page Layout
You can also move selected objects in small
increments to align them with the Crosshair using
the Arrow keys available on some keyboards:
To move 1 point in the direction of an Arrow key:
NOTE: 1 point equals 1/72 inch or 0.035 cm.
• Select the objects and then press an Arrow key.
To move 10 points using the Arrow key, for
example, to the right:
• Press Alt+Right Arrow or Option+Right
Arrow.
Hiding the Crosshair
To hide the Crosshair:
• From the View menu, choose Show Crosshair.
The check mark next to the Show Crosshair
command disappears.
Centering on a Page
To center an object (or group of objects) at the
center of the page:
1. Select the object you want to center using a
selection tool.
2. From the Object menu, choose Center on
Page.
The selected objects move so that the center of
the Selection rectangle is positioned at the
center of the page.
CambridgeSoft
Arranging Objects
Aligning Objects
Use the Align commands to align objects relative to
each other. Examples of the types of alignments are
shown on the menu.
If you select only part of a structure or group
with a selection tool, only that part is used for
the alignment operation, but the entire
structure or group is moved.
Distributing Objects
Use the distribute commands to distribute objects
horizontally or vertically and at an equal distance
apart. For reactants and products with different
shapes, select the parts of the objects to distribute.
To distribute 3 or more objects:
1. Select the 3 or more objects to distribute.
H
OH
CH2Br
2. On the Object menu, point to Distribute, and
then choose Vertically or Horizontally.
To align two or more objects:
1. Select the objects with a selection tool.
H
OH
CH2Br
The space between the objects is equalized.
The upper, lower, right, and left positions of
objects in your selection remain unchanged.
Front to Back Ordering
2. From the Align submenu, choose one of the
Align commands.
ChemDraw 9
The front to back ordering is a useful method for
changing the orientation of one object relative to
another object within the same picture layer. For
additional information specific to the layering of
bonds, see “Changing Bond Crossings” on page 71.
Working With Page Layout
Arranging Objects
• 185
Administrator
Send to Back
Creating Tables
To place one object behind another within a layer:
You can create tables of ChemDraw objects with
the Table tool or tables of text with the Text tool.
1. Select the object that you want to send to the
back, in this example, the two upper orbitals.
Creating Tables with the
Table Tool
Tables created with the Table tool are containers for
drawings and data. To place a structure in a table,
you can draw it directly in the table, or copy or drag
it into the table.
2. From the Object menu, choose Send to Back.
The Table tool enables you to do the following:
• Create and modify tables
• Customize the borders
• Add or delete rows and columns
• Resize the table and its cells manually
• Fit a cell around its contents automatically
The selected object appears behind all other
objects in the same layer.
• Align cell contents
To create a table with the Table tool:
Bring to Front
1. On the Main Tools palette, click the Table
To place one object in front of another within a
layer:
2. Do one of the following:
1. Select the object that you want to move
forward.
2. From the Object menu, choose Bring to Front.
The selected object now appears in front of all
other objects.
NOTE: When bonds have 3D coordinates, those
coordinates always determine the visible bond crossings. Bring
To Front and Send To Back have no visible effect in this case.
186•Working With Page Layout
tool
.
• Click and drag in the document window to
create the table.
The default table has two rows and two
columns.
• Click in the document window, type the
numbers of rows and columns in the Insert
Table dialog box, and then click OK.
CambridgeSoft
Creating Tables
The table appears in the document window.
To customize the borders of the table:
1. With the Table tool selected, point to a border
and right-click or option-click.
The Table Borders dialog box appears.
To resize the rows or columns:
1. Place your pointer on the border to resize.
The pointer changes to a double-headed arrow.
2. In the Setting section, click the borders to
2. Drag the border to the desired size.
which you want to apply the settings.
3. In the Style section, select the style, color and
width of the border to apply.
4. In the table diagram, click the borders to
customize.
5. Click OK.
To make a cell fit around its contents, such as in the
table shown below:
O
OH
1. Point to a border and right-click.
2. Choose Size To Fit Contents.
ChemDraw 9
Working With Page Layout
Creating Tables
• 187
The cells resize to fit around the contents.
If you want to …
Then choose …
add an empty column
to the right of the
indicated column
Add Column After.
O
Administrator
OH
delete the indicated row Delete Row.
and its contents
To add rows or columns to the table:
1. Point to the border where you want to add the
rows or columns.
The arrow appears as shown below.
delete the indicated
column and its
contents
Delete Column.
To align all of the objects in the table:
• Point to a border, right-click, point to Align,
and then choose the alignment you want.
The cell contents shift and stay in a fixed
position relative to the cell. The default
alignment is unaligned.
2. Right-click or Option-click and from the menu
that appears, choose the appropriate option:
If you want to …
Then choose …
add an empty row
Add Row Before.
above the indicated row
add an empty row
below the indicated
row
Add Row After.
add an empty column
to the left of the
indicated column
Add Column
Before.
Creating Tables with the
Text Tool
ChemDraw allows you to create tables of text using
the Tab key with the Text tool.
Creating the First Row (column
headings)
To create the first row and establish the columns of
a table:
3.
4.
5.
6.
188•Working With Page Layout
Click the Text tool.
Click in a document window where you want
the table to start.
Type a caption.
Press Tab.
A second caption box appears.
Type a second caption.
The second column is placed 20 points
(20/72 inch, 0.71 cm) to the right of the first.
CambridgeSoft
Creating Tables
7. Press Tab again to create a third column, and
so on.
NOTE: The style, font, and size that you set in each
column are maintained in all the rows that follow.
The following illustration shows the creation of
new columns using the Tab key.
Compound
M.W.
LogP
LD50
tab
tab
tab
To change the spacing between columns one point
at a time while editing a caption:
Select the caption.
8. Move the caption with the arrow keys.
For more information on moving objects, see
“Moving Objects” on page 111.
To create another column with this same spacing as
the previous:
• Press Tab.
• Press Tab to create another caption in the row,
and then press Tab twice to begin a new row.
The spacing between the newest row and the
row directly before it have the same spacing
that you specified between the previous two
rows.
Adjusting Row or Column Spacing
To use a selection tool to adjust the spacing in a
table:
Select all of the captions with a selection tool.
10.Shift+drag the caption.
The movement is constrained to the X-axis or Yaxis so that you can maintain the row or column
alignment.
Moving Around In Tables
A third caption text box appears.
To move within an existing table:
Creating a New Row
To start a new row that is exactly aligned with the
first:
• Press Tab twice at the end of a row.
A caption text box appears exactly aligned
under the first caption positioned exactly 20
points below the first caption in the first row.
The following diagram illustrates the creation of a
new row.
Compound
For more information on moving objects, see
“Moving Objects” on page 111.
To continue and fill in the row with captions:
M.W.
LogP
Click the Text tool and select a caption.
11. Press Ctrl+arrow or Command+arrow to
move to the next caption in the direction of the
arrow.
Alternatively, you can use the following key
combinations:
Use …
To move …
Tab
right
Shift+Tab
left
Ctrl+Enter or
Command+Return
down
LD50
1
To change the spacing between rows as you create
the table:
Select the captions in a row.
9. Move the captions using the arrow keys.
ChemDraw 9
Working With Page Layout
Creating Tables
• 189
Administrator
Use …
To move …
Ctrl+Shift+Enter or
Command+Shift+Return
up
13.Select the first caption in the row above or
To insert a row:
below the space you created.
14.Ctrl+Shift+drag or Command+Shift+drag
to create a copy of the caption and position it
in the empty space you created.
The placement of this copied caption sets the
position of the inserted row.
To fill in the inserted row with caption text:
Select a selection tool and select a row of
captions.
12.Shift+drag the selected row.
Shift constrains the movement to the Y-axis to
maintain the column alignment.
Click the Text tool and select the first caption
in the inserted row.
15.Type new text.
16.Press Tab to move to the second caption in the
inserted row, and so on.
Inserting a New Row
190•Working With Page Layout
CambridgeSoft
Creating Tables
Chapter 12: Sharing Information
Overview
ChemDraw includes many of the standard system
commands for transferring information within and
between ChemDraw documents, and between
ChemDraw and documents created using other
applications.
You can transfer information using:
• the Clipboard
• drag and drop
• file formats
When you drag-and-drop ChemDraw information,
or use the clipboard, the object you are copying can
be edited.
Using the Clipboard
You can use the clipboard to transfer part or all of
the information within an active document window
between applications on the same computer or a
networked computer. Use the standard “Copy-andPaste” or “Cut-and-Paste” tools to transfer information to any application that supports these tools.
The information is transferred as a ChemDraw
drawing object. Double-clicking on it will open
ChemDraw and allow you to edit the object. See
“Embedding Objects (Windows)” on page 194 and
“Edit Graphic Object (Macintosh)” on page 195
for more information on editing ChemDraw
objects embedded in other documents.
If the Clipboard contains ChemDraw structures
and you are pasting into another ChemDraw document, the pasted information is scaled to the
settings in the current document. For more information, see “Autoscaling” on page 193.
If you are pasting the ChemDraw drawing into a
document from which you are planning to print to
a PostScript printer, see“Transferring PostScript
(Macintosh)” on page 195.
SMILES and SMIRKS Strings
A SMILES string is a way to describe a chemical
structure in a line of text. Several software packages
use SMILES strings as a way to enter and store
chemical structure information.
A SMIRKS string is a way to describe chemical
reactions in text. If you select a reaction and use the
Copy As SMILES command, a SMIRKS string is
copied to the clipboard. If you use the Paste Special
SMILES command when a SMIRKS string is on
the clipboard, a reaction is pasted into your document.
Creating SMILES Strings
To create the SMILES string for the following
structure:
1. Select the structure using a selection tool.
2. From the Edit menu, point to Copy As, and
then choose SMILES.
The SMILES string corresponding to the
trans-2-amino-cyclohexanol molecule is transferred to the Clipboard.
NH2
OH
N[C@@H]1[C@H](O)CCCC1
To display the SMILES string:
• Paste the string in a document window.
ChemDraw 9
Sharing Information
Using the Clipboard
• 191
When the SMILES string is on the Clipboard, you
can transfer it to another application that can interpret and manipulate SMILES strings.
Administrator
If you select more than one structure in ChemDraw, and choose Copy SMILES from the Edit
menu, the SMILES string for each structure is
copied to the Clipboard and separated from the
previous SMILES string by a period.
SMILES supports an alternate notation for
aromatic structures using lowercase letters. ChemDraw generates this type of SMILES string for any
structure drawn with explicit aromatic bonds, either
by using the Aromatic bond type in the Atom Properties dialog box, or by placing a circle within any
ring structure.
The SMILES string is drawn as a structure.
NOTE: Pasting SMILES uses the same routines as the
Structure CleanUp command. For more information, see
“Using Variable Attachment Positions” on page 127.
Pro
Creating SLN Strings
You can copy a ChemDraw structure to the Clipboard as an SLN string for export to a Tripos application.
To copy a ChemDraw structure as an SLN string:
1. Select a structure.
2. From the Edit menu, point to Copy As, and
then choose SLN.
The Structure is copied to the clipboard as an
SLN String.
C1=CC=CC=C1
c1ccccc1
C[1]CCCCC@1
Pro
Pasting SMILES from Clipboard
If you have a SMILES string, then you can automatically convert that text string into a ChemDraw
structure.
To paste a SMILES string as a ChemDraw
structure:
1. Select the SMILES string using the Text tool.
2. From the Edit menu, choose Copy.
3. From the Edit menu, point to Paste Special,
and then choose SMILES.
Using Drag-and-Drop
You can use the drag-and-drop feature to copy
objects to place in other documents. To use this
feature in other applications, they must support
drag-and-drop. As when using the clipboard, the
information is transferred as a ChemDraw object
and can be edited.
You can also use the drag-and-drop feature to
create clipping files (Macintosh) or scrap files
(Windows).
To create a clipping file or a scrap file:
1. Select an object in a ChemDraw document.
2. Drag the selection out of the ChemDraw docu-
ment window onto the desktop.
192•Sharing Information
CambridgeSoft
Using Drag-and-Drop
A clipping file or a scrap file is created on your
desktop.
To view the information within a clipping file or a
scrap file:
• Double-click the file’s icon.
A window appears showing the ChemDraw
drawing. Click the close box to close the clipping file’s window.
To use the contents of a clipping or scrap file in a
document:
• Drag the clipping or scrap file into an open
window of an application that supports the
drag-and-drop feature.
The contents of the clipping or scrap file are
copied to the open window. The clipping or
scrap file is unchanged.
Transferring Between
ChemDraw Documents
Whether you use the clipboard or drag-and-drop,
when you move objects into another ChemDraw
document they will behave in a well-defined way. In
particular, you should be aware of the behavior of:
• Autoscaling
• Bonds
• Atom Labels
ment settings of the destination document. Automatic scaling assures that the objects being
transferred match the settings of the current document.
Bonds
All bonds drawn in the source document using the
values specified in the Drawing Settings dialog box
can be changed to use the Drawing Settings in the
destination document.
Any resized bond in the source document is scaled
in the destination document. The scale factor is
based on the ratio of the bond’s length after resizing
(source) to the Fixed Length in the Drawing
Settings dialog box (source). This scaling process
maintains the source document proportions in the
destination document. All values in the Drawing
Settings dialog box are scaled using this method.
For example, the Fixed Length is set to 1.0 cm in a
source document. A benzene ring is resized in to
200%. The bond length is then 2.0 cm: a ratio of 2.0
cm:1.0 cm or a scale factor of 2. In the destination
document, the Fixed Length set to 1.7 cm. When
the benzene ring is pasted into the destination
document, the bonds are scaled by a factor of 2 to
a final bond length of 3.4 cm.
Atom Labels
• Captions
Atom labels are scaled the same way as bonds.
• Non-bond Objects and Color
For example, in the source document, the atom
label font size is set to 16 points. One or two atom
labels in the source document are resized to 8
points, a ratio of 8:16 or a scale factor of 0.5. The
destination document has an atom label font size is
set to 14 points. When the atom label is pasted into
the destination document, the font size is scaled by
a factor of 0.5 to give a final atom label font size of
7 points.
• Pasting to an Empty Document Window
Autoscaling
When you transfer ChemDraw objects using the
Clipboard or drag and drop from one ChemDraw
document (the source document) to another ChemDraw document (the destination document), the
objects are automatically scaled to match the docu-
ChemDraw 9
Sharing Information
Transferring Between ChemDraw Documents
• 193
Captions
Administrator
ChemDraw autoscales captions are autoscaled
using the ratio of the fixed length in the destination
document to the fixed length in the source document times the caption font size. The font size of
the caption can be any size and is not related to the
setting in the Settings dialog box. This assures that
captions are always in proportion to the bonds with
which they are pasted.
For example, If the source document has a fixed
length of 1.0 cm and the destination document has
a fixed length of 2.0 cm, and the caption you are
pasting is 12 points, then the resulting caption size
after autoscaling is (2.0 cm /1.0 cm) x 12 points =
24 points.
Non-bond Objects and Color
All objects that are not affected by settings in the
Document Settings dialog boxes, such as arrows
and boxes, are scaled to maintain the same proportions to bonds that were present in the source document.
With the exception of the foreground and background color, the other colors present in the selection to be pasted are added to the destination
document’s Color Palette if they are not already
present (up to a maximum of 20 total colors). The
background color in the destination document is
unchanged, and all objects colored using the foreground color are changed to match the foreground
color in the destination document.
Pasting to an Empty Document Window
If you paste a ChemDraw drawing into an empty
ChemDraw document and the settings between the
documents are different, the Change Settings dialog
box appears:
To change the settings in the destination document
to match the settings in the source document:
• Click Change Settings.
All of the settings in the destination document
are changed to match those of the source document. All of the colors in the Color Palette of
the destination document are changed to those
specified in the source document.
To scale the objects from the source document to
the settings in the destination document:
• Click Don’t Change Settings.
The settings from the source document are
scaled to those in the destination document
using the ratios given above.
NOTE: If the source document was created in a
ChemDraw version earlier than 3.0, the name of the
document appears as “Unknown” in the dialog box.
Embedding Objects
(Windows)
ChemDraw supports the Object Linking and
Embedding (OLE) protocol on Windows. This
allows you to edit ChemDraw structures that are
194•Sharing Information
CambridgeSoft
Embedding Objects (Windows)
pasted in other types of documents. ChemDraw is
an OLE server, which means it can create OLE
objects that can be copied and pasted into other
OLE client applications.
When a drawing is transferred from ChemDraw
into another document type that supports OLE,
you can open the drawing and edit it from within
the client application.
For example, to edit a ChemDraw drawing inserted
into Microsoft Word for Windows version 6.0 or
later, do one of the following:
• Select a ChemDraw drawing in a Word docu-
ment and from the Edit menu, point to
CS ChemDraw Drawing Object, and then
choose Edit.
• Double-click a ChemDraw drawing in a Word
document.
The ChemDraw tools and menus replace those
of Word. Use the ChemDraw tools to edit the
drawing.
When you have finished making changes:
• Click in another area of the document.
The Word tools and menus are restored.
Edit Graphic Object
(Macintosh)
ChemDraw supports the Edit Graphic Object
(EGO) protocol for editing ChemDraw structures
pasted into other types of documents. When you
drag an object from ChemDraw into another type
of document that supports the EGO protocol, or
copy it with the clipboard, you can double-click on
the object and it appears in a ChemDraw document
window. When you close the ChemDraw document window, any changes you made are reflected
in the other document.
NOTE: As of this writing, versions of Microsoft Word
Transferring PostScript
(Macintosh)
To obtain the highest quality drawings possible on
a PostScript printer, ChemDraw creates both a
screen representation and a PostScript representation of your drawing. PostScript is a page-definition
language used to describe drawings. Many printers,
including most Apple LaserWriter printers, use
PostScript to create high quality output.
For best print quality under all circumstances, we
recommend that you leave the Include PostScript
and Include ChemDraw Laser Prep preferences
selected (default) when you copy and paste from
ChemDraw to other applications. The ChemDraw
Laser Prep option adds approximately 11K to 12K
to each drawing, but these options give you the
greatest flexibility if you give your document to
someone else or later want to print it on a PostScript printer.
If you never plan to print to a PostScript printer or
never plan to give your document to someone who
uses a PostScript printer, you can turn the preferences off.
To deselect the PostScript preferences:
1. From the File menu, choose Preferences.
2. Deselect Include PostScript and Include
ChemDraw LaserPrep.
To transfer only a few drawings to another
document:
NOTE: You can also transfer drawings to a document in a
remote location whose printer cannot be initialized by
ChemDraw.
• In the Preferences dialog box, select Include
PostScript and Include ChemDraw Laser
Prep.
after 5.0 do not support EGO.
ChemDraw 9
Sharing Information
Edit Graphic Object (Macintosh)
• 195
Administrator
The PostScript commands and the ChemDraw
Laser Prep are transferred with each drawing.
The transferred drawings can be printed independently of ChemDraw.
If you do not check the Include PostScript
check box when printing to a PostScript
printer ChemDraw sends QuickDraw
commands to the printer. For more information, see “Printing Background Color” on page
28.
To print to a non-PostScript printer:
• Deselect both Include PostScript and
Include ChemDraw Laser Prep on the
General tab of the Preferences dialog box.
Importing and Exporting
Many applications can use the information
contained within a ChemDraw document and
saved to another file format. Similarly, ChemDraw
can import and work with information in a number
of file formats. Not all formats are supported for
both import and export. See the individual format
descriptions for details. File formats are available in
a pop-up menu at the bottom of the “Open” and
“Save As” dialog boxes.
To export a file:
1. From the File menu, choose Save As.
2. In the Save As dialog box, do the following:
a. Type a name for the file and choose a
location in which to save it. Use the “Go To
ChemDraw Items” button to quickly locate
the ChemDraw Items folder.
b. Select a file format from the bottom of the
dialog box.
c. Click OK or Save.
A copy of the current document is saved in the
format you specified. The current document
remains unchanged.
Some file formats do not support atom labels that
contain nicknames or structural fragments. When
you save in these formats, ChemDraw automatically expands all atom labels and saves the file using
the expanded form. For more information, see
“Expanding Labels” on page 125.
The following formats do not support nicknames
or structural fragments:
• Connection Table
• MSI MolFile
• SMD
Some formats can be saved with different options.
If a format has no save options, the “Options”
button is grayed out. The following text-based
formats can use the Text Options:
• ChemDraw XML
• CML
• Connection Table
• ISIS/TGF
• ISIS/Reactions
• MDL MolFile
• Molecular Simulations MolFile
196•Sharing Information
CambridgeSoft
Importing and Exporting
• SMD
Other format options are noted in format descriptions.
Graphics export border
preference
An explicit preference option allows the user to
specify the size of the border when exporting
pictures. This preference affects the output of all
graphical formats, including but not necessarily
limited to: wmf, pict, eps, tiff, gif, bmp, and png. It
applies to both the clipboard and saved files.
The default value is 2 points (0.278 in; 0.071 cm).
The value can be zero, meaning that the exported
image is exactly snug against the objects in the
graphic. However, this is not recommended
because a bug in Windows causes clipping at the
edges of metafiles when they are reduced in size.
The default value should prevent clipping with
reductions to about 20% of original size.
File Formats
Import Export
ChemDraw Template
(*.ctp, *.ctr)
YES
YES
ChemDraw (*.cdx)
YES
YES
ChemDraw XML (*.xml)
YES
YES
ChemDraw 3.5 (*.chm)
YES
YES
ChemDraw 2.0 and ChemDraw 2.1 (*.chm)
YES
NO
ChemDraw Stationery/Style
Sheet (*.cds)
YES
YES
Connection Table (*.ct)
YES
YES
Chemical Markup Language
(*.cml)
YES
YES
Encapsulated PostScript
(Macintosh)
YES
YES
Graphic Image Format (*.gif) YES
YES
ISIS (*.skc, *.tgf, *.rxn)
YES
YESa
JCAMP (*.jdx, *.dx)
YES
NO
JPEG (*.jpg, *.jpeg)
YES
NO
MDL MolFile (*.mol)
YES
YES
PostScript (*.eps) (Windows)
ChemDraw supports both import and export
(except as noted below) of the following file
formats. To export a ChemDraw file to one of
these formats, use the Save As... option when
saving. For additional information on importing
files, see “Inserting Objects from Other Applications” on page 204.
Format
Import Export
Bitmap (*.bmp)
YES
ChemDraw 9
Format
YES
Sharing Information
Importing and Exporting
• 197
ChemDraw Template (*.ctp, *.ctr)
Administrator
Format
Import Export
MDL RGFile (*.rgf)
YES
YES
Use the ChemDraw Template file format to save
template documents that appear in the template
pop-up menu.
Molecular Simulations
MolFile (*.msm)
YES
YES
ChemDraw (*.cdx)
PICT (Macintosh)
Portable Network Graphics
(*.png)
YES
YES
Standard Molecular Data
(*.smd)
YES
YES
Galactic Industries (.*spc)
YES
NO
Windows Metafile
(*.emf, *.wmf)
YES
YES
TIFF file (*.tif)
YES
YES
Template Style Sheet (*.cts)
a. May have limitations. See the appropriate section
in the text.
Bitmap (.bmp)
Bitmap (.bmp) files store raster graphics in an array
of individual bits. Bitmap images are the most
common format for continuous-tone images.
Because they represent a fixed number of pixels,
bitmaps are resolution dependent and may appear
jagged and lose detail if they are scaled on-screen or
printed on a higher resolution printer than they
were created for.
198•Sharing Information
The ChemDraw file format is the native format for
ChemDraw version 4.0 and later. This is a public
tagged file format that stores information about a
ChemDraw structure in a series of data blocks. This
format is designed to be easily generated and interpreted by other programs. This format accurately
stores anything that can be drawn in ChemDraw.
NOTE: Imported drawings saved within a ChemDraw file
created using ChemDraw for Macintosh are lost when the file
is opened using ChemDraw for Windows. The same applies
for objects saved in ChemDraw for Windows and opened on
a Macintosh. However, all ChemDraw specific information
is preserved.
Imported drawings include any graphics pasted into a
ChemDraw document from another Macintosh application.
They also include Chem3D drawings imported using the
Insert Object dialog box or the “Get 3D Model” Edit menu
command in ChemDraw for Windows.
ChemDraw XML (*.xml)
The cdxml file format is an interpreted version of
cdx that conforms to the XML specification unlike
binary cdx format. cdxml is text-based but contains
some data. For information about XML in general,
see www.xml.org.
ChemDraw 3.5 (*.chm)
ChemDraw 3.5 file formats are used for saving or
opening ChemDraw documents using the version
3.5.x of ChemDraw. These documents can also be
CambridgeSoft
Importing and Exporting
opened in versions 3.0, 3.0.1, 3.0.2, and 3.1 of
ChemDraw as long as atom properties are not used
in the files.
NOTE: When you save a ChemDraw file in one of these
formats, all features specific to later versions are lost. For
example, multi-attached atom labels, variable attachment
points, and multicenter bonds are not be saved.
ChemDraw 2.0 and ChemDraw 2.1
(*.chm) Import Only
ChemDraw 2.0 and ChemDraw 2.1 file formats are
used for opening ChemDraw documents using the
version 2.x file format of ChemDraw for Macintosh. You cannot save files in these formats.
ChemDraw Stationery/Style Sheet
(*.cds)
Use ChemDraw Stationery file format to save
document settings and other objects.
Encapsulated PostScript (Macintosh)
PostScript, *.eps (Windows)
Encapsulated PostScript (EPS) files are ASCII text
files containing the scalable PostScript representation of a ChemDraw drawing that can be opened
using other applications and platforms. There are
two types: one containing text only, and one
containing a graphic representation of the drawing.
The latter are known as Postscript with Preview or
Postscript Mac. For text only files, programs that
do not support the display of raw PostScript can
only print, not view an image on screen.
Use EPS files to share ChemDraw drawings with
desktop publishing applications such as Adobe
PageMaker and QuarkXPress.
The “Options” dialog box allows you to select the
resolution (in dpi) and color depth of the saved file
The defaults are 300 dpi and Monochrome. For
Windows EPS with Preview, there is also a Preview
option (default: WMF).
.
Pro
Connection Table (*.ct)
The Connection Table file format is a simple
format that saves a list of atom connectivities in
terms of an element, serial number, X and Y coordinates, bond order, and bond type. For more
information, see , “Chemistry File Formats” on
page 267
Pro
Chemical Markup Language
(*.cml)
CML is an extensible, chemically-aware markup
language based on XML. ChemDraw supports
both import and export of the format. More information can be found at http://www.xml-cml.org/ and
http://cml.sourceforge.net.
ChemDraw 9
If you select a color option, all colors are saved in
the EPS file except for the Background color. To
save an EPS file with a colored background, create
a large colored rectangular box using the Drawing
Elements tool and choose Send to Back before
saving the file. For more information, see “Drawing
Boxes” on page 100 and “Using Multi-Center
Bonds” on page 126. These options only affect
embedded images. Objects created in ChemDraw
always output at maximum resolution and in full
color.
To include correct PostScript font names in
Windows EPS files, you must have Adobe Type
Manager (ATM) installed. Only ATM fonts are
saved in the EPS file.
Sharing Information
Importing and Exporting
• 199
Resolution
Pro
ISIS/SKC and ISIS/TGF
Administrator
Available resolutions range from 72 (computer
monitor) to 1440 dpi (high resolution output).
When choosing a resolution, keep in mind that the
size of the file increases as the square of the resolution.
You can save a ChemDraw document in an ISIS file
format for export to an ISIS application, or import
a file created by an ISIS application into ChemDraw.
Color
ChemDraw Pro provides two ISIS file formats:
You can select from the following color options:
• Monochrome—Forces all objects to black
and white.
• Grayscale—Translates colors to shades of
gray.
• 24-bit RGB —Stores colors using computer
monitor style of color encoding.
• 32-bit CMYK—Uses printing press style of
color encoding. Groups each color type
sequentially. This provides better compression.
GIF Image (*.gif)
Graphics interface format (GIF) is useful for
working with the hypertext markup language
(HTML) used in displaying information on the
World Wide Web. A GIF image can be displayed
directly on a Web page rather than having to download the drawing for viewing in a Helper application.
The default GIF format conforms to the GIF 89a
specifications with transparent backgrounds. You
can change this from the options menu.
• ISIS/Sketch (*.skc)—For saving files as a
binary sketch file for transfer to another ISIS
application running on the same operating
system (this format is used on the Clipboard).
• ISIS/TGF (*.tgf)—For saving as an ASCII
text file (a Transportable Graphics File) for
transfer to ISIS applications on different platforms.
NOTE: When transferring between ChemDraw and
ISIS/Draw, if information in a file or on the Clipboard
contains only non-bond, unsupported objects, the information
is imported as a WMF (metafile) or PICT graphic.
However, if a supported object, such as a bond, is also in the
file or on the Clipboard, then only the supported object
appears.
NOTE: Object types in ISIS not supported in ChemDraw,
such as polymers, are not transferred. Object types in
ChemDraw not supported in ISIS are not transferred.
However, in some cases, such as different arrow types, the
arrow is converted to the most similar form.
Pro
ISIS/Reactions (*.rxn)
The ISIS/Reactions format is an MDL-developed
format for storing chemical reaction information
used by the ISIS family of products and others.
200•Sharing Information
CambridgeSoft
Importing and Exporting
For single step single or multi-line reactions, ChemDraw uses the point of the reaction arrow as the
dividing line to determine which molecules in a
reaction are reactants and which are products.
NOTE: You cannot save a reaction with an intermediate
step accurately in the RXN file format.
Molecules whose centers are behind or above the
tip of the arrow are considered reactants, and all
remaining molecules are products. The reaction
arrow can be at any orientation; it does not have to
be parallel to the x-axis. If a reaction contains
multiple arrows, then the largest arrow is used as
the reaction arrow.
Reaction mapping and reaction center information
is stored in the rxn output file.
Pro
JDX (*.jdx, *.dx) Import Only
The Joint Commission on Atomic and Molecular
Properties (JCAMP) developed the JDX file format
for spectral data. JDX is a public, but not well
defined format that has numerous variations.
ChemDraw supports many of the more common
spectral variations with uniform x-axis spacing.
ChemDraw also supports Bruker NMR JCAMP
data, which is saved with a .dx file extension
When you import JDX files, they appear in the
window with a spectrum of a standard size that can
be re-sized by dragging.
You can export spectral data as part of a .cdx file
only.
JPEG (*.jpg, *.jpeg) Import Only
ChemDraw supports import of digital images
compressed with the widely used JPEG (Joint
Photographic Experts Group) algorithm. JPEG
images are imported as objects, and can be scaled
after importing.
ChemDraw 9
Pro
MDL MolFile (*.mol)
MDL Information Systems, Inc. MolFile (MDL
MolFile) file format is used by several other
Windows, Macintosh, and UNIX chemical databases and drawing applications such as
ISIS/Draw™, ISIS/Base™, MACCS™, and
REACCS™.
ChemDraw Pro provides two MDL MolFile
formats:
• MDL MolFile (Text)
• MDL MolFile (Mac) for Macintosh only. This
file type is saved with an mMol file type and can
be saved and opened with ISIS.
MDL MolFile files are ASCII text files that can be
created or edited in common word processing
applications or text editors. Atom and bond property information is stored in the MolFile.
MDL RGFile (*.rgf) file format is used by several
other chemical databases and drawing applications.
The MDL File RGFile supports alternate groups
whereas an MDL Molfile cannot. When you save a
ChemDraw file that contains alternate groups as an
MDL MolFile, it is automatically saved as an MDL
RGFile.
Pro
Molecular Simulations MolFile
(*.msm)
Molecular Simulations MolFile format is an ASCII
text file used by applications such as ChemNote™.
You can save a ChemDraw Pro document in
Molecular Simulations MolFile format for export to
one of these applications.
NOTE: ChemDraw uses the file extension “.msm” for
Molecular Simulations MolFiles rather than the standard
“.mol”, used by Molecular Simulation, Inc. ChemDraw
recognizes files with the “.mol” file extension as MDL
MolFiles. In addition, the extension “.msi” used in earlier
Sharing Information
Importing and Exporting
• 201
Administrator
versions of ChemDraw is no longer recognized in
ChemDraw. To open Molecular Simulations MolFiles that
have a “.mol” or “.msi” extension you must first change the
extension to “.msm”.
PICT (Macintosh)
PICT files contain a QuickDraw representation of
a ChemDraw drawing that can be used by various
drawing applications. You can save a ChemDraw
document in the PICT format so it can be opened
by one of these other applications. The PICT file
format contains ChemDraw structural information.
PICT files created by earlier versions of ChemDraw
can be reopened and edited by ChemDraw version
8.0. However, the pictures contained in PICT files
created by versions of CS ChemDraw earlier than
version 3.5, or by other applications, are treated as
a single, non-editable, imported picture.
All colors are saved in the PICT file except for the
Background color.
PICT scaled 4X (Macintosh)
PICT scaled 4X files are the same as PICT files,
except that the drawing is four times larger. When
these larger files are placed into certain other applications and shrunk back down to 1/4 size, they may
provide higher quality output than regular PICT
files.
PNG file (*.png)
PNG (Portable Network Graphics) format is an
alternative to the GIF format for adding graphics to
web pages. You can save, but not open, files in
PNG format. The PNG format is fairly new and
was designed to address many of the shortcomings
of the GIF format. In particular, the PNG file
format offers true color images, is less prone to
transmission errors and offers a full alpha channel
for specifying background or transparency options.
Pro
SMD (*.smd)
Standard Molecular Data (SMD) file format,
version 4.3, is an ASCII text file commonly used by
programs that search Chemical Abstracts Databases such as STN Express™. You can save your
ChemDraw document in SMD format and use the
file for searching in a Chemical Abstracts database.
Pro
SPC (.*spc) Import Only
The SPC file format was developed by Galactic
Industries as part of the GRAMS software, which
reads spectral data from every type of spectrometer
and converts them to SPC format. SPC is a
well-defined, proprietary, but open standard format
for spectral data.
ChemDraw imports most one-dimensional spectral
spc formats. When you import an SPC file, it
appears in the window with a spectrum of a standard size that can be re-sized by dragging.
You can export spectral data as part of a .cdx file
only.
Pro
Template Style Sheet (*.cts)
The Template Style Sheet file format is used for
saving document settings and row and column
characteristics for creating ChemDraw Template
documents.
Windows Metafile (*.wmf)
The Windows Metafile file format saves the
Graphic Device Interface (GDI) representation of
a ChemDraw drawing. Using the WMF file format
you can transfer ChemDraw drawings to other
applications, such as Microsoft® Word, that
support that WMF file format on the same or
For additional information about PNG visit:
http://www.boutell.com/boutell/png/
202•Sharing Information
CambridgeSoft
Importing and Exporting
different computers rather than using the Clipboard. The WMF file format contains ChemDraw
structural information.
TIFF file (*.tif)
TIFF format (Tagged Image File Format) is a high
resolution format commonly used for saving
graphics for importing into desktop publishing
applications on the same or on different computer
platforms. TIFF images can be saved using a variety
of resolution, color, and compression options. As
TIFF images can get rather large, choosing appropriate options is important. The TIFF format is for
export only.
Resolution
Available resolutions range from 72 (computer
monitor) to 1440 dpi (high resolution output).
When choosing a resolution, keep in mind that the
size of the file increases as the square of the resolution.
Color
You can select from the following color options:
• Monochrome—Forces all objects to black
and white.
• RGB Indexed—Stores colors using computer
monitor style of color encoding.
• CMYK Planar—Uses printing press style of
color encoding. Groups each color type
sequentially. This provides better compression.
For example: CCCCCCMMMMMMYYYYYYKKKKK rather than
CMYKCMYKCMYKCMYK. This option
produces far better compression than using the
PackBits compression method. However,
many desktop publishing packages do not
support CMYK Planar files.
• CMYK Contiguous—Uses printing press
style of color encoding. Stores colors nonsequentially. For example: CMYKCMYK. The
PackBits compression type provides no
compression for this type of file.
NOTE: If objects in your document are black and white
they are saved black and white regardless of which Color
options you set. If you import drawings from other
applications and want them to print Black and White you
must set the Color option to Monochrome.
Compression
You can select from the following compression
options:
• PackBits—Used to reduce files size by
encoding repeating bytes of information as
output when using the CMYK Planar color
option. Below is a highly simplified representation of this compression scheme. For a line of
color information such as: CCCCCMMMMMYYYYYKKKKK, the compression
yields a smaller file by representing the information as C46M5Y5K.
• CCITT Group 3—Used for fax transmissions
of images.
• CCITT Group 4—Used for fax transmissions
of images.
• Deflate—Similar to LZW compression.
Works well with all Color and Resolution
options.
Setting TIFF options
To set these options:
ChemDraw 9
Sharing Information
Importing and Exporting
• 203
• Click the Options button in the Save dialog
box to display the TIFF options dialog box.
3. Select the graphic and click Open.
The file is embedded into the ChemDraw file.
Administrator
NOTE: If you select file type “All files” and choose a
file type that ChemDraw does not support (such as .txt)
you will get an error message, and the file will not be
embedded.
3. Select the options you want and click OK.
NOTE: In the Macintosh version you may want to increase
the memory allocated to ChemDraw if you are saving large
TIFF files.
(Windows only)
To insert an object from another application into
ChemDraw:
1. From the Edit menu, choose Insert Object.
The Insert Object dialog box appears.
Inserting Objects from Other
Applications
You can insert graphics or documents created in
other applications into ChemDraw. You can edit
inserted objects using the ChemDraw Edit menu.
Inserted objects can be resized or rotated using the
resize and rotate handles of a selected object. You
cannot flip inserted objects.
To insert a graphic from another application into
ChemDraw:
1. From the Edit menu, chooseInsert File.
2. In the Open dialog box, select the file type
from the drop down menu.
InsertObject 155 dpi
2. Take the appropriate action:
If you want to Then …
…
create a new
object
a. Click Create New.
b. Select the Object Type.
c. Click OK.
insert an existing
graphic
a. Click Create from File.
b. Type the path or browse to
the object to insert.
c. Click OK.
204•Sharing Information
CambridgeSoft
Importing and Exporting
Transferring ChemDraw
Documents Across Platforms
Use the following procedures to transfer ChemDraw documents across platforms. From the
following table, determine the versions of the
ChemDraw software between which you want to
transfer documents and then follow the appropriate
instructions.
When you transfer ChemDraw files across platforms, fonts are not transferred. If a font in the
transferred document is not available, ChemDraw
substitutes fonts for those that are available on the
new platform.
Transferring from Macintosh
to Windows
To be able to open a ChemDraw file created on the
Macintosh in Windows, follow the instructions for
the appropriate versions shown in the table below.
From
Mac
Version
To
Window
s
Version
Instructions
≥ 4.0
≥ 4.0
Save as ChemDraw
and add .cdx to the file
name.
≥ 4.0
3.x
Save as ChemDraw 3.x
and add .chm to the file
name.
≤ 3.5.x
= 3.x
Transferring from Windows
to Macintosh
To be able to open a ChemDraw file created in
Windows on the Macintosh, follow the instructions
for the appropriate versions shown in the table
below.
From
Windows
Version
To Mac
Version
Instructions
≥ 4.0
≥ 4.0
Save as the default
ChemDraw (.cdx).
≤ 3.5.x
≥ 4.0
Save as ChemDraw
3.x (.chm).
≤ 3.5x
≤ 3.x
Save as ChemDraw
3.x (.chm) and
follow the instructions in “Transferring files to ChemDraw/Plus 3.1 for
the Macintosh”
below.
Transferring Files to ChemDraw/Plus
3.1 for the Macintosh
Save as ChemDraw
and add .chm to the file
name.
Use the following procedure to transfer a ChemDraw for Windows file to ChemDraw/Plus 3.1 for
the Macintosh. A file translator such as
PC Exchange or Apple File Exchange must be
running on your Macintosh.
To transfer from Windows to ChemDraw/Plus 3.1
for the Macintosh:
1. In ChemDraw for Windows, save the file in the
ChemDraw (.chm) format.
2. Insert the disk with the ChemDraw for
Windows files into the Mac floppy drive.
3. If you are using PC Exchange, double click the
floppy disk icon to display the files.
ChemDraw 9
Sharing Information
Transferring ChemDraw Documents Across Platforms
• 205
4. From the Control Panels, select
PC Exchange.
5. Select Add.
Administrator
6. Change the DOS suffix to .chm.
7. In the application selection, find CSC ChemDraw on your Mac and click once to highlight
8. Change the document type to CHMS.
If you are using a translator other than
PC Exchange, you need to use an editor such as
ResEdit or Disktop to change the type and creator
of the files being transferred. The type should be
“CHMS” and the creator should be “CHMD.”
the selection.
206•Sharing Information
CambridgeSoft
Transferring ChemDraw Documents Across Platforms
Chapter 13: ChemDraw/Excel
The ChemDraw/Excel add-in is an extension of
Microsoft© Excel© for Windows. ChemDraw/Excel enables you to:
• Add chemical structures and other data from
ChemDraw or a ChemFinder database to an
Excel spreadsheet.
• Search using the same search features as
ChemFinder.
• Perform calculations on chemical structures.
See the ChemOffice manual for information on
other CambridgeSoft add-ins for Excel.
NOTE: Any commands you use operate on the cells, not the
pictures in the cells.
Setting Up
ChemDraw/Excel
When you install ChemFinder, ChemDraw/Excel is
automatically installed. Before you use ChemDraw/Excel for the first time, do the following:
1. From the Tools menu, select Add-Ins.
The Add-Ins dialog box appears.
2. In the Add-Ins dialog box check the
ChemDraw for Excel checkbox and click OK.
A ChemOffice menu is added to the Excel
menu bar and a ChemOffice tool bar appears.
New
Import ChemFinder list
SMILES=Struct
worksheet Filter & Similarity tables
Name=Struct
Import
Structure controls:
table Export Load; Save; Cut;
table
Copy; Paste; Name
Structure controls:
Show; Hide;Resize;
Align
3. From the Tools menu, point to Macro and
select Security.
The Macro Security dialog box appears.
4. In the Macro Security dialog box click the
Security Level tab and set the security level to
Medium.
NOTE: ChemDraw/Excel no longer requires this
step. You must set security to Medium only if you will
be using ChemDraw/Excel worksheets from version 8
or earlier without conversion.
5. Click OK to save and exit.
To create a ChemOffice worksheet:
• From the ChemOffice menu, select New
ChemOffice Worksheet, or click
.
A ChemOffice worksheet appears. When a
ChemOffice worksheet is active,
ChemDraw/Excel appears in the title bar and
the ChemDraw tool bar is active.
ChemDraw 9
ChemDraw/Excel
Setting Up ChemDraw/Excel
• 207
The Import Table dialog box appears.
Administrator
Importing Tables
ChemDraw/Excel allows you to import from the
following sources:
• MDL SDFiles—Imports all records in the
file. Each structure is given the name stored in
the SDFile.
• ChemDraw databases —Imports all fields
stored in the main form. Molecular weight and
formula fields are not imported because
ChemDraw/Excel calculates them. Each
structure is named Structure <n>, where n is a
unique number.
NOTE: In order to import .cfw files into Excel, make sure
you save them with the “allow CAL/OLE Automation
access” security setting checked. See “Setting Security
Options” in Chapter 3 of the ChemFinder manual for
details.
When you import a table, structure data are transformed into structure drawings in the first column,
and all other fields are imported in separate columns.
To import a table:
3. Type or select the file name to import and click
Open.
All records are added to your spreadsheet.
Converting and
Upgrading
Instead of copying and pasting information from a
non-ChemDraw/Excel worksheet, you can convert
the existing worksheet into a ChemDraw/Excel
worksheet.
To convert a worksheet:
• Select Convert Worksheet from the
ChemOffice menu.
The work sheet is converted to a
ChemDraw/Excel worksheet.
Upgrading Workbooks
ChemDraw/Excel 9.0 improvements have made
workbooks created with older versions incompatible. You can open and maintain old workbook for-
1. Select the cell where you want the import to
start. The upper left corner of the import is at
this cell. Data is filled down and to the right.
2. From the ChemOffice menu, select Import
Table or click
.
208•ChemDraw/Excel
CambridgeSoft
Importing Tables
mats, but you may get error messages (depending
on your Excel security settings) and will be asked if
you want to upgrade each time you open them.
Importing a Hitlist
To import a hitlist:
1. From the ChemOffice menu, select Get
icon.
ChemFinder List, or click the
A message box similar to the one below
appears appears:
To upgrade a workbook:
1. From the Tools menu, point to Macro and
select Security.
2. Click the Trusted Sources tab and make sure
that CambridgeSoft Corporation is listed as a
trusted source. Make sure the Trust access to
Visual Basic Project checkbox is selected.
3. Select Upgrade Workbook from the
ChemOffice menu.
4. To maintain tight security, go back to the
Macro Security dialog box and uncheck the
Trust access to Visual Basic Project checkbox.
Importing Hit Lists
You can perform a search in ChemFinder and then
import the hit list structures with data into Excel
using the Get ChemFinder List command.
To use the Get ChemFinder List command, ChemFinder must be open with a hitlist present.
ChemDraw 9
2. Click Yes to import the hitlist.
The records are imported into Excel, starting
with the currently selected cell and moving
down and to the right.
Error Messages
If all conditions required to use the Get ChemFinder List command are not met, one of the following error messages may appear.
ChemFinder is not running, would you like to
start it up?
ChemFinder is not running. Do the following:
1. Click Yes.
The message “After loading your desired
database and performing your search, return to
Excel and redo the operation.” appears.
2. Click OK.
ChemFinder opens.
3. Open a database and perform a search.
4. Return to Excel and from the ChemOffice
menu, select Get ChemFinder List,
or click
.
No database loaded in ChemFinder. Load a
database and perform your search. Then return
to Excel and redo the operation.
ChemDraw/Excel
Importing Hit Lists
• 209
ChemFinder is running, but no database is loaded.
Do the following:
To export data:
1. Select the information to export:
1. Click OK.
Administrator
ChemFinder moves to the front.
2. Open a database and perform a search.
3. Return to Excel and from the ChemOffice
menu, select Get ChemFinder List,
or click
.
Form has no database or hitlist has no records.
Load a database and perform your search.
Then return to Excel and redo the operation.
1. Click OK.
ChemFinder moves to the front.
2. Open a database and perform a search.
3. Return to Excel and from the ChemOffice
menu, select Get ChemFinder List,
or click
.
If you want to export Then
a specified area of your
spreadsheet
Select the area to
export.
the entire spreadsheet
Do not make any
selection.
2. From the ChemOffice menu, select Export
.
Table or click
The Save Table To dialog box appears.
Exporting Tables
ChemDraw/Excel allows you to export tables to
MDL SDFiles.
Selected cells are exported to a specified file. If no
cells are selected, the entire spreadsheet is exported.
The first column of the area to export must have
the word “Structure” in its top cell. Structures outside the first column will be discarded.
3. Type the file name and click Save.
The table is saved to the specified file.
Adding Structures
You can add chemical structures from any file format supported by ChemDraw to a spreadsheet. The
names of added structures are retained. If the structure does not have a name, ChemDraw assigns the
name: Structure <n>, where n is a number unique
to the worksheet.
210•ChemDraw/Excel
CambridgeSoft
Exporting Tables
Adding Structures with
ChemDraw
The Choose Molecule to Load dialog box
appears.
The most direct way to insert a new structure into a
cell is by using ChemDraw.
To add a structure with ChemDraw:
1. Double-click in a cell.
The ChemDraw/Excel dialog box appears:
2. Click Yes.
ChemDraw opens.
3. Draw the structure in ChemDraw.
4. From the ChemDraw File menu, click Close
and Return to New Molecule.
The new structure appears in the cell.
Adding a Structure From a File
To add a structure from a file:
1. Select the cell into which you want to add the
structure.
2. From the ChemOffice menu, select Load
Molecule or click
.
NOTE: You can use the sample molecule file,
“SAMPLE.cdx” contained in the ChemDraw system
directory, or any .cdx file to load.
3. Type the file name of the structure to add and
click Open.
The information is stored in the selected cell.
Adding a Structure with a
SMILES String
You can insert SMILES strings into cells and convert them to structures.
To insert SMILES strings:
1. Type or paste SMILES strings into cells.
2. Select the range of cells or single cell to
convert.
NOTE: If you want to keep the original text, copy it
and paste it elsewhere.
3. From the ChemOffice menu, select Convert
SMILES To Molecule or click
.
ChemDraw 9
ChemDraw/Excel
Adding Structures
• 211
Administrator
If the cell contains a valid SMILES string, it is
replaced by a structure. The cell will display a
text string starting with “Structure” and
followed by a number. To display the structure,
click the Show Picture
icon.
If the cell did not contain a valid SMILES
string, the string remains.
The Save to File dialog box appears.
Adding Structures by Name
You can type or paste the names of chemicals into
cells and convert them into structures as follows:
1. Enter the names into cells.
2. Select the range of cells to convert.
NOTE: If you want to keep the original text, copy it
and paste it elsewhere. Note that this command can also
convert names generated from Excel formulas.
3. From the ChemOffice menu, select Convert
.
Name To Molecule, or click
If the cell contains a name supported by
ChemDraw Name=Struct, the structure
corresponding to that name is added to the cell,
with the given name as the name of the cell. To
show the structure, select the cell and choose
Show Picture from the ChemOffice menu.
For more information about Name=Struct, see
the ChemDraw User’s Guide.
Saving Structures
You can save a chemical structure to a separate file.
1. In the spreadsheet, select the cell containing
the structure.
2. From the ChemOffice menu, select Save
.
Molecule or click
212•ChemDraw/Excel
3. Select an existing file or enter a new file name,
and click Save.
The structure is saved with the name and in the
location you selected.
Searching
You can perform the same types of searches in
ChemDraw/Excel as you can in ChemFinder:
• Exact structure searching
• Substructure searching
• Similarity searching
Filter Tables
Filter tables allows you to search for exact structures and substructures.
To perform a structure search:
1. Select a cell containing the label Structure.
2. From the ChemOffice menu, select Filter
Table or click
.
The Search Query dialog box appears.
CambridgeSoft
Saving Structures
3. Select the search options:
If you want
to
search for a
structure
Then
a. To load a structure,
right-click and select
Read Structure.
b. To edit the structure,
double-click it.
c. Select the Search
Type.
d. Select the Filter
Type.
search for a
formula
a. Type the molecular
formula or formula
query in the And/Or
Formula Query box.
b. select Clear.
search for a
structure and a
formula
If you want
to
Then
see the
click Restore Previous
previous query Query.
4. Click Search.
The hit list is displayed in a column named
Match. Items matching the search criteria are
labeled as TRUE.
Similarity Searches
You can perform similarity searches to find structures with features corresponding to your search
structure. For more information about similarity
searching, see the ChemFinder User’s Guide.
To search for similarity:
1. Select a cell containing the label Structure.
2. From the ChemOffice menu, select Similarity
.
Table or click
The Similarity Query dialog box appears.
a. To edit the structure,
double-click it.
b. Select the Search
Type.
c. Select the Filter
Type.
d. Type the molecular
formula in the
And/Or Formula
Query box.
3. Select the Search Type.
4. Select the Similarity Is value.
see the RGroup
Analysis
ChemDraw 9
click the Show R-Group
Analysis box.
5. Select the Sort order.
6. Click Search.
ChemDraw/Excel
Searching
• 213
The hit list is displayed in a column named
Match. Items matching the search criteria are
labeled as TRUE.
Administrator
Working with
Structures
ChemDraw/Excel allows you to rename structures
and use the clipboard to cut, copy, and paste structures.
Naming Structures
Excel recognizes certain characters as formulas. To
prevent the system from interpreting a chemical
structure name as an Excel formula, you can
rename a structure.
To name a structure:
1. Select the structure.
2. From the ChemOffice menu, select Name
.
Molecule or click
The Name Molecule dialog box appears.
The structure is removed from the cell and is
placed on the clipboard.
To copy a structure from a cell:
1. Select the structure.
2. From the ChemOffice menu, select Copy
Molecule or click
.
The structure remains in the cell and a copy is
placed on the clipboard.
To paste a structure:
1. Select the area into which you want to paste the
structure.
2. From the ChemOffice menu, select Paste
.
Molecule or click
The structure is pasted from the clipboard.
Viewing Structures
ChemDraw/Excel allows you to select whether or
not to display structures in a cell. You can also
adjust the height and width of cells to display their
entire contents.
Showing and Hiding Structures
To show structures:
1. Select the cells in which you want to display
3. Type the name and click OK.
Using the Clipboard
You can cut, copy, and paste structures using the
clipboard. After you cut or copy a structure, it is
placed on the clipboard. You can then paste it into
another cell or another application.
To cut a structure from a cell:
1. Select the structure.
2. From the ChemOffice menu, select Cut
.
Molecule or click
214•ChemDraw/Excel
pictures.
2. From the ChemOffice menu, select Show
.
Picture or click
The structures are displayed in the selected
cells.
To hide structures:
1. Select the cells in which you do not want to
display pictures.
2. From the ChemOffice menu, select Hide
.
Picture or click
The structures are hidden and the cells resize.
CambridgeSoft
Working with Structures
Aligning Structures
Resizing Structures With a Macro
A structure may fall outside the boundaries of its
cell because it is too big or because it is improperly
positioned within the cell. Use the Align All Pictures
command to enlarge the cell or reposition the structure. If the entire structure is within the cell, regardless of its position, it is not affected by the Align All
Pictures.
To resize a large number of structures simultaneously, create the following macro:
To align structures:
• From the ChemOffice menu, select Align
Pictures or click
.
The cells adjust to display their entire contents.
Resizing Structures
To resize pictures use the Resize Picture command.
NOTE: When pictures are resized larger than their cells,
use Align Pictures to enlarge the cells. Align Pictures does
not make cells smaller.
To resize pictures:
1. Select the chemistry cells whose pictures you
want to resize.
It is not necessary to only select chemistry cells.
Non-chemical cells or chemical cells without
pictures will be ignored.
2. From the ChemOffice menu, select Resize
.
Picture or click
Resize handles appear on the selected
structures.
3. Click-drag the resize handles to resize a picture.
Any changes you make to a picture is
proportionately reflected in the other pictures.
4. To end resizing, click a cell and the pictures are
deselected.
ChemDraw 9
CFXL.xla!CFxlDoSelectPicture
and assign it to an Excel button or menu item.
Then do the following:
1. Select the cells to be resized.
2. Run the macro.
3. Resize one structure.
All of the selected structures resize by the same
amount.
4. Select the Structure column and align (see
“Aligning Structures” on page 215).
For more information on creating and storing macros, see Excel Help.
Using
ChemDraw/Excel
Functions
ChemDraw/Excel supplies nine functions that
return information about chemistry objects in a
specified cell. Seven of these functions take only
one argument—the cell to which the function
refers. The remaining two functions may also take a
string as an optional second argument.
The function ISSTRUCTURE is an example of a
function that takes only one argument. To determine whether the content of cell A1 in an Excel
spreadsheet is a ChemDraw/Excel chemistry
object, you type =ISSTRUCTURE(A1) into a second
cell. The second cell then displays TRUE or FALSE
depending on whether A1 contains a chemistry
object.
The function CHEM.COMPOSITION is one of
the functions that may take an optional second
argument. It works in one of two ways:
ChemDraw/Excel
Using ChemDraw/Excel Functions
• 215
With First Argument Only—
Administrator
Without the second argument, it displays elemental
composition by weight percent of the entire chemical structure in cell A1 when you type
=CHEM.COMPOSITION(A1) into a second cell. For
benzene, it displays C, 92.26; H, 7.74.
With Both Arguments—The second argument
lets you find the percent composition of a single
element in the structure. Typing =CHEM.COMPOSITION(A1, “C”) returns the weight percent of carbon in the structure. For benzene it would display
0.922582. Notice that the display format for a single element is different from that of the whole
structure.
The following table outlines the ChemDraw/Excel
functions. Only CHEM.COMPOSITION and
CHEM.NUM.ATOMS take an optional second
argument. The others only take the reference cell
argument.
Function
Action
ISSTRUCTURE
Returns TRUE if cell
referred to is any
ChemDraw/Excel
chemistry object
including reactions;
otherwise it returns
FALSE.
ISREACCTION
216•ChemDraw/Excel
Returns TRUE if cell
reference is any
ChemDraw/Excel
chemistry object and
reaction; otherwise it
returns FALSE.
Function
Action
CHEM.FORMULA
Returns formula for
structure in cell
reference; it returns
#N/A error if cell
doesn’t contain a
ChemDraw structure.
CHEM.MOLWEIGHT
Returns molecular
weight for structure in
cell reference. Returns
#N/A error if cell
doesn’t contain
ChemDraw structure.
CHEM.NUM.
HBACCEPTORS
Returns number of
hydrogen bond
acceptors based on
topology. Returns
#N/A error if cell
doesn’t contain
ChemDraw structure.
CHEM.NUM.
HBDONORS
Returns number of
hydrogen bond donors
based on topology.
Returns #N/A error if
cell doesn’t contain a
structure.
CHEM.SMILES
Returns SMILES
string for structure.
Returns #N/A error if
cell doesn’t contain
ChemDraw structure.
CambridgeSoft
Using ChemDraw/Excel Functions
Function
Action
CHEM.COMPOSITION Returns elemental
percent by weight for
all elements in
structure unless
optional second
argument specifies a
single element symbol
as a string. In this case
the elemental percent
is expressed as a
decimal number
between 0 and 1.
(75.1% would be
0.751) Returns #N/A
error if the cell
referenced in first
argument doesn’t
contain a ChemDraw
structure, or if second
argument is not a valid
element symbol.
CHEM.NUM.ATOMS
ChemDraw 9
Returns total number
of atoms in the
structure unless
optional second
argument specifies a
single element symbol
as a string. In this case,
it returns the number
of atoms of that
element only. Returns
#N/A error if the cell
referenced in first
argument doesn’t
contain a ChemDraw
structure or if second
argument is not a valid
element symbol.
Using ChemProp Functions
If you are using ChemDraw Pro or Ultra with the
ChemProp add-on installed, you can calculate physical and thermodynamic properties in ChemDraw/Excel. For detailed information on the
properties calculated and how ChemProp calculates
them, see “Viewing Chemical Properties” on page
141 and Appendix E: “How ChemProp Works.”
ChemProp Properties
In ChemDraw/Excel, you can use the ChemProp
functions to calculate the following properties:
Property
Function
LogP (Ultra only)
CHEMPROP.LOGP
Molar Refractivity
(Ultra only)
CHEMPROP.MR
Henry’s Law
Constant
CHEMPROP.HENRY.
LAW.CONSTANT
Boiling Point
CHEMPROP.BOILING
Freezing
Temperature
CHEMPROP.FREEZING
Critical
Temperature
CHEMPROP.CRITICAL.
TEMP
Critical Pressure
CHEMPROP.CRITICAL.
PRESSURE
Critical Volume
CHEMPROP.CRITICAL.
VOLUME
Heat of Formation
CHEMPROP.HOF
ChemDraw/Excel
Using ChemDraw/Excel Functions
• 217
Administrator
Property
Function
Gibbs Free Energy
CHEMPROP.GIBBS
Ideal Gas Thermal
Capacity
CHEMPROP.IDEAL.GAS
tPSA
CHEMPROP.TPSA
NOTE: Using ChemProp requires that you have a version
of ChemDraw that includes ChemProp installed.
Inserting Functions
To insert a ChemDraw/Excel function into your
worksheet:
1. Select an empty cell.
2. From the Insert menu, select Function.
The Paste Functions dialog box appears.
3. Select ChemDraw Functions.
218•ChemDraw/Excel
4. Select the function to insert from the list and
click OK.
A dialog box appears.
5. Enter the structure cell reference for which you
want to calculate properties in the Structure
box.
6. If the function takes a second argument, enter
it in the Element type box. Element type
arguments are optional.
7. Click OK.
Each property is calculated using the “best available” method. For more information about calculation methods, see the ChemDraw manual. If the cell
reference argument does not point to a valid structure cell, #N/A appears in the cell.
CambridgeSoft
Using ChemDraw/Excel Functions
Appendices
This section contains the Appendices for each of
the sections.
Section I: General
• Appendix A: Accessing the CambridgeSoft
Web Site.
• Appendix B: Technical Support.
• Contact information and hints on what you
should know to effectively report problems.
Includes a troubleshooting section.
Section II: ChemDraw
• Appendix C: The Chemistry of ChemDraw.
• Describes how ChemDraw interprets what
you draw and how you can help ChemDraw
better interpret what you mean.
• Appendix D: How ChemNMR Works.
• Describes how ChemNMR estimates
chemical shifts for hydrogen or carbon
atoms, and it’s limitations.
• Appendix E: How ChemProp Works.
ChemDraw 9
• Describes how ChemProp enables you to
calculate predicted values of selected
physical and thermodynamic properties.
• Appendix F: Shortcuts and Hotkeys.
• Contains tables listing ChemDraw shortcuts
and hotkeys for both Windows and Mac
versions.
• Appendix G: Document Settings.
• Drawing settings and a sample structure for
each of the Style Sheets or Stationery Pads
provided with ChemDraw.
• Appendix H: Chemistry File Formats.
• Most file formats supported by ChemDraw
are proprietary or extremely complex and
are documented more thoroughly
elsewhere. This Appendix describes the
connection table format in detail. Note,
however, that the format is obsolete, and is
documented here for historical purposes
only.
Appendices
• 219
Administrator
220•Appendices
CambridgeSoft
Appendix A: Accessing the
CambridgeSoft Web Site
Online Menu
Overview
code. Upon filling out a registration form, the
registration code is sent to you by email. This
registration scheme does not apply to site licenses.
The ChemOffice Online menu gives you quick
access to the CambridgeSoft web site from within
ChemOffice. With the Online menu, you can:
If your serial number is invalid for any reason, or if
you do not have an internet connection, you will
have to contact CambridgeSoft Support to receive
a registration code.
• Register your software.
• Search for compounds by name or ACX
number and insert the structure in a worksheet
• Use ACX numbers, or names or structures in
the worksheet, to search for chemical
information
• Browse the CambridgeSoft website for
technical support, documentation, software
updates, and more
To use the Online menu, you must have internet
access.
You may use your ChemOffice application a
limited number of times while waiting for the
registration process to be completed. Once the
application times out, you must register to activate
the software.
In addition to registering your software, you can
request literature, or register for limited free access
to ChemFinder.com, ChemACX.com,
ChemClub.com, and the email edition of
ChemBioNews from the Register Online link of the
Online menu. This link connects you to the
Cambridgesoft Professional Services page. From
this page you can link to a registration form.
To register online:
1. From the Online menu, choose Register
Online.
The Cambridgesoft Professional Services page
opens in your browser.
Register tab
ChemOffice 2005 applications utilize a new security
scheme. In order to activate any ChemOffice
application, you must register with the
CambridgeSoft website to receive a registration
ChemDraw- Appendix
Appendices
Registering Online
2. Select the Register tab.
Accessing the CambridgeSoft Web Site
Registering Online
• 221
Administrator
Accessing the Online
ChemDraw User’s
Guide
Accessing
CambridgeSoft
Technical Support
The Online menu link Browse CS ChemDraw
Documentation opens the Cambridgesoft Desktop
Manuals page, where you can access current and
previous versions of the ChemOffice User’s Guide.
The Online menu link Browse CS ChemOffice
Technical Support also opens the Cambridgesoft
Professional Services page. There are a number of
links on this page for Troubleshooting, Downloads,
Q&A (the ChemOffice FAQ), Contact, and so
forth.
To access the CambridgeSoft Manuals page:
1. From the Online menu, choose Browse
CS ChemDraw Documentation.
Finding Information
on ChemFinder.com
The Find Information on ChemFinder.com menu
item links your browser to the ChemFinder
database record of the compound you have
selected.
The Desktop Manuals page appears. PDF
versions of the CambridgeSoft manuals can be
accessed from this page.
NOTE: If you do not have a CambridgeSoft User
account, you will be directed to a sign-up page first.
2. Click version of the manual to view.
ChemFinder is the public-access database on the
ChemFinder.com website. It contains physical,
regulatory, and reference data for organic and
inorganic compounds.
To access ChemFinder.com:
1. In ChemOffice, select a structure you want to
look up.
2. From the Online menu, choose Find
Information on ChemFinder.com.
The ChemFinder.com page opens in your
browser with information on the selected
structure.
In ChemFinder.com you can search for chemical
information by name (including trade names), CAS
number, molecular formula, or molecular weight.
222•
Accessing the CambridgeSoft Web Site
CambridgeSoft
Accessing the Online ChemDraw User’s Guide
Follow the links to do substructure queries.The
following illustration shows part of the page for
Benzene.
Finding Chemical
Suppliers on ACX.com
The Find Suppliers on ACX.Com menu item links
your browser to the chemacx.com database record
of suppliers of the compound you have selected.
ChemACX (Available Chemicals Exchange) is a
Webserver application that accesses a database of
commercially available chemicals. The database
contains catalogs from research and industrial
chemical vendors.
1. In ChemOffice, select a structure you want to
look up.
2. From the Online menu, choose Find
Suppliers on ACX.com.
The ChemACX.Com page opens in your
browser with information on the selected
structure.
For example the ChemACX.com page for Benzene
is shown below.
For more information on using the ChemACX
website, see the ChemOffice Enterprise
Workgroup & Databases Manual.
Finding ACX
Structures and
Numbers
ChemOffice searches ACX and returns
information about related structures and numbers.
You can place the returned information in your
document.
ACX Structures
There are two ways to find ACX structures: by
ACX number or by name.
ChemDraw- Appendix
Accessing the CambridgeSoft Web Site
Finding Chemical Suppliers on ACX.com
• 223
Appendices
ChemACX allows the user to search for particular
chemicals and view a list of vendors providing
those chemicals.
To use Find Suppliers on ACX.Com menu access:
To find a structure that corresponds to an ACX
number:
Administrator
1. From the Online menu, choose Find
Structure from ACX Number.
The Find Structure from ACX number dialog
box appears.
ACX Numbers
To Find an ACX number for a structure:
1. In a ChemOffice document, select the
structure for which you want to find an ACX
number.
2. From the Online menu, choose Find ACX
Numbers from Structure.
The ACX number appears in the Find ACX
Numbers from Structure dialog box.
2. Type the ACX registry number.
3. Click OK.
The Structure appears in your document.
To find a structure from a name
1. From the Online menu, choose Find
Structure from Name at ChemACX.com.
The Find Structure from Name dialog box
appears.
Browsing
SciStore.com
Browse ChemStore.com opens the SciStore
(formerly ChemStore) page of the CambridgeSoft
web site (http://scistore.cambridgesoft.com/).
To access Browse SciStore.com:
• From the Online menu, choose Browse
ChemStore.com.
The SciStore.Com page opens in your browser.
2. Type in a name. As with ChemFinder.com, you
can use a chemical name or a trade name.
3. Click OK.
The Structure appears in your document.
224•
Accessing the CambridgeSoft Web Site
CambridgeSoft
Browsing SciStore.com
You can search SciStore.Com for chemicals, lab
supplies, chemistry-related software, and other
items you want to buy. You can access
ChemACX.Com and other pages from
SciStore.Com.
Browsing
CambridgeSoft.com
Browse CambridgeSoft.com opens the Home page
of the CambridgeSoft web site.
Using the ChemOffice
SDK
The ChemOffice Software Developer’s Kit (SDK)
enables you to customize your applications.
To browse the ChemOffice SDK:
• From the Online menu, choose Browse
ChemOffice SDK.
The CS ChemOffice SDK page opens in your
browser.
To access the CambridgeSoft Home Page:
• From the Online menu, choose Browse
CambridgeSoft.com.
The CambridgeSoft web site in your browser.
The ChemOffice SDK page contains
documentation, sample code, and other resources
for the Application Programming Interfaces
(APIs).
NOTE: You must activate Javascript in your browser in
order to use the ChemOffice SDK page.
Check the CambridgeSoft web site for new product
information. You can also get to SciStore.Com,
ChemBioNews.Com, and other pages through
CambridgeSoft.Com.
Appendices
ChemDraw- Appendix
Accessing the CambridgeSoft Web Site
Browsing CambridgeSoft.com
• 225
Administrator
226•
Accessing the CambridgeSoft Web Site
CambridgeSoft
Using the ChemOffice SDK
Appendix B: Technical Support
Overview
CambridgeSoft Corporation (CS) provides
technical support to all registered users of this
software through the internet, and through our
Technical Support department.
Our Technical Support webpages contain answers
to frequently asked questions (FAQs) and general
information about our software. You can access our
Technical Support page using the following
address: http://www.cambridgesoft.com/services/
If you don’t find the answers you need on our
website, please do the following before contacting
Technical Support.
1. Check the ReadMe file for known limitations
or conflicts.
2. Check the system requirements for the
software at the beginning of this User’s Guide.
3. Read the Troubleshooting section of this
appendix and follow the possible resolution
tactics outlined there.
4. If all your attempts to resolve a problem fail, fill
out a copy of the CS Software Problem Report
Form at the back of the User’s Guide. This
form is also available on-line at:
http://www.cambridgesoft.com/services/mail
• Try to reproduce the problem before
ChemDraw- Appendix
Internet:
http://www.cambridgesoft.com/services/mail
Email: [email protected]
Fax: 617 588-9360
Mail: CambridgeSoft Corporation
ATTN: Technical Support
100 CambridgePark Drive
Cambridge, MA 02140 USA
Serial Numbers
When contacting Technical Support, you must
always provide your serial number. This serial
number was on the outside of the original
application box, and is the number that you entered
when you launched your CambridgeSoft
application for the first time. If you have thrown
away your box and lost your installation
instructions, you can find the serial number in the
following way:
Macintosh
• With ChemDraw launched, choose About CS
ChemDraw from the Apple menu. The serial
number appears at the bottom left.
Windows
• Choose About CS <application name>
from the Help menu. The serial number
appears at the bottom left of the About box.
For more information on obtaining serial numbers
and registration codes see:
http://www.cambridgesoft.com/services/codes.cfm
Technical Support
Serial Numbers
• 227
Appendices
contacting us. If you can reproduce the
problem, please record the exact steps that
you took to do so.
• Record the exact wording of any error
messages that appear.
• Record anything that you have tried to
correct the problem.
You can deliver your CS Software Problem Report
Form to Technical Support by the following
methods:
Administrator
Troubleshooting
System Crashes
This section describes steps you can take that affect
the overall performance of CambridgeSoft Desktop
Applications, as well as steps to follow if your
computer crashes when using a CS software
product.
CambridgeSoft Desktop Applications should never
crash, but below are the steps you should go
through to try to resolve issues that cause computer
crashes while using a CS software product.
Performance
Below are some ways you can optimize the
performance of CambridgeSoft Desktop
Applications:
• Macintosh: Increase the total amount of
memory that the application can use:
• Select the ChemDraw application icon in
the Finder when ChemDraw is not running.
• From the Edit menu, choose Get Info.
Increase the memory allocation in the
Preferred size text box in the Memory
Requirements section of the dialog box.
• Windows: In the Performance tab in the
System control panel, allocate more processor
time to the application.
• Install more physical RAM. The more you
have, the less ChemOffice Desktop
Applications will have to access your hard disk
to use Virtual Memory.
• Increase the Virtual Memory (VM). Virtual
memory extends RAM by allowing space on
your hard disk to be used as RAM. However,
the time for swapping between the application
and the hard disk is slower than swapping with
physical RAM.
Change the VM as follows:
• System control panel, Performance tab.
1. Restart your computer (Macintosh) or restart
Windows and try to reproduce the problem. If
the problem recurs, continue with the
following steps.
2. The most common conflicts concern Video
Drivers, Printer Drivers, screen savers, and
virus protection. If you do need to contact us,
be sure to determine what type and version of
drivers you are using.
Video Driver related problems: If you are
having problems with the display of any
CambridgeSoft Desktop Application, try
switching to the VGA video driver in the
display Control Panel (or System Setup, and
then retest the problems. If using a different
driver helps, your original driver may need to
be updated–contact the maker of the driver
and obtain the most up-to-date driver. If you
still have trouble contact us with the relevant
details about the original driver and the
resulting problem.
Printer Driver related problems: Try using
a different printer driver. If using a different
driver helps, your original driver may need to
be updated–contact the maker of the driver
and obtain the most up-to-date driver. If you
still have trouble contact us with the relevant
details about the original driver and the
resulting problem.
3. Try reinstalling the software. Before you
reinstall, uninstall the software and disable all
background applications, including screen
savers and virus protection. See the complete
uninstall instructions on the CambridgeSoft
Technical Support web page.
228•
Technical Support
CambridgeSoft
Troubleshooting
4. If the problem still occurs, use our contact
form at:
http://www.cambridgesoft.com/services/mail
and provide the details of the problem to
Technical Support.
Appendices
ChemDraw- Appendix
Technical Support
Troubleshooting
• 229
Administrator
230•
Technical Support
CambridgeSoft
Troubleshooting
Appendix C: The Chemistry of
ChemDraw
Overview
ChemDraw automatically converts lines,
characters, and other symbols into chemically
meaningful figures as you work. This work occurs
in the background, but you can choose to view this
chemical data using Check Structure, Analyze
Structure, and Expand Atom Labels. ChemDraw
also uses this chemical data when exporting to file
formats that support only a subset of the notations
that ChemDraw does.
This appendix describes how ChemDraw interprets
what you draw and how you can help ChemDraw
better interpret what you mean.
Chemical Intelligence
in ChemDraw
ChemDraw was designed as a tool to aid in
chemical communication. Most chemists would
understand AcOo-C6H4COOH immediately,
whether or not they recognized it as aspirin. Most
computer programs, however, require what is
known as a “complete connection table,” in this
case, a collection of 21 atoms connected by 5
double bonds and 16 single bonds in a specific
pattern. ChemDraw takes what makes sense to a
chemist and converts it into what makes sense to
another application.
This chemical intelligence can be used as a
sophisticated “spelling” checker for chemical
compounds. For example, if you’re investigating
organic acids, a compound with the structural
formula CH3COO would probably represent acetic
ChemDraw 9
acid. Present the same formula in a paper on
transition metal chemistry, and you might be
describing a novel methylated cobalt oxide. If you
had asked ChemDraw to interpret it beforehand,
you would have received a message reporting a
valence error, and you might have been prompted
either to add a negative charge or to change the
capitalization.
ChemDraw can offer only suggestions. If you and
your audience understand what you are trying to
depict, then you can ignore these suggestions. In
many cases, you can teach ChemDraw to
understand the notation you’re using. For more
information, see “Applying Nicknames” on page
121.
Database
Conventions
Most databases require not only that you draw a
structure in a way that makes sense, but that you
draw it in the way that the database expects it.
Consider ferrocene, which is represented in at least
four different ways in major databases:
Fe
Fe
Fe
Fe
Merck Index
and 3 other isomers
Beilstein
The Chemistry of ChemDraw
Database Conventions
• 231
HC
HC
Administrator
Fe
HC
HC
Aldrich
CH
Fe
CH
Double bond, with cis/trans
stereochemistry unknown.
CH
CH
Tautomeric bond, either single or
double according to rules of
tautomerism.
CH
CH
Aromatic bond, part of a
delocalized resonance system.
MDL ACD
A successful search in one database might not
produce any hits in another. When in doubt,
consult the documentation for your database, and
see if it offers any clues to the conventions used.
Chemical Conventions
The following table describes the chemical
conventions understood by ChemDraw.
Bond
Triple bond.
Quadruple Bond.
A single bond near a closed circle is recognized as
aromatic:
Description
Single bond, unspecified
stereochemistry.
Single bond, “down”
stereochemistry (into the plane of
the paper, away from the viewer),
from the first drawn atom to the
second drawn atom.
Single bond, “up” stereochemistry
(out of the plane of the paper,
toward the viewer), from the first
drawn atom to the second drawn
atom.
Single bond, mixture of “up” and
“down” stereochemistries in some
unspecified proportion.
Dative bond. Often used to
indicate polar bonds, such as the NO bond in pyridine N-oxide.
Double bond, with cis/trans
stereochemistry as drawn.
232•The Chemistry of ChemDraw
Atom Labels
A simple atom label may contain any of the
following:
Cl
A single element.
O
CH3
H
N
Me
An element and some
number of hydrogen
atoms.
A nickname.
Ala
C(OCH3)3
Repeating units within
parentheses.
O(CH2)4CH3
CambridgeSoft
Chemical Conventions
+*/
CH2COOC(OPh)3
A series of any
combination of the
above.
When analyzing an atom label, ChemDraw starts at
the left and continues to the right, applying
standard rules of valence to determine which atoms
are bound to which. The exception is with an atom
label in Automatic alignment on the left side of a
compound. This sort of atom label is displayed
“backwards” (H3CO instead OCH3) and is
therefore parsed from right to left. Standard
valences for each atom are defined in the Isotopes
Table.
By definition, a “simple” atom label has all bonds
attached to the first (or last) character. A multiattached atom label has bonds connected to more
than one character, or has all of its bonds attached
to a specific character in the middle of the atom
label. Multi-attached atom labels are always parsed
from beginning to end, but again the beginning
might be on the right if the atom label was in
Automatic style and on the left side of the original
structure:
O
A multi-attached label that
is parsed from left to right.
CH2CCH3
O
A multi-attached label that
is parsed from right to left.
(CH2)4
CH2(CH2)2CH2
A bond attached to the
close parenthesis or repeat
count of a repeating group
is treated as if bonded to
the last of those groups.
Multiple fragments within a single label can be
specified in the following ways:
COO-Na
COO- Na+
COO-.Na+
Implicitly, using
standard valence rules.
Explicitly, using a space,
period (unsuperscripted
or unsubscripted), bullet,
or combination.
COO-•Na+
COO- . Na+
(COO-)3 . 3Na+
(COO-)3 . Na+ Na+ Na+
An unsuperscripted,
unsubscripted integer at
the start of a fragment is
recognized as a
stoichiometric multiplier
and is treated as if the
appropriate number of
fragments were drawn
explicitly.
H3CCH2C
(CH2)4OH
CH2(CH2)3OH
ChemDraw 9
A bond attached to the
open parenthesis of a
repeating group is treated
as if bonded to the first of
those groups.
Chemically Significant Text
Often it is simpler to write a chemical formula like
MeOH or H2O than it is to draw out an entire
atoms-and-bonds structure. ChemDraw correctly
interprets any unambiguous structural formula. For
example, CH3COCH2CH3 is recognized as methyl
ethyl ketone and MeOH is recognized as methanol.
On the other hand, C6H6 might mean benzene, or
it might mean one of over 200 other isomers. C6H6
The Chemistry of ChemDraw
Chemical Conventions
• 233
Administrator
is not recognized by ChemDraw, and generates an
error message if you try to analyze it. Generally,
empirical formulas (C2H6 and H2SO4) are not
recognized, but structural formulas (CH3CH3 and
HOSO2OH) are.
Molecular weight and elemental analyses of
empirical structures is possible, but the Expand
Label command does not work with them.
Empirical structures are discarded when they are
transferred to other applications that require
unambiguous structures.
Chemically-significant text must be entirely in
Formula or, for isotopes and charges, Superscript
style. ChemDraw does not recognize a chemical
formula embedded within a larger block of text.
NH4+
H 2O
If you draw a bond, add an atom
label, and then delete the bond,
you have a chemically
meaningful text block whose
font, size, and style match other
atom labels.
If you create a caption with the
text tool and set it to Formula
style, you have a chemically
meaningful text block whose
font, size, and style match other
captions.
Charges
Charges may be created as part of a textual atom
label or with the appropriate symbol from the
Chemical Symbols Palette. Charges are always
assigned to a specific element in the atom label,
whose acceptable valences become those of the
similar isoelectronic neutral element.
O-
A charge following an element
is assigned to that element.
234•The Chemistry of ChemDraw
+NH3
A charge that does not follow
an element is assigned to the
next element.
(N+)H3
NH3+
(N+)H3
CO2-
Charges that follow a
monovalent element with a
repeat count are assigned to the
element before that element.
Charges that follow other
repeating units are distributed
among those units.
CO(O-)
NH3+
Fe++
Fe+2
Fe2+
NH3
(N+)H3
Charges may be superscripted.
Multiple charges are
recognized appropriately.
Charges may have repeat
counts as long as both the
charge and the repeat count are
superscripted.
A “floating” charge placed with
the Chemical Symbols Tool is
assigned to the nearest atom. If
no atom is within the distance
set as the Fixed Length, the
charge is ignored and not
assigned to any atom.
A “floating” charge placed
within a delocalized system is
recognized by the Analyze
Structure function, but is
discarded when saved to
formats that require all charges
to be associated with specific
atoms.
CambridgeSoft
Chemical Conventions
Isotopes and Elements
H-Dot/H-Dash
By default, ChemDraw correctly recognizes all
isotopes in the full Table of the Elements. This data
is provided by CRC Press, Inc. Isotopes are defined
in the Isotopes Table file. You can edit this file to
add new isotopes in any text editor.
H-Dot and H-Dash symbols from the Chemical
Symbols Palette indicate the stereochemistry of a
single hydrogen atom. These symbols are most
commonly used in fused systems.
35
Cl
13
CH2 COOH
O
T
D3C
T
Isotopes can be
included anywhere that
regular elements can.
Deuterium and Tritium
can be indicated by their
one-letter symbols.
OD
Radicals
Radicals are indicated with the appropriate symbol
from the Chemical Symbols Palette. As with
charges, they are assigned to the nearest atom.
Radicals always occupy one free valence, in addition
to any charge effects.
Ph
Ph
Ph
H
A superscripted number
before the element
symbol indicates isotope
numbers.
C
C
O
H
Complexes
Compounds with electron pairs can act as Lewis
bases, bonding with Lewis acids that are electrondeficient. Similar behavior can be seen between
lone pairs and metals.
The best representation of these types of
interaction is with a dative bond from the electronpair donor to the acceptor. With a plain bond
instead of the dative bond, ChemDraw would
report a valence error. The dative bond more
accurately represents the electron donation.
Complexes may also be represented with explicit
lone pairs and without any bonds.
If you use a plain bond to indicate a complex, you
may want to set Abnormal Valence to Allowed in
the Atom Properties dialog.
F3B
NH3
O
Boron trifluorideammonia complex.
Boron trifluorideacetic acid
complex.
HO
B
F
F
ChemDraw 9
F
The Chemistry of ChemDraw
Chemical Conventions
• 235
N
Administrator
N
Fe
N
N
HO
Heme, a
compound with
two formal
covalent bonds and
two formal donoracceptor pairs.
pseudo-atom that is disregarded during chemical
calculations, but still allows you to create diagrams
that look meaningful to an experienced chemist.
O
M
Another
representation of
heme.
η3 or π-Allyl complex
N
N
Fe
N
Fe
N
HO
O
Multi-center Attachments
Multi-center attachments are meaningful only when
created using Add Multi-Center Attachment from
the Structure Menu. This command creates a
Ferrocene, a π-Aryl complex
Cl
Cl
Ti
Cp2TiCl2, another π-Aryl complex
CO
OC
CO
Mn
η-C5H5Mn(CO)3
Stereochemistry
Absolute stereochemistry is calculated for
tetrahedral atoms and double bonds according to
the Cahn-Ingold-Prelog (CIP) priority rules. The
236•The Chemistry of ChemDraw
CambridgeSoft
Chemical Conventions
CIP rules are designed to order ligands by their
priority and determine a descriptor based on the
orientation of the ordered ligands in space.
A ligand is an entity attached to a stereocenter. For
example, a tetrahedral carbon has four ligands
corresponding to its four substituents. When a
tetrahedral carbon is in a ring, it still has four
ligands: the two ligands outside the ring, a third
consisting of the ring “unpeeled” clockwise, and a
fourth consisting of the ring “unpeeled”
counterclockwise.
Five rules are used to determine the priority of
ligands are summarized below in simplified form.
For more detailed information, see the references.
They are checked sequentially as follows:
• Rule 1—Higher atomic number precedes
lower
• Rule 2—Higher atomic mass precedes lower
• Rule 3—cis precedes trans
• Rule 4—Like pairs of descriptors precede
unlike pairs
• Rule 5—R precedes S
ChemDraw checks differences up to 15 atoms
distant from the stereocenter.
Stereochemical Indicators
After the ligands are ranked, an indicator is assigned
as shown in the following table.1
Stereocenter
Indicator
Double bond
Z if the highest ranking ligand
of each pair are on the same
side of the bond; otherwise E.
ChemDraw 9
Stereocenter
Indicator
Tetrahedral atom When the lowest-ranking ligand
is located behind the central
atom:
• R when remaining 3
ligands are arranged
clockwise in descending
order
• S when remaining 3 ligands
are arranged
counterclockwise in
descending order
• r or s is used for
pseudoasymmetric atoms
Stereochemical Flags
While the chirality of a specific stereocenter can be
indicated with the appropriate wedged, hashed, or
plain bond, sometimes it is useful to indicate the
relative stereochemistry of a molecule as a whole,
considering the relationship between all
stereocenters. Stereochemical flags apply to the
1. R.S. Cahn, C.K. Ingold, and V. Prelog, “Specification of Molecular Chirality”, Angew. Chem.,
Int. Ed. Engl. 1966, 5, 385-414 (errata: 1966, 5,
511); Angew. Chem. 1966, 78, 413-447.
V. Prelog and G. Helmchen, “Basic Principals of
the CIP-System and Proposals for a Revision”,
Angew. Chem. 1982, 94, 614-631; Angew. Chem.
Int. Ed. Engl. 1982, 21, 567-583.
P. Mata, A.M. Lobo, C. Marshall, and A.P.
Johnson, “The CIP Sequence Rules: Analysis and
Proposal for a Revision.” Tetrahedron:Asymmetry. 1993, 4, 657-668.
The Chemistry of ChemDraw
Chemical Conventions
• 237
nearest structure; if no structure is within the
distance specified by the Fixed Length value, the
stereochemical flag is not assigned to any structure.
Administrator
The Absolute
flag indicates
the exact
stereoisomer as
drawn.
Abs
COOH
NH2
COOH
NH2
Rel
COOH
NH2
COOH
COOH
OR
NH2
NH2
Rac
COOH
NH2
COOH
NH2
The Relative
flag indicates
the exact
stereoisomer as
drawn, or its
enantiomer.
COOH
AND
The Racemic
flag indicates a
mixture of the
exact
stereoisomer as
drawn and its
enantiomer.
NH2
Polymer Representations
Brackets are used to enclose repeated structures or
structural fragments. ChemDraw provides bracket
properties to specify the orientation and context of
the repeating units. An explanation of the bracket
properties is given in “Representing Polymers and
Other Repeating Units” on page 163.
238•The Chemistry of ChemDraw
References
“Graphic Representations (Chemical Formulae) of
Macromolecules (Recommendations 1994)” Pure
Appl. Chem., 66, 2469-2482 (1994).
“Source-Based Nomenclature for Copolymers
(Recommendations 1985)” Pure Appl. Chem., 57,
1427-1440 (1985). Also available at:
http://www.iupac.org/publications/books/pbook
/
PurpleBook-C7.pdf.
“Basic Definitions of Terms Relating to Polymers
(1974)” Pure Appl. Chem., 40, 479-491 (1974) Also
available at:
http://www.iupac.org/reports/1996/6812jenkins
/
index.html).
Also see the Guide for the authors of papers and
reports in polymer science and technology from
IUPAC.
Query Properties
By their nature, query properties do not represent
actual chemical features, but describe broad classes
or groups of features. For information on using
query properties, see Chapter 10: Drawing Query
Structures.
Analysis Messages
When ChemDraw is unable to analyze your
structure fully, two general types of messages are
displayed:
• Status messages that report a problem that may
not affect the final analysis
CambridgeSoft
Chemical Conventions
• Critical messages that may affect the final
analysis
Message
Description
There are too
many bonds to
this unlabeled
Carbon.
Displayed for every unlabeled
atom with more than 4 filled
valences. Filled valences
include sum of bond orders,
charge, radicals, and free sites.
Aromatic bonds count 1.5
each, rounded down unless it is
the only bond to the atom.
Charge is signed and includes
charge implied by dative
bonds. The Substituents query
property treats Free Sites, Up
to and Exactly the same way:
an atom with 2 explicit bonds
and “Substituents: Up To 3” or
“Substituents: Exactly 3” or
“Substituents: Free Sites 1” has
three filled valences.
An atom in this
label has an
invalid valence.
Displayed in a variety of cases
where ChemDraw cannot find
a place to put a bond or cannot
find a bond to put on an atom.
Valid valences for each
element are listed in the
Isotopes Table file.
ChemDraw can’t Displayed when ChemDraw
interpret this
finds text that it cannot identify
label.
as an element, nickname,
generic nickname, or
alternative group name.
ChemDraw 9
Message
Description
Parentheses don’t Displayed when parentheses
match.
cannot be matched into nested
open-close pairs.
This label has
conflicting or
unassignable
charges.
Displayed when a plus and
minus charge have been
assigned to the same element,
charges have been assigned in
more than one way, or a charge
has been assigned to a
nickname, generic nickname,
or Alternative Group name.
Formula cannot Displayed for every label that
be computed for contains a generic nickname,
queries.
an element list or an alternative
group. This is a status message
only; analysis continues as if
the problematic label were not
selected.
Text not in
Formula style
won’t be
interpreted.
Displayed for the first caption
that is not an atom label or
Alternative Group name, and
which contains any text not in
Formula, Subscript, or
Superscript style. This is a
status message only, and
appears only once regardless of
how many captions are in the
selection.
This named
alternative group
contains no
attachment point.
Displayed for any structure
within an Alternative Group
Box where the structure lacks
an attachment point. This is a
status message only.
The Chemistry of ChemDraw
Chemical Conventions
• 239
Administrator
Message
Description
Message
Description
This named
alternative group
contains
fragments with
inconsistent
valences.
Displayed for any Alternative
Group Box whose contained
structures have varying
numbers of attachment points.
Since all structures within an
Alternative Group Box are to
be used interchangeably, they
must have the same number of
attachments. This is a status
message only.
The stereocenter
has no
stereobonds
specified.
Displayed for any asymmetric
center without attached
wedged, hashed, dashed, or
bold bonds. This is a status
message only, and appears only
when Show Stereochemistry is
tuned on and there is at least
one other wedged, hashed,
dashed, or bold bond in the
structure.
This named
Displayed for any Alternative
alternative group Group Box that is empty. This
contains no
is a status message only.
fragment.
There is a valence
and charge error
somewhere in
this aromatic
system.
Displayed for any
odd-membered ring drawn as a
delocalized system (with a
circle in the middle), where
there is no corresponding
associated charge. For
example, a delocalized
representation of
cyclopentadiene must include
either a negative charge or a
multicenter attachment.
The stereocenter
has conflicting or
ambiguous
stereobonds
specified.
Displayed for any stereocenter
(tetrahedral atom, asymmetric
double bond, etc.) where the
absolute stereochemistry
cannot be determined from the
structure as drawn. For
example, this message would
be shown for a carbon atom
attached by bold bonds to four
different ligands. This message
is displayed only when Show
Stereochemistry is also turned
on.
Part of a
molecule is
outside of the
alternative group
definition.
Displayed for any Alternative
Group Box whose border
crosses part of a structure. This
is a status message only.
This isolated
bond is probably
not intended to
have chemical
significance.
Displayed for unlabeled single
bonds unattached to other
bonds. All bonds are
interpreted chemically, usually
as C2H6, and may cause
unexpected results if intended
as a graphical line only. This is
a status message only.
The atom is very Displayed for any atom that is
close to another nearly touching another atom
atom or bond.
or bond but not bound to it. If
a bond really was intended, the
analysis of the structure
produces incorrect results.
This is s status message only.
240•The Chemistry of ChemDraw
CambridgeSoft
Chemical Conventions
Message
Description
This label has an Displayed for every label that
unrecognized
has a numeric superscript
isotopic mass.
immediately preceding an
atomic symbol, where the
superscripted number does not
correspond to a recognized
isotope. For example, 24CH3.
ChemDraw 9
The Chemistry of ChemDraw
Chemical Conventions
• 241
Administrator
242•The Chemistry of ChemDraw
CambridgeSoft
Chemical Conventions
Appendix D:
Works
Ultra
Overview
ChemNMR estimates chemical shifts for all
hydrogen or carbon atoms for which additivity rules
are available. Following a hierarchical list, it first
identifies key substructures of a molecule. A
substructure provides the base value for the
estimated shift. For example, benzene would be
identified as the key substructure of trinitrotoluene.
When a substructure happens to be a ring system
not available in the data, ChemNMR approximates
its base shift using embedded rings and, if
necessary, it will even disassemble the ring into
acyclic substructures.
ChemNMR views remaining parts of the molecule
as substituents of a substructure. Each substituent
adds to or subtracts from the base shift of the
substructure to which it is attached. Additivity rules
determine the increment of each contribution. If an
increment for a substituent cannot be determined,
ChemNMR uses embedded substituents—smaller
structural units with the same neighboring atoms.
Or, it will use increments of identical or embedded
substituents of a corresponding substructure by
assuming that the effects of the substituents are of
the same magnitude.
How ChemNMR
4000 parameters. It also implements models for
ethylenes (cis/trans) and cyclohexanes
(equatorial/axial).
ChemNMR
Limitations
The program handles the following elements:
H, D, He, Li, Be, B, C, N, O, F, Ne, Na, Mg, Al, Si,
P, S, Cl, Ar, K, Ca, Sc, Ti, V, Cr, Mn, Fe, Co, Ni, Cu,
Zn, Ga, Ge, As, Se, Br, Kr, Rb, Sr, Y, Zr, Nb, Mo,
Tc, Ru, Rh, Pd, Ag, Cd, In, Sn, Sb, Te, I, Xe, Cs, Ba,
La, Ce, Pr, Nd, Pm, Sm, Eu, Gd, Tb, Dy, Ho, Er,
Tm, Yb, Lu, Hf, Ta, W, Re, Os, Ir, Pt, Au, Hg, Tl,
Pb, Bi, Po, At, Rn, Fr, Ra, Ac, Th, Pa, U, Nep, Pu,
Am, Cm, Bk, Cf, Es, Fm, Md, No, Lr. Functional
groups are expanded automatically.
In case of 1H NMR, it estimates shifts of about 90%
of all CHx-groups with a standard deviation of
0.2. 0.3 ppm. The use of polar solvents may
strongly increase these deviations. It does not
estimate shifts of hydrogen atoms bonded to
heteroatoms because they are significantly affected
by solvents, concentration, impurities, and steric
effects.
ChemNMR provides a detailed protocol of the
estimation process applied. It gives substructures as
names, compound classes in most cases,
substituents in form of a linear code, respectively.
In case of 13C NMR, it estimates over 95% of the
shifts with a mean deviation of -0.29 ppm and
standard deviation of 2.8 ppm.
The data set for the 1H NMR Shift tool currently
contains 700 base values and about 2000
increments. The 13C NMR Shift tool is based on
Fürst, A.; Pretsch, E. Anal. Chim. Acta 1990, 229, 17.
ChemDraw 9
For more information see:
Pretsch, E.; Fürst, A.; Badertscher M.; Bürgin, R.;
Munk, M. E. J. Chem. Inf. Comp. Sci. 1992, 32, 291295.
How ChemNMR Works
ChemNMR Limitations
• 243
Bürgin Schaller, R.; Pretsch, E. Anal. Chim. Acta
1994, 290, 295.
Bürgin Schaller, R.; Munk, M. E.; Pretsch, E.
J. Chem. Inf. Comput. Sci.1996, 36, 239-243.
Administrator
Bürgin Schaller, R.; Arnold, C.; Pretsch, E. Anal.
Chim. Acta 1995, 312, 95-105.
244•How ChemNMR Works
CambridgeSoft
ChemNMR Limitations
Appendix E:
Works
Pro
ChemProp Values
ChemProp enables you to calculate predicted
values of selected physical and thermodynamic
properties for structures of up to 100 atoms. The
following topics describe how ChemProp obtains
its values.
LogP
LogP (partition coefficient for n-octanol/water)—
three fragmentation methods are used to predict
the logP values.
Method one is based on 94 atomic contributions
evaluated from 830 molecules by least squares
analysis. This method works with a standard
deviation of 0.47 logP units and can handle
molecules containing hydrogen, oxygen, nitrogen,
sulfur and halogens.
1. Method two is an extension of method one
that is based on 120 atomic contributions
evaluated from 893 molecules by least squares
analysis. In addition to the atoms introduced
for method one, it can handle molecules that
contain phosphorus and selenium atoms. This
method works with a standard deviation of
0.50 logP units.
2. Method three is based on 222 atomic
contributions calculated from 1868 molecules
by least squares analysis. This method allows a
calculation of logP with a standard deviation of
0.43 logP units and can handle molecules
ChemDraw 9
How ChemProp
containing hydrogen, oxygen, nitrogen, sulfur,
halogens and phosphorus atoms. If this
method is applied to molecules with internal
hydrogen bonds, the standard deviation is 0.83
logP units.
Henry’s Law
Henry’s Law Constant—The air to water
partition coefficient that is expressed as ratio of
vapor pressure to water solubility or as a unitless
distribution coefficient that can be evaluated as a
ratio of the concentration in air to the
concentration in water.
Two methods are used to predict Henry’s Law
constant.
1. The first is an approach based on the bond
contribution method. This method uses 59
bond contribution values and 15 correction
factors. The contributions were calculated by
least squares analysis using a data set of 345
chemicals. This method estimates with a mean
error of 0.30 units and a standard deviation of
0.45 units and can handle molecules containing
carbon, hydrogen, oxygen, nitrogen, sulfur,
phosphorus and halogens.
2. In the second method, Henry’s Law constant is
estimated from an equation found using linear
regression. Multifunctional compounds were
omitted from this study. This method should
not be used for compounds where distant polar
interaction is present.
How ChemProp Works
LogP
• 245
Molar Refractivity
Administrator
Molar refractivity—Two fragmentation methods
are used to estimate the molar refractivity value.
1. Method one includes 93 atomic contributions
evaluated from 504 molecules by using a
constrained least squares technique. This
method works with a standard deviation 1.27
cm3/mol and can handle molecules containing
hydrogen, oxygen, nitrogen, sulfur and
halogens.
2. The second method is an extension of method
one that includes 120 atomic contributions
evaluated from 538 molecules by using a
constrained least squares analysis technique. In
addition to the atoms introduced for method
one, this method can handle molecules with
phosphorus and selenium atoms. This method
works with a standard deviation of 0.77
cm3/mol.
Ultra
ClogP and CMR
Specific algorithms for calculating LogP and molar
refractivity from fragment-based methods
developed by the Medicinal Chemistry Project and
BioByte.
Topological Polar
Surface Area
The polar surface area of a molecule (measured in
square Ångstroms) is an imporant property that can
be used for the prediction of pharmaceutical
transport properties in the body. Historically, this
property has been calculated using time-consuming
3D techniques, but a recent paper1 has provided a
remarkably accurate way of predicting it very
rapidly. ChemDraw implements this algorithm, and
displays it on the Chemical Properties window.
Other Properties
Heat of Formation, Gibbs Free Energy, Ideal
Gas Thermal Capacity, Freezing Point, Critical
Temperature, Critical Pressure, and Critical
Volume are estimated using Joback’s
fragmentation method.
Normal Boiling Point and Melting Point—
Estimated in K using two methods.
1. Joback's fragmentation method.
2. The Joback method as modified by Stein. All
boiling points are estimated at a pressure of
1 atm.
For more information, see: biobyte.com
1. Ertl, P., Rohde, B., and Selzer, P., 2000. Fast
Calculation of Molecular Polar Surface Area as a
Sum of Fragment Based Contributions and Its
Application to the Prediction of Drug Transport
Properties. J.Med. Chem.43: 3714-3717.
246•How ChemProp Works
CambridgeSoft
Molar Refractivity
Appendix F: Shortcuts and
Hotkeys
Shortcuts are key sequences used by power users to
save time. The following tables list the ChemDraw
shortcuts.
ChemDraw Hotkeys are used for rapid labeling of
atoms, and for applying atom and bond properties.
The tables list the default ChemDraw Hotkeys. See
“Labeling Atoms with HotKeys” on page 87 for
information on customizing Hotkeys.
ChemDraw Windows
Shortcuts
See also “ChemDraw Hotkeys” on page 252.
File Commands
Enter...
to execute Command...
Shift+Ctrl+P
page set up…
Ctrl+P
print…
Edit Commands
Enter...
to execute Command...
Ctrl+Z
undo
Ctrl+X
cut
Enter...
to execute Command...
Ctrl+C
copy
Ctrl+N
new document
Ctrl+V
paste
Ctrl+O
open document
Shift+Ctrl+Z
redo
Ctrl+W
close document
Del
clear
Alt+F4
exit
Ctrl+A
select all
Ctrl+S
save document
Ctrl+Y
repeat last command
Shift+Ctrl+S
save as…
ChemDraw 9
Shortcuts and Hotkeys
• 247
View Commands
Enter...
to execute Command...
Administrator
Enter...
to execute Command...
Ctrl+K
scale selected object
F5
actual size
Ctrl+L
toggle fixed lengths
F6
fit to window
Ctrl+R
rotate
F7
magnify
Shift+Ctrl+V
flip vertical
F8
reduce
Alt+Shift+V
rotate 180° vertical
F11
toggle rulers
Shift+Click
select multiple objects
Ctrl+H
toggle crosshair
Object Commands
(with Lasso,
Marquee, or
Structure
Perspective tools)
Structure Commands
Enter...
to execute Command...
F2
bring to front
F3
send to back
Ctrl+E
toggle fixed angles
Ctrl+G
group selected objects
Shift+Ctrl+G
ungroup objects
Shift+Ctrl+H
flip horizontal
Enter...
to execute Command...
Alt+Shift+H
rotate 180° horizontal
F9 (in a label)
subscript the selected character
or the next character typed
Ctrl+J
join selected objects
248•Shortcuts and Hotkeys
Enter...
to execute Command...
Shift+Ctrl+K
clean up structure
Shift+Ctrl+N
convert name to structure
Alt+Shift+Ctrl+N
convert structure to name
Text Commands
CambridgeSoft
Enter...
to execute Command...
Enter...
to execute Command...
F10 (in a label)
superscript the selected
character or the next character
typed
Ctrl+click
create resonance delocalized
ring
Shift+Ctrl+C
centered
Alt+Shift+click
Shift+Ctrl+J
justified
(with ring tools
except chairs)
remove a curve segment
(with pen tool)
distort (limit resize to X or Y
(with resize handle) axis
Shift+drag
Shift+Ctrl+L
flush left
Shift+Ctrl+M
automatic justification
Ctrl+drag
copy a selected object
Shift+Ctrl+R
flush right
Ctrl+drag
change direction of a chain
Help Commands
Enter...
to execute Command...
F1
Help contents
Shift+F1
context sensitive Help
Drawing Commands
(with alkane chain
tool)
Shift+Ctrl+drag
copy a selected object
(constrained to X and Y axes)
Ctrl+Alt+Tab
toggles the Lasso and the
previous drawing tool
ChemDraw Mac
Shortcuts
See also “ChemDraw Hotkeys” on page 252.
Enter...
to execute Command...
Shift+click
change orientation of double
bonds
(with saturated
double bond ring
tools)
ChemDraw 9
File Commands
Enter...
to execute Command...
Command+M
minimize the ChemDraw
window
Command+N
new document
Shortcuts and Hotkeys
• 249
View Commands
Administrator
Enter...
to execute Command...
Command+O
open document
Enter...
to execute Command...
Command+P
print…
Command+H
toggle crosshair
Command+\
actual size
Shift+Command+P page set up…
Command+Q
quit
Command+/
fit to window
Command+S
save document
Command+>
magnify
Command+<
reduce
Command+;
toggle rulers
Shift+Command+S save as…
Command+W
close document
Edit Commands
Object Commands
Enter...
to execute Command...
Enter...
to execute Command...
Command+A
select all
Command+E
toggle fixed angles
Command+C
copy
Command+G
group selected objects
Command+V
paste
Shift+Command+G
ungroup objects
Command+X
cut
Shift+Command+H
flip horizontal
Command+Y
repeat last command
Option+Shift+
Command+H
rotate 180° horizontal
Command+Z
undo
Command+J
join selected objects
Command+K
scale
Del
clear
250•Shortcuts and Hotkeys
CambridgeSoft
Enter...
to execute Command...
Enter...
to execute Command...
Command+L
toggle fixed lengths
Shift+Command+L
flush left
Command+R
rotate
Shift+Command+M automatic justification
Shift+Command+V
flip vertical
Shift+Command+R flush left
Option+Shift+
Command+V
rotate 180° vertical
Shift+Option+8
Command+[
bring to front
Command+]
send to back
Shift+Click
(in a label)
Enter...
to execute Command...
Shift+Command+K
clean up structure
Shift+Command+N
convert name to structure
Option+Command+N convert structure to name
Text Commands
to execute Command...
Shift+Command+C centered
Shift+Command+J
ChemDraw 9
Drawing Commands
Enter...
to execute
Command...
Shift+click
change orientation of
double bonds
select multiple objects
Structure Commands
Enter...
insert ° symbol
justified
(with saturated double
bond ring tools)
Command+click (with
ring tools except chairs)
create resonance
delocalized ring
Option+Shift+click (with remove a curve segment
the pen tool)
(with resize handle)
distort (limit resize to X
or Y axis)
Command+drag
copy a selected object
Command+drag (with
change direction of a
chain
Shift+drag
alkane chain tool)
Shift+Command+drag
copy a selected object
(constrained to X and Y
axes)
Shortcuts and Hotkeys
• 251
Enter...
to execute
Command...
Administrator
Hotkey
Result
E
COOCH3
f
F
h
H
i
I
k
K
l
Cl
m
Me
n
N
N
Na
o
O
p
P
P or 4
Ph
q
Q (non-hydrogen heteroatom)
r
R
s
S
S
Si
t
TMS
Command+Option+Tab toggles the Lasso and the
previous drawing tool
ChemDraw Hotkeys
Hotkeys are used for rapid labeling of atoms, and
for applying atom and bond properties. The
following tables list the default ChemDraw
Hotkeys. See “Labeling Atoms with HotKeys” on
page 87 for information on customizing Hotkeys.
See also“ChemDraw Windows Shortcuts” on page
247
Atom Hotkeys
NOTE: All Hotkeys can be edited except <Enter> or
<Return>, <Space>, <Backspace>, and <Delete>.
Hotkey
Result
a
A
A or 5
Ac
b
Br
c
C
C or l (lower case
L)
Cl
d
D
e
Et
252•Shortcuts and Hotkeys
CambridgeSoft
ChemDraw Hotkeys
Hotkey
Result
Hotkey
Result
T
OTs
<Backspace> or Remove an atom label or bond.
<Delete>
x
X
1
n-Bu
2
s-Bu
Hotkey
Result
3
t-Bu
1
Change to single bond.
4
Ph
2
Change to double bond.
5
Ac
3
Change to triple bond.
<Enter>
Open an atom label text box.
4
Change to quadruple bond.
/ (slash)
Display the Atom Properties
dialog box.
c
Center a double bond.
l
Position a double bond to the
left.
r
Position a double bond to the
right.
f
Bring a bond to the front.
Bond Editing Hotkeys
= (equals)
Display the Choose Nickname
dialog box.
. (period)
Add an attachment point.
‘ (single quote)
Add an atom number.
<space>
Remove an atom label.
ChemDraw 9
Shortcuts and Hotkeys
ChemDraw Hotkeys
• 253
Administrator
254•Shortcuts and Hotkeys
CambridgeSoft
ChemDraw Hotkeys
Appendix G: Document Settings
Creating Style Sheets
or Stationery Pads
To create your own Style Sheet or Stationery Pad:
1. Create a new document.
2. Enter the settings in the Page Setup,
Drawing, Text Settings, and Color Palette
dialog boxes.
ChemDraw 9
3. From the File menu, choose Save As.
4. In the Save As dialog box:
a. Select the CD Style Sheet or Stationery Pad
file format.
b. Type a name for the document.
c. Select the ChemDraw Items folder as the
location for saving the template.
5. Click OK or Save.
Document Settings
• 255
Administrator
ChemDraw Style
Sheets or Stationery
Pads
This following table contains drawing settings and
a sample structure for each of the Style Sheets or
Stationery Pads ChemDraw provides.
Drawing, Atom Label, and Caption Text Settings in Journal Style Sheets or Stationery
Pads
ACS 1996
• Fixed Length: 14.4 pt
• Bold Width: 2 pt
O
• Line Width: 0.6 pt
HO
N
H
Morphine
• Margin Width: 1.6 pt
• Hash Spacing: 2.5 pt
• Chain Angle (degrees): 120
• Bond Spacing (% of length): 18
• Atom Label Font (Win/Mac): Arial/Helvetica
• Atom Label Size: 10 pt
• Caption Font (Win/Mac): Arial/Helvetica
• Caption Size: 10 pt
• Drawing Area (Width x Height): 540 pt x 720 pt
• Page Size: US Letter
• Reduction (%): 100
256•Document Settings
CambridgeSoft
ChemDraw Style Sheets or Stationery Pads
Drawing, Atom Label, and Caption Text Settings in Journal Style Sheets or Stationery
Pads
Adv. Synth. Catal.
• Fixed Length: 17 pt
• Bold Width: 2 pt
• Line Width: 1 pt
HO
• Margin Width: 1.6 pt
O
• Hash Spacing: 2.5 pt
HO
N
H
Morphine
• Chain Angle (degrees): 120
• Bond Spacing (% of length): 18
• Atom Label Font (Win/Mac): Arial/Helvetica
• Atom Label Size: 10 pt
• Caption Font (Win/Mac): Times New
Roman/Times
• Caption Size: 12 pt
• Drawing Area (Width x Height): 540 pt x 720 pt
• Page Size: US Letter
• Reduction (%): 100
ChemDraw 9
Document Settings
ChemDraw Style Sheets or Stationery Pads
• 257
Drawing, Atom Label, and Caption Text Settings in Journal Style Sheets or Stationery
Pads
Administrator
Helvetica Chimica Acta
• Fixed Length: 17 pt
• Bold Width: 2.9 pt
HO
• Line Width: 0.54 pt
• Margin Width: 2 pt
O
HO
• Hash Spacing: 2 pt
N
H
• Chain Angle (degrees): 120
• Bond Spacing (% of length):14
Morphine
• Atom Label Font (Win/Mac): Arial/Helvetica
• Atom Label Size: 10 pt
• Caption Font (Win/Mac): Arial/Helvetica
• Caption Size: 12 pt
• Drawing Area (Width x Height): 368 x 720 pts
• Page Size: US Letter
• Reduction (%): 100
258•Document Settings
CambridgeSoft
ChemDraw Style Sheets or Stationery Pads
Drawing, Atom Label, and Caption Text Settings in Journal Style Sheets or Stationery
Pads
J. Chin. Chem. Soc.
• Fixed Length: 18 pt
• Bold Width: 2.5 pt
• Line Width: 1 pt
HO
• Margin Width: 2 pt
O
• Hash Spacing: 2.5 pt
HO
N
H
• Chain Angle (degrees): 120
• Bond Spacing (% of length): 20
• Atom Label Font (Win/Mac): Arial/Helvetica
Morphine
• Atom Label Size: 12 pt
• Caption Font (Win/Mac): Arial/Helvetica
• Caption Size: 12 pt
• Drawing Area (Width x Height): 693 pt x 918 pt
• Page Size: US Letter
• Reduction (%): 80
ChemDraw 9
Document Settings
ChemDraw Style Sheets or Stationery Pads
• 259
Drawing, Atom Label, and Caption Text Settings in Journal Style Sheets or Stationery
Pads
Administrator
J. Mol. Med.
• Fixed Length: 14.4 pt
• Bold Width: 2 pt
• Line Width: 0.6 pt
O
HO
N
H
Morphine
• Margin Width: 1.6 pt
• Hash Spacing: 2.5 pt
• Chain Angle (degrees): 120
• Bond Spacing (% of length): 18
• Atom Label Font (Win/Mac): Times New
Roman/Times
• Atom Label Size: 10 pt
• Caption Font (Win/Mac): Times New Roman/Times
• Caption Size: 10 pt
• Drawing Area (Width x Height): 8.5 cm x 25.4 cm (1
column); 17 cm x 25.4 cm (2 column)
• Page Size: US Letter
• Reduction (%): 100
260•Document Settings
CambridgeSoft
ChemDraw Style Sheets or Stationery Pads
Drawing, Atom Label, and Caption Text Settings in Journal Style Sheets or Stationery
Pads
New Document
• Fixed Length: 30 pt
• Bold Width: 2 pt
• Line Width: 1 pt
• Margin Width: 2 pt
OH
• Hash Spacing: 2.7 pt
• Chain Angle (degrees): 120
O
• Bond Spacing (% of length): 12
OH
• Atom Label Font (Win/Mac): Arial/Helvetica
N
H
• Atom Label Size: 10 pt
• Caption Font (Win/Mac): Times New
Roman/Times
• Caption Size: 12 pt
Morphine
• Drawing Area (Width x Height): 7.5 in x 10 in
• Page Size: US Letter
• Reduction (%): 100
ChemDraw 9
Document Settings
ChemDraw Style Sheets or Stationery Pads
• 261
Drawing, Atom Label, and Caption Text Settings in Journal Style Sheets or Stationery
Pads
Administrator
• Fixed Length: 30 pt
• Bold Width: 4 pt
• Line Width: 1.6 pt
• Margin Width: 2 pt
• Hash Spacing: 2.7 pt
• Chain Angle (degrees): 120
• Bond Spacing (% of length): 15
• Atom Label Font (Win/Mac): Arial/Helvetica
• Atom Label Size: 12 pt
• Caption Font (Win/Mac): Times New
Roman/Times
• Caption Size: 16 pt
• Drawing Area (Width x Height): 7.5 in x 10 in
• Page Size: US Letter
• Reduction (%): 100
262•Document Settings
CambridgeSoft
ChemDraw Style Sheets or Stationery Pads
Drawing, Atom Label, and Caption Text Settings in Journal Style Sheets or Stationery
Pads
Phytomedicine
• Fixed Length: 20 pt
• Bold Width: 1.33 pt
• Line Width: 1pt
• Margin Width: 1.25 pt
O
• Hash Spacing: 3 pt
HO
N
H
• Chain Angle (degrees): 120
• Bond Spacing (% of length): 8
• Atom Label Font (Win/Mac): Arial/Helvetica
Morphine
• Atom Label Size: 12 pt
• Caption Font (Win/Mac): Arial/Helvetica
• Caption Size: 12 pt
• Drawing Area (Width x Height): 540 pt x 720 pt
• Page Size: US Letter
• Reduction (%): 100
ChemDraw 9
Document Settings
ChemDraw Style Sheets or Stationery Pads
• 263
Drawing, Atom Label, and Caption Text Settings in Journal Style Sheets or Stationery
Pads
Administrator
RSC (1 and 2 column)
• Fixed Length: 0.43 cm
• Bold Width: 0.056 cm
• Line Width: 0.016 cm
O
HO
N
H
Morphine
• Margin Width: 0.044 cm
• Hash Spacing: 0.062 cm
• Chain Angle (degrees): 120
• Bond Spacing (% of length): 20
• Atom Label Font (Win/Mac): Arial/Helvetica
• Atom Label Size: 9 pt
• Caption Font (Win/Mac): Arial/Helvetica
• Caption Size: 9 pt
• Drawing Area (Width x Height): 8.9 cm x 25.4 cm (1
column); 19 cm x 27.7 cm
• Page Size: US Letter
• Reduction (%): 100
264•Document Settings
CambridgeSoft
ChemDraw Style Sheets or Stationery Pads
Drawing, Atom Label, and Caption Text Settings in Journal Style Sheets or Stationery
Pads
SYNTHESIS, SYNLETT
• Fixed Length: 17 pt
• Bold Width: 2 pt
• Line Width: 0.8 pt
• Margin Width: 1.3 pt
O
• Hash Spacing: 2.5 pt
HO
Na
H
• Chain Angle (degrees): 120
• Bond Spacing (% of length): 18
• Atom Label Font (Win/Mac): Arial/Helvetica
Morphine
• Atom Label Size: 10 pt
• Caption Font (Win/Mac): Arial/Helvetica
• Caption Size: 10 pt
• Drawing Area (Width x Height): 12 cm x 26.7 cm
• Page Size: A4
• Reduction (%): 100
ChemDraw 9
Document Settings
ChemDraw Style Sheets or Stationery Pads
• 265
Administrator
266•Document Settings
CambridgeSoft
ChemDraw Style Sheets or Stationery Pads
Appendix H:
Formats
Chemistry File
Overview
File formats other than ChemDraw may not
preserve all of your data. ChemDraw can create
many types of items—particularly graphical objects
such as boxes and curves—that cannot be saved
into chemical file formats.
Other file formats sometimes contain data that
cannot be interpreted by ChemDraw. ChemDraw
always tries to interpret other file formats so that as
much chemically-relevant data is preserved as
possible, even if that causes the actual appearance
of the file to change when it is saved and reopened.
Most file formats supported by ChemDraw are
proprietary or extremely complex and are
documented more thoroughly elsewhere. For
example, you can find more information about
CambridgeSoft’s CDX file format at:
The following is a sample Connection Table file
produced for cyclohexanol using ChemDraw. The
line numbers are added for purposes of discussion
only.
Line 1
Cyclohexanol
Line 2
77
Line 3
0.0000
0.5000
0.0000
Line 4
-0.8667
0.0000
0.0000
C
Line 5
-0.8667
-1.0000
0.0000
C
Line 6
0.0000
-1.5000
0.0000
C
Line 7
0.8667
-1.0000
0.0000
C
Line 8
0.8667
0.0000
0.0000
C
Line 9
0.0000
1.5000
0.0000
O
Line 10
1211
Line 11
2311
Line 12
3411
sdk.cambridgesoft.com
Line 13
4511
Connection Table File
Format
Line 14
5611
Line 15
1611
Line 16
6711
The connection table format file described in this
section is generated for the cyclohexanol structure
shown below. All references to atom serial numbers
are based on the Atom Numbering shown.
7
OH
1
6
2
5
C
Each line represents a data record containing one or
more fields of information about the structure.
Individual fields are delimited by space(s) or a tab.
The fields in the Connection Table format file used
by ChemDraw are discussed below. The field value
for Carbon 6 from the example file is included in
parentheses for reference.
• Line 1 is the molecule name. The molecule
name is the file name when the file was created
using ChemDraw.
3
4
ChemDraw 9
Chemistry File Formats
Connection Table File Format
• 267
• Line 2 contains two fields: the first field is the
Administrator
number of atom labels, and the second field is
the number of bonds. These fields must be
separated by at least one space.
• Lines 3. 9 each contain 4 fields describing
information about the individual atoms: the
first field is the X Cartesian coordinate
(0.8667), the second field is the Y Cartesian
coordinate (0.0000), the third field is the Z
Cartesian coordinate (0.0000), and the fourth
field is the atom label (C).
The spacing of these fields is very important.
Any data outside the following columns
(especially data overlapping the ranges) may
render a file unreadable.
• Field 1: Columns 0. 9
• Field 2: Columns 10. 19
• Field 3: Columns 20. 29
• Field 4: Columns 31. end
• Lines 10. 16 each contain four fields describing
information about the individual bonds
between the atoms: the first two fields
represent the serial numbers of the atoms that
are connected by this bond (atom 1 and atom
6), the third field is the bond order (1) and the
fourth field is the bond type (1).
The bond types for the Connection Table format
are as follows:
value
bond type
1
Single.
2
Dashed.
3
Hashed.
4
Wedged hash with first atom at
narrow end.
268•Chemistry File Formats
value
bond type
5
Wedged hash with second
atom at narrow end.
6
Bold.
7
Wedged with first atom at
narrow end.
8
Wedged with second atom at
narrow end.
9
Wavy.
10
Hollow wedge with narrow end
towards 1st atom.
11
Hollow wedge with narrow end
towards 2nd atom.
12
Dative bond with arrow
towards 2nd atom.
13
Dative bond with arrow
towards 1st atom.
14
Any (bond property).
15
Single/Double (bond
property).
16
Double/Aromatic (bond
property).
17
Single/Aromatic (bond
property).
CambridgeSoft
Connection Table File Format
Double bonds are bit encoded using a bitmask.
The default value (0) indicates a normal (two solid
lines) double bond, with the second line on the right
(looking from the first atom to the second). Other
values are as follows:
value
bond type/position
16
A double bond with one bold
and one solid line.
value
bond type/position
32
A crossed bond.
1
The second line is on the left
(looking from the first atom to
the second).
64
A double bond with two
dashed lines.
2
The two lines are centered.
4
A double bond with one
dashed and one solid line.
8
ChemDraw 9
A modifier to the previous two
values, indicating that the user
specifically set the positioning.
If this bit is not present,
ChemDraw calculated the
positioning automatically.
So, for example, a bitmask value of 13 (= 1 + 4 +
8) means a double bond with one dashed and one
solid line (4), where the user specifically wants (8)
the second line to be on the left (1).
NOTE: This connection table format is obsolete, and is
documented here for historical purposes only. This format
should never be used for critical work where chemical
information is important.
Chemistry File Formats
Connection Table File Format
• 269
Administrator
270•Chemistry File Formats
CambridgeSoft
Connection Table File Format
Index
Numerics
C, 1H shifts, estimating 147
35 mm Slide Boundary lines 181
3D models 141
3D Query Properties 158
13
A
Abnormal Valence 155
Abnormally shaped arrows, creating 105
Absolute flag, drawing 161
ACS Document 1996 256
Actual Size command 181
ACX information, finding 223
ACX, number search 224
ACX, structure search 223
Acyclic Chain Tool, description 15
Acyclic chains
adding 68
length 68
Add
3D query property 158
chemical names 73
column to template 136
row to template 136
to selection 111
Add Frame 101
Adding
structures in ChemDraw/Excel 210
Aligning objects
Align Submenu 185
overview 185
rulers 182
with crosshair 184
Aligning Structures 34
Alternative Groups
attachment point numbering 169
ChemDraw 9
Alternative Groups (continued)
attachment point symbol 168
Attachment Rank indicators 168
defining 167
description 167
multiple attachment points 168
Always Display and Print Atom Mapping 171
Analysis
information 138
messages 238
Analysis window 18
Anion, drawing 97
Anonymous Alternative Groups 170
Apply Settings command 22
Arc Tool
description 15
using 102
Arcs
drawing 102
resizing 102
arcs 102
Arrow Tool
description 15
overview 99
palette 99
Arrows
autoscaling 194
created with curves 105
resizing 99
Aspect Ratio, changing 117
Assigning
atom mapping 170
structures to spectra 146
Atom
moving 112
numbering 89
•
i
Administrator
Atom (continued)
query properties 150
Atom Label text boxes, closing 79
Atom Labels
automatic justification 82
creating 86
deleting 87
editing 87
hotkeys 87
justification 82
layering 86
margin width 86
multi-attached 125
overview 79
repeating 89
specification 232
text boxes, creating new line 79
white space 86
Atom Numbering
editing 90
hiding 90
position 91
showing 90
Atom properties
abnormal valence 155
description 151
implicit hydrogens 152
in query structures 149
reaction changes 153
reaction stereo 153
resetting defaults 151
ring bond count 152
substituents 151
unsaturation 153
viewing 150
Atom-To-Atom Mapping 170
Attachment Point
defining 168
multiple 168
numbering 169
symbol 168
ii•
Attachment point
tool 98
Attachment Point Tool 168
Attachment Rank indicators, showing 169
Auto Update 74
Automatic
drawing of structure 74
error checking 71
justification, atom labels 82
Mapping 171
Autosave 24
Autoscale
bonds 193
empty document window 194
template color 133
when transferring 193
B
Background color, printing 28
Baseline style, captions 80
Benzene Ring
changing orientation 67
drawing 67
Benzene Ring Tool 66
Bezier curves 103
BitMap file format 198
Bitmapped
Fonts 92
printing quality 29
bmp files 198
Boiling Point
definition 142
Boiling point, calculation 246
Bold Bond Tool icon 62
Bold Wedge Bond Tool icon 62
Bold Width 60
Bond crossings
changing 71
white space 60
Bond order, changing 71
CambridgeSoft
Bond Properties
defining 155
descriptors 156
reaction center 158
removing 156
topology 157
types 156
viewing 156
Bond query indicators 156
Bond Spacing, description 60
Bond tool
description 15
icons 62
repeating a label 89
Bonds
adding 125
autoscaling 193
changing bond type 69
changing type 69
double either 157
drawing 64
drawing by clicking 65
editing 69
Fixed Length 64
layering 71
margin width 60
multi center attachment 126
orientation, changing 70
orientation, dative bond 64
orientation, wedge bond 64
quadruple 63
selecting 110
types 232
Border of page 177
Boxes
drawing 100
rotating 100
Braces 101
Bracket
usage 164
ChemDraw 9
Brackets
description 15
drawing 101
paired 101
setting properties 163
single 101
tool 101
using to represent polymers 163
Bring to Front command 186
Bruker JCAMP file format 201
C
Calculating
chemical properties 141
elemental analysis 139
exact mass 139
formula 139
Molecular Weight 139
Calculations see ChemProp <&nopage> 245
CambridgeSoft, accessing the website 221–225
CambridgeSoft.com 225
Can. J. Chem. Document 256
Caption text boxes
closing 79
creating new line 79
Captions
Analysis information 139
autoscaling 194
coloring 84
converting to structures 75
creating 84
creating tables 188
editing 85
formula 80
inserting from structure 73
inserting rows in tables 190
justification 81
setting Font, Size and Styles 83
subscript 80
superscript 80
Table column spacing 189
•
iii
Administrator
Captions (continued)
text overview 84
width 85
Carbon-13 shifts, see 13C, 1H shifts, estimating
Cation, drawing 97
CCITT Group 3 and 4 203
CD Template 198
cds format 199
cdx
file format 198
saving as 26
cdxml format 198
Center on Page command 184
Centering objects 184
Chain Angle, description 59
Changing
aspect ratio 117
Bond orientation 70
bond type 69
default settings 21
perspective 181
settings when transferring 194
tolerance 110
Character Map 20
Charges
specifications 234
symbols, drawing 98
Check Structure
overview 137
when copying 138
Checking Chemistry 137
Chem3D 141
Chem3D objects, caution when sharing files 198
ChemBioNews.Com 224
ChemClub.com 221
ChemDraw
2.x file format 198, 199
3.5 file format 199
cdx format 198
closing 30
ctp, ctr file formats 198
iv•
ChemDraw (continued)
customizing 20
HotKeys File 88
Nicknames 121
ChemDraw Items folder
description 27
Hotkeys 87
isotope table 155
nicknames 121
Open Special 28
overview 27
scripts 22
style sheets and stationery pads 24
templates 133
window menu 27
ChemDraw Laser Prep 29
ChemDraw/Excel
adding structure files 211
adding structures 210
adding structures as SMILES 211
adding structures by name 212
adding structures with ChemDraw 211
aligning structures 215
Get ChemDraw List command 209
naming molecules 214
overview 207
searching 212
starting 207
ChemFinder.com 223
Chemical name, structure from 74
Chemical properties
calculating 141
ChemProp 141
Chemical Properties window 18, 141
Chemical Symbols
palette 96
rotating 98
tool 15, 96
Chemical syntax checking 71
Chemical Warnings
overview 71
CambridgeSoft
Chemical Warnings (continued)
suppressing 31, 72
Chemically significant text 233
Chemicals, purchasing online 224
Chemistry
checking 137
of ChemDraw 231
ChemNMR
description 243
using 147
ChemOffice SDK, accessing 225
ChemProp
boiling point 246
calculations 245
ClogP 246
CMR 246
critical pressure 246
Critical temperature 246
critical volume 246
description 245
Freezing point 246
Gibbs Free Energy 246
Heat of Formation 246
Henry’s Law 245
Ideal Gas Thermal Capacity 246
logP 245
molar refractivity 246
Thermal Capacity 246
TPSA 246
using 141
ChemProp, using with ChemDraw/Excel 217
ChemStore.com <Italic>see SciStore.com
chm files 198
CIP Rules 236
Clearing
mapping 172
spectrum-structure assignments 147
stereochemical markers 139
Click to select objects 110
Clipboard 191
Check Structure 138
ChemDraw 9
Clipboard 191 (continued)
copy 113
cutting 112
moving objects 112
pasting 112
Clipping files 193
CLogP 142
ClogP 246
Closed Brackets, rotating 100
Closed style, shapes 105
Closing
caption text box 79
ChemDraw 30
documents 27
CML file format 199
CMR 142
CMYK, Planar and Contiguous 200, 203
Color
autoscaling 194
menu 130
overview 129
saving settings 133
Color dialog box 131, 132
Color Palette 131
Coloring
captions 84
objects 130
Colors, maximum number of 129, 131, 194
Column spacing 189
Compression 203
Connection Table
example file 267
file format 199, 267
Contract label 124
Conventions 10
Convert name to structure, limitations 74
Convert structure to name, automatic captions 73
Converting
name to structure 75
to 3D 141
Converting Names to Structures 75
•
v
Administrator
Copy
and Check Structure 138
As SLN command 192
As SMILES command 191
duplicating objects 113
objects 113
with Clipboard 191
with drag and drop 192
Creating
atom labels 86
HotKeys 88
mirror images 115
new document 23
SLN strings 192
tables 188
templates 135
text 79
Critical Pressure
definition 142
Critical pressure, calculation 246
Critical Temperature
definition 142
Critical temperature, calculation 246
Critical Volume
definition 142
Critical volume, calculation 246
Crosshair
displaying 183
moving 184
using to align objects 184
CT file format 199
CTP file format 198
CTR file format 198
CTS file format 202
Curves
autoscaling 194
for creating arrows 105
segment, deleting 105
Custom templates 134
Customized settings, saving 21
vi•
Customizing
ChemDraw 20
saving document settings 21
using Scripts 30
Cut
objects 112
Cycloalkane rings, converting to delocalized rings
67
Cyclohexane Chair Ring Tool
description 66
orientation 67
Cyclohexane Ring Tool 66
Cyclooctane Ring Tool 66
Cyclopentadiene Ring Tool 66
Cyclopentadiene Ring, changing orientation 67
Cyclopentadiene rings, drawing 67
Cyclopentane Ring Tool 66
Cyclopropane Ring Tool 66
D
Daggers 101
Dashed Bond Tool icon 62
Databases
support for query structures 149
supported 149
Dative Bond
drawing 64
Tool icon 62
Default
atom properties, resetting 151
bond properties, resetting 156
changing 21
document location 23
file format 24
save file format 26
Stationery pad 21
Style Sheet 21
Defined Nickname 122
Deflate compression 203
Delete Column, from template 136
Delete Row, from template 136
CambridgeSoft
Deleting
atom labels 87
Backspace key 111
curve segment 105
Delete key 111
Nicknames 124
objects 111
Pen tool shapes 105
Delocalized rings, drawing 67
Deselecting objects 111
Detecting errors
Automatic error checking 71
Check Structure command 137
Disable chemical warnings 31, 72
Discarding changes 25
Displaying
atom mapping 171
cross hairs 183
entire page 182
reaction mapping 171
rulers 182
Distorting objects 117
Distributing Objects 185
Distributing objects 185
Document
location, default 23
multi-paged 177
posters 178
reverting to last saved 25
saving 26
settings 256
Stationery pad settings 256
style sheet settings 256
Document Settings, overview 21
Document Setup
multiple-paged documents 178
Posters 178
Document window
drawing area 177
enlarging 177
orientation 180
ChemDraw 9
Document window (continued)
reducing 177
Documentation web page 222
Double bond
changing type 69
drawing 63
orientation 70
Double either bonds, drawing 63
Drag and drop 192
Drawing
acyclic chains 68
Arcs 102
bonds by clicking 65
boxes 100
charge symbols 98
cyclopentadiene rings 67
double bonds 63
double either bonds 63
dz2- orbitals 96
fixed length bonds 64
free sites 161
H-Dash Symbol 96
H-Dot Symbol 96
mirror images 115
orbitals 94
quadruple bonds 63
radicals 97
resonance delocalized rings 67
rings 66
rings with fixed length 66
sigma orbitals 94
single bonds 62
s-orbitals 94
stereochemical symbols 161
structure automatically from name 74
triple bonds 63
with templates 134
Drawing area 177
Drawing daggers 101
Drawing Elements
autoscaling 194
•
vii
Administrator
Drawing Elements (continued)
color 99
distorting 100
fill patterns 99
resizing 100
rotating 100
Drawing Elements Tool 15
Drawing settings
changing defaults 21
Fixed Angles 64
margin width, effect on atom labels 86
margin width, effect on bond crossing 60
Duplicating
labels 89
objects 113
dx file format 201
dz2- orbitals, drawing 96
E
Editing
atom labels 87
atom numbers 90
bond orientation 70
bond type 69
bonds 69
captions 85
embedded objects 194
generic nickname file 162
query indicators 160
Element
list 162
not-list 163
recognized 235
Elemental Analysis
caption 139
description 139
Embedded objects 204
Embedding objects 194
Encapsulated PostScript, see EPS file format
Enclosing objects 101
viii•
Enlarge
document window 177
page size 180
EPS file format
overview 199
Text 199
Eraser Tool 15
Eraser Tool, changing bond order with 71
Error checking 71
Error Messages 238
Exact Mass
caption 139
definition 138
Excel add-in, see ChemDraw/Excel 207
Exiting 30
Expanding labels 125
Exporting
checking structure 138
compatibility 172
mapping 172
PNG 202
query properties 172
query structures 172
TIFF 203
using file formats 196
F
FAQ, online, accessing 222
File Format
Stationery pad 199
File format
Bitmap 198
cdx 26
cdxml 198
ChemDraw 198
ChemDraw 3.5 199
ChemDraw Stationery 199
Connection Table 199
connection table 267
CT 199
CTP 198
CambridgeSoft
File format (continued)
CTR 198
cts 202
EPS (TEXT) 199
GIF 200
ISIS 200
ISIS/Reactions 200
JDX 201
MDL MolFile 201
MDL RGFile 201
MSI MolFile 201
native 26
PICT 202
PICT scaled 4x 202
PNG 202
rxn 200
SMD 202
SPC 202
style sheet 199
Template 198
TGF 200
TIF 202
TIFF 203
TPL Style sheet 202
WMF 202
File formats
CML 199
JPEG 201
File formats, table 197
Files, inserting 204
Fill patterns, orbital tool 94
Filled style, shapes 105
Filtering tables 212
Fit to Window 182
Fixed Angles
bonds 64
orbitals 94
toggling on/off 64
Fixed Lengths
bonds 64
description 60
ChemDraw 9
Fixed Lengths (continued)
drawing with 64
scaling 116
toggling on/off 64
Flags, stereochemical. See Indicators
Flatten command 114
Flip Horizontal command 115
Flip type 166
Flip Vertical command 115
Flush Left justification 81
Flush Right justification 81
Font
imaging speed 92
new captions 83
substitution 79
Footers, creating 178
Format
atom labels 82
text 80
Formula command
description 138
using 80
Free Energy
definition 142
Free Energy, calculation 246
Free Sites
drawing 161
in queries 152
Freezing Point, calculation 246
Front to Back ordering 185
Fusing templates 134
G
G Groups 167
Galactic Industries file format 202
Generic Groups 167
Generic Nicknames
description 161
editing file 162
Get ChemDraw/Excel List 209
Getting Started Tutorial 31
•
ix
Administrator
Gibbs Free Energy
definition 142
GIF format 200
GRAMS software 202
Graphical User Interface 13
Grouping
orbitals 94
using 118
Grouping Objects 118
Groups
Integral 118
GUI, see Graphical User Interface
H
Hard Coded HotKeys 89
Hash Spacing, description 61
Hashed Bond Tool icon 62
Hashed Wedge Bond tool icon 62
H-Dash Symbol, drawing 96
H-Dot and H-Dash, specification 235
H-Dot Symbol, drawing 96
Headers, creating 178
Heat of Formation
definition 142
Help
Windows 10
Henry’s Law 245
Henry’s Law, definition 142
Hide Crosshair command 184
Hide Rulers command 183
Hiding
Atom Numbering 90
palettes 17
High resolution
non-PS printing 29
printing 29
Highlight box
selecting 110
size 65
Hollow Wedge Tool icon 62
Home page, CambridgeSoft 225
x•
Hotkeys
atom hotkeys 252
bond alignment 70
bond editing hotkeys 71, 253
bond layering 71
Creating 88
File 88
Hard-coded 89
labeling by pointing 87
labeling multiple atoms 88
labeling the last atom drawn 87
labeling with a selection tool 88
overview 87
table of 252
How to use this guide 9
Hydrogens, implicit 152
Hyphens, Font submenu 81
I
Implicit Hydrogens 152
Imported objects, selecting 110
Imported Picture 198
Importing
spectral data 201, 202
using file formats 196
Include ChemDraw LaserPrep 195
Indicators
Atom Numbering 90
query 160
query, editing 160
query, positioning 160
stereochemical
stereochemistry 140, 237
stereochemistry, positioning 140
Indicators, stereochemical 161
Info window 19
Insert Name as Structure 74
Inserting
files 204
name as structure 74
objects 204
CambridgeSoft
Inserting (continued)
rows in tables 190
Integral Groups, Creating 118
Interface 13
Internet, CambridgeSoft web site 225
IR spectra, see spectra
ISIS
Reactions 200
SKC file format 200
TGF file format 200
Isotopes
specifications 235
Isotopes Table file 155
Isotopes text file 155
Isotopic Abundance 154
J
J. Mol. Mod.
(1 Column) 256
(2 Column) 256
JCAMP file format 201
JDX file format 201
Joback’s Fragmentation Method 246
Joining
structures 117
Joining Objects 117
JPEG file format 201
Justification
atom labels 82
captions 81
K
Kekule structures 67
Keyboard shortcuts
edit commands 250
drawing commands 249, 251
edit commands 247
file commands 247, 249
help commands 249
object commands 248, 250
ChemDraw 9
Keyboard shortcuts (continued)
structure commands 248, 251
text commands 248, 251
view commands 248, 250
L
Lab supplies, purchasing online 224
Labels
auto-update 74
contracting 124
expanding 125
Landscape page orientation 180
Lasso tool
selecting objects 109
toggling with Text Tool 89
Layering
atom labels 86
objects 185
Layout, page 177
Lewis dot symbol, see Lone Pair Symbol
Ligand, defined 237
Limitations, name-to-structure 74
Line Width 60
Lines, drawing 101
Link nodes 163
List Nicknames command 124
LogP 245
Lone Pair Symbol 97
M
m/z, displaying 139
Magnifying
with Magnification control 182
with View menu 181
Make Spectrum-Structure Assignment 146
Manual Mapping
clearing 172
overview 171
Mapping
atom 170
automatic 171
•
xi
Administrator
Mapping (continued)
clearing 172
exporting 172
manual 171
reaction 170
Margin Width
adjusting 60
description 60
effect on Bond crossings 60
specifying 86
Margin width, specifying 86
Marquee tool 109
Mass Fragmentation Tool 143
Mass spectra
importing as JDX 201
importing as SPC 202
mass/charge, displaying 139
Maximize objects 181
MDL MolFile 201
MDL RGFile 201
Melting Point, definition 142
Menus
view 17
Menus and toolbars 17
Message Area
display of fixed angles 64
Messages
analysis 238
status 238
Mirror images, creating 115
mol 201
mol file format 201
Molar refractivity 246
Molecular Design Limited, see MDL
Molecular mass, definition 138
Molecular Simulations MolFile 201
Molecular Weight
caption 139
definition 138
display in status bar 18
how calculated 139
xii•
Monochrome 200, 203
Moving
atoms, bond tool 70
atoms, Selection Tool 112
crosshair 184
in tables 189
objects 111
MS, see spectra
MSI MolFile format 201
Multi-attached atom labels command 125
Multi-Center Attachments
command 126
overview 236
Multiple Attachment Points 168
Multiple Bond tool 63
Multiple bonds tool 15
Multiple Undo 25
Multiple-paged documents, setup 178
N
Name
inserting as structure 74
of structure, inserting 73
Name to structure seeName=Struct
Name, automatic structure from 74
Name=Struct 74
converting 75
limitations 74
paste special 75
with German names 74
NameStruct 73
Native file format 26
New Color Button 131
New Command 23
New document 23
New Slide 256
New Template, creating 134
Nicknames
defining 122
deleting 124
generic 161
CambridgeSoft
Nicknames (continued)
overview 121
troubleshooting 123
Nicknames, generic
description 161
editing 162
nicknames.dat 121
NMR, see ChemNMR, Spectra
Non-PostScript printing
high resolution 29
Macintosh 196
Normal view 181
Numbering atoms 89
O
Object
Add Frame 101
Align 34
Distribute 185
Group 118
Join 117
Ungroup 118
Objects
aligning 184
centering 184
deleting 111
Distributing 185
distributing 185
grouping 118
joining 117
moving 111
ordering 185
reflecting 115
selecting all 111
ungrouping 118
using crosshair with 183
using rulers with 182
Objects, embedding 204
OLE 194
Online Help, see Help
ChemDraw 9
Online Menu
browse SciStore.com 224
CambridgeSoft homepage 225
ChemOffice SDK 225
CS technical support 222
lookup suppliers on SciStore.com 223
register online 221
Online menu
ACX numbers 224
ACX structures 223
Open command 24
Open Special command 23
Opening
ChemDraw/Excel 207
Orbital Tool
description 15
fill patterns 94
Fixed Angle 94
overview 94
Orbitals
drawing 94
grouping 94
type 94
Ordering objects 185
Orientation
Benzene Ring Tool 67
Cyclohexane Chairs 67
Cyclopentadiene Ring Tool 67
double Bond 70
of page 180
rings 66
templates 134
user-defined templates 135
Original view 181
Overlap, multipaged documents 178
P
Packbits, compression 203
Page
border 177
layout 177
•
xiii
Administrator
Page (continued)
orientation 180
overlap 178
setup 179
Page Definition Language
PostScript 28
QuickDraw 28
Page Setup
page layout 179
saving settings 181
Paged documents 178
Paired brackets 101
Palette
Arcs 102
Brackets 101
Chemical Symbols 96
color 131
Multiple bonds 62
orbital tools 94
Query tools 159
single bonds 62
Palettes
showing 17
tearing off 17
Paper Size 180
Parentheses 101
Paste
Duplicating objects 113
objects 112
Paste Special
name as structure 75
SMILES 192
Pen Tool 15
Pen tool shapes
deleting segments 105
selecting 104
Periodic Table 19
Perspectives, changing 181
PICT file format 202
PICT scaled 4x file format 202
xiv•
Picture Layers
atom labels 86
Plain style, shapes 105
PNG file format 202
Polymers
flip type 166
repeat pattern 166
source-based 164
structure-based 164
Portrait page orientation 180
Positioning
atom number indicators 91
crosshair 183
objects 111
query indicators 160
rulers 182
stereochemistry indicators 140
using the Clipboard 112
Posters, setup 178
PostScript
commands 195
EPS (TEXT) 199
print quality 28
printing 29
Preferences
Check Structure 138
drawing, see Drawing Settings 21
highlight box 65
Include ChemDraw LaserPrep 195
Include PostScript 195
Initialize PostScript Printer 195
overview 20
print 28
require CTRL+ENTER 79
require Option+Return 79
text, see Text Settings 21
Use Bitmap Fonts When Available 92
Print Quality 28
Printing
atom mapping 171
background color 28
CambridgeSoft
Printing (continued)
ChemDraw Laser Prep 29
drawing elements fill 99
effect of PostScript commands 195
high-resolution non-PostScript 29
include PostScript 29
orientation (of page) 180
overview 28
page setup 179
paper size 180
PostScript atom labels 29
preferences 28
reaction mapping 171
Properties
atom in searching 149
atom, abnormal valence 155
atom, description 151
atom, implicit hydrogens 152
atom, query 150
atom, reaction changes 153
atom, reaction stereo 153
atom, resetting defaults 151
atom, ring bond count 152
atom, substituents 151
atom, unsaturation 153
atom, viewing values 150
bond 155
bond descriptors 156
bond types 156
bond, reaction center 158
bond, removing 156
bond, topology 157
bond, viewing 156
brackets 163
calculating 141
Proton shifts, see 13C, 1H shifts, estimating
Q
Quadruple bonds 63
Queries
multiple rings 163
ChemDraw 9
Queries, see searching
Query indicators
editing 160
overview 160
Query Properties
3D 158
Query properties
exported 172
overview 238
Query Structures
description 149
exporting 172
Query Tools palette 159
Quick Reference Card, description 10
QuickDraw
bitmapped image 29
print quality 28
Quitting 30
R
R Groups 167
Racemic flag, drawing 161
Radicals
drawing 97
specification 235
Reaction Atom-Atom Map Tool 170
Reaction Atom-To-Atom Mapping 170
Reaction center 158
Reaction Changes 153
Reaction mapping
always display and print 171
automatic 171
clearing 172
exporting 172
manual 171
overview 170
Reaction Stereo 153
Red boxes on objects 71
Redo 25
Reduce
document window 177
•
xv
Administrator
Reduce (continued)
object 182
page size 180
Reflection 115
Registration marks 178
Registration, online 221
Relative flag, drawing 161
Remove
colors 133
rulers 183
Remove Color button 131
Repeat command, rotations 114
Repeating a Label, bond tool 89
Repeating actions 25
Repositioning
atom number indicators 91
query indicators 160
stereochemistry indicators 140
Require
Ctrl+Enter to Create New Line in Atom Labels 80
Ctrl+Enter to Create New Line in Captions
80
Requirements
Windows 11
Reset defaults
atom properties 151
bond properties 156
Resize Handle 116
Resizing
arcs 102
arrows 99
drawing elements 100
handle, double-clicking 116
objects 116
template panes 136
Resolution, TIFF 200, 203
Resonance Delocalized rings, drawing 67
Reversing actions 25
Revert command 25
RGB Indexed color 200, 203
xvi•
RGFile format 201
Ring Bond Count 152
Ring pointer icon appearance 66
Ring Tool 16
Rings
drawing 66
drawing with fixed length 66
orientation 66
Rotate
chemical symbols 98
command 114
dialog box 114
drawing elements 100
objects 114
Rotating objects 113
Rotation
handle 113
of Objects 113
Rotation handle 113
RSC Document 256
Ruler Guides 183
Rulers
hiding 183
showing 182
RXN file format 200
S
Sample code, SDK web site 225
Save As command 26
Save command
default file format 26
using 26
Saving
a copy of a document 27
changes automatically 24
defaults 21
document 26
in different file formats 27
structures in ChemDraw/Excel 212
template documents 136
with different name or location 26
CambridgeSoft
Saving customized settings 21
Scale
command 116
dialog box 116
Scaling
by a percentage 117
fixed length 116
objects 116
when Transferring information 193
SciStore.com 224
Scrap files 193
Scripts menu 30
SDK Online, accessing 225
Searching
ChemDraw/Excel 212
databases 149
export compatibility 172
for chemical information online 222
query properties supported 149
Select All command 111
Selecting
all 111
bonds 110
Lasso 109
Marquee 109
Pen tool shapes 104
several objects 111
structures 111
Selection Rectangle
Resize handle 116
Rotation handle 113
Selection Tool
definition 15
deleting with Delete key 111
deselecting objects 111
distorting objects 117
highlight box 110
joining 117
Lasso 15
Marquee 15
selecting all 111
ChemDraw 9
Selection Tool (continued)
selecting several objects 111
using 109
Selection, adding to 111
Send to Back command 186
Set Color Button 131
Setting
margin width 86
preferences 20
Settings
document 21
highlight box 65
tolerance 65
Shaded style, shapes 105
Shapes
closed 105
filled 105
plain 105
shaded style 105
Sharing Information 191
Shift key, deselecting objects 111
Shortcuts, see Keyboard shortcuts
Shortcuts, table of 247, 249
Show Crosshair 183
Show Page 182
Show Rulers command 182
Show Stereochemistry 139
Showing
Atom Numbering 90
palettes 17
sigma orbitals, drawing 94
Similarity searching
in ChemDraw/Excel 213
single bonds, drawing 62
Single brackets 101
skc format 200
SLN strings 192
SMD file format 202
SMILES
creating 191
overview 191
• xvii
Administrator
SMILES (continued)
paste 192
viewing clipboard 191
SMIRKS, overview 191
s-orbitals, drawing 94
SPC file format 202
Spectra
assigning structures 146
exporting 201, 202
importing 201, 202
importing as JDX 201
importing as SPC 202
removing assignments 147
Spectrum-structure assignments
making 146
removing 147
viewing 146
Spiro linkage, templates 134
Squiggly Bond tool see Wavy Bond tool 62
Standard Molecular Data, see SMD
Starting
ChemDraw/Excel 207
Stationery Pad
saving document settings 21
Stationery pad
Default 21
Document settings 21
file format 199
Page Setup settings 181
Stationery Pads
creating 255
provided 255
Status bar 18
Status messages 238
Stereochemical Indicators 237
Stereochemical symbols, drawing 161
Stereochemistry
drawing mirror images 115
how calculated 236
indicators 140, 237
indicators, repositioning 140
xviii•
Stereochemistry (continued)
removing markers 140
showing 139
terms supported 140
Struct=Name 73
Structure
3D perspective tool 15
automatic error checking 71
checking 137
CleanUp command 128
converting to name 73
Diagram Generation 128
perspective tool 114
selecting 111
show stereochemistry 139
Structure searching, in ChemDraw/Excel 212
Structures
3D 141
Aligning 34
Style Sheet
file format 199
Page Setup settings 181
saving document settings 21
Style sheet
Document settings 21
Style Sheets
color palette 133
creating 255
default 21
provided 255
Style, caption 80
Subscript command 80
Substituents 151
Substructure searching, in ChemDraw/Excel
212
Superatom, ISIS 200
Superscript command 80
Suppliers, finding online 223
Suppress chemical warnings 31, 72
Syntax Checking 137
Synthesis/Synlett Document 256
CambridgeSoft
System requirements 11
T
Table tool 186
Tables
column spacing 189
creating 188
creating with Table tool 186
inserting rows 190
moving in 189
TCL spots
crescent 107
Technical support 227–228
serial numbers 227
system crashes 228
troubleshooting 228
Template Panels 136
Template Tool
description 16
using 133
Templates
Autoscaling 134
coloring 133
creating 134, 135
drawing with 134
file format 202
fusing 134
fusing with existing structure 134
orientation 134, 135
overview 133
panel 136
resizing 136
resizing template panes 136
reusing 134
saving template documents 136
spiro linkage 134
Text
atom label format 82
Atom label textbox 86
atom label, editing 87
atom labels, automatic justification 82
ChemDraw 9
Text (continued)
caption editing 85
caption, creating tables 188
coloring 84
creating 79
formatting 80
types 79
Text Box
closing 79
creating new line 79
Text Settings
captions, font, size, and style 83
changing defaults 21
Text Tool
atom labels 86
labeling atoms 86
toggling with lasso tool 89
Text tool 15
TGF file format 200
TIFF
options 200, 203
resolution 200, 203
TIFF format 203
Tilting an object 117
TLC spots
custom, about 108
custom, adding 107
display or set Rf 107
enlarged 107
resizing 108
Rf, about 107
tails 107
wide 107
TLC tool 105
Toggling
between tools 110
fixed length/fixed angle 64
text tool with lasso tool 91
Tolerance
effect on highlight box 110
setting 65
•
xix
Administrator
Tool
Alternative Group 167
Arrow 99
Reaction Atom-To-Atom Mapping 170
Templates 133
Text 79
Toolbars and Menus 17
Tools
Acyclic Chain 68
acyclic chain 15
Arc 102
arc 15
arrow 15
attachment point 168
benzene ring 66
bold bond 62
bold wedge bond 62
Bond 15, 62
Bracket 101
brackets 15
Chemical Symbol 96
chemical symbols 15
cyclohexane chair 66
cyclohexane ring 66
cyclooctane ring 66
cyclopentadiene ring 66
cyclopentane ring 66
cyclopropane ring 66
dashed bond 62
dative bond 62
Drawing Elements 99
drawing elements 15
eraser 15
hashed bond 62
hashed wedge bond 62
hollow wedge bond 62
Lasso 109
lasso 15
Marquee 109
marquee 15
mass fragmentation 143
xx•
Tools (continued)
multiple bond 63
Multiple bonds 15
Orbital 94
orbital 15
Pen 102
pen 15
Query 159
ring 16
Structure perspective 15
Table 186
template 16
Text 15
Trackball 114
wavy bond 62
Topological Polar Surface Area 246
Topology 157
TPL style sheet 202
Trackball tool 114
Transferring information
across platforms 205
keeping in scale 193
Translation (query property) 154
Triple bond, drawing 63
Troubleshooting
online 222
Tutorial 31
Types of bonds 232
U
Undo 25
command 25
lost on save 25
Ungroup command 118
Ungrouping Objects 118
Unsaturation 153
Unspecified atom properties, in queries 151
Up to, in queries 152
Use Bitmap Fonts When Available 92
Use Defaults
atom properties 151
CambridgeSoft
Use Defaults (continued)
bond properties 156
Bracket properties 164
Preferences 21
User guide, online 222
User-Defined Templates 134
Using the clipboard 112
V
Variable attachment command 127
View menu 17
Viewing
analysis information 138
atom properties 150
bond properties 156
chemical properties 141
Spectrum-structure assignments 146
W
Warnings, chemical 71
Web site, CambridgeSoft, accessing 225
Wedge Bond, drawing 64
What’s New 9
White space, adjusting in atom labels 86
Window
analysis 138
chemical properties 141
Window menu
overview 28
stationery documents 23
Windows Help 10
Windows Metafile 202
WMF format 202
Z
Zooming, see Changing Perspectives
ChemDraw 9
•
xxi
Desktop Software
Enterprise Solutions
Research & Discovery
Applied BioInformatics
Knowledge Management
Chemical Databases
CAMBRIDGESOFT
ChemOffice Desktop to
KNOWLEDGE
MANAGEMENT
RESEARCH &
DISCOVERY
Desktop
E-Notebook
Enterprise
Discovery
LIMS
Registration
System
Document
Manager
21CFR11
Compliance
Formulations
& Mixtures
Inventory
Manager
Enterprise
WebServer
DESKTOP SOFTWARE
ChemOffice
Success begins at the desktop, where scientists use ChemDraw and ChemOffice to
E-Notebook
pursue their ideas and communicate with colleagues using the natural language of
ChemDraw
chemical structures, models, and information. In the lab, scientists capture their
Chem3D
ChemFinder
ChemInfo
ChemOffice WebServer
Oracle Cartridge
results by organizing chemical information, documents, and data with E-Notebook.
Chem3D modeling and ChemFinder information retrieval integrate smoothly with
ChemOffice and Microsoft Office to speed day-to-day research tasks.
ENTERPRISE SOLUTIONS
Just as ChemOffice supports the daily work of the individual scientist,
enterprise solutions and databases, built on ChemOffice WebServer, and Oracle
Cartridge help organizations collaborate and share information.
KNOWLEDGE MANAGEMENT
E-Notebook Enterprise
Research organizations thrive when information is easily captured, well organized,
Document Manager
and available to others who need it. E-Notebook Enterprise streamlines daily record
Discovery LIMS
keeping with rigorous security and efficient archiving, and facilitates searches by text
21CFR11 Compliance
and structure. Document Manager organizes procedures and reports for archiving
and chemically-intelligent data mining. Discovery LIMS tracks laboratory requests, and
21CFR11 Compliance implements an organization’s regulatory compliance processes.
SOLUTIONS
Enterprise Solutions
APPLIED
BIOINFORMATICS
CombiChem
Enterprise
Oracle Cartridge
or SQL DB
CHEMICAL
DATABASES
BioAssay
HTS
ChemACX
Database
The Merck
Index
BioSAR
Browser
ChemSAR
Properties
Chemical
Databases
RESEARCH & DISCOVERY
Registration System
Managing the huge data streams of new lab technology is a key challenge.
Formulations & Mixtures
Registration System organizes information about new compounds according to an
Inventory Manager
CombiChem Enterprise
organization's business rules, while Inventory Manager works with Registration System
and chemical databases for complete management of chemical inventories.
CombiChem Enterprise and Formulations & Mixtures are also important parts of
research data management.
APPLIED BIOINFORMATICS
BioAssay HTS
Finding structural determinants of biological activity requires processing masses of
BioSAR Browser
biological assay data. Scientists use BioAssay HTS and BioSAR Browser to set up
biological models and visualize information, to generate spreadsheets correlating
structure and activity, and to search by structure.
CHEMICAL DATABASES
ChemACX Database
Good research depends on reference information, starting with the structure-search-
ChemSAR Properties
able ChemACX Database of commercially available chemicals. The Merck Index 13th
The Merck Index
Edition and other databases provide necessary background about chemicals, their
Chemical Databases
properties, and reactions.
CONSULTING & SERVICES
Consulting Development
CambridgeSoft's scientific staff has the industry experience, and chemical and
Support & Training
biological knowledge to maximize the effectiveness of your information systems.
CS ChemOffice
So
ftw
ar
e
Software
Includes
*ChemDraw Ultra
Win/Mac
*ChemDraw Pro
Win/Mac
*ChemDraw Std
*ChemDraw Plugin Pro
Win/Mac
Win/Mac
*Chem3D Ultra
Win
*Chem3D Pro
Win
Chem3D Std
Win
*Chem3D Plugin Pro
*E-Notebook Ultra
ChemFinder Pro
ChemFinder Std
Win
Win
Win
Win
ChemDraw/Spotfire
*BioAssay Pro
Purchase/Excel
CombiChem/Excel
Win
Win
Win
Win
ChemFinder/Office
Win
Applications & Features
ChemDraw/Excel
Databases
Su
ite
s
Ch
em
O
ffi
ce
Win
Name=Struct
Struct=Name
Win/Mac
Win/Mac
ChemNMR
CLogP/ChemDraw
Win/Mac
Win/Mac
BioArt
Structure Clean Up
Win/Mac
Win/Mac
Polymer Draw
Win/Mac
LabArt
Win/Mac
ChemSAR/Excel
Win
3D Query
MOPAC/Chem3D
GAMESS Client
Gaussian Client
Win
Win
Win
Win
Tinker/Chem3D
Win
*CAMEO/ChemDraw
Win
*The Merck Index
*ChemACX Ultra
ChemSCX
ChemMSDX
*ChemINDEX Ultra
Win
Win
Win
Win
Win
ChemRXN
Win
NCI & AIDS
Win
*Available Separately
ECh
N
Ch
Ch
Ch
em
Ch
ot
em
e
e
eb
m
e
D
m
m
O
r
D
oo
D
a
3D
ra
ffi
ra
w
k
c
w
w
e
Ul
Ul
U
Ul
ltr
St
Pr
Pr
tra
tra
tra
d
a
o
o
Desktop to Enterprise Solutions
ChemOffice WebServer
ChemOffice Ultra includes it all, providing
ChemDraw Ultra, Chem3D Ultra, E-Notebook
Ultra, ChemFinder, CombiChem, BioAssay and
The Merck Index, for a seamlessly integrated suite
for chemists.Use ChemDraw/Excel and ChemFinder/
Word for Microsoft Office integration. Predict spectra,
use Name=Struct, and visualize 3D molecular surfaces
and orbitals with MOPAC. Use the ChemDraw and
Chem3D Plugins to publish your work or to query
databases on the web.
ChemOffice WebServer enterprise solutions and databases help
organizations collaborate on shared information with ChemDraw webbased interface and Oracle Cartridge security.
Knowledge Management with E-Notebook Enterprise streamlines
Enterprise Solutions & Databases
• Oracle Cartridge & Database Webserver
Knowledge Management
• E-Notebook Enterprise, Document Mgr,
Discovery LIMS & 21CFR11 Compliance
Research & Discovery
• Registration System, Formulations & Mixtures,
Inventory Manager & CombiChem Enterprise
Applied BioInformatics
• BioAssay HTS & BioSAR Browser
Chemical Databases
• The Merck Index, ChemACX & ChemSAR Properties
ChemOffice Ultra
Ultimate Drawing, Modeling & Information
• Adds The Merck Index, E-Notebook, CombiChem,
MOPAC, BioAssay & ChemACX to Office Pro
ChemOffice Pro
Premier Drawing, Modeling & Information
• Includes ChemDraw Ultra, Chem3D Pro,
ChemSAR/Excel, ChemFinder Pro,
ChemINDEX & ChemRXN databases
Also Available Separately…
ChemDraw Ultra
Ultimate Drawing, Query & Analysis
• Adds ChemDraw/Excel, ChemNMR, Name=Struct,
AutoNom & ChemFinder /Word to ChemDraw Pro
• ChemNMR, Stereochemistry, Polymers & BioArt
daily record-keeping with rigorous security and efficient archiving.
Document Manager indexes chemical structure content of documents
ChemDraw Pro
and folders.
Research & Discovery efforts are improved with Registration System
Premier Drawing & Database Query
• Define complex database queries
• ISIS/Draw & Base compatible via copy/paste
• Structure CleanUp and Chemical Intelligence
by organizing new compound information, while Inventory Manager
works with chemical databases for complete management of chemical
inventories.
Chem3D Ultra
Applied BioInformatics scientists use BioAssay HTS and BioSAR Ultimate Modeling, Visualization & Analysis
MOPAC, CLogP, Tinker, ChemProp,
Browser to set up biological models and visualize information, to generate • Adds
ChemSAR & Chem3D Plugin to Chem3D Pro
spreadsheets correlating structure and activity, and to search by structure. • Advanced modeling & molecular analysis tool
Chemical Databases include the ChemACX Database of commercial-
ly available chemicals, The Merck Index 13th edition, and other databases.
Consulting & Services includes consulting development, technical
support, and education training for pharmaceutical, biotechnology, and
chemical customers, including government and education, by
CambridgeSoft’s experienced staff.
E-Notebook Ultra
Ultimate Journaling & Information
• E-Notebook, ChemDraw Std, Chem3D Std,
ChemDraw/Excel & CombiChem/Excel
• Includes ChemFinder, ChemFinder/Word,
ChemINDEX & ChemRXN databases
Some features are Windows only.
All specifications subject to change without notice.
DESKTOP
CS E-Notebook
Electronic Journal and Information
E-Notebook Ultra streamlines daily record keeping tasks of research scientists, maintains live chemical
structures and data, and saves time documenting work and retrieving chemical information. E-Notebook combines all of your notebooks into one and sets up as many project notebooks as you need, organized the way you
work. Notebook pages include ChemDraw documents, Excel spreadsheets, Word documents and spectral data.
E-Notebook automatically performs stoichiometry calculations on ChemDraw reaction pages. Search by structure, keyword, dates and other types of data. Maintain required hardcopy archives by printing out pages.
Information cannot be accidentally modified. Spectral controls from Thermo Galactic are available.
CombiChem/Excel builds combinatorial libraries with embedded ChemDraw structures using
ChemDraw/Excel for Windows. Find reagents with ChemFinder and design experiments.
BioAssay Pro, available in ChemOffice Ultra, allows for flexible storage and retrieval of biological data. It
is designed for complex lead optimization experiments and supports almost any biological model.
Automatic
Stoichiometric
Calculations
Scanned Images in
Notebook Pages
S O F T WA R E
E-Notebook Ultra
Ultimate Journaling & Information
• Advanced search and structure query features
• Stores structures and models for easy retrieval
• Stores physical and calculated data
• Search by substructure, including stereochemistry,
using ChemDraw
• Search and store chemical reaction data
• CombiChem/Excel combinatorial libraries
• Integration with ChemDraw and Chem3D
• Import/export MDL SD & RD files
CombiChem/Excel
Combinatorial Chemistry in Excel
• Generate combinatorial libraries
• Choose starting materials & reaction schemes
• View structures & track plate/well assignments
ChemFinder Pro
Premier Searching & Information
• Advanced search & structure query features
• Stores structures & reactions along with calculated data & associated information
• Search by substructure including stereochemistry using ChemDraw
• Integration with ChemDraw & Chem3D
• Import/export MDL SD & RD files
ChemInfo Std
Reference & Reaction Searching
• ChemINDEX for small molecule information
• ChemRXN for reaction databases
BioAssay Pro
Biological Assay Structure Activity
• Set up biological models & visualize information
• Search data by structure to isolate key structural determinants of biological activity
• Tabulate & analyze structure-activity relationships with spreadsheet templates
• Available in ChemOffice Ultra
SYSTEMS & LANGUAGES
English & Japanese
Windows: 95, 98, Me, NT, 2000, XP
This software is Windows only.
All specifications subject to change without notice.
EMAIL [email protected] WWW www.cambridgesoft.com
TEL
1 800 315–7300
INT’L 1 617 588–9300
FAX 1 617 588–9390
MAIL CambridgeSoft Corporation 100 CambridgePark Drive Cambridge, MA 02140 USA
ChemOffice, ChemDraw, Chem3D, ChemFinder & ChemInfo are trademarks of CambridgeSoft ©2002.
All other trademarks are the property of their respective holders. All specifications subject to change without notice.
DESKTOP
CS ChemDraw
Chemical Structure Drawing Standard
ChemDraw Ultra adds ChemDraw/Excel, ChemNMR, Name=Struct, Beilstein’s AutoNom, CLogP and
ChemFinder/Word to ChemDraw Pro. With rich polymer notation, atom numbering, BioArt templates, and
modern user interface, ChemDraw is more powerful than ever before. Create tables of structures, identify and
label stereochemistry, estimate NMR spectra from a ChemDraw structure with structure-to-spectrum
correlation, obtain structures from chemical names, assign names from structures, and create multi-page
documents and posters.
ChemDraw Pro will boost your productivity more than ever. Draw publication-quality structures and
reactions. Publish on the web using the ChemDraw Plugin. Create precise database queries by specifying atom
and bond properties and include stereochemistry. Display spectra, structures, and annotations on the same
page. Use the Online Menu to query ChemACX.Com by structure, identify available vendors, and order online.
Stereochemistry
Structure-to-Spectrum
NMR Correlation
S O F T WA R E
ChemDraw Ultra
Ultimate Drawing, Query & Analysis
• Adds ChemDraw/Excel, ChemNMR, Name=Struct,
AutoNom & ChemFinder/Word to ChemDraw Pro
• Name=Struct/AutoNom creates structures from
names & vice versa
• ChemNMR predicts 1H & 13C NMR line spectra
with peak-to-structure correlation
• Polymer notation based on IUPAC standards
• ChemDraw/Excel brings chemistry to Excel
ChemDraw Pro
Premier Drawing & Information Query
• Query databases precisely by specifying atom & bond properties, reaction centers,
substituent counts, R-groups & substructure
• Read ISIS files with Macintosh/Windows cross-platform compatibility
• Structure Clean Up improves poor drawings
• Display spectra from SPC and JCAMP files
• Chemical intelligence includes valence, bonding & atom numbering
• Right-button menus speed access to features
ChemDraw Std
Publication Quality Structure Drawing
• Draw and print structures & reactions in color,
and save as PostScript, EPS, GIF, SMILES & more
• Collections of pre-defined structure templates
• Large choice of bonds, arrows, brackets, orbitals, reaction symbols & LabArt
• Style templates for most chemical journals
• Compatible with Chem3D, ChemFinder, ChemInfo, E-Notebook & Microsoft Office
ChemDraw Plugin
Advanced WWW Structure Client
• Embed live ChemDraw documents in WWW pages
• Works with Netscape & Internet Explorer
• Included with ChemDraw Ultra & Pro
SYSTEMS & LANGUAGES
Windows & Macintosh English, Japanese, French, German
Windows: 95, 98, Me, NT, 2000, XP
Macintosh: MacOS 8.6-10.1
Some features are Windows only.
All specifications subject to change without notice.
EMAIL [email protected] WWW www.cambridgesoft.com
TEL
1 800 315–7300
INT’L 1 617 588–9300
FAX 1 617 588–9390
MAIL CambridgeSoft Corporation 100 CambridgePark Drive Cambridge, MA 02140 USA
ChemOffice, ChemDraw, Chem3D, ChemFinder & ChemInfo are trademarks of CambridgeSoft ©2002.
All other trademarks are the property of their respective holders. All specifications subject to change without notice.
DESKTOP
CS Chem3D
Molecular Modeling and Analysis
Chem3D Ultra includes MOPAC, Tinker and set-up/control interfaces for optional use of GAMESS and
Gaussian. Estimate advanced physical properties with CLogP and ChemProp, and create SAR tables using
property servers to generate data for lists of compounds. Use ChemSAR/Excel to explore structure activity
relationships and use add-on Conformer for conformational searching. Publish and view models on the web
using the Chem3D Plugin.
Chem3D Pro brings workstation quality molecular visualization and display to your desktop. Convert
ChemDraw and ISIS/Draw sketches into 3D models. View molecular surfaces, orbitals, electrostatic potentials,
charge densities and spin densities. Use built-in extended Hückel to compute partial atomic charges. Use MM2
to perform rapid energy minimizations and molecular dynamics simulations. ChemProp estimates physical
properties such as logP, boiling point, melting point and more. Visualize Connolly surface areas and
molecular volumes.
Molecular Modeling & Analysis
Large Molecular
Visualization
S O F T WA R E
Chem3D Ultra
Ultimate Modeling, Visualization & Analysis
• Adds MOPAC, CLogP, Tinker, ChemProp,ChemSAR
& Chem3D Plugin to Chem3D Pro
• Includes GAMESS & Gaussian client interfaces
• ChemSAR/Excel builds SAR tables
Chem3D Pro
Premier Modeling, Visualization & Analysis
• Create 3D models from ChemDraw or ISIS Draw, accepts output from other modeling packages
• Model types: space filling CPK , ball & stick, stick, ribbons, VDW dot surfaces & wire frame
• Compute & visualize partial charges, 3D
surface properties & orbital mapping
• Polypeptide builder with residue recognition
• ChemProp—Basic property predictions with Connolly volumes & surface areas
• MM2 minimization & molecular dynamics, extended Hückel MO calculations
• Supports: PDB , MDL Molfile, Beilstein ROSDAL, Tripos SYBYL MOL , EPS , PICT , GIF , 3DMF , TIFF , PNG & more
MOPAC/Chem3D
Advanced Semi-Empirical Computation
• Calculate ∆Hf, solvation energy, dipoles, charges, UHF & RHF spin densities, MEP , charge densities & more
• Optimize transition state geometries
• AM1 , PM3 , MNDO & MINDO/3 methods
CAMEO/ChemDraw
Synthetic Reaction Prediction
• Expert system predicts and displays products
• ChemDraw creates starting materials when you choose reaction conditions; sold separately
Chem3D Plugin
Advanced WWW Model Client
• Works with Microsoft Internet Explorer
• Visualize 3D molecules on ChemFinder.Com
SYSTEMS & LANGUAGES
Windows & Macintosh English & Japanese
Windows: 95, 98, Me, NT, 2000, XP
Macintosh: MacOS 8.6-9.2.X
Some features are Windows only.
All specifications subject to change without notice.
EMAIL [email protected] WWW www.cambridgesoft.com
TEL
1 800 315–7300
INT’L 1 617 588–9300
FAX 1 617 588–9390
MAIL CambridgeSoft Corporation 100 CambridgePark Drive Cambridge, MA 02140 USA
ChemOffice, ChemDraw, Chem3D, ChemFinder & ChemInfo are trademarks of CambridgeSoft ©2002.
All other trademarks are the property of their respective holders. All specifications subject to change without notice.
DESKTOP
CS ChemFinder
Searching and Information Integration
ChemFinder Pro is a fast, chemically intelligent, relational database search engine for personal, group or
enterprise use. Extended integration with Microsoft Excel and Word adds chemical searching and database
capability to spreadsheets and documents.
An ever-increasing number of chemical databases are available in ChemFinder format. Compatibility with MDL
ISIS databases is provided by SDfile and RDfile import/export. ChemFinder provides network server workgroup
functionality when used with ChemOffice WebServer.
ChemFinder/Word is an extension of Microsoft Excel and Word for Windows. Create structure searchable spreadsheets and index documents with embedded ChemDraw structures.
ChemDraw/Excel adds chemical intelligence to Microsoft Excel for Windows. Show structures in spreadsheet cells, tabulate chemical calculations and analyze data with Excel functions and graphs.
Purchase/Excel uses ChemDraw/Excel to manage reagent lists and track purchasing information.
CombiChem/Excel builds combinatorial libraries with embedded ChemDraw structures using
ChemDraw/Excel for Windows. Find reagents with ChemFinder and design experiments.
ChemDraw/Excel
Search Chemical
Databases
S O F T WA R E
ChemFinder/Word
• Search structures in documents & folders
ChemDraw/Excel
• Add chemical intelligence to spreadsheets
Purchase/Excel
• Organize chemical purchasing information
ChemFinder Pro
Premier Searching & Information
• Advanced search and structure query features
• Stores structures and reactions along with calculated data and associated information
• Search by substructure including stereochemistry using ChemDraw
• Import/export MDL SD and RD files
• Integration with ChemDraw and Chem3D
ChemFinder/Word
Searching Word, Excel & More
• Searches documents for embedded structures
• Indexes structures and source locations
• Searches specified folders and whole hard drives
ChemDraw/Excel
Searching & Calculating in Excel
• Displays ChemDraw structures in spreadsheet cells
• Adds chemical calculations to Excel functions
• Useful for graphing and analyzing chemical data
Purchase/Excel
High Throughput Purchasing
• Finds vendor and price information from ChemACX Database or ChemACX.Com
• Search for suppliers and purchase online
• Maintains lists of compounds
CombiChem/Excel
Combinatorial Chemistry in Excel
• Generate combinatorial libraries
• Choose starting materials and reaction schemes
• View structures and track plate/well assignments
SYSTEMS & LANGUAGES
English & Japanese
Windows: 95, 98, Me, NT, 2000, XP
This software is Windows only.
All specifications subject to change without notice.
EMAIL [email protected] WWW www.cambridgesoft.com
TEL
1 800 315–7300
INT’L 1 617 588–9300
FAX 1 617 588–9390
MAIL CambridgeSoft Corporation 100 CambridgePark Drive Cambridge, MA 02140 USA
ChemOffice, ChemDraw, Chem3D, ChemFinder & ChemInfo are trademarks of CambridgeSoft ©2002.
All other trademarks are the property of their respective holders. All specifications subject to change without notice.
DESKTOP
CS ChemInfo
Reference and Chemical Databases
The Merck Index is an encyclopedia of chemicals, drugs, and biologicals, with over 10,000 monographs
covering names, synonyms, physical properties, preparations, patents, literature references, therapeutic uses
and more.
ChemACX Pro includes 500,000 chemical products from 300 supplier catalogs, searchable with a single
query by structure, substructure, name, synonym, partial name, and other text and numeric criteria.
ChemACX-SC is a compilation of searchable catalogs from leading screening compound suppliers.
ChemACX.Com is the ChemACX web site with full search capabilities and convenient online ordering
from major suppliers.
ChemINDEX includes 100,000 chemicals, public NCI compounds, and more.
ChemRXN is a collection of 30,000 fully atom-mapped reactions selected and refined from the chemical
literature. It includes reactions from InfoChem’s ChemSelect database and ISI ’s ChemPrep database.
ChemMSDX provides material safety data sheets for 7,000 pure compounds.
ChemFinder.Com is the award-winning web site with information and WWW links for over 100,000
chemicals. Search by name or partial name, view structure drawings, or use the ChemDraw Plugin for structure
and substructure searches. View live ChemDraw files on Windows and Macintosh clients.
ChemRXN database
on CD-ROM
ChemINDEX database on
ChemFinder.Com
S O F T WA R E
The Merck Index
• Encyclopedic chemical reference
ChemACX Pro
• Chemical searching & buying
The Merck Index
Chemistry’s Constant Companion
• Over 10,000 monographs of chemicals, drugs & biologicals
ChemACX Pro
Chemical Searching & Buying
• Database of commercially available chemicals: 300 catalogs with 500,000 chemical products
• ChemACX-SC database with 500,000 structures from leading screening compound suppliers
ChemACX.Com
WWW Chemical Searching & Buying
• Search by text, structure or substructure and order online from major catalogs
ChemINDEX
Reference Searching & Information
• NCI database of over 200,000 molecules, with anti-HIV & anti-cancer assay data
ChemRXN
Reaction Searching & Information
• Includes ChemSelect with reactions from InfoChem GmbH & ISI’s ChemPrep
ChemMSDX
Safety Data Searching & Information
• Provides full Material Safety Data Sheets for over 7,000 pure compounds
ChemFinder.Com
WWW Reference Searching & Info
• WWW links for over 100,000 compounds
• Enter text queries or use ChemDraw Plugin for structure & substructure searching
• Works with Netscape & MS Internet Explorer
SYSTEMS & LANGUAGES
English & Japanese
Windows: 95, 98, Me, NT, 2000, XP
CD-ROM software is Windows only.
All specifications subject to change without notice.
EMAIL [email protected] WWW www.cambridgesoft.com
TEL
1 800 315–7300
INT’L 1 617 588–9300
FAX 1 617 588–9390
MAIL CambridgeSoft Corporation 100 CambridgePark Drive Cambridge, MA 02140 USA
ChemOffice, ChemDraw, Chem3D, ChemFinder & ChemInfo are trademarks of CambridgeSoft ©2002.
All other trademarks are the property of their respective holders. All specifications subject to change without notice.
ENTERPRISE
ChemOffice WebServer
Enterprise Solutions, Applications and Databases
ChemOffice WebServer
ChemOffice WebServer is the leading solution platform for enterprise, corporate intranet, and Internet scientific information applications. Compatible with major databases including Oracle, SQL Server, and Microsoft
Access, ChemOffice WebServer is the development and deployment platform for custom applications and those
listed below.
ChemOffice Browser
ChemOffice Browser, including ChemDraw Java, ActiveX, and the ChemDraw and Chem3D Plugins, brings the
power and chemical intelligence of ChemOffice to Internet and intranet applications.
User Friendly & IT Ready
User-friendly and IT ready ChemOffice WebServer and Browser enterprise solutions, applications and databases are easier and faster for users to learn and the IT staff to deploy. Using ChemOffice WebServer technology,
along with familiar browser technology, overall costs are lowered and less time is required for implementation.
Enterprise Solutions
Enterprise solutions built upon ChemOffice WebServer, including Oracle Cartridge, help workgroups and
organizations collaborate and share information, just as ChemOffice supports the daily work of the scientist.
Browse Detailed
Compound Information
Easy Management
of Search Results
SOLUTIONS
• Development and deployment platform for workgroup
and enterprise chemical information applications
• Webserver and browser components facilitate
application deployment to desktops with minimal
impact and training
• Enterprise Solution applications address areas of
Knowledge Management, Research & Discovery,
Applied BioInformatics and Chemical Databases
Knowledge Management
Knowledge Management applications organize and distribute chemical information. E-Notebook Enterprise
streamlines daily record keeping with rigorous security and efficient archiving, and facilitates information
retrieval by structure and text searching. Document Manager indexes the chemical structure content of documents, Discovery LIMS tracks laboratory requests, and 21CFR11 Compliance implements an organization’s regulatory compliance processes.
Research & Discovery
Research and discovery applications include Registration System for managing proprietary compound information, Inventory Manager for reagent tracking needs, and chemical databases for complete management of chemical inventories. Formulations & Mixtures and CombiChem Enterprise also provide tailored approaches to managing chemical data.
Applied BioInformatics
BioAssay HTS and BioSAR Browser applications process biological assay data to pinpoint the structural determinants of biological activity. BioAssay HTS supports low, high, and ultra-high throughput workflow, including sample and plate management, while BioSAR Browser probes structural details within assay data.
Chemical Databases
The Merck Index and ChemACX Database provide reference information, property estimations, and searchable
compilations of commercially available chemicals.
EMAIL [email protected] WWW www.cambridgesoft.com
TEL
1 800 315–7300
INT’L 1 617 588–9300
FAX 1 617 588–9390
MAIL CambridgeSoft Corporation 100 CambridgePark Drive Cambridge, MA 02140 USA
ChemOffice, ChemDraw, Chem3D, ChemFinder & ChemInfo are trademarks of CambridgeSoft ©2002.
All other trademarks are the property of their respective holders. All specifications subject to change without notice.
ENTERPRISE
Oracle Cartridge
Enterprise Infrastructure for Database Security
WebServer Oracle Cartridge
In scientific applications, the ability to store and manipulate chemical information is essential. By using
CambridgeSoft’s Oracle Cartridge, you add chemical knowledge to your Oracle platform and automatically
take advantage of Oracle’s security, scalability, and replication without any other external software or programs.
You can search the chemical data by structure, substructure, and similarity, including options for stereo-selectivity, all through extensions to Oracle’s native SQL language. Tools like PowerBuilder, Visual Basic and Visual
C++ readily lend themselves as database clients. With the addition of the ChemDraw ActiveX control in the client,
your end users can be structure-searching in no time.
Chemical Data Formats
CambridgeSoft recognizes that there is an enormous amount of legacy data out there in a myriad of formats,
and most users have no desire to make wholesale changes to their chemical data generation or storage. To this
end, Oracle Cartridge supports all major data types without translation or modification. In addition to CDX ,
it supports CDXML , MolFile, Rxn, and SMILES formats. Moreover, there are built-in extensions to SQL that
allow you to extract data in all supported formats. Due to the variety of data formats supported, Oracle
Cartridge is easily deployed even within existing applications. Since no manipulation of the data is needed, new
records are automatically added to the index for searching.
Simple Client-Server
Architecture
Web Based
Architecture
SOLUTIONS
• Adds chemical data types to Oracle, linking chemical
applications to enterprise software systems without
special programming
• Confers Oracle’s security and scalability, simplifying
large-systems’ architectural considerations
• Makes legacy chemical data, such as MDL ISIS ,
accessible to ChemOffice WebServer applications
WebServer Enterprise Solutions
Even if you’re not developing your own applications, or interested in the advanced data portability aspects of
the Oracle Cartridge, CambridgeSoft’s strategy will have a positive benefit for your IT infrastructure.
CambridgeSoft’s enterprise solutions are available in Oracle Cartridge versions, including E-Notebook Enterprise,
Document Manager, Registration System, Inventory Manager, and BioAssay HTS. By utilizing Oracle Cartridge,
you can deal with issues such as scalability and security entirely through the database layer, simplifying largesystems’ architectural considerations. Oracle Cartridge has the side benefit of providing a database-level interface
to key applications, so developers can integrate CambridgeSoft’s solution platform with in-house IT solutions
without tinkering with the business tier. Communicating with Oracle Cartridge is as simple as learning a few
extensions to SQL .
Systems & Support
Support extends to include a variety of UNIX operating systems in addition to Windows servers. Oracle
Cartridge has been deployed by large pharmaceutical companies with Oracle 8i and 9i.
EMAIL [email protected] WWW www.cambridgesoft.com
TEL
1 800 315–7300
INT’L 1 617 588–9300
FAX 1 617 588–9390
MAIL CambridgeSoft Corporation 100 CambridgePark Drive Cambridge, MA 02140 USA
ChemOffice, ChemDraw, Chem3D, ChemFinder & ChemInfo are trademarks of CambridgeSoft ©2002.
All other trademarks are the property of their respective holders. All specifications subject to change without notice.
KNOWLEDGE
E-Notebook Enterprise
Desktop to Enterprise Knowledge Management
E-Notebook
E-Notebook provides a smooth web-based interface designed to replace paper laboratory notebooks, with a fully
configurable, secure system for organizing the flow of information generated by your organization. You can enter
reactions, Microsoft Word documents, spectra and other types of data, and then search this data by text, substructure or meta-data. You can organize your electronic pages by projects, experiments or any other classification that conforms to your workflow.
Desktop to Enterprise
E-Notebook allows organization of notebook pages at either the personal or enterprise level. Enterprise groups can
organize and store notebook pages in a central data repository, allowing colleagues to take advantage of each
other’s work. All access to data is subject to granular security. E-Notebook works with Oracle Cartridge and SQL
Server, for departments or entire enterprises, and Microsoft Access, for individuals or small groups.
ChemDraw & Stoichiometry Calculations
While not quantum theory, stoichiometric calculations remain long and tedious. E-Notebook tackles this troublesome problem. First, draw your reaction directly in the page. Then, simply enter the mass, volume and denAutomatic Stoichiometric Calculations
Scanned Images in
Notebook Pages
MANAGEMENT
• Custom organization of notebook pages at personal
or enterprise levels with links to chemical registration
• Notebook pages include ChemDraw reaction schemes,
Microsoft Word and Excel documents, and spectral
data using the Galactic Spectral Control
• Oracle Cartridge provides detailed security and data
integrity; SQL Server also available
sity, volume and molarity, and other factors of the limiting reagent and specify the number of equivalents of the
other reactants. The notebook will do everything except calculate the experimental yield. To do that, you still
have to run the experiment!
Microsoft Office & Galactic Spectra
E-Notebook manages all the other kinds of data chemists store in their notebooks. For free-form data, you can
include Microsoft Word or Excel documents. For spectral data, you can take advantage of the Galactic Spectral
Control embedded in the notebook that allows for analysis and storage of hundreds of kinds of spectra files.
Inventory Manager
E-Notebook includes an inventory of common reactants and reagents. If you have one of these common components loaded into the inventory application, all you have to do is click the Add Reactant button in
E-Notebook. From here, you navigate to the desired compound and include it in your stoichiometry calculations. The enterprise edition of E-Notebook integrates with procurement and inventory management systems.
Not only does this provide a useful way to know what compounds you have in stock and where they are located, it also saves time entering data.
Registration System
E-Notebook can be integrated into the entire chemical workflow of enterprise organizations. For example, once
you record a reaction in your notebook, you can click a button to forward the products of the reaction to your
compound registration system. These kinds of workflow enhancements increase productivity for the entire
organization.
EMAIL [email protected] WWW www.cambridgesoft.com
TEL
1 800 315–7300
INT’L 1 617 588–9300
FAX 1 617 588–9390
MAIL CambridgeSoft Corporation 100 CambridgePark Drive Cambridge, MA 02140 USA
ChemOffice, ChemDraw, Chem3D, ChemFinder & ChemInfo are trademarks of CambridgeSoft ©2002.
All other trademarks are the property of their respective holders. All specifications subject to change without notice.
KNOWLEDGE
Document Manager
Desktop to Enterprise Document Searching
Document Manager
Everyone produces reports electronically, but searching information located in these reports has always been
difficult. Thousands of Microsoft Word, Excel, PowerPoint, and other documents reside on file servers or individual computers, with no way to globally search them for information. Certainly, no easy way exists to search
for the chemistry contained in these documents. Document Manager solves this problem, and requires no
change in how you write and distribute reports.
Easy to Use
Document Manager manages a repository of new documents. These can be Microsoft Word, Excel, PowerPoint,
or many other document types. When a new document is added, Document Manager automatically builds a
free-text index of the document, and automatically extracts the chemical information into a chemically-aware,
substructure searchable database. Chemical information can be both ChemDraw and ISIS /Draw. Finding information in reports is now as simple as entering a query through your web browser.
Unattended Data Indexing
As new documents are added they are automatically indexed and chemical information is extracted. Similarly, if
a document is modified, it is re-indexed. No administration of the server is necessary other than routine back-up.
Unattended Data
Repository Indexing
Search Documents
by Structure
MANAGEMENT
• Indexes chemical structure information in documents and
compiles a structure-searchable database
• Monitors designated folders or drives and automatically
indexes new documents as they appear
• Documents are searchable by structure and free text
Free Text Searching
Documents are searchable by free text, including Boolean expressions, proximity operators, or simple queries.
For example “author near Saunders” finds all Word documents where the word “author” appears near the word
“Saunders”.
Advanced Chemical Searching
Since the chemical information is automatically extracted, documents can be queried by structure, substructure, similarity, molecular weight and formula. Chemical queries also support atom lists, Boolean operations
on structures, superatoms, functional groups and many others. Queries can also be refined after an initial
search, extending the power of the query language.
Structured Document Support
Structured documents, including documents created with Word templates or XML , are also supported.
Information in structured documents is extracted and stored in specific fields of the database for more precise
searching.
ChemFinder/Word
ChemFinder/Word, the desktop version, searches Word documents, Excel spreadsheets, ChemDraw files,
ChemFinder databases, SD files, MDL molfiles, and more. Unlike other Microsoft Find facilities,
ChemFinder/Word lets you work with the results you’ve located. Once you have a hit list, you can browse,
search, refine, or export it to any destination.
EMAIL [email protected] WWW www.cambridgesoft.com
TEL
1 800 315–7300
INT’L 1 617 588–9300
FAX 1 617 588–9390
MAIL CambridgeSoft Corporation 100 CambridgePark Drive Cambridge, MA 02140 USA
ChemOffice, ChemDraw, Chem3D, ChemFinder & ChemInfo are trademarks of CambridgeSoft ©2002.
All other trademarks are the property of their respective holders. All specifications subject to change without notice.
KNOWLEDGE
21CFR11 Compliance
Electronic Records and Signatures Regulations
The Challenge
Large and growing enterprises are facing a challenge to their core missions of developing and producing new
products including food, therapeutic pharmaceuticals, medical devices, cosmetics or other health enhancing
items. The complexity lies in complying with government regulations designed to protect public health and
safety. The most notable of these is Title 21 of the Code of Federal Regulations governing Electronic Records
and Signatures (21CFR11). Although 21CFR11 has been in the draft stage for almost a decade, final regulations have recently been created. Enforcement of these regulations is beginning to take place and enterprises are
responding with a wide variety of initiatives, both within individual organizations and across industry sectors.
Integrated Software
CambridgeSoft applications, such as E-Notebook Enterprise and Document Manager, are at the leading edge of
the integration of corporate knowledge management with 21CFR11 Compliance. These products are designed so
that as your organization reviews its internal processes for 21CFR11 Compliance, the software can be configured
to support these internal processes. Major requirements of 21CFR11, such as electronic signatures, audit trails,
and long-term archiving, are incorporated within the routine workflow to generate the critical information
required by research, development and production. In addition, E-Notebook Enterprise and Document Manager
can be integrated with existing critical data systems.
Document and
Record Management
E-Notebook Data Capture
MANAGEMENT
• E-Notebook Enterprise and Document Manager
integrate corporate knowledge with regulatory
compliance
• Consulting teams analyze and adapt existing
procedures to comply with new regulations
• Systems include authentication and digital signatures
and adapt to changing regulations and demands
Analysis
As your enterprise develops the operating procedures that you will need to adopt for 21CFR11 Compliance,
CambridgeSoft’s consulting team can provide invaluable assistance in analyzing your current operating procedures, adapting your existing procedures to comply with new regulations, and validating the software and the
operating procedures that you will use. CambridgeSoft’s consulting teams consist of individuals who have
extended experience in deploying systems used by large pharmaceutical companies, emerging biotechs, and
major enterprises worldwide.
Implementation
Once you have determined how your enterprise will comply with these new regulations, implementing those
decisions needs to be done quickly, efficiently and with the understanding that the rules for compliance are in
flux. In order to succeed, you must be able to respond to change. CambridgeSoft’s 21CFR11 Compliance consulting has both the tools and the expertise to provide complete solutions, carry out integration with your existing systems, and help you execute the process as quickly as your organization demands. Since ongoing monitoring is a part of business for regulated industries, you can be confident that, as regulations evolve and your
requirements change, your systems can adapt. With CambridgeSoft, you can take advantage of the knowledge
that has helped dozens of businesses, large and small, gain control over their business processes, their
intellectual capital, and their material resources.
EMAIL [email protected] WWW www.cambridgesoft.com
TEL
1 800 315–7300
INT’L 1 617 588–9300
FAX 1 617 588–9390
MAIL CambridgeSoft Corporation 100 CambridgePark Drive Cambridge, MA 02140 USA
ChemOffice, ChemDraw, Chem3D, ChemFinder & ChemInfo are trademarks of CambridgeSoft ©2002.
All other trademarks are the property of their respective holders. All specifications subject to change without notice.
RESEARCH &
Registration System
Chemical and Biological Registration
Registration System
Registration System includes a robust data model for pure compounds, batches, salt management, automatic
duplicate checking and unique ID assignments. Compounds may be entered individually or with SD files. The
data model resides entirely in Oracle and uses Oracle’s security and transaction framework. For companies
intending to modify or construct their own registration system, ChemOffice WebServer includes a powerful
Software Developer’s Kit (SDK ) to add custom functionality. Instead of inventing a proprietary language,
ChemOffice WebServer SDK extends the Microsoft and Oracle platforms, allowing information scientists to use
the industry’s most powerful development tools.
ChemDraw Plugin & WebServer
Registration System is easily adapted in almost any work environment. Its web-based, industry standard
ChemDraw interface, makes ChemOffice WebServer the best choice for your corporate scientific information.
User Friendly Chemical Registration
New compounds are entered through a web form, and chemical, along with non-chemical, data is kept in a
temporary storage area. When the compound is registered, it is compared for uniqueness via a configurable,
stereoselective duplicate check, and assigned a registry number. All information about the compound, including its test data and other syntheses, is tracked by the registry number.
Display & Format Results
Search for a Compound
DISCOVERY
• Accessed through your favorite web browser, the
system uses Oracle with robust data model to manage
chemical products and their properties
• Checks for uniqueness during registration and optionally
registers duplicates as batches of existing substance
• User administration and data entry are done through
simple, easy-to-learn web forms; highly configurable
system avoids tedious and expensive customization
Duplicate Checking with Override
When compounds are registered, the structure is checked for novelty. If a duplicate already exists in the database, the user can elect to register the information as a new batch of the existing compound, or assign it a
unique registry number.
Oracle Cartridge
Registration System is the only true n-tiered application of its kind that is designed around thin clients and thin
servers. This translates into ultimate flexibility on both the client and server side. Oracle is supported as a host,
both with native security, on a variety of platforms and operating systems. The chemical information is directly stored in the Oracle tables.
Web Based User Interface
While the business logic of Registration System is complex, its user interface is clean and simple. Web browser
support for Netscape Navigator and Internet Explorer, plus a choice of ChemDraw Plugin, ActiveX or Java
client tools are provided. This significantly reduces training time and cost of client maintenance.
Advanced Chemistry Features
Duplicate checking is stereochemically aware. Batch data is maintained separately from compound data.
Registration numbers support multiple sequences, including one for synthesized and one for procured.
Compounds can be tracked by project and notebook reference, and registered in batches from SD files or other
sources of molecular information.
EMAIL [email protected] WWW www.cambridgesoft.com
TEL
1 800 315–7300
INT’L 1 617 588–9300
FAX 1 617 588–9390
MAIL CambridgeSoft Corporation 100 CambridgePark Drive Cambridge, MA 02140 USA
ChemOffice, ChemDraw, Chem3D, ChemFinder & ChemInfo are trademarks of CambridgeSoft ©2002.
All other trademarks are the property of their respective holders. All specifications subject to change without notice.
RESEARCH &
Inventory Manager
Chemical and Biological Inventory Integration
Database Technology
Inventory Manager is a ChemOffice WebServer based application designed to manage the reagent tracking needs of
chemical and pharmaceutical research centers. The system manages data associated with both commercially
and internally produced chemical substances. Although Inventory Manager is a stand-alone application, it can
be tightly integrated with CambridgeSoft’s Registration System and chemical procurement ChemACX Database.
Inventory Manager is designed for a range of sizes from large workgroups to enterprises, and captures both
stockroom and reagent needs as well as high-throughput discovery.
Cascading Location Model
Inventory Manager has a fully cascading location model. This means that laboratories can decide for themselves
the granularity of their locations. Some labs may define locations as wells on plates residing on shelves inside
refrigerators, which, in turn, are found in laboratories. Another lab may decide to track reagents at the bench
or cabinet level. Still, in other settings, it may suffice to track chemicals on a lab-by-lab basis. The moving of
chemical inventories is greatly helped by this model. For example, if an entire refrigerator is relocated, all of its
containers move along with it. There is no need to re-catalog or reconcile, which saves a great deal of time.
Substructure Search
Form
Viewing Information
by Container
DISCOVERY
• Integrated with Registration System and ChemACX
for procurement and life cycle chemical tracking
• Cascading location model allows different labs to track
reagents at different levels (stockroom, refrigerators)
• Designed for tracking reagents, high-throughput
discovery libraries, and true HTS plate management
at multiple levels
Discovery, Reagents & Stockroom
Inventory Manager integrates fully with CambridgeSoft’s ChemACX Database of available chemicals and
Registration System. It also functions completely as a stand-alone application. Through this architecture,
CambridgeSoft’s enterprise solutions are truly plug-and-play. There are no added system integration costs, and
the applications can live on different servers in different parts of the world.
Flexibility
The flexibility of the location model allows Inventory Manager to accommodate both reagent and discovery
inventories in the same system. Each container in the system can be configured to track quantities in increasingly small values. A reagent bottle, for instance, can be measured as “full” or “empty”, while wells in a 96-well
plate can be measured in microliters. By moving such settings and preferences down to the container level,
rather than system-wide or custom programming, Inventory Manager can accommodate both worlds in a
single instance.
Integration with Purchasing & Registration
Inventory records are created directly from ChemACX Database of available chemicals, as well as from
Registration System. For substances that do not exist in either database, Inventory Manager has its own chemically aware user interface. By tightly coupling with ChemACX Database and Registration System, the need for
duplicate data entry is virtually eliminated. Once a product is ordered, its chemical information is stored and
it is given an “on order” status, reducing duplicate ordering of popular reagents.
EMAIL [email protected] WWW www.cambridgesoft.com
TEL
1 800 315–7300
INT’L 1 617 588–9300
FAX 1 617 588–9390
MAIL CambridgeSoft Corporation 100 CambridgePark Drive Cambridge, MA 02140 USA
ChemOffice, ChemDraw, Chem3D, ChemFinder & ChemInfo are trademarks of CambridgeSoft ©2002.
All other trademarks are the property of their respective holders. All specifications subject to change without notice.
RESEARCH &
CombiChem Enterprise
Desktop to Enterprise Combinatorial Chemistry
Benefits of Combinatorial Chemistry
Combinatorial chemistry, in particular the technique of parallel synthesis, has become an essential element of
the drug discovery process. This is true both at the point of finding new leads as well as optimizing a promising
lead. By using parallel synthesis techniques, chemists are able to multiply their productivity by a factor of
between 5 and 100. This increase in productivity creates data management challenges. CombiChem Enterprise
has been developed to provide the software tools required by the combinatorial chemist to manage and
document parallel synthesis experiments. The software models real-world workflow as much as possible.
Starting Out
To start, the user simply draws a generic reaction step in a ChemDraw ActiveX control directly embedded in
the notebook environment. Multiple reactants and products are supported. Points of variability on the molecules are indicated by the traditional “R” designation. Furthermore, query features can be used to precisely define
the intended molecules. After drawing the reaction, the software analyzes the generic
reaction, determines the role of each molecule, and creates pages for managing the lists of real reagents to be
used in the actual parallel synthesis experiment.
Reaction Based
Library Generation
Library in
Spreadsheet View
DISCOVERY
• Reagent lists can be drawn from varied sources
• Reaction based library generation allows for
evaluation by product or reagent
• Data management is simplified and library
specifications are available to others on the network
Finding Reagents
Flexibility is the key when dealing with databases of chemical compounds. CombiChem Enterprise can use
reagent lists from a variety of different sources: SD files, ChemFinder databases, ChemFinder hit lists, ChemOffice
WebServer hit lists, ChemACX Database, or directly from the user via ChemDraw. Regardless of the source,
CombiChem Enterprise produces a list of reagents which match a particular generic reactant. The chemist then
chooses which of the compounds to use for generating products.
Getting Results
Once the chemist has given CombiChem Enterprise a set of reagents for each of the generic reactants in the
reaction scheme, the software generates the set of products which would result from running the experiment.
CombiChem Enterprise evaluates the products using several in silico methods, and the chemist can then choose
which compounds to keep and which ones to reject. After the products have been generated, the software
provides product information for each of the reagents. The chemist can use that information, for example, to
trim away reagents having few or no products which pass the Lipinski Rule of Five test. Finally, the products
are laid out on plates based on user-definable plate layouts.
Integration with E-Notebook
Keeping track of compound library data can be a challenge: which reagents led to this product, which
product goes with that spectrum, what was in the mixture used in this thin layer chromatography? CombiChem
Enterprise provides ways to organize the data and navigation is simple. When used with E-Notebook Enterprise,
the data for a library of shared compounds, and the entire experiment, is automatically documented and made
available to the entire organization.
EMAIL [email protected] WWW www.cambridgesoft.com
TEL
1 800 315–7300
INT’L 1 617 588–9300
FAX 1 617 588–9390
MAIL CambridgeSoft Corporation 100 CambridgePark Drive Cambridge, MA 02140 USA
ChemOffice, ChemDraw, Chem3D, ChemFinder & ChemInfo are trademarks of CambridgeSoft ©2002.
All other trademarks are the property of their respective holders. All specifications subject to change without notice.
RESEARCH &
BioAssay HTS
Biological Assay and High Throughput Screening
BioAssay HTS
BioAssay HTS provides scientists with an effective way of managing test results for biological and other kinds
of experiments intended to assess the efficacy of compounds. Suitable for both plate-based high throughput
screening assays and smaller-scale lead optimization experiments, BioAssay HTS provides researchers with
simple tools for setting up their models in a database, uploading data, automating calculations and reporting
on their findings.
User Friendly Assay Management
Even for the most basic protein assays, the independent and dependent variables used by the biologist to quantify efficacy can vary substantially from assay to assay. The underlying requirement that follows from this variability is for a flexible data management system that can adapt quickly to different assays and biological models. With BioAssay HTS, researchers or IT support staff simply define the observables and calculations that
make up the assay. The database does the rest. Users can set up unlimited levels of drill-down. This allows users,
for example, to click an IC50 and see a graph of percent inhibition versus concentration. Click again, and the
software displays the original triplicate results, with outliers marked. The software even supports complex in
vivo models.
Automated Curve
Fitting & Data Analysis
Flexible Assay
Definition Tools
DISCOVERY
• Effectively manages data from complex biological
assays involved with lead optimization
• Adapts quickly and flexibly to different assays and
biological models
• Closely integrated with Microsoft Excel, ChemOffice
and ChemDraw
Easily Manage Large Volumes of Data
BioAssay HTS offers an easy way to capture large volumes of data from automated laboratory equipment and
store it securely in Oracle. Scheduled data import means you can set up an import template once, and all future
data will appear in the system as it is gathered. BioAssay HTS contains a complete plate inventory system that tracks
plates and compound groups across plates. It easily manages daughter plate creation, barcoding, and freeze/thaw
cycle tracking. Since it is integrated with your assay data, you can instantly view compound information and
visualize results plate-wise to detect anomalies before they become a problem.
Automated Calculations & Curve Fitting
Once the database is configured for an assay, calculations are performed automatically whenever new data is
entered or imported. Calculations can be quite complex, built from multi-step procedures. For an IC 50 assay in
triplicate, the software can average your triplicate results, take control values into account, and perform a
sigmoidal dose-response curve fit according to your specifications. It is now as easy to do for 10,000
compounds as it is for ten.
Find Structure-Activity Relationships
Users can visualize data for multiple assays with BioSAR Browser, which is specifically designed for viewing
structures and alphanumerics side-by-side. Other components of the ChemOffice product line provide
additional ways to analyze structural and biological data and perform structure searches. Both ChemFinder and
ChemOffice WebServer make it easy to create customized forms for viewing data. Users can export data to Excel
or Spotfire for further analysis and reporting.
EMAIL [email protected] WWW www.cambridgesoft.com
TEL
1 800 315–7300
INT’L 1 617 588–9300
FAX 1 617 588–9390
MAIL CambridgeSoft Corporation 100 CambridgePark Drive Cambridge, MA 02140 USA
ChemOffice, ChemDraw, Chem3D, ChemFinder & ChemInfo are trademarks of CambridgeSoft ©2002.
All other trademarks are the property of their respective holders. All specifications subject to change without notice.
RESEARCH &
BioSAR Browser
Biological and Chemical Meta Data Catalog
BioSAR Browser
BioSAR Browser, a strategic must for any discovery organization interested in serious data mining, is a data-dictionary driven structure-activity analysis program. Users may choose among assays registered in the dictionary or
search for assays of interest.
Providing Catalog Capabilities
The power of BioSAR Browser lies in the researcher’s freedom from dependence on IT support. Once an assay
is registered into the data-dictionary it is automatically included in the powerful analysis framework. By reducing the time between question and answer, BioSAR Browser gives researchers the freedom to explore new
ideas—the bottom line for discovery information systems. Systems that provide answers after questions have
become irrelevant are of no use. BioSAR Browser avoids this by placing application development in the
researcher’s control.
Forms & Tables in a Unified Interface
While most SAR tools provide only a table-based interface, BioSAR Browser provides a forms-based interface in
addition to a tabular view. Researchers have demonstrated that both form and tabular views are essential. Forms
provide highly detailed information about one compound, whereas tabular views make comparisons between
Form and Table Views
Data Dictionary
Organizes Reports
DISCOVERY
• Catalog driven data mining and analysis operation
• Both form and table views available within simple
web interface; ChemDraw for Spotfire
• Role based security specifies operations allowed for
administrators, publishers and browsers
compounds more feasible. There is often a tradeoff between power and simplicity, and most SAR tools opt for
the former at the expense of the latter. BioSAR Browser, however, merges the sophistication of a powerful data
catalog technique with knowledge gained through years of working closely with users. The result is a SAR
application that is as intuitive as it is powerful.
Security & Convenience
Security within BioSAR Browser is highly granular. Different roles exist for administrators, publishers, and
browsers. Administrators may add assays to the data catalog engine, publishers may create reports and publish
them, and browsers may use data query and analysis. Most data mining tools provide a mechanism to store
queries, but the interface for creating queries is too complex. With BioSAR Browser, each set of assays is a complete report with a query form, a view form, and a table view, combining the convenience of a ChemFinder or
ISIS application with the power and flexibility of a data catalog-driven mining program.
ChemDraw for Spotfire
ChemDraw for Spotfire is a powerful add-in for the Spotfire DecisionSite software. Spotfire makes industry
standard applications for high-dimensional visual data analysis, and is used to explore large biological datasets.
ChemDraw for Spotfire adds chemistry to DecisionSite, providing structure visualization and searching services. Highlight a spot in Spotfire’s DecisionSite, and a structure is displayed directly in the window. If you draw
a structure and click Search, the matching records are displayed right in the Spotfire window. The structures
are retrieved from a chemical database such as Registration System, ChemFinder, or Oracle Cartridge, and are
returned directly over the network. In this way, structures can be linked by registry number, CAS number, or
EMAIL [email protected] WWW www.cambridgesoft.com
TEL
1 800 315–7300
INT’L 1 617 588–9300
FAX 1 617 588–9390
MAIL CambridgeSoft Corporation 100 CambridgePark Drive Cambridge, MA 02140 USA
ChemOffice, ChemDraw, Chem3D, ChemFinder & ChemInfo are trademarks of CambridgeSoft ©2002.
All other trademarks are the property of their respective holders. All specifications subject to change without notice.
CHEMICAL
ChemACX Database
Available Chemicals and Screening Compounds
ChemACX Database
Sifting through chemical catalogs is a poor use of time for any researcher. The Available Chemicals Xchange
database, ChemACX Database, provides a complete tool for research chemical sourcing and purchasing. The
database can be accessed from both desktop and enterprise environments and boasts an impressive list of major
suppliers, from Alfa Aesar and Aldrich, to TCI and Zeneca with hundreds in between. The enterprise procurement solution for ChemACX saves time by streamlining the entire purchasing process. Use ChemACX to
build an internal requisition, print the form on your company template, fill it out and submit it to purchasing.
ChemACX-SC
ChemACX-SC is an additional fully structure searchable database containing the catalogs of leading screening
compound suppliers, including ChemBridge, Maybridge, Sigma-Aldrich’s Rare Chemical Library and others.
Data Quality
Over 500,000 products from 300 research chemical and biological catalogs have been selected to have their
product catalogs prepared for electronic delivery. The data provided by the suppliers is enriched by editors who
add searchable chemical structures, physical and chemical properties, and incorporate a comprehensive
chemical synonym dictionary. All substances and supplier catalog numbers are cross-referenced, making it easy
to locate alternate sources for back ordered or discontinued items.
ChemACX on the Web
ChemACX on CD-ROM
D ATA B A S E S
• Fully structure-searchable database of 500,000 products
from 300 chemical catalogs; separate ChemACX-SC
database contains screening compounds
• Search by name, synonym, partial name, formula, and
other criteria, as well as structure and substructure
• Shopping cart system works with requisition forms
and purchasing systems, such as SAP , Ariba and
Commerce1, to streamline chemical purchasing
Data Currency
A premium is placed on the accuracy and currency of the ChemACX Database. Many suppliers listed in the
database are also currently selling their products online through the ChemACX.Com web site, and therefore
have a vested interest in ensuring that their data remains complete, accurate and up-to-date. You won’t find a
sourcing database with more frequently updated content and current pricing than ChemACX.
Data Accessibility
The same way that Internet users can publicly access ChemACX.Com, enterprise users can access their private
ChemACX Database via a standard web browser. There is no need to configure or install any additional software. ChemDraw users can either use the ChemDraw Plugin to draw chemical structures directly in the browser’s search page, or alternatively submit queries to the database server directly from ChemDraw. ChemFinder
users can access their own copy of the database right from their local hard drive.
Electronic Requisitions
Traditional sourcing databases were conceived merely as reference tools. ChemACX Database, however, goes
one step further by including the ability to collect products into an electronic shopping cart and export its contents into electronic requisition forms or purchasing systems. This time-saving feature has proven to be one of
the most popular advantages of ChemACX among scientists and purchasing agents alike. Users can readily
export data from the shopping cart into Excel and Word templates used as departmental requisition forms.
EMAIL [email protected] WWW www.cambridgesoft.com
TEL
1 800 315–7300
INT’L 1 617 588–9300
FAX 1 617 588–9390
MAIL CambridgeSoft Corporation 100 CambridgePark Drive Cambridge, MA 02140 USA
ChemOffice, ChemDraw, Chem3D, ChemFinder & ChemInfo are trademarks of CambridgeSoft ©2002.
All other trademarks are the property of their respective holders. All specifications subject to change without notice.
CHEMICAL
The Merck Index
Chemistry’s Constant Companion
Industry Standard
Among printed chemical reference works, one that stands out for its integrity, detail and longevity is The Merck
Index. This encyclopedia of chemicals, drugs and biologicals has 10,250 monographs, 446 named reactions and
23 additional tables. Merck & Co., Inc., the publisher of The Merck Index, has chosen CambridgeSoft to produce the complete contents of the 13th edition in a fully searchable ChemOffice format.
Detailed Monographs
The subjects covered include human and veterinary drugs, biologicals and natural products, agricultural chemicals, industrial and laboratory chemicals, and environmentally significant compounds. What makes The
Merck Index so valuable is its extensive coverage. The information provided includes chemical, common and
generic names, trademarks, CAS registry numbers, molecular formulas and weights, physical and toxicity data,
therapeutic and commercial uses, and literature citations. In addition to the standard searches, compound
monographs can now be searched by ChemDraw structure as well as substructure. Moving this information to
the fully searchable ChemOffice format makes it easier and faster to search and get results. Instead of consulting the auxiliary indices and then turning to the actual monograph, all searching can be done from a single form.
Organic Name Reactions
Query Search Form
D ATA B A S E S
• Encyclopedic reference for over 10,000 chemicals,
drugs, and biologicals
• Fully searchable by ChemDraw structure, substructure,
names, partial names, synonyms and other data fields
• Available in desktop, enterprise and online formats
Integrated Information
Having The Merck Index in ChemOffice format confers another valuable benefit: integration with other information sources. For example, after locating a substance in The Merck Index, it is a simple matter to copy the
name, structure or other data elements to search ChemACX Database to find out whether there are commercial
suppliers of the substance. The structures could also be used as input to Chem3D to obtain three-dimensional models and to perform electronic structure and physical property calculations. Information can also be brought
into any ChemOffice desktop or enterprise solution, including ChemDraw/Excel, ChemFinder/Word, E-Notebook
and Registration System.
ChemOffice Formats
The Merck Index is available in two ChemOffice compatible formats. The desktop edition is a CD-ROM in a
ChemFinder database format, for use by an individual researcher. The enterprise edition, designed for workgroups
and larger user communities, is served by ChemOffice WebServer to connected users. The Merck Index thus adds
to the growing set of reference databases served by ChemOffice WebServer. Just as ChemOffice integrates the
desktop edition of The Merck Index with the scientist’s everyday activities, the enterprise edition becomes an integral part of the applications deployed on ChemOffice WebServer.
Web Versions
The complete contents of The Merck Index are also available online through your favorite web browser. To
meet your specific needs, single user subscriptions, corporate extranet subscriptions and intranet webservers are
all available.
EMAIL [email protected] WWW www.cambridgesoft.com
TEL
1 800 315–7300
INT’L 1 617 588–9300
FAX 1 617 588–9390
MAIL CambridgeSoft Corporation 100 CambridgePark Drive Cambridge, MA 02140 USA
ChemOffice, ChemDraw, Chem3D, ChemFinder & ChemInfo are trademarks of CambridgeSoft ©2002.
All other trademarks are the property of their respective holders. All specifications subject to change without notice.
CHEMICAL
Chemical Databases
Reference, Chemicals, Reactions, Patents and MSDS
Databases
ChemOffice WebServer provides a full range of compound and reaction databases essential for research.
Databases are available at ChemFinder.Com, or over corporate intranets.
Reference
The Merck Index contains encyclopedic references for over 10,000 chemicals, drugs and biologicals.
ChemINDEX includes 100,000 chemicals, public NCI compounds and others.
World Drug Index (WDI ) from Derwent contains over 58,000 compounds with known biological activity.
WDI classifies compounds according to type of biological activity, mechanism, synonyms, trade names,
references and more.
Chemicals
ChemACX and ChemACX-SC, Available Chemicals Xchange, is a large and growing source for information
on compound availability. It lists compounds from Alfa Aesar and Aldrich to TCI and Zeneca with hundreds
in between, including 500,000 products from 300 catalogs. ChemACX-SC is a library of screening compounds.
ISI Reactions
Derwent Patents
D ATA B A S E S
• Extensive collection of chemical reference information
in fully searchable database format
• Includes information on commercial availability;
properties; biological activity; organic reactions; material
safety data sheets; and patent or development status
• Developed by CambridgeSoft in partnership with the
leading chemical database publishers
Reactions
Organic Syntheses is the electronic version of the annual and collective volumes of trusted, peer reviewed synthesis procedures published since 1921 by Organic Syntheses.
Current Chemical Reactions (CCR) from ISI is both a current awareness and a data mining application used to
design chemical syntheses. Renowned for its quality, CCR contains information from over 300,000 articles
reporting the complete synthesis of molecules. Updated daily, CCR is an excellent way to stay on top of recent
developments.
ChemReact and ChemSynth from InfoChem are carefully selected from a database of over 2.5 million reactions through an automated process of reaction classification. With over 390,000 reaction types, ChemReact is for
expert synthetic chemists designing novel syntheses. Entries in ChemSynth are further refined to those with over
50% yield and at least two literature references.
ChemRXN is a refined selection of over 29,000 fully atom-mapped reactions. Including carefully selected reactions
from InfoChem’s ChemSelect database and ISI’s ChemPrep database, ChemRXN is a terrific combination of utility.
Patents
World Drug Alerts (WDA) from Derwent is a current awareness application providing information on patents,
new biologically active compounds, new methods for synthesizing drugs, and other data. It is a requirement for
effective decision making in all stages of drug design.
Investigational Drugs Database (ID db) from Current Drugs is the world’s leading competitor intelligence
service on drug R&D. Updated weekly, it covers all aspects of drug development world wide, from first patent to
launch or discontinuation.
Safety MSDS
ChemMSDX provides over 7,000 material safety datasheets.
EMAIL [email protected] WWW www.cambridgesoft.com
TEL
1 800 315–7300
INT’L 1 617 588–9300
FAX 1 617 588–9390
MAIL CambridgeSoft Corporation 100 CambridgePark Drive Cambridge, MA 02140 USA
ChemOffice, ChemDraw, Chem3D, ChemFinder & ChemInfo are trademarks of CambridgeSoft ©2002.
All other trademarks are the property of their respective holders. All specifications subject to change without notice.
C O N S U LT I N G &
Consulting & Services
Development, Installation & Training Services
Managing Information
Today’s businesses are facing many complex issues. Among them are the overloads of disparate types of information, unmanaged proliferation of valuable research data, virtual projects in many locations, uncontrolled
research data, compliance, certification and regulation. Technological solutions to these issues require careful
planning and management. CambridgeSoft now offers the following professional services to assist businesses
in fully utilizing the power of technology.
Decision Making
CambridgeSoft believes that successful technology utilization begins with the assessment and decision making
process. Our experts can assist clients with:
· Readiness Assessment: Identify the scope, requirements, and deliverables for your project. Assure critical IP
is incorporated. Allow end-users to capitalize on existing scientific and technology resources.
· Strategic Planning: Conduct formal analysis of scientific, technical, operational, and process environments
to determine the necessary approach to customization and deployment.
· Prototypes and Proof of Concept: Prototypes allow you to test the technical feasibility of solutions. This
activity can provide a baseline for the future roll-out of the solution, and can also gather user feedback so
requirements can be refined.
DECISION
MAKING
CUSTOM
DEVELOPMENT
DEPLOYMENT &
TRAINING
Readiness
Assessment
Custom
Application
Development
Application
Development
Strategic
Planning
Prototype or
Proof of Concept
Business Case
Development
Data
Integration
Installation &
Customization
of Applications
Beta &
Pre-Release
Programs
Controlled
Pilots
Training
MANAGE
THE PROCESS
SERVICES
· Business Case Development: Business cases help define a clear and purposeful solution based on well-defined
and documented business needs. Having a business case helps to justify good projects, stop bad projects
before they are started, and provides the basis for ongoing measurements after project completion to make
sure that the business is getting the results they wanted.
· Operational Planning: In order to effect change on complex environments, it is necessary for organizations
to develop operational plans. These plans minimize the risks associated with large technology deployments.
Plans may incorporate key business processes and workflows, and help to identify any operational constraints.
Custom Development
Your organization requires solutions that meet you unique needs. CambridgeSoft consultants can assist with:
· Custom Application Development: Assess business needs, document specifications, and create custom webbased solutions for your enterprise.
· Data Integration: Create interfaces with other data management systems to incorporate your data into an
enterprise system.
· Installation and Customization: Customize your solution to your specifications. Make certain that all technical and logistical installation processes are managed.
Deployment & Training
Develop a comprehensive road map for deployment of technology solutions across the enterprise. Our experts
help you plan and deploy your solutions by:
· Application Deployment: Document, define and execute all of the actions required to support end user
acceptance. Manage the deployment process to assure a smooth roll-out to the end-users
· Beta and Pre-Release Programs: Beta and pre-release programs involve a limited deployment to a small set
of users in order to identify deployment readiness or logistical issues that must be addressed prior to a largescale deployment. When early release programs are employed, the success rate of large scale deployments
is greatly increased and end users are more likely to adopt the new technology.
· Controlled Pilots: Controlled pilots involve deploying a pre-production system to a small group of users to
evaluate it's functional, usability, technical, and operational characteristics in a real-world environment
prior to the completion of final system development. A controlled pilot helps identify and correct showstopper technology or operational issues before a final roll out program is implemented.
· Training: Develop customized training materials for users, system administrators, and help desk personnel.
If you choose to outsource training management, CambridgeSoft can schedule and conduct training for
all users and stakeholders.
EMAIL [email protected] WWW www.cambridgesoft.com
TEL
1 800 315–7300
INT’L 1 617 588–9300
FAX 1 617 588–9390
MAIL CambridgeSoft Corporation 100 CambridgePark Drive Cambridge, MA 02140 USA
ChemOffice, ChemDraw, Chem3D, ChemFinder & ChemInfo are trademarks of CambridgeSoft ©2002.
All other trademarks are the property of their respective holders. All specifications subject to change without notice.
CS Software Problem Report
For faster response and accuracy, use the Web:
www.cambridgesoft.com/services/mail
USER INFORMATION (Please Print Legibly)
Name
WWW
EMAIL
FAX
MAIL
Title
Firm
Street
City
Submit this form via…
State
Zip
Country
Tel
Fax
Email
DETAILS OF THE PROBLEM
SYSTEM CONFIGURATION
SOFTWARE
Application Name
!
Please cut here or photocopy page.
Version Number
Serial Number
SYSTEM
Windows (version)
MacOs (version)
Web Browser(s) (version)
US
1 617 588-9300
FAX
1 617 588–9390
WWW
EU
00 800 875 20000
FAX
+44 1223 464990
EMAIL
MAIL 100 CambridgePark Drive Cambridge, MA 02140 USA
www.cambridgesoft.com
[email protected]
www.cambridgesoft.com/services/mail
[email protected]
1 617 588–9360
CambridgeSoft, 100 CambridgePark Dr.
Cambridge, MA 02140 USA
CS ChemOffice
Desktop to Enterprise Solutions
ChemOffice Ultra, desktop
edition, includes it all, with
ChemDraw Ultra, Chem3D Ultra,
BioOffice Ultra, Inventory Ultra,
E-Notebook Ultra and ChemInfo Ultra for
a seamlessly integrated suite. Draw reaction
mechanisms for publication and visualize
3D molecular surfaces, orbitals and
molecular properties. Features include
The Merck Index, ChemACX Database,
CombiChem/Excel, ChemDraw/Excel, and BioViz.
Bring your work to the web or query online
databases with the ChemDraw ActiveX/Plugin.
C h e m O f f i c e E n t e r p r i s e is a comprehensive
knowledge management and informatics solution,
covering elextronic notebooks, biological screening,
chemical registration and more over your intranet.
Enterprise Ultra includes E-Notebook for record
keeping, BioAssay for low and high-throughput
screening, integrated plate inventory, Inventory for
reagents,
BioSAR
for
SAR reports ,
Registration
system and ChemACX Database of available chemicals.
Technologies include ChemDraw ActiveX and Oracle Cartridge.
US
1 617 588-9300
FAX
1 617 588–9390
WWW
EU
00 800 875 20000
FAX
+44 1223 464990
EMAIL
MAIL 100 CambridgePark Drive Cambridge, MA 02140 USA
MAE 04980 0408
www.cambridgesoft.com
[email protected]
®