1
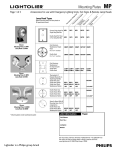
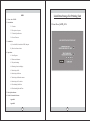
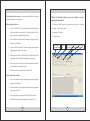
Label Data Storage For Printing Unit.
Packing List
1. Label Data Storage For Printing (LDSP_LED) - 1 No.
2. This User's Manual - 1 No.
3. Standard Modem Serial Cable - 1 no.
User's Manual [(ver2_0]
4. Trigger cable for printing purpose - 1no.
Of
Label Data Storage for Printing
5. A CD containing TERMINAL software for serial
communication with LDSP_LED - 1no.
(LDSP_LED)
By
6. Serial Number of LDSP_LED……………
Futura Apsol Pvt. Ltd.
1212/B/2, Apte Road, Shivajinagar,
Pune 411 004. Telefax: 020- 2553 1832.
www.futuras.com
[email protected]
Software Version: LDSP_LED_8722_1 (30/07/09)
APSOL PVT. LTD.
APT
SOLUTIONS
1
INDEX
Label Data Storage For Printing Unit
1. Front view of LDSP.
2. Introduction.
1 Front View of LDSP_LCD:
2.1 Function
2.2 Description of system
2.3 Technical Specifications
2.4 General Features:
3. Installation
A] Create label file, download in LDSP, and print.
B] Down load date and time.
4 Operations
4.1 State Diagram
4.2 Menus and submenus
4.3 Keys and meaning
4.4 Meanings of various displays
4.5 Interfacing with Pc
4.6 Interfacing with Printer.
4.7 Interfacing with Barcode scanner.
4.8 Interfacing with Yc checker.
4.9 Downloading Label Data:
4.10 Downloading Data and Time:
5. Description of menus.
6. Details of terminal software.
Appendix1
Appendix2
2
3
2 Introduction:-
2.3 Technical Specifications:
2.1 Function:
1.
Power Supply--- 0 ~ 230 AC, 50HZ ± 10%
LDSP is specially meant for storage and printing of different label data after
testing of UUT. The special feature of this product includes, along with
different data user can select date, time, month,
year, week, in different
combinations.
2.
Communication Protocol - RS-232, 2400 baud, 8 bit data, 2 Stop
bits. (for serial communication)
3.
User Interface :
a) 4 key keyboard
2.2 Description of System:
Confirm label data, Receive label data, date & time (Confirm
Key)
Printer Supply
Select label data, Receive operator code (Select Key)
230 V A.C
b) 4 LED'S
Potential free O/P of UUT
UUT
4.
Mechanical Dimension--- 200 * 120 * 90 mm, ABS body
2.4 General Features:
LDSP_LED
1) LDSP_LCD is specially made for storage of label data for printing
purpose.
2) PC interface will be through RS232 serial port.
PRINTER CABLE
PARALLEL PORT
PRINTER
3) Maximum 4 different label data of 3.5 KB each can be stored.
4) User interface is with four keys and 4 LED'S.
5) Printer interface is through 25 pin D type connector.
ONLINE SET UP OF SYSTEM.
6) Can be interfaced to any other centronics printer having parallel
port.
7) Variable data such as date, time, week, serial no, shift times,
incremented serial no, can be generated through LDSP_LED for printing.
4
5
4 Operation:-
3 Installation:-
4.1 LED status and Meanings:
Installation procedure of LDSP_LED.
A) Operation specific:
A] Create label file, download in LDSP, and print.
1) Design label on PC using label design software provided with label
printer. Print this label by connecting PC to printer.
2) Open this prn file to note pad and add # at the start and at the end of label
file.
Reference:-Demo label file (example) given with in the CD.
3) Connect printer to LDSP_LED through printer cable. Power on printer
and let him take ready to print status.
4) Connect LDSP to PC's serial port through standard modem cable (9 pin
m -9pin f) and download label file in to LDSP_LED. Refer operation
section for downloading.
l
Any single LED glows steadily: - Shows current label location selected.
l Any single LED blinks once: - External trigger has been accepted or label location has
been confirmed by user.
l
First two LED glowing: --- User is in label data reception mode.
l
Last two LEDS glowing: ---User is in date and time reception mode.
l
LED 1 & LED 2 both blinking means: - It shows that the unit is receiving label data.
l Any single LED blinking continuously: - It shows that the unit is saving label data at
blinking location.
l Any single LED blinking continuously on key press: - It shows that the user is in
progress for selection of label data mode.
5) After successful downloading of label data demo label print will come.
l
6) For different variables such as date time serial no etc. required by user,
modify label file as Reference: - Appendix 1.
B) Error Specific indications:
l
B] Down load date and time.
1) Connect LDSP_LED to PC serial port through standard modem cable
(9 pin m -9pin f) and download DATE file in to LDSP_LED.
All four blinks in row once: LDSP_LED is sending data to printer. .
All 4 LEDS blinks for 2 times: - Error condition in any operation.
l All 4 LEDS glows continuously: - Either printer is not connected or printer is not ready
for printing (printer is busy).
4.2 Menus and Submenus (Menu name and keys accepted)
2) Refer operation section for downloading data and time in to
LDSP_LED. Also refer date and time example given with CD.
Select label location: Selection key after power on.
Label data reception mode: Press confirm key until first two LED'S glow.
Date and time reception mode: Press confirm key until last two LED'S glow.
4.3 Interfacing with PC:-Connect standard modem cable (9 pin m -9pin f) to PC's serial
port at one end and LDSP_LED's serial port at another end.
4.4 Interfacing with Printer:-Connect printer cable to printer at one end (centronics)
and LDSP_LED (25 pin) at printer port provided.
6
7
4.5 Interfacing with external unit: - Connect trigger cable (9 pin m) to ldsp at
one end and external device at other end.
4.6 Downloading Label data:
l
Set baud rate (2400), data bits (8), parity (none), stop bits (2) and hand
Power on LDSP_LED, select label and confirm label location at
which you want to save the label file. Otherwise label file will be
saved on previously confirmed label location
l
5 Details of 'Terminal' software screen are as follows:- use for
sending data through PC.
shaking
(none) as shown below.
Select proper COM port.
Click on connect.
Enter in label data reception mode through pressing confirm key
until first two LED'S glow.
l
Now Send label file through PC with the help of terminal software
Select connect
for transmission
COM1
port
Baud rate (2400), data bits (8), parity (none),
stops bits (2) and hand shaking (none)
with appropriate setting (refer section6).
l
During reception first two LED'S will bink, after that single LED of
confirmed location will blink indicating saving is in progress.
l
After saving, data will be sent to printer with indication and if printer
is ready then demo label print will come.
l
For label file refer to example file given with the CD.
4.7 Downloading Data and Time:
l
Enter in date and time reception mode through pressing confirm key
until last two LED'S glow.
l
Send date and time file through terminal software with appropriate
settings (refer section6).
l
New date and time will be assigned to LDSP_LED after saving.
l
For date and time file refer to example file given with the CD.
8
9
Appendix 1
Selection of Printing Format: User can modify default label file as follows
# --- (add # at the start)
Label Data @1@2@3@4@5@6---@6@7@8@9@A@B@C@D
# ---- (add # at the end)
Some of Our Products :
Cable Harness Tester : PHTM320, PHTM640, PHTM960.
@ 1- Date (dd/mm/yy)
Cable Harness Tester : HTM T32, HTM T64.
@2- Time (hh:mm:ss)
One to One Continuity Tester : CT121-16, CT121-32,
@ 3- Week.
CT121-48, CT121-96.
@4- Only month. (mm)
Harness Assembly Aid : HAA64, HAAP64, HAAP96.
@ 5- Only year (yy)
Label Data Storage for Printing : LDSP, LDSP-LCD.
@6- Serial number@6. (For initialization of serial no write zero to
eight digits
Serial no,here.Serial no. more than eight digits not allowed.)
Solid State Floppy : SSF.
Gaugelink.
Visit for details : www.futuras.com
@7- Repeated serial no.
@8- Only day. (dd)
@A- Not Applicable.
@B- Not Applicable.
@C - Not Applicable.
@D - Shift
From 07.30 am to 03.30 pm Shift 'A'.
From 03.30 pm to 12.30 am Shift 'B'.
From 12.30 am to 07.30 am Shift 'C'.
@E-Incremented serial no.
Appendix 2
Data and time format
#ddmmyyhhmmss # (no blank space allowed)
E.g. # 231007164530#
Date: 23-10-2007
Time: 04pm: 45Min: 30Seconds.
10
11


![User`s Manual [(LDSP_LCD_99_2)] Label Data](http://vs1.manualzilla.com/store/data/005846764_1-de86383eb41f3d06a08b51e5958ead91-150x150.png)