1
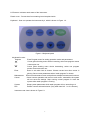
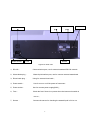
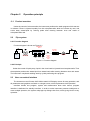
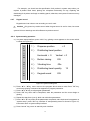
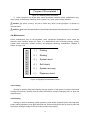
URIT-670 Microplate Washer Operator’s Manual URIT Medical Electronic Co., Ltd CONTENTS CONTENTS…… ........................................................................................................................................... 1 Copyright and Declaration……………………………………………………………………………………1 Chapter 1 Introduction.......................................................................................................................... 1 1.1 General introduction ................................................................................................... 1 1.2 Intended use ............................................................................................................. 1 1.3 Specifications .............................................................................................................. 1 1.4 Components ............................................................................................................... 2 Chapter 2 Principles ............................................................................................................................ 5 2.1 Overview ..................................................................................................................... 5 2.2 Pipe system ................................................................................................................ 5 2.2.1 Function diagram................................................................................................. 5 2.2.2 Principle ............................................................................................................... 5 2.3 interface ...................................................................................................................... 5 Chapter 3 Installation&power on ....................................................................................................... 6 3.1 Unpacking ................................................................................................................... 6 3.2 Installation................................................................................................................... 6 3.2.1 Environment requirements .................................................................................. 6 3.2.2 External connection ............................................................................................. 6 3.2.3 Wash head installation ........................................................................................ 7 3.3 Power on..................................................................................................................... 7 Chapter 4 Operation ............................................................................................................................ 10 4.1 Program .................................................................................................................... 10 4.1.1 Program No ....................................................................................................... 10 4.1.2 Wash mode ........................................................................................................11 4.1.3 Aspiration mode .................................................................................................11 4.1.4 Wash cycles .......................................................................................................11 4.1.5 Row choice .........................................................................................................11 4.1.6 Dispense volume ............................................................................................... 12 4.1.7 Immersing time .................................................................................................. 12 4.1.8 Aspiration time................................................................................................... 12 4.1.9 Program operation............................................................................................. 14 4.2 System setting .......................................................................................................... 14 4.2.1 Dispense position .............................................................................................. 15 4.2.2 Vertical position of wash head .......................................................................... 15 4.2.3 Horizontal position of wash head ...................................................................... 15 4.2.4 Bottom rinsing ................................................................................................... 15 4.2.5 Vibrating time..................................................................................................... 15 4.2.6 Wash head ........................................................................................................ 15 4.2.7 Keypad sound ................................................................................................... 16 4.2.8 System setting ................................................................................................... 16 4.3 Washing plate ........................................................................................................... 17 i 4.4 Maintenance ............................................................................................................. 18 4.4.1 Priming .............................................................................................................. 18 4.4.2 Rinsing............................................................................................................... 18 4.4.3 System restoration ............................................................................................ 19 4.4.4 Self-checking ..................................................................................................... 19 4.4.5 System recovery................................................................................................ 19 4.4.6 Dispense checking ............................................................................................ 19 4.4.7 Maintenance ...................................................................................................... 19 4.5 Power off ................................................................................................................... 20 Chapter 5 Attentions ........................................................................................................................... 21 5.1 Safeguard ................................................................................................................. 21 5.2 Before operation ....................................................................................................... 21 5.3 During the operation ................................................................................................. 21 5.4 Power safety ............................................................................................................. 21 5.5 Disinfection ............................................................................................................... 22 Chapter 6 Mainteneance .................................................................................................................... 23 6.1 Maintenance ............................................................................................................. 23 6.2 Troubleshooting ........................................................................................................ 23 6.3 Changeable parts ..................................................................................................... 23 ii Copyright and Declaration Copyright© Guilin URIT Medical Electronic Co., Ltd., All Rights Reserved. Congratulations to be our honorable guest, welcome to use URIT-670 microplate washer, which will bring to you fresh experience and convenience. All contents in this manual were strictly complied according to the related laws and regulations in China, as well as the specific condition of URIT-670 microplate washer which made by Guilin URIT Medical Electronic Co., Ltd.. It can only use in the domestic of People’s Republics of China (not includes Taiwan, Hong Kong, and Macao). This specification covers all the updated information before printing. Guilin URIT Medical Electronic Co., Ltd. is solely responsible for this specification in simplified Chinese version’s edition and specification, and reserve the right to the relevant renovate contents without separate notice. Some of the demonstration pictures in this manual are for reference and subject to real object if any differences. All the information included is protected by copyright. No any part of this document may be reproduced stored or transmitted in any form or by any means unless written authorization by Guilin URIT Medical Electronic Co., Ltd. All instructions must be followed strictly in operation. In no event should URIT be responsible for failures, errors and other liabilities resulting from user’s noncompliance with the procedures and precautions outlined herein. Limited quality responsibility warranty 《 URIT-670 microplate washer manual 》 clear the agreement that concerning quality responsibility certificate, right and duty for after service as wells as generating and terminating between Guilin URIT Medical Electronic Co., Ltd. and customer. Guilin URIT Medical Electronic Co., Ltd. will provide one year free service for the instrument that sold by it or competent agent from the day of installation if there is any damage caused by manufacturer or material. Guilin URIT Medical Electronic Co., Ltd.’ s duty is only for maintenance under the followings, not including the economic loss or other additional fee caused by stopping use instrument. For example: Freight(including custom fee) Economic and time loss caused by incapable using instrument Lodgment, repast or other on the way fee. The loss caused by inconvenient. Other charges Guilin URIT Medical Electronic Co., Ltd. is irresponsible for the direct, indirect or ultimate damage caused by the following situations. Guilin URIT Medical Electronic Co., Ltd. has no responsibility for the security, reliability and running situation if the following situation occurs. And at the same time, we consider that the quality guarantee responsibility, right and duty about after-sale service, assumpsit of engender and stopping, all of that promissory free service right will be seen as permanence abandon unconditionally. Failure due to abuse the instrument or neglect the maintenance. Using regent and accessory other than manufactured or recommended by Guilin URIT Medical Electronic Co., Ltd. i Instrument damage caused by miss operation and carelessness which not according to this manual. Replace accessories not specified by Guilin URIT Medical Electronic Co., Ltd., or maintain, mend or modify instrument not via by Guilin URIT Medical Electronic Co., Ltd. Discreteness is tear open and installation, stretching, and debugging afresh. The instrument will be abated if each hospital or institution cannot carry out a suit of normative maintenance program. Guilin URIT Medical Electronic Co., Ltd. will provide circuit diagram not freely if user put forwards requirement, in addition, we will listing to explain adjustment method and other information, which in order to help user can let eligible technical person to mend the part that Guilin URIT Medical Electronic Co., Ltd. Consider user can maintain by themselves. Caution: Guilin URIT Medical Electronic Co., Ltd. makes no warranties, either express or implied, as to product quality, performance, and value as a commodity or applicability for any particular purpose. We welcome you give us a call if you meet any problems. Our company service department opens technique and service hotline to provide technical support and difficulty solution for user. Please reserve relative sample and inform agents or contact Guilin URIT Medical Electronic Co., Ltd. service department immediately if there is any fault occurred. Guilin URIT Medical Electronic Co., Ltd. will send professional engineer or local service representative to provide timely and fully servicing if the fault cannot solve by telephone guidance. Manufacturer, instrument registration information Product name:URIT-670 Auto Microplate Washer Product standard:YZB 0028-2008 《Auto Microplate Washer》 Register license No.: Fresh armed Gui Drug Administration (prospective) 2008, No. 240034 Producer:URIT Medical Electronic Co., Ltd Tel:+86-773-2288582/2288586 Register address:No. 407 High-tech business Incubator B Produce address:No. 4, East Alley, Jiuhua Road, Guilin City Fax:+86-773-2288560 Postcode:541001 Website: www.uritest.com www.urit.com E-mail: [email protected] Version No.:03/2008 ii Chapter 1 Introduction 1.1 General introduction 1) English-operation system, liquid crystal display, graphic interface. 2) Main target is rinsing for the flat, U and V type 96-wells microplate which be used for immune test analysis by medical institution. 3) Adjustable programmable washing modes, aspiration mode, washing times, rinse quantum, immersing time, aspiration time, and vibrating time. Two wash modes for choose: whole plate mode or row mode. Supports bottom rinsing and compatible with multiple microplate specification by adjusting wash head position. 4) Automatic panel washing processing, automatic positioning of washing head, and fine-tune for manual positioning. 5) Independently designs for aspirations probes and dispense probe, which evidently decreases cross-pollution. 6) Random row washing function can meet different applications. 7) Automatic Liquid level sensor alarm function. 8) Multiform instrument maintenance functions. 9) Anti-overflowing feature which can prevent cross pollution between wells and wells or rows and rows. 10) With system self-check, system failure protection and system recovery function, one key to carry out system maintenance 1.2 Intended use Rinsing for the flat, U and V type 96-wells microplate which be used for immune test analysis by medical institution. 1.3 Instrument Specifications 1.3.1 Instrument Specifications LCD 240*128 Chinese dot matrix LCD Keyboard 8 keys plate type flat, U and V type96-wells microplate panel Wash head 8, 12 wells Residual volume ≤2µL/well Dispense precision CV≤3% (typical) Wash program 50 groups Wash row 1-12 row (can be adjusted freely) Dispense position +2mm (can be adjusted slightly) Wash head’s horizontal position +2mm (can be adjusted slightly) Wash head’s vertical position +2mm (can be adjusted slightly) Dispense volume 50~450µL/welll, 50uL / step 1 wash cycles 1~20 times(can be adjusted ) Vibrating time 0-60 sec. (can be adjusted) soak time (1~90) sec. (can be adjusted) Aspiration time (1~10)sec. (can be adjusted) Output port RS-232 serial port Weight about 5kg Dimension 400mm×330 mm×170mm Consumed power ≤60VA Fuse current 2A 1.3.2 Power and Environment requirements power supply 1.4 AC 220×(1±10%)V, 50/60Hz Work environment: 5℃~40℃,RH≤85% Storage environment: -10℃--50℃, RH≤95% Atmospheric pressure: 70.0kPa -106.0kPa Components The instrument is composed of circuit, pipe system, display and accessory. The instrument’s front panel is shown in Figure1-1. Display Keyboard Plastic cover Figure1-1 Front view 2 LCD screen: Indicates work status of the instrument. Plastic cover:Prevent dust from entering into microplate inside. Keyboard:User can operate the instrument by it, which is shown in Figure 1-2. Figure1-2 Keyboard panel Keyboard function: Program Enter Maintenance Cancel System Run Enter Program menu for setting operation mode and parameters. Cursor glints showing menu choice increasing, select one program means content plus one. Cursor glints showing menu choice decreasing, select one program means content minuses one. Enter or exit when item is chosen. Choose current item when cursor is glinting. Save current parameters when “wash program” is chosen. Enter into maintenance menu and performs multiple maintenance functions. Cancel current operation and return to main menu, meanwhile, the system will not save the settings. Stop running current program or reset the system when wash program is running. Setup system parameters which wash program will run according to it. Perform current selected mission (Only when item NO. 1 or 2 is chosen). Instrument rear view is shown in Figure1-3: 3 Rinse bottle plug Power switch Power socket Fuse Waste bottle plug RS-232 Sensor Figure1-3 Rear view 1、RS-232: Communication port, use for external standard RS-232 network. 2、Waste bottle plug: Waste liquid interface port, use for connect external waste bottle 3、Rinse bottle plug: Using for external rinse bottle; 4、Power switch: Use for turn on or off the power of instrument 5、Power socket: Use for connect power supply(220V); 6、Fuse: Check the fuse if there is no power when the instrument’s switch is turn on; 7、Sensor: Connect the sensor for checking the wasted liquid is full or not. 4 Chapter 2 .2.1 Operation principle Product overview Under the control of microcontroller, the instrument performs the wash program which was set in advance. Rinse is injected equably into the microplate-wells which are chosen by user, and sucks away waste-liquid by sucking probe after reacting between rinse and waste of microplate-wells wall. 2.2 Pipe system 2.2.1 Function diagram Function diagram is shown as Figure 2-1. Distributing head Lotion Electromag netic valve Waste bottle Dispense needle Vacuum pump Liquid pump Lotion bottle Aspiration needle Figure 2-1 Function diagram 2.2.2 Principle Under the control of liquid pump, liquid in the rinse bottle is injected into microplate-wells. Then the aspiration-probe sucks waste-liquid into waste bottle after reacting between rinse and waste. The instrument completed washing work by cycled performing thus program. 2.3 User convenient interface The instrument uses Chinese 240*128 dot matrix LCD display screen for easy operation, and all parameters and graphics are listed on a single screen, which implements visual operation. Interface divides into program, system and maintenance three main menus, program interface is defaulted for standby interface. In order to make instrument possess intelligence to react multiple operation, the system adopt pop up dialogue box form, which giving hints to every operation. 5 Chapter 3 Installation and power on 3.1 Unpacking a) Please take the instrument and accessories from the packing box carefully, reserve the packing material for the use of transportation or storage afterwards. b) Please check the accessories according to the packing list. c) Please check if there is spilling rinse or water soaking about the instrument. d) Please check there is any mechanical damage about it e) Please check all external-expose lead, inserted part and accessory. If you have any questions, please contact local agent immediately. 3.2 Installation 3.2.1 Environment requirements a) Avoid direct sunlight. b) Avoid expose in excessive humidity and too high or too low temperature environment. To ensure instrument’s normal operation, the suitable ambient temperature is between 5℃ to 40℃, relative humidity should less than 85%. c) By all means to keep the instrument from dust. d) Keep the instrument from the equipment can disturb the test result such as centrifuge, X-ray machine, display, copier, ect. e) Do not use mobile telephone, radiophone which can produce strong radiation field. Too strong radiation field will disturb instrument’s normal working. f) Voltage’s regular fluctuation will lead to the reduction of function and reliability, user should solve this problem before using this instrument, for example, AC voltage stabilizer (user should equip it themselves). g) The frequent interruption of power supply will lead to the reduction of function and reliability, user should solve this problem before using this instrument, for example, Uninterrupted Power Supply -----UPS(user should equip it themselves) h) User have duty to make sure the reliability of power protection ground in using place, ensure the normal connection between plug ground and socket ground. i) Do not lay instrument on the place which hard to turn off power switch. j) By all means to ensure good ventilation. 3.2.2 External connection a) Take the rinse bottle and waste bottle out from packing box, place them on the back of instrument, we suggested place rinse bottle on the left side, waste bottle on the right side. b) Butt the pipe with two colors junction (green and black) joint with the matched colored 6 bottle on the back of instrument, and screw the nut. c) Insert the sensor plug on the waste bottle cap into sensor socket on the back of instrument’s plate. d) Pour rinse into rinse bottle. 3.2.3 Wash head installation Connect the dispense pipe which using for linking wash head with pipe junction the working table according to matched colors. Make the wash head parallel supporting arm and put wash head above supporting arm, adjusting the adjust screw on the supporting arm to let wash head parallels working table. Installed wash head is shown as Figure 3-1. Distributing pipe Supporting arm Wash head Microplate panel Tray Figure 3-1 Installed wash head 3.3 Power on a) Place the microplate panel on the worktable. b) Pour the rinse into rinse bottle. c) Connect power supply cable, one side to the power plug in the back of plate, the other side to the power supply (220V). d) Turn on the power supply on the back panel, Figure 3-2 appears, instrument begins to initialize system. 7 Guilin URIT Medical Electronic Co., Ltd. URIT-670 Auto Microplate Washer Figure 3-2 Power on interface e) The instrument begins to self-check after its initialization, after the initialization completed, self-check report shown as Figure 3-3. Self-check report f) Horizontal move institution: normal Vertical move institution: normal EEPROM read-in: normal Waste bottle condition: not full Figure 3-3 Self-check report Instrument can only enter standby main menu interface when self-check has completed and there is no system fault, which is shown in Figure 3-4. 8 W H O L E 1) Wash mode: whole washing W 2) Aspiration mode: 3) Wash times: 4) Row choice: ABCDEFGH G 5) Lotion volume: 200uL P 6) Immersing time: 05s 7) Pause time: 01s double A S 01 time H I N R O G R A M 01 Figure 3-4 Standby main interface Caution: The instrument will keep warning and refuse to enter into work interface due to any system errors such as self-check failure or abnormal operation, shut the instrument off and restart it after a while, if the problem still exist, cut off power and contact our company’s service department. Caution: Do not place instrument on the position that hard to touch power switch. Caution: Accessory attachments please see 3.2.2, 3.2.3. 9 Chapter 4 Operation 4.1 Program Instrument enters Program interface directly after power on, which is shown in Figure 4-1. Program menu contains program No., washing mode, aspiration mode, washing time, row choice, washing volume, immersing time and pause time , these parameters can be set according to customer’s need. W H O L E 1) Wash mode: whole washing W 2) Aspiration mode: double 3) Wash times: 02 time 4) Row choice: ABCDEFGH G 5) Lotion volume: 200uL P 6) Immersing time: 05s 7) Aspiration time: 01s A S H I N R O G R A M 01 Program No. Figure 4-1 Program menu 4.1.1 Program No. Program No. places under “wash program”, which is shown in Figure 3-1. User can set 50 groups’ different parameters’ wash programs, and system will store these. And the instrument will run according to your setting when you chose one group of programs and press “run” key. You can choose wash program by pressing “▲”or “▼” key, when you make your choice, 10 matched parameter will refresh automatically. 4.1.2 Wash mode Washing mode divides into well washing and row washing. Well washing: Dispense-liquid row by row, then sucking-liquid row by row. Generally well-washing recommended. Row washing: Dispense row according by row and aspiration secondly, then enter the next row. 4.1.3 Aspiration mode Aspiration mode divides into 3 types---single, double and median. Single: Aspiration probe of wash head only sucks at one point, which used to plat-bottom microplate. Double: wash head aspiration probe only sucks at two points, which used to plat-bottom microplate. Median: wash head carry out rinse in the middle, which used to U and V type microplate. 4.1.4 Wash cycles Wash cycles time:Set time freely between 1 to 20, instrument will repeat this operation. 4.1.5 Row choice Set washing rows needed, for example, max row is 8 when wash head’s quantity is 12, matched code is ABCDEFGH; max row is 12 when wash head’s quantity is 8, matched code is ABCDEFGH. Choose matched code, selected row will be washed. When wash head’s quantity is 8, panel washing interface is shown as Figure 4-2: 11 W H O L E 1) Wash mode: whole washing W 2) Aspiration mode: double 3) Wash times: 02 time 4) Row choice: ABCDEFGH G 5) Lotion volume: 200uL P 6) Immersing time: 05s 7) Aspiration time: 01s A S H I N R O G R A M 01 Figure 4-2 8-probe wash head interface 4.1.6 Rinse volume Rinse volume can be set freely between 50 to 450uL, 50uL increasing every time. 4.1.7 Immersing time Immerse time is the waiting time which the beginning of aspiration after dispense of washing head completed, startup immersing function can increase cleaning effect, which can be set freely between 1 to 90 seconds. 4.1.8 Aspiration time Aspiration time is the time aspiration probe aspirates liquid in the bottom of the wells, which can be set freely between 1-10 seconds. The shorter Aspiration time, the faster washing speed, but must be ensure the effect. If residual volume is too much, aspiration time can be increased. System aspiration time is 1 second. 12 4.1.9 Program operation a) Instrument enter standby main interface after self-check, standby main interface will acquiescence to program menu interface, which is shown in Figure 4-1. b) Press “▲”or “▼” key, glinting cursor appears on the screen, which is shown as Figure 4-2. Continue to press “▲” or “▼”key, make the cursor move to the program want to edit. W H O L E 1) Wash mode: whole washing W 2) Aspiration mode: double 3) Wash times: 01 time 4) Row choice: ABCDEFGH G 5) Lotion volume: 200uL P 6) Immersing time: 05s 7) Aspiration time: 01s A S H I N R O G R A M 01 Figure 4-2 Program interface c) Press ”OK” key, now cursor stop glinting, luminance bar appears on program parameter, press “▲”or “▼”key, edit the content of program. d) Store current program when edit completed, cursor start to glint, user can edit other programs according to “▲”or “▼”key at the same time. e) When all programs editing completed, press “▲”or “▼”key to make the wash program is chosen by luminance bar, then press “OK” key, 4-3 interface appears showing edit is succeed. Setup saved Figure 4-3 Store interface f) Row choice operation This instrument can wash random rows, user must set parameters before washing, otherwise 13 working status will in abnormal. Operation: Firstly move cursor to this program, press “OK” key, cursor will stay on the first row, press “▲”or “▼”key can choose this row or not, when this row has already set, press “OK” key, move to next one, repeat the same operation to set other rows. When last row finished, press “OK” key to quit, cursor will glinting, press “▲”or “▼”key can choose other programs. Caution: Results only can be stored when “wash program” is chosen by pressing “OK” key. System won’t store all edited data automatically if it doesn’t press “OK” key; press “running” key when “well washing” or “program No.” is chosen, instrument will store current parameter automatically and begin to operate well washing. Caution: Instrument will not store parameters by pressing “OK” key when all the parameters are not edited. Caution: Press “▲”or “▼”key will edit program when cursor glints; press “▲”or “▼”key will edit program content when program is chosen. 4.2 System setting Press “system” key on the keyboard, “system setting” menu on the main interface of standby which is shown in Figure 3-4 will appear. System setting menu including the setting of dispense position, wash head horizontal and vertical position, bottom rinsing, vibrating time, wash head quantity and keypad sound, which is shown in Figure 4-4. S Y S T E M S E T T I N G +0 1) Dispense position 2) Distributing head position Horizontal +0 Vertical +0 3) Bottom rinsing ON 4) Vibrating time 00s 5) Distributing head quantity 6) Keypad sound Figure 4-4 system setting 14 ON 12 4.2.1 Dispense position Dispense position is the position when wash head in dispense situation, dispense probe bottom relative to the microplate’s level. Appropriate position will prevent liquid’s overflow, in general, user cannot change system’s default setting. When washing nonstandard microplate appears liquid’s overflow, using this function to adjust ±2mm can meet different requires. 4.2.2 Wash head vertical position Wash head vertical position is the altitude that wash head moving on the vertical direction, this altitude can be adjusted ±2mm, when the wash head move downwards to the bottom of microplate, the altitude of supporting arm should lower than wash head(it means wash head could fall on the bottom of microplates freely, otherwise aspiration halfway). 4.2.3 Wash head horizontal position Wash head is on the relative place which in the first row of the microplates, this place can be adjusted by ±2mm, suitable position can obtain better effect of aspiration, in addition, liquid will not spray on the wall of microplates or outside. 4.2.4 Bottom rinsing Bottom rinsing dispenses rinse when dispense probe approaching the bottom of the microplate wells, which can increase washing effect. User can turn it on or off. 4.2.5 Vibrating time Vibrating will make washing effect better. Vibrating time can be set between 0 to 60 seconds freely. Vibrating will be closed when time is 0. Caution:We suggest close vibrating to avoid overflow if liquid is full in microplates. 4.2.6 Wash head standard Wash head specification can choose 8 probes or 12 probes, standard is 12 probes. 8-probe is forbidden if user doesn’t equip, otherwise instrument may in abnormal status. Place the microplate vertically when users choose 12 probes; place the microplate horizontal when users choose 8 probes. Caution:System need edit relative parameter setting when switch 8 probes or 12 probes, as a result, the device will automatically update the system parameters. After switch, Program menu data will recover to default data. Be used with caution. Warning: Make sure the following is right when replace wash head,: A. The specification of wash head should set correctly in system setup. B. The direction of placing microplate should be right. C. The displacement of wash head is OK. 15 For example, you should set the specification for 8 probes in system setup when you replace 8 probes wash head, placing the microplate horizontally on tray, replacing the distributing for 8 probes and begin to washing panel, otherwise, some parts of instrument may damaged. 4.2.7 Keypad sound Keypad sound can close or not according to user’s need. Caution:Only press key makes sound when keypad sound is set for close, but some systems’ hints or warnings are still sufferance to produce sound. .4.2.8 System setting operation a) In system setup interface, press “▲”or” key, glinting cursor appears on the screen which is shown as Figure 4-5 +0 S 1) Dispense position Y S 2) Distributing head position T Horizontal +0 E Vertical +0 M 3) Bottom rinsing ON E 4) Vibrating time 00s T T 5) Distributing head quantity I N 6) Keypad sound S 12 ON G Figure 4-5 system setting edit b) Press “▲”or “▼”key, move cursor to the program which wants to edit; Press ”OK” key, cursor stop glinting, luminance bar appears on program parameter. c) Press “▲”or “▼”key to edit program parameters. d) Press “OK” key when edit is completed, store the parameter and the cursor begin to glinting. e) Repeat the step from a) to d), which can edit other parameters. f) Press “▲”or “▼” key when all the parameters completed, make luminance bar appears on “system setup”, press “OK” key, interface of “setup already stored” is shown in Figure 4-3, instrument return to system setup interface. g) Press “cancel” key, return to stand-by main interface. 16 4.2.8.1 Dispense position adjustment In normal, dispense position setting is forbidden, unsuitable adjustment will lead to abnormal status or unexpected effect when wash program is running. User can adjust dispense position to match it If microplate is not standard, Firstly, select this program, press “Yes” key, stop it after system location, press “▲” or “▼” key to adjust aspiration probe position, up or down, observing condition when adjusting it as far as to get satisfied effect, then press “Yes” key to quit. 4.2.8.2 Wash head adjustment Wash head adjustment is similar to dispense adjustment. When wash head horizontal position adjusted completed, press “OK” key to adjust vertical position. Caution: When user adjusting “dispense position” and “wash head position”, press “OK” key to select, instrument will drive wash head and tray to pointed position. Other operation will inefficacy before this operation has finished. Press “▲” or “▼” key each time, instrument will reflect the set situation immediately (only make effect to press key when operation has finished and sound occur), user can observe this situation to adjust instrument. 4.3 Well washing Carry out rinsing after program and setting, the details as following: a) Place the microplate which you want to wash on the tray. b) Press “▲”or“▼” key, “Program No.” is chosen by glinting bar; press “▲”or “▼” key, choose program No. which you want to operate, press ”OK” key. c) Press “▲”or“▼” key, make the “wash program” is chosen by glinting bar. d) Press “running” key on the keyboard, instrument begins to rinsing according to set data, washing parameter showing on the LCD, the two lowest rows on the bottom show current progress, user can know progress according to it, processing interface is shown as Figure 4-6. Program 01# running Wash times: 02 times, 8 rows, 200uL Aspiration time: 01S Whole washing, double Immersing time: 05S Vibrating time: 00S bottom Now: Wash time: 01 time, 01 row 01 time left Figure 4-6 Washing process e) Rinsing process completed after progress bar is full, buzzing from instrument shows operation finished, interface shown as Figure 4-7 appears and after 2 seconds return back to main interface. 17 Program 01# completed! Figure 4-7 Washing panel completed f) Press “Program” key at this time, return to program interface; press “maintenance” key, enter system maintenance interface; press ”system” key, enter system setup interface. Caution:By press “running” key will in effect only when “rinsing program” is chosen by luminance bar. Caution:Make sure the specification of wash head correspond with the direction of microplate. 4.4 Maintenance Press “maintenance “key on the keyboard, enter “equipment maintenance” menu under the stand-by main interface shown as Figure 3-4. Maintenance menu including priming, rinsing, system reset, self-check, system recovery and dispense checking, maintenance interface is shown as Figure 4-8. M A I N T E N A N C E 1) Priming 2) Rinsing 3) System reset 4) Self-check 5) System recovery 6) Dispense check Figure 4-8 Equipment maintenance menu 4.4.1 Priming Priming is used for filling and cleaning the pipe system in high speed, to ensure the normal working and accuracy. Priming must do when the first time using or changing rinse, or when the wells blocking. 4.4.2 Rinsing Rinsing is used for cleaning system pipelines, wash heads, dispense probe and aspiration probe, making expedition of air-pipe and liquid row. Execute rinsing one time or more to make the instrument working normally for the first using or after long keeping. 18 4.4.3 System reset Instrument can reset correctly when “system reset” about wash head and tray completed in any place. Wash head located above washing groove after reset. Report of error will pop up if system reset failed to remind user the error type. Instrument can’t work normally if system reset fails; it needs mending at this time. 4.4.4 Instrument self-check Self-check operation carry out every time automatically when instrument turn on. Once a serious error, will lead to instrument working damage. In this case, protection measures will on, error report popes up at first, warning lasting, instrument cannot work normally. Turn off power supply and reset after a while if above situation appears; some parts of this instrument has already damaged when problems is lasting, please contact URIT company to check. Use this self-check function can realize the health condition in normal using. 4.4.5 System recovery Execute this function will make each parameter recover to factory installation. Use this function can recover instrument system when it running or adjusting. Caution: Memorizer may in fault if system recovery failed or messy code appears can’t recover, contact URIT Company to check. 4.4.6 Dispense check Use this function to check dispense volume is exact or not, or need washing or not. After operation, instrument will stop operation aspiration after inject rinse to microplates. Caution: Dispense volume is the current program No. in program menu, user can set dispense volume according to “wash program”, select “dispense checking” in maintenance menu to operate. 4.4.7 Maintenance operation a) Under the equipment maintenance interface shown as Figure 4-8, press “▲”or “▼” key, equipment maintenance interface appears glinting cursor shown as Figure 4-9. b) Press “▲”or “▼” key, move the cursor to the maintenance program which needs to operate. c) Press “running” key on keyboard, instrument begins to carry out matched maintenance program. d) Instrument returns to the equipment maintenance menu interface shown as Figure 4-8 when maintenance program completed. e) Press “cancel” key, return to standby main interface. 19 M 1) Priming I 2) Rinsing N T 3) System reset 4) Self-check N C 5) System recovery E 6) Dispense check A E N A Figure 4-9 Maintenance operation interface 4.5 Power off Turn off power switch on rear panel, cut off power supply when instrument doesn’t running. 20 Chapter 5 Attentions To ensure user’s safety, keep the accuracy of experiment, and avoid the damage of instrument in case of operation’s fault, following fairs should pay attentions: 5.1 Safeguard Infectious specimens and corrosive liquid can often be met in experiment, put on antiseptic experimental clothing and glove in the operation. Deal with dangerous samples according to laboratory operation handbook. 5.2 Before operation a) Install instrument according to this manual strictly, ensure the correct connection of piperow to avoid leakage. b) Operate rinsing and priming more than 2 times to ensure expedition of piperow and air-pipe when use washer again after long time storage. c) Use the hose provided by URIT Company for connection. 5.3 During the operation a)Confirm the followings before operate rinsing: 1) Wash head is installed correctly, quantity correspond with the one in “system setting”, otherwise it may lead to the damage about wash head or microplate. 2) Microplate lies in right place. 3) Suitable program and parameter data have already set. b)Avoid waste liquid dumping in order to prevent liquid flow into pump. c) Clean up the surface of instrument with neutral sterile pack fluid if there is any danger biotical material on it. d) Keep the cleanness and dryness of tray’s surface, avoid the block of aspiration probe and dispense probe. e) Press ”cancel” key to stop instrument in the process running , hand or object force stopping is forbidden.. f) Do not use hand to push and pull tray and wash head in the process of running or washing program completed, which can avoid any damages about some parts. g) Use needle objects to dredge if dispensing is blocked. 21 5.4 Power safety a) Make sure the external equipment such as circuit, socket in accordance with electrical appliance safety standard. b) Do not use this instrument in damp environment. c) Do not turn on the instrument if there is any mechanic damage. d) Cut off all the power supply connecting to the instrument when operate any adjustments, displacement, maintenance or mending about instrument. e) Technician who is familiar with potential danger should deal with any unavoidable electric situation. f) Cut off power supply immediately when instrument is wetting by water, user should deal with this situation under the instruction of technician. 5.5 Disinfection Instrument should be sterilized regularly. Gather waste water in special vessel, explanation after sterilization, clean up the pollutant on the surface of washing plate by 70% alcohol, aspiration orifice should be wiped several times by 200 mg/L clean liquid, wiped by rinsing agent or rinsing several times for stand-by using. 22 Chapter 6 Maintenance 6.1 Maintenance a) Do not placed instrument under direct sunlight or heat source nearby. b) Clean the instrument with soft cloth and neutral rinse regularly; wipe off the liquid on the tray in time. c) Dredge Dispense probe wells when there is obvious nonunion situation in Dispense. d) Dredge Aspiration probe wells if amount of residue is increasing. e) The storage of liquid bottle. f) Excessive residual liquid on working table may overflow the edge and leakage to the chassis, wipe off by soft clothe. g) Replace liquid bottle every two years, or earlier if it under the direct sunlight or keep long time. It can be replaced with same material one. h) Sterilized instrument regularly, Gather waste water in special vessel, explanation after sterilization, clean up the pollutant on the surface of washing plate by 70% alcohol. Aspiration orifice should be wiped several times by 200 mg/L clean liquid, wiped by rinsing agent or rinsing several times for stand-by using. .6.2 Troubleshooting a) Screen does not display or no reaction when press keyboard, poor connection about LCD or keyboard may the possible reason, shut the instrument off and restart it after a while. b) System can identify trouble automatically when the instrument self-checking or running, system self-protection start-up to protect instrument if system in severe condition, instrument return to normal status after problems solved. c) Identification of instrument’s damage: 1) System faults shown on LCD and self-check report pop up when power on or running wash program; some parts on instrument have already damaged if above situation appears too many time, contact URIT company workmen to deal with it. 2)Instrument may have partly damage and stop to using under following circumstances ① Severe external damage exists; ② Still in abnormal situation when repeat operation for many times; ③ Storage too long under the unqualified environment; ④ Transportation pressure overloads. Contact URIT company workman to deal with any abnormal problems. 23 6.3 Changeable parts Liquid bottle should be changed every 2 years or earlier under sunlight or keep long time. URIT company provides following parts, and it will irresponsible for any consequence caused by user themselves. 1 Rinse, waste liquid pipe. 2 Wash head. 3 Tray. 24