1
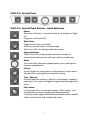
Users manual VISIO 22+ Version 2.4 - August 2012 English About this manual This manual addresses to end users of VISIO 22+. The device was assembled by your dealer or shipped to you as a completely assembled and tested device. In this manual you will find all information required to use your VISIO 22+. The manual is a part of your device. Please read this manual with care and attention as it contains important instructions and tips with regard to operating the device and its safety. Please keep the manual always within reach of your device and do pass it on to a next owner. Copyright ©2012 BAUM Retec AG, In der Au 22, Wiesenbach, Germany. All rights reserved. No part of this publication may be reproduced or distributed in any form or by any means, or stored in a database or retrieval system, without prior written permission from BAUM Retec AG. All efforts have been made to ensure that information contained in this document is correct at the time of issue. Neither BAUM Retec AG nor its representatives assume any responsability for errors or omissions. Nor is any liability assumed for damages resulting from the use of information contained herein. Licenses and trade marks All licenses and trade marks are the property of their respective owners. 2 About VISIO Handy design, simple to use, excellent picture quality – that is what VISIO 22+ stands for. All VISIO 22 models have a High-Resolution camera and a 22” widescreen display in 16 by 9 format with high contrast and power saving LED backlight. Thanks to the High-Resolution camera VISIO 22+ provides a bright and crisp image even in the smallest magnification. Though being one of the smallest, lightweight and best designed devices, VISIO 22+ provides all the functionality you expect from an excellent CCTV reader. Visio 22+ features full colour auto focus and a variety of false colours. Reverse foreground and background colour is provided as well as desired fix focus for hand writing and filling in forms. Thanks to its image optimizer feature VISIO 22+ will always provide an optimum image quality. VISIO 22+ can even display documents of very poor quality magnified and in higher contrast, like faint print or crumpled or dirty paper. However despite all technical efforts made, there may exist a few documents which cannot be displayed properly. In those rare cases, the full colour setting may be the best setting but in seldom cases it may happen that a document cannot be made better readable. 3 Table of contents ABOUT THIS MANUAL ...................................................................................................................................... 2 TABLE OF CONTENTS........................................................................................................................................ 4 BEFORE YOU START .......................................................................................................................................... 5 HOW TO POSITION VISIO 22+ ON YOUR DESK ............................................................................................... 5 VERY FIRST TIME POWER ON AFTER INSTALLATION..................................................................................... 6 VISIO 22+ CONTROL PANEL ............................................................................................................................. 7 VISIO 22+ CONTROL PANEL BUTTONS - QUICK REFERENCE......................................................................... 7 GETTING FAMILIAR WITH YOUR NEW VISIO 22+ ........................................................................................... 8 FOR YOUR SAFETY .......................................................................................................................................... 12 COMMON PROBLEMS AND SOLUTIONS ....................................................................................................... 15 DISPLAY AND LIGHTS REMAIN DARK .............................................................................................................................................. 15 ONLY DISPLAY REMAINS DARK, LIGHTS ARE ON ........................................................................................................................... 15 IMAGE IS BLURRED............................................................................................................................................................................ 15 DOCUMENT CANNOT BE READ ........................................................................................................................................................ 15 XY-TABLE IS NOT MOVING .............................................................................................................................................................. 15 LETTERS ARE FLUTTERING ............................................................................................................................................................... 16 ENVIRONMENTALLY FRIENDLY DISPOSAL ACCORDING TO EC-DIRECTIVE 2002/96/EG ......................... 16 WARRANTY...................................................................................................................................................... 17 DEFECTS AND REPAIR..................................................................................................................................... 18 SERVICE BOX ................................................................................................................................................... 19 TECHNICAL DATA............................................................................................................................................ 20 INFORMATIONS FOR THE RE-USE OF VISIO 22+ .......................................................................................... 21 PRODUCT DESCRIPTION:.................................................................................................................................................................. 21 SPECIFIC PURPOSE: .......................................................................................................................................................................... 21 PRODUCT LIFE TIME: ........................................................................................................................................................................ 21 RE-USE / INSTALLATION AND MAINTENANCE: ............................................................................................................................. 21 SAFETY CHECKS (§6 MP-BETREIBV): ........................................................................................................................................... 21 SPECIAL ADVICE FOR TRANSPORT AND STORAGE:........................................................................................................................ 22 POWER CABLE:.................................................................................................................................................................................. 22 PRODUCT IDENTITY SHEET VISIO.................................................................................................................. 24 4 Before you start Please read the safety instructions at the end and check the contents of the packaging What’s in the box: 1 VISIO 22+ CCTV Reader device 1 Power supply with cable to mains 1 Users manual How to position VISIO 22+ on your desk Place VISIO 22+ on your desk and set it so far back that when pulled out to the maximum position (nearest to your belly) the front edge of the XY-table is aligned to the front edge of your desk or even a little further back. Also, when pushed to the leftmost or rightmost position, the edges of the XY-table shall not exceed the boundaries of your table! Thus a safe stand of VISIO 22+ is provided in all conditions of operation. 5 Very first time power on after installation The following chapter usually can be skipped, as this has usually already been done when you received your VISIO 22+. It should not be necessary that you do this again. Connect VISIO 22+ power supply to mains. on left of control unit for about one second or until Press Power button lights turn on, monitor should be turned on automatically. (Check for blue light on bottom of TFT display, a bit right of middle. Display power button is directly left to light. You can move your finger from the right bottom edge of Display frame slowly to the left, until you feel the raised power button. After pressing this button, the blue light will be lit. From now, VISIO will switch on the Monitor automatically. The above steps only have to be performed once directly after assembly. In your daily use from then on, you only have to press the Power button on the VISIO 22+ control panel. 6 VISIO 22+ Control Panel VISIO 22+ Control Panel Buttons - Quick Reference Power Short press of about 1 second will power up the device (lights on). Long press will switch off. Auto Focus Toggles Auto Focus on and off. Auto Focus on has always a sharp image. Auto Focus off is for taking handwritten notes. Image optimizer Selects one of five image quality optimizer settings for viewing critical documents with low contrast or bad print. Zoom Turn knob left to decrease magnification, turn knob right to increase magnification. Picture Use this option to view pictures or documents in true colours. Also good for viewing bad print and for writing. Text – Reverse Use text mode for reading. Contrast is enhanced so reading is more easy. Press again to toggle foreground and background colors. False colors In Text mode: Press to change between 7 false colours. (Use Text button to reverse foreground and background) In Picture mode: toggle white balance between warm reddish white, neutral white and cold blueish white. . 7 Getting familiar with your new VISIO 22+ You have already learned how to position VISIO on your desk and you have connected VISIO to the power supply. You can slightly tilt the display so that you can comfortably view the screen. Do not tilt too much; do not try to exceed the stopper position. Now, switch on VISIO 22+ and use it for the first time. The control panel is mounted right below the screen. The power button is the leftmost one. A short press for about a second on the power button will switch on VISIO 22+. As soon as the lights turn on, you may release the power button. The Display may show a message “Invalid video mode”, after a few seconds VISIO shows a magnified image. You can switch VISIO 22+ off by pressing the power button for more than a second. Thus, touching this button accidentally will have no effect. Practice switching on and off VISIO for a few times then leave it switched on to proceed. Place a document on the XY-table. Please use something coloured, like a brochure or magazine with text and images. You can align a document horizontally by moving it against the silver rim at the back end of the XY-table. Thus you will track a line when moving the XYtable left and right. The XY-table provides a brake that can fix the table. At the front edge, you find the brake lever. Put it in the leftmost position and you can move the XYtable freely in all directions. In the middle position, you can move the XY-table left and right only and the up down position is fixed. In the rightmost position the table is fixed in all directions. Now, align your document against the back rim and position the brake lever in the leftmost position. WARNING: Avoid having fingers or (pieces of) clothes jammed into the mechanism of the XY-table underneath the reading platform. Please put your hands on top of or on the front side of the reading platform. Do not reach underneath the sides or underneath the rear side of the reading table. 8 Let us try the buttons on the control panel now. We have already learned, the power on button is the leftmost button. In the middle of the control panel, there is a round knob. This is the zoom knob which controls magnification. Turning this knob clockwise will increase magnification while turning it counter clockwise will decrease magnification. Turn the zoom knob counter clockwise to the end position to obtain minimum magnification. The minimum zoom level is not intended for reading; however it gives you a better overview on the document structure. Thus you can easily find the position you want to view at higher magnifications. Now, press the picture button. The picture button is located to the right of the zoom knob. Pressing this button will set VISIO to real colour or picture mode. This mode is ideal for viewing images and it also serves for reading bad print and for writing or filling in forms. It provides all natural colours in all shades. So move the XY-table until you see one of the images of your document. If the image is too small, increase magnification by turning the zoom knob clockwise. If you got lost and do not know where you are on the document, decrease magnification, move the XY-Table and increase again. VISIO will remember the last setting even after power off. You already know a lot about VISIO now, however let us read some text. Move the XY-table to a position where you see some text on the display. Now press the text button. The text button is located to the right of the picture button it is the second button to the right of the zoom knob. The image will be displayed in high contrast now and in two false colours only. If you press the text button again, foreground colour and background colour will be reversed. Press this button a few times to see the difference, also switch between text mode and picture mode to see the difference. In text mode, letters are much clearer and brighter with higher contrast whereas in picture mode you see all colours and shades of grey. You do not like the colours shown in text mode? No problem! Let us change them. You have a selection of seven false colour combinations and with reversing foreground and background you will have 14 different colour 9 options. Try out by pressing the false colour button. This is the rightmost button on the control panel. Each time you press it, the colours will change. After you went through all 7 options it will start over again. If you want to reverse foreground and background, press the text button. The available false colours are black-white, black-yellow, black-cyan, blackgreen, black-magenta, blue-white and blue-yellow. Select the colours you prefer with the false colour button and press the text button for reversing foreground and background until you find the option you prefer. In picture mode, the false colour button has a different function. There you may change the white balance. Press this button to toggle between a warm reddish white, especially for viewing photos, a neutral white or a cold blueish white that is good for reading coloured texts. Note: VISIO 22+ remembers the colour settings you made. So if you switch between Text mode and Picture mode and come back to Text mode, you find the previous colours there. VISIO 22+ will even remember your last settings when you switch it off. Now that you found your preferred colour settings in text mode, let us try to read some more problematic text with low contrast or faint print. In most cases, VISIO’s automatic image control will present a good quality magnified image of your document. This is easy with black characters on bright white paper. However sometimes documents are of low quality like coloured text on coloured background or bad copies with faint print on grey paper. In those cases we make use of the Image Optimizer button. This is the third button from the left, directly left to the zoom knob. The image optimizer button selects one of five levels of optimization. So if you do not get a good quality representation on VISIO’s display, simply press this button several times until you get the best result. This button works in picture mode as well as in text mode. Note: You will often find the previous setting was the best one, so the trick to get one step back is by pressing the button four more times. Now, there is only on buttons left to explain. The auto focus button. This sounds complicated, but is very easy to use. 10 When you switch on VISIO, it is always in auto focus mode. That means, no matter how thick a book or how curved a page, VISIO will always focus on the part displayed and thus always present a sharp image on the display. So this is the setting you usually will prefer. However, sometimes you want to fill in forms or crosswords or you want to paint your nails or view three-dimensional objects. This is where fix focus comes into play. First, let us find that button. The auto focus button is the second button from the left. Press it to toggle auto focus on and off. On the screen “AF ON“ or “AF OFF” will be displayed for a few seconds respectively. Let us test how this works. If you have already played with this button, press the Auto Focus button once or twice and check for “AF ON” being displayed to make sure, automatic focus is on. VISIO will magnify the document lying on the XY-table and display a sharp image. Put your hand on the document now. VISIO will magnify your hand and you see the skin of your hand is focussed now while the characters on your document are blurred. The same may happen when you want to fill in a form. Instead of showing sharp letters, VISIO may focus on the back of your hand holding a pencil. If you remove your hand, the characters are sharp again. So let us try the same with fixed focus now. Place a form on the XY-table. If VISIO does not show sharp characters, press the auto focus button. “AF ON“ will be displayed. Now that characters are sharp, press the Auto focus button again to switch it off. “AF OFF“ will be displayed. If you fill in the form with a pencil now, VISIO will always stay in focus on the characters and not on your hand. Once finished, do not forget to turn auto focus on again by pressing the Auto Focus button. Now you have already learnt about all options on VISIO 22+. We hope you will enjoy your new CCTV. 11 For your safety WARNING: Failure to observe the following warnings may invalidate the guarantee and could cause damage of the device or serious injury. Please check contents of package before you use the device. If parts are damaged or missing, please do not hesitate to inform your dealer. Please keep the shipping box, so you can safely pack the device in case you have to ship it for service etc. Improper packaging can cause loss of warranty. In case you need a new shipping box, we can send you one. Please carefully read the user’s manual and safety instructions before you use the device for the first time. This device may only be used in a home or office environment. Do not place on an instable surface. It may fall causing serious damage to the device or injury to the user. Please follow the instruction on how to place the device especially in respect to avoidance of tilting and falling down by keeping proper space to edges of table. The XY-table and display of CCTV’s contain moving parts. Please take care when adjusting the display or moving the XY-table. Injury may occur if fingers or clothing are caught in the operating mechanism. If you have difficulties in operating the unit safely, please seek advice or contact your local dealer. Connect power supply to a grounding-type power outlet only. Do not use the device if you find any damages at device or wires. If the device appears to be operating abnormally, or to be damaged in any way, please contact your BAUM dealer as soon as possible. If you smell smoke or an odour coming out of the device, turn off the power immediately. Do not try to repair the device yourself. Opening or removal of housing may cause damage or injury. 12 Do not allow sand or dust to come into contact with the device as this may lead to serious damage and could make repair impossible. Use the device with clean hands only. Do not use in locations where strong radio waves are emitted or where there is radiation. Keep a distance of at least 30 cm (approx. 12 in.) to mobile phones. Only use original accessories. Use of second source accessories may damage device or cause malfunction or safety issues. Do not use a power supply not made for this device. Only use the original power supply! Do not use the power supply with other devices. Avoid liquids and food near the device. Do not use or store the device in any of the following places as this may cause damage: Inside cars with the windows closed in the hot sun. In direct sunlight or close to heaters, radiators, etc. Locations subject to severe vibration such as on top of a washing machine. Locations subject to strong magnetism such as near loudspeakers. Humid places (bathroom), in water, or near water. In rain or snow Do not use or store below 0°C or above 40°C. Humidity shall be within 20% to 80% Avoid fast temperature changes If you bring the device from cold places into a warm room, humidity may condensate. Wait until dry and well tempered to room temperature before use. Unplug from mains before cleaning. Wipe dust and dirt from the device with a soft cloth dampened with a diluted neutral detergent, then wipe dry with a cloth. Do not bring in contact with water. 13 Do not insert objects into openings. Do not use device during thunderstorms. Unplug from mains during thunderstorms. We recommend use of an overvoltage protection adapter, which can be bought from your local electronics store. Please note, this does not provide a 100% protection from overvoltage. Do not insert or remove the plug with wet hands. Do not heat in a microwave oven, on a cooker or similar. Never disassemble, attempt to repair or modify device yourself. If liquids or metal fragments should enter device, switch it off and remove the power lead immediately. Do not pull the plug out by the lead when removing the power plug. Avoid shock. Do not throw or let fall. Repairs may only be carried out by BAUM service personnel or by service technicians authorized by BAUM Retec AG. Care and maintenance Avoid damp and water. Use only a clean, dry cloth to clean the housing. Do not use any cleaning fluids or solvents. Protect the device from extreme heat, e.g. from the sun, heating units, hot cars etc. With extreme cold and frost the device becomes inoperable and must be brought slowly back to room temperature. Under no circumstances must the device be warmed up or “thawed out” in a conventional oven, microwave oven or any other heating device! Avoid any mechanical damage to the housing or accessories. Use only the power supply provided. 14 Common problems and solutions So now it happened. VISIO does not work as expected and you are clueless if it is broken. Very often, a small reason can cause a big problem, which can be resolved easily. So please read the following checklist and try to find out what is wrong. If this does not help, please switch VISIO off, unplug the power cable from mains and contact our service department. Display and lights remain dark Please try to switch VISIO on again. If this does not help, make sure power supply is connected to both the VISIO and wall outlet and that wall outlet is live. You may want to connect another device to the wall outlet to check. Also check if mains cable is firmly seated in power supply! Only display remains dark, lights are on Is the light in the bottom of the displays, right of middle on? Is it blue? If not, switch display on. The display power button is directly left of the light and you can feel that raised button. Best you touch the edge and move your finger leftwards until you feel first the light and then the button. Now the light should be on and blue. If not, please check if power cable in back of display is seated properly. At VISIO 22+, the short power supply cable for the display comes out of the camera housing behind the display. Image is blurred Check if protective plastic foil is still covering camera lens (remove this foil) or whether this lens is dirty. If so, clean with a dry, soft cloth. Turn zoom knob clockwise in middle position. Press Auto focus button. Must show „AF ON“, else wise press again. Document cannot be read Turn zoom knob clockwise. Try different setting of Image optimizer button. XY-Table is not moving Move lever to leftmost position. 15 Letters are fluttering Increase zoom by turning zoom knob clockwise. Try different settings of Image optimizer button. Please contact our Service Department if you encounter any problems or have any questions: BAUM Retec AG - Service, In der Au 22, D-69257 Wiesenbach Germany Tel.: +49 6223 4909-0 E-mail: [email protected] Compliances See end of Manual for compliance declarations. Medical electrical equipment needs special precautions regarding Electro Magnetic Compatibility (EMC). It must be installed and serviced according to the EMC guidelines. WARNING: Use of accessories, transducers and cables other than those specified and sold with the device by the manufacturer as replacement parts may result in increase of emissions or decrease of immunity of the device. Environmentally friendly disposal according to EC-Directive 2002/96/EG The symbol (crossed garbage can), wich is also attached to the device, states that this device and its accessories, once come to the end of its life-time, should not be regarded as household waste. An environmentally-friendly way of final disposal is compulsory. This device contains electronic components. In order to avoid risks or dangers for the environment through non-professional waste disposal, the disposal of this device and its accessories must correspond to the valid EC-Directives or other local regulations. Please check your local regulations for proper disposing of this device or consult your local distributor. 16 Warranty BAUM Retec AG warrants the device, effective from the date of delivery, to be free of any defects in material and workmanship. Warranty is not transferable and does not apply to groups, multi users or agencies. This device has been designed for the individual purchaser to be used in home or office environments. BAUM Retec AG reserves the right to repair or replace with a similar or better product. In no event shall BAUM Retec AG or its distributors be liable for indirect or consequential damages. The original users’ remedies are limited to replacement of devices modules/parts. This warranty is valid only when service is done in the country of original purchase and with intact warranty seals. For additional warranty claims or service during or after warranty period, please refer to your local distributor. BAUM Retec AG does not take responsibility for use of this device other than described in this Manual. Warranty on new devices is 24 months. Warranty on used or refurbished devices is 12 months. Warranty on Consumable parts (Batteries, Braille Pins, Data carriers etc.) is 6 months. Warranty onrepairs and spare parts is 12 months. All defects caused by improper use or users fault are not covered by this warranty. Parts replaced during repair are transferred into ownership of BAUM Retec AG and will not be returned to the customer. In case of repair the device must be properly packed into its original shipping box or service box. Costs for packing, shipping and insurance are not covered by BAUM. 17 Defects and Repair If VISIO is broken – what to do? Did you check all settings and connections according to the manual? Did you remove the protective plastic film from the camera lens? Are you sure the mains outlet is live? Do not use a broken device! Unplug broken device from mains! Please do not hesitate to contact your local distributor or BAUM Retec AG. You can reach BAUM Retec AG at telephone number +49 (0) 6223 4909-0 in Germany. We will help you check your VISIO and in case it is broken we can mail a service box for shipping VISIO to our repairs department. Show this manual to the person who will help you packing VISIO in the service box. Contact: BAUM Retec AG In der Au 22 D-69257 Wiesenbach Germany Phone: + 49 (0) 6223 4009 – 0 Web: www.baum.de Email: [email protected] Email Service: [email protected] 18 Service box For shipping VISIO 22+ in the service box, proceed as follows: Switch off VISIO Unplug from mains Put display in upright position, fasten brake of XY-table Remove white foam parts and corrugated card board cover from box. Cover left and right side of display with foam parts. Hold VISIO on handle on upper side and put it in service box. Only fits in one direction into pre-shaped bottom space (see image). Insert corrugated card board cover on top and put power supply in smaller pocket. Close box. 19 Technical Data CCTV magnifying device with High-Resolution camera and widescreen display (up to 400% more Pixels as traditional CCTV’s) Refresh rate 60 Hz Display diagonal 54,61 cm (22 in.) in 16:9 format Monitor with LED Backlight Maintenance-free LED reading lights VISIO 22+: Full colour 7 False colours with enhanced contrast + Reverse image giving 14 combinations (black-white, black-yellow, black-cyan, black-green, black-magenta, blue-white and blue-yellow). Auto Focus Fix focus for handwriting Automatic exposure Zoom range approx. 2,8 to 60 times Lightweight design (approx. 11.5 kg (= approx. 26.5 lbs.) Dimensions: approx. 513 mm x 560 mm x 580 mm (= approx. 20.2 x 22 x 22.8 in.) Power supply: 100-240 V AC 50/60 Hz 1.7 A max. Power consumption: Operation / Standby: approx. 32 W / < 1 W Protection Class I Sales and Support: Manufacturer: BAUM Retec AG In der Au 22 D-69257 Wiesenbach Germany Phone: Fax: Email: Web: BAUM Systeme GmbH In der Au 22 D-69257 Wiesenbach Germany +49 (0) 62 23 / 4909-0 +49 (0) 62 23 / 4909-399 [email protected] www.baum.de 20 Informations for the Re-use of VISIO 22+ Product description: Stationary opto-electronic CCTV magnifying device for magnifying texts and images. The reading materials are being viewed and magnified by the camera and directly shown on the integrated monitor. Specific purpose: CCTV magnifiers are medical devices used to assist reading blackprint material. Visually impaired people use these devices to compensate their partial loss of vision or eye-illnesses. Product life time: Seven years from manufacturing date, provided that the recommended service and maintenance intervals have been complied with. Re-use / Installation and Maintenance: The device may only be repaired, technically refurbished and reconditioned by BAUM service personnel or by service technicians authorized by BAUM Retec AG. Further use or re-use is only allowed after a thorough technical cleaning and disinfection in combination with a safety check. Safety checks (§6 MP-BetreibV): The carry out of safety checks must explicitly only be done by BAUM Retec AG or by an organization authorized by BAUM Retec AG! BAUM Retec AG does not stipulate certain intervals or deadlines for safety checks. The statements made in §6 Medizinprodukte-Betreiberverordnung regarding intervals and deadlines are however recommended (at least every two years). An assessment of the safety condition of a device is made during a safety check according to German standard VDE 0751. 21 Special advice for transport and storage: For safety reasons it is necessary to store and transport this device either in its original packaging or in a designated service box. This device must be stored in its original packaging or in the designated service box and in a dry and closed storage space. The following conditions for storage and transport must be respected: • Temperature range: -10°C to +50°C • Relative air humidity: 30 % to 80 % Power cable: Please use only the original power cable that has been supplied by BAUM Retec AG. WARNING: Using other accessories than those specified and sold with the device by the manufacturer as replacement parts may result in increase of emissions or decrease of immunity of the device. © 2012 Copyright by BAUM Retec AG 22 23 Product Identity Sheet VISIO Type: VISIO Basic mono VISIO Basic color VISIO CS VISIO 19 VISIO 19+ VISIO 22 Basic mono VISIO 22 Basic color VISIO 22 CS VISIO 22 VISIO 22+ VISIO HD VisioBook Serial No.: _____________________ Manufacturer: BAUM Systeme GmbH, D-69257 Wiesenbach, Germany. Supplier: _____________________ Year of purchase: ______________ User* : 1. ___________________________________________________ 2. ___________________________________________________ 3. ____________________________________________________ 4. ____________________________________________________ 5. ____________________________________________________ End test: _____________________ Delivery date / Shipping date: ____________ Power supply: 100-240 V AC 50/60 Hz 1.7 A max. Power consumption: approx. 32 W Display size: TFT-Monitor 22 in. approx. B = 476 mm, H = 298 mm Installed by: ____________________________________________________ First safety check** : _____________________________________________ * In case of another Customer or user, the next user must be mentioned on next line. ** In case of re-using a device a new safety check is required! 24 Sales and Support: BAUM Retec AG In der Au 22 D-69257 Wiesenbach Germany Phone: Fax: E-Mail: Web: +49 (0) 62 23 / 4909-0 +49 (0) 62 23 / 4909-399 [email protected] www.baum.de Manufacturer: BAUM Systeme GmbH In der Au 22 D-69257 Wiesenbach Germany Be advised this manual is subject to error and change without prior notice. © 2012 Copyright by BAUM Retec AG 25


![Mode d`emploi [ pdf / 8 MB ] - RETEC](http://vs1.manualzilla.com/store/data/006514927_1-63183ac72c1a9064bd355c8b59e6d959-150x150.png)