1
INTREPID User Manual
Library | Help | Top
Subsections of datasets (T21)
1
| Back |
Subsections of datasets (T21)
Top
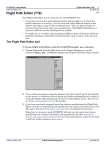
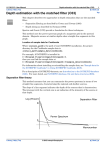
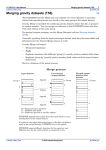
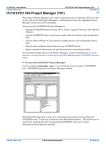
The INTREPID Subsection tool can extract a subset of data from a dataset and save
it as a new separate dataset.
For a practical introduction to this tool, see the Guided Tour Managing INTREPID
datasets (G06).
It can extract data lying within or outside:
•
•
A rectangular geographic area defined by
•
Corner points or
•
Centroid, size and orientation,
An existing polygon dataset or a polygon that you trace on the screen.
It can also (in combination with a geographic region if required) extract data
•
Selected by a logical expression and/or
•
Subsampled from the original dataset.
You can choose whether to leave out or retain but set to null the data that is to be
excluded from the new dataset.
If the Subsection process removes part of the data from the middle of one or more
lines in a line dataset, you can choose whether to convert each split line into two
separate lines or to leave them as one line.
The Subsection tool displays the dataset graphically. You can choose the degree of
detail (subsampling interval) used in the display of a vector dataset.
You can save a traced polygon as a new polygon dataset for later use if required. In
this way the Subsection tool can act as a utility for creating polygon datasets.
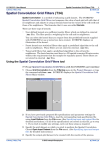
The Subsection tool
>> To use Subsection with the INTREPID graphic user interface
Library | Help | Top
1
Choose Subsection from the File menu in the Project Manager, or use the
command subset.exe. INTREPID displays the Subsection Main window.
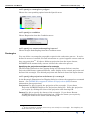
2
If you have previously prepared file specifications and parameter settings for
Subsection, load the corresponding task specification file using Load Options from
the File menu. (See Specifying input and output files for detailed instructions.) If
all of the specifications are correct in this file, go to step 8. If you wish to modify
any settings, carry out the following steps as required.
© 2012 Intrepid Geophysics
| Back |
INTREPID User Manual
Library | Help | Top
3
Subsections of datasets (T21)
2
| Back |
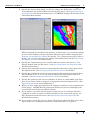
Specify the dataset from which you wish to extract the Subsection. Use Load
Vector Dataset or Load Grid Dataset from the File menu. (See Specifying input
and output files for detailed instructions.) INTREPID displays the dataset in the
Subsection Main window.
While preparing for the Subsection process, or afterwards, you can zoom (enlarge
an area of the display) and pan (examine different regions while enlarged) (See
Zooming and panning the display for details). For a large dataset that is slow to
display you can also determine the display subsampling interval (See Specifying
the display resolution for instructions)
4
Specify the output dataset to be created with the results of the process. Use
Specify Output from the File menu. (See Specifying input and output files for
detailed instructions.)
5
Specify the geographic criteria for extracting the Subsection using options from
the Spatial menu (See Specifying the Subsection criteria for details).
6
Specify the conditional criteria for extracting the Subsection using options from
the Condition menu. You can use this in conjunction with Spatial criteria if
required. (See Specifying the Subsection criteria for details).
7
Specify the options for the process (whether to delete or retain nulls, split lines,
pass or reject data inside a polygon) using options from the Options menu. (See
Subsection options for more information.)
8
When you have made specifications and settings according to your requirements,
choose Apply. INTREPID will perform the Subsection process and display the
new dataset in the Subsection Main window.
9
If you wish to record the specifications for this process in a task specification
(.job) file in order to repeat a similar task later or for some other reason, use
Save Options from the file menu. (See Specifying input and output files for
detailed instructions.)
10 If you wish to repeat the process, choose Close Dataset from the File menu, then
repeat steps 2–9, varying the parameters and/or data files as required.
Library | Help | Top
© 2012 Intrepid Geophysics
| Back |
INTREPID User Manual
Library | Help | Top
Subsections of datasets (T21)
3
| Back |
11 To exit from Subsection, choose Quit from the File menu.
To view the current set of specifications choose Report from the Window menu.
INTREPID displays the Subsection Report window. See Displaying options and
using task specification files for details and an example of a set of specifications.
During the Subsection process, INTREPID displays messages in the Status section
of the Command area in the Subsection Main window. These messages indicate
INTREPID's current activity.
You can view Help information by choosing options from the Help menu (See Help
below).
You can execute Subsection as a batch task using a task specification (.job) file that
you have previously prepared. SeeDisplaying options and using task specification
files for details.
Specifying input and output files
To use Subsection, you will need to specify the vector or grid dataset from which you
wish to extract the subsection, and the name of the new subsection dataset.
Choose the options as required from the File menu.
In each case INTREPID displays an Open or Save As dialog box. Use the directory
and file selector to locate the file you require. (See "Specifying input and output files"
in Introduction to INTREPID (R02) for information about specifying files).
Vector dataset notes: INTREPID obtains the X and Y data from the dataset
aliases. The dataset must have the following aliases identifying appropriate field
files.
Alias
Field File
X
X coordinate (geographic location)
Y
Y coordinate (geographic location)
See "Vector dataset field aliases" in INTREPID database, file and data structures
(R05) for more information about aliases.
Load Vector Dataset Use this option to specify a vector dataset from which you
wish to create the subsection. INTREPID will open the dataset and display its
traverse lines or points in the Subsection Main window.
Load Grid Dataset Use this option to specify a grid dataset from which you wish to
be create the subsection. INTREPID will open the dataset and display it in the
Subsection Main window.
Specify Output Use this option to specify the name for the output vector or grid
Library | Help | Top
© 2012 Intrepid Geophysics
| Back |
INTREPID User Manual
Library | Help | Top
Subsections of datasets (T21)
4
| Back |
dataset you are creating with the subsection process.
Load Options If you wish to use an existing task specification file to specify the
Subsection process, use this option to specify the task specification file required.
INTREPID will load the file and use its contents to set all of the parameters for
the Subsection process. (See Displaying options and using task specification files
for more information).
Save Options If you wish to save the current Subsection file specifications and
parameter settings as an task specification file, use this option to specify the
filename and save the file. (See Displaying options and using task specification
files for more information).
The Subsection tool display
Zooming and panning the display
You can enlarge and reduce the display (zoom in and out) and view different parts of
it (pan).
>> To zoom in and out (enlarge/reduce) by steps
To zoom in (enlarge the display) choose Zoom In from the Command area. Each time
you choose this button, INTREPID will enlarge the display by 25%.
To zoom out (reduce the display) choose Zoom Out from the Command area. Each
time you choose this button, INTREPID will reduce the display by 25%.
>> To zoom in on a selected area of the display
1
Ensure that you are not currently tracing a polygon (Check that the Trace a
Polygon option in the Spatial menu is turned off—See Creating polygons on the
screen for details).
2
Hold down the left mouse button and drag diagonally (corner to corner) across the
area that you wish to enlarge. INTREPID will enlarge the selected region to fill
the display area of the window.
If you choose Zoom Out, having used this process to zoom in, INTREPID will
immediately zoom out to the full dataset display.
Library | Help | Top
© 2012 Intrepid Geophysics
| Back |
INTREPID User Manual
Library | Help | Top
Subsections of datasets (T21)
5
| Back |
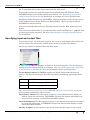
To pan the display (view different parts)
When you have zoomed in, the Pan/Zoom indicator in the Command area consists of a
small square within a larger square. The large square represents the whole display
and the small square the part visible on the screen. When you drag the small square
to a different part of the large square INTREPID shows the corresponding part of the
display.
If you are viewing the whole display, the small square may occupy the whole of the
large square.
Specifying the display resolution
This section applies only to vector datasets. If you are processing a large vector
dataset, INTREPID may take some time to display the data. It normally displays
every 10th data point (the display subsampling interval). To speed up the data
display on the screen, decrease the subsampling interval.
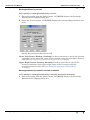
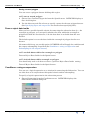
To modify the display subsampling interval, choose Display Subsampling from the
Options menu. INTREPID displays the Subsampling for Display dialog box.
Specify the subsampling interval you require in the Subsampling Rate text box, then
choose OK.
Note: Increasing the value of the Subsampling Rate parameter means increasing the
interval—INTREPID displays fewer data points.
Library | Help | Top
© 2012 Intrepid Geophysics
| Back |
INTREPID User Manual
Library | Help | Top
Subsections of datasets (T21)
6
| Back |
INTREPID will redisplay data in the Subsection Main window using the new
subsampling interval.
Be careful not to confuse output subsampling with display subsampling. The output
subsampling interval affects the data that INTREPID copies to the new dataset. The
display subsampling interval affects the way INTREPID displays the dataset in the
Subsection tool main window. See Subsampling for the output dataset for more
information about output subsampling.
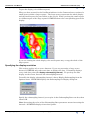
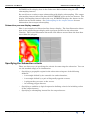
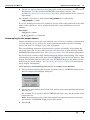
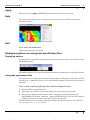
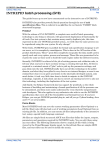
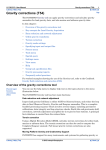
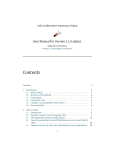
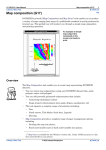
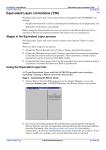
Subsection process display example
Here is an example of a Subsection line dataset display. The first illustration shows
part of the original dataset display with a polygon specified as the subsection
criterion. The second illustration shows the new dataset created from the data that
was within the polygon.
Specifying the Subsection criteria
There are three ways of specifying the criteria for extracting the subsection. You can
use the methods singly or in combination.
•
Library | Help | Top
Specifying a geographic region for the subsection using one of the following
methods
•
A rectangle defined by its centroid, size and orientation,
•
A rectangle defined by a pair of diagonally opposite corners,
•
A polygon that you trace on the screen,
•
An existing polygon dataset,
•
Specifying a condition (a logical expression defining criteria for including values
in the output dataset)
•
Specifying a subsampling interval for the output dataset.
© 2012 Intrepid Geophysics
| Back |
INTREPID User Manual
Library | Help | Top
Subsections of datasets (T21)
7
| Back |
>> To specify a rectangle or polygon
Choose the corresponding option from the Spatial menu
>> To specify a condition
Choose Expression from the Condition menu.
>> To specify an output subsampling interval
Choose Output Subsampling from the Condition menu.
Rectangles
You can define a rectangular geographic region for the subsection process. It can be
defined in terms of centroid, size and orientation or a pair of opposite corners and can
have any projection12. If it has a different projection from the input dataset,
INTREPID will automatically convert it before the subsection process.
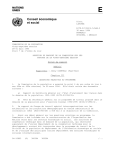
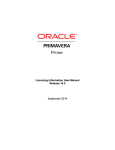
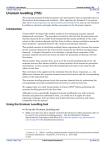
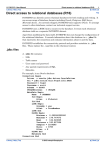
Specifying the projection and datum of a rectangle
The Rectangle Dimensions for Clipping dialog box (illustrated below) contains
Projection and Datum command buttons, and a display of the current projection and
datum of the rectangle. The default projection and datum is that of the input dataset.
>> To specify the projection and datum of a rectangle
In the Rectangle Dimensions for Clipping dialog box choose the appropriate command
button. See INTREPID’s supported datums and projections (R09) for more
information about projections.
Projection Use this to specify the projection of the rectangle. If you choose
Projection INTREPID displays the Projections dialog box. Select the projection
you require by clicking the name of the projection and choosing OK.
Datum Use this to specify the datum of the rectangle. If you choose Datum
INTREPID displays the Datum dialog box. Select the datum you require by
clicking the name of the datum and choosing OK.
1.2 If the rectangle is geodetic, then it may not strictly be a rectangle. For simplicity we
shall still refer to it as such.
Library | Help | Top
© 2012 Intrepid Geophysics
| Back |
INTREPID User Manual
Library | Help | Top
Subsections of datasets (T21)
8
| Back |
Rectangle defined by corners
>> To specify a rectangle defined by corners.
1
Choose Rectangle from the Spatial menu. INTREPID displays the Rectangle
Dimensions for Clipping dialog box.
2
Select the Corners option. INTREPID displays the corresponding parameter text
boxes.
Specify the parameters then choose OK.
Lower Left Corner: Easting, Northing Use these text boxes to specify the location
coordinates of the lower left corner of the rectangle using the rectangle's distance
units (See Specifying the projection and datum of a rectangle).
Upper Right Corner: Easting, Northing Use these text boxes to specify the
location coordinates of the upper right corner of the rectangle using the
rectangle's distance units (See Specifying the projection and datum of a
rectangle).
Rectangle defined by centroid, size and orientation
>> To specify a rectangle defined by centroid, size and orientation.
1
Library | Help | Top
Choose Rectangle from the Spatial menu. INTREPID displays the Rectangle
Dimensions for Clipping dialog box.
© 2012 Intrepid Geophysics
| Back |
INTREPID User Manual
Library | Help | Top
2
Subsections of datasets (T21)
9
| Back |
Select the Centroid Dimensions option. INTREPID displays the corresponding
parameter text boxes.
Specify the parameters then choose OK.
Centroid: Easting, Northing Use these text boxes to specify the coordinates of the
centroid of the rectangle using the rectangle's distance units (SeeSpecifying the
projection and datum of a rectangle).
Dimensions: X Direction, Y Direction Use these text boxes to specify the
dimensions of the rectangle using the rectangle's distance units (See Specifying
the projection and datum of a rectangle).
Rotation Use this text box to specify the orientation of the rectangle. The default
value is 0, which orients the Y dimension (see above) in the North/South direction.
The rotation is expressed in degrees, positive in the clockwise direction, so that,
for example, if Rotation is +45°, the Y dimension will be in the North–Easterly
direction.
Existing Polygon Datasets
You can specify an existing polygon dataset to define the region for the subsection.
>> To use an existing polygon dataset
1
Library | Help | Top
Choose Load Existing Polygon from the Spatial menu. INTREPID displays an
Open dialog box.
© 2012 Intrepid Geophysics
| Back |
INTREPID User Manual
Library | Help | Top
2
Subsections of datasets (T21)
10
| Back |
Use the directory and file selector to locate the dataset you require. (See
Specifying input and output files for details about specifying files). INTREPID
displays the outline of the polygon dataset.
Creating polygons on the screen
You can use the mouse to trace a new polygon directly onto your dataset display for
use as the region for the subsection.
You can save this as a new polygon dataset for later use if required. In this manner
the Subsection tool can act as a utility for creating polygon datasets.
If you make an error or no longer require the traced polygon, you can erase it from the
display.
>> To trace a polygon on the screen.
Library | Help | Top
1
Choose Trace a Polygon from the Spatial menu. INTREPID will enter polygon
trace mode and turn on the Trace a Polygon option in the Spatial menu.
2
Click each vertex of the required polygon. You do not need to close the polygon
(i.e., you do not need to click the first vertex again at the end). INTREPID will
create a closed polygon with the vertices you specify.
3
Choose Trace a Polygon from the Spatial menu again. INTREPID will exit from
polygon trace mode.
© 2012 Intrepid Geophysics
| Back |
INTREPID User Manual
Library | Help | Top
Subsections of datasets (T21)
11
| Back |
Saving a traced polygon
You can create a polygon dataset defining this region.
>> To save a traced polygon
1
Choose Save Current Polygon As from the Spatial menu. INTREPID displays a
Save As dialog box.
2
Use the directory and file selector to specify a name for the new polygon dataset.
(See Specifying input and output files for details about specifying files).
Pass or reject data inside
After you have specified spatial criteria for extracting the subsection data (i.e., the
rectangle or polygon), you can specify whether the data within the rectangle or
polygon will form the new dataset, or be the data that is excluded from the new
dataset.
The default option is to use the data inside the rectangle of polygon for the new
dataset.
No matter which way you set this option, INTREPID will still apply the condition and
the output subsampling if specified (See Conditions—using an expression and
Subsampling for the output dataset).
>> To exclude data within the rectangle or polygon
Turn on Reject Data Inside in the Spatial menu.
>> To include data within rectangle or polygon
You should only need to do this to reverse a previous Reject Data Inside setting.
Turn off Reject Data Inside in the Spatial menu.
Conditions—using an expression
You can use a logical expression as a criterion for extracting the Subsection. You can
use this alone or in conjunction with spatial criteria and/or subsampling.
To specify a logical expression for the subsection process
1
Library | Help | Top
Choose Expression from the Conditions menu. INTREPID displays the
Subsection Condition dialog box.
© 2012 Intrepid Geophysics
| Back |
INTREPID User Manual
Library | Help | Top
2
Subsections of datasets (T21)
12
| Back |
Specify any logical expression involving fields in the vector dataset / values in the
grid dataset. Use the standard INTREPID expressions notation. (See
INTREPID expressions and functions (R12) for a full description of the syntax of
expressions.
For example, if you have a field called LINE_NUMBER you could specify:
LINE_NUMBER > 1200
If you are testing grid values in a condition, use the name of the grid itself as the field
name in the expression. For a multiband grid add a colon followed by the band
number.
Examples:
raw_grid < 2016
K_Th_U_grid:1 > 1723.56
Subsampling for the output dataset
Output subsampling works for vector datasets only. If you are creating a subsection of
a vector dataset you can reduce the detail in the output dataset by only including
some of the data, for example every 10th data point.
The corresponding operation on grid datasets consists essentially of increasing the
size of the grid cells. If you wish to perform such processes on grid datasets use the
INTREPID Grid Operations tool. See Grid Operations (T25) for further information.
Be careful not to confuse output subsampling with display subsampling. The output
subsampling interval affects the data that INTREPID copies to the new dataset. The
display subsampling interval affects the way INTREPID displays the dataset in the
Subsection tool main window. See Specifying the display resolution for information
about display subsampling.
>> To specify a subsampling interval for an output vector dataset
1
Choose Output Subsampling from the Condition menu. INTREPID displays the
Dataset Output Subsampling dialog box.
2
Specify the subsampling interval (in data points) in the corresponding Subsample
Rate text box.
For example, if you specify 5 then INTREPID will copy every 5th data point to the
output dataset.
Note: Increasing the value of the Subsample Rate parameter means increasing
the interval—INTREPID displays fewer data points.
3
Library | Help | Top
Choose OK.
© 2012 Intrepid Geophysics
| Back |
INTREPID User Manual
Library | Help | Top
Subsections of datasets (T21)
13
| Back |
Subsection options
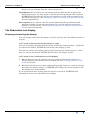
Deleting or retaining nulls
You can choose whether you wish INTREPID to omit the excluded data from the new
dataset or retain it but set all values to null. INTREPID will normally omit the
excluded data.
>> To retain the excluded data but set all of its Z values set to null
Choose Retain Nulls from the Options menu.
INTREPID will place a check mark against this option.
>> To omit the excluded data
You should only need to do this to reverse a previous Retain Nulls setting.
Choose Delete Nulls from the Options menu. INTREPID will place a check mark
against this option.
Splitting lines
This section applies only to line datasets. If the Subsection process removes part of
the data from the middle of one or more lines in a line dataset, you can choose
whether to convert the separated line segments into separate lines or to leave them
as a single line.
If you leave the split line as a single line, there may be a large difference in Z values
on either side of the gap. This could cause time consuming, unnecessary and
irrelevant smoothing activity in several INTREPID tools. If the two line sections
become two separate lines, these problems are avoided.
If you split the lines, all lines retain the original line number.
The default option is for INTREPID to leave the data as a single line.
>> To specify that lines should be split
Turn on the Split Lines option in the Options menu.
>> To specify that lines should not be split
Turn off the Split Lines option in the Options menu.
Library | Help | Top
© 2012 Intrepid Geophysics
| Back |
INTREPID User Manual
Library | Help | Top
Subsections of datasets (T21)
14
| Back |
Apply
When you choose Apply, INTREPID performs the subsection operation.
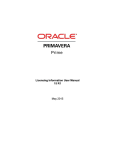
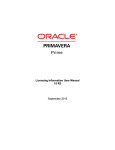
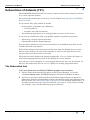
Help
You can use the Help menu to display help text on the topics shown in the menu
illustration below.
Exit
>> To exit from Subsection
Choose Quit from the file menu.
Displaying options and using task specification files
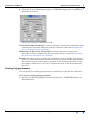
Displaying options
To display the current file specifications and parameter settings, choose Report from
the Window menu.
INTREPID displays the Subsection Report window containing the task specifications.
Using task specification files
You can store sets of file specifications and parameter settings for Subsection in task
specification (.job) files. Also, at V5.0, the protobuf option is delivered in the form of
task files.
>> To create a task specification file with the Subsection tool
1
Specify all files and parameters.
2
If possible, execute the task (choose Apply) to ensure that it will work.
3
Choose Save Options from the File menu. Specify a task specification file
(INTREPID will add the extension .job) INTREPID will create the file with the
settings current at the time of the Save Options operation.
For full instructions on creating and editing task specification files see INTREPID
task specification (.job) files (R06).
Library | Help | Top
© 2012 Intrepid Geophysics
| Back |
INTREPID User Manual
Library | Help | Top
Subsections of datasets (T21)
15
| Back |
>> To use a task specification file in an interactive Subsection session
Load the task specification (.job) file (File menu, Load Options), modify any settings
as required, then choose Apply.
Library | Help | Top
© 2012 Intrepid Geophysics
| Back |
INTREPID User Manual
Library | Help | Top
Subsections of datasets (T21)
16
| Back |
>> To use a task specification file for a batch mode Subsection task
Type the command subset.exe with the switch –batch followed by the name (and
path if necessary) of the task specification file.
For example, if you had a task specification file called surv329.job in the current
directory you would use the command
subset.exe –batch surv329.job
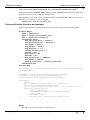
Task specification file notes and example
Here is an example of a Subsection task specification file, using Parms format.
Process Begin
Name = subsection
GRID = /disk1/surv/mlevel_grid
OUT = /disk1/surv/mlevel_A
Parameters Begin
Box_Centroid_East = 740000.0
Box_Centroid_North = 8415000.0
Box_Width = 2000.0
Box_Height = 1000.0
Box_Rotation = 0.0
Output_Subsampling = 1
Shrink = Yes
SplitLines = No
Exclude = No
Box_Projection = "TMAMG54"
Box_Datum = "AGD66"
Search_Condition = "mlevel_grid>1969"
Parameters End
Process End
A similar job file, this time written using V5.0 protobuf syntax
is shown below.
# Example task file V5.0 protbuf syntax - subset
# Subsection a line dataset using a bounding polygon.
# Usage: fmanager -batch subsection_line_polygon.task
IntrepidTask {
Subset {
IN: “../datasets/ebagoola_S..DIR”; # a line dataset
CLIP_POLY: “../datasets/eba_polygon..DIR”;
OUT: “../datasets/ebagoola_S_subset..DIR”; # what you want to create
ReportFile: “subsection.rpt”;
Output_Subsampling: 1;
RectangleOption: None; # no rectangular clipping
Shrink: true;
SplitLines: false;
Exclude: false; # keep the data inside the box!!
}}
Notes
•
Library | Help | Top
Use IN = to specify an input vector dataset
© 2012 Intrepid Geophysics
| Back |
INTREPID User Manual
Library | Help | Top
Library | Help | Top
Subsections of datasets (T21)
17
| Back |
•
Use GRID = to specify an input grid dataset
•
The Box_Projection and Box_Datum statements apply only to rectangles, not to
polygon datasets, which have their own projections.
•
If you wish to use a traced polygon in a task specification file, you must save it as
a polygon dataset, using Save Current Polygon As from the Spatial menu.
© 2012 Intrepid Geophysics
| Back |