1
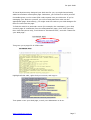
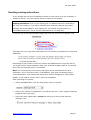
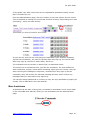
24 April 2008
Web Site Mini-Guide:
CourseBot Quick Start
This guide is a “quick start” to using the CourseBot software, which you can use for
sending newsletters and on-line courses.
To find out more about the full features available in CourseBot, download the
CourseBot User Manual, which you can do by clicking the HELP button next to
“CourseBot” in the administration page:
The full User Manual is quite detailed, and will take you some time to read and
understand. That’s why we also have this guide, which will help you to get started.
Initial Setup
The CourseBot installation comes with two courses already set up for you:
•
A newsletter, with a welcome message. You can add to this to construct your
own e-mail newsletter.
•
A “tip of the week” course that sends an inspirational quotation each week. You
are welcome to offer this to your subscribers, or simply use it as an example
when creating new courses.
Note: CourseBot doesn’t make any distinction between a “newsletter” and a
“course”. As far as it’s concerned, everything is a course, so you will see the term
“course” used throughout CourseBot, in the User Manual, and in this guide.
To see the courses, log in to your administration page and go to “View courses”:
Click this and you’ll see all of your courses:
www.virtualsync.com.au
Page 1
24 April 2008
You can return to this list whenever you see this link:
Here’s a brief summary of what each column means:
•
Clicking the course title takes you to details of that particular course. This is the
usual way of working on a particular course.
•
The Flags column shows various settings for that course. There is a key at the
bottom of the page showing what each flag means. In the example courses:
¾
Both use Smart Text
¾
The weekly quotations loop forever
¾
The newsletter is “permanent”
, so that subscribers remain enrolled even
when there are no scheduled messages to send them;
¾
The newsletter is double opt-in
, so that subscribers have to verify their
subscription by clicking a link in an e-mail message. This ensures that they
have subscribed themselves, rather than somebody else subscribing them
without their permission.
, which allows you to format your messages easily;
;
•
The Units column shows the number of scheduled messages for that course.
The weekly quotations course has 57 messages (about a year’s worth) and the
newsletter has only one (the welcome message). Clicking this number is a quick
way of listing the messages.
•
The List column shows the number of subscribers, currently zero for both
courses. When there are subscribers for a course, you can click the number,
which is a quick way of listing the subscribers.
•
The Delete column allows you to delete a course.
Configuring the newsletter
Let’s change the newsletter configuration slightly to make it match your
requirements. We’ll change the title, thank-you message and welcome message.
To start, click the newsletter course title:
This takes you to a list of commands for this course. You can return to this page
any time you see this link:
Click the “Change the general course information” link:
www.virtualsync.com.au
Page 2
24 April 2008
Title
Change the newsletter title to something more appropriate for you:
Thank you message
The next field is the “thank you” message, which appears on the Web page after
somebody signs up. This is the default message:
Note the use of “FIRST-NAME”, which is replaced by the subscriber’s first name;
and “COURSE-TITLE”, which is replaced by the title from the previous field.
Note that the subscriber will also receive a welcome message by e-mail (which we’ll
look at next). If you have a specific message for them, it’s better to put it in that
message than on the thank-you page.
However, you might like to modify the wording of the thank-you message slightly.
For example, it might read better as “… signing up for Joe’s Thoughts.” rather than
“… signing up for the Joe’s Thoughts mailing list”.
Leave the rest of the fields on this page unchanged, and click the Change button at
the bottom of the page:
You will see that the title has now changed:
www.virtualsync.com.au
Page 3
24 April 2008
Welcome message
Now let’s change the welcome message that a new subscriber receives. Start by
clicking the “View/change the units (summary)” link:
You’ll see the list of messages (known as “units”) here:
In this case, there’s only one, but if you had more messages, they would be listed
here as well (see the weekly quotations course, for example).
To look at the current welcome message, click the preview icon
in a new window:
and it will open
A few things to note here:
•
It has proper formatting and includes your branding;
•
The date is automatically inserted into the message;
•
The course title you set (“Joe’s Thoughts”) appears at the top of the message;
•
The message can be personalised with the subscriber’s name. Whenever you’re
previewing messages, it uses the name “Jane Smith”. In a real message, of
course, it would use the subscriber’s name.
www.virtualsync.com.au
Page 4
24 April 2008
•
There is a “Manage Subscription” link at the bottom, which allows them to
unsubscribe, change their e-mail address, or switch to a text-only version.
To see the text-only version, close this window, and click the text preview icon
instead. Again, this opens a new window:
Close this window.
The default welcome message you see here is adequate, but you might like to
improve it by editing it. At the least, it’s a good idea to add your name to the
welcome message.
To do this, click the edit icon
, which opens up the edit page:
Change the subject and/or message. Again, note the use of “FIRST-NAME” to
personalise the message.
After making the changes, click the Change button, which takes you back to the list
of units. Preview the message again to make sure you’re happy with the new
message.
www.virtualsync.com.au
Page 5
24 April 2008
Enrol in a course
It’s a good idea to enrol in all of your own courses, so that you can be sure that you
see them exactly the way your subscribers see them. So let’s enrol in the
newsletter course as an example.
Go back to the course page, scroll down to the “Enrolment form” section, and click
“Test an enrolment now”:
This opens an enrolment window, which you should fill in:
Because the newsletter is a double opt-in list, you’ll get a message to that effect:
Follow these instructions to complete your enrolment. Check that you get the
welcome message correctly.
After enrolling, go back to the course list and you’ll see that there is now one
subscriber on the newsletter list:
Adding an enrolment form to your Web site
To make your newsletter available to the public, you have to add an enrolment
form to your Web site.
www.virtualsync.com.au
Page 6
24 April 2008
If Virtual Synchronicity designed your Web site for you, we might have already
added a newsletter subscription page. Otherwise, you will have to add it yourself.
CourseBot gives you the exact HTML code to paste into your Web site. If you’re
managing your Web site yourself, you will cut and paste this code into the
appropriate page. Alternatively, you might send this code to your Web designer for
them to insert into the page.
To find the code for a particular course (for example, the newsletter), go to that
course’s page of commands (from the administration page, click “View courses”,
then click that course title), scroll down to “Enrolment form”, and click “Paste into
your Web page”:
This gives you a page full of HTML code:
Highlight all this code, right-click your mouse, and copy it:
Then paste it into your Web page, or ask your Webmaster to do so.
www.virtualsync.com.au
Page 7
24 April 2008
Enrolling existing subscribers
If you already have a list of subscribers stored in some other form (for example, in
Outlook or Excel), you can transfer them en masse to CourseBot.
Note: One of the conditions of using CourseBot is that all subscribers have given
explicit permission to be on your mailing list. So please make sure that that is
the case. For instance, if you have collected their business card but they didn’t
explicitly ask to be added to your mailing list, you cannot include them on a
CourseBot mailing list. This is a strict requirement of our Web host.
To do this, go to the administration page and click the “Enrol lots of people” link:
This takes you to a page with instructions on how exactly to prepare the names and
addresses:
Depending on the format in which the names and addresses are currently stored,
you might require some assistance from your technical support staff for converting
them into the required form for CourseBot.
Note: You must specify a first name, last name and e-mail address for each
subscriber. If you only have their e-mail address, give them the dummy name
Friend Subscriber. This means that when they receive messages to “Dear FIRSTNAME”, it will read as “Dear Friend”, which is acceptable.
After preparing the names:
•
Select “NEWSLETTER” from the drop-down menu of courses:
•
Paste in the names and addresses (or load the CSV file, if your support staff has
prepared them that way).
•
Leave the other fields blank, except for ticking the “Don’t send welcome
message” box:
www.virtualsync.com.au
Page 8
24 April 2008
(The reason you tick this is that these are existing subscribers, so they don’t
require another welcome message)
•
Click the Enrol button.
This will add all the people to the list.
CourseBot will check for duplicates, warn you about them, and ignore them.
However, if it finds a mistake in the format of the names and addresses, it informs
you and doesn’t process any names at all. In that case, fix the mistake and
submit them all again.
Preparing course messages
In the following section, we’ll look at the process for sending a newsletter to your
subscribers. Before we do that, though, let’s look at some hints on preparing the
text.
CourseBot uses a system called “Smart Text”, which allows you to type text easily
and have it formatted nicely without having to understand HTML coding. The full
documentation for Smart Text is at www.vsplugins.com/smart_text. In this guide,
we’ll just show you the most common features.
Line wrapping and paragraphs
Write your text as normal, with a blank line between each paragraph.
It doesn’t matter whether you hit the Enter key at the end of each line or not.
CourseBot will wrap the lines correctly to fit the user’s screen width.
Bold and italics
To make some text bold, put two asterisks before it and two asterisks after it, like
this:
If you continue, you will **lose all your data** immediately.
To put some text in italics, use underscores instead of asterisks, like this:
If you continue, you will __lose all your data__ immediately.
Bullet points
Start each bullet point line with an asterisk, like this:
* First bullet point
* Second point, which spills over more than one
line
* Third point and whatever details you want to include
Headings
You could simply use bold text for headings and sub-headings, but a better option
is to use the special heading formatting, like this:
=== Top-Level Heading ===
www.virtualsync.com.au
Page 9
24 April 2008
text goes here ...
=== Another Heading ===
etc.
Note the spaces on either side of the text, separating it from the dashes - they are
required!
Links to Web pages
Here’s an example of a line with a link to an external Web page:
Find out more at [http://www.example.com our Web site].
The link starts with a square bracket [, then the full Web address of the page, then
a space, then the text you would like to appear for the link, then a closing square
bracket ].
Pictures
To insert a picture, you first have to prepare it at the right size, save it as a gif or
jpg file, upload it to your Web server, and know its Web address.
If you’re new to preparing graphics for the Web, read our separate guide on Web
Graphics.
To test that it’s ready, type its Web address in your browser and the picture should
appear. Then insert a line like this into your text:
<img src="http://www.example.com./pics/falcon.jpg">
where of course you replace the Web address above with your own.
You can align the picture to the left or right of text, like this:
<img src="http://www.example.com./pics/falcon.jpg" align=right>
<img src="http://www.example.com./pics/falcon.jpg" align=left>
Sending a newsletter
Now let’s look at the process of sending a newsletter to your mailing list.
If you’ve got a brand new list with very few subscribers, it might be worth waiting a
while until you have enough subscribers to make it worthwhile writing to them.
However, don’t wait too long, or the first subscribers will forget about you.
Make sure that you are on the newsletter mailing list yourself, so that you can
verify that the message has been sent to the list.
Prepare the text of the newsletter in, say, Microsoft Word or Windows Notepad.
Remember to use the Smart Text features described above for formatting.
www.virtualsync.com.au
Page 10
24 April 2008
Then go to the newsletter course page (from the administration page, click “View
courses”, then click the newsletter title) and click “Send e-mail to subscribers”
under Current Enrolments:
(Be careful, because there is also a section for Past Enrolments further down the
page, with a similar set of options)
This now opens the sending window. Fill it in as follows:
•
Fill in the e-mail subject.
•
Then fill in the message body by pasting it directly into the Message box.
•
Then scroll down to the Preview Your Message section:
•
The first time, fill in your e-mail address and don’t tick the checkbox. Then click
the Send Message button to send the message to yourself. Make any changes
required and repeat this step until you’re happy with the message.
•
Then keep your e-mail address there and do tick the checkbox. Click the Send
Message button again, and this time it will send off your message to a spamchecking service, which e-mails you a report. If there are too many “spam-like”
words and phrases, re-word the message and repeat this step until you’re
happy.
•
Finally, clear out your e-mail address, un-tick the box and click Send Message.
This pops up a confirmation window, and then sends your message to the list.
The software that distributes the e-mail to the mailing list checks for new messages
every 10 minutes, so wait 10-15 minutes for it to arrive in your mailbox.
Creating a course
Most of this guide has been about managing your newsletter, and that’s because it
will almost certainly be one of your most important marketing tools.
However, CourseBot can work with on-line courses as well, which are scheduled to
be sent out at pre-defined intervals whenever somebody subscribes.
If you’re planning to create your own on-line courses, it really is worth reading the
CourseBot User Manual in detail, because it covers them in depth. For the purposes
www.virtualsync.com.au
Page 11
24 April 2008
of this guide, let’s take a brief look at the inspirational quotations weekly course
that is included for you.
From the administration page, click the number in the Units column for this course
(This is identical to clicking the course title and then clicking “View/change the units
(summary)”, which we used earlier):
This shows you a list of units for this course:
As you can see, this has one unit going out immediately (the welcome message,
just like the newsletter), the next on the day after they sign up, the next a week
after they sign up, the next 2 weeks after, and so on.
The individual units are written in Smart Text, as described earlier.
The course has an enrolment form, just like the newsletter. The main difference
with enrolments, though, is that when somebody signs up for the course, they will
start receiving the messages in sequence; whereas when they sign up for the
newsletter, they will receive the welcome message but they won’t receive any
messages that you sent before they signed up.
You can also assign passwords to courses, so they are only accessible to people you
choose. This is described in the User Manual.
More Assistance
As described at the start of this guide, CourseBot is described in much more detail
in the CourseBot User Manual, which you can download from the administration
page:
www.virtualsync.com.au
Page 12