1
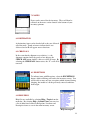
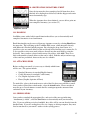
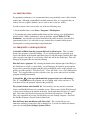
USER MANUAL
LOADMATE INVENTORY
______________________________________
23121 Verdugo Drive * Laguna Hills * CA * 92653 Tel: (949) 837-6283
www.techmateinternational.net * [email protected]
1
TABLE OF CONTENTS
1.1 INTRODUCTION
1.2 HARDWARE
1.3 GETTING STARTED
2.1 INVENTORY PROGRAM
2.2 OPEN NEW / EXISTING FILE
2.3 SHIPMENT INFORMATION
2.4 ORIGIN ADDRESS
2.5 DESTINATION ADDRESS
2.6 INVENTORY TAGS
3.1 DESCRIPTIVE INVENTORY
3.2 TAG NUMBERS
3.3 SELECTING A NEW ITEM
3.4 ENTERING CONDITIONS / EXCEPTIONS
3.5 CUSTOM LOCATIONS / EXCEPTIONS
3.5A CUSOTMIZING ITEMS
3.6 ENTERING NOTES
3.7 DESCRIPTIVE TERMS
3.8 PBO VERSUS CP CONTAINERS
3.9 PLURAL ITEMS / DELETING CONDITIONS
4.1 COMPLETED INVENTORY
4.2SWITCHING TAGS
4.3 VOIDING AN ITEM
5.1 ELECTRONIC SIGNATURE
5.2 PRINTING
5.3 PRINT SETTINGS
5.4 CONTAINER SUMMARY
6.1 CAR INVENTORIES
6.2 PIANO INVENTORIES
7.1 NOTES
8.1 DESTINATION
8.2 CHECK ALL
8.3 EXCEPTIONS
9.1 HELP FILES
10.1 DESTINATION SIGNATURES / PRINT
11.1 EMAILING
11.2 ATTACHING FILES
11.3 SENDING FILES
12.1 DELETING FILES
13.1 FREQUENTLY ASKED QUESTIONS
2
1.1
INTRODUCTION
Thank you for purchasing the LoadMate Inventory package. We are proud to have you
as a customer and consider you to be a partner in progress.
LoadMate empowers drivers to wirelessly print or email inventories directly from
residence. The systems’ easy-to-use features mirror the existing paper process to
minimize the learning curve. Completed surveys can be printed in English or in Coded
format. LoadMate offers a more professional appearance, a faster, cleaner inventory
process and a reduction in claims.
LoadMate is designed to:
•
•
•
•
•
•
•
•
•
•
•
Reduce excess paperwork
Produce clear and concise inventories
Print in code or in English
Provide Exception Reports
Complete piano and car inventories
Offer Container Summaries
Enter Customizable Articles and Conditions
Create Flexible Print Options
Wirelessly Print/Email Inventories
Generate Electronic Signatures
Print one sheet or multiple copies at a time
Drivers will be able to hold over a hundred inventories and have up to 12 hours of
continuous battery life. The addition of options such as a digital camera, GPS, and
wireless connection make this the perfect tool for the over-the road driver.
This manual should help you to navigate the LoadMate software. We encourage you to
read through this document in its entirety prior to contacting us. A copy of the manual is
posted on your company’s web page at www.TechMateinternational.net.
TechMate’s goal is to offer you the very best mobile solution and to provide you with a
maximum return on your investment. Please contact us at (949)837-6283 or
[email protected] with any questions or suggestions for the software. Your
feedback provides the foundation for future developments and is always appreciated.
3
1.2 HARDWARE
The LoadMate package was designed for use on all PocketPC devices. Supported
printers include:
•
•
•
Canon BJC 50/55/85
Canon Pixma I Series
HP 450 and 460
If you purchased both Software and Hardware through TechMate, your package should
entail the following:
1.
2.
3.
4.
Pocket PC
Printer
Ruggedized Case
Software
Optional items include: Keyboard and Car Charger.
1.3 GETTING STARTED
Prior to reading this manual, you should have installed your mobile software (reference
attached installation documentation) and plugged in your handheld unit. If you
purchased your hardware through TechMate, then the software has been preloaded onto
your handheld unit. For help with this process, please contact Technical Support at
(949)837-6283 or [email protected]
4
2.1 INVENTORY PROGRAM
To enter the program, press Start – Programs and then select the LoadMate Inventory
icon.
Screen 1: Company Settings
To set default company/driver information; select Options – Company Information.
You can edit these settings at any time.
Once you have completed all of the relevant information, select “OK” in the upper right
hand corner. This will bring you to the Customize Printing option. Any information
that you enter here will print out on the bottom of your inventory (just above the
electronic signatures).
Opening Screen
Company Profile
Print Disclaimer
2.2 OPEN NEW/EXISTING FILE
.
To open a new file, select File – New, and then choose from the listed shippers. To open
an existing file select File – Open
5
2.3 SHIPMENT INFORMATION
This screen enables you to enter shipment reference information
such as Van numbers, agent information and carrier numbers.
Reference Numbers
Once this section is complete, select the green arrow located in the
bottom-right corner of the screen. If you do not see this arrow, it is
usually because the electronic keyboard is covering it. To deselect
the keyboard option, touch on the miniature keyboard on the gray
menu bar.
Reference Info
2.4 ORIGIN ADDRESS
This screen enables you to enter the origin address and contact
information for your customer. Information that is entered onto this
screen will print out on the top of the inventory form.
When appropriate fields have been completed, touch the green
arrow to move forward. You can also, edit your entries at any time
by selecting the red arrow located in the bottom left hand corner of
your screen.
Origin Address
2.5 DESTINATION ADDRESS
Enter the customer’s destination address and contact information.
Information that is entered onto this screen will print out on the
top of your inventory form.
Destination Address
2.6 INVENTORY TAGS
All information is required on this screen. You must enter a Lot #,
Tag Color and Tag #.
**If a new inventory lot is required while in the middle of an inventory, select
Options, New Role and you will be able to enter a new lot#, color and tag #.**
Tag Information
6
3.1 DESCRIPTIVE INVENTORY
This screen enables you to complete a comprehensive driver inventory.
13
1
12
2
3
4
5
11
10
9
1.
2.
3.
4.
5.
6.
7.
8
Item tag Number (3.2)
Delete Button
Locations
Exceptions
Additional Notes
Descriptive Terms
Customize Inv./Loc./Except.
Selecting an item
7
6
8. CP/PBO Boxes
9. Options (New Inv. Role)
10. Plural button
11. Back to inventory
12. Inventory Conditions
13. Item
Entering conditions
Entering Desc. Items
7
3.2 TAG NUMBERS
Once you have entered the locations and conditions for a given item, select the right
arrow to move forward. This will then move you to the next tag number and allow
you to select a new item.
3.3 SELECTING A NEW ITEM
When you select a new tag number by hitting the forward arrow located in the upper
right corner of your mobile unit (#1), you will see the following screen:
To select an item, you can either type it in, or select from the
predefined list. The item list is alphabetical and incorporates
auto-complete functionality. By typing “M”, you will
automatically move to the section containing items that begin
with the letter “M”. Once you have found the item, simply
touch it once with the stylus to select that item and the keyboard
and item list will disappear.
Inventory Screen
3.4 ENTERING CONDITIONS / EXCEPTIONS
Once an item has been selected, you can begin entering the
conditions and exceptions for that particular item. Simply
touch on the locations and the exceptions to indicate areas of
pre-existing damage. LoadMate will automatically add in the
appropriate comas, hyphens and forward slashes. When you
have finished adding the conditions for a given item, touch
the right-facing arrow in the upper right corner to proceed to
the next item.
Inventory Screen
8
3.5 CUSTOM LOCATIONS / EXCEPTIONS
Custom locations and exceptions can be added by selecting
either the custom location button or the custom exception
button, both of which are located in the bottom right of their
respective categories. An alternate approach is to select
Custom – Item / Location. You will then be prompted to enter
a custom location and a custom exception. When these have
been updated, select Done to return to the main page.
Custom Location/Exception Screen
Note that customized locations and exceptions can only be edited one time per
shipment. Any other unique conditions must be entered through the notes section.
3.5a CUSTOMIZING ITEMS
LoadMate comes with a predefined list of 200 articles. Items that are not included on
this list can be added for a particular circumstance by utilizing the keyboard (there is
no need to rely on the drop down list). It is also possible to
customize the drop-down list of items. In order to do this,
select Customize – Item. This will allow you to add, edit
and delete items on the drop-down list.
Because the system uses an auto-complete function to
reference this drop-down list, it is strongly suggested that
custom items are categorized by users, i.e. “Chair, Arm,”,
“Chair, Straight”, “Table, Dining”.
Customized Items
3.6 ENTERING NOTES
To enter particular notes for a given item, select the notes
section marked “notes”. Any notes will be reflected in
parenthesis behind your item conditions.
3.7 DESCRIPTIVE TERMS
Descriptive terms can be added by selecting the Description
button.
Descriptive Terms
9
3.8 PBO VERSUS CP CONTAINERS
Boxes will always have the condition PBO (packed by owner)
or CP (Carrier Packed). Any time a box is added, whichever
button (PBO or CP), is currently selected will be added to the
condition of that box. For example if CP is green, and if a box
is added to your inventory, the default condition will be “CP” or
Carrier Packed.
You can also add the condition PBO and CP to refer to items
such as bureaus and chests.
CP vs. PBO Containers
3.9 PLURAL ITEMS / DELETING CONDITIONS
To add more than one item, i.e. “legs”, select the Greater Than button located on the
bottom left of the screen (“>1”).
To delete a condition or set of conditions, touch the item field. The last section of
conditions that were entered (both locations and exceptions) will be automatically
highlighted. Select the red Delete button to remove the highlighted section.
4.1 COMPLETED INVENTORY
Once your inventory has been completed, select the red arrow
to bring you to the “Descriptive Inventory” page, which
provides a complete listing of your items. Items can be edited
at any time by touching them once with the stylus and then
selecting the Edit button.
Inventory Summary
10
4.2 SWITCHING TAGS
LoadMate incorporates the option to move items around on
your inventory screen. To complete this task, touch one of
the items that you want to move and select Insert. This
will bring you to a screen that allows you to move one item
in place of another. Once you have switched two items, all
other tag numbers will be adjusted accordingly.
Insert Item
Example: By switching tag number 1 in place of tag number 10, item number 1 would
become item number 10 and all other tag number would shift up to fill the void left by
the removal of number 1 (former item number 2 would become number 1, the former
item number 10 would now be item number 9 etc).
4.3 VOIDING AN ITEM
To void an item(s) from your list, select the item(s) by highlighting them with the
stylus and then press the Void button. The item(s) will be crossed out and will print
out with the condition reflecting **VOID**. You can also remove the Void for an
item by reselecting it with the stylus and touching the Void button again.
5.1 ELECTRONIC SIGNATURE
From this screen, both the driver and shipper are able to sign to
indicate both the items and conditions of those items.
Signature Screen
11
5.2 PRINTING
To print out your inventory (including car and
piano inventories) select Print and then the
appropriate item.
•
•
•
•
To print your inventory in Code, select Print – Coded
To print in standard English, select Print – Standard
To print your car inventory, select Print- Car
To print your piano inventory, select Print – Piano
***Note that in order to print, the infrared connections must be lined up between the
handheld unit and the printer.***
5.3 PRINT SETTINGS
LoadMate allows you to print in multiple formats including:
•
•
•
•
•
•
•
•
Coded
English
Without Lines
With Lines
Letter Paper (30 lines per page)
Legal Paper (50 lines per page)
With Company Information printed on top (Select Blank)
Without Company information printed using pre-printed
forms (Select Pre-printed)
Print Setting Screen
These settings are defined at the beginning of the program by selecting Options –
Print Settings from the main (first) TechMate Inventory Screen.
5.4 CONTAINER SUMMARY
CP containers entered as part of the inventory will be captured in a Container
summary that will be automatically printed as the last page of your inventory.
12
6.1 CAR INVENTORIES
LoadMate incorporates picture inventories for cars. To enter a
car inventory, select the CAR button located on the first
signature capture screen. Conditions for the car can be drawn
in on the screen with the stylus. To obtain an alternate view of
the car, select the dual arrow button located between the Notes
and Clear buttons.
The NOTES section enables you to enter notes for the car at
origin and destination and to include odometer readings at both
origin and destination.
The CLEAR button, removes all conditions that have been
previously entered on the screen.
The DESCRIPTION button allows you to enter pertinent
information about the vehicle such as model, year, color and
license plate number.
By selecting the green forward arrow, signatures can be entered
for the car and/or piano conditions.
6.2 PIANO INVENTORIES
LoadMate also enables you to record graphic images for various
types of pianos. To record your conditions simply draw them in
with the stylus. To obtain an alternate view of the piano, or an
alternate type of piano, touch the dual arrow button located
between the Notes and the Clear button.
The NOTES section enables you to enter notes concerning the
piano at origin and destination.
The CLEAR button, removes all conditions that have been
previously entered on the screen.
The DESCRIPTION button allows you to enter pertinent
information about the piano such as manufacturer, serial
number and the conditions of the keys.
By selecting the green forward arrow, signatures can be entered
for the car and/or piano conditions.
13
7.1 NOTES
Notes can be entered for the inventory. These will then be
reflected on the notes section located at the bottom of your
inventory printout.
8.1 DESTINATION
At destination, items can be checked off as they are delivered
off of the truck. Touch an item to indicate that it was
delivered and an X will appear next to that item.
8.2 CHECK ALL
In the event that the shipment was exclusive, i.e. the
shipment contained only the goods of one shipper, the
CHECK ALL button enables a driver to select all items. By
selecting the CHECK ALL button twice, the “X”s will all be
removed.
8.3 EXCEPTIONS
To indicate items with Exceptions, select the EXCEPTIONS
button, which will bring you back to the inventory screen. You
will be able to enter any new exceptions which occurred during
shipping, but unable to edit the previously entered conditions
from origin.
9.1 HELP FILES
Help files are available by selecting Help – Topics from the
menu bar. By selecting Help – Symbol Chart you can view
a list of abbreviated terms for Exceptions, Locations and
Descriptive items as seen in the main inventory screen.
Help File Topics
14
10.1 DESTINATION SIGNATURES / PRINT
Once the inventory has been completed and all items have been
checked off as having been delivered, both the shipper and carrier
must electronically sign.
When the signatures have been obtained, you are able to print out
your completed inventory (see section 5.2)
Signature Screen
11.1 EMAILING
LoadMate comes with a built in email function that allows you to electronically mail
completed inventories in an .html format.
Email functionality can be accessed from any signature screens by selecting Email from
the menu bar. This will bring up the TechMate Mail screen, which integrates directly
with Microsoft’s Pocket Outlook program. By selecting the drop-down arrow, it is
possible to view any email addresses that are already loaded into the user’s contact list. It
is also possible to enter new email addresses directly into the email field by using the
keyboard. Once you have selected and/or entered an address, click Add. There is no
limit to the number of email addresses that can be added. Both the subject and message
of the email are predefined, however they are also editable.
11.2 ATTACHING FILES
Before sending your email, it is necessary to identify which forms
will be sent. The options include:
•
•
•
•
Standard (Inventory in standard English format)
Coded (Inventory in standard Coded format)
Car (Graphic depiction of Car)
Piano (Graphic depiction of Piano)
TechMate Mail
To attach files, place a check mark next to each of the files that you would like to email.
Once you have placed these check marks, select the Attach button. Please note that it
may take up to several minutes to attach the files contingent upon the amount of data
contained in your inventory.
11.3 SENDING FILES
Once you have attached the appropriate files, and received the message indicating,
“Attachment(s) Added”, select the Send button to electronically mail your inventory
files. If you are utilizing a wireless handheld, these files will be sent out directly from the
handheld unit. If you are sending these files via a laptop or desktop computer, they must
first be transferred to your email’s outbox via the syncing process.
15
12.1 DELETING FILES
For optimum performance, it is recommended that you periodically remove files from the
mobile unit. Although your handheld can hold numerous files, it is suggested that you
remove files on a regular schedule (once a week or once every two weeks).
In order to remove files you can take one of the two following steps:
1. On the handheld unit, select Start – Programs – File Explorer.
2. To eliminate files from both the handheld unit and the desktop, place the Handheld
into the cradle. While synchronized, open up the folder entitled Pocket_PC My
Documents. Any files that you delete from this folder while the unit is synced will be
permanently deleted. It is advisable to copy estimate files to another folder prior to
deleting them to avoid permanently losing information.
13.1 FREQUENTLY ASKED QUESTIONS
I selected LoadMate from the program files and it will not open? This is usually
because the program is currently running. To see which programs are currently open,
depress the button on the bottom right hand corner of your unit marked with an arrow that
curves up and to the right (if you are using a Dell, this will be the Switch bar). This will
bring up all programs that are currently running.
How do I close a program? By selecting the button on the bottom right of the iPAQ or
the Switch bar on a Dell (see prior FAQ), you will bring up all currently open programs.
If you select a particular program with the stylus and hold the stylus on the program, you
will be given the option to “Close this Task”, “Close All Tasks”, or to “Close background
Tasks”. It is suggested that you close all tasks every day or two and not leave too many
programs running concurrently.
I selected the X at the top right hand of the program, but it was still running?
The “X” simply minimizes the program you are working with, it does not close it. To
learn how to close the program, reference the prior FAQ.
My system is frozen, what should I do? Occasionally, you may run into a situation
where your Handheld freezes on a particular screen. If this occurs, tilt the iPAQ forward
so that you are looking at the bottom of the unit. On the right hand side there is a small
hole. Insert the stylus into the hole and you will effectively complete a “Soft Reset”.
This is the equivalent of pressing Ctrl Alt Delete on your desktop computer. On a Dell
the Soft Reset button is located on the left hand side.
How do I know how much battery life I have left? The system will give you
numerous warnings if your battery life is running low. You can also check your battery
power by selecting Start, Settings, Systems, Power.
16
While the handheld includes a backup battery, it is imperative that you not let the
battery life run down to zero. In this event, you run the risk of losing not only your
files but also the program. Backing up your files to a storage card or a desktop or
laptop computer is recommended.
Do I need to close all programs before shutting off my unit? No, simply depress the
button on the top right hand of the unit. It is recommended however that you periodically
close all programs. When you depress the button again to power on the unit, you will
find that you are on the same screen as when you shut the system down.
How do I change the backlight settings? To edit the backlight settings, choose Start,
Settings, System, Backlight, Brightness and then slide the scroll bar to the appropriate
level.
Does PocketPC offer different methods for data entry? Yes. The iPAQ offers four
distinct data entry methods. To edit your mode of entry, select the black arrow on the
bottom right corner of your unit located adjacent to the keyboard icon. The system will
then bring up four different options from which to select, including the Keyboard,
Transcriber, Block Recognizer and Letter Recognizer. While this is a subjective
decision, the Technical Staff at TechMate recommends using the Letter Recognizer as a
fast and efficient method.
________________________________________________________________________
If you have additional questions pertaining to the LoadMate program, please
feel free to contact our office during normal business hours at (949)837-6283 or
online at [email protected] . We appreciate your patronage.
17