1
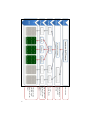
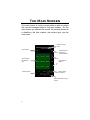
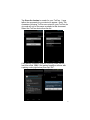
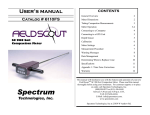
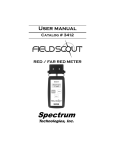
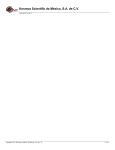
TruFirm
App
PRODUCT MANUAL
Table of Contents
General Overview
3
Data Storage In the TruFirm App
3
Starting TruFirm
5
The Main Screen
6
Pairing and Connecting to the
TruFirm
7
Recording Data
11
Configure Ranges
13
The Menu
14
Deleting A Course
15
This manual will familiarize you with the features and operation of
your new TruFirm App for the Field Scout TruFirm Turf Firmness
Meter. Please read this manual thoroughly before using your
instrument. For customer support, or to place an order, call
Spectrum Technologies, Inc. at 800-248-8873 or 815-436-4440
between 7:30 am and 5:30 p.m. CST,
FAX at 815-436-4460, or E-Mail at [email protected].
www.specmeters.com
Spectrum Technologies, Inc
3600 Thayer Court
Aurora, IL 60504
2
General Overview
TruFirm is designed to enable a user to collect, store and
analyze data which represents the firmness of surfaces
across a golf course. The software runs on an Android
device running Android 2.1.1 or higher that has Bluetooth
enabled. The TruFirm app can be installed at no cost from
the Google Play store.
Data Storage in the
TruFirm APP
TruFirm data recorded by the app is associated with a
course name. Within a course, sessions are created and
named by the date and time the session began. Typically a
user would create a new session each time a data set is
going to be taken (i.e. once per 18 holes). Separating data
into sessions enables the analysis of data over time to
identify trends in firmness values. Within a session, data is
stored by hole number and within each hole, by surface
(Approach, Fairway, Greens, etc…). Finally, each surface
has nine labeled zones or locations based on their relative
position where individual readings can be stored (Back Left,
Middle Left, Front Center, etc…).
On the following page you will find a chart that depicts the
concept of recording data at the various levels as described
above.
3
User Created
Generated when
starting a new
session
1 – 18 +
Custom Holes
Approach, Bunker,
Fairway, Greens,
Rough, Tee, or
Other
9 Regions within
a surface: From
Back left to Front
Right
4
Starting the TruFirm
After installation, an icon for TruFirm will appear in the Apps
area on your device. You can move it to any page. Tap the
TruFirm icon to launch the application.
When TruFirm is launched, it will prompt you to either select an existing course, or create a new course. If selecting
an existing course TruFirm will ask you to create a new
session or use an existing session. If you choose to use an
existing session, the most recent session for that course
will be made active.
5
The Main Screen
The main screen is used to record data as well as review
the raw and averaged data by hole and surface. On the
main screen you can see the course, the session (shown as
a date/time), the hole number, the surface type, and the
nine zones.
Selected Course
Name
Current Hole #
Current Surface
and Surface
Selection Button
Zone Selection
and Data Display
Current Session
Hole Selection
Buttons
Session Selection Buttons
Menu Button (May vary by
device)
6
Pairing and Connecting
to the TruFirm
Quick Start:
The TruFirm App will lead you through all steps required to
connect the App on your Android device and your TruFirm
meter. Turn the TruFirm on by pressing the button, open
the TruFirm App on your device, and get ready to take a
reading. Follow the on screen prompts of your Android device, if required. The pairing code is ‘1234’. Step by step
instructions are included below:
Step by Step:
The TruFirm device must be equipped with the Bluetooth
option for the TruFirm App to function. If the TruFirm is
equipped with Bluetooth, the Bluetooth LED on the front of
the TruFirm should blink when the unit is powered on.
When powered on, the TruFirm is always in pairing mode.
No additional steps are required on the TruFirm to allow
your Android device to search for and pair with the
TruFirm.
To initiate pairing (only required the first time connecting)
or to reconnect, tap any one of the nine zones on the main
screen. If Bluetooth is not currently enabled on your device, the TruFirm app should prompt you to turn it on.
Bluetooth must be enabled for the app to record data. You
may turn Bluetooth on in the settings menu of the Android
operating system.
The Bluetooth symbol
in the status bar will indicate if
Bluetooth is turned on (see below).
7
After Bluetooth is on (and the TruFirm unit is powered up),
tap the Connect TruFirm Device via Bluetooth.
8
Tap Scan for devices to search for your TruFirm. It may
take a few moments for your device to appear. Note: The
characters following TruFirm are unique to your TruFirm device and will not be the same as shown in this document.
Select the TruFirm device from the list.
If the pairing operation requests a pairing code (left below) then enter 1234. If the pairing operation returns with
a pairing code (right below) then tap “OK”.
9
Your mobile device should now be paired to your TruFirm
unit. If successful, the app will indicate it is connected to
your TruFirm just below the status bar. Consult your Android Device’s user manual if you have trouble pairing.
During subsequent sessions after your Android device is
paired, your TruFirm device should show under “Paired Devices”. You should not have to search for and enter the
PIN of the TruFirm again unless the device is unpaired in
the device settings menu.
10
Recording Data
You are now ready to begin using the TruFirm to record
data. The reading screen on the Android device will display
0.000 as it waits for a reading from the TruFirm. As you
take each reading with the TruFirm the value displayed on
the unit’s LCD screen should also appear in the center of
the screen on your Android device accompanied by a confirmation tone. See notes below. You may either ACCEPT
this reading to place it in the specific zone in the grid on the
main screen or CANCEL to return to the main screen without placing this reading. If additional readings are taken on
the TruFirm without ACCEPTING or CANCELLING, the
most recent reading will replace the previous one. If you
ACCEPT a reading then tap the same zone again, the next
reading will be averaged with the previous reading(s). If
you would like to delete a reading from a specific zone, use
the “Measurement” menu on the main screen. See page 13
for additional information on this menu.
NOTES: The LCD display on the TruFirm shows the current
reading for 3 seconds and then the average reading. Only
the current reading is transferred to the App.
You must have a zone selected for the device to be able to
accept a reading.
11
Recording Data
The average of the current nine zones is automatically provided in the top center of the main screen (0.77 in the case
above). To average multiple readings within one of the
nine zones, tap on a zone already containing a value and
take an additional reading. This can be repeated multiple
times to add additional data points to the single zone average.
If the GPS or location services are enabled on your device,
the longitude and latitude of the Android device will be
shown on the data collection screen. This data is stored in
the database file and can be extracted for use in a third
party application by advanced users. Consult your Android
devices user guide to learn more about enabling and using
location services.
12
CONFIGURE RANGES
You may want to change the colors that appear in the
zones by configuring the ranges on the TruFirm App.
To configure ranges, you must press the menu button and
then press Measurements . The following screen will appear. Press Configure ranges.
Press the Min and Max to change the number to your desired configuration. Once you are satisfied with your entry,
press Save. Based on the numbers you enter the colors on
the zones will change when new measurements are taken.
For example, if your measurement is between .25 and .30
then that section will appear the dullest yellow.
13
The Menu
The TruFirm app menu, accessible from the home screen,
has the following options:
Course
•
•
•
•
•
Select
New Course
Add New Surface
Add New Hole
Delete a Hole
Sessions
• Select
• New Session
Measurements
• Delete Last Entry
• Delete Entries for Location
• Configure Ranges
Reports
•
•
•
•
All Holes, This Session
This Surface, This Hole
This Surface, All Holes
Specific Location
About
•
14
View the software version
Deleting a Course
To prevent accidental loss of data, courses cannot be deleted within the app Using your devices file manager app,
courses can be deleted by removing the sqlite file with the
same name as the course. The course database files are
stored on the devices SD Card in the directory: FieldScout/
db/
Advanced users may also download the sqlite database
files for further analysis using their own software.
15
3600 Thayer Court
Aurora, IL 60504
(800) 248-8873 or (815) 436-4440
Fax (815) 436-4460
E-Mail: [email protected]
www.specmeters.com
16
R 4/14