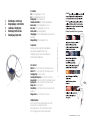
1
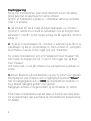
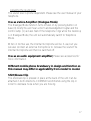
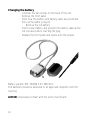
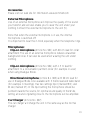
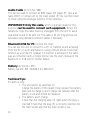
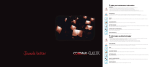
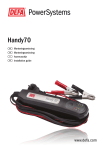
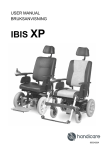
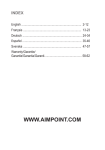
Safety and maintenance information
WARNING:
- Use only batteries, chargers and accessories approved by COMMIDT for use with this particular unit.
The use of any other types invalidates all approval and warranty, and may be dangerous.
- Please contact your local dealer for more information about approved accessories available.
- When disconnecting the power cord of any accessory, make sure to grasp and pull the plug, not the cord.
- Keep the unit and all accessories out of the reach of small children. Do not let children play with the neck loop and cords.
INTERFERENCE:
- All electric equipment may from time to time be susceptible to interference, which could affect the performance.
Local interference of e.g. PC,TV, luminous tupe etc. may cause noise.To avoid this interference, try to move away from the noise source.
- The performance of medical equipment e.g. pace maker and implanted equipment could be affected by the Blues unit. Do not place Blues
directly on such medical equipment. In case of any suspicion, it is recommended to use another solution than Blues.
USAGE
Read the user’s manual carefully before using this product. Performance may differ. Use only in the normal position as explained in the user’s
manual.
QUALIFIED SERVICE
Only qualified personnel may repair this product. Only open the unit when changing the battery.
BATTERY/CHARGER
Use only approved batteries and charger. Change the batteries as explained in the user’s manual. Old batteries should be delivered to an
approved reception point for recycling. Use only battery type Ni-MH.
CONNECTING TO OTHER DEVICES
When connecting to other devices, please read the user’s manual for that particular device for more information.
Do not connect incompatible products.
WATER-RESISTANCE
This unit is not water-resistance. Keep it dry and clean by wiping with a dry cloth.
Informasjon og sikkerhetsregler
ADVARSEL
- Bruk bare batterier, batteriladere og ekstrautstyr som er godkjent av COMMIDT for bruk sammen med denne modellen. Bruk av andre
typer kan oppheve all godkjenning og garanti, og kan være farlig.
- Kontakt forhandleren hvis du vil ha mer informasjon om hva som er tilgjengelig av godkjent utstyr.
- Når du kobler fra strømkabelen på ekstrautstyr, bør du holde i og trekke ut kontakten, og ikke dra i ledningen.
- Enheten og alt ekstrautstyr må oppbevares utilgjengelig for små barn. Ikke la barn leke med slynge og ledninger.
FORSTYRRELSER
Alt elektronisk utstyr kan fra tid til annet utsettes for forstyrrelser som kan påvirke ytelsen.Ved mye støy kan dette bedres ved å forflytte deg
noen meter da dette ofte skyldes lokale forstyrrelser fra for eksempel lysrør. PC,TV og lignende.
- Funksjonen til medisinsk utstyr som pacemaker og annet implantert utstyr kan påvirkes av Blues-enheten. Ikke plasser Blues direkte over slikt
utstyr. Hvis du har mistanke om forstyrrelser så anbefales det å benytte en annen løsning enn Blues. (gjelder Blues)
BRUK
Les nøye gjennom bruksanvisningen før bruk. Funksjonalitet kan avvike noe. Brukes bare på vanlig måte som forklart i bruksanvisningen.
“Handsfree”-funksjonaliteten på denne enheten avviker noe fra standard “Handsfree”. (gjelder Blues)
KVALIFISERT SERVICE
Bare kvalifisert personale kan reparere dette produktet. Enheten åpnes kun ved batteriskifte.
BATTERIER/LADER
Bruk bare godkjente batterier og lader. Batteriskifte gjøres i henhold til beskrivelse. Gammelt batteri leveres til godkjent mottak for resirkulering.
Batterier er av type Ni-MH.
KOBLE TIL ANDRE ENHETER
Når du kobler til andre enheter, må du lese brukerhåndboken for disse for å få mer detaljert informasjon. Ikke koble sammen produkter som
ikke er kompatible.
VANNTOLERANSE
Enheten tåler ikke vann. Oppbevar den på et tørt sted. Rengjøres med tørr klut.
1
2
3
4
5
Kontrollampe / control lamp
Betjeningsknapp / control button
Ladelampe / charging lamp
Bunnknapp / button on base
Kabelinngang / input socket
N - Huskeliste
På: Trykk inn betjeningsknappen (2) i ca. 1 sek.
Av: Trykk inn betjeningsknappen (2) i ca. 4 sek.
Kobling/paring: Trykk inn bunnknappen (4).
Forbindelse med telefon: Et kort trykk på betjeningsknappen (2).
Besvare anrop: Trykk inn betjeningsknappen (2) i ca. 1 sek.
Avvis anrop: Trykk inn betjeningsknappen (2) i min. 2 sek.
Avslutt samtale: Tryk på betjeningsknappen (2).
Taleoppringing: Et kort trykk på betjeningsknappen (2) og enheten er klar
taleoppringing.
Dialog innstilling: Trykk inn bundknappen (4) i 1 sek.
GB - Check List
Switch on: Press the control button (2) for approximately one second.
Switch off: Press the control button (2) for approximately four seconds.
Coupling/pairing: Press button on base (4).
Connecting with telephone: Press control button (2) briefly once.
Answering calls: Press the control button (2) for approximately one second.
Rejecting calls: Press the control button (2) for at least two seconds.
Ending a call: Press control button (2).
Voice dialling: Press control button (2) briefly once to prepare the unit for
voice dialling.
Dialogue mode: Press control button (2) for one seconds.
Commidt
Et utvalg av våre produkter/A slection of out product range:
ILLUSTRATION
For enkel bruk:
Slå på og av enheten med et langt trykk på betjenningsknappen.
Besvare og avslutte samtale gjøres med et kort trykk.
Dialoginnstilling slås på og av med et trykk på bunnknappen (4).
Enheten må lades når ladelampa blinker.
Commidt
Simplified Operation
Switch the unit on and off by pressing and holding the control button.
Answer and end a call by pressing the button briefly.
Switch Dialogue mode on or off by pressing the button on base (4).
When the charging lamp flashes, the battery is being recharged.
Trykk: Innherred Grafisk as - tlf. +47 74 08 19 44
1
2
– improve your quality of life
MANUAL
NORWAY
www.commidt.com
– lyd og livskvalitet
4
INNHOLDSFORTEGNELSE
Komme i gang
Kopling/paring
Bruk som halsslynge for telefon
Bruk som samtaleforsterker
Bytte av batteri
Tilleggsutstyr
Problemløsning
Huskeliste
5
6
7
8
9
10
12
13
INDEX
Getting started
Coupling/pairing
Use as neck loop for telephone
Use as Voice Amplifier
Changing the battery
Accessories
Problem solving
Check list
14
15
16
17
18
19
20
21
Norsk
Bluetooth trådløs halsslyngeforsterker med integrert samtaleforsterker,
for mobiltelefoner og audioutstyr.
Les bruksanvisningen nøye før du bruker Blues.
Les bruksanvisningen for det utstyret du skal koble deg til før
du setter i gang.
Før bruk:
- Sett ladepluggen inn i enheten (3) og laderen i
stikkontakten.
- Normal ladetid er 2-3 timer. Dette styres automatisk og
batteriet lades optimalt.
- Ladelampen (3) lyser fast under lading.
- Ladelampen (3) slukker når enheten er ferdig ladet.
- Lav batterispenning indikeres med blink i ladelampen (3)
samt indikeringslyd på teleslynga.
Komme i gang:
Du slår enheten PÅ ved å trykke minimum 1 sekund på betjeningsknappen (2) og du får da lysblink i kontrollampe (1) og lyd via slynga.
Du slår enheten AV ved å trykke minimum 4 sekund på betjeningsknappen (2). Du får også da blink i kontrollampe (1) lyd via slynga.
5
Kopling/paring:
Paring mot mobiltelefonen (eller annen Bluetooth-enhet) må utføres
første gang man brukes Blues mot denne enheten.
Sørg for at mobiltelefon og Blues er i umiddelbar nærhet av hverandre
(max. 1 m avstand).
1. Slå enheten PÅ ved å trykke på betjeningsknappen (2) i fronten i
minimum 1 sekund. Du vil da få en lydindikasjon hvis du benytter høreapparatet i T eller MT og har slyngen på deg. Du får også blink i kontrolllampe (1).
2. Trykk så inn bunnknappen (4) i minimum 2 sekunder og du får en ny
lydindikasjon og fast lys i kontrollampe (1) mens enheten er i paringsmodus. Enheten er da klar til å bli logget opp som “Handsfree”.
For enkelte mobiltelefoner som er forhåndsinnstilt med “Headset” må
man trykke inn knappen på nytt i 2 sek. for å bli logget opp på Blues
med “Headset”.
Ved tredje trykk i 2 sek. går enheten ut av paringsmodus og lampen vil
slokne.
3. Aktiver Bluetooth på mobiltelefonen og velg “ny enhet” eller lignende.
Mobiltelefonen viser enhetene som er tilgjengelig.Velg enhet ”Blues”.
Tast inn påloggingskode som er 0000, på mobiltelefonen.Telefonen vil
da gi beskjed “pålogging godtatt” eller lignende.
Påloggingen av Blues er nå gjennomført og kontrollampe (1) slokner.
På de fleste mobiltelefonene kan det være en fordel å autorisere Blues
slik at oppkoblingen skjer automatisk. Se mobiltelefonens bruksanvisning
for detaljer.
6
Bruk som halsslynge for telefon:
Sett høreapparatet(ene) i T eller MT-stilling.
Slå Blues PÅ ved å trykke betjeningsknappen (2) inne i min. 1 sekund.
Før det etableres kontakt med telefonen vil lampe (1) blinke.
Gi så et kort trykk på samme knapp for å etablere forbindelse med
mobiltelefonen. Et langt trykk (2 sek.) vil avbryte forbindelsen.
• Samtale
Ring ut på telefonen på vanlig måte. Du får lyden via halsslyngen.
Avslutt samtalen ved å trykke på knappen (2) eller avslutt samtalen på
telefonen på vanlig måte. Du får et kort blink på kontrollampe (1) samt
lydsignal.
Ved anrop vil du høre ringelyd i høreapparatet.
Kontrollampe vil blinke raskt mens telefonen ringer (avhengig av type
mobiltelefon). Samtalen besvares/avsluttes ved et trykk på betjeningsknappen (2).
• Avvise anrop
Når telefonen ringer og du ikke ønsker å besvare anropet kan du holde
inn knappen (2) i minimum 2 sekunder (gir opptattsignal).
• Taleoppringing
For taleoppringing, se telefonens bruksanvisning for innlesing av navn.
Et kort trykk på knappen (2) og du får et lydsignal som indikerer at
enheten er klar for taleoppringing. Du kan da uttale “navnet” og telefonen ringer opp automatisk.
• Justering av lydstyrke
Se telefonens bruksanvisning, da denne funksjonen er telefonavhengig.
7
Bruk som samtaleforsterker (Dialog):
Funksjonen Dialog aktiveres/deaktiveres ved et kort trykk på bunnknappen (4). Du vil få en kort kvitteringslyd samt blink i kontroll-lampe (1).
Funksjonen slås automatisk av når du tar imot en telefonsamtale på
Blues.
Normalt vil enhetens interne mikrofon være i bruk.Ved tilkobling av ekstern mikrofon blir lyden forsterket, og den interne mikrofonen er koblet
ut.
Bruk som audioforsterker; se tilleggsutstyr.
Det kan forekomme avvik i forhold til denne beskrivelsen
avhengig av telefontype.
Skjorte/bluseklips:
Vedlagt klips trykkes fast på baksiden av enheten. Klipsen kan festes
begge veier.
Vi anbefaler å bruke klips for å redusere støy ved bevegelse.
8
Bytte av batteri:
- Skru opp de to skruene på baksiden av enheten.
- Ta av frontdekslet.
- Observer hvordan batteri og batterikabel ligger.
- Trekk ut batteripluggen (6).
- Ta bort det gamle batteriet.
- Legg nytt batteri på plass og legg/form batterikabelen som
den gamle kabelen før den plugges i.
- Sett frontdekselet på plass og skru sammen enheten.
Bruk batteripakke Ni-MH 3,6/300, 3,6V 300mAh.
Gammelt batteri leveres til godkjent mottak for resirkulering.
IKKE berør elektronikkortet eller antenne unødvendig.
9
Tilleggsutstyr:
Et utvalg av tilleggsutstyr. Se også vår hjemmeside
www.commidt.com
Ekstern mikrofon:
Ved bruk av ekstern mikrofon blir lyden fra deg bedre. Med ekstern
mikrofon kan du også bære enheten under klærne. Ekstern mikrofon
plugges inn i enheten (5).
NB! Ved bruk av ekstern mikrofon koples den interne mikrofonen ut.
Det er viktig at du tenker på dette spesielt når telefonen ringer.
Mikrofoner:
• Klipsmikrofon (artikkelnr. 901) med 40 cm ledning for å sette på krave.
Ved bruk av mikrofonen unngår unødvendig bakgrunnstøy. Benyttes også
når man bærer enheten under klærne.
• Klipsmikrofon (artikkelnr. 902) med 1,5 m ledning for å sette på samtalepartners krage for bruk i stilling Dialog, samtaleforsterker.
• Retningsmikrofon (artikkelnr. 903) med 60 cm ledning for bruk i stilling
Dialog. Leveres også med 3 meter ledning og bordstativ (f.eks. i møter).
Har to stillinger, Spot (merket MO) og Wide (merket ST). I Spot posisjon peker du mot lydkilden og får optimal lyd. I Wide posisjon forsterkes opp all lyd rundt mikrofonen.
Biloplader (artikkelnr. 907):
Lading ved hjelp av billader gjennomføres som ved vanlig lading.
10
Audiokabel / audioforsterker (artikkelnr. 908):
Denne benyttes for tilkopling av MP3-spiller, CD-spiller, PC, kommunikasjonsradioer, etc. på inngangen (5). Du kan da lytte til musikk eller tale
ved hjelp av Dialogfunksjonen på halsslyngen.
VIKTIG: Kabelen er spesiallaget for dette formålet og kun denne kan
benyttes ved tilkopling av slikt utstyr. Når telefonen ringer må denne
kabelen kobles fra for å unngå at uønsket lyd sendes ut. Kabelen er 1,5
meter lang og kan forlenges v.h.a. standard skjøtekabler ved behov.
Bluetooth / USB for PC (artikkelnr. 912):
Ved hjelp av denne enheten kan du koble deg opp mot PC for å få
overført lyd trådløst eller som et alternativ til mobiltelefon. Den vil da
virke som et vanlig hodesett for PC. Oppkobling gjøres på samme måte
som for oppkobling mot mobiltelefon. Se for øvrig Bluetooth/USB-enhetens bruksanvisning.
Batteri (artikkelnr. 909):
Batteripakke Ni-MH, 3,6/300, 3,6V 300mAh.
Teknisk:
Problemløsning:
1. Enheten kan ikke slås på.
Sett den på lading. Hvis dette ikke hjelper så skift batteripakken og lad på nytt. Kort brukstid på batteriet tyder på
at batteriet er “slitt” og bør byttes.
2. Får ikke ladet batteriet.
Sjekk at ladelampe (3) lyser når du setter i pluggen.
Kontroller at pluggen (5) står godt i kontakten og at det er
strøm i veggkontakten.
11
3. Problemer med opplogging mot telefonen.
Kontroller at telefonen har påslått Bluetooth-funksjon, er
opploggbar mot “Handsfree” og at Blues er valgt på
telefonen.
4. Blues har ”sat sig fast”. Ingen af funktionerne virker.
Nulstil Blues ved at sætte den i opladekontakten et øjeblik.
Enheden er herefter klar til brug igen.
Vedlikehold:
Hold enheten ren ved hjelp av tørr klut.
Enheten skal ikke utsettes for fuktighet.
Tekniske data:
Batteritype: Ni-MH, 3,6 V 300mAh
Ladetid: 2-3 timer
Samtaletid: ca. 12 timer
Standby-tid: ca. 60 timer
Bluetooths rekkevidde: ca. 5m.
Huskeliste!
På: Trykk inn betjeningsknappen (2) i ca. 1 sek.
Av: Tryk inn betjeningsknappen (2) i ca. 4 sek.
Kobling/paring: Trykk på bunnknappen (4).
Forbindelse med telefon: Et kort trykk på betjeningsknappen (2).
Besvare anrop: Trykk inn betjeningsknappen (2) i ca. 1 sek.
Avvise anrop: Tryk inn betjeningsknappen (2) i min. 2 sek.
Avslutt samtale: Trykk på betjeningsknappen (2).
Taleoppringing: Trykk kort på betjeningsknappen (2) og enheten er
klar for taleoppringing.
Dialog innstilling: Trykk inn bunnknappen (4) i 1 sek.
12
Forenklet bruk:
Enheten slås på og av med et langt trykk på betjeningsknappen.
Oppringninger besvares, og samtaler avsluttes, med et kort trykk.
Dialoginnstillingen slås på og av ved å trykke på bunnknappen (4).
Enheten lades opp, når oppladningslampen blinker.
Minislyngeliste:
Besøk vår hjemmeside www.commidt.com for å finne kompatible mobiltelefoner til din halsslynge. Der finner du en minislyngeliste som til en
hver tid er oppdatert.
NB! Mobiltype velges nederst på siden.
Elektrisk og elektronisk utstyr (EEE) inneholder materialer, komponenter
og stoffer som kan være farlige og skadelige for menneskers sunnhet og
for miljøet, hvis ikke avfallet av elektrisk og elektronisk utstyr (WEEE)
ikke kastes korrekt. Produkter som er merket med ovenstående søppelkasse sympoliserer at avfall av elektrisk og elektronisk utstyr ikke skal
kastes sammen med husholdningsavfall, men skal innsamles særskilt.Ved
utvikling og framstilling av ditt COMMidt produkt er det brukt materialer
og komponenter av høy kvalitet som kan gjenvinnes.Ved kasting av elektrisk og elektronisk utstyr skal du levere det til et egnet innsamlingspunkt, det vil si på en autorisert en-til-en-basis når du kjøper et nytt lignende produkt, eller til et autorisert innsamlingssted for resirkuleringg av
avfall fra elektrisk og elektronisk utstyr (EE-utstyr). Du kan få mer informasjon om hvor du kan avhende utrangert utstyr til resirkulering ved å
kontakte lokale myndigheter, et godkjent WEEE-program eller husholdningens renovasjonsselskap.
13
English
Amplified bluetooth neckloop with integrated voice
amplifier, for telephones and audio equipment.
Please read this user manual carefully before using your
Blues.
Please refer to be user manual of the equipment you would
like to connect to Blues before use.
Preperations:
- Insert the charging plug in the unit (5) and connect to a
main socket.
- Normal charging time is two-three hours.This is controlled
automatically to ensure optimal battery charging.
- The charging lamp (3) lights continuously during charging.
- The charging lamp (3) turns off when the battery is fully
charged.
- Low battery voltage is indicated by flashing charging lamp
(3) as well as by an audible signal in the induction loop.
Getting started:
Switch ON the unit by pressing the control button (2) for at least one
second: an audible signal will be heard and the control lamp (3) will light
up.
To switch OFF, press control button (2) for at least four seconds.You
will then hear an audible signal and the control lamp (1) will flash.
14
Coupling/pairing:
To be able to use Blues for the first time it is necessary to pair the unit
with the mobile phone (or other Bluetooth units)
Ensure that the mobile phone and the Bluetooth unit are close to each
other (maximum 1 metre distance).
1. Switching on
Switch ON the unit by pressing the button on the front panel (2) for at
least one second. An audible signal will be heard if you are wearing the
loop with the hearing aid switched to T or MT.The control lamp (1) will
also flash.
2. Pairing
Now press the button on base (4) at the bottom of the unit for at least
two seconds; you will hear a new audible signal and the control lamp (1)
will light continuously while the unit is in pairing mode.The unit is now
ready to be logged as ‘handsfree’.
Headset setup
Some mobile phones are preset as ‘headset’. Press the button on base
(4) again for about two seconds to log on Blues as ‘headset’.
Exit pairing by pressing button (4) for the third time for about two
seconds, you will exit pairing mode, and the lamp (1) will turn off.
3. Selecting Blues on mobile
Activate the Bluetooth function of the mobile phone and select “New
unit”.The mobile phone will indicate available units. Select the “Blues”
unit. Enter the log-in code, 0000, on the mobile phone.The phone will
then display the text “log-in successful” or similar.
Logging in of the Blues unit is now complete and the control lamp (1)
turns off.
15
On most mobile telephones it is recommended to authorize Blues to
make the coupling automatically.
Refer to the phone user manual for further details.
Used as neckloop with telephone:
Switch the hearing aid(s) to T or MT.
Switch on Blues by pressing control button (2) for at least one second.
Before establishing contact with the telephone the lamp (1) starts to
flash.Then press the same button again briefly to establish connection
with the mobile phone.
To break the connection with the mobile phone, press and hold button
(2) for about two seconds.
• Making a call
Make a call using the telephone in the normal manner.The sound will be
heard through the neckloop.
To terminate the call, press the control button (2) or hang up the
telephone in the normal manner.The control lamp (1) will give a short
flash and an audible signal will be heard.
An incoming call will be indicated by a ringing tone in the hearing aid.
The control lamp will flash repeatedly while the phone is ringing (phone
dependent). Answer/terminate the call by pressing control button (2).
• Rejecting incoming calls
When the telephone rings and you do not wish to answer the call, hold
button (2) for at least two seconds (gives the busy signal).
• Voice dialling
See the user’s manual of your mobile phone for instructions on
recording names for voice dialling.
Press button (1) briefly; an audible signal will indicate that the unit is
ready for voice dialling. Say the name of the person you wish to call and
the telephone will dial the number automatically.
16
• Adjusting the sound level
The sound level is phone dependent. Please see the user manual of your
telephone.
Use as a Voice Amplifier (Dialogue Mode)
The Dialogue Mode function turns off and on by pressing button on
base (4) briefly.You will hear a short acknowledgement signal and the
control lamp (1) will also flash. If the telephone rings while the neckloop
is in Dialogue Mode, the unit will automatically switch to Telephone
Mode.
When in normal use, the internal microphone will be in use, but you
can also connect an external microphone to increase the sound.The
internal microphone will then be switched off.
Use as an audio equipment amplifier; Please see accessories for
more information.
Different mobile phone brandsvary in design and function so
this manual may differ in applicability from model to model.
Shirt/blouse Clip
The enclosed clip is pressed in place at the back of the unit. Can be
attached in both directions. COMMidt recommends using the clip in
order to decrease noise when you are moving.
17
Changing the battery
- Unscrew the two screws on the back of the unit
- Remove the front panel
- Note how the battery and battery cable are positioned
- Pull out the battery plug (6)
- Remove the old battery
- Insert a new battery and position the battery cable as the
old one was, before inserting the plug
- Replace the front panel and secure with the screws.
Battery pack Ni-MH 3.6/300, 3.6 V 300 mAh
Old batteries should be delivered to an approved reception point for
recycling
AVOID unnecessary contact with the unit’s circuit board.
18
Accessories
Please visit our web site for information. www.commidt.com
External Microphone
Use of an external microphone will improve the quality of the sound
you transmit, and will also enable you to wear the unit under your
clothing. Connect the external microphone to the unit (5).
Note that when the external microphone is in use, the internal
microphone is switched off!
It is important to bear this in mind, especially when the telephone rings.
Microphones:
• Clip-on microphone (Article No. 901) with 40 cm lead for collar
attachment.The use of an external microphone reduces unwanted
background noise. It can also be used when wearing the unit under
clothing.
• Clip-on microphone (Article No. 902) with 1.5 m lead for
attachment to a conversation partner’s collar (for example in a car)
when using Dialogue Mode.
• Directional microphone (Article No. 903) with 60 cm lead for
use in Dialogue Mode. Also available with 3 metre lead and table stand
(for example in meetings). Has two settings; Spot (marked MO) and
Wide (marked ST). In the Spot setting, the microphone should be
pointed towards the source, for optimal sound quality. In the Wide
setting, all sound originating close to the microphone will be amplified.
Car Charger (Article No. 907):
The car charger will charge the unit in the same way as the normal
charger.
19
Audio Cable (Article No. 908):
This can be used to connect an MP3 player, CD player, PC, two-way
radio, DECT or similar unit to the input socket (5).You can then listen
to music using the Dialogue function of the neckloop.
IMPORTANT: Only this cable, which is specially made for this
purpose, can be used to connect such equipment. When the
telephone rings, this cable must be unplugged from the unit to avoid
unwanted sound to be sent out.The cable is 65 cm long and can be
extended using standard extension cables if necessary.
Bluetooth/USB for PC (Article No. 912):
You can use this unit to connect to a PC to transmit sound wirelessly
from the PC or as an alternative to using a mobile phone. It will then
function as a normal PC headset. Connection is achieved in the same
way as connection with a mobile phone. See the user’s manual of the
Bluetooth or USB unit for further details.
Battery (Article No. 951):
Battery pack Ni-MH 3.6/300, 3.6 V 300 mAh
Technical Tips:
Problem solving:
1. The unit cannot be switched on.
Charge the battery. If this doesn’t help, replace the battery
pack and re-charge. A short charge life indicates that the
battery is old and should be replaced.
2. The battery won’t charge.
Check that the charging lamp (3) lights when the plug is
inserted. Check that the plug (5) is correctly inserted into
the main socket and that the main socket is live.
20
3. Problems logging in to the telephone.
Check that the telephone’s Bluetooth function is switched
on, that the connection to the handsfree is functioning and
“Blues” has been selected on the telephone.
4. Blues doesn’t function.
Reset Blues by connecting the charger for a brief moment.
Blues is now ready to use.
Maintenance:
Keep the unit clean by wiping with a dry cloth.
Do not expose the unit to moisture.
Technical Data
Battery type: Ni-MH, 3.6 V 300 mAh
Charging time: approx. 2 hours
Call time: approx. 12 hours
Standby time: approx. 60 hours
Bluetooth range: approx. 5 m
Check List!
Switch on: Press the control button (2) for approximately one second.
Switch off: Press the control button (2) for approximately four seconds.
Coupling/pairing: Press button on base (4).
Connecting with telephone: Press the control button (2) briefly once.
Answering calls: Press the control button (2) for approximately one
second.
Rejecting calls: Press the control button (2) for at least two seconds.
Terminating a call: Press control button (2).
Voice dialling: Press control button (2) briefly once to prepare the unit
for voice dialling.
Dialogue Mode: Press button on base (4) for one second.
21
Simplified Operation
Switch on and off the unit by pressing and holding the control button.
Answer and terminate a call by pressing the button briefly.
Switch on or off Dialogue Mode by pressing the button on base (4).
When the charging lamp flashes, the battery is being recharged.
Connector Guide
Please visit our website www.commidt.com to find compatible
mobile phones for your Neckloop.The Connector guide will be updated
at all times. NB! Choose the type of mobile phone (make) at the
bottom of the page.
Electrical and electronic equipment (EEE) contains materials,
components and substances which can be dangerous and detrimental to
human health and the environment if waste electrical and electronic
equipment (WEEE) is not disposed of correctly.
Products marked with the “crossed-out waste bin” symbol shown below
are electrical and electronic equipment.This symbol indicates that waste
electrical and electronic equipment must not be discarded along with
unsorted household waste, but must be collected separately.
In the development and manufacture of your COMMidt product,
high-quality materials and components have been used which can be
recycled. When disposing of electrical and electronic equipment you
should therefore make use of a collection arrangement intended for this
purpose, which may involve either delivery at your local collection point
or recycling station or collection at your home. Further information
should be obtained from your local authorities.
22