1
User’s Manual
for
Diagram Consistency and Validation in agentTool III
Submitted by Patrick Gallagher
CIS 895 MSE Project
Department of Computing and Information Sciences
Kansas State University
Table of Contents
Description
Page #
Summary of Changes………………………………………………………………………………..........
1. Introduction………………………………………………………………………………………........
2. How to Use at3 Validation……………………………………………………………………….........
2.1. Workspace vs. Project Specific
Preferences……………………………………………….......
2.2. Workspace Preferences
Only……………………………………………………………..........
2.3. Project Specific and Global Workspace
Preferences……………………………………..........
2.3.1. Activating/Deactivating
Validation……………………………………………….........
2.3.2. Checking Warnings/ Checking
Errors…………………………………………….........
3. How to Create New at3 Validation Rules………………………………………………………..........
3.1. Method 1 – Wizard
Usage………………………………………………………………..........
3.2. Method 2 – Manual
Creation……………………………………………………………..........
3.3. Setting Preference Store
Values…………………………………………………………..........
3.4. Implementing the run() Method is
Rules…………………………………………………........
Appendix A………………………………………………………………………………………….........
ii
iii
1
1
2
3
4
5
5
5
5
15
20
26
a
Summary of Changes
Version #
Date
Changed by
Summary Log
1.0
March 24, 2006
Patrick Gallagher
Initial draft of document
iii
1. Introduction
This User’s Manual is intended to be used with the at3 Validation Eclipse plug-in. It outlines how to use at3
Validation within your at3 Diagrams. The second portion of this manual describes the process of adding new rules
to at3 Validation. We have also included a tutorial to add a new rule. This is found in Appendix A.
The following is a list of prerequisites to use at3 Validation within at3 Diagrams.
1.
2.
3.
4.
5.
Eclipse 3.1 – found at http://www.eclipse.org/downloads
GEF 3.1 – found at http://download.eclipse.org/tools/gef/downloads/
Java 1.5 – found at http://java.sun.com/j2se/1.5.0/download.jsp
at3Validation 1.0 – available by request
at3Diagram plug-ins – available by request (6 plug-ins)
Download all the appropriate versions for you machine. For the GEF plug-in, you may choose to download the
package that does or doesn’t include the examples.
To install Eclipse, download the 3.1.1 build and unpack the file to an appropriate file on your computer. Within the
unpacked Eclipse folder is a folder called plug-ins. Unpack the GEF 3.1, at3Validation 1.0, and the six at3Diagram
plug-ins into plug-ins folder. Start Eclipse by selecting eclipse.exe in the root Eclipse directory.
Java 1.5 is required only to add rules to the validation library.
For instructions on how to use the at3 Diagram plug-ins, please see the corresponding user manuals for each project.
2. How to Use at3 Validation
The at3 Validation plug-in for Eclipse gives at3 users a way to maintain consistency between their at3 diagrams. A
user is given many options on just how they would like to validate their diagrams. All at3 diagrams are validated
against other diagrams present in their current at3 project, depending on the rules governing the type of diagram.
For instructions on how to use at3 diagrams, please see the at3 Static and Dynamic User Manuals.
at3 Validation comes with a variety of options to use during validation. These include whether or not to validate a
project, whether or not to check error problems within diagrams, and whether or not to check warning problems
within diagrams. The at3 diagrams are validated using a set of rules that have been defined by Dr. DeLoach and his
OMASE Methodology. Each of the rules provides valid and invalid actions in at3 diagrams. An example of an
invalid action in the Organizational Model is that each Organizational Model must contain one, and only one
Organization component. If at3 Validation is turn on then we are given an error if we have an Organizational
Diagram that goes against this rule. We are given an error because the rule defines that an invalid action against this
rule denotes an error. We have a wide variety of errors and warnings.
Eclipse uses Problem Markers to report, well Problems, to its users. We must note that validation is only performed
on the current diagrams saved to the file system. This means that you must save your changed diagrams before they
will be validated. In future releases we hope to change this to be more “real-time” and performing validation when
changes are made to the diagram instantaneously. You can see this through invalid Java code in a Java project in
Eclipse. If there is a syntax error in your Java code, the Problem is report to the user through the problems view.
at3 Validation is no different. We use this functionality to report Problems back to the user when an invalid action
is present within a diagram. The at3 Problem Marker contains a description of the problem, which diagram the
problem exist in, and the type of problem, whether it be an error or a warning. It also contains the project that the
invalid diagram belongs to.
Now that we have a good idea what at3 Validation does, we can delve into how to use it. When we create a new at3
Diagram project, which is for now a new Java Project, the at3 Engine is registered with that project. We can start
creating our diagrams within this project and if any of the diagrams contain components that go against our library
of rules, we receive problems, viewable in the Problems View. An example of how to get a Problem Marker is to
create a new Activity Diagram. This will create an error problem because one of our governing rules is that all
Activity Diagrams must be represented in an Agent Diagram as a Service component. In the following sections we
will cover what features accompany our validation engine.
2.1. Workspace vs. Project Specific Preferences
Within at3 Validation we are given the liberty to chose either global or project specific properties with certain
preferences. We can decide if we want to follow the global settings for each project or whether we want a specific
project to follow its own set of preferences. We will first discuss the preferences that pertain solely to the global
workspace.
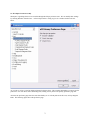
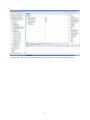
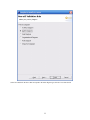
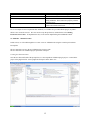
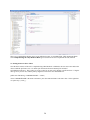
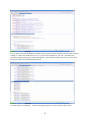
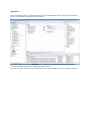
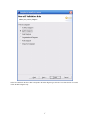
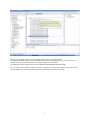
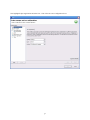
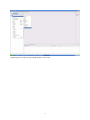
In order to open a projects preference page through a resource we must first highlight the resource. With at3
Validation, the resource must be a diagram file. We filter all other out by checking the files extension and see if it is
a correct file type for validation. Right-click the at3 diagram and select Properties at the bottom. This opens a
preference page for us. We see at3 Primary Preferences Page in the right panel of the window. Highlight it. We
now see this:
We have the choice to set the preferences according to either the global workspace settings or to use project Specific
Settings. If we elect to configure the workspace settings, we only are allowed to edit the three main preferences
Activate Validation, Check Warnings, and Check Errors. This is because, as we discussed earlier, the other
preferences are only editable by choosing the preferences through the WindowÆPreferences path. If we select the
Use Project Settings button, the Use Workspace Setting button is now disabled. We discuss the purpose of each of
these options later in section Project Specific and Global Workspace Preferences
2
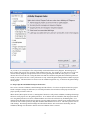
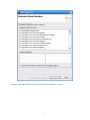
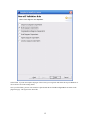
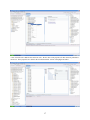
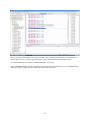
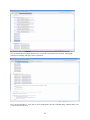
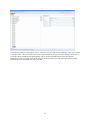
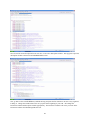
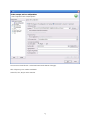
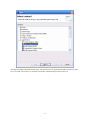
2.2. Workspace Preferences Only
Workspace or global preferences are accessible through the Eclipse preference store. We can modify these settings
by selecting Window Æ Preferences… in the Eclipse tool bar. Doing so gives us a window similar to the one
below.
As you can see we have a section called at3 Primary Preference Page. This contains subheading to set more specific
preferences. We will discuss these subheadings first, making our way back to the primary preference page later.
All of the sub preference pages have the same functionality so we will only discuss the first one, Activity Diagram
Rules. The following figure shows this preference page.
3
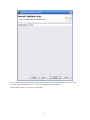
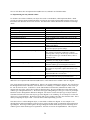
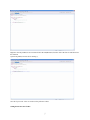
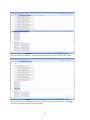
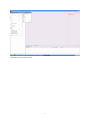
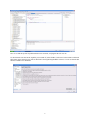
As you can see, we currently have five rules primarily associated with the activity diagram. Deselecting any of
these settings will ‘turn off’ any reporting of this problem to the user. For example, if we don’t care to see an error
when an Activity Diagram is not present as a Service in an Agent Diagram within the same project, we would
deselect the box next to this rule. Doing this deactivates that rule and when a diagram that contains this problem is
found, it is not report to the user. These preferences are only valid in the global settings and not available as project
specific settings. This means that if we chose to use the validation engine this way, we must use the global settings
on our project.
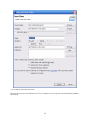
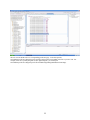
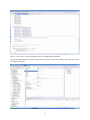
2.3. Project Specific and Global Workspace Preferences
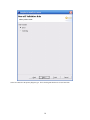
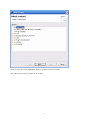
Here we have Activate Validation, Check Warnings and Check Errors. If we have an option activated on a project
but the workspace settings are deactivated, we will still perform the selected actions on the project because the
project specific preferences tell us to.
When checked, these options are active, meaning that if checked we will perform validation, including all warnings
and errors on all projects set to the global preferences. If we uncheck Activate Validation, then all projects that are
set to the global preferences will not be validated and the user will not be notified of any invalid diagrams. If we
uncheck Check Warnings, then all projects that are set to the global preferences will not report warnings back to the
user but all errors will be reported, so long that validation and Check Errors are active. The same goes for errors as
with warnings. Deselecting Check Warnings and Check Errors has the same end result as deselecting Activate
Validation, although it is advisable to deselect Activate Validation if this is wanted.
4
2.3.1. Activating/Deactivating Validation
As stated above, we can choose which of our projects we wish to perform validation on. This means that if we have
two at3 projects in our workspace then we chose to active validation on either project or both or neither. This value
is set as a project preference. We have the choice to include a project in our global preferences. If we choose to
deactivate validation within the project specific settings, that project will not be validated.
If a project is set to follow the workspace settings, then it will either be active or inactive based on the global setting.
2.3.2. Checking Warnings/ Checking Errors
The Check Warnings/ Check Errors option is available so that we may be able to validate our diagrams, ignoring or
including certain type of problems. If we would want to ignore warnings on our project, then we simply deselect
this option in our preference page. We can mix and match preferences for each project and doing so has no effect
over the next, so long as the project is not set to follow workspace settings.
3. How to Create New at3 Validation Rules
To make adding a new rule easy on users, we now created a diagramRule extension. Most features in Eclipse are
available through extensions. This extension allows the user to provide essential information about the new rule,
which is gathered through either a wizard page, which in itself is an extension point (Method 1) or through direct,
manual creation (Method 2) and contribute the basic logic behind the rule. Once this is done, the rule will be apart
of validation package. In the following sections we describe just how to add new rules to the at3 Validation plug-in.
To create new rules we have two options. The first is referred to as Method 1 – Wizard Usage and the other is
Method 2 – Manual Creation. Both of these require that once complete, the user sets the appropriate preferences.
This is outlined in the section Setting Preference Store Values.
3.1. Method 1 – Wizard Usage
In this section we will walk through how to create a new at3 Validation rule using the extension’s wizard page.
Prerequisites
The user must have access to the at3 Validation plug-in source code.
The user must have the at3 Validation plug-in .jar file placed in the plug-ins folder in the Eclipse HOME directory.
The user must have at3 Validation project open in the workspace.
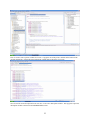
Once the user has satisfied all of the prerequisites, we must expand at3 Validation plug-in project. Located in the
project is the plugin.xml file. Select plugin.xml and open it in the editor view.
5
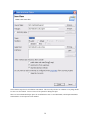
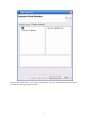
Select the Add… button next to the All Extensions box. This will bring up a list of all available extensions.
6
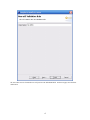
Select the Extension Wizards tab at the top of this page and then highlight at3, as shown.
7
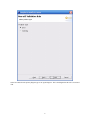
The “New at3 Validation Rule” is now visible in the right frame. Select this and press Finish. Insert the name of
your new rule in the next page and select Next.
8
It is recommended to follow the naming scheme XX.YY where XX is an identifier and YY is a short, one word
descriptor. They are separated with a (.). You are not required to follow this format.
Select whether the rule is of type error or type warning.
9
Select Next and select the primary diagram type. This is the diagram that the rule is associated with.
10
Select Next and check the boxes that correspond to the other diagram types this rule is associated with.
11
Select Finish. If you do not complete all pages of the wizard, you can go back and follow the steps in Method 2 of
rule creation to file in the missing details.
Once you click Finish, your new rule extension is placed under the at3Validation.diagramRule extensions in the
plugin.xml page. The figure below shows this.
12
Verify that the properties on the right are correct. Notice that your new rule’s class is pointing to a new class located
in the rules folder. The location of the rule in rule’s folder depends on your type of primary diagram. In this case it
is located in the at3Validation.rules.agent package. This is the fully qualified location of the class that will
implement your rule but in order to create the class you need to select the class*. link next to the location. Doing
this brings up a new wizard that will create your class.
13
Notice that the Superclass is at3Validation.rules.ARule. This is need by all rules for validation. Everything should
be correct so select Finish. Your new class will be opened for editing in Eclipse.
There are four methods that Eclipse places in our definition because we extended ARule, which implements IRule.
Outlined below is a description of each method.
14
Method
Constructor
run()
getActiveState()
getProblemState()
Description
Default and nothing needs to be changed.
Here is what needs to be done to validate the rule
Returns whether or not our rule is actively set to be ran
during validation. This is based on a property with our
preference store.
Returns whether or not we are validating the type of
problem associated with this rule
To see an example of how to implement these methods, view another rule provided with the plug-in, say SR4.1.
We have now created a new rule. We now need to set up the preferences, outlined in the section Setting
Preference Store Values. To implement the rule, see the section implementing the run Method is Rules.
3.2. Method 2 – Manual Creation
In this section, we will walk through how to create a new at3 Validation rule using the extension point schema.
Prerequisites
The user must have access to the at3 Validation plug-in source code.
The user must have at3 Validation project open in the workspace.
Creating New Extension Point
Once the user has satisfied all of the prerequisites, we must expand at3 Validation plug-in project. Located in the
project is the plugin.xml file. Select plugin.xml and open it in the editor view.
15
Located along the bottom of the editor view is a set of tabs. Select the ‘Extensions’ tab to open it in the editor view.
Once this is done, expand the at3Validation.diagramRule tree in the ‘All Extensions’ section. All of the extension
points based on the ‘…diagramRule’ extension are the current rules within at3Validation.
Right click on ‘at3Validation.diagramRule’ and select New->Rule.
16
A new extension rule is added to the end of our rules. We now have some properties for this extension point that we
need to set. These properties are visible in the ‘Extension Details’ section of the plugin.xml editor.
17
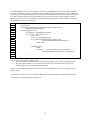
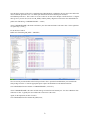
Below is a table describing the properties for an at3 Validation Diagram Rule.
Property
name
class
problemType
primaryDiagram
SequenceDiagramDependent
roleDiagramDependent
orgDiagramDependent
goalDiagramDependent
agentDiagramDependent
activityDiagramDependent
Description
The name of the rule
The fully qualified class location the rule implements
The type of problem created within Eclipse (Error, warning)
The primary diagram type associated with this rule
Does it involve the sequence diagrams?
Does it involve the role diagrams?
Does it involve the organizational diagrams?
Does it involve the goal diagrams?
Does it involve the agent diagrams?
Does it involve the activity diagrams?
The name of the rule must be the same that will be stored in Eclipse’s preference store. The class is the
implementing class used to perform the logic of rule validation. The problemType gives us the Problems category
that the rule will violate. This is either an error or a warning. The primary diagram is the type of at3 Diagram that
corresponds to the type of at3 Diagram associated with this rule. Every rule has one type of diagram that when the
diagram has changed, the rule must be run on those types of diagrams. The ‘…diagramDependent’ properties are
those at3 Diagrams that are check for consistency with the primary diagram. All or none of these may be true or
false.
For example if I have a rule that states “All roles in an Agent Diagram must also be in a Role Diagram. This is
reported as an error.”, then the primary diagram would be the Agent Diagram and the rule is also dependent on Role
Diagrams. The rest of the diagramDependent values are false. The problemType would be an error.
When implementing a class, change the name property of the extension point to the appropriate name. An example
name would be SR.TEST. For consistency, we need to name our class after the name of our rule. So, the fully
qualified class for the new rule would be at3Validation.rules.agent.SR_TEST. Notice that we replaced the (.) with
an (_). This is the only difference.
Now, to create the class, select the class*. link next to the class property. This brings up a wizard to create a new
class definition that extends ARule.
18
Use the default values and select Finish.
This then opens up a new rule definition class for us to complete our rule’s logic that is performed during validation.
The required
19
There are two methods that Eclipse places in our definition because we extended ARule, which implements IRule.
Section Implementing the run() Method is Rules gives instructions on how to implement the run() function.
3.3. Setting Preference Store Values
Once the basic structure of the rule is completed using either Method 1 or Method 2, the user must create and set the
values within the preference store. To do this open the class PreferenceConstants.java located in
at3Validation.preferences. This is where we create a value for our new rule in Eclipse’s Preference Store. Using the
name given to you new rule, find the primary diagrams section in the class and add the line
public static final String <VARIABLENAME> = "name";
where VARIABLENAME is the name consistent to your rules name and name is the same value. Notice again that
we replace any (.) with (_).
20
Next we need to provide a default value for this preference value. Open PreferenceInitializer.java located in the
same package as before. Locate the appropriate place to place the initialization code and insert this line
store.setDefault(PreferenceConstants.<VARIABLENAME>,<VALUE>);
where VARIABLENAME is the same variable name given in PreferenceConstants.java. the value a Boolean value
either true or false. Typically the user would want to insert true as the value.
21
We now need to add the rule to its corresponding preference page. To do this open the
at3Validation.preferences.diagram.specific package and open the corresponding class file to your new rule. For
example, if the rule’s primary diagram was the Agent Diagram, you would open
at3Validation.preferences.diagram.specific.At3ValidationAgentDiagramRulesPreferencePage.
22
First we need to create a private variable for our rule. Copy/paste one of the private variables to the bottom of the
variable declarations. Change the pasted statements variable name to the name of your rule
Next we need to create a description for our new rule. Create a new description variable. Just copy/paste a previous
description variable to the end of our DESCRIPTIONS section.
23
Now, go down to the CreateFieldEditors() method and copy and paste the first statement. Be sure to stay organized
in doing so. Change the variable name to the one you place at the beginning of your code. Also change the
PreferenceConstant and description variable appropriately. The Preference constant is the value you create in the
PreferenceConstant class that distinguishes this rule.
Next copy and paste an addField(… statement, changing the parameter to the variable you just created.
24
Now go down to the performOK() method. Here you need to copy and paste one statement, changing the
preferences accordingly and again, ensure organization.
Save your work and that’s it. Now when we create at3 Diagrams, this rule is included during validation and is set to
a value in the preference store.
25
Next we will discuss how to implement the run(IResource res) method in at3 Validation Rules.
3.4. Implementing the run() Method is Rules
To validate a rule with at3 Validation, our object class needs to extend ARule, which implements IRule. ARule
provides us with some much needed functionality to aid in our quest while using the IRule interface enforces us to
include the extra functions need to write our rules. The table below contains the functions available to us through
ARule.
Function
ARule()
setName(String)
getName()
getActiveState(IProject)
setProblemState(String)
getProblemState(IProject)
getProblemSetting()
getProblemStateInt()
getPageId()
UpdateMarkers(IResource, boolean, String, int)
okToMark(IResource)
DetermineDiagramType(String)
RetreiveFromCache(IResource, Integer)
GetOtherDiagram(IResource, Integer)
runAsSecondary(IResource, Integer)
Description
A default constructor. Has no functionality.
Set the name of rule to the given name.
Returns the name of the rule
Tells us if this rule is active.
Sets the state to either warning or error
Gives us whether rules problem state is active on the
given project.
Helper method to get the problem state setting
Gives us a value for our Problem state consistent with
IMarker.SEVERITY
A unique identifier used to determine if the current
project uses project specific settings.
Updates Problem markers on IResource. If Boolean is
false, it deletes all markers on IResource without
replacing them. String is the message sent back to the
user while int is the type of Problem marker, either a
warning or error.
Checks to make sure that according to the user’s
preferences, it is okay to place a marker.
Uses the given String(a resources file extension) to
determine which type of at3 Diagram a resource is.
Retrieves a resource of type Integer from our cache. If
the resource is not present, it places the resource in to
the cache.
Gives us all the resources of type Integer present in the
project that IResource is located in.
Runs all rules associated with diagrams of type Integer
that is located in the same project as IResource.
IRule forces us to implement the function run(IResource). This controls how to validate a rule on a diagram.
Now for the interesting function, run(IResource). Below is an example run(IResource) function. We will reference
this throughout this section. IResource is the file that we are validating. To validate a diagram we first need to get
the .xml file from our cache. To do this we use the function RetreiveFromCache, inherited from ARule. This
function will convert the .xml file into a usable at3 Diagram object. We pass our IResource to this function along
with the type of diagram IResource is. We use the static types in DiagramType as the types. These are just unique
identifiers used to distinguish the different at3 Diagram. We must be sure that the object type of object returned
from RetreiveFromCache is the same object type of the diagram we are validating. In our example we see that the
object type is of AgentSchema. We must now check that we have actually retrieved a value from the cache. This is
done by comparing our object to null. You must do this when implementing your rule.
Now that we have a valid at3 Diagram object, we search this to validate our diagram. In our example we are
checking that in each Agent Diagram a protocol exist to at least one other agent or organization from each agent in
agent diagram. We first get all the agents in the Agent Diagram and then check that a protocol relationship exists
with the agent to either another agent or organization. After this we need to call UpdateMarkers. This will place
26
any Problem Markers on our file if the diagram is invalid. The UpdateMarkers() function takes three parameters,
the resource the marker is place on, whether the rule was validated, and a description of the problem. If the rule is
valid for the current component then all markers with the same description on the resource are removed. If the rule
is invalid, a marker with the given description and type are placed on the resource. In this example we place a
marker on the resource for every agent that is invalid within the Agent Diagram. Other examples are found in the
at3Validation.rules package of the plug-in.
1
2
3
4
5
6
7
8
9
10
11
12
13
14
15
16
17
18
19
public void run(IResource res) {
boolean found;
AgentSchema agentDiagram = (AgentSchema)RetreiveFromCache(res,
DiagramType.AgentDiagram);
if ( agentDiagram != null ) {
List allAgents = agentDiagram.getAgents();
for ( int i = 0; i < allAgents.size(); ++i ) {
found = true;
Agent a = (Agent)allAgents.get(i);
if ( a.getProtocolSrcRelationships().isEmpty() &&
a.getProtocolDestRelationships().isEmpty() ) {
found = false;
}
UpdateMarkers(res,
found,
a.getName()+ " is not connected to at least one AGENT or " +
"ORGANIZATION by the PROTOCOL relationship.");
}
}
}
As a recap, there a few things all rules must do.
1. They must retrieve the diagram from the cache first and compare to null to ensure a diagram is given.
2. They must update markers, even if no problems are found. This is needed to remove any previous
problems of the same type associated with the diagram.
Please see the at3 Diagram Plug-ins’ API’s for a description of valid operation to retrieve components of each
diagram object.
You should now be able to write your own at3 Validation rules and use them during validation of at3 Diagrams.
See appendix A for a tutorial to add an example rule.
27
Appendix A
This is a tutorial that walks a user through creating a new rule called SR.NEW. Many snapshots in this tutorial are
the same as the snapshots found earlier in this document.
Select the Extension tab just below the editor page that just opened.
Also, select the Add… button next to the All Extensions box. This will bring up a list of all available extensions.
Select the Extension Wizards tab at the top of this page and then highlight at3, as shown.
b
The “New at3 Validation Rule” is now visible in the right frame. Select this and press Finish. Insert the name of
your new rule in the next page and select Next.
c
We can rename our rule if needed but we will just leave the default SR.NEW. On the next page select the Error
radio button.
d
Select Next and select the primary diagram type as an Agent Diagram. This is the diagram that the rule is associated
with.
e
Select Next and check the boxes that correspond to the other diagram types this rule is associated with. For us this
will be the Role Diagram only.
f
Select Finish.
Once you click Finish, your new rule extension is placed under the at3Validation.diagramRule extensions in the
plugin.xml page. The figure below shows this.
g
Verify that the properties on the right are correct. Notice that your new rule’s class is pointing to a new class located
in the rules folder. The location of the rule in rule’s folder depends on your type of primary diagram. In this case it
is located in the at3Validation.rules.agent package. This is the fully qualified location of the class that will
implement your rule but in order to create the class you need to select the class*. link next to the location. Doing
this brings up a new wizard that will create your class.
h
Notice that the Superclass is at3Validation.rules.ARule. This is need by all rules for validation. Everything should
be correct so select Finish. Your new class will be opened for editing in Eclipse.
i
Right now the only method we are concerned with is the run(IResource) function. Place the line of code below into
this function.
System.out.println(“Our test rule is running.”);
Save all of your work. Now we need to set the preference values.
Setting Preference Store Values
j
Once the basic structure of the rule is completed using either Method 1 or Method 2, the user must create and set the
values within the preference store. To do this open the class PreferenceConstants.java located in
at3Validation.preferences. This is where we create a value for our new rule in Eclipse’s Preference Store. Using the
name given to you new rule (in our case SR_NEW), find the primary diagrams section in the class and add the line
public static final String <VARIABLENAME> = "name";
where VARIABLENAME is the name consistent to your rules name and name is the same value. Notice again that
we replace any (.) with (_).
For us the line of code is
Public static final String SR_NEW = “SR.NEW”;
Next we need to provide a default value for this preference value. Open PreferenceInitializer.java located in the
same package as before. Locate the appropriate place to place the initialization code and insert this line
store.setDefault(PreferenceConstants.<VARIABLENAME>,<VALUE>);
where VARIABLENAME is the same variable name given in PreferenceConstants.java. the value a Boolean value
either true or false. Typically the user would want to insert true as the value.
Again, for the inspection, the line of code is:
store.setDefault(PreferenceConstants.SR_NEW, true);
k
We now need to add the rule to its corresponding preference page. To do this open the
at3Validation.preferences.diagram.specific package and open the corresponding class file to your new rule. For
example, if the rule’s primary diagram was the Agent Diagram, you would open
at3Validation.preferences.diagram.specific.At3ValidationAgentDiagramRulesPreferencePage.
First we need to create a private variable for our rule. Copy/paste one of the private variables to the bottom of the
variable declarations. Change the pasted statements variable name to the name of your rule
l
Next we need to create a description for our new rule. Create a new description variable. Just copy/paste a previous
description variable to the end of our DESCRIPTIONS section.
Now, go down to the CreateFieldEditors() method and copy and paste the first statement. Be sure to stay organized
in doing so. Change the variable name to the one you place at the beginning of your code. Also change the
PreferenceConstant and description variable appropriately. The Preference constant is the value you create in the
PreferenceConstant class that distinguishes this rule.
m
Next copy and paste an addField(… statement, changing the parameter to the variable you just created.
Now go down to the performOK() method. Here you need to copy and paste one statement, changing the
preferences accordingly and again, ensure organization.
n
That’s it. Now when we create at3 Diagrams, this rule is included during validation.
We will now run the plug-in in a runtime workbench to verify that our new rule is running. Select Run on the menu
bar and then select Run…
o
Now highlight Eclipse Application and select New. This will create a new configuration for us.
p
Our screen now looks like this. Select Run located on the bottom of the page.
This will open up a new runtime workbench.
Select File, New, Project on the menu bar.
q
This brings up a new project wizard.
r
Select Next with Java Project highlighted. Name our project Test and select Finish.
Now right click our Test project and select New, Other
s
Expand agentTool 3 and select Agent Diagram Editor. Select Next.
t
After this select finish with all the default values. We just created a new Agent Diagram and it was check to make
sure it was valid. We see this if we switch back to the first workbench and open the console view.
u
Here we see that the System.out.println statement was executed, verifying that the rule was ran.
To check that the rule also has the capability to be turned off, select Window, Preferences in the runtime workbench.
This brings up the following page with at3 Preferences and Agent Diagram Rules selected. You can see that the SR
NEW is available to be deselected.
v