1
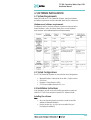
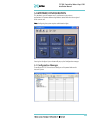
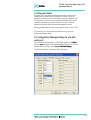
CTC PAL Control for Waters Emp3 CDS
Installation Manual
CTC PAL Control for Waters Empower 3
Software Revision 2.3.3
Installation Manual
CTC Analytics AG reserves the right to make improvements and/or changes
to the product described at any time without notice.
CTC Analytics AG makes no warranty of any kind with regard to this product,
including but not limited to implied warranties of merchantability and
suitability for a particular purpose.
In no case shall CTC Analytics AG be liable for any coincidental or
consequential damage in connection with or arising from the use of this
document.
© 2011 - 2014 CTC Analytics AG. All rights reserved. Neither this publication
nor any part hereof may be copied, photocopied, reproduced, translated or
reduced to electronic medium or machine readable form without the prior
written permission of CTC Analytics AG, except as allowed under copyright
laws.
CTC Analytics AG acknowledges all trade names and trademarks used as
the property of their respective owners.
1
CTC PAL Control for Waters Emp3 CDS
Installation Manual
A. Printing History
Edition
Date
Reason for Change
Edition 4
Edition 3
Edition 2
December 2014
June 2014
June 2014
Edition 1
April 2011
Product version 2.3.3 Release
Product version 2.3.1 Release
Update as to Feature Release 2
improvement concerning client support
Empower 3 support
2
CTC PAL Control for Waters Emp3 CDS
Installation Manual
B. Table of Content
A. Printing History
2
B. Table of Content
3
1. INTRODUCTION
5
1.1 General
5
1.2 About Screen Shots
5
1.3 Default Behavior
5
2. LICENSING, PACKAGING AND DEPLOYMENT
6
3. SUPPORTED CONFIGURATIONS
7
4. SOFTWARE INSTALLATION
8
4.1 System Requirements
8
Hardware and software requirements
8
4.2 Tested Configurations
8
4.3 Installation Instructions
8
Installing the software
8
Uninstalling the software
9
4.4 Trademarks
9
5. EMPOWER CONFIGURATION
10
5.1 Configuration Manager
10
5.2 Empower Nodes
11
5.3 Configuration Manager Dialog for use with serial port
11
5.4 Configuration Manager Dialog for use with TCP/IP
13
Obtain TCP/IP Settings from the Waters DHCP server
13
Fixed TCP/IP Settings
17
5.5 New Chromatographic System
19
Create New System
19
Connect to Existing System
19
Add instruments
20
Access Control
21
Name Selection
22
5.6 Plates
23
Define plate type VT32
23
Define plate type VT98
24
Configure Plates
25
6. FIRST USE
6.1 Configure for use with multiple plates
26
26
7. POINTS YOU NEED TO KNOW
7.1 Prerequisite
27
27
3
CTC PAL Control for Waters Emp3 CDS
Installation Manual
7.2 CTC PAL setup
27
7.3 PAL in combination with Agilent GC`s
27
7.4 Examples
28
8. KNOWN LIMITATIONS
8.1 Overlapped injection
30
30
8.2 Cycle Editor not available on an Empower Client 30
8.3 Editing Methods in ‘Browse Projects’
30
4
CTC PAL Control for Waters Emp3 CDS
Installation Manual
1. INTRODUCTION
1.1 General
This document describes the configuration of the CTC PAL in Empower.
1.2 About Screen Shots
Bitmaps of windows in this document may differ slightly from the software,
due to bug fixing, changes in functionality, updated graphical interface, etc.
Where these discrepancies exist, the version of the image in the software will
take precedence.
1.3 Default Behavior
This software is an instrument control add-on to Empower. As such, where a
software behavior or feature is not described in this document, it can be
assumed to be similar to the behavior or feature for other third-party
instrument drivers.
5
CTC PAL Control for Waters Emp3 CDS
Installation Manual
2. LICENSING, PACKAGING AND
DEPLOYMENT
This instrument control module will be packaged as an instrument control
add-on. The instrument control module will be installed as an addition to the
base software and should be installed on the Empower Node and all
Empower clients that will use the instrument. There’s no need to install the
module on the Empower database server.
6
CTC PAL Control for Waters Emp3 CDS
Installation Manual
3. SUPPORTED CONFIGURATIONS
The software is designed for use with Empower 3 Build 3471 Feature Release
2 and higher (for more details see 4.2 Tested Configurations).
7
CTC PAL Control for Waters Emp3 CDS
Installation Manual
4. SOFTWARE INSTALLATION
4.1 System Requirements
Before you install the CTC PAL Control for Empower, note these hardware
and software requirements and the information about the PAL environment:
Hardware and software requirements
The following table lists the basic computer requirements necessary for the
various Empower 3 nodes. For further details, please see the Empower 3
Basic Computer and Installation Requirements documentation.
4.2 Tested Configurations
The CTC PAL Control for Empower has been tested on these configurations.
•
•
•
•
Microsoft Windows 7 Professional Service Pack 1, English versions
Citrix Server
Empower 3 Feature Release 2 (FR2)
CTC PAL-xt standalone firmware 4.3.0, 2.5.2
4.3 Installation Instructions
In this procedure, you will run the self-installing executable to unpack and
install the ‘CTC PAL Driver for Waters Empower CDS’ software bundle.
Installing the software
Note:
•
•
You must have administrative permission in order to install the
software on Microsoft Windows 7
Previous versions (e.g. v2.1.0) must be uninstalled first (see ”
Uninstalling the software”)
8
CTC PAL Control for Waters Emp3 CDS
Installation Manual
Run ‘Setup.exe
Setup.exe’
Setup.exe to start the installer application (InstallShield Wizard will be
displayed). Follow the instructions the installer provides.
The installer may ask you to reboot your computer.
Uninstalling the software
To uninstall the software:
• Navigate to the Add/Remove Programs tool in the Windows Control
Panel
• Click ‘CTC PAL Driver for Waters Empower CDS’ in the list
• Click Change/Remove
4.4 Trademarks
PAL is a trademark of CTC Analytics AG.
Microsoft, Windows 7 and the Windows logo are trademarks of Microsoft
Corporation in the United States, or other countries, or both.
Other company, product, and service names may be trademarks or service
marks of others.
9
CTC PAL Control for Waters Emp3 CDS
Installation Manual
5. EMPOWER CONFIGURATION
This window is part of Empower and is used to access the primary
applications in Empower software. Applications started from here are assigned
to the current user.
Note: Configuring the system requires administrative rights.
Pressing the Configure System button will pop up the Configuration manager.
5.1 Configuration Manager
To configure the CTC PAL we have to configure an Empower Node and at
least one System.
1 0
CTC PAL Control for Waters Emp3 CDS
Installation Manual
5.2 Empower Nodes
The name (up to 15 alphanumeric characters) assigned to a device on a
network (the first character must be a letter). Use a name, such as the
location of the Network LAC/E, that identifies the node as a Network LAC/E.
The node name must be the name assigned to the Network LAC/E during
installation (also known as computer name). You use the instruments
connected to Empower Nodes to create chromatographic systems.
Managing Empower Nodes involves several tasks for setting up the CTC PAL.
The menu item File > New or right-click Properties brings you to the
configuration Manager Dialog.
5.3 Configuration Manager Dialog for use with
serial port
Confirm that PAL communication is set to SER (this applies just for PALPAL-xt
firmware 4.1
4.1 . x and higher, for detailed information please see CTC PAL User
Manual Edition 4 and higher section 8.1/9.1
8.1 9.1 Com Port Settings)
Settings
Use this tab to select the serial port the PAL is attached to.
1 1
CTC PAL Control for Waters Emp3 CDS
Installation Manual
When switching to the ‘Instruments’-tab, the following screen will appear:
On some systems the ‘OK?’-value will be ‘No’ at first. The reason may be that
the instrument is not yet initialized. The value should change to ‘Yes’ by
pressing ‘Scan Instruments’ after a few seconds.
1 2
CTC PAL Control for Waters Emp3 CDS
Installation Manual
5.4 Configuration Manager Dialog for use with
TCP/IP
The CTC PAL (this applies just for PALPAL-xt firmware 4.1.x and higher with LAN
interface) can be configured to have fixed TCP/IP settings or to obtain them
from a DHCP server. Waters Empower includes a DHCP server.
Obtain TCP/IP Settings from the Waters DHCP server
Select tab Configure DHCP and click button “Configure DHCP”
Select menu item Server > Configuration Wizard
1 3
CTC PAL Control for Waters Emp3 CDS
Installation Manual
Select Network Connection the PAL is connected to
•
•
•
•
•
•
Click Next (2x) and Finish, Restart system when asked
Start Empower and open Configuration manager
Turn on the PAL, confirm that PAL communication is set to LAN and
DHCP to On (this applies just for PALPAL-xt firmware 4.1.x and higher,
for detailed information please see CTC PAL User Manual Edition 4
and higher section 8.2/9.2
8.2 9.2 Setting up LAN Communication)
Communication
Open properties of the Empower node
Select tab Configure DHCP and click button “Configure DHCP”
Connected PAL will appear in DHCP Server Configuration window
1 4
CTC PAL Control for Waters Emp3 CDS
Installation Manual
Select PAL and click Edit
Select ctcPAL in Instrument Type
Click OK
Confirm that the Instrument Type is set to ctcPAL:
Click OK
1 5
CTC PAL Control for Waters Emp3 CDS
Installation Manual
When switching to the ‘Instruments’-tab, the following screen will appear:
On some systems the ‘OK?’-value will be ‘No’ at first. The reason may be that
the instrument is not yet initialized. The value should change to ‘Yes’ by
pressing ‘Scan Instruments’ after a few seconds.
1 6
CTC PAL Control for Waters Emp3 CDS
Installation Manual
Fixed TCP/IP Settings
Confirm that PAL communication is set to LAN and DHCP to Off (this applies
just for PALPAL-xt firmware 4.1.x and higher, for detailed information please see
CTC PAL User Manual Edition 4 and higher section 8.2/9.2
8.2 9.2 Setting up LAN
Communication )
Select tab Configure DHCP and click button “Configure DHCP”
Click “Add” in the DHCP Server Configuration
Set IP Address to IP set on the PAL, set a fake MAC Address, select Instrument
Type “ctcPAL” and set a Unique Name
Click OK
PAL Instrument is added in DHCP Server Configuration
Click OK
When switching to the ‘Instruments’-tab, the following screen will appear:
1 7
CTC PAL Control for Waters Emp3 CDS
Installation Manual
On some systems the ‘OK?’-value will be ‘No’ at first. The reason may be that
the instrument is not yet initialized. The value should change to ‘Yes’ by
pressing ‘Scan Instruments’ after a few seconds.
1 8
CTC PAL Control for Waters Emp3 CDS
Installation Manual
5.5 New Chromatographic System
Create New System
Specifies that you create a new chromatographic system using available
instruments connected to an Empower Node. The system might not be
directly connected to your Empower Personal workstation.
Connect to Existing System
Specifies that the current user can access the selected chromatographic
system. If the system is password-protected, you need the password to access
the system. Then you can use the chromatographic system to acquire and
process data, and to generate reports.
1 9
CTC PAL Control for Waters Emp3 CDS
Installation Manual
Add instruments
Use this page to add instruments to a new chromatographic system.
1.
2.
Select an instrument from the Available Instruments list and drag it
to the New System Instruments list. You can use instruments from
the Unused Components and an existing system. If the instrument is
not in the Available Instruments list, click Cancel, and check the
properties of the Empower Node.
Click Next.
Note: You cannot drag the last instrument from an existing system. To free up
the last instrument on a system, delete the system.
Use this page to control how other users access the new system you are
creating. You can share the system with other network users and passwordprotect the system.
Note: If you have access to a chromatographic system, you do not need to
enter the password unless you are crossing databases.
2 0
CTC PAL Control for Waters Emp3 CDS
Installation Manual
Access Control
Share System with Other Network Users
Specifies that other network users (determined by the access option you
select; see below) can use the system. If you select this option, consider
password-protecting the system to limit its use to authorized users.
Allowed Access
Owner Only
Specifies that the owner of the chromatographic system and users with
Administrator privileges can access the selected chromatographic system.
Owner and Group(s)
Specifies the owner of the chromatographic system, group members as
specified in the Allow Access to Groups list, and administrators can access the
selected system. Group access only allows a user to operate a
chromatographic system.
Note: To modify a chromatographic system, you need access to the
chromatographic system and its Empower Node.
Owner, Group, and
an d World
This field specifies that all users in the database can operate the selected
chromatographic system.
Password Required
This field specifies that users enter a password before they can access the
selected chromatographic system across databases.
Password
Specifies a password (up to 30 alphanumeric characters) is needed to access
the selected chromatographic system across databases.
Confirm Password
Requires re-entry of the password to confirm that it was spelled correctly.
2 1
CTC PAL Control for Waters Emp3 CDS
Installation Manual
Allow Access to Group(s)
Group(s)
Select the user group(s) that you want to give access to the selected
chromatographic system. Access privileges of these user groups override
access privileges of the selected world user type. If you select Owner, Group,
and World, groups that were not selected in the Allow Access to Groups list
are assigned the World User Type Access.
Name Selection
Use this page to name the new chromatographic system and enter any
optional comments.
System Name
Identifies the chromatographic system in the Empower database and in
Configuration Manager. Up to 30 alphanumeric characters are allowed for the
system name. Use a meaningful system name in case other users have access
to the system.
Empower Node Name
Name of the Empower Node to which the selected system is connected. This
field is not editable.
Online
If all configured system instruments are available (not configured in another
online system), this brings the new system online. Default: selected.
System Comment
Displays optional remarks (up to 250 characters). Comments that describe
the chromatographic system, its components, and its intended use can help
others if they have access to the system.
2 2
CTC PAL Control for Waters Emp3 CDS
Installation Manual
5.6 Plates
The following sections show the properties of the most commonly used CTC
tray types; the VT32 and VT98.
Defining plate type can be done from the QuickSet, QuickStart and
Configuration Manager.
Define plate type VT32
2 3
CTC PAL Control for Waters Emp3 CDS
Installation Manual
Define plate type VT98
2 4
CTC PAL Control for Waters Emp3 CDS
Installation Manual
Configure Plates
Before you select the correct plates in Empower, you need to know the
names of the trays and their configured tray types in the PAL itself. This
information can be gathered through the CTC PAL Control panel.
2 5
CTC PAL Control for Waters Emp3 CDS
Installation Manual
6. FIRST USE
6.1 Configure for use with multiple plates
By default Empower is not configured to work with multiple plates/trays.
In this the case the system will default to Tray1,
Tray1 which must be present in the
PAL.
To work with the plates defined in section 5.6 open the Empower QuickStart
or QuickSet interface and select the menu item Edit > Plates.
The following screen will appear:
1.
Uncheck the ‘2790 Layout’ checkbox
2.
Click on the ‘Plate Type Name’ of the first row and select a VT32
plate
3.
Click on the ‘Plate Layout Position’ of the first row and enter name
of the VT32 tray as configured in the PAL. By default ‘Tray1’ or
‘Tray2’.
4.
Repeat previous steps for a VT98 tray.
To select sample locations, select a plate, click on the vials in the right pane
and push the Insert or Append button.
2 6
CTC PAL Control for Waters Emp3 CDS
Installation Manual
7. POINTS YOU NEED TO KNOW
7.1 Prerequisite
•
•
Networking cable RJ45 or RS232 cable PC 9pf/9pf (delivered with
the PAL-xt)
CTC Article no: RS9B-3000
Agilent remote cable (for A7890, A6890, A1100)
CTC Article no: Cbl 7890
7.2 CTC PAL setup
Synchronization Signals (Sync Signals) are inputs that tell the PAL when to
wait or proceed with a sample-processing step. Output Signals (Out Signals)
are sent from the PAL to external devices.
In combination with Agilent instruments (e.g. A7890, A6890, A1100 etc.) the
PAL Cycle events require the following setup:
•
•
Start (Sync Signal)
Injected (Out Signal)
> TTL-In1
> SW-Out1
•
•
Remaining Sync Signals
Remaining Out Signals
> Immediate (Ignore)
> Off
To assign this physical event (e.g. SW-Out1) to an existing signal object
(Injected) complete the following menu selections on the PAL:
•
Menu > Setup > Objects > Out Signals >Injected > Destination >
SW-Out1
7.3 PAL in combination with Agilent GC`s
Agilent 7890:
The Setting Tab for the Injectors has to be set to None (see below). Otherwise
the system would indicate an Agilent autosampler is configured, while there is
no autosampler present. Empower would respond with an Instrument Failure
(Empower Message Center > the injector configured in the method is not
present).
2 7
CTC PAL Control for Waters Emp3 CDS
Installation Manual
Agilent 6890:
The same applies here, the General Tab should have the Front Injector and
Back Injector disabled (see below). Otherwise the system would indicate an
Agilent autosampler is configured, while there is no autosampler present.
Empower would respond with an Instrument Failure (Empower Message
Center > the injector configured in the method is not present).
7.4 Examples
A7890 and PAL:
QuickStart > Run Samples > Control Panel
2 8
CTC PAL Control for Waters Emp3 CDS
Installation Manual
A7890 and PAL:
QuickStart > View Method > PAL
2 9
CTC PAL Control for Waters Emp3 CDS
Installation Manual
8. KNOWN LIMITATIONS
8.1 Overlapped injection
As of now, time optimization for overlapped injections is limited to two
samples. This can be achieved by building a method based on the cycle
named HS_2HS_2 -VialVial -Overlap.
Overlap Sample lists should only contain methods based
on overlap cycles.
The order of instruments within the system configuration should always have
the preparing instrument before the analyzing instrument (please see
example below).
This feature is not available when the CTC PAL is used in combination with
the Agilent 6890 GC or the Agilent 7890 GC with Agilent Instrument Control
Software v2.5 and up (Instrument Control Software v2.01 is supporting this
feature) controlled by Empower. The reason for this is how the Agilent 6890
and 7890 is integrated and controlled by Empower.
8.2 Cycle Editor not available on an Empower
Client
Cycles are the base of all methods. They contain the individual commands of
the CTC PAL.
The Cycle Editor is located in the Tools menu of the Configuration Manager.
Cycles can only be edited on the PC that is physically connected to the PAL.
This is because Empower is unable to store and distribute Cycles.
8.3 Editing Methods in ‘Browse Projects’
Editing methods that were created with earlier versions of the product version
(2.3.0 or earlier) is not possible in ‘Browse Projects’ before converting the
method to a newer structure.
3 0
CTC PAL Control for Waters Emp3 CDS
Installation Manual
This conversion can be achieved by starting ‘Run Samples’ for the instrument
the method was intended for. Make sure the Control Panel Status is green
and displays ‘Ready’. Now open the method, save it and close it.
When editing a method in ‘Run Samples’, always make sure it is opened for
the correct instrument, because the method will only work for this instrument
or an instrument that is configured identically, once it’s saved.
3 1