1
22" Full High Definition LED TV
User Manual
www.lenco.com
CONTENTS
Important Safety Instructions
4
Safety Information
5
Preparation
6
!
"#$
%&'
Connecting External Devices
11
Initial installation for DVB-C
12-13
DVB-T Channel Setting
14
Setting analog cable channels
15
Child Lock / Password / Hotel mode
16-17
Edit stored DTV channels
18
Edit stored ATV channels
19
Basic Operation
20
Teletext
21
EPG
22
Timer List
23
Media Operation / Media Browser
24
File Playback
25-26
Supported File Types
27
SPECIFICATION
28
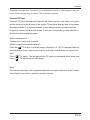
IMPORTANT SAFETY INSTRUCTIONS
operated.
– All the safety and operating instructions should be read before this product is
– The safety and operating instructions should be retained for future reference.
– All warnings on the appliance and in the operating instructions should be adhered to.
– All operating and use instructions should be followed.
– The appliance should not be used near water or moisture – for
example, in a wet basement or near a swimming pool.
ccordance with the manufacturer’s instructions.
one wider than the other. A grounding plug has two blades and a third grounding prong. The wide blade
electrician for replacement of the obsolete outlet.
and at the point where they exit from the apparatus.
sold with the apparatus. When a cart or rack is used, use caution when moving the cart/
apparatus combination to avoid injury from tip-over.
any way, such as the power supply cord or plug is damaged, liquid has been spilled, or objects have fallen
into the apparatus, or the apparatus has been exposed to rain or moisture, does not operate normally, or
has been dropped.
To reduce the risk of fire or electric shock, do not expose this apparatus to rain or
such as vases should not be placed on the apparatus.
The wall socket plug is used as disconnect device, the disconnect device shall remain
readily operable.
The direct plug-in adapter is used as disconnect device, the disconnect device shall
remain readily operable.
To prevent injury, this apparatus must be securely attached to the floor/wall in
accordance with the installation instruction.
alert the user to the presence of non-insulated “dangerous voltage” within the product’s
sk of electric shock.
ed personnel.
triangle is intended to alert the user to
the presence of important operating and maintenance instructions in the literature
accompanying the appliance.
This product contains electrical or electronic materials. The presence of these materials may, if not disposed of
properly, have potential adverse effects on the environment and human health.
Presence of this label on the product means it should not be disposed of as unsorted waste and must be collected
separately. As a consumer, you are responsible for ensuring that this product is disposed of properly.
HDMI:
or registered trademarks of HDMI Licensing LLC.
EN 4
SAFETY INFORMATION
To ensure reliable and safe operation of this equipment, please carefully read all the instructions in
this user guide, especially the safety information below.
Electrical Safety
) The TV set should only be connected to a main power supply with voltage that matches the label
at the rear of the product.
) To prevent overload, do not share the same power supply socket with too many other electronic
components.
) Do not place any connecting wires where they may be stepped on or tripped over.
) Do not place heavy items on any connecting wire, which may damage the wire.
) Hold the main plug, not the wires, when removing from a socket.
) During a thunderstorm, or when not using the television for extended period of time, turn off the
power switch on the back of the television.
) Do not allow water or moisture to enter the TV or power adapter. Do NOT use in wet, moist areas,
such as bathrooms, steamy kitchens or near swimming pools.
) Pull the plug out immediately, and seek professional help if the main plug or cable is damaged,
liquid is spilled onto the set, if the TV set accidentally exposed to water or moisture, if anything
accidentally penetrates the ventilation slots or if the TV set does not work normally.
) Do not remove the safety covers. There are no user-serviceable parts inside. Trying to service the
only service this apparatus.
) To avoid a battery leakage, remove batteries from the remote control, when the remote is not use
for long period, or when the batteries are exhausted.
)
Physical Safety
) Do not block ventilation slots in the back cover. You may place the TV in a cabinet, but ensure at
least 5cm (2’’) clearance all around.
) Do not tap or shake the TV screen, or you may damage the internal circuits. Take good care of the
remote control.
)
) Do not install near any heat sources such as radiators, heat registers, stoves or other apparatus
) Do not defeat the safety purpose of the polarized or grounding-type plug. A polarized plug has
two blades with one wider than the other. A grounding plug has two blades and a third grounding
prong. The wide blade, or the third prong is provided for your safety. If the provided plug does not
) Protect the power cord from being walked on or pinched particularly at plugs.
) Unplug the apparatus during lightning storms or when unused for long periods.
)
operate normally or if the apparatus, including the power supply cord or plug, has been damaged
in any way.
) Servicing is also required if liquid has been spilled, or objects have fallen into the apparatus; when
the apparatus has been exposed to rain or moisture; or if the apparatus has been dropped.
) Always connect your television to a power outlet with protective ground connection.
EN 5
771109
What is Included
%
0
$
1
3
88
$
6737
3
Quick
Start Guide
<
=>
%10#18
771109
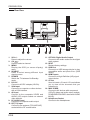
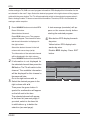
Front View
1. POWER Indicator
30
? 0
3@ ?
2. IRB"
!G
!
" ?
771109
Rear View
17
16
15
14
13
12
6
7
8
1. VOL +/7J! ?
2. CH
7?
3. MENU
K
8@ 9K B 8@G
?
4. SOURCE
7 "" 8
?
5. POWER
039Q3@
?
6. DC 12V
%1%QK%8B&XQ1G?
7. VGA Input
% 8!
>1
"?
8. AV Input
% 8
K9 1ZK9 B[QG 8 = \
!
!
?
9. PC AUDIO Input
% 8
8?
10. RF(]^) Input
%B]^_QZ_G
=
\
3?
9
10
11
11. OPTICAL Digital Audio Output
%
=
@ ?
12. REST
"@
?
13. USB Port
%Z!
8@
8
3 8 "
? BZ
G?
14. HDMI Inputs
%_
#K`
B_KG
8!
?
15. CI Slot
Z
%?1%
@ !
@
3
3?
16. MINI YPBPR
%1!
8
B6Q73Q7G!
8=?
%9$790{K9
1ZK9
B[QG?
17. Headphone Socket
%_8?
771109
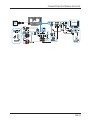
Installing the Base Stand
[@ 0 "# "|
"!
?
2. \ 88 0
}88!
?
\30
}88!
?
Removing the Stand for Wall-Mounting
1. [@ 0 "# "|
"!
?
2. Z
}8
3@ ! ?
3. 1 # 3= 0 3= " 0? $ 0
# 3=?
WARNING: 0
88
3883@Z[[
3=?
771109
Remote Control
&'
%9%0>~01[K%
&&
"K#%
) 0 01[01[[10988"`
"8?
0
38
B3G?
Preparation K
0 " 8 88@?0 K#%
"38!
?0888@
0
?
0=88
?
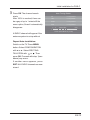
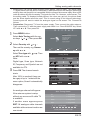
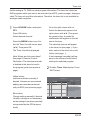
1 Choose the OSD language with the
cursor keys (
or
First Time Installation
). Then set the
language e.g. English
Select Country with
or
. Then set
or
Select Energy Model with
.
English
Language
Country
Germany
Energy Model
OK
Home Mode
Auto Tuning
Then set Home Mode or Store
Mode
Home Mode = Energy saving/ Store Mode = Max. brightness
A message will appear after selecting Store mode: “Would you like to exit the
Home Mode?”
!!"#$!
2 Press OK. Choose Tune type with
or
Tuning Setup
.
Then set DTV
or
Select Digital type with
.
Select Scan type with
or
.
Then set Network Search...or Full
Select Network search. = if suppor-
Tune Type
DTV
Digital Type
DVB-C
Scan Type
Network Scan
Network ID
Auto
Frequency
Auto
Symbol Rate
Auto
ted by cable provider.
Full = if Network Search.. does
not store all channels.
Network ID, frequency and symbol
rate will remain set to Auto by which
all channels can be found.
&X
MENU Back
OK
Start
"K#%
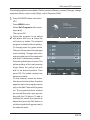
3 Press OK. The channel search
Auto Tuning Status
starts.
TV
:
0 Programme
After 100% is reached, there can
DTV
:
0 Programme
be a gap of up to 1 minute till the
Radio
:
0 Programme
menu option ‚Search‘ automatically
Data
:
0 Programme
5
disappears.
%...
134.00 MHz
(TV)
Please press MENU key to skip
A DVB-C channel will appear if the
antenna system is setup without
Repeat Auto-installation:
Switch-on the TV. Press MENU
button. Select CONFIGURATION
&'*'+TALLATION with
or
.. Then
press OK. Proceed with step 1(see
above).any errors.
If another menu appears, press
EXIT. ALL DVB-C channels are now
stored.
&
K#0%
) 00 K#% K#0 ? " K#% @@K#0?K#0
Q
8"K#%?
Preparation: K
0 " 8 88@? 0 K#0
?00
888@
?79Z%3?
K0
?79?
1 Press MENU button.
Select Auto Tuning with the
cursor keys (
or
Auto Tuning
ATV Manual Tuning
DTV Manual Tuning
Programme Edit
Schedule List
Signal Information
Cl-Informationen
.)Then press
CHANNEL
OK.
Move
2 Select Country with
or
MENU
Return
OK
Select
EXIT Exit
Tuning Setup
.. Then
set the country e.g. Germany with
Country
Tune Type
DTV
Digital Type
DVB-T
Scan Type
Network Scan
Network ID
Auto
Frequency
Auto
Symbol Rate
Auto
or
Select Reception type with
.. Then set DTV
Select Digital Type with
or
..
Then set DVB-T
German
3 Press OK. The channel search
starts.
MENU Back
OK
Start
After 100% is reached, there can
be a gap of up to 1 minute till the
Auto Tuning Status
menu option ‚Search‘ automatically
disappears.
A DVB-T channel will appear if the
antenna system is setup without
TV
:
0 Programme
DTV
:
0 Programme
Radio
:
0 Programme
Data
:
0 Programme
5
%...
134.00 MHz
any errors.
If another menu appear, press EXIT.
All DVB-T channels are now stored.
&}
Please press MENU key to skip
(TV)
3
) 130]'@"
@B" 88\?&]'X'''G?03
0
" 8
?_
@|
8
"@
\
" 8
3
8@?$"
38!
""0
"30?_!|0|
30
8@38
||8
`
3?0
@?
3@ " 0? 7 "
Preparation: K
0 " 8 88@?0 3 ?
00
888@
?79Z%=@?
10
?089?
MENU button.
1 Press
Select Auto Turning with the cursor keys ( or
.) Then press OK.
2 Select Country with
or
Auto Tuning
ATV Manual Tuning
DTV Manual Tuning
Programme Edit
Schedule List
Signal Information
Cl-Informationen
CHANNEL
..
Then set the country e.g. GermaMove
MENU
Return
OK
Select
EXIT Exit
ny
Select Turn type with
or .. Then
Tuning Setup
set ATV Note:
Country
Digital type, Scan type, Network
Tune Type
ATV
ID, Frequency and Symbol are not
Digital Type
DVB-T
Scan Type
Network Scan
Network ID
Auto
After 100% is reached, there can
Frequency
Auto
be a gap of up to 1 minute till the
Symbol Rate
Auto
available for ATV.
3 Press OK. The channel search
starts.
menu option ‚Search‘ automatically
German
MENU Back
OK
Start
disappears.
An analogue channel will appear
if the antenna system is setup
Auto Tuning Status
TV
:
0 Programme
DTV
:
0 Programme
is available.
Radio
:
0 Programme
If another menu appears,press
Data
:
0 Programme
EXIT. All analogue cable channels
5
without any errors and if cable TV
%...
134.00 MHz
(TV)
available at the antenna location are
now stored.
Please press MENU key to skip
&]
%
[=Q7Q_ ) %
[=
"
"K8""?
"
@
883@?
1 2
"3+45#
#6!
then press OK. The following appears: Enter Password.
2 Enter 0000 with the digit keys (0-9). 0000 is the password set by the manufacturer. Subsequently activate/deactivate ‚System Lock‘ with the OK button. The settings for child lock,
"#!"##7"8";<5>#@
is activated. Channel search and Edit Programs are also automatically blocked then.
3 Child Lock:
5!>#@JQ6X
YZ!#<JQ6[\
press OK. If a channel with a corresponding child lock code is received (not supported
by any channel currently), then the program is blocked. A password input dialogue will be
displayed. The program can be viewed only when the correct password is entered.
Password setting:
Change the preset password (0000) to your own password in order to
1. Protect the password against unauthorized change;
2. To protect the Hotel mode against unwanted access.
Attention!
If someone else comes before you and changes the password then you will be standing in
front of a locked TV! Therefore you should change the password yourself. It can be done as
follows:
5X
!@JQ6!X
YZ
[3
!X
!'````j
{
2. Enter a new password and write it down at a secure location. Call the customer care if
you have lost the new password or if it has been misplaced by a third person. The TV unit
must be then taken to the service center.
3. Re-enter the new password. The password is now changed and is known only to you. A
third party will not know this password and therefore cannot change it without your permission.
&
%
[=Q7Q_ Block Channels:
@#}JQ6!X
YZJQ6!
press the green button. A lock icon will appear next to the channel name. If the channel is
selected then a menu will appear to enter the password. The channel cannot be viewed
without entering the password.
Key Lock:
5Z>#@JQ6~<Q!<##YZ'j5##@
active then all buttons (including the RESET button) on the TV do not function.
Hotel Mode:
@$!}JQ6!X
YZ$XX
2
YZ
activate the ‘Hotel Mode’. The Hotel mode is thus active. ‘System Lock’ (see above) must
not be active. The company password 0000 must be changed (see above) to prevent unauthorized changes to the Hotel mode. Set the Hotel menu as you wish to. ‘Export Database’
helps in cloning the fully set and programmed TV unit. ‘Import database’ reads the data of a
cloned unit.
Backlight:
@#}JQ6<j
[[`
["
ness and lowest power consumption, 10 = maximum brightness and maximum power
X7
!<
!
8\!jj
$!!<
!
8
4
Press EXIT to exit the menu.
&
K0
The following options are available: Delete channels (Delete), change sequence (Move),
mark to skip (Skip), add to Favorites (FAV).
Press SOURCE button and select
1 DTV.
10
10$0
K0$0
7
[
" %#" Press MENU button
Select Edit Programs with cursor
CHANNEL
#7JQ68
Then press OK.
$!
the program to be edited
2 Select
JQ6
2
$Z
7
9
~0 \
red button to delete. The selected
program is deleted without asking.
Press the yellow button to move. The
yellow marking of the row becomes
larger. Then enter the new desired
program/channel numbers with
the digit keys. The number entered
appears in red color next to the program/channel names. Or move the
K$
!
=
p
JQ6!
!
position. Then press OK. The yellow marked row becomes smaller.
To skip channel, search as above,
then press the blue button. A symbol
appears next to the program names
only in the Edit Channels/Programs
list. The program/channel marked
as such will then skip upon proceeding with the CH button. To add to
favorites list, search the channel as
above then press the FAV button. A
red heart symbol will appear next to
the channel name.
&
&Q}&
=
10
The following options are available: Delete channels (Delete), rename (Change), change
sequence (Move), mark to skip (Skip), add to Favorites (FAV).
SOURCE button and select
1 Press
ATV.
10
10$0
K0$0
7
Press MENU button
Select Edit Programs with cursor
CHANNEL
#7JQ68
Then press OK.
Select the program to be edited
2 JQ6
2
$!
red button to delete. The selected
$Z
9
7
$!
~0 \
program is deleted without asking.
To change press the green button.
The part of the name to the changed
"# JQ6
select another part of the name with
JQ6
X"
Press the yellow button to move. The
yellow marking of the row becomes
larger. Move the yellow row with
JQ6 !
! X
press OK. The yellow marked row
K
&Q&
=
8
=
becomes smaller.
To skip channel, search as above,
then press the blue button. A symbol
appears next to the program names
only in the Edit Channels/Programs
list. The program/channel marked
as such will then skip upon proceeding with the CH button. To add to
favorites list, search the channel as
above then press the FAV button. A
red heart symbol will appear next to
the channel name.
&
98
Select input source: Press SOURCE"!
!XJ
6
Then press OK.
Channel selection: Press SOURCE button. Then select ATV or DTV.
With digits (0-9).
Example: No. 2: Button 2 / No. 29 : Button 2 and press button 9 within 2 seconds.
No. 929: Press 9,2,9 as above.
Changing channels with CHJ
6#"2 seconds. If only 5 channels have been
saved during the automatic channel search, then only these 5 channels will be seen. Channels
marked for skipping will not be seen (see S.17).
Channel List
The channel list shows the stored/set channels. The channel list is displayed with CH LIST.
!
!J
6{
OK.
Information screen
Press
/DISPLAY to display the DTV channel information.
The following image shows the information of a DVB channel.
1
2
3
4
11 10 9
20
ABC HDTV
08:56 - 09:10
8
09:04 Frl. Jul 13 2007
The Secret Show
720p
Children’s Youth Prog...
DVB-T
HD
English
Subtitle
Age 09
Teletext
7
6
Martian thieves are sucking up the Earth’s gravity.Entire countries are floating while Mars is drawing them towards it!
Victor & Anita must get Earth’s gravity back before the planets collide!
&% X% 3
5
7 }
" ]7 " K\!
3
K3
!
3
%
=B
"!
3G
1
&'
@8
&&7 Audio/Subtitle language for DVB program.
If the current program has more than one audio/subtitle language then you can change it with
NICAM or SUBTITLE
Press NICAM many times to select the audio language.
Press SUBTITLE to select the subtitle language.
X'
0\
Teletext is sent page-wise. This device can automatically store up to 1000 pages but they can
be accessed only after they are stored. This could take some time.
Fastext/TOP text
&QY2X"
j
{!7
!
!"8"j
{!!
!X
displayed in them. The colored buttons on the remote control correspond to the
X<
!{!
2
X!
!"
display the desired teletext page.
Q;
Teletext is not sent by all channels.
Select a channel that sends teletext.
Press the
/TTX button. A teletext page is displayed. (If „100“ is displayed without
text information then it could mean that the selected channel does not support teletext).
Press
/TTX again . The teletext and the TV picture is displayed at the same time.
Press
Q;
Note:
You cannot select any other programs/channels as long as teletext is active. Deactivate teletext if you wish to switch to another channel.
X&
7>
Unlike analogue TV, DVB can send program information. EPG displays this information for the
set channel for the next 7 days. Select the desired programs in the right column of the program
guide with the green button. The TV will automatically switch to the selected program when it
starts. Analogue cable TV does not send this information. Therefore, EPG is not available for
analogue cable reception.
1 Press SOURCE button and select DTV.
A text message (reminder) will ap-
Press OK button.
pear on the screen shortly before
Select desired channel.
starting the selected program.
Press EPG button once. The program
guide will appear. The channel is selec-
4 Blue button: EPG display forwards
ted whose information is displayed in
day-wise.
the right column.
Yellow button: EPG display back-
Select the desired channel in the left
wards day-wise.
#7JQ68
Disable EPG display: Press EXIT
The information of the selected channel
button.
will be displayed in the right column.
Press SOURCE button and select DTV.
2 If information is not displayed for
7 Day TV GUIDE
20:40 - 22:10 02 Sep 2007
Dokumentation GroBbritannien 2004
Not Supported
the selected channel then press the
OK button. The TV will switch to this
channel. The available information
02 Sep 2007 20:55:26
02 Sep 2007
800 arte
20:40-22:10 Agatha Christie-Mein Leben in Bildern
Now
801 MDR FERNSEH...
22:10-00:05 Saturday Night Fever
Next
802 NDR FERNSEH...
will be displayed for this channel a
few seconds later.
3 Select the desired program in the
JQ6
Then press the green button. A
"j
{
XX
on the left next to the time.
The selected channel will appear
in the timer list (see next page). If
you wish, switch to the timer list
to edit further e.g. to delete the
selection (see next page).
XX
Remind
Move View
Prev Day
Display
Details
Next Day
EXIT Exit
0
[
Unlike analogue TV, DVB can send program information. The timer list enlists the
DVB programs which you wish to be reminded (see EPG, previous page). Analogue
cable TV does not send this information. Therefore, the timer list is not available for
analogue cable reception.
1 Press SOURCE button and select
DTV.
Select the desired program in the
Press OK button.
JQ6X
Select desired channel.
the green button. A symbol for
{
XX
j
Press the MENU button once. Se-
next to the time.
lect the Timer List with cursor keys
The selected channel will appear
7JQ68X
YZ
in the timer list (see page..). If you
The Timer List will be displayed.
wish, switch to the timer list to edit
further (see page…).
Note: Where are the cursor keys?
A text message (reminder) will ap-
See page 9, Remote Control.
pear on the screen shortly before
Red button: The selected reminder
starting the selected program.
is deleted in the timer list and in
the program guide (see previous
page).
Timer List display: Press
2 Disable
EXIT button.
Yellow button:
Schedule List
Add new reminder manually if
(5% Used)
desired. However we recommend
adding new reminders automati-
1/1
Programme Title
Date
11:22 26 Dec
802 CBeebies
1
D
Doodle Do
26/12/2008
Doodie Do
2
D
This is CBeebies!
01/01/2009
12:12~12:35
Ice Cube Drawing: Adventures with
cally via EPG (see previous page).
Dib-Dab, Scribble and Stick, Chris shows
Dib-Dab, Scribble and Stick how to peint
with ice cubes, and the four of them play
a game of ice bockey. [S]
Blue button:
Change setting manually if desired.
Move
Delete
Add
Edit
EXIT
Exit
Usually a change is not necessary
as the settings have been precisely
incorporated by the EPG automatically.
X
$
98
Q$
Playback files
Insert USB-stick to USB port.
12&
Q
Then press OK.
Press SOURCE button to select USB
JQ6
Press OK button.
2{JQ6QQX
YZ
Media Selection
Key
Response
JQ6QQ Cursor keys
OK
Confirm
Play/Pause
File Selection
ƽ
Stop
Next file
Previous file
Forward
Rewind
Playback screen
/DISPLAY Display on/off.
FB
X}
FF
Prev.
Next
Stop
RepeatAll
MUTE
7@3=
Photo
Option
Response
Pause/Play
Pause / Play
Prev.
Prev.
Next
Next
Stop
Stop
RepeatAll
Select the repeat mode (all/off/current title)
Music
Background music on/off
Playlist
Playback list
Info.
Display available information
Rotate
Rotate clockwise 90 deg.
Rotate
Rotate anti-clockwise 90 deg
Zoom In
Enlarge
Zoom Out
Reduce
Move
Shift enlarged view
MUSIC
Option
Response
Pause/Play
Pause / Play
FB
Fast rewind
FF
Fast forward
Prev.
Previous file
Next
Next file
Stop
Stop
RepeatAll
Select the repeat mode (all/off/current title)
STUMM
Mute on/off
Playlist
Playback list
Info.
Goto Time
Display available information
Time jump
X]
7@3=
Film
Option
Response
Pause / Play
Pause / Play
FB
Fast rewind
FF
Fast forward
Prev.
Previous file
Next
Next file
Stop
Stop
CharSet
Only when supported by file
RepeatAll
Select the repeat mode (all/off/current title)
Set A
Determine start/end of the scene repetition
Playlist
Playback list
Info.
Display available information
Vor
Slow motion
Rück
Single step
Goto Time
Time jump
Zoom in
Enlarge
Zoom out
Reduce
Bildformat
Picture format
Bewegen
Shift enlarged view
TEXT
Option
Response
Prev. page
Back
Next page
Next
Prev.
Previous file
Next
Next file
Stop
Stop
CharSet
Change CharSet if supported
Music
Background music on/off
Playlist
Playback list
X
88
0@8
File type
Film
Music
Photo
File format
Video codec
Audio codec
.mpg
MPEG-1, MPEG-2
MP3, AAC
.mp4
MPEG-4 H.264
.mp3
--
MP3
.m4a
-
AAC
.jpg/
.jpeg
Progressive JPEG
Baseline JPEG
.bmp
BMP
.png
Without line jump
With line jump
Remark
Maximum
resolution:
768×576
Maximum
resolution:
1920×1080
Scanning
frequency:
8~48kHz
Bit rate
32~320kbps
Scanning
frequency:
16~48kHz
Bit rate
32~320kbps
Maximum
Maximum
resolution:
8192×8192
Maximum
resolution
6500×6500
Pixel depth:
Maximum
Maximum
X
SPECIFICATION
Panel Size
Display Type
Panel Technology
Panel 60 Hz Vs. 120 Hz
Display Resolution
Panel Resolution
Aspect Ratio
Dynamic Contrast Ratio-Panel
Brightness (Centre Typ.) Cd/M²
Response Time (G To G)
Lamp Life (Typ. Hours)
Horizontal Viewing Angle (At CR>10)
Vertical Viewing Angle (At CR>10)
Wall-mount(LxW-mm)
22 inch diagonally
LED
TFT
60 Hz
1920 x 1080
1920 x 1080
16:9
400:1
160
3.5 ms
25.000 hours
160
110
100*100(mm)
This symbol indicates that the relevant electrical product or battery should not be disposed of as
general household waste in Europe. To ensure the correct waste treatment of the product and
battery, please dispose them in accordance to any applicable local laws of requirement for disposal of
electrical equipment or batteries. In so doing, you will help to conserve natural resources and improve
standards of environmental protection in treatment and disposal of electrical waste (Waste Electrical
and Electronic Equipment Directive)
Products with the CE marking comply with the EMC Directive (2004/108/EC) and the Low Voltage
Directive (2006/95/EC) issued by the Commission of the European Community.
EN 28
Service and support
For information: www.lenco.com
For support: http://lencosupport.zendesk.com
Lenco helpdesk:
Germany
The Netherlands
Belgium
France
0900-1520530
0900-23553626
02-6200115
03-81484280
(Local charges)
(Local charges + 1ct p/min)
(Local charges)
(Local charges)
The helpdesk is accessible from Monday till Friday from 9 AM till 6 PM.
When contacting Lenco, you will always be asked for the model and serial number
of your product. The serial number can be found on the back of the device. Please
write down the serial number below:
Model: LED-2201 TV
Serial number:_________________________________
Lenco offers service and warranty in accordance to European law, which means
that in case of repairs (both during and after the warranty period) you should contact
your local dealer.
Important note: It is not possible to send products that need repairs to Lenco
directly.
any way, the warranty expires.
This device is not suitable for professional use. In case of professional use, all
warranty obligations of the manufacturer will be voided.
®All rights reserved
www.lenco.com
EN 29