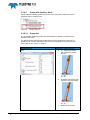
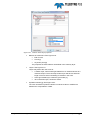
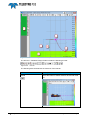
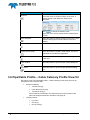
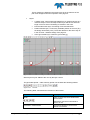
1
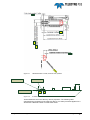
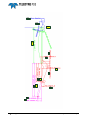
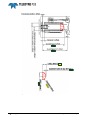
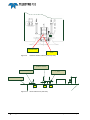
Cable Lay V2 Teledyne PDS Version 1.0.4 May 2015 Teledyne RESON B.V. Stuttgartstraat 42- 44 3047 AS Rotterdam The Netherlands Tel.: +31 (0)10 245 15 00 www.teledyne-reson.com Amendment Record Sheet Rev. Date Reason for Modifications 1.0.4 12/05/2015 Acquisition: Cable slack and cable loss text added. 1.0.3 09/04/2015 Version after review NVW 1.0.2 02/04/2015 Version after review HST 1.0.1 02/04/2015 Version after review PDV 1.0.0 02/04/2015 First version of the Cable Lay V2 Manual. Contents 1 Introduction 1.1 Cable Lay V2 ................................................................................................... 1 2 Getting Started 2.1 2.2 2.3 1 3 Introduction ...................................................................................................... 3 Application type ............................................................................................... 3 Equipment........................................................................................................ 3 2.3.1 Cable Lay ................................................................................................... 4 2.3.1.1 Cable lay device Properties .............................................................. 4 2.3.2 Cable Departure Angles ............................................................................ 7 2.3.2.1 Cable Departure Angles Properties .................................................. 7 2.3.3 Laser Scan ................................................................................................. 7 2.3.3.1 Laser Scan Properties ...................................................................... 7 2.3.4 Echosounder .............................................................................................. 7 2.3.4.1 Echosounder Properties ................................................................... 7 2.3.5 External Marker.......................................................................................... 8 2.3.6 Acoustic Current Measurement (ADCP) .................................................... 8 2.3.6.1 ADCP Properties .............................................................................. 8 2.3.7 Winch Information ...................................................................................... 8 2.3.8 Dredge Positioning System [backhoe] ....................................................... 8 2.3.8.1 Dredge Positioning System Properties ............................................. 9 2.3.8.2 Crane with Auxiliary Hook .............................................................. 12 2.3.8.2.1 Properties 12 2.3.9 Cable Proces (Quadrant Handler Data) .................................................. 13 2.3.9.1 Cable Process Properties ............................................................... 13 2.3.10 Quadrant Underwater Positioning .......................................................... 18 2.3.10.1 Underwater Positioning Properties ............................................... 18 3 Acquisition 19 3.1 3.2 Introduction .................................................................................................... 19 Cable Lay Control View ................................................................................. 20 3.2.1 Operate Modes ........................................................................................ 21 3.2.2 Logging .................................................................................................... 22 3.2.3 Parameters .............................................................................................. 22 3.2.3.1 Parameters Tab .............................................................................. 22 3.2.3.2 Sensors and Deck Route Tab ........................................................ 24 3.2.3.3 Loading ........................................................................................... 27 3.2.3.4 Pull Out ........................................................................................... 28 3.2.3.5 Laying ............................................................................................. 31 3.2.3.6 Overboarding .................................................................................. 32 3.3 Pipe/Cable Profile – Cable Catenary Numerics View V2 .............................. 34 3.4 Plan view - Dredge/Construction Operation .................................................. 36 Teledyne PDS - Cable Lay V2 Contents i 3.5 3.6 3.8 3.9 3.10 3.4.1.1 Routes ............................................................................................ 39 3.4.1.2 Markers .......................................................................................... 40 3.4.1.3 Other layers .................................................................................... 41 Pipe/Cable Profile – Cable Catenary Profile View 3D V2 ............................. 42 Pipe/Cable Profile – Cable Catenary Profile View V2 ................................... 46 3D View – Online Dredge/Construction ........................................................ 49 Pipe/Cable Profile – Laser Cable Detection View ......................................... 51 Laser Scan Control View............................................................................... 52 4 Operate 55 4.1 4.2 4.3 4.4 4.5 Introduction ................................................................................................... 55 Step 1 Define cable parameters ................................................................... 55 Step 2 Loading .............................................................................................. 55 Step 3 Pull Out .............................................................................................. 56 Step 4 Laying ................................................................................................ 58 4.5.1 Chute Table ............................................................................................. 59 4.6 Step 5 Overboarding ..................................................................................... 60 4.6.1 Crane ....................................................................................................... 60 4.6.1.1 Crane Table ................................................................................... 61 4.6.2 Quadrant.................................................................................................. 61 4.7 Step 6 Result ................................................................................................. 63 ii Contents Teledyne PDS - Cable Lay V2 Figures Figure 2-1 Figure 2-2 Figure 2-3 Figure 2-4 Figure 2-5 Figure 2-6 Figure 2-7 Figure 2-8 Figure 2-9 Figure 2-10 Figure 2-11 Figure 3-1 Figure 3-2 Figure 3-3 Figure 3-4 Figure 3-5 Figure 3-6 Figure 3-7 Figure 3-8 Figure 3-9 Figure 3-10 Figure 3-11 Figure 3-12 Figure 3-13 Figure 3-14 Figure 3-15 Figure 3-16 Figure 3-17 Figure 3-18 Figure 3-19 Figure 3-20 Figure 3-21 Figure 3-22 Figure 3-23 Figure 3-24 Figure 3-25 Figure 3-26 Figure 3-27 Figure 3-28 Figure 3-29 Figure 3-30 Figure 3-31 Figure 3-32 Offset/Dimensions chute, tensioner and quadrant .............................................................. 5 Z-Offset shute and tensioner ............................................................................................... 5 Sub System ......................................................................................................................... 9 knuckle-boom crane ............................................................................................................ 9 Knuckle boom crane dimensions ...................................................................................... 11 Additional device ............................................................................................................... 12 Dimensions quadrant ........................................................................................................ 14 Dimensions quadrant handler ........................................................................................... 15 Quadrant handler reference point (top view) ..................................................................... 16 Vessel reference Z (side view) .......................................................................................... 16 Reference point quadrant .................................................................................................. 18 Cable Lay Control View ..................................................................................................... 20 Functions cable Lay Control .............................................................................................. 21 Operate mode selection button. ........................................................................................ 21 Logging .............................................................................................................................. 22 parameter tabs .................................................................................................................. 22 Yellow background color ................................................................................................... 22 Parameters tab .................................................................................................................. 23 Sensors and deck route .................................................................................................... 24 Loading parameters........................................................................................................... 27 Pull out parameters ........................................................................................................... 28 Pull out status .................................................................................................................... 29 Pull out displayed in 3D .................................................................................................... 30 Numerics length to pull ...................................................................................................... 30 Laying parameters ............................................................................................................. 31 Overboarding parameters ................................................................................................. 32 Cable Profile – Cable Catenary Numerics View ................................................................ 34 Plan view – dredge/construction Operation ...................................................................... 36 Tool bar plan view – dredge/construction operation ......................................................... 36 Routes ............................................................................................................................... 39 Markers .............................................................................................................................. 40 Position marker layer ......................................................................................................... 41 3D view – Realtime Design Profile .................................................................................... 42 Position marker layer properties ........................................................................................ 43 Cable Catenary Profile View 3D (in 2D mode and without vessel shape) ........................ 44 Tool bar ............................................................................................................................. 44 Markers in catenary view ................................................................................................... 47 Tool bar ............................................................................................................................. 47 3D view online Dredge/Construction ................................................................................. 49 Tool bar ............................................................................................................................. 49 Pipe/Cable Profile – Laser Cable Detection View ............................................................. 51 Context menu - ‘Draw Polygon’ ........................................................................................ 52 Example of a laser cable detection view with a defined polygon. ..................................... 52 Teledyne PDS - Cable Lay V2 Figures iii Figure 3-33 Figure 4-1 Figure 4-2 Figure 4-3 Figure 4-4 Figure 4-5 Figure 4-6 Figure 4-7 Figure 4-8 Figure 4-9 Figure 4-10 Figure 4-11 Figure 4-12 Figure 4-13 Figure 4-14 Figure 4-15 iv Figures Laser scan Control View ................................................................................................... 53 Catenary during loading. ................................................................................................... 56 Numerics during loading ................................................................................................... 56 Route and centerline black colored................................................................................... 57 Line color changes ............................................................................................................ 57 Catenary numerics view pull out data ............................................................................... 57 Extra pull in length ............................................................................................................ 58 Plan view ........................................................................................................................... 58 Example of chute table ..................................................................................................... 59 Design parameters retrieved from chute table. ................................................................. 60 Example of crane table ..................................................................................................... 61 Raw data view crane hook design parameters. ................................................................ 61 Teklink and cable: two catenaries .................................................................................... 62 Quadrant vertical ............................................................................................................... 62 Track guidance routes ...................................................................................................... 63 Guidance editor with cable as layed route. ....................................................................... 64 Teledyne PDS - Cable Lay V2 1 Introduction 1.1 Cable Lay V2 Improvements and additional features were added to the existing Teledyne PDS Cable Lay application. Now also cable lay vessels equipped with a quadrant are supported. A quadrant is used as a buffer for the cable control on deck, furthermore it is possible to use the quadrant to lower the cable to the seabed. The Cable Lay application do the necessary computations and visualizes the cable lay process in different views. The cable lay control view has been improved and additional features were added. This manual consists of three chapters. Getting started, describes the application type and necessary devices to add for a cable lay project. Acquisition; describes the views used in the acquisition module. Operate; summarizes briefly operational notes for the cable lay operation. This manual will only explain parts related to the Cable Lay application. For other information about Teledyne PDS see the Teledyne PDS User Manual (the file Teledyne PDS User Manual.pdf in the folder ‘manuals’) Teledyne PDS. All Teledyne PDS related manuals are available from the Teledyne PDS Control Center Help menu ‘Help>Open Manuals folder’. This manual is also available as a HTML Help file and can be opened with F1 or with Help > Help Topics from the menu bar. Teledyne PDS Instruction movies are available on the Teledyne PDS YouTube channel. Watch Teledyne PDS instruction movies. Teledyne PDS - Cable Lay V2 Introduction 1 2 Getting Started 2.1 Introduction A Teledyne PDS project must defined with besides the standard project configuration and vessel configuration settings, the correct application type and used devices. 2.2 Application type For a cable lay project in Teledyne PDS the application type is ‘Multi-purpose survey’. 2.3 Equipment Besides the standard equipment such as the vessel position, compass and VRU, additional devices are added to the vessel configuration equipment list. For a cable lay application these are: Cable Lay device; Cable Departure Angles device. Alternatively to the cable departure angle device, laser scan device(s) may be used instead. Additional (optional) devices are Echosounder device; Dredge Positioning System Backhoe; External marker device; Acoustic Current Measurement (ADCP) device; Winch information device; Output device; In case the vessel is equipped with a quadrant: Quadrant underwater position devices Cable Proces (Quadrant handler data) device. Teledyne PDS - Cable Lay V2 Getting Started 3 2.3.1 Cable Lay The cable lay device provides the data from the cable machine. The data may consist of payout cable length, cable speed and optionally the cable tension. The driver is a vessel unique driver. Device Group Cable Lay Devices Jan de Nul – Willem de Vlaming Van Oord Van Oord NEXUS -VOPTEN 2.3.1.1 Cable lay device Properties In the cable lay device properties the dimensions, tensioner and chute offsets and shapes are set. A vessel is possibly equipped with more cable deck routes from the cable tank to the chute. Possible deck routes are: Starboard via buffer (quadrant); Starboard direct; Port direct. This is specified in the associated vessel cable lay device driver. It depends of the number of deck routes if more or less dimensions or offsets must be specified. In Figure 2-1 and Figure 2-2 the dimensions and offsets of a cable lay vessel with more cable deck routes is illustrated. In this case the vessel is equipped with a quadrant. 4 Getting Started Teledyne PDS - Cable Lay V2 Y2 Y1 X2 X1 Dist1 d1 Ra Figure 2-1 Z - SHUTE Offset/Dimensions chute, tensioner and quadrant Z - TENSIONER Z - VESSEL REFERENCE Figure 2-2 Z1 Z2 Z-Offset shute and tensioner These offsets are set in the cable lay device properties. The following table summarizes the properties of the cable lay device. The same procedure applies for a vessel with a different number of cable deck routes. Teledyne PDS - Cable Lay V2 Getting Started 5 Property Deck route. Description (See also Figure 2-1 and Figure 2-2) Specify the cable cut deck length and the cable distance from the tensioner to the cable drum (carousel). In case the vessel is equipped with three cable deck routes, than each deck route is specified. 6 Getting Started Chute radius. Radius of the chute. (Port) Tensioner offset. X = -X1 Y = Y1 Z = Z2 (Port) Chute offset. X = -X2 Y = Y2 Z = Z1 (Starboard) Tensioner offset. X = X1 Y = Y1 Z = Z2 (Starboard) Chute offset. X = X2 Y = Y2 Z = Z1 Shape selection. Shape selection of the concerned item. Quadrant radius. Dist1 Rad1 Teledyne PDS - Cable Lay V2 2.3.2 Cable Departure Angles The cable angle departure device is a data string which provides Teledyne PDS with the cable position in the chute. Device Group Cable Departure Angles Devices Van Oord trolley Van Oord NEXUS -VOPLAS 2.3.2.1 Cable Departure Angles Properties Define in the properties the device offset. The device offset is the laser reference point to the vessel reference point. 2.3.3 Laser Scan Alternatively to the Cable angle departure device, laser scan device(s) may be used to detect the cable position in the chute. Device Group Laser Scan Devices Sick LMS1 Sick LMS5 2.3.3.1 Laser Scan Properties Define in the properties; Device offset. The offset of the laser scan to the vessel reference point. Laser orientation base The mounting orientation of the laser scan. With the orientation correctly defined the laser scan calibration of roll and pitch is as in the vessel grid. Heading correction, roll correction and Pitch correction. These are the mounting angles of the laser scan based on the vessel grid. When the laser scan is pointed forward the heading correction is 0. Other attributes are defined in the laser scan control view and laser cable detection view. 2.3.4 Echosounder Optionally for the bottom source (See page 22. ) an echosounder may be selected. In this case an echosounder must be added to the equipment list. Device Group Echosounder Devices Several brands and data strings as used by CDL, Deso, Elac, Navisound, Odom, Simrad etcetera. 2.3.4.1 Echosounder Properties Define in the properties; Device offset. The offset of the transducer acoustic center to the vessel reference point. Teledyne PDS - Cable Lay V2 Getting Started 7 2.3.5 External Marker It is possible to acquire Coda echoscope line or circle data by Teledyne PDS. This information is logged and visualized in the realtime acquisition plan view survey coverage and in the cable catenary profile view. There are no properties to set for this device. Device Group External Marker Devices Coda Echoscope. 2.3.6 Acoustic Current Measurement (ADCP) Device Group ADCP Devices workhorse The touchdown position during the cable lay is possibly corrected for the water current. See page 22. The water current can be measured by an Acoustic Doppler Current Profiler (ADCP). In this case the ADCP must be added to the equipment list. 2.3.6.1 ADCP Properties The following properties must be defined. Device offset. The offset between the ADCP reference point and the vessel reference point. Heading correction Heading correction of the ADCP 2.3.7 Winch Information Data received from a DROMEC pull-winch is optionally available. The pull-winch may be used on top of a monopole to pull the cable in the pole during the start or the end of the cable lay operation. In this case the winch info device is added to the equipment list. Device Group Winch Info Devices Van Oord – dromec - $SF2SUR There are no properties to set. 2.3.8 Dredge Positioning System [backhoe] A crane is possibly used for the cable lay operations. When the crane is equipped with a positioning device to determine the hook position, the Teledyne PDS crane dimension parameters must be defined. Device Group Dredge positioning system (backhoe) Devices Custom specified OPC devices Custom Can specified devices Other custom specified devices 8 Getting Started Teledyne PDS - Cable Lay V2 The crane is added as a sub system. As a sub system the position is using the main system (vessel) position reference point, heading and attitude. Figure 2-3 Sub System Define the sub system offset with respect to the vessel reference point. As sub system offset the crane offset point is used. 2.3.8.1 Dredge Positioning System Properties Crane configuration parameters for the cable lay application are only accessible by the attributes of the device driver, not by the vessel configuration tools page. Different types of cranes are in use. The below section describes a knuckle boom crane. Contact Teledyne RESON for other crane configurations. In the below example a knuckle boom crane is configured. A knuckle boom crane has the following shape. Figure 2-4 knuckle-boom crane See Figure 2-5. The relevant dimensions are indicated. The crane must correctly positioned in order to measure all relevant dimensions. Teledyne PDS - Cable Lay V2 Getting Started 9 Dia1 Dist1 Ang1 Y1 Z1 Y3 Z2 Y4 Y5 Y2 Y6 Y7 Z3 Z4 Z5 10 Getting Started Teledyne PDS - Cable Lay V2 Figure 2-5 Knuckle boom crane dimensions The following table summarizes these dimensions as defined in the dredge positioning system properties. Offset parameter Device offset Boom Dimension. See Figure 2-5. Device offset of the crane reference point (boom pin) with reference to the sub system reference point. a. X = 0 Y = Y1 Z=0 b. Select shape boom Stick a. X = 0 Y = Y2 Z=0 b. X = 0; Y = Y3 Z = Z1 c. X = 0; Y = Y4 Z = Z2 d. X = 0; Y = Y5 Z = Z3 e. Diameter top sheave f. Hook Select shape stick a. X = 0; Y=0 Z=height hook b. Select shape hook c. Na d. Ang1 e. Dist1 f. Teledyne PDS - Cable Lay V2 Dia1 Getting Started 11 2.3.8.2 Crane with Auxiliary Hook Add an additional dredge positioning device to the sub system when the crane is equipped with an auxiliary hook. Figure 2-6 Additional device 2.3.8.2.1 Properties For this dredge positioning device, the stick attribute is different compared to the knuckle boom crane. The following table summarizes the dimensions for the stick of the crane with an auxiliary hook. All other parameters are the same as defined for the knuckle boom crane. See section 2.3.8.1 on page 9. Offset parameter Stick Dimensions. See Figure 2-5. a. X = Xoffset top sheave with respect to second sheave. Y = Y7 Z = Z5 b. X=Xoffset top sheave with respect to second sheave. Y = Y7 Z = Z4 c. 12 Getting Started Diameter top sheave Teledyne PDS - Cable Lay V2 2.3.9 Cable Proces (Quadrant Handler Data) A vessel is possibly equipped with a quadrant. The quadrant is used as a moving buffer to maintain a stable cable tension. The quadrant is connected to a winch. The cable payout of this winch is measured. With this information the position of the quadrant is determined. In addition, it is possible to use the quadrant to lower the cable to the seabed (cable overboarding). For this purpose the quadrant is attached to a quadrant handler which is able to go in a vertical position. On this way the quadrant is lowered vertically to the seabed. For visualizing and perform correct cable lay calculations the cable process device must added to the equipment list. This device provides the quadrant position on deck and the quadrant handler angle. Device Group Cable Process Info Devices Van oord – NEXUS - VOPQAD 2.3.9.1 Cable Process Properties In the following figures the relevant offset and dimensions of the quadrant, quadrant handler and winch are indicated. These dimensions are entered in the cable process properties. Teledyne PDS - Cable Lay V2 Getting Started 13 Y1 Y9 Z1 Dist1 Y2 d1 Ra Figure 2-7 14 Getting Started Dimensions quadrant Teledyne PDS - Cable Lay V2 Len2 Diam1 Y7 Len1 Y5 Y8 Sep1 Y6 Z2 Z4 Z3 Y4 Figure 2-8 Teledyne PDS - Cable Lay V2 Len3 Dimensions quadrant handler Getting Started 15 Y3 QUADRANT REFERENCE POINT VESSEL REFFERENCE POINT Figure 2-9 Quadrant handler reference point (top view) Z – QUADRANT 0 POSITION Z - QUADRANT HANDLER Z - WINCH Z - VESSEL REFERENCE Z5 Figure 2-10 16 Getting Started Z6 Z7 Vessel reference Z (side view) Teledyne PDS - Cable Lay V2 The following table summarizes the properties of the cable process device. Property Definition Refer to Figure 2-7, Figure 2-8, Figure 2-10 and Figure 2-9. X=0 Y = +Y1 Z = +Z6 Rad1 Dist1 Position source : USBL1 ( ⃰Applicable when quadrant is equipped with USBL for underwater positioning) Transponder offset: X = 0 (In lign with X ref quadrant.) Y = +Y2 Z = -Z1 Position source : USBL2 ( ⃰Applicable nd when quadrant is equipped with 2 USBL for underwater positioning) Transponder offset: X = 0 (In lign with X ref quadrant.) Y = -Y2 Z = -Z1 Heading and VRU source of quadrant sensors. X=0 Y = +Y3 Z = +Z5 Y4 Z2 Len1 Len2 Sep1 Teledyne PDS - Cable Lay V2 Getting Started 17 Property Definition Refer to Figure 2-7, Figure 2-8, Figure 2-10 and Figure 2-9. X=0 Y = +Y5 Z=0 X=0 Y = +Y6 Z = -Z3 Len3 X=0 Y = +Y7 Z = 0; X = 0; Y = +Y8 Z = -Z4 Diam1 X=0 Y = +Y9 Z =+Z7 2.3.10 Quadrant Underwater Positioning For underwater positioning the quadrant may be equipped with: VRU USBL Altimeter In case these devices are used they must be added to the equipment list. 2.3.10.1 Underwater Positioning Properties The device offsets of the quadrant underwater positioning devices must be set with reference to the reference point of the quadrant. See Figure 2-11. Figure 2-11 18 Getting Started Reference point quadrant Teledyne PDS - Cable Lay V2 3 Acquisition 3.1 Introduction This chapter describes the specific views as used for the cable lay application. Cable Lay Control view. Pipe/Cable Profile - Cable Catenary Numerics view V2. Cable Catenary Profile view. 3D – View Online Dredge/Construction. Dredge/Construction Operation. 3D – View Realtime Design Profile. Teledyne PDS - Cable Lay V2 Acquisition 19 3.2 Cable Lay Control View Figure 3-1 Cable Lay Control View This control view is added to the acquisition under the menu option Tools>Equipment Control in acquisition. Select in the dialog the cable lay device and close the dialog. The view is now added to the acquisition and from now on will be act like all other views in the Acquisition. The cable lay control view is used to: 20 Acquisition Switch between operate mode; Start/pause and stop logging; Enter the relevant parameters. Teledyne PDS - Cable Lay V2 Figure 3-2 Functions cable Lay Control 3.2.1 Operate Modes The cable operation is divided into four stages (operate modes). Loading Cable loading. Pull out Start of operation by pulling the cable to the monopile, HDD pipe or beach. Cable laying Laying of the cable. Overboarding Placing the cable overboard using the crane or quadrant. The surveyor must select the relevant button to activate the correct mode that will do the correct calculations. Figure 3-3 Teledyne PDS - Cable Lay V2 Operate mode selection button. Acquisition 21 3.2.2 Logging In operate mode ‘Laying’ and ‘Overboarding’ the cable lay process is logged. The logging starts, pauses or stops when the surveyor select the relevant button. Figure 3-4 Logging The selected mode/button is highlighted. (In Figure 3-4 ‘End Lay and route logging’). When logging is enabled a Teledyne PDS log data file and a track guidance 'as layed route' is created and saved. 3.2.3 Parameters Parameters are subdivided by tabs. Figure 3-5 parameter tabs When a parameter value is changed the related box background color will turn yellow. Press ‘Enter’ or select ‘Apply’ to validate the setting. Figure 3-6 Yellow background color The following sections describe the different tabs. 3.2.3.1 Parameters Tab The parameters tab includes: 22 Acquisition Catenary calculation parameters Horizontal current offset correction. Teledyne PDS - Cable Lay V2 Figure 3-7 Parameters tab The following table summarizes the parameters tab. Function Catenary calculation parameters. Cable Lay Bottom Source. Teledyne PDS - Cable Lay V2 Description Cable weight Cable weight (kg/m) Submerged cable weight per m Submerged cable weight (kg/m) This parameter is used together with the cable tension to compute the catenary and touch down point. Cable diameter. Drag coefficient. Drag/resistance of the cable in the water. Protection radius of the cable. The radius of the cable is limited to a certain value. Select the bottom source. Use default bottom Z Define bottom manually. Survey model The active grid model as selected in the logging settings page. Echosounder Data provided by an interfaced echosounder. Acquisition 23 Function Description Horizontal current offset correction. 3.2.3.2 Select the offset correction source: None No horizontal current correction apply during the cable lay process. Manual Define manually the water current and direction. ADCP Data provided by an interfaced ADCP sensor. Sensors and Deck Route Tab These parameters are related to CDA selection. CDA sensor averaging and filter. Laser position point selection. Cable deck route. Quadrant winch. Cable length measurement. Figure 3-8 24 Acquisition Sensors and deck route Teledyne PDS - Cable Lay V2 The following table summarizes the sensors and deck route parameters. Function CDA selection Description Select: Manual CDA relative vertical. Enter manually the CDA. 90 0 Vertical CDA Sensor averaging and filter CDA from lasers CDA retrieved from lasers or cable departure angle device(s). Select the enable filter checkbox to filter (stabilize) the CDA from laser measurement. Define: Laser position point selection Teledyne PDS - Cable Lay V2 Averaging period. Minimum Tension threshold. Select or deselect laser detection position. Acquisition 25 Function Cable deck route. Description Select the used cable route from the carousel to the tensioner: Carousel via buffer to starboard tensioner Tensioner PS Carousel Cable Tensioner SB Carousel direct to starboard tensioner. Tensioner PS Carousel Cable Tensioner SB Carousel direct to port side tensioner. Tensioner PS Cable Carousel Tensioner SB Quadrant winch. The quadrant is connected to a winch of which the payout cable length is measured. With this cable length the quadrant deck position is determined. Set: 26 Acquisition Length correction of the winch cable payout cable length. Select the ‘Reset length 0’ button to reset the winch cable payout length to 0. The quadrant is set to its 0 reference point. Teledyne PDS - Cable Lay V2 Function Description Cable length measurement. Select the used cable machine or carousel for the cable length measurement. Set for each machine or carousel: Factor % (Compensation of cable length count error) Correction (offset) Select ‘Reset payout to 0’ to reset the cable payout to 0. The correction values of the machines and carousel will change accordingly for a payout length of 0. 3.2.3.3 Loading These parameters are related to the operate mode ‘Loading’. Figure 3-9 Loading parameters The following table summarizes the functions of the loading parameter tab. Function Catenary calculation. Description For the catenary calculation during cable loading define: The top location coordinates of the shore cable storage drum. Radius of the shore shute (when used) or sheave. Select the checkbox ‘Use quadrant support’ when the quadrant (suspended by the crane) is used. Reset the payout length when the cable is in the tensioner in order to measure the loaded cable length. The catenary calculation is based on the tension and height difference between the shore point. The catenary is indicated in the views: Teledyne PDS - Cable Lay V2 Acquisition 27 Function Description Catenary with quadrant: Loaded cable. Catenary without quadrant: Select the ‘Set length from sensor’ when the cable is loaded into the cable tank. The cable length as measured will be applied. The cable length is indicated in the cable length box. Set the cable length manually by changing this value. 3.2.3.4 Pull Out These parameters are relevant for the operate mode ‘Pull out’. Figure 3-10 Pull out parameters The cable can pulled out to: Monopole; HDD pipe (Horizontal directional Drilled); Or Beach floating. The following table summarizes the functions of the pull out parameters. Function Monopole. 28 Acquisition Description Select Monopole when the pull out is to a monopole. Easting and Northing of the monopole. Alternatively select the WP button and select a way point from the drop down list. Teledyne PDS - Cable Lay V2 Function Description HDD pipe - Beach floating. Select HDD pipe or Beach floating when a pull out is to a HDD or beach floating route. The catenary is calculated based on the height difference between the selected HDD pipe route or the beach floating route and the vessel shute. Extra pull in length. Route. Select from the drop down list the HDD pipe route or beach floating route. Select ‘Reverse the pull out route’ to reverse pull out from height kp to low kp or opposite. Select ‘Pull out until KP’ to pull until the defined KP. Defined the additional cable length to pull in at for example a monopole. This length is indicated vertically in the views. In the views the progress of the pull out is monitored. A black line is drawn as the defined center line between the shute and the target KP. A red line indicates the current pay out. For a HDD or beach floater the payout is shown over the selected route. During the pull out process the red line moves over the black colored define line indicating the current cable position. See Figure 3-11. Figure 3-11 Teledyne PDS - Cable Lay V2 Pull out status Acquisition 29 Figure 3-12 Pull out displayed in 3D In the cable catenary numerics view the length to pull is indicated. See page 34 Figure 3-13 30 Acquisition Numerics length to pull Teledyne PDS - Cable Lay V2 3.2.3.5 Laying These parameters are relevant for the operate mode ‘Laying’. Figure 3-14 Laying parameters The following table summarizes the functions of the laying parameters tab. Function As planned cable route. As laid Cable Route. Teledyne PDS - Cable Lay V2 Description Route file Select from the drop down list the planned cable route. Select ‘Reverse route lay direction’ when the cable lay is done from the end of the planned cable route. Off route extra length sailing pattern. Select well before the end of the cable lay. The last valid KP and payout will be set on current touch down KP. This action is necessary before changing to operate mode overboarding as the vessel will maneuver away from the route with its KP numbers. KP cable-crossing. The KP were a cable is crossed. Set the interval on which the cable as laid route will be logged. Acquisition 31 Function Description Vessel Chute Route. Select from the drop down list the cable as planned route. The created chute route is the route the chute (vessel) should follow to lay the cable at the route as planned. Select ‘Send route to DP’ to transfer the route to the DP. Design parameters. Chute table file. Click ‘Select’ to open the ASCII import wizard to import a chute table file. Cable paid-out cor. Press ‘0-diff’ for a differential reset to zero. The cable payout as defined in the chute table is corrected. Alternatively the user can also adjust the payout correction manually in the adjacent box. See also Chute table on page 59. 3.2.3.6 Overboarding These parameters are relevant for the operate mode ‘Overboarding’. Figure 3-15 32 Acquisition Overboarding parameters Teledyne PDS - Cable Lay V2 The following table summarizes the overboarding parameter functions. Function Crane. Description Crane table file. Click ‘Select’ to start the ASCII import wizard to import a defined crane table file. The crane table is used when the crane has taken over the cable from the chute. In this case the design parameters are no longer related to the chute but instead the hook will be used for the cable route calculation. Select ‘0-diff’ for a differential reset to zero. The cable payout as defined in the table will be corrected. Alternatively the user can correct the payout manually in the adjacent box. See also Crane table on page xx. Quadrant. Hook position o Crane –vertical wire uses hook position information from the crane o USBL – hook position information from USBL Use tension from DROMEC winch. Pull tension of the DROMEC winch on the monopile when pulling in the cable. Position source o Vertical wire The wire from the winch connected to the quadrant. o USBL USBL mounted on quadrant. Heading source o Compass Heading from compass sensor at quadrant. o Heading of Transponders Heading as measured by quadrant USBL system. Select ‘Drop Cable and stop route logging’ when the cable is layed at position. The logging of the data stops and a cable as laid route is created and saved. Extra pull in length. Teledyne PDS - Cable Lay V2 Define the extra length of a cable to pull in. Acquisition 33 3.3 Pipe/Cable Profile – Cable Catenary Numerics View V2 Figure 3-16 Cable Profile – Cable Catenary Numerics View The Pipe/Cable Profile – Cable Catenary Numerics View (V2) shows all relevant cable lay data numerically. The following table gives a description of the data fields. Data field Description Cable laid Cable as laid from of touch down point. Length to pull This is the cable length to the defined position (monopole start point or HDD pipe/beach floating route start point) on which to pull the cable + defined extra pull in length. 0 indicates the cable length is as specified to the pull position + specified extra length. A negative value indicates there is more cable pulled as defined. Cable touch down radius The radius of the cable at the touch down point. Cable loss This is the difference between the as planned true route distance and the payout cable as measured with the cable length meter. (The loss value will have a false offset when the route is not sailed from the start of the route. An extra offset value and a reset button is added to make the loss zero at the start of the lay.) The Distances are with respect to True KP. (ellipsoidal distance) 34 Acquisition Touchdown X Easting coordinate touchdown point. Touchdown Y Northing coordinate touchdown point. Touchdown KP Touchdown KP. Touchdown Offtrack Offtrack distance touchdown point – cable route. Touchdown CMG Bearing of touchdown point. (cable as laid) Catenary Cable length catenary. (= distance touchdown point – laydown point) Layback rel. cable depart point Cable departure point. Departure point depends of CDA selection. Current offset Offset due to water current. Cable departure angle Departure angle of cable. Cable slack % Ratio between cable speed and vessel speed in percentage. Teledyne PDS - Cable Lay V2 Data field Description Cable slack %:(Cable speed/Chute Topspeed1)*100 Distance to cable crossing Distance to cable crossing. Cable crossing is defined as KP in laying parameters tab. Cable payout Cable pay out from start of cable laying process. Cable marker Cable marker + cable marker start value. Tension source Tension source as selected in sensors and deck route tab. Used cable tension Calculated cable tension from CDA. Cable speed Speed of cable. Laser detection X Easting position of cable laser detection. Laser detection Y Northing position of cable laser detection. Laser detection KP Laser detection KP. Laser detection offtrack Offtrack distance between laser detection and cable route. Cable Hdg Heading of cable determined by lasers. Cable left Cable left at cable drum (loaded cable-cable pay out) Route left Left route distance. Cable cutoff Distance to cable cutoff point. Cable cutoff marker Cable cutoff marker. 0=cutoff point. Sel. Chute top speed (calculated) Chute top speed. Sel chute X Easting position chute. Sel chute Y Northing position chute. Sel. Tension point Kp Tension point KP. Sel. Tension point offtrack Offtrack Tension point – cable route. Sel. Chute top CMG Chute bearing. Teledyne PDS - Cable Lay V2 Acquisition 35 3.4 Plan view - Dredge/Construction Operation This view is a top view of the cable lay process. Figure 3-17 Plan view – dredge/construction Operation The view includes the following tool bar. Figure 3-18 Tool bar plan view – dredge/construction operation The following table summarizes the functions of the tool bar. Function Zoom Description Zoom in, zoom out and zoom window. Alternatively use the mouse wheel to zoom. Pan This button toggles the pan option on/off. When pan is active the pointer changes into the pan symbol. Hold the left mouse button to move through the data. Measure Measure a distance by clicking on one location and move the cursor to another location. A display appears with Distance and Bearing information. Click to change the distance unit. Select the button again or right click in the View to deactivate the measure mode. Measure Rel. 36 Acquisition Measure a distance between the mouse pointer and the selected Teledyne PDS - Cable Lay V2 Function Vessel Description tracking point. Click to change the distance units. A right click in the View deactivates the measure mode. Select symbol, set waypoint on symbol These functions are applicable when a C-map chart layer is added. Refer to the Teledyne PDS User manual for more details. DP mode and auto ranging Used for the DP (Dynamic Positioning) View. Not applicable for this application. Create Sonar Target Sonar target creation. Not applicable for this application. Follow vessel When selected the vessel will be always in the center of the Plan view. The vessel moves out of the view when not selected. Orientation mode The orientation mode of the Plan view: North up: Plan view orientation always north up. Heading up: Heading of the vessel always up (top of view). Fixed skew: Plan view has a fixed orientation as set in the layer ‘fixed skew’ properties. Set fixed skew from heading When this button is selected and also as orientation mode ‘Fixed skew’ is selected, the actual heading of the vessel will become the orientation mode of the Plan View. Interactive selection Select this button to select items in the plan view with the mouse. (Like the color table when available.) Edit mode Select this button to enable the edit mode. Not applicable for this application. Undo, Redo Undo or redo the last action in the edit mode. Not applicable for this application. Teledyne PDS - Cable Lay V2 Acquisition 37 Function Description Show color table Show the color table of the grid model in the right side of the view. Grid Model Color Mode Different grid model color modes could be displayed. Not applicable for this application. Coverage settings Settings of the grid model. Refer to the Teledyne PDS User manual for more details. Edit Alarm In the Plan View a numerical layer could be added. In this numerical layer an alarm could be defined. Refer to the Teledyne PDS User manual for more details. Layer control Select this button for the layer control dialog box. Properties Select this button for the Layers properties dialog box. By adding layers to the view, it is possible to show different features as used during the cable lay process, such as the different routes, vessel, grid model and markers. The user can change the properties of the layers. 38 Acquisition Teledyne PDS - Cable Lay V2 3.4.1.1 Routes Figure 3-19 and the following table summarizes some important routes as indicating in the plan view. Figure 3-19 Routes Route 1 See Figure 3-19 As planned’ cable route. 2 See Figure 3-19 Lay Barge route 3 See Figure 3-19 Cable as layed route. Layer Active route layer The route as planned for the cable. This route is selected on the cable control view > Laying tab. See page 31. This is the route the chute must follow in order to lay the cable at the defined cable route. Active lay barge route layer Active cable route layer This is the route as the cable is laid. The route name is selected in the cable control view>Laying>vessel chute route. See page 31. Additional routes Route 1 Pull out Layer Catenary layer This is the route used at the pull out HDD pipe or beach floating mode. This route is selected from the cable lay control view>pull out tab. Teledyne PDS - Cable Lay V2 Acquisition 39 Route 2 Layer Vessel chute route Runline layer This route is selected in the cable lay control view. Laying tab >vessel chute route. This is an as planned vessel route or designed top of chute route. 3.4.1.2 Markers Figure 3-20 and the following table summarizes the markers of the plan view. Figure 3-20 Markers Marker Layer 1 Cut off Catenary layer. 2 End of route Catenary layer. 3 Lay down Catenary layer. 4 Tensioner offset This is an offset defined in the properties of the cable lay device. 5 Laser reference offset This is an offset defined the cable departure or laser scan device. 6 Touch down Position marker layer. Open the layer properties to edit the marker properties. 40 Acquisition Teledyne PDS - Cable Lay V2 Add an additional position marker layer to indicate: Chute top. Touch down point. Laser detection point Touchdown point . Crane hook. Design touch down point(s). Select in the position source the cable lay position device and attached it to the required position. Figure 3-21 Position marker layer 3.4.1.3 Other layers The vessel and quadrant (when available) shape is added to the view from the Dredge construction layer. The shapes are selected in the cable lay device properties. (See page 4.) The quadrant position is updated in the view. Like any other plan view in Teledyne PDS additional layers such as DXF, grid model, S-57 Chart layers etc. may be added to the view. Teledyne PDS - Cable Lay V2 Acquisition 41 3.5 Pipe/Cable Profile – Cable Catenary Profile View 3D V2 Figure 3-22 3D view – Realtime Design Profile The Pipe/Cable Profile – Cable Catenary Profile View 3D (V2) is a view which can switch into 2D or 3D mode and can show the catenary with: See Figure 3-24. Markers on the: Chute top [a] Touch down point [b] Laser detection point Crane hook Design touch down point Markers are added by adding a position marker layer. Select in the position marker layer the correct cable lay device as position source and attach it to the required position. 42 Acquisition Teledyne PDS - Cable Lay V2 Figure 3-23 Position marker layer properties Markers as vertical line. See Figure 3-24. End of route Cut off [c] Lay down point [d] The properties of these markers are defined in the catenary layer. Layers. See Figure 3-24. Layers may add to the view such as: A marker layer, with markers generated from an external device as a coda echoscope. The echoscope marker layer will have a historical length control to avoid a clustering of markers in the View. Active grid model layer, shows the grid model. [e] 3D construction layer, shows the vessel. Up/down indicator [g]. See Figure 3-24. The user can add an up/down indicator to indicate a value or a difference between two computations or data. Teledyne PDS - Cable Lay V2 Acquisition 43 Figure 3-24 Cable Catenary Profile View 3D (in 2D mode and without vessel shape) The 3D View – Realtime Design Profile includes the following tool bar. Figure 3-25 Tool bar The following table summarizes the functions of the tool bar. Function 2D/3D Description Select this button to switch between 2D and 3D mode. 2D: 44 Acquisition Teledyne PDS - Cable Lay V2 Function Description 3D: Hold the mousse button to change the point of view. Zoom Zoom in, zoom out, zoom window and zoom extents. Alternatively use the mouse wheel to zoom in or out. Horizontal / Vertical Zoom Select these buttons to zoom in/out vertical or horizontal. Pan This button toggles the pan option on/off. When pan is active the pointer changes into the pan symbol. Hold the left mouse button to move through the data. Show spotlight Select this button to open an illumination angle box in upper left corner. Move the yellow dot to change the light source illumination angle. Teledyne PDS - Cable Lay V2 Acquisition 45 Function Description Measure a distance by clicking on one location and move the cursor to another location in the view. A display appears with Distance, Bearing and Elevation. Measure Click to change the distance units. Right click in the view to deactivate the measurement function. Save Snapshot Select this button to take a snapshot of the View. A file selection dialog opens to define the file name and location. Grid Axis layer Select this button to show the coordinate axis Create Sonar Target Select this button to create a sonar target. This is not applicable for the cable lay application. Show Color table Show the color table of the grid model in the right side of the view. Layer Control Select this button to open the layer control dialog box. Properties Select this button to open the layer properties dialog box. 3.6 Pipe/Cable Profile – Cable Catenary Profile View V2 See Figure 3-26. The Pipe/Cable Profile – Cable Catenary Profile view (V2) is a 2D view and show the catenary with: Markers indicating: Tension point [a] Laser detection point [b] Touchdown point [c] These markers are defined in the same layers as in the markers of the plan view dredge/construction operation. See page 40. 46 Acquisition Vertical markers Lay down Cut off [e] End of route [f] Teledyne PDS - Cable Lay V2 These markers are defined in the same layers as in the markers of the plan view dredge/construction operation. See page 40. Layers: Figure 3-26 A marker layer, with markers generated from an external device as a coda echoscope. The echoscope marker layer will have a historical length control to avoid a clustering of markers in the View. Echosounder track layer, for tracking of echosounder data. Position Marker layer, to show any available position as a mark. (E.g. the design touchdown point). These are defined on the same way as in the 3D view – Realtime design. See page 42. Active grid model layer, shows the grid model. [g] Markers in catenary view Other layers may be added to the view by the layer control. The pipe/cable profile – cable catenary profile view includes the following toolbar: Figure 3-27 Tool bar The following table summarizes the functions of the tool bar. Function Zoom Description Zoom in, zoom out, zoom window and zoom extents. Alternatively use the mouse wheel to zoom in or out. Horizontal / Vertical Zoom Teledyne PDS - Cable Lay V2 Select these buttons to zoom in/out vertical or horizontal. Acquisition 47 Function Description These functions are only available if the scale mode property of the profile view is set on Fixed Vertically or on Scale Freely. 48 Acquisition Pan This button toggles the pan option on/off. When pan is active the pointer changes into the pan symbol. Hold the left mouse button to move through the data. Vertical auto Ranging A vertical zoom extent is active. Follow vessel When selected the vessel will be always in the center of the Plan view. If not clicked the vessel Number of markers Select this button to set the number of markers. Layer Control Select this button to open the Layer control dialog box. Properties Select this button to open the layer properties dialog box. Teledyne PDS - Cable Lay V2 3.8 3D View – Online Dredge/Construction This view shows the cable lay process in 3D. The view is helpful during the cable overboarding operation. Figure 3-28 3D view online Dredge/Construction The 3D view online Dredge/Construction includes the following toolbar. Figure 3-29 Tool bar The following table summarizes the tool bar functions. Function Description Zoom Zoom in, zoom out and zoom extents. Alternatively use the mouse wheel to zoom in or out. Follow vessel Teledyne PDS - Cable Lay V2 When selected the vessel will always be in the center of the Plan view. If not clicked the vessel Acquisition 49 Function Show spotlight Measure Description Select this button to open a source illumination window at the upper left corner. Move the yellow dot to change the light source illumination angle. Measure a distance by clicking on one location and move the cursor to another location in the view. A display appears with Distance, Bearing and Elevation. Click to change the distance units. Right click in the view to deactivate the measurement function. 50 Acquisition Grid Axis layer Select this button to show the coordinate axis. Save Snapshot Select this button to take a snapshot of the View. A file selection dialog opens to define the file name and location. Create Sonar Target Select this button to create a sonar target. This is not applicable for the cable lay application. Show Color table Show the color table of the grid model in the right side of the view. Grid Model Color Mode Different grid model color modes could be displayed. This is not applicable for the cable lay application. Coverage settings Settings of the grid model. This is not applicable for the cable lay operation. Layer Control Select this button to open the Layer control dialog box. Properties Select this button to open the layer properties dialog box. Teledyne PDS - Cable Lay V2 The view shows: Markers Vertical Markers Routes Vessel, quadrant and quadrant handler in 3D. These components positions are visualized. This means when for example the quadrant is lowered it will be displayed. To add one of above items or change the properties, the same layers are used as in the 3D view Realtime design profile. 3.9 Pipe/Cable Profile – Laser Cable Detection View This view is only applicable when for the cable angle departure angle measurement a Laser scan device is used. Figure 3-30 Pipe/Cable Profile – Laser Cable Detection View The Pipe/Cable Profile – Laser Cable Detection View is a QC view for the laser scan cable detection. The view displays how good the laser scan detects the cable in the cable chute. The black bar on top of the view shows the valid cable detection beams as a green area. The red box is a polygon mask shape as selected in the laser scan control view. Laser scan data outside the polygon mask shape will be removed for a better detection of the cable. Right-click in the view for a context menu and select ‘Draw Polygon’ to draw a (new) polygon. Teledyne PDS - Cable Lay V2 Acquisition 51 Figure 3-31 Context menu - ‘Draw Polygon’ Figure 3-32 Example of a laser cable detection view with a defined polygon. The lavender blue dots are the rejected detection points. 3.10 Laser Scan Control View This view is only applicable when for the cable angle departure angle measurement a Laser scan device is used. This control view is added to the Acquisition with the menu option Tools > Equipment Control. Select in the dialog the Laser Scan device and close the dialog. The view is now added to the Acquisition and from now on will be act like all other views in the Acquisition. 52 Acquisition Teledyne PDS - Cable Lay V2 Figure 3-33 Laser scan Control View In this view the properties of the Cable Detection Beamfilter Computation are set. The following table summarizes the functions of the laser scan control view. Function Cable diameter Filter settings Apply Teledyne PDS - Cable Lay V2 Description Specify the diameter of the cable. Minimum range The minimum range on which the cable must be detected. Maximum range the maximum range on which the cable must be detected. Previous pos margin The maximum allowed margin in cable position between two updates. This value must be fine-tuned when the laser scan is mounted and detects the cable. Mask shape Select from the drop down list a polygon. Only detections within the polygon are used. A polygon can be drawn in the Pipe/Cable Profile – Laser Cable Detection View. See page 51. Filter Level The amount of filtering done on the cable detection. A lower value makes the detection more sensitive for changes. Select ‘Apply’ to validate changes. Acquisition 53 4 Operate 4.1 Introduction This chapter briefly describes some considerations and procedures when using the Teledyne PDS cable lay application. Four operate modes are distinguished for the cable lay process and need to follow in a sequential base: 1 Loading; loading the cable in the cable tank. 2 Pull out; cable pull out to a monopole, HDD pipe or beach with floaters. 3 Laying; cable laying. 4 Overboarding; Placing the cable overboard. These operate modes are selected in the cable lay control view. A cable lay vessel is possibly equipped with a quadrant. The quadrant is used as a cable buffer and for the cable loading and/or cable overboarding. Before a cable lay is done the cable and other parameters must be defined. 4.2 Step 1 Define cable parameters Refer to Parameters on page 22. Define: Cable parameters. Bottom source. Horizontal current source. 4.3 Step 2 Loading Refer to Loading on page 27. Select the ‘Loading’ tab from the cable lay control view. Define the (on shore) cable storage top coordinates and the storage shute or sheave diameter. Set the cable length to zero in the cable length box. Set from the sensors and deck route tab the payout to zero. See page 24. Select the ‘Use quadrant’ checkbox when a quadrant is used for the cable loading. The catenary is displayed accordingly. The height of the catenary is measured by the crane hook. (Quadrant is hoisted by the crane.) Teledyne PDS - Cable Lay V2 Operate 55 Select the operate mode ‘Loading’. Select ‘Set length of sensor’ when the cable is loaded in the cable tank. The cable length as measured by the cable machine is loaded and indicated in the cable length box. Alternatively the cable length can be entered manually in the cable length box. The catenary during the loading process is displayed in the Pipe/Cable profile – Cable Catenary profile view and the 3D view Realtime design. ( See page 42 and page 46) Figure 4-1 Catenary during loading. The relevant loading parameters are showed in the cable catenary numerics view. Figure 4-2 Numerics during loading 4.4 Step 3 Pull Out Refer to Pull Out on page 28. 56 Operate Set from the sensors and deck route tab the payout to zero. See page 24. Open the sensor and deck route tab. Change the quadrant winch length correction, to set or correct the quadrant position on deck. Open the pull out tab. Select Monopole,HDD pipe or beach floating. Select for a monopole the coordinates and for the HDD pipe and Beach floating the route. This route can possibly reverse. A KP may select to pull out the cable. Set the extra pull in length. Select the operate mode ‘Pull out’. Teledyne PDS - Cable Lay V2 In the views the catenary and centerline to the monopole or HDD pipe/ beach floating route is black colored. Figure 4-3 When the pull out starts the cable position is updated in the views. The black line will become red colored on the cable position. Figure 4-4 Line color changes The relevant pull out data is displayed in the cable catenary numerics view. Figure 4-5 Route and centerline black colored. Catenary numerics view pull out data The extra pull in length is drawn in the views as a vertical line. Teledyne PDS - Cable Lay V2 Operate 57 Figure 4-6 Extra pull in length 4.5 Step 4 Laying Refer to Laying on page 31. Open the Laying tab. Select the cable route file. The route may reverse. A designed chute route can select in the vessel chute route drop down list. Select the Laying operate mode. Start Route logging. Use the Plan view –Dredge/construction Operation for navigation. The cable route and the lay barge route are showed. The chute must follow the lay barge route in order to lay the cable at the cable route. Different points such as the touch down point are shown by markers when defined in the associated layers. Figure 4-7 58 Operate Plan view The relevant cable lay data is shown in the catenary numerics view. The catenary is shown in the 3D view real time design, cable catenary profile and 3D view- online Dredge/Construction. Teledyne PDS - Cable Lay V2 Select the ‘Fix and use last valid KP’ checkbox when the vessel must maneuver from the route for the extra length sailing pattern. 4.5.1 Chute Table A chute table is used to optimize the touchdown accuracy. The cable computation will make the theoretical and differentia cable payout data available in the data block for further use. The KP range of the vessel route and the chute table need to overlap. The KP values don’t need to coincide with each other. With the cable payout as defined in the chute table is corrected. The payout correction can also adjust manually by the user in the adjacent box. Figure 4-8 Example of chute table The design data is available by the raw data view. Teledyne PDS - Cable Lay V2 Operate 59 Figure 4-9 Design parameters retrieved from chute table. 4.6 Step 5 Overboarding Refer to Overboarding on page 32. The vessel maneuvers in a cable cut position. The cut off marker is at the cable 0 reference point (normally the chute position). This is visualized in the views. The cable is cut off at the cut off device. (Cable cut deck length is defined in the cable lay device properties) Select from the overboarding tab the: Crane, if the crane is used for overboarding the cable. See 4.6.1 Quadrant, if the quadrant is used for overboarding the cable. See 4.6.2. Select the operate mode: Overboarding. 4.6.1 Crane In this case the design parameters are no longer dependent of the top of the chute. Instead the position of the hook will be used for the cable route calculation 60 Operate The catenary / touchdown calculation is based on the crane hook Z and the cable protection radius as specified in the parameters tab All relevant data is available in the catenary numerics view. The catenary is displayed in the 3D view online dredge/construction, the 3D view – Realtime Design Profile and the pipe/cable profile – cable catenary profile view. Select from the overboarding tab the checkbox ‘Drop cable and stop route logging’. Teledyne PDS - Cable Lay V2 4.6.1.1 The cable lay process is finished. Crane Table A crane table is used to make the overboarding process more accurate if the crane is used. It provides designed crane hook position, touch down parameters along with other parameters. The crane table is a customer provided table. Figure 4-10 Example of crane table In the profile view the Hook Z design line and actual track is shown. The top of crane route will be read from the table and made available in the crane route layer in the plan and a catenary profile view. The crane design data can also retrieved from the raw data view of the cable lay computation. . Figure 4-11 Raw data view crane hook design parameters. 4.6.2 Quadrant In this case the design parameters are no longer dependent of the top of the chute. Instead the position of the quadrant will be used for the cable route calculation. Teledyne PDS - Cable Lay V2 All relevant data is available in the catenary numerics view. The catenary is displayed in the 3D view online dredge/construction, the 3D view – Realtime Design Profile and the pipe/cable profile – cable catenary profile view. Operate 61 The pull out of the teklink to the monopole is visualized. The teklink is pulled out by the port side tensioner. The cable may retrieved by the starboard tensioner. The catenary is based on the port chute position. The two catenary / touchdown points are calculated and visualized. Figure 4-12 Figure 4-13 Teklink and cable: two catenaries From the sensors and deck route tab the CDA selection is changed to manual with the correct angle specified. The quadrant is positioned in the handler. This is visualized in the views. The tensions points changes from the chute to the quadrant. The handler position the quadrant in a vertical position. The quadrant moves vertically. This process is visualized in the views. The position of the quadrant is obtained by mounted underwater sensors. Quadrant vertical 62 Operate The cable is pulled into the monopile. This is visualized. The current cable position is red colored. The centerline is black colored. Over length is drawn as a vertical line. Teledyne PDS - Cable Lay V2 Select from the overboarding tab the checkbox ‘Drop cable and stop route logging’. The cable lay process is finished. 4.7 Step 6 Result When the cable lay process is finished when the ‘Drop cable and stop route logging’ was selected the logging stops. PDS logdata files are created in the PDS logData folder The cable as layed route is available in the project track guidance routes. Figure 4-14 Track guidance routes It is possible to open a route in the guidance editor. Teledyne PDS - Cable Lay V2 Operate 63 Figure 4-15 64 Operate Guidance editor with cable as layed route. Teledyne PDS - Cable Lay V2 ─P─ Parameters - 22 Pull out - 28 Pull Out - 56 Index ─Q─ quadrant - 13 Quadrant - 18, 61 ─R─ Routes - 39 ─A─ ─T─ ADCP - 8 Tension Point - 46 Touchdown Point - 41, 46 track guidance routes - 63 True KP - 34 ─B─ Beach floating - 28 ─C─ Cable Departure Angles - 7 Cable loss - 34 Cable slack - 34 Catenary - 22, 42 chute table - 59 Chute table - 32 Crane - 60 crane table - 33, 61 ─W─ Winch Information - 8 ─H─ HDD pipe - 28 Horizontal current - 22 ─L─ Laser Cable Detection View - 51 Laser Detection Point - 41, 42, 46 Laser Scan - 7, 52 Layers - 43 Laying - 31, 58 Loading - 27, 55 Logging - 22 ─M─ Markers - 43 Monopole - 28 ─O─ Overboarding - 32, 60 Teledyne PDS - Cable Lay V2 Index 65