1
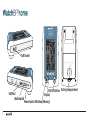
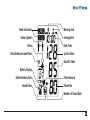
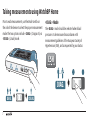
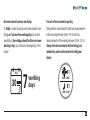
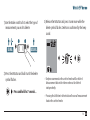
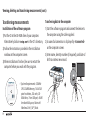
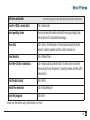
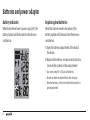
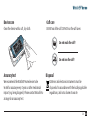
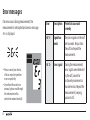
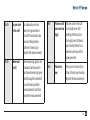
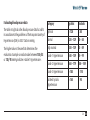
Accurate home blood pressure measurements with the WatchBP Home. Instruction Manual EN 3 Microlife WatchBP Home is the world’s first digital blood pressure measurement device that strictly follows European Society of Hypertension (ESH)1, 2 and American Heart Association (AHA) recommendations for home blood pressure measurement. Using the WatchBP Home device helps you collect accurate home blood pressure measurement your doctor can trust. This WatchBP Home device has been clinically validated according to the ESH protocol 3. 1 O’Brien E, Asmar R, Beilin L, Imai Y, et al. European Society of Hypertension recommendations for conventional, ambulatory and home blood pressure measurement. European Society of Hypertension Working Group on Blood Pressure Monitoring. J Hypertens 2003;21:821-848. 2 Stergiou GS, et al. A tool for reliable self-home blood pressure monitoring designed according to the European Society of Hypertension recommendations: The Microlife WatchBP Home monitor. Blood press Monit. 2007;12:127-131. 3 Stergiou GS, Giovas PP, Gkinos CP, Patouras JD. Validation of the Microlife WatchBP Home device for self home blood pressure measurement according to The International Protocol. Blood Press Monit. 2007;12(3):185-188. Table of Contents Before using WatchBP Home for the first time Viewing, deleting, and transferring measurements Product description .....................................................3–4 Viewing measurements ......................................... 15–16 Activating the device ...................................................... 5 Deleting measurements ......................................... 17–18 Selecting the correct cuff ................................................ 6 Transferring measurements ................................... 19–20 Taking measurements using WatchBP Home Appendix «DIAG.» Mode ..............................................................7–9 Batteries and power adaptor ................................. 21–22 «USUAL» Mode ............................................................. 10 Safety, care, accuracy test and disposal ................. 23–24 Eight steps for taking proper blood pressure Error messages ....................................................... 25–26 measurements Important facts ....................................................... 27–28 Blood pressure measurement procedures ............. 11–14 Technical specifications ................................................ 29 EN SYS mmHg Cuff Socket DIA mmHg Pulse /min USB Port Mode Switch 3 ON/OFF Button Battery Compartment Display Power Socket M Button (Memory) Mode Indication Morning Data Doctor Symbol Evening Data Relax Outside Measurement Time Date/Time Systolic Value Diastolic Value Battery Display Delete Memory Data Stored Value Pulse Indicator Pulse Rate Number of Stored Data 4 EN Before using WatchBP Home for the first time Activating the Device Pull out the protective strip from the battery compartment. Press ON/OFF Button to confirm Press M Button to make selection 2) Set the month – Use the M Button to set the Month. Press the ON/OFF Button to confirm. 1) Set the year – Upon removing the protective strip or installing new batteries, the Year number flashes in the display. Use the M Button to select the Year. Press the ON/OFF Button to confirm your selection. 5 3) Set the day – Press the M Button to set the Day. Press the ON/OFF Button to confirm. 4) Set the time – Once you have set the Hour and Minutes and pressed the ON/OFF Button, the date and time are set, and the current time is displayed. Selecting the correct cuff The WatchBP Home device is available with different cuff sizes. If you believe the cuff size provided with your device is incorrect, please consult your doctor. * please use only Microlife cuffs! M (Medium size) 22 - 32 cm (8.7 - 12.6 inches) 5) If you want to change the date and time, briefly take out and put back one battery from the battery compartment. The Year number will flash. Complete the process as described above. M is the correct size for most people. L (Large size) 32 - 42 cm (12.6 - 16.5 inches) 6 EN Taking measurements using WatchBP Home Prior to each measurement, use the Mode Switch on the side of the device to select the proper measurement mode. The two options include: «DIAG.» (Diagnostic) or «USUAL» (Usual) mode. «DIAG.» Mode The «DIAG.» mode should be selected when blood pressure is to be measured in accordance with measurement guidelines of the European Society of Hypertension (ESH), and as requested by your doctor. DIAG. DIAG. 7 USUAL No measurements on non-work days Two sets of measurements per day In «DIAG.» mode, blood pressure measurements are taking on 7 consecutive working days (or normal week days). No readings should be taken on «nonworking» days (or particularly relaxing days) in this mode! ESH guidelines recommend to take two measurements in the morning between 06:00 - 09:00 and two measurements in the evening between 18:00 - 21:00. Always take measurements before taking your medication, unless otherwise directed by your doctor. JAN 30 7 working days X1 06:00 – 09:00 X1 18:00 – 21:00 8 EN Taking measurements using WatchBP Home (cont.) Extended measurement period Evaluation WatchBP Home has an extended measurement period and allows morning measurements between 04:00 - 12:00 and evening measurements between 18:00 - 24:00. After measurements have been carried out for a total of 7 working days, bring the device to your doctor for evaluation of your home blood pressure. Outside these times, measurements cannot be taken and the symbol on the left will be displayed on the screen. 9 When measurements have been carried out for the full 7 days, the doctor symbol will flash on the screen. «USUAL» Mode 250 measurements safely stored The «USUAL» mode should be selected when blood pressure is to be measured independent of recommended guidelines. In «USUAL» mode, single measurements can be taken at any time, and results are automatically stored for later evaluation by your doctor. The WatchBP Home device can store up to 250 single measurements in «USUAL» mode. memory is full, each new measurement will * When automatically overwrite the earliest measurement. Anytime USUAL 250 Measurements 10 EN Eight steps for taking proper blood pressure Step 1 Step 2 Avoid taking measurements directly after eating, drinking, or smoking. Allow at least one hour between these activities and measurement of your blood pressure. Prepare a chair and table for the measurement. The chair should have a vertical back-rest and the table should allow for your upper arm to rest at the same height as your heart. 1 Hour Before 11 Step 3 Step 4 Remove all clothing covering or constricting the measurement arm. Apply the cuff. Make sure the lower edge of the cuff is 2–3cm from the inner fold of your arm. The tube connecting the cuff to the device should be placed on the inside of the arm. (Additional visual instruction can be found on the cuff) Sit down and relax for at least five minutes prior to the measurement. 12 EN Eight steps for taking proper blood pressure (cont.) Step 5 Step 6 Sit upright and lean comfortably against the chair’s backrest. Press the start button. The device will initiate a 60-second countdown. During the measurement do not move, cross your legs, or tense your arm muscles. Breath normally and do not talk. One measurement cycle includes two measurements. Once the first measurement is complete, continue to relax as you wait for the second measurement. The second measurement will start after 60-seconds. During this time avoid movement. 1 2 60 sec. 13 Step 7 Step 8 Once the two readings are complete, measurement data are automatically stored for future reference by your doctor. If an error displays after the readings, please repeat the first six steps once again. When seven days of measurements have been collected, the Doctor Symbol will flash on the display. Do not forget to bring your WatchBP Home device with you on your next doctor visit. (Note: the doctor symbol is only displayed for measurements in «DIAG.» Mode.) Automatically stored 14 EN Viewing, deleting and transferring measurements Viewing measurements In «DIAG.» Mode 1) Use the Mode switch to first select the type of measurements you wish to view. 1) When the M Button is pressed, it briefly displays the total number of measurements stored, e.g. N=20. DIAG. USUAL 2) Then press the M Button. is displayed when * «A» the number shown is the average of all data. 15 «- -» will display when the * number of measurements is less than 12. 2) Pressing the M Button again displays the average of all morning data. 3) Pressing M Button once again shows the average of all evening data. individual readings can be viewed by repeatedly pressing * All the M Button. In «USUAL» Mode 1) When the M Button is pressed, it briefly displays the total number of measurements stored, e.g. N=63, followed immediately by the average of all measurements stored in memory. 2) All individual readings can be viewed by repeatedly pressing the M Button. Individual Reading 16 EN Viewing, deleting and transferring measurements (cont.) Deleting measurements Data from «DIAG.» and «USUAL» can be deleted independent of each other. DIAG. 17 USUAL deleting data, be sure to ask your doctor if the * Before measurement data are still required. Only delete the stored measurements when you are sure that you no longer need the data. 1) Use the Mode switch to first select the type of measurements you wish to delete. DIAG. 3) Release the M Button and press it once more while the delete symbol flashes. Deletion is confirmed by the beep sound. USUAL 2) Press the M Button and hold it until the delete symbol flashes. Press and hold for 7 seconds... measurements in the selected mode will be deleted. * Only Measurement data in the other mode must be deleted independently. the M Button to delete data will erase all measurement * Pressing data in the selected mode. 18 EN Viewing, deleting and transferring measurements (cont.) Transferring measurements Transferring data to the computer Installation of the software program 1) Start the software program and connect the device to the computer using the cable supplied. 1) Put the CD in the CD-ROM drive of your computer. Alternatively click on «setup.exe» in the CD’s directory. 2) Follow the instructions provided in the installation window on the computer screen. WatchBP Analyzer Home Version 1.0.0.7 Install CD System Requirements: 550MHz CPU. 256MB Memory, 1024x768 pixel resolution, 256 color, CD-ROM drive, 1 free USB port, 40MB free hard disk space, Microsoft Windows 2000 / XP / Vista. 19 ed. serv ©200 s Re Right 8 Microlif e Corporation. All 3) When installation is finished, be sure to restart the computer before you work with the program. Requirements: 550MHz * System CPU. 256MB Memory, 1024x768 pixel resolution, 256 color, CDROM drive, 1 free USB port, 40MB free hard disk space, Microsoft Windows 2000 / XP / Vista. 2) A successful connection is displayed by «Connected» on the computer screen. 3) Enter name, identity number (if required), and date of birth to create a new record. Software commands Refer to the software user manual for detailed information and instructions. Transfer «DIAG.» mode data Click «Download» Corresponding value You can remove the check mark and the corresponding value will not be used to calculate the average. Store data Click «Save», the file name is formed automatically from the patient’s identity number and the suffix «Dmode.xls». View the data Click «Patient Files» Store the «USUAL» mode data Click «Download Usual Mode Data», the file name is formed automatically from the patient’s identity number and the suffix «Umode.xls». Print the data sheet Click «Print» Delete the memories Click «Clear Memory» Close the program Click «Exit» * Stored your data before using «Clear Memory» or «Exit». 20 EN Batteries and power adaptor Battery indicator Replacing low batteries When the batteries have ¼ power supply left, the Battery Symbol will flash each time the device is switched on. When the batteries need to be replaced, the Battery Symbol will flash each time the device is switched on. 1) Open the battery compartment at the back of the device. 2) Replace the batteries – ensure correct polarity as shown by the symbols in the compartment. * Use 4 new, long-life 1.5V, size AA batteries. * Do not use batteries beyond their date of expiry. batteries, if the device will not be used for a * Remove prolonged period. 21 Using a power adaptor The WatchBP Home device can also be operated using a Microlife power adaptor (DC 6V, 600mA). * Only use Microlife branded power adaptors. 1) Plug the adaptor cable into the Power Plug in the WatchBP Home device. 2) Plug the adaptor plug into the wall socket. When the power adaptor is connected, no battery power is consumed. S g SY mH m DIA mH m g lse Pu in /m 22 EN Safety, care, accuracy test and disposal Safety and protection This device may be used only for the purpose described in this booklet. The device comprises of sensetive components and must be treated with caution. The manufacturer cannot be held liable for damage caused by incorrect application. :chjgZi]ViX]^aYgZcYdcdijhZi]ZYZk^XZjchjeZgk^hZY0 some parts are small enough to be swallowed. DcanVXi^kViZi]Zejbel]Zci]ZXj[[^h^chiVaaZY# 9dcdijhZi]ZYZk^XZ^[ndji]^c`^i^hYVbV\ZYdg^[ anything appears unusual. GZVYi]Z[jgi]ZghV[Zin^chigjXi^dch^ci]Z^cY^k^YjVa sections of the instruction manual. 9dcdiXdccZXii]ZYZk^XZidVXdbejiZg until prompted to do so by the computer software. 23 Observe the storage and operating conditions described in the “Technical specifications” section of this manual. Protect the device from water and moisture Protect the device from direct sunlight Protect the device from extreme heat and cold Avoid proximity to electromagnetic fields, such as those produced by mobile phones Never open device Protect device from impact and drops Device care Cuff care Clean the device with a soft, dry cloth. DO NOT wash the cuff. DO NOT iron the cuff cover. Do not wash the cuff! S g SY mH m g DIA mH m lse Pu in /m Do not iron the cuff! Accuracy test We recommend the WatchBP Home device to be tested for accuracy every 2 years or after mechanical impact (e.g. being dropped). Please contact Microlife to arrange for an accuracy test. Disposal Batteries and electronic instruments must be disposed of in accordance with the locally applicable regulations, and not as domestic waste. 24 EN Error messages If an error occurs during measurement, the measurement is interrupted and an error message «Er» is displayed. consult your doctor, Please if this or any other problem 25 occurs repeatedly. If you think the results are unusual, please read through the information in this instruction manual carefully. Error Description Potential cause and remedy «Er 1» Signal too weak The pulse signals on the cuff are too weak. Re-position the cuff and repeat the measurement. «Er 2» Error signal During the measurement, error signals were detected by the cuff, caused for instance by movement or muscle tension. Repeat the measurement, keeping your arm still. «Er 3» No pressure in the cuff An adequate pressure cannot be generated in the cuff. A leak may have occurred. Replace the batteries if necessary. Repeat the measurement. «Er 5» Abnormal result The measuring signals are inaccurate and no result can therefore be displayed. Read through the checklist for performing reliable measurements and then repeat the measurement. «HI» Pulse or cuff pressure too high The pressure in the cuff is too high (over 300 mmHg) OR the pulse is too high (over 200 beats per minute). Relax for 5 minutes and repeat the measurement. «LO» Pulse too low The pulse is too low (less than 40 beats per minute). Repeat the measurement. 26 EN Important facts about blood pressure and home measurements Blood pressure is the pressure of the blood flowing in the arteries generated by the pumping of the heart. Two data, the systolic (upper) value and the diastolic (lower) value, are always measured. The pulse rate is the number of times the heart beats in a minute. Permanently high blood pressure data can damage your health and must be treated by your doctor! Always discuss your home blood pressure measurement data with your doctor and tell him/her if you have noticed anything unusual or feel unsure. Never rely on single blood pressure readings. 27 There are many causes of excessively high blood pressure readings. Your doctor will explain them in more detail and offer treatment where appropriate. Blood pressure is subject to wide fluctuations as the day progresses, and can be impacted by emotions, physical exertion and other conditions . Evaluating blood pressure data The table at right classifies blood pressure data for adults in accordance to the guidelines of the European Society of Hypertension (ESH) in 2007. Data in mmHg. The higher value is the one that determines the evaluation. Example: a readout value between 150/85 or 120/98 mmHg indicates «Grade 1 Hypertension». Category Systolic Diastolic Optimal < 120 < 80 Normal 120 - 129 80 - 84 High normal 130 - 139 85 - 89 Grade 1 Hypertension 140 - 159 90 - 99 Grade 2 Hypertension 160 - 179 100 - 109 Grade 3 Hypertension r 180 r 110 lsolated Systolic Hypertension r 140 < 90 28 EN Technical specifications Operating temp.: Storage temp. Weight: Dimensions: Measuring procedure: Method: Measurement range: Cuff pressure display: 10 - 40 °C / 50 - 104 °F -20 - +50 °C / -4 - +122 °F 15 - 90 % relative maximum humidity 385 g (including batteries) 150 x 100 x 50 mm Oscillometric, corresponding to Korotkoff Phase I systolic, Phase V diastolic 30 - 280 mmHg – blood pressure 40 - 200 beats per minute – pulse Range: 0 - 299 mmHg Resolution: 1 mmHg Static accuracy: Voltage source: Reference to standards: 4 x 1.5 V Batteries; size AA Mains adapter DC 6V, 600 mA (optional) EU Directives 93/42/EEC NIBP requirements: EN 1060-1/-3/4, ANSI / AAMI SP10, IEC 60601-1, IEC60601-1-2 System requirements: 550MHz CPU. 256MB Memory 1024x768 pixel resolution 256 color, CD-ROM drive 1 free USB port 40MB free hard disk space Microsoft Windows 2000 / XP / Vista pressure within ± 3 mmHg Pulse accuracy: ± 5 % of the readout value 29 Microlife reserves the right to alter technical specfications without prior written notice. Guarantee card This device is covered by a five-year guarantee from the date of purchase. This guarantee is valid only on presentation of the guarantee card completed by the owner confirming date of purchase or purchase receipt. Batteries, cuff and wearing parts are not covered by this guarantee. Name: Address: Date: Telephone: Email: Product: WatchBP Home Product Number: 3MX1-1 S g SY mH m Serial Number: g DIA mH m lse Pu in /m Date: