1
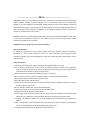
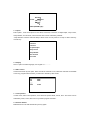
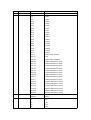
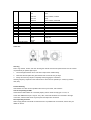
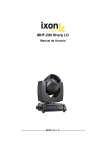
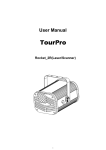
Instruction Manual PROFESSIONAL SHOW LIGHT BEAM200 (5R) ------------------------------2012Ver1.0------------------------------Unpacking: Thank you for purchasing this unit. Every unit has been thoroughly tested and shipped in perfect condition. Carefully check the shipping carton for damage that may have occurred during shipping. If the carton appears to be damaged, carefully inspect your unit for any damage and be sure all accessories necessary to operate the unit has arrived intactly. In the case damage has been found or parts are missing, please contact the manufacturer or your dealer for further instructions. Do not return this unit to your dealer without any warning. Caution! There are no user serviceable parts inside this unit. Do not attempt any repairs yourself; doing so will void your manufacturer warranty. In the unlikely event your unit may require service please contact the manufacturer or your dealer. PLEASE recycle the shipping carton whenever possible. General Instructions To optimize the performance of this product, please read these operating instructions carefully to familiarize you with the basic operations of this unit. These instructions contain important safety information regarding the use and maintenance of this unit. Please keep this manual with the unit for future reference. Safety Precautions ● Be sure that the local power outlet match that of the required voltage for your unit, ● Do not attempt to operate this unit if the power cord has been frayed or broken. Do not attempt to remove or break off the ground prong from the electrical cord. This prong is used to reduce the risk of electrical shock and fire in case of an internal short. ● Disconnect from main power before making any type of connection. ● Do not remove the cover under any conditions. There are user serviceable parts inside. ● Never operate this unit when its rear cover is removed. ● Never plug this unit into a dimmer pack. ● Always be sure to mount this unit in an area that will allow proper ventilation. Allow about 6” (15cm) between this device and a wall. ● Do not attempt to operate this unit, if it becomes damaged. ● During long periods of non-use, disconnect the units main power. ● Always mount this unit in safe and stable matter. ● Power-supply cords should be routed so that they are not likely to be walked on or pinched by items placed upon or against them, paying particular attention to the point they exit from the unit. ● Cleaning unit should be cleaned only as recommended by the manufacturer. See ‘Cleaning” for details. ● Heat –The appliance should be situated away from heat sources such as radiators, heat registers, stoves, or other appliances (including amplifiers) that produce heat. ● The unit should be serviced by qualified service personnel when: A. The power-supply cord or the plug has been damaged. B. Objects have fallen, or liquid has been spilled into the appliance. C.The appliance has been exposed to rain or water. D.The appliance does not appear to operate normally or exhibits s marked change in performance. WARNING: Avoid Electric Shock High temperature of bulb FIRE WARNING DMX Linking: To ensure proper DMX data transmission, when using several DMX units try to use the shortest cable path possible. The order in which units are connected in a DMX line does not influence the DMX addressing. For example; a unit assigned a DMX address of 1 may be placed anywhere in a DMX line, at the beginning, at the end, or anywhere in the middle. When a unit is assigned a DMX address of 1, the DMX controller knows to send DATA assigned to address 1 to that unit, no matter where it is located in the DMX chain. POWER SUPPLY MAINS Use the plug provide to connect the mains power to the projector paying attention to the voltage and frequency marked on the panel of the projector. It is recommended that each projector be supplied separately so that they may be individually switched on and off. IMPORTANT It is essential that each projector is correctly earthed and that electrical installation conforms to all relevant standards. Power consumption of this projector is 400W. Mounting bracket Every unit can be placed on the ground or hanging installation in any position. The fast lock system makes it quick and simple to install bracket to four locations, see Figure: Operating Modes: You can use the LED unit in 4 ways: ● Sound-Active mode–The unit will react to sound, chasing through the built-in programs ● Auto Mode-The unit will automatically chase through the different colors. ● DMX control mode – This function will allow you to control each individual units traits with a standard DMX 512 controller. ● Master-slave mode – One unit will work as the master in the one of the above three modes, other units in the chain will work in synchronization towards the master. LCD display and button LCD DISPLAY There is one simple button beside the LCD screen controls whole operation: MENU, DOWN, ENTER, UP. Press button to activate main menu, enter next menu or back. Turn button left to browse last options or decrease DMX value, turn right to browse next options or increase DMX value.. When the fixture is powered, resetting or connected to DMX console, the LCD display will show: Beam 200 Sharpy Address:1 Now, the fixture is ready for work. 1. Menu operation The main menu options of Beam 200 include: Exit, DMX Address, Parameter, Option, Display, Main control, Test operation, Resume default, Fixture reset. 1.1 Exit Press button after power fixture, Exit is the first option in list. 1.2 DMX Address In the main menu, select”DMX Address”, the LCD will show: DMX Address Address=1 Then you can set dmx address from 1 to 512. 1.3 Parameter Select” Parameter” , there are three sub-options: Back, Control, Models, enter “Control”, you can select three modes as below: Back Standard Control Extended Simplify Models(B200W Light) 1.4 Option Enter “Option” , there are 8 options to use” Back, X Reverse, Y Reverse, XY Optocoupler, Lamp control, Lamp ON/OFF, Turn shortest, Color half. All of them can be activated by NO/YES. “Lamp ON/OFF” means to select the lamp of fixture to be on once power on or lamp on when control by console only. Back X Reverse Y Reverse XY Optocoupler Lamp control Lamp ON/OFF Turn shortest Color Half 1.5 Display This is a option to select language, use “English” or “简体中文“ . 1.6 Main control Control all channels by this option, there are total 32 channels to use, select the channels are available to use only, program effect of fixture you want from channel by value 0-255. Back CH1 CH2 ……. ……. CH32 0-255 0-255 0-255 1.7 Test operation In main menu, select” Test operation”, there are three options: Back, Sound, Auto”. The fixture can be activated by music, sound, also can run by build-in program automatic . 1.8 Resume default Make the fixture to be with default set by factory again! 1.9 Fixture reset “Fixture reset” means to reset everything of the fixture. DMX Chart No. Channel 1 Color 2 Flash DMX value 0-4 5-8 Description White White – Color 1 9-12 Color 1 13-17 Color 1 – Color 2 18-21 Color 2 22-25 Color 2 – Color 3 26-29 Color 3 30-34 Color 3 – Color 4 35-38 Color 4 39-42 Color 4 – Color 5 43-46 Color 5 47-51 Color 5 – Color 6 52-55 Color 6 56-59 Color 6 – Color 7 60-63 Color 7 64-68 Color 7 – Color 8 69-72 Color 8 73-76 Color 8 – Color 9 77-81 Color 9 82-85 Color 9 – Color 10 86-89 Color 10 90-93 Color 10 – Color 11 94-98 Color 11 99-102 Color 11– Color 12 103-106 Color 12 107-110 Color 12 – Color 13 111-115 Color 13 116-119 Color 13 – Color 14 120-123 Color 14 124-127 Color 14 – White 128-255 0-3 4-103 Color wheel rotation Close Strobe 104-107 Open 108-207 Fast 208-212 Open 213-225 Slow 226-238 Medium 239-251 Fast 3 4 Dimmer Gobo 5 Prism 6 Prism rotation 252-255 0-255 0-3 4-7 Open Dark bright Open Gobo1 8-11 Gobo2 12-15 Gobo3 16-19 Gobo4 20-23 Gobo5 24-27 Gobo6 28-31 Gobo7 32-35 Gobo8 36-39 Gobo9 40-43 Gobo10 44-47 Gobo11 48-51 Gobo12 52-55 Gobo13 56-59 Gobo14 60-63 Gobo15 64-67 Gobo16 68-71 Gobo17 72-113 Gobo rotation, forward 114-117 Stop 118-159 Gobo rotation, backward 160-166 Gobo1 Shake(slow to quick) 167-172 Gobo2 Shake(slow to quick) 173-179 Gobo3 Shake(slow to quick) 180-185 Gobo4 Shake(slow to quick) 186-191 Gobo5 Shake(slow to quick) 192-198 Gobo6 Shake(slow to quick) 199-204 Gobo7 Shake(slow to quick) 205-211 Gobo8 Shake(slow to quick) 212-217 Gobo9 Shake(slow to quick) 218-223 Gobo10 Shake(slow to quick) 224-230 Gobo11 Shake(slow to quick) 231-236 Gobo12 Shake(slow to quick) 237-243 Gobo13 Shake(slow to quick) 244-249 Gobo14 Shake(slow to quick) 250-255 0-127 128-255 0 21 Gobo15 Shake(slow to quick) No prism Prism 0° 90° 42 180° 63 270° 84 360° 7 8 9 10 11 12 13 14 15 16 Effect Frost Focus Pan Pan fine Tilt Tilt fine No Function Reset Lamp control 17 Pan/Tilt speed 105 450° 127 540° 128-190 Prism rotation, forward 191-192 Stop 193-255 0-255 0-255 0-255 0-255 0-255 0-255 0-255 Prism rotation, backward 0-59 60-63 No function Lamp Off 64-255 0-255 Lamp On Fast-Slow Chart size: Cleaning Due to fog residue, smoke, and dust cleaning the internal and external optical lenses must be carried out periodically to optimize light output. 1. Use normal glass cleaner and a soft cloth to wipe off the outside casing. 2. Clean the external optics with glass cleaner and a soft cloth every 20 days. 3. Always be sure to dry all parts completely before plugging the unit back in. Cleaning frequency depends on the environment in which the unit operates (i.e. smoke, fog residue, dust, dew). Trouble Shooting Listed below are a few common problems the user may encounter, with solutions. Unit not responding to DMX: Check that the DMX cables are connected properly and are wired correctly (pin 3 is “hot”; on Some other DMX devices pin 5 may be “hot”). Also, check that all cables are connected to the right connectors; It does matter which way the inputs and outputs are connected. Not responding to sound Quiet or high pitched sounds will not activate the unit. If problems are not resolved, contact with your dealer for service. 4. Specifications Model Name: Noble Beam200 (5R) Power: 220V/50~60Hz (110V version is available upon request.) Power consumption: 400W Working postion: Any safe working position Lamp: Philips MSD200R5 (Optional Yodn and Jenbo MSD Platinum 5R) 200W/160W, 7800K±300K, 2000 hr (Eco mode), Motors: 13 step motors / Cooing: Forced ventilation with axial fans. Inputs: DMX512/ Channels: 17 Pan/Tilt: 540°/270° Resolution: Pan = 2.11°, Pan Fine = 0.008°, Tilt = 0.98°, Tilt Fine =0.004° Wateproof IP rating: IP20 Weight: 17Kg