1
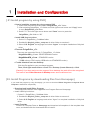
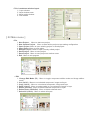
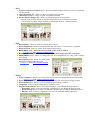
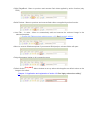
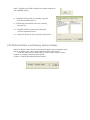
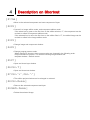
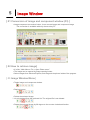
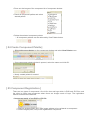
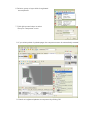
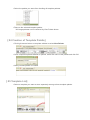
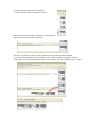
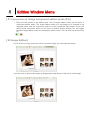
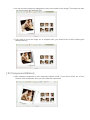
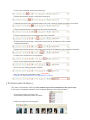
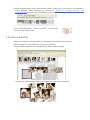
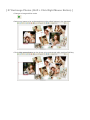
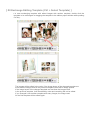
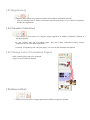
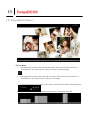
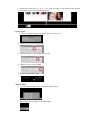
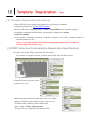
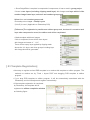
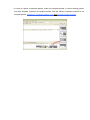
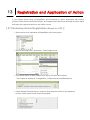
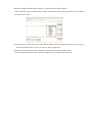
DelgaEditor v7
USER’S MANUAL
Contents
Chapter 01. Installation and Configuration
01. Install Program by Using DVD
02. Install Programs by downloading files from Homepage
03. Install the program on different location]
04. Photoshop Configuration (Only PRO)
Chapter 02. Screen Layout
01. Screen layout of Editor Program
02. Main menu
03. Frequently used menu
Chapter 03. Configure Project Option
01. General Matters in Album
02. General Matters in DelgaBOOK
03. General Matters in DelgaBOOK Music
04. Default Value and Saving Option Value
Chapter 04. Description of Shortcut Key
01. Tab
02. F2
03. F3
04. F5
05. F7
06. Ctrl+T
07. Ctrl+“+” , Ctrl+“-”
08. Ctrl+Delete
09. Shift+Delete
Chapter 05. Image Window
01. Conversion of image component window (F3)
02. How to retrieve image
03. Image Window Menu
04. Image Palette Menu
Chapter 06. Component Window
01. Conversion of image component window (F3)
02. Component Window Menu
03. Component Palette Window Menu
04. Create Component Palette
05. Component Registration
Chapter 07. Template window
01. Template window menu
02. Template Size Setup
03. Template palette menu
04. Template Palette Creation
05. Template Collection
Chapter 08. Edition window menu
01. Conversion of image component edition mode (F2)
02. Image Edition
03. Component Edition
04. Edition window menu
05. Automatic edition
06. Group Edition
07. Exchange Photos (Shift + Click Right Mouse Button)
08. Exchange Editing Template (Ctrl + Select Template)
09. Layer window menu
10. Layer Option Window Menu
11. Text Window Menu
12. Template Decoration and Creation by using Component
Chapter 09. Edition Completion Window
01. Retrieve completed page
02. Deletion
03. Registration
04. Change order of Completed Pages
05. Zoom in and out
Chapter 10. Save and Make
01. Save the Edited Contents
02. Making PSD, JPG and DelgaBOOK
03. Folder Structure of Results
04. DLP
05. DAP
Chapter 11. DelgaBOOK
01. DelgaBOOK Menu
02. Burning CD
Chapter 12. Template Registration (Only PRO)
01. Template Registration Procedure
02. PSD Correction Conforming to Registration Specification
03. Template Registration
Chapter 13. Application and registration of action (Only PRO)
01. Photoshop Action Registration
02. Applying Action during Edition
Chapter 14. Step-by-step Build (Only PRO)
01. Project Option
02. Build Step 1
03. Build Step 2
04. Build Step 3
Chapter 15. Batch Build Function (Only PRO)
01. Build Register Option (automatic, show dialog, manual)
02. Add, Delete, Select
03. Build Option
04. Step1 Option
05. Build, Build & Power off, Close
1
Installation and Configuration
[ 01 Install program by using DVD]
▪ How to install the program by using program DVD
1. Insert DVD into DVD drive and select “DelgaEditor_v7x” folder.
2. After selecting DelgaEditor_v7x folder and click right mouse button and “Copy” menu
to copy DelgaEditor_v7x folder.
3. Select “C:\” and click right mouse button and “Paste” menu to paste the
DelgaEditor_v7x folder to “C:\”
▪ Install USB KeyLock driver
1. Select C:\ DelgaEditor_v7x\driver folder.
2. Doubleclick Keylock_driver_setup.exe in driver folder to exercise it.
3. Select “U.S. English” as language and select “Agree” to complete installation of Keylock
driver.
▪ Execute DelgaEditor_v7x
There are two execution files in C:\ DelgaEditor_v7x folder .
DelgaEditorPRO_v7.exe : PROFESSIONAL version
DelgaEditorSTD_v7.exe : STANDARD version
(* PRO refers to PRO version, STD refers to STANDARD version)
▪ Create shortcut icon on desktop
Click the file applied to your purchased program,
Then, Click right mouse button > Send To > Desktop (Create Shortcut) > Click
[Caution] If you drag and move the program file to desktop, the path will not be recognized.
You have to use Create Shortcut on Desktop menu and use shortcut icon.
[02. Install Programs by downloading files from Homepage]
If you install the program by using Homepage, you have to download Editor Program and Keylock Driver
Template to install them respectively.
▪ Download and install Editor Program
Download and install the most upgraded from Program Data on Homepage.
▪ Install USB KeyLock driver
1. Select C:\ DelgaEditor_v7x\driver folder.
2. Doubleclick Keylock_driver_setup.exe in driver folder to execute it.
3. Select U.S. English as language and select “Agree” to complete installation of Keylock
driver.
▪ Install Template
Connect to Template Data on Homepage and download all templates in the template data
room, and doubleclick the downloaded file to install it.
▪ Execute DelgaEditor_v7x
There are three execution files in C:\ DelgaEditor_v7x folder for PRO version.
These are all same programs, but we classify them by ‘r’ or ‘n’ according to Keylock.
Please use the program applied to you.
DelgaEditorPRO_v7.exe : For users who purchased one user PRO version
DelgaEditorSTD_v7.exe : For users who purchased one user STANDARD version
[03. Install the program on different location]
The default location for installation of DelgaEditor program is “C:\ DelgaEditor_v7x”
If you want to install it to a location other than the default location, copy whole “C:\ DelgaEditor_
v7x” folder and “paste” it onto the location you want to install it.
▪ Additionally installed templates or upgraded files are basically installed in
“C:\ DelgaEditor_v7x” folder.
Therefore, if you install the program onto another location, you should copy additionally
installed templates or upgraded files and paste them onto the folder you installed on another
location.
▪ [Caution] If you install the program onto another location, you have to move the whole program
folder.
If you move execution file only or structure of sub directory of the folder is changed, the
program does not work properly.
[04. Set up Photoshop Configuration]
When you want to use DelgaEditor PRO version’s retouch function which is connected to
Photoshop, please set up Photoshop configuration as follows.
▪ Select Edit > Preferences > File Handling from Photoshop menu.
▪ Select “Always” from Maximize PSD and PSB File Compatibility option.
2
Screen Layout
[ 01 Screen layout of Editor Program]
▪ This is overall screen layout of the program.
1. Main menu
2. Frequently used menu
3. Image window/ component window
4. Image window menu / component window menu
5. Image / component palette menu
6. Edition window
7. Edition window menu
8. Template window
9. Template window menu
10. Template palette menu
11. Edition completion window
12. Edition completion window menu
13. Edition completion palette menu
▪ This is assistant window layout.
1.; Layer window
2. Layer window menu
3. Layer option window
4. Text window
[ 02 Main menu ]
▪ File
1. New Project : Menu to start new project
2. New Custom Project: Menu to start edition project at pre-setting configuration
3. Open Project: Menu to open existing project or saved project
4. Open Photo: Menu to open photo
5. Reopen Project : Menu to open recently edited project
6. Save Project : Menu to save project
7. Save Project : Menu to save project as another name
8. Exit : Menu to exit program
▪ Edit
1. Change Edit Mode (F2) : Menu to toggle component edition mode and image edition
mode
2. Cut (Ctrl+X) : Menu to cut selected component, image and layer
3. Copy (Ctrl+C) : Menu to cut selected component, image and layer
4. Paste (Ctrl+V) : Menu to paste copied or cut component, image or layer
5. Delete (Ctrl+Del) : Menu to delete selected component or layer
6. Delete Photo (Shift+Del) : Menu to delete selected menu
7. Select All (Ctrl+A) : Menu to select all layers
▪ View
1. Photo Component ListView (F3) : Menu to change image window mode to component
window mode
2. Layer TreeView (F7) : Menu to open and close layer window
3. Text Editor (Ctrl+T) : Menu to open text edition window
4. Screen Mode Change (F5) : Menu to change program screen mode
Change three screen modes in the following order.Project window full screen
> Full screen including Image window and template window > Default screen
▪ Run
1. Build Album : Menu to build per-setting photo album
2. Build DelgaBook : Menu to create flash video with action, in case action is applied
3. Build Preview : Menu to create flash video without action
4. Build Step1 (PRO) : Menu to extract original image used for edition
*Chapter 03. See configure project option
5. Build Step2 (PRO) Menu to create PSD file edited with image extracted from Step 1
6. Build Step3 (PRO)): Menu to create JPG file and DelgaBOOK by using PSD created
from Step2
7. Batch Build(PRO)) : Menu to create batch
album files without building work
* Chapter 15. See batch project function
▪ Option
1. Project Options : Menu to set up project environment of editing album and flash video
* Chapter 03. See configure project option
2. Show Filename : Menu to select the name of image file retrieved to image window
3. Show Guide Line : Menu to set up guideline in the center of album
4. Language : Menu to select language of program menu
5. Register Batch Build : Menu to set up registration on the Batch Build project list
> Automatic: Menu to set up automatic registration on the Batch Build project list
> Show Dialog: Menu to check up whether registering on the Batch Build project list
> Manual: Menu to set up ‘registration by user’ on the Batch Build project list
▪ Tools
1. Auto Edit – in order : Menu to automatically edit retrieved image on the selected
template palette
* Chapter 08. Edition project window menu > 03. See Automatic edition
2. Action Editor : Edition window menu of registered action (PRO)
* Chapter 13. See application and registration of action
3. Explorer : Execute Window explorer. After Build project, open the folder with explorer
4. Internet Explorer : Menu to connect to Delga Homepage (delga.co.kr)
5. Import PSD : In order to register user’s PSD template on edition program
* Chapter 12. See template registration.
[ 03 Frequently Used Menu ]
▪ Menu to begin new edition job
▪ Menu to retrieve saved edition project
▪ Menu to save edition project
▪ Menu to exit program
▪ Build Album : Menu to execute building album project
▪ Build DelgaBook : Menu to produce and execute flash video applied by action function (only
PRO)
▪ Build Preview : Menu to produce and execute flash video not applied by action function
▪ Auto Edit – in order : Menu to automatically edit and execute the retrieved image in the
selected template
* Chapter 08. Edition project window menu > 03. See Automatic edition
▪ Menu to execute Window explorer If you execute Build project, relevant folder will open.
▪ Delga Homepage (delga.co.kr) connection menu
▪ Default Action(Only PRO): Menu window to set up action which applies as default value on the
image to be edited
* Chapter 13. Application and registration of action >02 See “Apply action when editing”
3
Project Option
Project option is a menu to set up project environment for album flash video to be edited.
You can set up edition album size, output DPI, basic action value, option setup for build by step,
and the size and background music of flash video.
Also, the setting value can be saved and used later.
[ 01 General Matters with Album ]
▪ Easy setting: Menu to select and set up album size (inch) and resolution from the setting value
▪ Advanced setting : Menu to set up album size unit and size resolution manually and precisely
▪ Default Action( Only PRO) : Action setup menu window applied to image to be edited as default
value
* Chapter 13. Application and registration of action See Application of action during
edition
▪ Step1 : Option to select whether original image is extracted as JPG and PSD files.
1. Nothing : Option not to extract original source file additionally
2. JPG Files : Option to extract original source file to usedsource>jpg folder.
3. PSD Files : Option to extract original source file to usedsource> psd folder.
[Caution] In case the original source file extracted from the step 1 is revised by other retouch
programs or Photoshop, it has to be saved as same name and format to use the revised
imaged in the step 2.
▪ Step 2 : Setup menu to create PSD file edited in the template with original source file extracted from the
step 1.
▪ Step3 : Setup menu to create JPG and DelgaBOOK completed with PSD file created in the step 2.
[Build application method in step 1, 2 and 3]
Extract original image used in the step 1 and retouch it by other retouch programs or Photoshop.
PSD file applied by the original source file retouched in the step 1 is created in step 2..
Retrieve the created PSD from Photoshop and edit it including layer.
This is step 3 to create final JPG and DelgaBOOK applied by edited PSD in the step 2.
[ 02 General Matters with DelgaBOOK ]
▪ Set up DelgaBOOK flash video size.
Set it up by matching to monitor size.
When executing it in other computers,
consider the computer’s monitor environment.
[ 03 DelgaBOOK music]
▪ Set up background music to be used
for DelgaBOOK flash video.
▪ Available files : This is MP3 file list
which can be used as background music.
▪ Currently used files: This is MP3 file list currently
registered as background music.
▪ Add : Register user’s MP3 located in another location at
the available file list.
▪ > : Register selected file as currently using file
from the available file list.
▪ < : Delete the selected file from the currently
using file list.
▪ >> : Register all files as currently using files
from the available file list.
▪ << : Delete all files from the currently using file list.
[ 04 Default Value and Saving Option Value]
▪ Save as default value: Save current project option value as default value.
▪ Save as album type : Save current project option value as file.
It can be retrieved from Main Menu > File > New Custom Project.
▪ Check out : Apply selected project option.
▪ Cancel : Cancel the selected project option.
4
Description on Shortcut
[ 01 Tab ]
▪ Move to the selected component and next component of layer.
[ 02 F2 ]
▪ Convert it to image edition mode, and component edition mode.
If the select box is green or the first icon on the edition window, ‘C”, the component can be
revised or edited in component edition mode.
If the selected box is red or the first icon on the edition files is “P”, the edited image can be
revised or edited in the image edition mode.
[ 03 F3 ]
▪ Change image and component window.
[ 04 F5 ]
▪ Change program screen mode.
When clicking F5 shortcut, three screen modes are changed in the following order.
Project window full screen > Full screen including Image window and
template window > Default screen
[ 05 F7 ]
▪ Open and close layer window.
[ 06 Ctrl + T ]
▪ Open and close text window.
[ 07 Ctrl + ”+” , Ctrl + ”-” ]
▪ The edition project window can be enlarged or reduced.
[ 08 Ctrl + Delete ]
▪ Remove the selected component and layer
[ 09 Shift + Delete ]
▪ Delete the selected image.
5
Image Window
[ 01 Conversion of image and component window (F3) ]
▪ Image component conversion button, it can convert image and component image
The conversion is available with only shortcut key F3.
[ 02 How to retrieve image]
▪ it is like, “Main Menu> File > Open Photo menu.”
▪ The image can be opened by image opening button.
▪ Select images from Window Explorer, and drag and drop them inside of the program.
[ 03 Image Window Menu]
▪ Toggle image and component window.
▪ Retrieve image.
▪ Delete the selected image.
* It is only deleted from the retrieved list. The original file is not deleted.
▪ Rotate the selected image by 90 degree to the counter clockwise direction.
▪ Rotate the selected image by 90 degree to the clockwise direction.
▪ Check out images with thumbnail image or large image during edition work.
[ 04 Image Palette Menu ]
▪ Select previous image palette of the selected image palette.
▪ Select the next image palette of the selected image palette.
▪ Zoom in the images in the image lists of images window.
▪ Zoom out the images in the image lists of images window.
▪ Select the palette you want after checking all image palette.
▪ Remove the selected image palette.
* All image palettes can be retrieved by View Palette button.
6
Component Window
[ 01 Conversion of image component window (F3) ]
▪ Image component change button can toggle image and component image
It is F3, a short cut of toggle.
[ 02 Menu of Component Window]
▪ Toggle image and component window.
▪ Retrieve component palette.
▪ Retrieve components.
▪ Delete the selected component.
* It is only from the component list. The original file will not be removed.
[ 03 Component Palette Menu]
▪ Select previous image palette of the selected component palette.
▪ Select the next image palette of the selected component palette.
▪ Zoom in the images of the component list of component window.
▪ Zoom out the images of the component list of component window.
▪ Check all component pallets and select
wanted pallets.
.
▪ Delete the selected component palette.
* All component palettes can be retrieved by View Palette button.
[ 04 Create Component Palette]
▪ Click right mouse button on the component window and select New Palette menu.
▪ Once component palette window is opened, select the name and click OK.
▪ Newly created palette is created.
[ 05 Component Registration ]
There are two types of components. One is like icon and logo which is PNG and JPG files, and
the other is frame type component where there are images made of layer. The registration
method of these two is different.
▪ Component made of one PNG or JPG file
1. Retrieve images (PNG, JPG) from image window to be registered as component
2. Select images (PNG, JPG) to be registered as component.
3. Select “Move to Component Palette” by clicking right mouse button.
4. Select palette list to be registered.
5. Convert to component window and check out the registered palette.
▪ Component made of multiple layers
1. Make a file to be registered as component.
* See Chapter 12. Registration of Template for the making method of PSD with images..
2. Retrieve PSD to be registered by selecting Main Menu > Tools > Import PSD Menu
At this time, PSD file is analyzed connecting to Photoshop.
3. After analyzing PSD, the PSD file is converted into Delga Editor file (DLP) in the edition
completion window.
4. Double click or drag and drop files to be registered in the edition work window.
5. Open layer window by selecting Main Menu > View > Layer TreeView (F7) menu
6. Select a group or layer which is registered
as component.
7. Click right mouse button to select
“Group to Component” menu.
.
8. If you select palette in palette page, the component name is automatically created.
9. Check out registered palette at component by clicking OK.
7
Template Window
[ 01 Template Window Menu]
▪ Retrieve template palette.
▪ Retrieve template.
▪ Remove the selected template from the selected palette.
* It is only removed from the palette list. The original file will not be removed.
It can be retrieved by “Retrieve template” button.
▪ Open project option window to determine template size.
Chapter 07. See Template window > 02 Template window size set up
[ 02 Template Size Setup]
▪ Select album size and resolution with easy setup.
▪ Precisely select unit and resolution of album size by advanced setup.
Chapter 03. See Configure project option
[ 03 Template Palette Menu ]
▪ Select previous template palette of the selected template palette.
▪ Select next template palette of the selected template palette.
▪ Zoom in the images of template list in template window.
▪ Zoom out the images of template list in template window.
▪ Select the palette you want after checking all template palettes.
▪ Remove the selected template palette.
* All image palettes can be retrieved by View Palette button.
[ 04 Creation of Template Palette]
▪ Click right mouse button on template window to select New Palette.
▪ Once component palette window is opened, select the name of the palette and click OK.
▪ Newly created palette is created.
[ 05 Template List]
▪ Select a template you want to store separately among various template palette.
▪ Drag the selected template and register it
on the right side edition completion window.
▪ Select newly created template palette or existed palette
where the template group is registered.
▪ Select a template you want to store separately among various template palette.
▪ If you select the template group registered on the right side edition completion window,
and drag it to the selected template palette on the bottom, then the template group is saved.
8
Edition Window Menu
[ 01 Conversion of image component edition mode (F2) ]
▪ There are two modes in the edition work. One is image edition mode and the other is
component edition mode. The image edition mode is to edit image to be inserted in the
designed frame, and the component mode is to edit component with images. If you click
edition mode conversion button on the menu of edition project window, you can toggle
between image edition mode and component edition mode. You can also use shortcut key
F2.
[ 02 Image Edition]
▪ If you select an image, and move cursor out of the image, you can rotate the image.
▪ You can zoom in and out the image by dragging the small boxes of the corner of the image.
▪ You can move the image by dragging the circle in the center of the image. The image can only
be moved within the template size.
▪ If you want to move the image out of template size, you should move it while clicking and
holding shift key.
[ 03 Component Edition]
▪ After selecting component in the component edition mode, if you move cursor out of four
corners of the component, then you can rotate the component.
▪ You can zoom in and out the component by dragging four boxes of corner of the component.
▪ You can move the component by dragging the circle in the center of the component
by dragging it with mouse cursor.
[ 04 Edition Project Window Menu]
▪ Convert image edition mode and component edition mode.
▪ Make new empty template.
▪ Register the edited template to the edition completion window.
▪ Remove the template in the course of edition.
▪ Copy the selected component and layer
▪ Paste the copied component and layer.
▪ Cut out the selected component and layer.
▪ Delete the selected image, component and layer.
▪ Change the color of the selected image into color (original), black and white, and sepia.
▪ Flip the selected image, component and layer horizontally.
▪ Flip the selected image, component and layer vertically.
▪ Rotate the selected image, component and layer by 90 degree to the counter
clockwise direction.
▪ Rotate the selected image, component and layer by 90 degree to the clockwise direction.
▪ Create text component in the template.
▪ Zoom in the editing template window.
▪ Zoom out the editing template window.
▪ Set up action at the selected image.( Only PRO )
* Chapter 13. See application and registration of action
[ 05 Automatic Edition ]
The order of automatic edition is from bottom layer of the template to the upper layer
in the order of template selected in the template palette in the image window.
▪ Correct the name of image to be
automatically edited by order of edition.
.
▪ Retrieve image into the program.
▪ Select template palette to be automatically edited. At this time, if you want to use template in
various palettes, collect templates by referring to Chapter 07. Template Window > 05.
Template Group and select the palette where you collect templates.
▪ If you select Main Menu > Tools > Auto Edit – in order menu,
the automatic edition starts
[ 06 Group Edition]
▪ Retrieve templates by double clicking or dragging it into edition project window.
▪ Select images for group edition by using Ctrl or Shift key.
▪ Drag multiple images into the template of the edition project window.
▪ Images are automatically edited from the bottom image layer of template.
[ 07 Exchange Photos (Shift + Click Right Mouse Button) ]
▪ Change to image edition mode.
▪ Select one image to be exchanged among the edited images in the template.
▪ Click right mouse button on the image to be exchanged while pushing Shift key.
[ 08 Exchange Editing Template (Ctrl + Select Template) ]
▪ In case exchanging template with edited images with another template, double click the
template to be exchanged or dragging the template to the edition project window while pushing
Ctrl key. .
The images will be edited in the order. If the image layers of the changed template are
more than the images used in the previous template, there will be empty spaces.
If the image layers of the changed template are less than the images used
in the previous template, it will be edited by order and remaining will not be edited.
If you changed it into another template with many images, the image used
for the first template will be edited again.
.
[ 09 Layer Window Menu]
You can check layer information of template here.
can use many applications.
If you can use the layer window menu, you
.
▪ Create image layer. If you create this layer, you can add image available for edition.
.
▪ Copy the selected layer and component (group).
▪ Paste the copied layer and component (group).
▪ Cut out the selected layer and component (group).
▪ Delete the selected layer and component (group).
▪ Make group (component) for the selected layer and component (group).
▪ Release the selected component (group)
▪ Set up clipping mask as a feature of bottom layer for the selected layer.
* Clipping mask is the function to show clipping mask layer at certain (In case of DelgaEditor,
bottom layer) layer area.
(Same as the clipping mask of Photoshop)
▪ Release the clipping mask of the selected layer with clipping mask.
▪ Unfold layer in the group.
▪ View layers in group by simply folding.
▪ If you want to change the order of layers, select and drag the layer to the location you want.
* If you insert the layer in a group or between group and group, check out layer moving
indication line.
Insert into layers
Insert into group (component)
[ 10 Layer Option Window Menu ]
▪ DropShadow : It sets up shadow effect of the selected layer.
1. Visible : Activate or deactivate drop shadow effect
2. Opacity : Set up transparency of DropShadow effect
3. Angle : Set up the direction of DropShadow effect
4. Distance : Set up the distance between layer and
DropShadow effect
5. Size : Set up the size of DropShadow effect
6. Color : Set up the color of DropShadow effect
[ 11 Text Window Menu]
▪ Text : Write texts of the selected text layer.
1. B : Apply bold effect to the written texts
2. I : Apply Italic effect to the written texts
3. Default Font : Set up font of texts
4. Opacity : Set up transparency of texts
5. Size : Set up the size of texts
6. Char Space : Set up the distance between texts
7. Line Space : Set up the distance between rows
8. Color : Set up the color of texts
9. Text Field : Write the contents of texts
▪ Stroke : Set up outline effect of the written texts.
1. Visible : Set up activation or de-activation of stroke effect.
2. Opacity : Set up transparency of stroke effect
3. Size : Set up the size of stroke effect
4. Color : Set up the color of stroke effect
▪ DropShadow : Set up shadow effect for the selected text layer.
1.Visible : Set up activation or de-activation for
DropShadow effect
2. Opacity : Set up the transparency of DropShadow effect
3. Angle : Set up the direction of DropShadow effect
4. Distance : Set up the distance between layer and
DropShadow effect
5. Size : Set up the size of DropShadow effect
[ 12 Template Decoration and Creation by using Component]
▪ Set up album size by selecting Main Menu > Option > Project Option Menu or
Template Window Menu > Template Size Menu
.
▪ Click “Create empty template” button from the edition project window menu.
▪ It is converted into component window.
▪ Double click or drag background component after selecting BackGound palette.
* If you use one color as background, select color from ColoChip palette to retrieve it to
edition project window.
.
▪ Edit the background layer matched to the screen.
▪ Bring image frame you like from another palette of component window and edit and design the
size and location.
▪ Bring frame from frame palette of component window and additionally design it.
▪ Click text menu in the edition project menu, and write text additionally.
Chapter 08. Edition project window menu> 11 See text window menu
▪ Bring image into the template with completed design and edit the image.
▪ Complement the design finally to finish the production of template.
9
Edition Completion
The edition completion window indicates the window of red box in the below figure.
In order to register the edition, you should edit in the edition project window and register it at
edition completion window.
If you edit basically and retrieve another template, it will be automatically registered at the edition
completion window.
[ 01 Retrieve Completed Page]
▪ Retrieve previous edited DLP file menu
If you save the completed edition page, it is saved under the folder as *.DLP file type.
In case you want to make current album and previous pages into one album or flash video,
or edit common page in various albums, you can retrieve previous page to add it.
* Chapter 10. Save and make > 04. See DLP
[ 02 Delete]
▪ Registered edition page deletion menu in the edition completion window.
[ 03 Registration]
▪ Register page edited in the project window at the edition completion window.
* Click the background of edition completion window and drag it to the edition completion
window for registration.
[ 04 Template Collection]
▪ The function of this menu is to register pages registered at edition completion window at
template palette.
You can register and use the edition page, and also collect templates among various
templates to use them after registration.
.
However, if registering and using the page, you can use the template with photos.
[ 05 Change order of Completed Pages]
▪ After selecting the page to be changed,
drag it to the location to change.
[ 06 Zoom In/Out]
▪ Zoom in/out view menu of page registered at edition completion window
10
Saving and Making
[ 01 Save the Edited Contents]
▪ If you save by Main Menu > File > Save Project menu or Save button of frequently used menu,
write the name and push confirm to finish saving.
.
▪ If you finish to save it, a folder with the name which is written at the timing of saving, and
DLP and DAP files are saved in the folder.
▪ Among edition project window, only pages which is finished with edition and registered
at edition completion window are saved.
[ 02 Making PSD,JPG, DelgaBOOK ]
▪ After saving the edition, if you want to create PSD, JPG and DelgaBOOK, you should use
Build menu for production..
▪ Use the frequently using menu button or Run>Build Album menu.
▪ Results created after Build will be created as the contents set up at project option.
Chapter 03. See Project Option Setup
[ 03 Result’s Folder Structure]
▪ DelgaBook flash video is saved at DelgaBook folder.
▪ JPG file of “Step 3 : Final album output file” set up by project option is saved in the Jpeg folder
▪ PSD file of “Step 2 : Output file for edition” set up by project option is saved in the Psd folder
▪ The original source image of Step 1 set up by project option in UsedSource>Jpeg folder is
saved as JPG file type.
.
▪ The original source image of Step 1 set up by project option in UsedSource>Psd folder is
saved as PSD file type.
[ 04 DLP ]
▪ This is file applied to each page registered and saved at edition completion window after
edition.
DLP file has edited image, template and edited information.
Afterwards, certain pages can be retrieved for re-edition.
▪ If there is DLP file, such page is always produced as PSD, JPG or DelgaBOOK..
▪ Retrieve DLP file: Chapter 09. Edition Completion Window > 01. See Retrieve completed
page ‘
[ 05 DAP ]
▪ This has list information of DLP file saved as individual page.
This has whole information for edited album. If you retrieve DAP files, you can continue the
project by retrieving previous jobs..
.
▪ DAP file has only list information of edited album.
The design information on each page is in DLP. You can work normally when you have DLP
file.
▪ Retrieve DAP file: With file > Open project menu, you can retrieve such DAP file.
11
DelgaBOOK
[ 01 DelgaBOOK Menu ]
▪ Screen Menu
1. If you approach mouse to the left side of screen, the look of mouse turns into “<”
At this time, if you click mouse, it will go to back to previous page.
2. If you approach mouse to the right side of screen, the look of mouse turns into “>”
At this time, if you click mouse, it will go to next page.
3. If you move mouse to the upper of the screen, there Shortcut Quick button appears.
4. f you move the mouse to the bottom of the screen, it will show main AD.
5. When look of mouse is “<” or “>”, if you drag the page on the bottom of the screen,
such page will be automatically selected.
▪ Upper menu
1. Menu to select background music (playing music list)
2. Menu to move to previous page.
3. Menu to play or stop background music.
4. Menu to move to next page.
5. Short cut and Quick menu
▪ Bottom Menu
1. You can select motion mode of page progress video.
2. This shows current page out of total pages.
3. Menu to go directly with checking page list.
3. Resize or unresize (original size) matched to the image size of monitor set up menu
.
4. Menu to select whether playback is repeated
5. Menu to select playback speed of the pages
6. Menu to separately select the page you like
7. Menu to show only selected pages or whole pages.
8. Exit DelgaBOOK flash video.
[ 02 DelgaBOOK CD Burning]
DelgaBook folder is in your saved folder. There are delgaBOOK.exe,
AUTORUN.INF files and data folder in the folder
as follows. Use these files and folder to burn CD.
[Caution] delgaBOOK.exe, AUTORUN.INF and data folder should be in the root folder.
If you produce DelgaBOOK. as CD, it is not automatically executed.
12
Template Registration
Only
[ 01 Template Registration Procedure]
▪ Revise PSD files to be registered at template by conforming to template
registration specification. 02. See PSD Creation
▪ Retrieve PSD file by using Main Menu > Tools > Import PSD menu to edition program.
▪ If template is registered at Photoshop, the template is registered at edition
completion window..
▪ Drag template registered at edition completion window to the lower template palette or
template palette you like.
[Caution] Since the template registration project is registered by associating with Photoshop, therefore, it is available only
for computers equipped with Photoshop CS-CS3..
[ 02 PSD Correction Conforming to Registration Specification]
▪ Produce area where image is inserted with each layer.
For example, if images are three, produce each image area with three layers..
▪ Change the name of layer at each
image area to “<U>”
.
▪ Make empty layer above the layer with name <U> where
image is inserted to apply clipping mask. .Layer of <U>
Photoshop after selecting newly created layer
Menu: Layer > Create clipping mask
Use (Alt +Ctrl +G). (Applied to Photoshop CS3)
▪ Since DelgaEditor’s template is composed of components, it has to work in group project.
If there is two layers (including clipping mask layer) with images and layer which is like
another image frame layer, select all and conduct group work.
Select them and conduct group work.
Photoshop menu Layer > Group Layers
(Ctrl+G) is used. (Applicable to Photoshop CS3)
[Reference] The registration is possible even without group work, but since it is moved to each
layer when component is moved, the edition work will be complicated.
.
▪ Make template with three images
If this is completed, there will be three layers
with images and name of
“<U>”
There will be empty layer applied by clipping mask
above the <U> layer, and three groups including layer
with image should be generated
[ 03 Template Registration]
▪ Next step to register revised PSD template is to retrieve this template to edition program. The
methods to retrieve are by “Tools > Import PSD” and dragging PSD template to edition
program.
▪ If you drag PSD template to edition program, it will be automatically associated with the
Photoshop, and it will analyze and register automatically.
▪ If the template registration is completed
by Photoshop, the template will be
registered at edition completion window
as following figure.
▪ In order to register at template palette, make new template palette, or select existing palette,
and drag template registered at template palette from the edition completion window to the
template palette. Chapter 07. Template window > 04. See Template Palette Creation
13
Registration and Application of Action
If you register action using at DelgaEditor and Photoshop or action associated with retouch
program, these actions should be Droplet, and register and combine each Droplet at action editor,
and apply this registered action to the edition course.
[ 01 Photoshop Action Registration (Based on CS3 )]
▪ Select action to be registered at DelgaEditor from action panel.
▪ Select Photoshop File > Automate > Crate Droplet menu.
▪ Use choose button of Save Droplet In to set up file name and location.
The location of working is C:\delgaeditor_7x\Resource\Actions\BaseActions .
▪ Check whether Set and Action in between Play areas are action to be registered,
and four check boxes below should be emptied.
▪ Destination option selects Save and Close. The checkbox below should be emptied.
▪ Select Stop For Errors for Errors option.
▪ If all options are selected, click OK button on the right side upper part to save Droplet.
▪ Execute DelgaEditor to execute Main Menu > Tools > Action Editor.
▪ The new registered Droplet file appears
on base action.
.
▪ Create new action set with
new action set button.
.
▪ Click the newly created action
to change new action set.
▪ Select newly registered Droplet file at
Base Action on the left side, and click the
registration button “>” to register it to
action set.
▪ Click OK button to finish
registration of action.
.
▪ Click frequently used menu or action application
menu of edition project window menu to check
out the registered action.
.
[ 02 Applying Action during Edition]
There are two methods to apply action which is to apply same action to all images, and to apply
different action by image.
▪ Method to apply same action to all images
After setting up default action at frequently used menu or action to be applied to Option >
Project Option > Default Action, edit the page then the action will be applied to all images.
If you do not want to set up action, set up as <none> option.
[Caution] If applying default action after edition, such action does not apply to previous images.
Set up action at default action before edition.
▪ Method to apply different action image by image selectively after edition.
After selecting image at image edition mode, select action value among action menu of edition
project window menu.
▪ If Action Menu is used, this action value will be applied even though such action menu is set up
in Default Action.Select <none> to remove action application
▪ Make sure to apply action after selecting an image in the image edition mode
In the component edition mode, noting is applied even though action is set up.
14
Step by Step Build
For more sophisticate edition, the original image used in the edition is extracted in Step 1, the edited
PSD file is created in Step 2 while applying the retouched original source file in Step 1 and in Step 3,
the final JPG and DelgaBOOK are created while applying the edited PSD in Step 2..
[ 01 Project Option ]
▪ Set up build environment in each step with Main Menu > Option > Project Option Menu.
[02 Build Step 1 (Image clips used in the edition) ]
In Sep 1, it is selected whether the original images used in the edition will be extracted as JPG and PSD
files.
▪ For manually correcting the images used in the edition, select Main Menu > Run > Build Step1
menu. The established file under the Project Option will be saved in Jpeg or Psd folder below
Usedsource folder. .
1. Nothing : Option to extract noting from the original source file separately
2. JPG Files : Option to extract usedsource>jpg folder from the original source file used in the edition
3. JPG Files : Option to extract usedsource> psd folder from the original source file used in the edition
▪ In a given circumstance that an action is established in the edition, if Psd is selected from
Step 1 Option, corrected layers and the original layer in PSD files will be created.
Save the file under the same name after additionally correcting the work.
Then, execute Build Step 2 menu to make the corrected work in PSD file.
[Caution] In case that the original source file extracted in Step1 is corrected, make sure to save it under
the same name in the same format to apply the corrected image to Step 2.
▪ Step 3 : It is selected whether JPG and DelgaBOOK, which are completed with PSD files created
in Step 2, will be produced or not[Step1, 2, 3 build application method]
Extract the original image used in Step 1 and retouch it by other retouch programs or Photoshop.
In Step 2, create edited PSD files to which the retouched original source file is applied.
Retrieve the created PSD to Photoshop and edit it including layer.
In Step 3, create the final JPG and DelgaBOOK to which the corrected PSD is applied.
[ 03 Build Step 2 ]
▪ Step 2 : Menu to select whether to create PSD file edited in the template with the original source file
extracted in Step 1.
▪ Produce PSD file edited in the template with the retouched image file in Step 1 Edit the
produced PSD file and save it under the same name. Then, execute Build Step 3 menu to
produce JPG output of the edited PSD file.
[ 04 Build Step 3 ]
Step 3 : Menu to select whether to create JPG and DelgaBOOK completed with PSD file created
in Step 2.
▪ Produce JPG with the retouched PSD file in Build Step2
[Note] The edited output in Build Step 1 is applied to DelgaBook
Build Step 1 is not applied.
But, the edited output in
15
Batch Build Function
[ 01 Build register Option (automatic, show dialog, manual) ]
These are options for registering in the Batch Build
Select Option > Register Batch Build.
▪ The automatic menu automatically registers the work
in the Batch Build List after being edited.
▪ The show dialog menu checks whether the work is
registered in the Batch Build List after being edited.
▪ The manual menu does not automatically register the work
in the Batch Build List after being edited.
You should register it at batch build administrator window manually.
[ 02 Add, Delete, Select ]
Execute Batch Build Administration after selecting Main > Run > Batch Build.
▪ The addition menu adds a project (album)
edited in the Batch Build List.
▪ The deletion menu deletes a certain project
(album) registered in the Batch Build List.
▪ The selection menu temporarily selects
whether the job for a certain project
(album) registered in the Batch Build List
is proceeded or not without deleting it.
[ 03 Build Option ]
▪ Step1(Create Used Source): Run Step 1 setting
only in the Batch Build. See 04.Step1 Option
▪ Step2(Create PSD): Run the job established
by Step 2 in the Batch Build
▪ Step 3(Create JPEG, DelgaBook) :
Run the job established by Step 3
in the Batch Build
▪ Build All: Run all steps.
[ 04 Step1 Option]
Establish Step 1 of the Batch Build
See Chapter 14.Build by steps>O2.Build Step1
[ 05 Execute, conclude the work, Close ]
▪ Execute the production option
that establishes the Batch Build.
▪ After executing the above production option,
conclude the work.
▪ Close the administrator window
of the batch build.