1
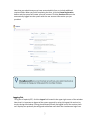
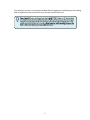
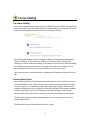
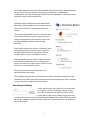
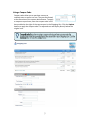
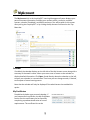
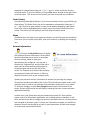
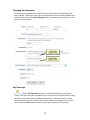
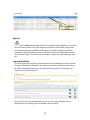
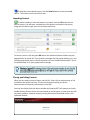
Unleash the Power of e-Learning
Version 1.4
November 2011 Edition
© 2002-2011
ICS Learning Group
Disclaimer
ICS Learning Group makes no representations or warranties with respect to the
contents or use of this manual, and specifically disclaims any express or implied
warranties of merchantability or fitness for any particular purpose. ICS Learning Group
reserves the right to revise this publication and to make changes to its content at any
time, without obligation to notify any person or entity of such revisions or changes.
Further, ICS Learning Group makes no representations or warranties with respect to
any ICS Learning Group product, and specifically disclaims any express or implied
warranties of merchantability or fitness for any particular purpose. ICS Learning Group
reserves the right to make changes to any and all parts of ICS Learning Group products
at any time, without obligation to notify any person or entity of such changes.
Trademarks
Inquisiq, Inquisiq R3, Inquisiq Studio, Intelligent Streaming Video (ISV), and ICS
Learning Group are registered trademarks of Interactive Communications Solutions
Group, Inc.
Other brands and their products are trademarks or registered trademarks of their
respective holders.
Product Support
If you have purchased a support package and have any questions during the use of
Inquisiq R3™ that are not addressed in this guide, please visit our support site at:
http://support.icslearninggroup.com/
Or contact us at:
ICS Learning Group
8221 Ritchie Highway
Suite 303
Pasadena, MD 21122
http://www.icslearninggroup.com
Table of Contents
Inquisiq R3™ Introduction
Accessing Inquisiq R3™
The Home Screen
Logging In
Retrieving a Lost Password
Creating Your Account
Logging Out
The Inquisiq R3™ Interface Overview
Course Catalog
The Course Catalog
Course Details Screen
Searching the Catalog
Enrolling in a Course
Your Shopping Cart
Using a Coupon Code
Calendar
My Certificates
Order History
Menu
Account Information
Changing Your Password
My Transcript
My Cart
Learning Activities
Launching Content
Closing and Exiting Content
Inquisiq R3™ Introduction
Welcome. The Inquisiq R3™ Learning Management System (LMS) is your training portal
that will allow you to access to all of your online and classroom-based learning
activities and associated information.
You will be able to use the Inquisiq R3™ LMS to do the following activities:
Browse Course Catalogs and self-enroll in Courses.
Access and launch the Courses that you are enrolled in.
View your personal calendar for at-a-glance reminders of your scheduled
learning activities - both online and classroom-based.
View and print the certificates you have earned.
View your transcript of completed learning activities.
For systems with e-Commerce enabled, you can use the shopping cart to
purchase Courses and view your order history.
Accessing Inquisiq R3™
Access to the web-based Inquisiq R3™ Learning Management System requires a basic
internet connection and web browser. Your administrator will provide you with the
URL or web address of the Inquisiq R3™ system. To access Inquisiq R3™, open your
web browser, enter the URL in the address field and press Enter.
The Home Screen
The first screen you will see is the Home Screen. The main part of this screen will
display the welcome message that is specific to your organization. The Home screen is
the starting point that allows you to do one of three things; you can choose to Login to
the system, register for a new account, or Browse the Course Catalog.
Logging In
For the Inquisiq R3™ Learning Management System to track,
record, and report learner activity, each learner must login
with a unique username and password that identifies them
within the system.
From the Home screen, enter your username and password
and click the Login button. If you do not see the login form on
the screen, click the Home button located on the Top Menu of
the Inquisiq R3™ window.
Note that your system may be configured to use your email or other information as
your username. If this is the case, the initial form field may be labeled something other
than Username.
If you are unable to login, there are several possible reasons:
You may have provided an incorrect username and/or password (check casesensitivity)
Your account may not (yet) exist, or
Your account may have been disabled by the administrator
Your account may still be logged in from a previous session that was not properly
closed.
If you have any questions, contact your system administrator – an email link should be
visible at the bottom of the screen beneath the text menu.
Resetting a Lost Password
If you have forgotten your password, you may reset your password by clicking the “I
forgot my password” link located under the login button. Simply enter your username
as prompted by the form and click the Submit button. An email containing a link that
will allow you to reset your password will be sent to the email address associated with
your user profile. If your user profile does not have an associated email address, you
should contact your system administrator to have your password reset.
Note: Passwords are stored in Inquisiq R3™ using a one way encryption, this means
that the password cannot be recovered, it can only be reset. Passwords are stored
using this type of encryption to protect the integrity of user account data.
Creating Your Account
If your administrator has not created your account and your system is configured to
allow it, you may create your own account. If you are not already there, click the Home
button to display the login form on the Home screen. Click the register here link to
display the registration form. Enter your name, email address, username, password
and any other information required by the form - required fields are marked with a red
asterisk.
Note that your administrator may have customized this form to include additional
required fields. When you finish completing the form, click the Create Registration
button and the system will create your user account. Click the Continue button to be
automatically logged into the system with the user account information you just
provided.
Logging Out
To log out of Inquisiq R3™, click the Logout link located in the upper right corner of the window.
Note that it is important to logout of the system properly by using this logout link and not by
simply closing the window. Closing the window will leave you logged in until the session times
out. Inquisiq can optionally be configured to disallow more than one simultaneous login from
the same user account, so closing the window without logging out could keep you from being
able to log back into the system until your previous session times out.
The Inquisiq R3™ Interface Overview
The Inquisiq R3™ Learning Management System interface is divided into several easy
to use sections.
The Top Menu, located just underneath the masthead graphic, provides navigation
buttons for accessing the Home Page, Course Catalog, and My Account screen. The
Home Page is the starting point for logging into the Inquisiq R3™ LMS. The Course
Catalog lists your available catalogs and courses. The My Account screen contains all
your personal account
information, learning activities,
transcript, certificates and
shopping cart.
The Left Side Menu is visible
when you select either the
Course Catalog or the My
Account screen. If you are on
the Course Catalog screen, the
left side menu will contain an
Event Calendar, and/or a
search box, depending on
what the administrator has
enabled. The Event Calendar
will display all of the live
training events that have been scheduled, and the search box allows you to search for
courses in the Course Catalog. If you are on the My Account screen, then the Left Side
Menu will display your personal calendar (if enabled) and potentially sub items such as
your awarded certificates and your order history.
Note that if you do not have any awarded certificates or have not purchased any
courses then you will not see these sub items on the Left Side Menu.
The Footer, located at the bottom of the screen, contains links to items such as Terms
of Use, Privacy Policy, and a few others including an About link and the email address
of your system administrator or other contact.
Course Catalog
The Course Catalog
The Course Catalog screen displays two tabs: CATALOGS, and COURSES. The number of
items contained in each tab can be found in parentheses directly to the right of the tab
name. You can display the contents of a tab by clicking on the tab.
The Catalogs tab displays all of the catalogs to which you have been granted access.
Click the catalog’s name to open the catalog. The view will change to display all
Catalogs or Courses within that catalog. The number of courses in the selected catalog
can be found in parentheses directly to the right of the tab name. Clicking a course
name will take you directly to the Course Details screen for that course.
Note that courses not contained within a catalog can be found by clicking the Courses
tab.
Course Details Screen
You will find virtually all the information for both instructor-led and online courses on
the Course Details screen. The top of this screen contains basic information including
the course name, cost, number of credits, type, approximate length, available seats,
and date. Information may vary slightly for instructor-led and online courses. Beneath
the basic information, the screen is broken up into the following sections: (Note because much of this information is optional, not all sections appear for all courses)
The Description section contains a text description of the course as entered by the
system administrator.
The Objectives section lists the objectives of the course.
The Course Materials section lists downloadable files that have been included with the
course. These files may consist of documents, presentations, spreadsheets,
worksheets or any other file that the administrator has uploaded. To download course
materials, simply click the desired link.
The Expert section displays the name and contact
information for the subject matter expert or person
who you can contact for information about the
Course.
The Location Information section is a free text area
that the administrator may use to give you extra
location information for live courses such as room
numbers, building numbers or even driving
directions.
The Schedule Information section is a free text area
that the administrator may use to give you extra
scheduling information for live courses such as
irregular dates, times or cancellation notices.
The Prerequisites section will list all other courses
that must be completed prior to enrolling in this
course. You may click a course name in this list to go
directly to its course details screen.
The Lessons section lists the lessons that are
contained within the course.
The Certificates section lists all certificates that require successful completion of the
selected course. Note that course completion will not necessarily earn each certificate
as they may require credit from other courses.
Searching the Catalog
If your administrator has enabled it, you may search
for a specific course or catalog by using the search
form that is located in the upper left corner of the
screen when in the course catalog. Simply enter the
search word or phrase in the input field and click Search. The search will display results
for courses, catalogs, and lessons that contain your search word or phrase within the
title or description.
Enrolling in a Course
To enroll in a course, you must first find your course
in the catalog and view its course details screen. If
the course is available for self-enrollment you will
see an Enroll link beneath the red apple icon. Click
the Enroll link to enroll in the course. A confirmation screen will display, telling you
that you have been successfully enrolled in the course.
If a fee is associated with the course, you will be taken to your personal Shopping Cart.
From here, you can either pay for the course, or return to the catalog. Details on
paying for a course can be found below.
If the Enroll button is not available, there may be several possible reasons including
(but not limited to):
You may not have completed all the required prerequisites to enroll in the
course
The course may be closed (self-enrollment not allowed)
If you are viewing the course details screen and are not logged in, you will be given the
option to login or you may create your account using the same form described in
Accessing Inquisiq R3™: Creating Your Account. In either case, upon successful login or
account creation, you may then click the Enroll icon to enroll in the course.
Your Shopping Cart
If there is a fee associated with a course, you will be taken to your Shopping Cart upon
clicking the Enroll link. Depending on the configuration of your particular system, the
payment gateway may be the Inquisiq R3™ built-in credit card processing form, or an
external 3rd party payment processor such as PayPal. In either case, follow the
onscreen instructions. You will automatically be enrolled in the course as soon as the
transaction is complete. Note that in some cases such as electronic payment by check
using Pay Pal, the payment transaction may not be completed right away.
Using a Coupon Code
Coupon codes allow you to purchase courses at
reduced rates or even at no cost. They are distributed
at the discretion of the system administrator. To apply
a coupon to a purchase, enter the coupon code in the
box provided to the right of the course name in the Shopping Cart. Click the Update
button to apply the coupon code. The adjusted cost will display directly below the
original cost.
The My Account link in the Inquisiq R3™ Learning Management System displays your
personal account information including your account profile, transcript, enrolled
courses, calendar (if enabled), certificates and more. You will be taken to this screen
after you log into Inquisiq R3™ or by clicking the My Account link found on the Top
Menu bar.
Calendar
If enabled, the calendar displays on the left side of the My Account screen along with a
summary of the week’s events. Move your cursor over an event on the calendar to
display detailed information. Click Open, found directly above the calendar on the left,
to open your calendar in a new window. From here you can change months, if desired,
to view past or future learning events.
Note that the calendar will only be displayed if the administrator has enabled this
option.
My Certificates
Found directly below your personal calendar, if
you have earned a certificate, the My Certificates
section lists the certificates you’ve earned by
completing a predetermined series of course
requirements. The certificate list can be
expanded or collapsed by clicking the “+” or “-” sign. To view a certificate, click the
certificate name. To print a certificate, click the Print button located to the right of the
certificate name. This section will not show if you have not earned any certificates.
Order History
Listed directly below My Certificates, if you have purchased a course, you will find your
Order History. The Order History list can be expanded or collapsed by clicking the “+”
or “-” sign. Click on an order number to open a new window displaying order details.
From here, click on the Print button to send a copy of the order information to the
printer. This section will not display if you have not purchased a course.
Menu
Found directly to the right of your personal calendar, you will find your personal Menu.
From here, you can access your profile, view your transcript, or display your shopping
cart.
Account Information
Click on the My Profile button to display
your personal Account Information. Several other
optional tabs allow you to access or view other
account settings, based on what your
administrator has configured. You may see a
Contact Info, Employee Info, and/or Other tab in
which you can access personal information by
clicking the given tab on the left side of the
screen. For example, click Contact Info to display
your personal contact information, or Other to
display information such as your company code.
Update your personal account information as necessary by entering any changes
directly into the space provided on the screen. This information includes name, email,
company name, as well as any fields that may have been customized in your system.
To save your changes, click the Save Changes button found at the bottom of the
screen. A green confirmation box will display, indicating that your account has been
updated successfully!
In some cases, your information may be pushed into Inquisiq R3™ from another
system such as an HR software application, user tracking system or database. In this
case, you will not be able to change your account information here as it is being stored
and managed in the other system. To have your information changed, you should use
whatever process may already be in place at your organization to make such changes
or contact your system administrator.
Changing Your Password
To change your password, first view your account information as described in the
section above. In the form, enter your new password in both the New Password and
Confirm fields and click the Save Changes button. The next time you log in be sure to
use your new password.
My Transcript
Click on My Transcript to open a new window displaying your course
history. The report includes a complete list of the courses you have enrolled in along
with the course status, date completed, lesson name, completion status, success
status and score. You can sort the report by any column by clicking on the column
name. Click the Print button to send a copy of your transcript to the printer.
My Cart
Click on My Cart to display the items in your personal shopping cart. From here
you can remove courses from your shopping cart, add a coupon code, and/or enter
the required credit card and billing information to complete your purchase. More
information about the Shopping Cart can be found in the Your Shopping Cart section
of this Learner Guide. This section will not display if you do not have anything in your
cart.
Learning Activities
The Learning Activities section of the My Accounts screen displays four tabs: Enrolled,
Overdue, Completed, and Expired. The number of courses contained in each tab can
be found in parentheses directly to the right of the tab name. You can display the
contents of a tab by clicking on it.
Initially, courses are sorted alphabetically. You can sort courses by Due Date or
Expiration Date by clicking on the associated column heading.
To view the course details screen, click the Details button for the associated
course. This button is active on all four tabs.
Launching Content
To launch content or view the lessons in a course, click the GO button for the
desired course. You will see a complete list of the lessons contained in the course,
along with the lesson type, your current Status and Score.
To launch a lesson, click the green GO button for the desired lesson. Make sure your
popup blocker is turned off. If you receive a message that the popup blocker is on, turn
off the popup blocker and re-launch the lesson. Be sure to add the Inquisiq R3™ site to
the allowed sites list in your popup blocker settings.
Closing and Exiting Content
When you are ready to close a lesson, use the Exit, Close, Quit or other button or link
provided in the lesson interface. This ensures that upon exiting, the lesson
communicates all necessary information to the LMS.
You may also simply close the lesson window and Inquisiq R3™ will attempt to cleanly
handle the data that the lesson has transmitted up to that point. In most cases this will
not cause problems, however properly closing the lesson as described earlier is the
preferred method.
Once the lesson window has closed, the main Inquisiq R3™ window will display “Data
Saved.” From here, click the link Click here to go back to your 'My Account' screen. to
return to the lesson listing screen. The lesson status and score will reflect your latest
activity.