1
TickWrite 7.1
User Guide
Version 20150824
Database Management Software
For High-Frequency Global Market Data
Equities
Forex
Futures
Options
Indices
Indicators
rev. 3.1 (2015.08.24)
Using This User Guide
TickWrite is a powerful data management tool that allows Tick Data clients to create data files customtailored to their needs. The program has many settings that can greatly alter its output, so this User
Guide was developed to explain exactly how the myriad parameters available in TickWrite 7 affect the
format and content of output data.
Whenever possible, the settings look the same between asset types, but a number of variations exist
due to the inherent differences between equities, currencies, futures, options, and indices. The User
Guide explains the settings that pertain to each asset type in separate ‘Creating Files of…’ sections. If a
client only licenses futures data, for example, he/she can skip the sections on Equity Data, Forex Data,
Options Data, and Cash Index and Indicator Data.
As a result, most users should not have to review this User Guide in its entirety. All first-time users
should refer to the ‘Installation’ and ‘Configuring TickWrite’ sections for setup instructions. If you have
time, review the ‘First Use’ section for details on all menu items. If you plan to use the Scheduler to
automate updates and/or file creation, review ‘Daily Updates and the Scheduler’. Otherwise, skip to
the section on ‘Jobs and the Job Explorer’ for an explanation of the main window, and then go to the
relevant ‘Creating Files of…’ section(s) for details on your specific data type(s).
Welcome to TickWrite 7.1
Volumes in the financial markets are growing exponentially. Market characteristics are changing more
rapidly than ever before. TickWrite 7 was designed to provide clients with the fastest, easiest, and
most flexible way to generate custom ASCII files of historical intraday market data. Since trade and
quote volumes vary greatly from one symbol to the next and one asset class to the next, so will the time
required to generate output files. TickWrite 7 allowed us to compress more fields of information,
greatly expanding the scope of data we can offer.
With TickWrite 7.1, we have further expanded the program’s capabilities. Here are some of the
enhancements and offerings of the new format and software:
-
Expanded global futures and cash index offering, including over 90 futures contracts and 50
cash indices.
A new ASCII-based source file format for all asset classes.
A single program for creating custom ASCII files for all asset classes, including options.
A convenient, familiar interface for Company Info/Ticker Mapping (CITM) clients.
Daily updates for futures, index, and options (trade-only) data.
Seamless integration between TickWrite, the Tick Data Deep History server, and the online
store.
A scheduler and downloader that work together to automatically download daily updates and
generate ASCII output files.
Sales condition information for futures data (beginning 7.1.2011).
New Futures roll features, including Most Active, for more precise continuous futures contract
rollovers and rolling ‘n’ days prior to expiration.
Ratio Adjusting for removing rollover gaps from continuous files of futures data.
Output timestamp in milliseconds when available.
Ability to generate files of sub-minute bars.
Enhanced file output options, including filtering by and re-ordering headers.
Ability to write out bar intervals of trade data using filtered or unfiltered prices (when
processed from TICK trade data).
Please review this User Guide to ensure TickWrite 7.1 is outputting the data in the format you require.
1
HISTORICAL MARKET DATA AGREEMENT
The document displayed below describes the relationship between Tick Data, Inc., a Virginia
corporation, with a place of business at 10134-G Colvin Run Road, Great Falls, VA 22066 (“TICK
DATA”) and you, the licensee, (“Licensee”).
You, as the “Licensee” desire to subscribe to the Tick Data system from your facility or any auxiliary
facilities where you or your employees conduct related activities on behalf of your business, and to
access the Tick Data system through Tick Data’s web site, and Tick Data desires to provide internet
access to the Tick Data system to Subscriber upon the terms and conditions contained in this
Agreement. The Tick Data system consists of the Software Product made accessible to you through
the internet
By agreeing to the terms herein (and the act of recording that agreement by the use of the AGREE
button) and using the data and software accessible through the web site (and installing the software
keys and APIs), you acknowledge that you have read this Historical Market Data Agreement
(“Agreement”) and consent to its terms. This Agreement will become effective when you record your
consent (“Effective Date”). If you do not accept these terms and conditions, you should click on the
REJECT button and delete the materials from your computer.
TICK DATA® is a registered trademark of Tick Data, Inc.
The copyright rights and all other intellectual property rights in the Data and the
program that constitutes this software together with the computer files downloaded
via the internet, through our web site, or other media on which this Data and
software is supplied, is and remains the property of Tick Data, Inc.
YOU AGREE THAT YOU ARE LEGALLY ABLE TO ENTER INTO THIS AGREEMENT. AMONG OTHER
THINGS, THIS MEANS (1) IF YOU ARE A DESIGNATED USER REGISTERING FOR A BUSINESS OR
GOVERNMENT LICENSE/ACCOUNT, YOU MUST BE A BONA FIDE EMPLOYEE OR INDEPENDENT
CONTRACTOR OF THE BUSINESS/GOVERNMENT ENTITY IN WHOSE NAME THE
LICENSE/ACCOUNT IS HELD AND YOU MUST BE AUTHORIZED TO BIND THE
BUSINESS/GOVERNMENT ENTITY AND BE AUTHORIZED TO REGISTER UNDER THE NAME OF THE
BUSINESS/GOVERNMENT ENTITY AND (2) IF YOU ARE REGISTERING FOR AN INDIVIDUAL LICENSE
ACCOUNT, YOU MUST BE AN INDIVIDUAL OF AT LEAST TWENTY ONE (21) YEARS OF AGE
REGISTERING UNDER YOUR OWN NAME. YOU AGREE THAT THIS AGREEMENT IS ENFORCEABLE
LIKE ANY WRITTEN NEGOTIATED AGREEMENT SIGNED BY YOU. IF YOU DO NOT AGREE, DO NOT
AGREE TO THESE TERMS OR USE THIS DATA OR SOFTWARE.
2
LICENSE TERMS AND CONDITIONS
WHEREAS TICK DATA licenses and/or sublicenses use of data, software and any corresponding user
manual(s) or other user documentation to utilize the historical market data licensed to Licensee and
set forth in the registration, checkout and/or installation process.
WHEREAS Licensee desires to be granted a license and/or sublicense to use the Data, or in addition
also the Software Product, as set forth in the registration, checkout and/or installation process on the
terms and conditions set forth in this Agreement or in addition also desires to subscribe to the Tick
Data system from its facility or any auxiliary facilities where it or its employees conduct related
activities on behalf of its business, or in addition also to access the Tick Data system through Tick
Data’s web site and the internet.
NOW, THEREFORE, and in consideration of the terms and conditions set forth below, TICK DATA and
Licensee agree as follows:
1. Certain Defined Terms.
The term “Contract” as used in this Agreement means the relationship formed between us that leads
to this Agreement and consists of that set of terms for the relationship as set forth in the registration,
checkout and/or installation process, whichever are applicable, and also includes the terms in this
Agreement itself. Registration and checkout may also include, or have included, the completion of a
Schedule A or any other data set itemization document, physical or electronic.
The term “Data” as used in this Agreement means the historical market data which are set forth in the
Contract.
The term “Data Update Service” as used in this Agreement means the services provided by TICK DATA
whereby TICK DATA shall provide Licensee with additional data relating to the Data licensed to
Licensee hereunder and which are set forth in the Contract. Any data received by Licensee by way of
the Data Update Service shall constitute “Data” for the purpose of this Agreement.
The term “Software Product” as used in this Agreement means the software computer program(s) and
documentation which may allow the Licensee to access and use Data as set forth hereunder and which
are set forth in the Contract. For the avoidance of doubt, the Software Product excludes any and all
Data. (Dependent on your choices in the Contract, you may not be using Software Product. Also
dependent on your choices in the Contract, other alternatives you may choose are use of Software
Product in the form of TickWrite® or in the form of API access.)
The term “Tick Data system” as used in this Agreement means the Software Product made accessible
to you through the internet.
Data will be delivered via download, if possible. In the rare event that the Data in the data set is too
large for download, Data will be delivered on external media (e.g. DVD or external hard drive). If data
is delivered on an external hard drive, a hard drive fee will apply. Most orders for Data are processed
and ready for delivery immediately or in most events no more than 1 to 3 business days. Orders for
larger equity and options Data can take longer, depending on the amount of Data ordered.
Data Updates will remain available for download for 30 calendar days, and then deleted from our
servers. A processing fee will be charged to re-process the data files and deliver the Data if the Data
Updates are not downloaded in that 30 calendar period.
2. License.
3
2.1
Authorized Use. Subject to Licensee’s compliance with the terms of this Agreement, TICK
DATA grants Licensee a non-exclusive, non-transferable, non-assignable license to use the Data and, if
selected, Software Product or internet access to the Tick Data system solely in the course of Licensee’s
internal business use as expressed in the Contract. Licensee’s use is limited to use by Licensee’s
Department and/or Business function expressed in the Contract and only in conjunction with the
authorized use and at the physical location expressed. Licensee acknowledges and warrants that no
other departments, business function, employees, affiliates or subsidiaries of Licensee, (other than
those explicitly set forth by the Contract) are authorized or will access or use the Data and Software
Product or internet access to the Tick Data system hereunder. A Description of Use is required by the
Contract where the Licensee involves more than a single end user. The description must disclose all
locations where the access information for the Data and Software Product or internet access to the
Tick Data system will be stored, the number of users authorized to access the Data and Software
Product or internet access to the Tick Data system, directly or indirectly, and if users are able to access
the Data and Software Product or internet access to the Tick Data system directly or only derived
works of the Data and Software Product or internet access to the Tick Data system. Licensee may (i)
make one copy of the Data, for backup and archival purposes only; and (ii) modify the Data for
Licensee’s own internal purposes in accordance with this Section 2.1 and the other the provisions of
this Agreement. Licensee is solely responsible for supervision of Licensee’s internet access to the Tick
Data system, including: (a) ensuring proper operating methods and audit controls; (b) establishing
adequate backup plans to diagnose and repair defects in obtaining internet access to the Tick Data
system in the event of a malfunction of Licensee's hardware or software; and, (c) implementing
adequate procedures to satisfy Licensee's requirements for security, accuracy of input and output, and
restart and recovery in the event of a malfunction of the Tick Data system or the Software Product or
the access to the Tick Data system.
2.2
Data Update Service. Provided that Licensee is not in breach of the terms and conditions of
this Agreement, TICK DATA shall, use reasonable commercial efforts to provide to Licensee with the
Data Update Service as set forth in the Contract. Licensee acknowledges that nothing in this Agreement
constitutes an obligation on TICK DATA to continue to make the Data available in any form and
particularly its present form or configuration or to continue to provide the Data Update Service.
2.3
Restrictions. Licensee shall not: (1) distribute, disclose, rent, lease or sublicense all or any
portion of the Data and Software Product or internet access to the Tick Data system to a third party as
a paid service or otherwise; (2) use the Data and Software Product or internet access to the Tick Data
system in a computer-based services business which would allow third parties to access, view or use
the Data in whole or in part, or otherwise publicly display visual output of the Data in any manner; (3)
allow any employees of Licensee, other than as explicitly set forth by the Contract to use or access the
Data and Software Product or internet access to the Tick Data system, or (4) reverse engineer,
decompile or disassemble the Data and Software Product or internet access to the Tick Data system.
Except as set forth hereunder, Licensee agrees to keep the Data and Software Product or internet
access to the Tick Data system strictly confidential and to prevent and protect same from being
disclosed or used by any third party or in violation of the terms of this Agreement. Licensee
acknowledges that TICK DATA or its licensors own all copyright, trade secret, patent and other
proprietary rights in the Data and Software Product or internet access to the Tick Data system and
same are not transferred to Licensee hereunder. Licensee may modify any Data and/or aggregate Data
with other data (such modified Data or aggregation is referred to as “Derived Data”) for use internally
and otherwise in connection with its business activities as set forth above provided that Licensee may
not disclose or otherwise provide third parties with access to any Data or Derived Data in any manner
whatsoever. Without limiting the generality of the foregoing, this Agreement does not give the Licensee
any rights to distribute the Data, whether in its present form or in a modified form, to any third party.
Licensee shall remain liable for any breach of the foregoing by its officers, employees, agents and
representatives.
2.4
Compliance with laws. Licensee and Licensee's use of the Data and Software Product or
internet access to the Tick Data system shall comply with all applicable federal, state and local laws,
4
rules and regulations, and exchange rules, regulations and contract terms. Licensee represents and
warrants that Licensee shall not engage in, nor is currently engaged in, the operation of any unlawful
transactions and/or business. Licensee shall not use, nor shall Licensee permit any third party to use,
the Data and Software Product or internet access to the Tick Data system for any unlawful purpose. In
the event TICK DATA believes that Licensee is not in compliance with the terms of this Section, TICK
DATA reserves the right to terminate this Agreement at any time with or without notice and without
incurring any liability or obligation in connection therewith.
2.5
No Advice. Licensee shall be solely responsible and liable for its use of the Data and Software
Product or internet access to the Tick Data system and/or for any unauthorized use thereof. TICK
DATA assumes no responsibility and shall not be liable to Licensee, or any other third party for any
decision made or action taken in reliance upon the Data and Software Product or internet access to the
Tick Data system. All investment decisions by Licensee and/or any other third parties are the sole and
exclusive responsibility of Licensee and/or such third parties and are taken at their sole risk and
discretion. Licensee acknowledges that the Data and Software Product or internet access to the Tick
Data system are not intended to provide legal, investment or tax advice.
2.6
Security. Licensee is responsible for ensuring that all of its systems, including hardware and
software systems, will, to the extent reasonably possible, prevent any person other than the Licensee
and its directors, officers, employees and agents from obtaining access to the Data and Software
Product or internet access to the Tick Data system. The Licensee shall take reasonable steps to ensure
that its systems, devices and equipment are secure and prevent any person that is not authorized from
gaining access to the Data and Software Product or internet access to the Tick Data system.
3. Fees.
3.1
Fees. Licensee agrees to pay the fees in such amounts as may be determined by reference to
the formulas set forth in the Contract (the “License Fee”). The applicable fee relating to the Data Update
Service (the “Data Update Service Fee”) in such amounts as may be determined by reference to the
formulas set forth in the Contract. All fees payable by Licensee, including without limitation, shipping
and handling and/or hard drive fees, are due prior to delivery, and, in rare cases, shipment, of the Data
or Software Product or access information for the Tick Data to Licensee.
3.2
Taxes. All fees and charges, including, without limitation, the License Fee and Data Update
Service Fee are exclusive of any applicable taxes or assessments imposed by or pursuant to any
government body or subdivision thereof on the services and products hereunder (collectively
“Taxes”), except for any federal, state or local income taxes, if any, imposed on TICK DATA. Licensee
shall always remain liable for and shall pay all Taxes with respect to the services and products
hereunder, as and when notified.
3.3
Data Update Service Fee. Fees for the Data Update Service provided to Licensee pursuant to
this Agreement shall remain fixed for the period of time set forth by the formulas set forth in the
Contract and may thereafter be increased from time to time.
4. Limited Warranties.
TICK DATA warrants to Licensee that the Software Product shall be free from material programming
defect or deficiency for a period of thirty (30) days after receipt of same by Licensee. If during the thirty
(30) day warranty period, the Software Product is not free from material defect or deficiency and
Licensee has notified TICK DATA of such in writing, TICK DATA shall use reasonable efforts to correct
such defect or deficiency or replace the Software Product as accessed in the Tick Data system. TICK
DATA does not warrant the Data or the Tick Data system. Without limiting the generality in the
foregoing, TICK DATA does not warrant that the Data is accurate, error free, comprehensive or
complete. If Licensee has notified TICK DATA of an error in the Data in writing, TICK DATA shall use
reasonable efforts to correct such defect or deficiency or replace the Data. The entire risk as to the
results and performance of the Data and Software Product or internet access to the Tick Data system
5
is assumed by Licensee. The above shall be the sole liability of TICK DATA in connection with
programming defects or deficiencies affecting the Data and Software Product or internet access to the
Tick Data system.
5. Warranty Disclaimer.
EXCEPT AS EXPRESSLY SET FORTH IN SECTION 4 ABOVE, THE DATA, THE TICK DATA SYSTEM, AND
THE SOFTWARE PRODUCT ARE PROVIDED “AS IS”. NONE OF TICK DATA, ITS RELATED PARTIES,
AFFILIATES, AGENTS, OR ANY THIRD PARTY PROVIDER MAKES ANY WARRANTY, EXPRESS OR
IMPLIED, AS TO THE ACCURACY OR COMPLETENESS OF THE DATA OR ANY PART THEREOF OR THAT
THE DATA, THE TICK DATA SYSTEM, AND THE SOFTWARE PRODUCT IS ERROR FREE. TICK DATA,
ITS RELATED PARTIES, AFFILIATES, AGENTS, OR ANY THIRD PARTY PROVIDER DISCLAIM ALL
WARRANTIES, CONDITIONS, GUARANTIES OR REPRESENTATIONS, WHETHER EXPRESS OR
IMPLIED, IN LAW OR IN FACT, ORAL OR IN WRITING, OR THAT ARISE FROM STATUTE OR FROM A
COURSE OF DEALING, USAGE OR TRADE INCLUDING WITHOUT LIMITATION ANY WARRANTIES,
CONDITIONS, GUARANTIES OR REPRESENTATIONS OF FITNESS FOR PURPOSE, MERCHANTABILITY
OR MERCHANTABLE OR SATISFACTORY QUALITY, OR FOR NON-INFRINGEMENT. NEITHER TICK
DATA, ITS RELATED PARTIES, AFFILIATES, AGENTS, OR ANY THIRD PARTY PROVIDER WILL BE
LIABLE TO LICENSEE OR ANY THIRD PARTY FOR ANY INDIRECT, SPECIAL, INCIDENTAL,
CONSEQUENTIAL OR PUNITIVE DAMAGES, HOWEVER CAUSED, INCLUDING ANY TRADING LOSSES
OR FAILURE TO SUCCESSFULLY IMPLEMENT ANY INVESTMENT STRATEGY REGARDLESS OF
WHETHER TICK DATA, ANY OF ITS RELATED PARTIES, AFFILIATES, AGENTS, OR ANY THIRD PARTY
PROVIDER HAS BEEN ADVISED OR IS OTHERWISE AWARE OF THE POSSIBILITY OF SUCH LOSSES.
LICENSEE ACCEPTS FULL RESPONSIBILITY FOR ANY INVESTMENT DECISIONS MADE BY LICENSEE
USING THE DATA, THE TICK DATA SYSTEM, AND THE SOFTWARE PRODUCT. NO SALES PERSONNEL,
EMPLOYEES, AGENTS OR REPRESENTATIVES OF TICK DATA, ITS AFFILIATES OR ANY THIRD PARTY
ARE AUTHORIZED TO MAKE ANY REPRESENTATION, WARRANTY OR COVENANT ON BEHALF OF
TICK DATA OR ANY LICENSOR TO TICK DATA. ACCORDINGLY, ORAL STATEMENTS DO NOT
CONSTITUTE WARRANTIES AND SHOULD NOT BE RELIED UPON AND ARE NOT PART OF THIS
AGREEMENT. LICENSEE EXPRESSLY AGREES THAT USE OF THE DATA, THE TICK DATA SYSTEM, AND
THE SOFTWARE PRODUCT IS AT LICENSEE'S SOLE RISK AND THAT TICK DATA AND ITS AFFILIATES
AND LICENSORS SHALL NOT BE RESPONSIBLE FOR ANY ERRORS OR LOSSES CAUSED BY THE
LICENSED DATA, THE TICK DATA SYSTEM, OR THE SOFTWARE PRODUCT. THIS SECTION SHALL
SURVIVE TERMINATION OR EXPIRATION AND NONRENEWAL OF THIS AGREEMENT.
6. Limitation of Liability.
TICK DATA’s entire aggregate liability arising from or related to this Agreement shall not exceed the
fees charged by TICK DATA to Licensee in the year preceding the date that the first cause of action
arose, even if such cause of action is continuing. In no event shall any of TICK DATA’s related parties,
affiliates, or any third party providers or such other entities’ officers, directors, employees or agents
have any liability to the Licensee or any third party under or related to this Agreement. The provisions
of this section shall survive the termination of this Agreement. Notwithstanding other provisions
herein, the aggregate liability of TICK DATA hereunder, including TICK DATA’s indemnity obligations
shall not exceed $25,000. All disclaimers and limitation herein shall apply regardless of the nature of
any cause of action or demand (including, but not limited to breach of contract, breach of warranty,
negligence, strict liability, tort or any other cause of action) and shall survive a fundamental breach or
breaches and/or failure of the essential purpose of this Agreement or any remedy contained herein.
7. Termination.
7.1
Data Update Service. TICK DATA may, if and as set forth in the Contract, provide Licensee with
the Data Update Service beginning at such date and continuing for a time period as set forth in the
Contract (the “Data Update Service Subscription”). Upon the expiry of such Data Update Service
Subscription, TICK DATA and Licensee may agree to continue provision of the Data Update Service and
6
TICK DATA will invoice the Licensee for the applicable fees relating to such continued provision of the
Data Update Service in advance. Any such continued provision of the Data Update Service shall be
subject to the terms of this Agreement. Subject to the terms of this Agreement and provided the
Licensee is not in breach thereof, any expiry or non-renewal of the Data Update Service shall not effect
Licensee’s rights hereunder relating to the Data earlier received by Licensee. The provisions of
Sections 2, 3, 5, 6, 8, 9, 10 and 11 shall survive the termination or expiration and nonrenewal of this
Agreement.
7.2
Termination for Breach. TICK DATA agrees to provide Licensee with ten (10) days prior
written notice of its intent to terminate the Agreement for a failure on the part of Licensee to comply
with any provisions of this Agreement; provided, that, in each case such notice shall provide Licensee
with the opportunity to cure such failure prior to the date of termination and provided, further, that,
notwithstanding the foregoing to the contrary, there shall be no notice requirement with respect to
any failure by the Licensee in connection with Sections 2 or 9 hereof that are incapable of cure. Upon
termination of this Agreement, Licensee shall return or destroy all Data received hereunder and
information providing Tick Data system access and provide TICK DATA with written certification of
such return or destruction.
8. Indemnity
8.1
By TICK DATA. TICK DATA will indemnify, defend and hold Licensee harmless from and
against any claim, suit or proceeding brought against Licensee alleging that the Software Product or
Licensee's use of the Software Product constitutes a misappropriation of, or infringement upon, any
United States of America published patent or copyright of a third party, provided that: (i) Licensee
promptly notifies TICK DATA, in writing, of any such claim, suit or proceeding; (ii) TICK DATA has sole
control of the investigation, defense and settlement of any such claim, suit or proceeding; and (iii)
Licensee provides TICK DATA, upon TICK DATA’s request, with all reasonable assistance in
investigating, defending and settling any such claim, suit or proceeding. If the Software Product is held
to infringe upon any United States of America patent or copyright of a third party, and Licensee's use
of the Software Product is enjoined or prohibited by a court of competent jurisdiction, TICK DATA shall,
at its sole option, within thirty (30) calendar days of such injunction or prohibition, either: (A) procure
for Licensee the right to continue using the Software Product free of any liability for infringement; (B)
replace or modify the Software Product with a noninfringing product of equivalent functionality; or
(C) in the event TICK DATA is unable, after exercising its best efforts to implement one of the options
set forth in subsection (A) or (B) above, accept return of the Software Product without refund to
Licensee. TICK DATA shall have no obligation to indemnify, defend or hold Licensee harmless
hereunder in the event any such claim, suit or proceeding arises from: (I) changes or modifications to
the Software Product not authorized, in writing, by TICK DATA; (II) the combination of the Software
Product with any software, hardware or other product not authorized, in writing, by TICK DATA; (III)
use of the Software Product not in accordance with the Software Product's user documentation; or (IV)
use of a superseded or altered release or version of the Software Product if the infringement could
have been avoided by use of the current unaltered release or version of the Software Product. This
Section shall survive any termination or expiration and nonrenewal of this Agreement. THE RIGHTS
AND OBLIGATIONS SET FORTH IN THIS SECTION 8.1 ARE TICK DATA’S SOLE LIABILITY AND
OBLIGATION AND LICENSEE'S SOLE AND EXCLUSIVE REMEDIES FOR ANY CLAIM, SUIT OR
PROCEEDING WITH RESPECT TO INFRINGEMENT OR MISAPPROPRIATION, INCLUDING WITHOUT
LIMITATION BY OR OF THE DATA, THE SOFTWARE PRODUCT, AND THE TICK DATA SYSTEM.
8.2
By Licensee. Licensee agrees to defend, indemnify and hold TICK DATA, its affiliates, members,
managers, officers, employees, representatives, agents, attorneys, successors, assigns, and TICK
DATA’s licensors with respect to Data, harmless from and against any and all claims, losses, damages,
liabilities, obligations, judgments, causes of action, costs, charges, expenses and fees (including
reasonable attorneys' fees and costs and such fees and/or penalties as any of TICK DATA’s licensors
may impose) arising out of (a) any breach or alleged breach by Licensee of this Agreement; (b) any
failure of Licensee to comply with the requirements of, or obligations imposed by any self regulatory
7
securities organization or securities exchanges of which Licensee, is a member of or is subject to, or
any other applicable regulatory authorities; or (c) any negligence, or willful or reckless actions or
misconduct of Licensee or Licensee's employees or agents with respect to the use of the Tick Data
system, the Data, and/or the Software Product. TICK DATA reserves the right to select its own
attorneys at Licensee's cost.
9. Confidentiality
9.1
General. Licensee acknowledges and agrees that the Data, the Software Product, and the Tick
Data system constitutes and incorporates confidential and proprietary information developed or
acquired by, or licensed to, TICK DATA. Licensee shall take all reasonable precautions necessary to
safeguard the confidentiality of the Data, the Software Product, and the Tick Data system, including at
a minimum, those taken by Licensee to protect Licensee's own confidential information that, in no
event, shall be less than a reasonable standard of care. Licensee shall not allow the removal,
eradication, or defacement of any confidentiality or proprietary notice placed on the Data, the
Software Product, and/or the Tick Data system. The placement of copyright notices on these items
shall not constitute publication or otherwise impair their confidential nature. Licensee shall maintain
the confidentiality of TICK DATA’s proprietary and confidential information for the term of this
Agreement and after the termination or expiration and nonrenewal of this Agreement for any reason.
9.2
Disclosure. Licensee shall not disclose, in whole or in part, the Data, the Software Product,
and/or the Tick Data system or other information that has been designated as confidential by TICK
DATA to any individual or entity, except for use in acceptance with this Agreement. Licensee
acknowledges that any unauthorized use or disclosure of the Data, the Software Product, and/or the
Tick Data system or any portion thereof may cause irreparable damage to TICK DATA and/or its
licensors. If an unauthorized use or disclosure occurs, Licensee shall immediately notify TICK DATA
and, at Licensee's expense, shall take all steps necessary to recover the Data, the Software Product, and
the Tick Data system and prevent subsequent unauthorized use or dissemination. If requested by its
licensors, TICK DATA may provide information and data to such licensors with respect to Licensee and
this Agreement. TICK DATA shall not disclosure, in whole or in part, any information that has been
designated as confidential by Licensee to any individual or entity, except for use in acceptance with
this Agreement. The parties acknowledge that the terms of this Agreement constitute confidential
information and that same shall not be disclosed to any third party; provided however that TICK DATA
may from time to time provide information relating to Licensee and/or this Agreement to its licensors
and data providers. Licensee consents to any such disclosure by TICK DATA.
10. Inspection and Audit Right
Licensee acknowledges that TICK DATA’s licensors and data providers may from time to time audit
TICK DATA and/or its licensees in connection with their use and access to data. At all reasonable times
during the term of this Agreement and for a period of one (1) year thereafter, TICK DATA and/or its
licensors shall have the right, upon no less than twenty four (24) hours notice to Licensee, to full and
free access to the relevant files, computers and/or equipment of Licensee to inspect the use of the Data,
the Tick Data system and the Software Product by Licensee. Licensee shall cooperate fully with such
verification and inspection. TICK DATA shall have the right to copy any item that Licensee may possess
with respect to a possible violation or breach of this Agreement and to remove any Data, access to the
Tick Data system and/or Software Product as a result of such violation or breach. Licensee will be
liable for the reasonable costs of any audit (including, without limitation, reasonable accountants' and
attorneys' fees and costs) that reveals a breach of this Agreement by Licensee.
11.
Miscellaneous
11.1
This Agreement constitutes the final, entire and exclusive agreement among the parties with
respect to the subject matter herein, and no representations, inducements or agreements, oral or
otherwise, not contained herein will have any force or effect. While the parties intend and expect that
8
all provisions of this Agreement are enforceable and valid, to the extent any provision hereof is deemed
unenforceable, all other provisions will continue to be fully enforceable as if the unenforceable or
invalid provisions were absent.
11.2
Licensee acknowledges and agrees that any breach of its obligations under this Agreement
with respect to the Data, the Tick Data system, and the Software Product and the other proprietary
rights and confidential information of TICK DATA or TICK DATA’S licensors will cause irreparable
injury to TICK DATA and/or the licensors, as applicable, for which there are inadequate remedies at
law and, therefore, TICK DATA and/or its licensors shall be entitled to equitable relief in addition to all
other remedies provided by this Agreement or available at law.
11.3
TICK DATA may modify the terms of this Agreement with ninety (90) days prior written notice
to Licensee, except for provisions relating to the discontinuance of licenses. If TICK DATA modifies the
Agreement, Licensee may terminate this Agreement or discontinue any licenses provided hereunder
with ninety (90) days written prior notice to TICK DATA.
11.4
All notices or approvals required or permitted under this Agreement must be given in writing
and sent by mail, courier or facsimile to the addresses set forth in the Contract. Licensee shall give
prompt written notice to TICK DATA of any change of the name, nature or address of Licensee's
business.
11.4
The relationship between Licensee and TICK DATA is that of independent contractors and
nothing contained in this Agreement shall be construed to constitute the parties as partners, joint
venturers, or agents of the other.
11.5
Neither party shall have any liability for any failure or delay in performing any obligation
under this Agreement (other than payments to TICK DATA) due to circumstances beyond its
reasonable control including, but not limited to, acts of God or nature, actions of the government, fires,
floods, strikes, civil disturbances or terrorism, or power, communications line, satellite or network
failures.
11.6
Licensee shall not assign, delegate or otherwise transfer this Agreement or any of its rights or
obligations hereunder, in whole or in part, without TICK DATA’s prior written consent; During any
time that Licensee has any balance owed to TICK DATA, Licensee shall not sell or transfer all or
substantially all of its assets or engage in an acquisition, merger or other transaction that will have the
effect of reducing the credit of Licensee available to satisfy its obligations under this Agreement.
11.7
This Agreement and all the rights and duties of the parties arising from or relating in any way
to the subject matter of this Agreement or the transaction(s) contemplated by it, shall be governed by,
construed and enforced in accordance with the laws of the Commonwealth of Virginia (excluding any
conflict of laws’ provisions which would refer to and apply the substantive laws of another
jurisdiction). The parties hereto agree to jurisdiction in the Commonwealth of Virginia and that the
proper venue for any dispute will be the Fairfax County Circuit Court or the United States District Court
for the Eastern District of Virginia, Alexandria Division and in the event that there is no other manner
of service hereby appoint the Secretary of the Commonwealth of Virginia. In any judicial proceedings
between the parties hereto or in the event that TICK DATA employs attorneys to enforce any rights
arising out of or relating to this Agreement, TICK DATA shall be entitled to recover reasonable
attorneys' fees, costs and expenses.
[END OF LICENSE TERMS AND CONDITIONS]
9
TickWrite 7.1 Data Management Software
User Guide
Using This User Guide ..................................................................................................... 1
Welcome to TickWrite 7.1 ............................................................................................ 1
Installation........................................................................................................................ 11
Configuring TickWrite ................................................................................................. 13
First Use ............................................................................................................................. 20
Jobs and the Job Explorer ........................................................................................... 25
Daily Updates and the Scheduler ............................................................................ 27
Creating Files of Equity Data .................................................................................... 30
Creating Files of Forex Currency Data .................................................................. 39
Creating Files of Futures Data .................................................................................. 45
Creating Files of Options Data .................................................................................. 54
Creating Files of Cash Index and Indicator Data .............................................. 62
Executing Jobs via the Command Line.................................................................. 68
Appendix A: Network Connectivity Requirements ......................................... 70
Appendix B: Special Notes for TickWrite on Microsoft Windows
Machines............................................................................................................................ 73
Appendix C: Special Notes for TickWrite on Linux Machines..................... 76
Appendix D: TickWrite Data File Change Report ............................................. 77
Appendix E: Moving a TickWrite Installation to Another Computer ...... 79
10
Installation
Tick Data delivers data by Internet download or external hard disk drive(s). The instructions for each
method differ slightly, and are detailed below in ‘Installing TickWrite 7’, sections 1a and 1b.
Some users are installing TickWrite 7 for the first time, while others may be upgrading an existing
installation to the latest version. In order to re-install TickWrite 7, the old version must first be uninstalled, which is detailed below in ‘Re-installing TickWrite 7’. Once the old version is un-installed, the
installation process is the same for a new TickWrite installation and for re-installations.
Compatibility
TickWrite7 is available for Windows and Linux. It should run on the following OS versions:
Windows
Windows 10
Windows 8/8.1
Windows Server 2012
Windows 7
Windows Server 2008
Windows Vista
Windows Server 2003
Windows XP Professional (SP2)
Windows 2000 Server (SP4)
Linux
RedHat Enterprise Linux 5
RedHat Enterprise Linux AS 4.0
SUSE Linux Enterprise Server 10
SUSE Linux Enterprise Server 9
NOTE: While TickWrite should run on most flavors of Linux, the only validated Linux OS is
RedHat Enterprise Linux 5.
In general, applications compiled for Linux require the following system libraries:
kernel 2.6.x
glibc 2.3 or above
NPTL 2.3 or above
Re-installing/Upgrading TickWrite 7
If you already have TickWrite 7 installed and are updating to a newer version, the existing version of
TickWrite 7 MUST be uninstalled first.
Uninstall TickWrite 7
1) If TickWrite 7 is currently open, please close the application.
2) Run the uninstaller. It can be found in the Tick Data Program Group: START –> Programs –>
Tick Data – >TickWrite7 –> Uninstall TickWrite, or go to the installation directory
(e.g. C:\Tick Data\TickWrite7\Uninstall.exe)
3) Select ‘YES’ to begin the un-installation process.
4) Once complete, click OK to close the Uninstaller window
11
NOTE: Certain components will purposely not be uninstalled, such as your data, job, and
output files.
Installing TickWrite 7
1a) Delivery by External Hard Disk Drive: Close all open programs. If you received an external
hard disk drive(s), plug the external hard disk drive box into a USB. Go to My Computer on your
desktop, and explore the hard drive. Download the TickWrite installer from our Software Downloads
page: https://www.tickdata.com/support/software-downloads/. Go to step 2.
1b) Delivery by Internet Download: Close all open programs. If receiving the data via internet
download, follow the instructions in the confirmation email, and follow the link to download the
TickWrite 7 installer. That link will take you to Tick Data’s website and ask you to Save or Run
TickWrite7_INSTALL.exe. You can either save it to your computer (remember the directory you
choose) or run it from the server. Go to step 2.
2) Click Next to begin.
1.
Read the License Agreement, and select ‘I Agree’ if you agree to the terms. NOTE: Once ‘I
Agree’ has been selected, the INSTALL button activates (at the bottom, left of window).
Clicking this button skips subsequent installation steps and installs the software using
all default settings (as described below). It is recommended to use default settings.
2.
You will then be prompted to install the application for the current Windows user only or for
anyone who uses your computer. Unless you have a reason to only install it for one Windows
login, select ‘Anyone who uses this computer’ and click Next.
3.
Choose the installation directory for the program (the data can be installed in a different
location during Configuration), and click Next. NOTE: It is strongly recommended to use
the default directory, C:\TickData\TickWrite7. Also, TickWrite 7 requires that the user
has WRITE access to the program directory.
a.
NOTE: If you are reinstalling and/or upgrading to a newer version of TickWrite,
you will receive a message stating “The selected location exists and is not
empty. Some files may be overwritten”. As you have first uninstalled the
previous version, the left over files represent your custom data and settings.
Therefore, simply click Yes to continue.
4.
Select your desired Program Group (default is recommended), and click Next.
5.
Select your preference for a desktop shortcut icon, and click Next.
6.
Confirm your settings, and click Next to begin installing the files.
7.
When prompted, click Finish to complete the installation.
Once completed, the Configuration Wizard will start. NOTE: If you do not see the Configuration
window on your screen, it may be behind an active window.
12
Configuring TickWrite
After installing the software, but before use, it must be configured for your Tick Data account. You will
use the same User ID and Password used to log on to Tick Data’s online store to complete configuration.
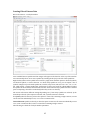
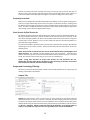
Here is Step 1 of the Configuration Wizard:
TickWrite 7 has two configuration options: Primary Installation and Workstation.
Primary Installation
This is the most common installation configuration. Each customer must have one and only one
primary installation. As many customers will have only one installation, this will be a primary
installation.
Generally, you must be connected to the internet to complete the configuration wizard for a primary
installation as it will download your account information and all necessary metadata from Tick Data’s
servers. If Internet connectivity it not possible, you will need to contact Tick Data to have a metadata
file generated and sent to you. Once you receive this file, check the Perform Offline Installation
checkbox and click Next. Browse to the metadata file you receive from Tick Data and it will import the
metadata and allow you to continue with the remainder of the wizard.
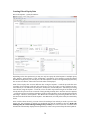
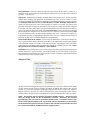
Otherwise, if you do have Internet connectivity, you should click the Test Connection to ensure that
TickWrite can reach Tick Data’s servers. If this connection is not successful, you may have Internet
13
connectivity that is restricted by the use of a proxy server. In this case, you may need to configure the
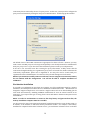
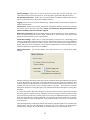
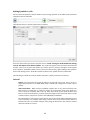
proxy server information by clicking the Proxy Server Details button. It will bring up this window:
The default choice of Use HTTP Connections is appropriate for almost all cases. However, you may
need to enter an HTTP proxy server host/port and possibly a user id and password for authentication
with your proxy server. If you do not have this information, please consult your IT department.
If the test is not successful even after entering the proxy information, it likely means that the
connection is being blocked by your organization’s proxy server or firewall. For details on the network
connectivity requirements, please refer to Appendix B. You may also need to consult with your
organization’s network administrator for assistance if any firewall changes need to be made.
NOTE: If you cannot successfully connect to Tick Data’s server using the Test Connection button,
do not continue with the configuration. You will not be able to complete installation of
TickWrite 7.
Workstation Installation
If you wish to run TickWrite on more than one computer, one of the installations must be a Primary
Installation, and subsequent machines must run TickWrite in Workstation mode. Workstations are
designed to support multiple users co-located at a single location such as an office building (on the
same Local Area Network). Installing TickWrite workstations for users in remote locations is not
supported. If you require this type of setup, please contact Tick Data to obtain an enterprise license
for TickWrite.
NOTE: In order for workstations to connect to the deep history and generate data files, the
Primary Installation computer must be accessible.
You do not need to enter a user name and password, but will instead need to enter the host name, or
IP address, of the machine on which the Primary Installation resides. For example, if the Primary
Installation’s computer has the name “tickwrite-server”, you would enter “tickwrite-server” in the host
14
field. Alternatively, you can enter an IP address into the host field. In this case, you must install the
TickWrite server installation on a machine with a static IP address.
To confirm that the host address is valid, click Test Connection. If the connection is not successful, it
could mean that this machine cannot access the primary host or that the TickWrite Service is not
running on the primary host.
Once the connection has been confirmed, click Next.
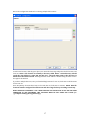
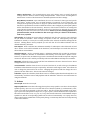
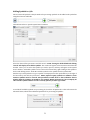
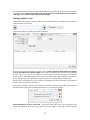
Data File Location Configuration
If you are upgrading from a previous installation of TickWrite 7, you will be asked if you wish to keep
the existing configuration:
Selecting ‘Yes’ will skip the next screen and go directly to the Finish step.
If you select ‘No’, or if you have not installed TickWrite 7 before, you must configure a new data file
location in this window:
15
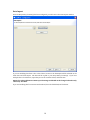
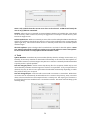
TickWrite 7 allows for the data to be stored in a single location or in multiple locations on a computer
or network. NOTE: Deep History file locations can be changed after configuration is complete
in SETUP -> Preferences -> DEEP HISTORY LOCATIONS.
Selecting Install Data Files to a Single Location gives you the ability to choose one directory on your
computer or network in which all Deep History files will be stored. Select the desired location (the
Deep History files will reside in subfolders of your selected directory) by browsing to or typing in the
path to the directory (using the universal path to the directory if on a network or another computer).
Selecting Install Data Files to Multiple Locations allows data sets to be stored in separate locations. This
feature is especially useful for clients who license data sets too large to fit on a single drive. Data from
different time periods within the same data set can also be stored in separate locations. For example,
Futures data can be stored on one drive, U.S. Equity data from 1993-2006 can be stored on a separate
drive, and U.S. equity data from 2007 to present can be stored on a third drive.
16
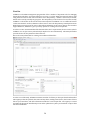
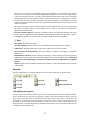
Here is the configuration window for selecting multiple file locations:
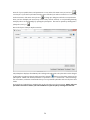
To add a new location, click the green ‘plus’ icon. Enter the date range and path to the file location, and
click OK. NOTE: This location is normally a directory called ‘DATA’. In this directory should
reside the data folders (i.e. FUT, IDX, US_TED, etc.). The path must point to the directory in
which these data folders reside. Existing locations can be edited or deleted using the other icons to
the right of the window.
If you have multiple data sets, once you finish adding locations for one set, click Next to add locations
for the next set.
Once Deep History locations have been set for each data set, click Next to continue. NOTE: Data file
locations must be configured for all data sets and date ranges before proceeding to next step.
WHEN POINTING TICKWRITE 7 TO A DEEP HISTORY LOCATION THAT IS NOT ON THE SAME
COMPUTER AS THE SOFTWARE, THE LOCATION MUST BE SET USING UNC PATHS (i.e.
\\[computer name]\[drive]\[directory]).
17
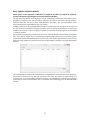
Data Import
Once the Deep History location(s) has been configured, you will come to the Data Import window:
If you are installing data from a disc or hard drive, browse to the dataimport.tdi file included on the
hard drive and click Import. The data will be copied to your Deep History location(s). If you have
multiple discs or hard drives, repeat this process for each hard drive, and click Next.
NOTE: The Advanced button contains special settings and should not be changed unless directly
advised by Tick Data.
If you are installing data from an internet download, leave the field blank, and click Next.
18
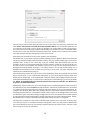
Downloading Data Updates
If you are receiving the historical data you ordered via internet download, and/or if you subscribe to
daily updates, the final step is to download the latest data available:
This is how clients with internet delivery will download their data. It is also how clients receiving data
on disc or hard drive who subscribe to updates receive data that has become available since their
orders were shipped. Click the Download Orders button to download data and/or updates from Tick
Data. NOTE: This could be a long download depending on the symbols, time period, and data
type requested. Downloading can be deferred until after installing by simply clicking ‘Next’
without clicking the Download Orders button. Once the software is installed, download the data
by clicking Actions -> Check For Updates in the main TickWrite window.
Once this step is completed, click Next and then when prompted, click Finish.
19
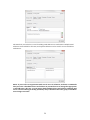
First Use
TickWrite is a database management program that offers a number of important tools for managing
historical intraday data. Its primary function is to create, or ‘collect’ ASCII (pronounced ‘AS-key’) files
using the data stored on the user’s hard drive in the ‘Deep History’. ASCII is a universal text format,
which can be read by virtually any program. The ‘Deep History’ is the location of source files used by
TickWrite 7. These files can be stored on the same computer as TickWrite 7 or on a different location
on the same network. In fact, TickWrite 7 allows users to store the ‘Deep History’ in multiple locations.
While clients can now access the source data without TickWrite, as the source data are now stored in
zipped ASCII files, TickWrite 7 gives you many options for creating custom output files.
In order to create custom ASCII data files that match the user’s requirements, the user creates Jobs for
TickWrite 7 to run (see section Jobs and the Job Explorer for more information). The main Job window
provides choices for the parameters that can be set.
Here is the main Job window for creating custom historical data files:
In order to run efficiently, TickWrite maintains an index of all data you have purchased and installed.
This registry tracks the symbols, their start and stop dates, trading session hours, the location of these
files on your hard drive, and other information needed to create output files. The registry is created
automatically during the installation process and is updated every time you download or import data
files after installation.
20
Asset Classes
When running TickWrite, the user must first select an asset class tab from the top of the window:
TickWrite currently supports Equities, Forex, Options, Futures, Indicators, and Indices. NOTE: Tabs
will only appear for the asset classes you have licensed. For example, when available, clients with
equity data will have up to three separate equity tabs: Equities – Quote, Equities – Trade, and Equities
– One Minute. Each tab has specific features that are discussed in detail in the ‘Creating Files of Equity
Data’ section.
Main Menu
Within each asset class, the user selects symbols, date ranges, and a number of other parameters
required to generate custom ASCII files. At the top of the screen are five main menu items. The
following describes each item.
1. File
New Job: Clears the current job and allows user to enter parameters for a new job. The user is
asked to save the current job if changes were made.
Open Job: Allows user to browse for saved jobs.
Job Explorer: Brings up a window that lists all jobs that are saved in the default directory. NOTE:
A Jobs directory must first be set in SETUP -> Preferences. Using Job Explorer, you can run
multiple jobs at once.
Save Job: Saves the current parameters for generating ASCII files as a job.
Save Job As: Allows user to save the current parameters as a new job.
Exit TickWrite: Exits the program.
2. Setup
Preferences: This is the layout of the Preferences window:
21
General Settings: Allows user to choose directories for Job files and job result logs. If no
‘Alternate location for Job result logs’ is set, result log will be generated in Output directory.
GUI Startup Preferences: Allows user to specify location of TickWrite window after startup.
This is especially useful for clients with multiple monitors.
Logging: Allows user to set level of detail for logs. Used primarily by Tick Data Tech Support to
diagnose and fix issues.
Performance: Allows user to specify the number of ASCII files, ZIP files, and processor threads
that can be open or run at the same time. NOTE: You should not change the default values
unless advised by Tick Data customer support.
Mail Server Properties: Input valid SMTP settings to allow TickWrite 7 to allow TickWrite to
send out email notifications from the main Job window or the Scheduler (see section Daily
Updates and the Scheduler for more information).
Connection Settings: Allows users to enter/edit details of a proxy server. Depending on the
network configuration at the customer’s site, this information may be necessary for TickWrite
to communicate with Tick Data’s update servers. Please consult with your IT department to
obtain your proxy server information. Also, please see Appendix B for more information on the
network connectivity requirements of TickWrite.
Equity Preferences:
settings.
(for licensed Equity users only) Allows users to specify Split Adjust
The first preference determines what splits will be considered when split adjustment is selected
on a job. By default, only splits that occur within the extraction date range are considered. This
results is data that is split adjusted as it would have been on the end date of the extraction. For
example, if an extraction job is set for company ABC for 1/1/1993 – 12/31/1999, it would be
adjusted for all splits occurring through 12/31/1999 but NOT adjusted for splits occurring after
that date.
If, on the other hand, “Adjust For All Splits” is selected, extracted data is adjusted for all splits
that occurring in a company’s history, regardless of extraction range. Please note that you must
have a data license on the day on which a split occurs to have an adjustment made. For example,
if you purchased data for company ABC from 1/1/1993 through 12/31/1999, you would only
be able to adjust for splits occurring until 12/31/1999 because you do not have a data license
after that point.
The remaining settings on this page related to the number of decimal points to be used with split
adjusted data. Because split adjustment calculations can often result in long floating point
numbers, these settings can you the ability to round the data to your desired precision.
22
Futures Preferences: (for licensed Futures users only) allows users to specify advanced
settings related to Futures contract rolling and adjustments. Please see the “Creating Files of
Futures Data” section of this document for detailed explanation of these settings.
Deep History Locations: Upon installation, the user set locations for data types and specific
date ranges. In this section, user can make changes to location(s) of source data files. For
example, if a deep history becomes too large for a particular drive, the user can specify that all
data after a specific date be stored in a different location. Once changed, any subsequent updates
will be downloaded to the new directory. However, if the location of data for an existing date
range (already downloaded and resident on the user’s hard drive) is changed, the user must
manually move the source files to the new location. NOTE: If you are receiving updates for a
particular market, set the end date for that asset type’s entry to a date far in the future,
such as 12/31/2099.
Tab Defaults: By clicking Set Current Values as Default for Tab, the user can save every setting on
the job window as defaults. These settings are specific to that tab. Subsequently, every time
TickWrite is started (or a new job is created) and that tab is selected, the default settings will be
selected. Clicking Restore Factory Defaults for Tab will clear all user-defined defaults and use
defaults defined by Tick Data.
Data Import: Used to add data into TickWrite manually for subsequent orders delivered via hard
drive. Browse to the .tdi file included on the hard drive, and click Import to transfer the data from
the hard drive into TickWrite.
Metadata Import: Used to manually import a TickWrite metadata file provided by Tick Data.
Normally, TickWrite metadata is downloaded electronically from Tick Data’s update servers.
However, in special cases, Tick Data may provide a metadata file that should be imported using this
menu item. Browse to the .mdi file provided by Tick Data and TickWrite will import its metadata.
Migration: Allows the user to convert job files from TickWrite 6 format to the new format. Please
see Appendix A for more information.
Account Details: Window show the user’s account id and user id, as well as the type of TickWrite
installation. This information may be requested by Tick Data’s Tech Support team. Also allows the
user to change the password for the account. Changing this password will also change the user’s
password for the online store. The User ID cannot be changed.
Scheduler: Opens the scheduler, which allows users to schedule update downloads and jobs to run
automatically. See below section “Daily Updates and the Scheduler” below for more information on
using the scheduler.
3. Actions
Execute Job: Runs the current job.
Import Symbol List: Some data collecting jobs may have many symbols. In order to select multiple
symbols quickly, users can save a text file with a list of desired symbols (or Tick Data IDs). First,
create a new text file in Notepad or other text editor. The file can then be formatted in two ways:
type or paste one valid symbol or ID per line, or type or paste a comma-delineated list of symbols or
IDs. Then save the file as a .txt, .csv, .prn, .asc, or any other text file extension. Click ACTIONS->Import
Symbol List, and the corresponding symbols will be selected automatically. For equity data sets,
which contain many symbols that can frequently change, a custom map date can be used by entering
a date in the window:
23
NOTE: Only symbols from the current asset class can be selected. TickWrite will notify the
user of any symbols it cannot find.
Reindex: Allows the user to manually recreate TickWrite’s database of available data. This should
not be necessary under normal use, but may be suggested as a remedy for certain issues by Tick
Data’s Tech Support team.
Refresh Symbol List: While not commonly an issue, if the user has multiple TickWrite installations
and the one installation downloads new data, the screen on the workstation may not automatically
update right away. This selection allows the user to manually refresh the list of available symbols
and date ranges.
Check for Updates: Opens a dialogue box from which user can check for data file updates. NOTE:
User must be subscribed to Tick Data’s update service and be online to receive data updates.
For more information see ‘Daily Updates and the Scheduler’ below.
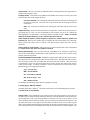
4. Tools
Update Metadata: Downloads any new metadata (holiday calendar, exchange session times, etc.)
Normally, all necessary metadata is downloaded automatically at the same time data updates are
downloaded. However, Tick Data support may instruct a customer to manually download metadata
to quickly resolve a specific problem.
Data File Integrity Check: Checks current deep history files for corruption; should only be used
when advised by Tick Data customer support to search for corrupted files. If any corrupted files are
detected, they may be able to have replacements downloaded automatically depending on which
files (and how many) are corrupted.
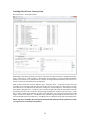
Data File Change Report: Tick Data will at times make corrections to certain data. While these
corrections will be automatically downloaded into the customer’s deep history, many customers
desire to know what files have been impacted since a certain point. This report gives customers a
list of files that have been modified since a certain date and time. This menu item will bring up the
following dialog:
24
The customer can choose a certain Market (e.g. Futures, US Equities, etc.) and Data set (e.g. Trades,
Quotes, etc.). If a customer is licensed for multiple markets/data sets, they can use the *ALL* choice
to process all markets/data sets. Secondly, a date and time must be entered. This report will include
all files updated since this date and time (in the customer’s local time zone). Finally, enter or browse
to a file where the report should be generated and click Generate Report. Depending on the amount
of data for which a customer is licensed, the report will take anywhere from a few seconds to several
minutes to generate.
The change report generated is an ASCII file that is human readable but that can also be easily parsed
by a script or program that the customer might choose to develop. The format is documented in
Appendix E of this document.
Data File Inventory Report: Generates an inventory report of the data files included in the deep
history. This is a diagnostic tool that Tick Data support may ask a customer to generate in order to
troubleshoot a problem. It is not used by a customer during normal use of TickWrite.
5. Help
User Guide: Opens this User Guide.
Tick Data Website: Opens a web browser to Tick Data’s home page if the user is online.
Online Store: Opens a web browser to Tick Data’s online store if the user is online.
Test Connection to Update Server: Tests your ability to connection successfully to Tick Data’s
update server.
Send Email To Tick Data: Opens a dialog for sending for e-mail a message to Tick Data customer
support and easily attaching relevant files that might be required for troubleshooting. NOTE: Mail
Server Properties under Setup -> Preferences must be correctly configured before using this
feature.
About: Displays version and build information of TickWrite 7 (the version number is in the title bar
of this dialog).
Menu Bar
Below the Main Menu is a menu bar with shortcuts to the most commonly-used menu items:
New Job
Open Job
Job Explorer
Save Job
Save Job As
Import Symbol List
Run Job
Jobs and the Job Explorer
Jobs are created by selecting symbols, dates, and processing parameters on the main Job window.
These can be saved to a directory and opened to quickly retrieve the parameters and run a process
again. This is especially useful if a client subscribes to daily updates and wishes to run the same job
each night once the database has been updated. The process can be further automated by using the
Scheduler to automatically download updates and then run a Job to create custom ASCII files, all
without the user even interacting with the TickWrite user interface (see section Daily Updates and the
Scheduler for more information).
25
Once all of your symbols, dates, and parameters are set, either click FILE-> Save Job, Ctrl-S, or
to
save the Job. If you select a Job name already in use it will ask if you wish to overwrite it. To save a job
with a new name, click FILE-> Save Job As or
to bring up a dialog box and select a new Job name.
Once you have multiple Jobs saved, they can be easily viewed, selected, or run (including batching
multiple jobs to run sequentially) by opening the Job Explorer. This can be opened by clicking FILE->
Job Explorer, Ctrl-J, or
.
Here is the layout of the Job Explorer window:
The Job Explorer displays all TickWrite jobs residing in the Job Folder. The Job Folder can be changed
by browsing or typing into the Job Folder text field. Click the
button to refresh the contents of the
Job Explorer. NOTE: The default Job Folder is specified in Setup -> Preferences-> General Settings.
For convenience, Tick Data recommends that you set up a default job folder and save all jobs in that
folder.
By using the Ctrl and Shift keys, multiple Jobs can be selected at once for processing. NOTE: Only one
Job can be selected at a time if you wish TickWrite to open the job by clicking Load Selected.
26
Daily Updates and the Scheduler
NOTE: Please review Appendix C (Windows) or Appendix D (Linux) for important, platformspecific information regarding the use of the TickWrite Scheduler.
The Tick Data Deep History can be kept up to date by subscribing to Tick Data’s daily update service.
Available for equities, Forex, futures, indices, indicators, and options, this service allows clients to
download data files each day to keep their databases up-to-date. For more information about
subscriptions, please call Tick Data or visit our website.
TickWrite can be set to automatically download data at a specific time and day, and even run Jobs once
the data has been downloaded, using the Scheduler. Data can also be downloaded directly from the
TickWrite user interface without using the scheduler. To manually download updates, click ACTIONS
-> Check for Updates.
The Scheduler is an easy way to automate the processes of downloading data and creating custom ASCII
files. The Scheduler allows users to schedule downloads and Jobs separately or group them together
to download updates and immediately start a Job or Jobs. Once a Job or Jobs have been created on the
main processing window of a particular asset class, click ACTIONS-> Scheduler to bring up the Schedule
Explorer:
The Schedule Explorer displays all scheduled items, along with their Active/Inactive status, frequency,
information on when they run, and each operation’s last result. By clicking or right-clicking on a
Scheduler item, you can edit, delete, activate/deactivate, or run immediately. Click the green plus sign
on the right to create a new Scheduler item, or click Edit, and it will bring you to the Schedule Editor
window:
27
The top section of the Schedule Editor window lets you set the name, day, frequency, and time for the
item. NOTE: Once an item is created, the name cannot be edited. You can schedule updates to run
on certain days of the week or once a month. For example, you could configure a task to run every day
at a certain time by selecting Day(s) of Week and checking every weekday. To have a scheduled task to
run just once a week, only check the desired day of the week. Finally, to have a job run once a month,
select Day of Month and enter the appropriate day of the month.
At the bottom of the window are three tabs: Updates, Jobs, and Emails.
The Updates tab, as seen above, can be activated by checking Check for Updates. When activated, it will
use the day and time settings to download daily updates. Only one market and data type can be set per
Scheduler item. If data for the current day is not yet available when the schedule task runs, the
Scheduler can be set to retry downloading data a specific number of times at a set interval in the case
the data or server is not available. For example, if you were to set up a task to download new data at
midnight and entered Number of Retries = 5 and Retry Interval = 30, the task would initially run at
midnight and if new data was not available, it would retry at 12:30, 1:00, 1:30, 2:00, and finally 2:30
until data was available before giving up.
The scheduled task can also be set up to issue e-mail notifications when the download was successful
and/or unsuccessful. To be notified with information on a successful data download, check Send
Update Success Notification. To be notified with a task fails without downloading new data, check the
Send Update Failed Notification. You will need to configure the e-mail address(es) to alert on the Email
tab. NOTE: An outgoing mail server must be set up in the Preferences window. See Mail Server
Properties for more information.
Additionally, when the task is set up to retry multiple times, a warning notification can be sent out if
the download of new data fails before the task terminates. This allows an administrator to be notified
of a failed data download preemptively while the task will continue to retry in the background. To
configure this, check the Warn after every checkbox and enter the number of failed retries after which
a warning should be sent out. For example, consider a task set up to run at midnight with 4 retries that
are 60 minutes apart. If the Warn setting is configured for 2 retries, an administrator would be warned
at 2:00 (after the first two failed attempts), then at 4:00 (after the second two failed attempts). Finally,
the administrator would be notified after the final failed attempt at 5:00 if so configured.
The Jobs tab, as seen below, can be used to schedule a Job or Jobs to run at a set time on specific days,
or to add a Job or Jobs to a scheduled automatic daily update. In the case of the latter, TickWrite will
first run the download, and once successfully completed, will execute the Job or Jobs. The Job or Jobs
must already be saved to be scheduled.
28
The Emails tab, as seen below, is used for adding email addresses to notifications. Multiple email
addresses can be added for each item, and separate addresses can be used for success and failure
notifications.
NOTE: If you work in an organization with several users of TickWrite, Tick Data recommends
that you create a distribution list e-mail address on your mail server to manage the appropriate
e-mail addresses. This way, you can just use the distribution list e-mail address within the mail
server and avoid having to modify potentially many scheduled tasks if the group of TickWrite
users changes over time.
29
Creating Files of Equity Data
Here is the Equities – Quote Job window:
Depending on the data purchased, you may see only one equity tab titled Equities or multiple equity
tabs: Equities – Quote, Equities – Trade, and Equities – One Minute. If, for example, you only purchased
One-Minute Equity Data, you will only see a tab titled Equities. Clients receiving Tick Equity Data may
also receive one-minute. These will cause both tabs to be displayed.
Each of these equity tabs accesses different data. Using the Equities – Trade tab provides the most
versatility for processing trade-only data, and from it a user can create not only tick bars but also
interval bars (i.e. one-minute bars), daily bars, weekly bars, and monthly bars. And when processing
interval bars using the Equities – Trade tab, a user can filter output data using all of the fields of the
tick-by-tick file yet write it out to interval or daily/weekly/monthly bars. However since the Equities
– Trade tab accesses a much larger database of tick-by-tick trade data, any processing performed will
take longer. Therefore, if the Equities – One Minute tab is available, any processing of data into files of
bar intervals should be done from the Equities – One Minute tab, as it will perform the job considerably
faster.
Once a tab has been selected, you must choose the Exchange from which you wish to process data.
Again, only the exchanges for which you purchased data will be available in the list. NOTE: the
Exchange may be a non-exchange trading venue (i.e. MTF). Once selected, the list of available data
will NOT be automatically displayed in the symbol list, as this can represent many thousand symbols.
30
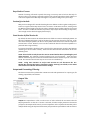
Adding Symbols to a Job
The user must add symbols to the Job window for processing. Symbols can be added to the symbol list
using these buttons and fields:
Click the binoculars to open the Symbol Search window:
Select the desired filter parameters and click Search. NOTE: leaving the fields blank and clicking
‘Search’ will display all available symbols. The results will appear in the Instrument Search Results
window. There you can select the symbols you wish to process, and they will appear in the Symbol
Search window. Individual symbols can be removed if not desired by right-clicking on the symbol in
the list and clicking remove. Click OK to add the symbols to the symbol list in the Job window.
Another way to add symbols is to type a symbol or Company ID into the quick add box (to the right of
the binoculars) and click the plus button. NOTE: Japanese equity symbols are numeric. These
numeric symbols must be entered with quotations around them so that TickWrite doesn’t
mistake them for Company ID numbers. For example, Matsui Securities Co. has a Company ID
1801 and the symbol is 8628. In order to add by symbol you must type “8628”.
To include all available symbols in a processing job, check the All Symbols box. This will activate the
Advanced button, which offers additional parameters for processing all symbols:
31
Name Instruments As They Traded On: Leaving this blank will use the current symbols for all
companies regardless of the date range selected in the Job window. Selecting a date will use the
symbology as of that date. For example, if you are working with symbols that you know to be a few
years old (that may have different symbols today), you might enter a date as of a few years ago in this
field so that the symbol naming convention used by TickWrite more closely matches the symbology
that you are familiar with.
Only Includes Instruments Active As Of: Leaving this blank will result in all active and inactive
symbols being included in the processing job (for the date range specified in the processing job). If
you select a date, TickWrite will only process symbols that are listed on that date. For example, you
may want to extract all symbols from 1995 – 2000 but include only those companies that are still
trading today. In this case you would enter today’s date in this field.
To check many symbols at once, you can import a list of symbols. Simply list your desired symbols in
a text file, one per line, and save it as a ‘.txt’, ‘.csv’, or ‘.asc’ file. Click FILE -> Import Symbol List, and
browse to select your saved file. When OPEN is clicked, the symbols in the file will be checked in the
data list. See section Import Symbol List in the First Use section) NOTE: Any symbols that were listed
prior to importing a list will be removed (unless they are also on the list).
Selecting Job Parameters
Once you have selected the desired equity symbols for processing, select the parameters in the middle
of the window to suit your requirements. The screen will activate different settings depending on: 1)
how many symbols are selected; 2) the Granularity selected, and; 3) the Output To selected.
The following are details for each Job window parameter:
Interval
Trades: The output file will contain all trades tick-by-tick for the selected time period. Since
a ‘tick’ is a single data point, there is no OPEN, HIGH, LOW, or CLOSE; just a single price at
which a trade occurred. Users will also note that there is no way to output ‘Tick Count’ when
Trades is selected as the Interval. This is because each tick has a ‘Tick Count’ of 1. NOTE:
This Interval setting is not available on the Equities – One Minute tab.
Tick Based Bars: Users can also write data out as multi-tick bars. When Tick Based Bars is
selected, users can define the number of ticks that will comprise each bar, instead of using a
time interval to constrain a bar. In the Granularity box, you must specify the number of ticks
per bar. Each line of data in the output file is time-stamped with the time of the last tick in
each bar.
Time Based Bars: When selected, TickWrite outputs files of any desired intraday time
interval from 1-second bars up. NOTE: This is trade data only, as TickWrite 7 cannot write
out time based bars of quote data. Each line of data can contain Date, Time, Open, High,
Low, Close, Volume (if available), Tick Count, Up Ticks, Down Ticks, and/or Same Ticks
for that interval. In the Granularity box, you must specify the length of a bar interval in
whole seconds or whole minutes. Adjacent is a field to select MINUTES or SECONDS.
The timestamp for each interval represents the data of the period ending immediately prior
to the timestamp. For example, when using 5-minute bars, the 8:35 bar contains data from
8:30:00 to 8:34:59. As another example, when using 30-minute bars, the 4:00 bar contains
data from 3:30:00 to 3:59:59.
Daily/Weekly/Monthly Bars: These intervals will output files of 1-day, 1-week, or 1-month
intervals, respectively.
Quotes: The output file will contain all quotes (Level I bids and offers) for the selected time
period. Since a ‘tick’ is a single data point, there is no OPEN, HIGH, LOW, or CLOSE; just a single
price at which a trade occurred. Users will also note that there is no way to output ‘Tick Count’
32
when Quotes is selected as the Interval. This is because each tick has a ‘Tick Count’ of 1. NOTE:
This Interval setting is not available on the Equities – Trade or Equities – One Minute
tabs. Quote data is much larger in volume and size than Trade data, and therefore
processing times will be considerably longer.
Split Adjust
Checking this box will cause the output file(s) to be adjusted for stock splits and stock
dividends. If the box is unchecked, the output file(s) will not be adjusted and split gaps will
exist in the prices. However, the split and dividend information can be obtained by checking
Company Info (discussed below). For clients planning to add data to a database and analyze
data pre-split, this may be a better option than adjusting.
When checking this box, there are a few other global settings that will impact the output from
the job. To configure these settings, go to the Setup menu and select Preferences. Select the
Equity Preferences item. This displays the following split adjust related settings:
The radio buttons determine what splits will be considered when adjusting. By default, only
splits that occur within the extraction date range are considered. This results in data that is
split adjusted as it would have been on the end date of the extraction. For example, if an
extraction job is set for company ABC for 1/1/1993 – 12/31/1999, it would be adjusted for
all splits occurring through 12/31/1999 but NOT adjusted for splits occurring after that date.
If, on the other hand, “Adjust For All Splits” is selected, extracted data is adjusted for all splits
that occurring in a company’s history, regardless of extraction range.
NOTE: that you must have a data license for the day on which a split occurs to have an
adjustment made. For example, if you purchased data for company ABC from 1/1/1993
through 12/31/1999, you would only be able to adjust for splits occurring until
12/31/1999 because you do not have a data license after that point.
Also, when adjusting for stock splits, both price and volume are adjusted which can often cause
these field to become long decimal values. You can configure the number of decimals to use
for each field here. Additionally, you can configure whether trailing zeroes should be
removed. For example, if price decimals is set to 4 and an adjusted value is calculated to be
10.25, selecting Remove Trailing Zeroes will result in a printed value of “10.25”, whereas
leaving this option unchecked will result in the printed value “10.2500”.
Setting number of decimals to zero will result in the value being rounded to the nearest whole
number. For example, if it is not desirable to have fractional volumes, the Volume Decimals
can be set to zero to prevent this (in this case the Remove Trailing Zeroes setting has no effect).
33
NOTE: The price decimals set above are always overridden by a Price Decimals value
supplied in the job file (see the Formatting/Filtering section below).
Company Info
Will include a folder in the Output Directory that contains information about each security
processed in the Job, including splits, dividends, and mergers, as well as translation
information for converting Tick Data Company IDs to current ticker symbols. For more
information about the contents of the CompanyInfo folder, please see the File Format Guide for
the corresponding exchange, located on your data disc/drive and also available on Tick Data’s
website: http://www.tickdata.com/html/downloads.shtml
Empty Intervals
These selections are not active when Trades, Tick Based Bars, or Quotes are selected as the
Interval. For all other intervals, they give important options for handling empty time intervals.
Empty intervals occur when there are no trades during the full length of a bar.
Skip Empty Intervals: Any interval without data is excluded from the file. There will not be
a timestamp. The only drawback to this method comes if a user is working in a spreadsheet,
as there will not be an equal number of prints each day.
Hold Last Value: Holds the value of the close of the last bar to have a price through all
intervals until another price occurs. This guarantees the number of bars per day is constant,
but creates artificial bars.
Fill With Zeroes: Any empty interval will have a zero (0) value for the Open, High, Low, Close,
and Volume. This also guarantees the number of bars per day is constant, but if it is graphed,
the zeroes will cause the chart to be useless.
Extend Last Interval
Active when Time Based Bars is selected at the ‘Interval’, this parameter is useful if there are
not an even number of intervals in a single day, based on the bar interval the user selected in
Granularity. For example, the U.S. stock market opens at 9:30 and closes at 16:00 EST. If the
user selects ‘60’ for the Granularity, there is not an even number of 60-minute bars in the day.
If Extend Last Interval is not checked, there will be a 16:30 bar that only contains 30 minutes
of data (15:30:00-15:59:59). However, if Extend Last Interval is checked, the last bar of the
day will be a 15:30 bar that contains 90 minutes of data (14:30:00-15:59:59).
Ignore Filtered Prices
Active when creating Tick or Time Based Bars from Tick Trade data, this parameter allows
the user to generate bars using raw, unfiltered prices. If unchecked, bars are built using prices
that may be altered by Tick Data’s proprietary price filtering algorithm. NOTE: Also see
section on Formatting/Filtering tab for information on ‘Use Excluded Records in
Output’ parameter.
Begin Date/End Date
By default, the begin and end dates will both say MM DD YYYY. When MM DD YYYY is displayed,
the complete date ranges for each individual symbol in the list of checked symbols will be used
by the corresponding symbol. However, this can be overridden by entering begin and/or end
dates in the appropriate boxes.
The buttons to the right of the YYYY field will pull up calendars that can assist users to enter
dates.
34
Days Back to Process
Instead of creating a file with a specific date range, a user may want to look at data only for
the past x days. This setting is especially useful if such a client subscribes to daily updates, as
a file can be updated automatically each night to only reflect trading for the past x days.
Session(s) to Include
Many stock exchanges offer extended trading hours in addition to their regular trading hours.
In the U.S. regular market Day Session hours are 9:30 to 16:00 EST. However, trading in the
Pre-Market session begins several hours earlier, and After-Hours trading continues for several
hours. In order to include Pre-Market, Day Session, and/or After-Hours trading in output files,
users simply need to check the appropriate box(es).
Start Session At/End Session At
By default, the Start Sessions At and End Sessions At fields are inactive and display 00:00. Set
this way, TickWrite will write out all of the data for the sessions chosen for each day. If the
user selects multiple symbols, the file for each symbol will be written out with the respective
session hours of each. However, users can also confine the data for all selected symbols to a
particular time range each day.
To activate these fields, check the boxes to the left of the Start Sessions At and/or End Sessions
At fields (you can use either or both). Then enter the desired hours and minutes in 24-hour
(military) time.
NOTE: These fields can only be used to restrict normal market hours (including day and
night sessions). For example, if normal markets hours run from 07:00 – 19:00, the Start
Session At must be equal to or after 07:00 and the End Session At must be equal to or less than
19:00. The custom session hours may not cross over two market days.
NOTE: Using Start Sessions At and/or End Sessions At will deactivate the PreMarket/Day Session/After-Hours checkboxes under Session(s) to Include, as the times
entered will override the standard session settings.
Output and Formatting/Filtering
The bottom section of the Job window contains two tabs with parameters for output type, file
naming, output fields, and formats.
Output Tab:
Output To: Output data to a file or to the screen. If File is selected, the user must select the
Output parameters on the tab. If Screen is selected, all other Output parameters deactivate
(except for the Output Fields section). Screen output data can be copied in the window (select
multiple fields using the Shift and Ctrl buttons) and pasted into spreadsheets and text editors
35
like Word or Notepad. NOTE: Pasted data will use the Delimiter set in Output Fields; in
order to copy fields into separate cells in a spreadsheet, use Tab as the delimiter.
Compression: The user can write out ASCII files that are unzipped (full-size output files) or
compressed using Zip or Gzip.
If Output Exists: Determines how TickWrite will handle file creation if a file by the same
name already exists in the output directory.
Overwrite Existing: The existing file will be deleted and recreated according to the
parameters in the job. The user will not be warned that the existing file will be
overwritten.
Append Updates: When selected, TickWrite will attempt to append data in an
existing file using data generated by the job. This selection should primarily be used
by clients who subscribe to daily updates and have jobs scheduled to download and
process out the same data every day. It will decrease processing time, as the job will
begin where the existing file leaves off.
Skip: The extraction job will leave the existing file untouched and not extract new
data.
Output Directory: Enter the desired location of output files. This must be chosen prior to
processing data to a file. As with all parameters, this location can be set as a default by
selecting SETUP -> Tab Defaults -> Set Current Values as Default for Tab. NOTE: As with all
defaults, the Output Directory set in a tab will only affect that tab.
Name Output by Symbol / Name Output by Company Id / Name Output By Symbol and
Company id: Will use the symbol and/or company ID of the instrument as the filename.
These options also allow users to include a file prefix and/or suffix and select the file
extension.
Email Job Notification: Once you have entered valid SMTP server settings in Preferences,
enter a valid email address in this field to email notifications of Job success or failure, along
with an attached .twj Job file.
Name Output by Custom Value: Allows the user to choose the filename of the output ASCII
file. NOTE: Active only when one symbol is selected.
DATE WILDCARDS IN FILE PATHS: TickWrite7 supports date wildcards that can be used in
the output directory, file prefix, file suffix, and custom file name. The wildcards will resolve to
the current date and/or time as of when the collection job is first executed. This can be used
to dynamically create new directories/files based on the current date without the need to
create custom scripts. To utilize a wildcard, it must be denoted by ${ and } in the literal value.
The following are the supported wildcards:
yyyy – current year
MM – current month
dd – current day of month
HH – hour of day (0 – 23)
mm – minute of hour
For example, the following output directory might be entered:
C:\temp\${yyyy-MM-dd}\TRADES
Assuming that today is April 16th, 2010 this would resolve to the following directory name:
C:\temp\2010-04-16\TRADES
36
Output Fields: Active whether the user selects Screen or File as the ‘Output To’, here the user
can make choices about the fields within the data file. The field delimiter can be chosen here
by selecting Space, Tab, or by entering whatever character you wish to use (comma ‘,’ is the
most commonly-used character). Finally, choose the fields you wish to include in the file. The
up and down arrows to the right of the Field Name list allows users to move fields up and
down. The available fields will change depending on the Interval and Exchange selected. For
more information about each field, please see the File Format Guide for each exchange’s data,
which should be included with purchased data but is also available on Tick Data’s website:
http://www.tickdata.com/support/
VWAP: Beginning with Build 20131125, TickWrite can generate a volume-weighted
average price (VWAP) for all Interval selections in Equity Trade data. This
calculation is based on the following formula, using the Granularity setting
for the period, or if Trades is the Interval, it will accumulate over the trading
day:
VWAP = Sum (price * volume) / Total Volume
File Header: You can optionally elect to include a header as the first line in each output file
by checking the Include Header checkbox. By default, the header row will include the name of
each field, in the specified order, delimited by the specified delimiter. However, if you would
like to change the standard header to a custom value, you can do so by clicking the Add Custom
Header button entering your own header. This is useful if your internal systems require a
certain header or you need to name the output fields differently. Note that the custom header
is written exactly as entered; if any changes are made to the field selection the custom header
must be changed accordingly.
Formatting/Filtering Tab:
Date Format: Select the desired date format for the output file.
Price Decimals: Used to select the desired number of decimal places in the output file.
Default is set by default, and will use the standard number of decimal contained in the source
data (which differs by exchange). The user can also force TickWrite to output a specific
number of decimal places by selecting from the list.
Time Format: Select the desired time format. Since some data Tick Data offers has a
millisecond stamp, while others have only a second stamp or even only a minute stamp, by
selecting Optimal, TickWrite will use the proper time format. Alternately, the user can choose
a specific time format from the list.
37
Time Zone: TickWrite has the ability to output data in various time zones. This is especially
helpful when working with data from an exchange that is not in your country, as some
countries have different schedules for adjusting for Daylight Savings Time. The three choices
are Exchange Time Zone (default), Local Time Zone, and GMT. Exchange Time Zone will
output the data in the time zone of the exchange on which it is traded. For Indices, this
generally means the exchange on which the futures contract is traded. The Local Time Zone
value is derived from the time zone to which your computer is set. Please be sure your
computer’s clock is set properly. GMT is Greenwich Mean Time, the international baseline
time zone. GMT does not adjust for Daylight Savings Time, so depending on the time of the
year, the number of hours from one time zone to GMT varies. TickWrite handles this
automatically.
Use Excluded Records in Output: A new feature in TickWrite 7.1, this feature allows the
user to generate time series in intervals (Time Bars or Tick Bars) that include trades flagged
to be excluded. These can include out-of-sequence trades, off-exchange trades, and other
trades that have condition codes suggesting they should be excluded from the data. This
feature is only available for certain data sets. In cases where it is not available, the checkbox
will be disabled.
Field Filters: This feature allows users to filter output data and only display data meeting the
desired parameters. The fields available for filtering vary based on the Interval and Exchange
selected. Select your filter parameters and click the ‘plus’ sign. To remove a filter or all filters,
right-click in the field display window to show a context menu.
If you wish to filter by two parameters in the same field, separate the Values with commas and
use ‘IN’ and/or ‘NOT IN’. For example, if you wanted to only include trades with Exchange
Codes ‘N’ and ‘S’, you would enter ‘Exchange Code’ in Field, ‘IN’ in If, and ‘N,S’ in the Value field.
38
Creating Files of Forex Currency Data
Here is the Forex – Trade Job window:
Depending on the data purchased, you may see only one Forex tab titled Forex or multiple Forex tabs:
Forex – Quote, Forex – Trade, and Forex – One Minute. If, for example, you only purchased One-Minute
FX Data, you will only see a tab titled Forex. Clients receiving Tick Forex Data may also receive oneminute. These will cause both tabs to be displayed.
Each of these Forex tabs accesses different data. Using the Forex – Trade tab provides the most
versatility for processing trade-only data, and from it a user can create not only tick bars but also
interval bars (i.e. one-minute bars), daily bars, weekly bars, and monthly bars. And when processing
interval bars using the Forex – Trade tab, a user can filter output data using all of the fields of the tickby-tick file yet write it out to interval or daily/weekly/monthly bars. However since the Forex – Trade
tab accesses a much larger database of tick-by-tick trade data, any processing performed will take
longer. Therefore, if the Forex – One Minute tab is available, any processing of data into files of bar
intervals should be done from the Forex – One Minute tab, as it will perform the job considerably faster.
NOTE: The list of available data will NOT be automatically displayed in the symbol list, as this
can represent over two thousand symbols.
39
Adding Symbols to a Job
The user must add symbols to the Job window for processing. Symbols can be added to the symbol list
using these buttons and fields:
Click the binoculars to open the Symbol Search window:
Select the desired filter parameters and click Search. NOTE: leaving the fields blank and clicking
‘Search’ will display all available symbols. The results will appear in the Instrument Search Results
window. There you can select the symbols you wish to process, and they will appear in the Symbol
Search window. Individual symbols can be removed if not desired by right-clicking on the symbol in
the list and clicking remove. Click OK to add the symbols to the symbol list in the Job window.
The following are details for each Job window parameter (Trade parameters are shown):
Interval
Quotes: The output file will contain all ticks for the selected time period. Since a ‘tick’ is a
single data point, there is no OPEN, HIGH, LOW, or CLOSE; just a single price at which a quote
printed.
Time Based Bars: When selected, TickWrite outputs files of any desired intraday time
interval from 1-second bars up. Each line of data can contain Date, Time, Open, High, Low,
Close, Volume (if available), Tick Count, Up Ticks, Down Ticks, and/or Same Ticks for that
interval. In the Granularity box, you must specify the length of a bar interval in whole seconds
or whole minutes. Adjacent is a field to select MINUTES or SECONDS.
The timestamp for each interval represents the data of the period ending immediately prior
to the timestamp. For example, when using 5-minute bars, the 8:35 bar contains data from
8:30:00 to 8:34:59. As another example, when using 30-minute bars, the 4:00 bar contains
data from 3:30:00 to 3:59:59.
40
Daily/Weekly/Monthly Bars: These intervals will output files of 1-day, 1-week, or 1-month
intervals, respectively.
Empty Intervals
Skip Empty Intervals: Any interval without data is excluded from the file. There will not be
a timestamp. The only drawback to this method comes if a user is working in a spreadsheet,
as there will not be an equal number of prints each day.
Hold Last Value: Holds the value of the close of the last bar to have a price through all
intervals until another price occurs. This guarantees the number of bars per day is constant,
but creates artificial bars.
Fill With Zeroes: Any empty interval will have a zero (0) value for the Open, High, Low, Close,
and Volume. This also guarantees the number of bars per day is constant, but if it is graphed,
the zeroes will cause the chart to be useless.
Extend Last Interval
Active when Time Based Bars is selected at the ‘Interval’, this parameter is useful if there are
not an even number of intervals in a single day, based on the bar interval the user selected in
Granularity. For example, the U.S. stock market opens at 9:30 and closes at 16:00 EST. If the
user selects ‘60’ for the Granularity, there is not an even number of 60-minute bars in the day.
If Extend Last Interval is not checked, there will be a 16:30 bar that only contains 30 minutes
of data (15:30:00-15:59:59). However, if Extend Last Interval is checked, the last bar of the
day will be a 15:30 bar that contains 90 minutes of data (14:30:00-15:59:59).
Begin Date/End Date
By default, the begin and end dates will both say MM DD YYYY. When MM DD YYYY is displayed,
the complete date ranges for each individual symbol in the list of checked symbols will be used
by the corresponding symbol. However, this can be overridden by entering begin and end
dates in the appropriate boxes.
The buttons to the right of the YYYY field will pull up calendars that can assist users to enter
dates.
Days Back to Process
Instead of creating a file with a specific date range, a user may want to look at data only for
the past x days. This setting is especially useful if such a client subscribes to daily updates, as
a file can be updated automatically each night to only reflect trading for the past x days.
Start Session At/End Session At
By default, the Start Sessions At and End Sessions At fields are inactive and display 00:00. Set
this way, TickWrite will write out all of the data for the sessions chosen for each day. If the
user selects multiple symbols, the file for each symbol will be written out with the respective
session hours of each. However, users can also confine the data for all selected symbols to a
particular time range each day.
To activate these fields, check the boxes to the left of the Start Sessions At and/or End Sessions
At fields (you can use either or both). Then enter the desired hours and minutes in 24-hour
(military) time. The End Sessions At value will act as the close of the day, and the last tick of
the session will be the last tick BEFORE the closing time entered.
41
Output and Formatting/Filtering
The bottom section of the Job window contains two tabs with parameters for output type,
file naming, output fields, and formats.
Output Tab:
Output To: Output data to a file or to the screen. If File is selected, the user must select the
Output parameters on the tab. If Screen is selected, all other Output parameters deactivate
(except for the Output Fields section). Screen output data can be copied in the window (select
multiple fields using the Shift and Ctrl buttons) and pasted into spreadsheets and text editors
like Word or Notepad. NOTE: Pasted data will use the Delimiter set in Output Fields; in
order to copy fields into separate cells in a spreadsheet, use Tab as the delimiter.
Compression: The user can write out ASCII files that are unzipped (the largest output files)
or compressed using Zip or Gzip.
If Output Exists: Determines how TickWrite will handle file creation if a file by the same
name already exists in the output directory.
Overwrite Existing: The existing file will be deleted and recreated according to the
parameters in the job. The user will not be warned that the existing file will be
overwritten.
Append Updates: When selected, TickWrite will attempt to append data in an
existing file using data generated by the job. This selection should primarily be used
by clients who subscribe to daily updates and have jobs scheduled to download and
process out the same data every day. It will decrease processing time, as the job will
begin where the existing file leaves off.
Skip: The extraction job will leave the existing file untouched and not extract new
data.
Output Directory: Enter the desired location of output files. This must be chosen prior to
processing data to a file. As with all parameters, this location can be set as a default by
selecting SETUP -> Tab Defaults -> Set Current Values as Default for Tab. NOTE: As with all
defaults, the Output Directory set in a tab will only affect that tab.
Name Output by Symbol: Will use the symbol of the instrument as the filename. This
parameter also allows users to include a file prefix and/or suffix and select the file extension.
Name Output by Custom Value: Allows the user to choose the filename of the output ASCII
file. NOTE: Active only when one symbol is selected.
Email Job Notification: Once you have entered valid SMTP server settings in Preferences,
enter a valid email address in this field to email notifications of Job success or failure, along
with an attached .twj Job file.
42
DATE WILDCARDS IN FILE PATHS: TickWrite7 supports date wildcards that can be used in
the output directory, file prefix, file suffix, and custom file name. The wildcards will resolve to
the current date and/or time as of when the collection job is first executed. This can be used
to dynamically create new directories/files based on the current date without the need to
create custom scripts. To utilize a wildcard, it must be denoted ${ and } in the literal value.
The following are the supported wildcards:
yyyy – current year
MM – current month
dd – current day of month
HH – hour of day (0 – 23)
mm – minute of hour
For example, the following output directory might be entered:
C:\temp\${yyyy-MM-dd}\TRADES
Assuming that today is April 16th, 2010 this would resolve to the following directory name:
C:\temp\2010-04-16\TRADES
Output Fields: Active whether the user selects Screen or File as the ‘Output To’, here the user
can make choices about the fields within the data file. You can choose whether or not to
include a header row that shows the field names at the top of each file. The field delimiter can
be chosen here by selecting Space, Tab, or by entering whatever character you wish to use
(comma ‘,’ is the most commonly-used character). Finally, choose the fields you wish to
include in the file. The up and down arrows to the right of the Field Name list allows users to
move fields up and down. NOTE: Rearranging the field order will slow down file creation
speed.
File Header: You can optionally elect to include a header as the first line in each output file
by checking the Include Header checkbox. By default, the header row will include the name of
each field, in the specified order, delimited by the specified delimiter. However, if you would
like to change the standard header to a custom value, you can do so by clicking the Add Custom
Header button entering your own header. This is useful if your internal systems require a
certain header or you need to name the output fields differently. Note that the custom header
is written exactly as entered; if any changes are made to the field selection the custom header
must be changed accordingly.
43
Formatting/Filtering Tab:
Date Format: Select the desired date format for the output file.
Price Decimals: Used to select the desired number of decimal places in the output file.
Default is set by default, and will use the standard number of decimal places required for the
contract. The user can also force TickWrite to output a specific number of decimal places by
selecting from the list.
Time Format: Select the desired time format. Since some data Tick Data offers has a
millisecond stamp, while others have only a second stamp or even only a minute stamp, by
selecting Optimal, TickWrite will use the proper time format. Alternately, the user can choose
a specific time format from the list.
Price Multiplier: Activated when checked, this parameter allows users to factor in a
multiplier to the entire output file. This multiplier must be a factor of 10, but can be a decimal
(i.e. .001, .1, 10, 100, etc.).
Time Zone: TickWrite has the ability to output data in various time zones. This is especially
helpful when working with data from an exchange that is not in your country, as some
countries have different schedules for adjusting for Daylight Savings Time. The three choices
are Exchange Time Zone (default), Local Time Zone, and GMT. Exchange Time Zone will
output the data in the time zone of the exchange on which it is traded. For Indices, this
generally means the exchange on which the futures contract is traded. One notable exception
is the DJIA cash index data, which is in Eastern Standard Time even though the DJ futures
contract is traded in CST on the CBOT. The Local Time Zone value is derived from the time
zone to which your computer is set. Please be sure your computer’s clock is set properly. GMT
is Greenwich Mean Time, the international baseline time zone. GMT does not adjust for
Daylight Savings Time, so depending on the time of the year, the number of hours from one
time zone to GMT varies. TickWrite handles this automatically.
Field Filters: This feature allows users to filter output data and only display data meeting the
desired parameters. The fields available for filtering vary based on whether the user is on the
Trade, Quote, or One-Minute tab. Select your filter parameters and click the ‘plus’ sign. To
remove a filter or all filters, right-click in the field display window to show a context menu.
If you wish to filter by two parameters in the same field, separate the Values with commas and
use ‘IN’ and/or ‘NOT IN’. For example, if you wanted to only include trades with Exchange
Codes ‘N’ and ‘S’, you would enter ‘Exchange Code’ in Field, ‘IN’ in If, and ‘N,S’ in the Value field.
44
Creating Files of Futures Data
Here is the Futures – Trade Job window:
Your available futures symbols and date ranges will appear in the data list at the top of the window.
You can manually select one or more symbols by checking the box(es) to the left of the symbol list.
Right-click anywhere in the symbol list to activate a popup menu with the option to check all symbols,
un-check all symbols, or invert selection. To check many symbols at once, you can import a list of
symbols. Simply list your desired symbols in a text file, one per line, and save it as a ‘.txt’, ‘.csv’, or ‘.asc’
file. Click Actions -> Import Symbol List, and browse to select your saved file. When OPEN is clicked,
the symbols in the file will be checked in the data list. Please note that any symbols that were checked
prior to importing a list will be unchecked (unless they are also on the list).
The screen will activate different settings depending on: 1) how many symbols are selected; 2) the
Granularity selected; 3) the Output To selected, and; 4) which Contract is selected.
If only one symbol is selected, you have the option to create a file containing a single contract, to write
out all contracts individually at once, or to create a continuous file.
If more than one symbol is selected, you have the option to write out all contracts individually at once
or to create a continuous file, but not to create files containing a single contract.
The following are details for each Job window parameter:
45
Interval
NOTE: Please see the Futures File Format Guide available at www.tickdata.com for a
detailed explanation of available fields.)
Trades: The output file will contain all ticks for the selected time period and symbol(s). Since
a ‘tick’ is a single data point, there is no OPEN, HIGH, LOW, or CLOSE; just a single price at
which a trade occurred. Users will also note that there is no way to output ‘Tick Count’ when
Trades is selected as the Interval. This is because each tick has a ‘Tick Count’ of 1.
Quotes (only available under the Futures – Quote tab): The output file will contain all Level
I quotes (top of book or best bid/offer- BBO) for the selected time period and symbol(s).
Quote data is much larger in volume and size than Trade data, and therefore processing
times will be considerably longer.
Tick Based Bars: Users can also write data out as multi-tick bars for futures trade and quote
data. When Tick Based Bars is selected, users can define the number of ticks that will
comprise each bar, instead of using a time interval to constrain a bar. In the Granularity box,
you must specify the number of ticks per bar. Each line of data in the output file is timestamped with the time of the last tick in each bar.
Time Based Bars: When selected, TickWrite outputs files of any desired intraday time
interval from 1-second bars up for trade data and from 1-minute bars up for quote data. Each
line of data can contain Date, Time, Open, High, Low, Close, Volume (if available), Tick Count,
Up Ticks, Down Ticks, and/or Same Ticks for that interval. In the Granularity box, you must
specify the length of a bar interval in whole seconds or whole minutes. Adjacent is a field to
select MINUTES or SECONDS.
The timestamp for each interval represents the data of the period ending immediately prior
to the timestamp. For example, when using 5-minute bars, the 8:35 bar contains data from
8:30:00 to 8:34:59. As another example, when using 30-minute bars, the 4:00 bar contains
data from 3:30:00 to 3:59:59.
Daily/Weekly/Monthly Bars: These intervals will output files of 1-day, 1-week, or 1-month
intervals, respectively.
Empty Intervals
These selections are not active when Quotes, Trades, or Tick Based Bars are selected as the
Interval. For all other intervals, they give important options for handling empty time intervals.
Empty intervals occur when there are no trades during the full length of a bar.
Skip Empty Intervals: Any interval without data is excluded from the file. There will not be
a timestamp. The only drawback to this method comes if a user is working in a spreadsheet,
as there will not be an equal number of prints each day.
Hold Last Value: Holds the value of the close of the last bar to have a price through all
intervals until another price occurs. This guarantees the number of bars per day is constant,
but creates artificial bars.
Fill With Zeroes: Any empty interval will have a zero (0) value for the Open, High, Low, Close,
and Volume. This also guarantees the number of bars per day is constant, but if it is graphed,
the zeroes will cause the chart to be useless.
Extend Last Interval
Active when Time Based Bars is selected at the ‘Interval’, this parameter is useful if there are
not an even number of intervals in a single day, based on the bar interval the user selected in
Granularity. For example, if the SP opens at 8:30 and closes at 15:15, and the user selects ‘30’
for the Granularity, there are not an even number of 30-minute bars in the day. If Extend Last
46
Interval is not checked, there will be a 15:30 bar that only contains 15 minutes of data
(15:00:00-15:14:59). However, if Extend Last Interval is checked, the last bar of the day will
be a 15:00 bar that contains 45 minutes of data (14:30:00-15:14:59).
Ignore Filtered Prices
Active when creating Tick or Time Based Bars from Tick Trade data, this parameter allows
the user to generate bars using raw, unfiltered prices. If unchecked, bars are built using prices
that may be altered by Tick Data’s proprietary price filtering algorithm. NOTE: Also see
section on Formatting/Filtering tab for information on ‘Use Excluded Records in
Output’ parameter.
Contract
Front: Will process all of the nearest contracts in a given date range into a single continuous
contract. To create a continuous file, check the ‘Continuous File’ box, and give the file a
name in the ‘File Name’ field. If ‘Continuous File’ is not selected, the most active months of
each contract within the date range will be processed into separate files. In this case, the
files will be automatically named: CCMYY.ext, where CC is the Ticker symbol, M is the
month code for the expiration month, YY is the expiration year, and .ext is the selected file
extension. If ‘Continuous File’ is selected and only one symbol is selected, you have the
option of naming by Symbol or by Custom Value. If ‘Continuous File’ is selected and
multiple symbols are selected, TickWrite will name the files by Symbol. (For more details
see the sections below: Continuous Files)
1st Back: Will process in the same manner as Front, but instead of using the nearest contract,
it will use the first back month as the current contract.
2nd Back: Will process in the same manner as Front, but instead of using the nearest contract,
it will use the second back month as the current contract.
3rd Back: Will process in the same manner as Front, but instead of using the nearest contract,
it will use the third back month as the current contract.
Most Active: Will process in the same manner as Front, but instead of using the nearest
contract, it will attempt to use the most liquid contract as the current contract. This can
be useful under conditions. For example, for certain instruments the Front Month is the
most liquid. For other instruments the First Back might be the most liquid. For still other
instruments, the Front Month might usually be the most liquid but a contract or two per
year are illiquid and should be skipped. By selecting Most Active all three of these
examples can be extracted as part of the same job.
All: Will process all contract months available in the given date range into separate files. They
will be automatically named using the CCMYY.ext format.
Individual Contract Months: If only one symbol is checked, you can process one contract at
a time. A list of available contracts will appear in the drop-down box. Once the contract
month is selected, the date range for that specific contract month will appear in the ‘Begin
Date’ and ‘End Date’. If a begin date from prior to the available range of the contract is
manually selected, the data will begin at the contract’s inception. The list of contracts
will not appear if more than one symbol is checked.
Continuous Files
Most futures contracts do not stay active for more than a few months. This can make system
development and optimization very time-consuming. The solution is to perform research on
files that contain multiple contracts linked together, using only the most active portion of each
contract. TickWrite makes it easy to create continuous files of futures data. Selecting Front,
47
1st Back, 2nd Back, or 3rd Back under Contract will activate the Roll Method, Day To Roll, and
Adjustment Type options. Here, users can choose a roll method and adjustment type.
Roll Method:
Auto: AutoRoll is the recommended roll method, because it is the most precise way
to determine the best time to roll. AutoRoll computes daily tick volume for the current
and next back-month contracts (regardless of the interval selected) and rolls to the
next contract when the daily, day-session tick volume of the back-month contract
exceeds the daily tick volume of the current month contract. By constraining this
computation to a specific range of dates (based on Tick Data’s research), AutoRoll can
be applied to virtually all futures symbols.
Expiration: This method will roll the contract on the expiration day. It is useful for
several commodities that actually trade up through their last trading days (i.e. CF, NK,
NG).
Days Prior to Expiration: This method works similarly to ‘Expiration’, except that
the user has the option of entering a positive integer into the Days Prior/Date box
(just below the ‘Roll Method’ field), causing the roll to occur n days prior to expiration.
Using a value of 1 will cause the roll to occur one day prior to expiration.
Date: TickWrite can also use a specific date as the criteria for rollover. When ‘Date’
is set as the Roll Method, the Days Prior/Date box will activate. If only one symbol is
selected, the field will be populated with the date Tick Data suggests. This value can
be changed by the user, although it will revert back to the default date when the
program is restarted or the symbol selection is changed (a custom value can be saved
as part of a Job). If multiple symbols are selected, the field will be blank, and the
number entered will be used as the roll day for all selected symbols. If symbols with
different roll dates are selected, it is advised to create a separate job for each and run
the jobs from the Job Explorer.
Next to the Days Prior/Date box is a checkbox for Previous Month. If Previous Month
is unchecked, the number in Day To Roll represents a date in the expiration month
(i.e. ‘12’ in Day To Roll is the 12th of the expiration month). If Previous Month is
checked, the number in Day To Roll represents a date in the month prior to the
expiration month (i.e. ‘12’ in Day To Roll is the 12th of the previous month). If the roll
day ever falls on a non-trading day, TickWrite will use the first trading day after the
date as the roll day. NOTE: This differs from the method in TickWrite 6.
Inception: This method rolls to the next contract on the first trading date of the
newest contract. It is used for Japanese symbols JA, JM, and JG. It will only work for
the Contract- FRONT setting. Choosing it for other settings will result in an error.
Adjustment:
This parameter has changed significantly in TickWrite 7.1, with addition of Ratio
adjusting. Ratio adjustment removes rollover gaps by dividing the price of the current
front month by the price of the next front month contract at the close of the day
session on the day prior to the rollover. If Forward is selected, that quotient is then
multiplied by all subsequent prices in the series. If Backward is selected, the inverse
of that quotient is multiplied by all previous prices in the series. This calculation is
repeated at every rollover.
Tick Data used to only support a simple arithmetical adjustment which subtracts one
closing price from the other, which we now call Difference adjusting. In Difference
adjusting, the difference is added to all previous prices (if Backward adjusting) or
subtracted from all subsequent prices (if Forward adjusting).
48
If None is selected, no price adjustment is made, and any price gaps that appear as a
result of rolling contracts remain.
Much has been written in the world of Futures about roll adjustment methodologies.
Some claim that one is better than the other. What is most important is that the user
has a complete understanding of the mathematics behind his/her model and uses the
adjustment method (or no method) that produces compatible data.
Global Settings Impacting Continuous Contracts
Certain global settings also have an impact on the generation of continuous contracts.
To configure these settings, go to SETUP -> Preferences -> FUTURES PREFERENCES.
As described above, adjustment factors are determined using the prices on the day
prior to the roll. Occasionally, for certain illiquid contracts, a roll date is determined
to be a certain day but the data on the prior day is unavailable or insufficient to
calculate an appropriate adjustment factor. The following two settings impact the
behavior of an extraction when this condition exists:
Allow roll date to move +/- this many days to locate valid adjustment – When
the condition described above occurs, the system will move the roll date in order to
locate a valid adjustment factor (the roll date will always be moved forward except in
cases where a Front Month Expiration roll is used, in which case it is moved
backward). This setting determines how many days a roll date can be moved to find
a valid adjustment factor. If an adjustment factor cannot be determined after moving
the roll date this number of days, the extraction job will fail for this contract.
Force non-adjusting jobs to have same roll dates as adjusting jobs – This setting
will only effect jobs where the Adjustment Type is set to “None” (i.e. non-adjusting
jobs). For jobs that do not adjust, the ability to determine an adjustment factor is
irrelevant, so the above condition is not a problem. However, this means that it is
possible for a non-adjusting job to have different roll dates than the same job file with
adjustments. This discrepancy may be undesirable, in which case the user can check
this option which will force any non-adjusting jobs to have the same roll dates as the
same job with adjustments. In other words, the system will potentially move the roll
date in order to calculate an adjustment factor even though that adjustment factor
will not be applied.
Allow Adjusted Values To Be Negative: Sometimes, applying adjustments to prices
will cause those prices to become negative. Trading models are generally not capable
of handling negative prices, so by default TickWrite 7 will add a constant to ALL
PRICES in the file to bring the negative prices positive (even values in the most recent
contract in a backwards-adjusted file will be adjusted). Checking this box will override
this feature and allow for negative prices in the output file.
Begin Date/End Date
By default, the begin and end dates will both say MM DD YYYY. When MM DD YYYY is displayed,
the complete date ranges for each individual symbol in the list of checked symbols will be used
49
by the corresponding symbol. However, this can be overridden by entering begin and end
dates in the appropriate boxes.
The buttons to the right of the YYYY field will pull up calendars that can assist users to enter
dates.
Days Back to Process
Instead of creating a file with a specific date range, a user may want to look at data only for
the past x days. This setting is especially useful if such a client subscribes to daily updates, as
a file can be updated automatically each night to only reflect trading for the past x days.
Start Session At/End Session At
By default, the Start Sessions At and End Sessions At fields are inactive and display 00:00. Set
this way, TickWrite will write out all of the data for the sessions chosen for each day. If the
user selects multiple symbols, the file for each symbol will be written out with the respective
session hours of each. However, users can also confine the data for all selected symbols to a
particular time range each day.
To activate these fields, check the boxes to the left of the Start Sessions At and/or End Sessions
At fields (you can use either or both). Then enter the desired hours and minutes in 24-hour
(military) time. The End Sessions At value will act as the close of the day, and the last tick of
the session will be the last tick BEFORE the closing time entered. NOTE: Using Start Sessions
At and/or End Sessions At will deactivate the Day and Night checkboxes under Session(s)
to Include, as the times entered will override Day/Night session settings.
Session(s) to Include
Tick Data provides data for trading in both pit and electronic markets for night sessions and
day sessions since 1 July 2003 (prior to that date we only have limited night session data for
GLOBEX contracts such as ES and NQ, and day-session only for all other contracts). Currently,
and for the foreseeable future, all overnight trading is done via electronic markets. However,
several commodities also have electronic trading during the day session, concurrent with the
pit session. While most exchanges have separate symbols for these markets, Tick Data has
integrated these sessions into a single symbol, and TickWrite gives users the ability to write
out data for pit and/or electronic trading during the day and/or night sessions all in one file
or into separate files. Users simply need to check the appropriate boxes.
Output, Formatting/Filtering, and Advanced
The bottom section of the Job window contains two tabs with parameters for output type,
file naming, output fields, and formats.
Output Tab:
50
Output To: Output data to a file or to the screen. If File is selected, the user must select the
Output parameters on the tab. If Screen is selected, all other Output parameters deactivate
(except for the Output Fields section). Screen output data can be copied in the window (select
multiple fields using the Shift and Ctrl buttons) and pasted into spreadsheets and text editors
like Word or Notepad. NOTE: Pasted data will use the Delimiter set in Output Fields; in
order to copy fields into separate cells in a spreadsheet, use Tab as the delimiter.
Compression: The user can write out ASCII files that are unzipped (the largest output files)
or compressed using Zip or Gzip.
If Output Exists: Determines how TickWrite will handle file creation if a file by the same
name already exists in the output directory.
Overwrite Existing: The existing file will be deleted and recreated according to the
parameters in the job. The user will not be warned that the existing file will be
overwritten.
Append Updates: When selected, TickWrite will attempt to append data in an
existing file using data generated by the job. This selection should primarily be used
by clients who subscribe to daily updates and have jobs scheduled to download and
process out the same data every day. It will decrease processing time, as the job will
begin where the existing file leaves off.
Skip: The extraction job will leave the existing file untouched and not extract new
data.
Output Directory: Enter the desired location of output files. This must be chosen prior to
processing data to a file. As with all parameters, this location can be set as a default by
selecting SETUP -> Tab Defaults -> Set Current Values as Default for Tab. NOTE: As with all
defaults, the Output Directory set in a tab will only affect that tab.
Name Output by Symbol: Will use the symbol of the instrument as the filename. This
parameter also allows users to include a file prefix and/or suffix and select the file extension.
Name Output by Custom Value: Allows the user to choose the filename of the output ASCII
file. NOTE: Active only when one symbol is selected, and when Front, 1st Back, 2nd Back,
or 3rd Back, or Most Active is selected as the ‘Contract’ while Continuous File is checked.
Email Job Notification: Once you have entered valid SMTP server settings in Preferences,
enter a valid email address in this field to email notifications of Job success or failure, along
with an attached .twj Job file.
DATE WILDCARDS IN FILE PATHS: TickWrite7 supports date wildcards that can be used in
the output directory, file prefix, file suffix, and custom file name. The wildcards will resolve to
the current date and/or time as of when the collection job is first executed. This can be used
to dynamically create new directories/files based on the current date without the need to
create custom scripts. To utilize a wildcard, it must be denoted by ${ and } in the literal value.
The following are the supported wildcards:
yyyy – current year
MM – current month
dd – current day of month
HH – hour of day (0 – 23)
mm – minute of hour
For example, the following output directory might be entered:
C:\temp\${yyyy-MM-dd}\TRADES
Assuming that today is April 16th, 2010 this would resolve to the following directory name:
51
C:\temp\2010-04-16\TRADES
Output Fields: Here the user can make choices about the fields within the data file. The field
delimiter can be chosen here by selecting Space, Tab, or by entering whatever character you
wish to use (comma ‘,’ is the most commonly-used character). Finally, choose the fields you
wish to include in the file. The up and down arrows to the right of the Field Name list allows
users to move fields up and down.
File Header: You can optionally elect to include a header as the first line in each output file
by checking the Include Header checkbox. By default, the header row will include the name of
each field, in the specified order, delimited by the specified delimiter. However, if you would
like to change the standard header to a custom value, you can do so by clicking the Add Custom
Header button entering your own header. This is useful if your internal systems require a
certain header or you need to name the output fields differently. Note that the custom header
is written exactly as entered; if any changes are made to the field selection the custom header
must be changed accordingly.
VWAP: Beginning with Build 20131125c, TickWrite can generate a volumeweighted average price (VWAP) for all Interval selections in Futures Trade
data. This calculation is based on the following formula, using the
Granularity setting for the period, or if Trades is the Interval, it will
accumulate over the trading day:
VWAP = Sum (price * volume) / Total Volume
Formatting/Filtering Tab:
Date Format: Select the desired date format for the output file.
Price Decimals: Used to select the desired number of decimal places in the output file.
Default is set by default, and will use the standard number of decimal places required for the
contract. The user can also force TickWrite to output a specific number of decimal places by
selecting from the list.
Time Format: Select the desired time format. Since some data Tick Data offers has a
millisecond stamp, while others have only a second stamp or even only a minute stamp, by
selecting Optimal, TickWrite will use the proper time format. Alternately, the user can choose
a specific time format from the list.
52
Price Multiplier: Activated when checked, this parameter allows users to factor in a
multiplier to the entire output file. This multiplier must be a factor of 10, but can be a decimal
(i.e. .001, .1, 10, 100, etc.).
Time Zone: TickWrite has the ability to output data in various time zones. This is especially
helpful when working with data from an exchange that is not in your country, as some
countries have different schedules for adjusting for Daylight Savings Time. The three choices
are Exchange Time Zone (default), Local Time Zone, and GMT. Exchange Time Zone will
output the data in the time zone of the exchange on which it is traded. For Indices, this
generally means the exchange on which the futures contract is traded. One notable exception
is the DJIA cash index data, which is in Eastern Standard Time even though the DJ futures
contract is traded in CST on the CBOT. The Local Time Zone value is derived from the time
zone to which your computer is set. Please be sure your computer’s clock is set properly. GMT
is Greenwich Mean Time, the international baseline time zone. GMT does not adjust for
Daylight Savings Time, so depending on the time of the year, the number of hours from one
time zone to GMT varies. TickWrite handles this automatically.
Use Excluded Records in Output: A new feature in TickWrite 7.1, this feature allows the
user to generate time series in intervals (Time Bars or Tick Bars) that include trades flagged
to be excluded. These can include out-of-sequence trades, off-exchange trades, and other
trades that have condition codes suggesting they should be excluded from the data. NOTE:
This parameter not available in Futures – Quote window.
Field Filters: This feature allows users to filter output data and only display data meeting the
desired parameters. For futures data, you can filter based on price and volume. Select your
filter parameters and click the ‘plus’ sign. To remove a filter or all filters, right-click in the field
display window to show a context menu.
Advanced Tab:
An advanced feature designed to support the generation of continuous contracts is the ability
to only consider certain contract months. By default, TickWrite will consider ALL contract
months of a particular instrument (although using the Most Active feature may suppress
illiquid contracts). However, if a user is certain that they want to disregard certain contract
months in their extraction, they can uncheck any contract months that they want to exclude.
NOTE: This window always includes all contract months (January – December) and
does not change based on the instrument(s) selected. Therefore, the selected
instrument(s) may not trade in all contract months listed. If a futures contract only
trades on the quarterly HMUZ cycle, any checked contract months that are not valid for
the instrument are ignored. However, if none of the selected contract months are valid
for a selected instrument, TickWrite will not output any data.
53
Creating Files of Options Data
Once your data has been installed, select an Options tab. Here is the Options – Quote Job window:
Depending on the data purchased, you may see only one options tab titled Options or multiple options
tabs: Options – Quote, Options – Trade, and Options – One Minute. If, for example, you only purchased
One-Minute Options Data, you will only see a tab titled Options. Clients receiving Tick Options Data
may also receive one-minute. These will cause both tabs to be displayed.
Each of these options tabs accesses different data. Using the Options – Trade tab provides the most
versatility for processing trade-only data, and from it a user can create not only tick bars but also
interval bars (i.e. one-minute bars), daily bars, weekly bars, and monthly bars. And when processing
interval bars using the Options – Trade tab, a user can filter output data using all of the fields of the
tick-by-tick file yet write it out to interval or daily/weekly/monthly bars. However since the Options
– Trade tab accesses a much larger database of tick-by-tick trade data, any processing performed will
take longer. Therefore, if the Options – One Minute tab is available, any processing of data into files of
bar intervals should be done from the Options – One Minute tab, as it will perform the job considerably
faster.
If Trade and Quote data is available on the user’s account, the Options – Quote tab will be present. From
this tab, the only Interval available is ‘Trades and Quotes’. The output data will have both Trade and
Quote data interleafed in the same file, as provided by the exchanges.
Once a tab has been selected, you must choose the Exchange from which you wish to process data.
Again, only the exchanges for which you purchased data will be available in the list. Once selected, the
54
list of available data will NOT be automatically displayed in the symbol list, as this can represent many
thousand symbols. NOTE: At this time, Tick Data only has U.S.-listed Options data, and all U.S.
exchanges are contained in the OPRA Options Exchange.
Adding Symbols to a Job
The user must add symbols to the Job window for processing. Symbols can be added to the symbol list
using these buttons and fields:
Click the binoculars to open the Symbol Search window:
Select the desired filter parameters and click Search. NOTE: leaving the fields blank and clicking
‘Search’ will display all available symbols. The results will appear in the Instrument Search Results
window. There you can select the symbols you wish to process, and they will appear in the Symbol
Search window. Individual symbols can be removed if not desired by right-clicking on the symbol in
the list and clicking remove. Click OK to add the symbols to the symbol list in the Job window.
Another way to add symbols is to type a symbol or Company ID into the quick add box (to the right of
the binoculars) and click the plus button.
To include all available symbols in a processing job, check the All Symbols box. This will activate the
Advanced button, which offers additional parameters for processing all symbols:
Name Instruments As They Traded On: Leaving this blank will use the current symbols for all
companies regardless of the date range selected in the Job window. Selecting a date will use the
55
symbology as of that date. For example, if you are working with symbols that you know to be a few
years old (that may have different symbols today), you might enter a date as of a few years ago in this
field so that the symbol naming convention used by TickWrite more closely matches the symbology
that you are familiar with.
Only Includes Instruments Active As Of: Leaving this blank will result in all active and inactive
symbols being included in the processing job (for the date range specified in the processing job). If
you select a date, TickWrite will only process symbols that are listed on that date. For example, you
may want to extract all symbols from 1995 – 2000 but include only those companies that are still
trading today. In this case you would enter today’s date in this field.
To check many symbols at once, you can import a list of symbols. Simply list your desired symbols in
a text file, one per line, and save it as a ‘.txt’, ‘.csv’, or ‘.asc’ file. Click FILE -> Import Symbol List, and
browse to select your saved file. When OPEN is clicked, the symbols in the file will be checked in the
data list. See section Import Symbol List in the First Use section) NOTE: Any symbols that were listed
prior to importing a list will be removed (unless they are also on the list).
Selecting Job Parameters
Once you have selected the desired options symbols for processing, select the parameters in the middle
of the window to suit your requirements. The screen will activate different settings depending on: 1)
how many symbols are selected; 2) the Granularity selected, and; 3) the Output To selected.
The following are details for each Job window parameter:
Interval
Trades: The output file will contain all trades tick-by-tick for the selected time period. Since
a ‘tick’ is a single data point, there is no OPEN, HIGH, LOW, or CLOSE; just a single price at
which a trade occurred. Users will also note that there is no way to output ‘Tick Count’ when
Trades is selected as the Interval. This is because each tick has a ‘Tick Count’ of 1. NOTE:
This Interval setting is not available on the Options – One Minute tab.
Tick Based Bars: Users can also write data out as multi-tick bars. When Tick Based Bars is
selected, users can define the number of ticks that will comprise each bar, instead of using a
time interval to constrain a bar. In the Granularity box, you must specify the number of ticks
per bar. Each line of data in the output file is time-stamped with the time of the last tick in
each bar.
Time Based Bars: When selected, TickWrite outputs files of any desired intraday time
interval from 1-second bars up. NOTE: This is trade data only, as TickWrite 7 cannot write
out time based bars of quote data. Each line of data can contain Date, Time, Open, High,
Low, Close, Volume (if available), Tick Count, Up Ticks, Down Ticks, and/or Same Ticks
for that interval. In the Granularity box, you must specify the length of a bar interval in
whole seconds or whole minutes. Adjacent is a field to select MINUTES or SECONDS.
The timestamp for each interval represents the data of the period ending immediately prior
to the timestamp. For example, when using 5-minute bars, the 8:35 bar contains data from
8:30:00 to 8:34:59. As another example, when using 30-minute bars, the 4:00 bar contains
data from 3:30:00 to 3:59:59.
Daily/Weekly/Monthly Bars: These intervals will output files of 1-day, 1-week, or 1-month
intervals, respectively.
Trades and Quotes: Unlike equity data sets, option data files contain trades and quote
interleaved together. While Tick Data makes a trade only data set available (using interval of
Trades as described above), there is no “quote only” data set (however, users may extract
quotes only by applying a field filter on the record type field). By default, the output file will
contain all trades and quotes (Level I bids and offers) interleaved for the selected time period.
Since a ‘tick’ is a single data point, there is no OPEN, HIGH, LOW, or CLOSE; just a single price
56
at which a trade occurred. Users will also note that there is no way to output ‘Tick Count’
when Trades and Quotes is selected as the Interval. This is because each tick has a ‘Tick Count’
of 1. NOTE: This Interval setting is not available on the Options – One Minute tab. Trade
and Quote data is much larger in volume and size than Trade Only data (2000-3000X),
and therefore processing times will be considerably longer.
Company Info
Will include a folder in the Output Directory that contains information about each security
processed in the Job, including splits, dividends, and mergers, as well as translation
information for converting Tick Data Company IDs to current ticker symbols. For more
information about the contents of the CompanyInfo folder, please see the File Format Guide for
the corresponding exchange, located on your data disc/drive and also available on Tick Data’s
website:
http://www.tickdata.com/html/downloads.shtml
Empty Intervals
These selections are not active when Trades, Tick Based Bars, or Quotes are selected as the
Interval. For all other intervals, they give important options for handling empty time intervals.
Empty intervals occur when there are no trades during the full length of a bar.
Skip Empty Intervals: Any interval without data is excluded from the file. There will not be
a timestamp. The only drawback to this method comes if a user is working in a spreadsheet,
as there will not be an equal number of prints each day.
Hold Last Value: Holds the value of the close of the last bar to have a price through all
intervals until another price occurs. This guarantees the number of bars per day is constant,
but creates artificial bars.
Fill With Zeroes: Any empty interval will have a zero (0) value for the Open, High, Low, Close,
and Volume. This also guarantees the number of bars per day is constant, but if it is graphed,
the zeroes will cause the chart to be useless.
Extend Last Interval
Active when Time Based Bars is selected at the ‘Interval’, this parameter is useful if there are
not an even number of intervals in a single day, based on the bar interval the user selected in
Granularity. For example, the U.S. stock market opens at 9:30 and closes at 16:00 EST. If the
user selects ‘60’ for the Granularity, there is not an even number of 60-minute bars in the day.
If Extend Last Interval is not checked, there will be a 16:30 bar that only contains 30 minutes
of data (15:30:00-15:59:59). However, if Extend Last Interval is checked, the last bar of the
day will be a 15:30 bar that contains 90 minutes of data (14:30:00-15:59:59).
Begin Date/End Date
By default, the begin and end dates will both say MM DD YYYY. When MM DD YYYY is displayed,
the complete date ranges for each individual symbol in the list of checked symbols will be used
by the corresponding symbol. However, this can be overridden by entering begin and/or end
dates in the appropriate boxes.
The buttons to the right of the YYYY field will pull up calendars that can assist users to enter
dates.
Days Back to Process
57
Instead of creating a file with a specific date range, a user may want to look at data only for
the past x days. This setting is especially useful if such a client subscribes to daily updates, as
a file can be updated automatically each night to only reflect trading for the past x days.
Session(s) to Include
Many stock exchanges offer extended trading hours in addition to their regular trading hours.
In the U.S. regular market Day Session hours are 9:30 to 16:00 EST. However, trading in the
Pre-Market session begins several hours earlier, and After-Hours trading continues for several
hours. In order to include Pre-Market, Day Session, and/or After-Hours trading in output files,
users simply need to check the appropriate box(es).
Start Session At/End Session At
By default, the Start Sessions At and End Sessions At fields are inactive and display 00:00. Set
this way, TickWrite will write out all of the data for the sessions chosen for each day. If the
user selects multiple symbols, the file for each symbol will be written out with the respective
session hours of each. However, users can also confine the data for all selected symbols to a
particular time range each day.
To activate these fields, check the boxes to the left of the Start Sessions At and/or End Sessions
At fields (you can use either or both). Then enter the desired hours and minutes in 24-hour
(military) time.
NOTE: These fields can only be used to restrict normal market hours (including day and
night sessions). For example, if normal markets hours run from 07:00 – 19:00, the Start
Session At must be equal to or after 07:00 and the End Session At must be equal to or less than
19:00. The custom session hours may not cross over two market days.
NOTE: Using Start Sessions At and/or End Sessions At will deactivate the PreMarket/Day Session/After-Hours checkboxes under Session(s) to Include, as the times
entered will override the standard session settings.
Output and Formatting/Filtering
The bottom section of the Job window contains two tabs with parameters for output type, file
naming, output fields, and formats.
Output Tab:
Output To: Output data to a file or to the screen. If File is selected, the user must select the
Output parameters on the tab. If Screen is selected, all other Output parameters deactivate
(except for the Output Fields section). Screen output data can be copied in the window (select
multiple fields using the Shift and Ctrl buttons) and pasted into spreadsheets and text editors
like Word or Notepad. NOTE: Pasted data will use the Delimiter set in Output Fields; in
order to copy fields into separate cells in a spreadsheet, use Tab as the delimiter.
58
Compression: The user can write out ASCII files that are unzipped (full-size output files) or
compressed using Zip or Gzip.
If Output Exists: Determines how TickWrite will handle file creation if a file by the same
name already exists in the output directory.
Overwrite Existing: The existing file will be deleted and recreated according to the
parameters in the job. The user will not be warned that the existing file will be
overwritten.
Skip: The extraction job will leave the existing file untouched and not extract new
data.
Output Directory: Enter the desired location of output files. This must be chosen prior to
processing data to a file. As with all parameters, this location can be set as a default by
selecting SETUP -> Tab Defaults -> Set Current Values as Default for Tab. NOTE: As with all
defaults, the Output Directory set in a tab will only affect that tab.
Name Output by Symbol / Name Output by Company Id / Name Output By Symbol and
Company id: Will use the symbol and/or company ID of the instrument as the filename.
These options also allow users to include a file prefix and/or suffix and select the file
extension.
Name Output by Custom Value: Allows the user to choose the filename of the output ASCII
file. NOTE: Active only when one symbol is selected.
Email Job Notification: Once you have entered valid SMTP server settings in Preferences,
enter a valid email address in this field to email notifications of Job success or failure, along
with an attached .twj Job file.
DATE WILDCARDS IN FILE PATHS: TickWrite7 supports date wildcards that can be used in
the output directory, file prefix, file suffix, and custom file name. The wildcards will resolve to
the current date and/or time as of when the collection job is first executed. This can be used
to dynamically create new directories/files based on the current date without the need to
create custom scripts. To utilize a wildcard, it must be denoted ${ and } in the literal value.
The following are the supported wildcards:
yyyy – current year
MM – current month
dd – current day of month
HH – hour of day (0 – 23)
mm – minute of hour
For example, the following output directory might be entered:
C:\temp\${yyyy-MM-dd}\TRADES
Assuming that today is April 16th, 2010 this would resolve to the following directory name:
C:\temp\2010-04-16\TRADES
Output Fields: Active whether the user selects Screen or File as the ‘Output To’, here the user
can make choices about the fields within the data file. The field delimiter can be chosen here
by selecting Space, Tab, or by entering whatever character you wish to use (comma ‘,’ is the
most commonly-used character). Finally, choose the fields you wish to include in the file. The
up and down arrows to the right of the Field Name list allows users to move fields up and
down. The available fields will change depending on the Interval and Exchange selected. For
more information about each field, please see the File Format Guide for each exchange’s data,
59
which should be included with purchased data but is also available on Tick Data’s website:
http://www.tickdata.com/html/downloads.shtml.
File Header: You can optionally elect to include a header as the first line in each output file
by checking the Include Header checkbox. By default, the header row will include the name of
each field, in the specified order, delimited by the specified delimiter. However, if you would
like to change the standard header to a custom value, you can do so by clicking the Add Custom
Header button entering your own header. This is useful if your internal systems require a
certain header or you need to name the output fields differently. Note that the custom header
is written exactly as entered; if any changes are made to the field selection the custom header
must be changed accordingly.
Formatting/Filtering Tab:
Date Format: Select the desired date format for the output file.
Price Decimals: Used to select the desired number of decimal places in the output file.
Default is set by default, and will use the standard number of decimal contained in the source
data (which differs by exchange). The user can also force TickWrite to output a specific
number of decimal places by selecting from the list.
Time Format: Select the desired time format. Since some data Tick Data offers has a
millisecond stamp, while others have only a second stamp or even only a minute stamp, by
selecting Optimal, TickWrite will use the proper time format. Alternately, the user can choose
a specific time format from the list.
Price Multiplier: Activated when checked, this parameter allows users to factor in a
multiplier to the entire output file. This multiplier must be a factor of 10, but can be a decimal
(i.e. .001, .1, 10, 100, etc.).
Time Zone: TickWrite has the ability to output data in various time zones. This is especially
helpful when working with data from an exchange that is not in your country, as some
countries have different schedules for adjusting for Daylight Savings Time. The three choices
are Exchange Time Zone (default), Local Time Zone, and GMT. Exchange Time Zone will
output the data in the time zone of the exchange on which it is traded. For Indices, this
generally means the exchange on which the futures contract is traded. The Local Time Zone
value is derived from the time zone to which your computer is set. Please be sure your
computer’s clock is set properly. GMT is Greenwich Mean Time, the international baseline
time zone. GMT does not adjust for Daylight Savings Time, so depending on the time of the
year, the number of hours from one time zone to GMT varies. TickWrite handles this
automatically.
60
Field Filters: This feature allows users to filter output data and only display data meeting the
desired parameters. The fields available for filtering vary based on the Interval and Exchange
selected. Select your filter parameters and click the ‘plus’ sign. To remove a filter or all filters,
right-click in the field display window to show a context menu.
If you wish to filter by two parameters in the same field, separate the Values with commas and
use IN and/or NOT IN filters. For example, if you wanted to only include trades with Exchange
Codes ‘N’ and ‘S’, you would enter ‘Exchange Code’ in Field, ‘IN’ in If, and ‘N,S’ in the Value field.
Option Instrument Filters Tab:
The parameters on this tab are used to narrow the selection of files output by a Job. These
parameters will pertain to all symbols selected for processing, so it is advisable to only process
one underlying option symbol per job when using the Strike Price Range parameter.
61
Creating Files of Cash Index and Indicator Data
Cash Indices and Indicators are handled almost identically by TickWrite 7, so the instructions and
details are the same for both. Here is the Indices Job window:
Your available Index/Indicator symbols and date ranges will appear in the data list at the top of the
window. You can manually select one or more symbols by checking the box(es) to the left of the symbol
list.
Right-click anywhere in the symbol list to activate a context menu with the option to check all symbols,
un-check all symbols, or invert selection. To check many symbols at once, you can import a list of
symbols. Simply list your desired symbols in a text file, one per line, and save it as a ‘.txt’, ‘.csv’, or ‘.asc’
file. Click Actions -> Import Symbol List, and browse to select your saved file. When OPEN is clicked,
the symbols in the file will be checked in the data list. Please note that any symbols that were checked
prior to importing a list will be unchecked (unless they are also on the list).
The screen will activate different settings depending on: 1) how many symbols are selected; 2) the
Granularity selected, and; 3) the Output To selected.
The following are details for each Job window parameter:
Interval
Tick: The output file will contain all ticks for the selected time period. Since a ‘tick’ is a single
data point, there is no OPEN, HIGH, LOW, or CLOSE; just a single price at which a trade
62
occurred. Users will also note that there is no way to output ‘Tick Count’ when Tick is selected
as the Interval. This is because each tick has a ‘Tick Count’ of 1. Also of note is that ‘Tick Count’
is basically irrelevant in the case of Indices, which are calculated on a mostly constant interval,
meaning the ‘Tick Count’ will not vary significantly.
Tick Based Bars: Users can also write data out as multi-tick bars. When Tick Based Bars is
selected, users can define the number of ticks that will comprise each bar, instead of using a
time interval to constrain a bar. In the Granularity box, you must specify the number of ticks
per bar. Each line of data in the output file is time-stamped with the time of the last tick in
each bar.
Time Based Bars: When selected, TickWrite outputs files of any desired intraday time
interval from 1-second bars up. Each line of data can contain Date, Time, Open, High, Low,
Close, Volume (if available), Tick Count, Up Ticks, Down Ticks, and/or Same Ticks for that
interval. In the Granularity box, you must specify the length of a bar interval in whole seconds
or whole minutes. Adjacent is a field to select MINUTES or SECONDS.
The timestamp for each interval represents the data of the period ending immediately prior
to the timestamp. For example, when using 5-minute bars, the 8:35 bar contains data from
8:30:00 to 8:34:59. As another example, when using 30-minute bars, the 4:00 bar contains
data from 3:30:00 to 3:59:59.
Daily/Weekly/Monthly Bars: These intervals will output files of 1-day, 1-week, or 1-month
intervals, respectively.
Empty Intervals
These selections are not active when Tick or Tick Based Bars are selected as the Interval.
For all other intervals, they give important options for handling empty time intervals. Empty
intervals occur when there are no trades during the full length of a bar.
Skip Empty Intervals: Any interval without data is excluded from the file. There will not be
a timestamp. The only drawback to this method comes if a user is working in a spreadsheet,
as there will not be an equal number of prints each day.
Hold Last Value: Holds the value of the close of the last bar to have a price through all
intervals until another price occurs. This guarantees the number of bars per day is constant,
but creates artificial bars.
Fill With Zeroes: Any empty interval will have a zero (0) value for the Open, High, Low, Close,
and Volume. This also guarantees the number of bars per day is constant, but if it is graphed,
the zeroes will cause the chart to be useless.
Extend Last Interval
Active when Time Based Bars is selected at the ‘Interval’, this parameter is useful if there are
not an even number of intervals in a single day, based on the bar interval the user selected in
Granularity. For example, the U.S. stock market opens at 9:30 and closes at 16:00 EST. If the
user selects ‘60’ for the Granularity, there is not an even number of 60-minute bars in the day.
If Extend Last Interval is not checked, there will be a 16:30 bar that only contains 30 minutes
of data (15:30:00-15:59:59). However, if Extend Last Interval is checked, the last bar of the
day will be a 15:30 bar that contains 90 minutes of data (14:30:00-15:59:59).
Ignore Filtered Prices (Cash Indices only)
Active when creating Tick or Time Based Bars from Tick Trade data, this parameter allows
the user to generate bars using raw, unfiltered prices. If unchecked, bars are built using
prices that may be altered by Tick Data’s proprietary price filtering algorithm.
63
Begin Date/End Date
By default, the begin and end dates will both say MM DD YYYY. When MM DD YYYY is displayed,
the complete date ranges for each individual symbol in the list of checked symbols will be used
by the corresponding symbol. However, this can be overridden by entering begin and end
dates in the appropriate boxes.
The buttons to the right of the YYYY field will pull up calendars that can assist users to enter
dates.
Days Back to Process
Instead of creating a file with a specific date range, a user may want to look at data only for
the past x days. This setting is especially useful if such a client subscribes to daily updates, as
a file can be updated automatically each night to only reflect trading for the past x days.
Session(s) to Include (Cash Indices only)
For some cash indices, ticks continue to update for several minutes after the market officially
closes. Therefore, TickWrite provides an After-Hours session that will include these ticks that
are time stamped past the close. To only extract ticks that are within the official market hours,
a user can uncheck the After-Hours session and leave only Day Session selected.
Start Session At/End Session At
By default, the Start Sessions At and End Sessions At fields are inactive and display 00:00. Set
this way, TickWrite will write out all of the data for the sessions chosen for each day. If the
user selects multiple symbols, the file for each symbol will be written out with the respective
session hours of each. However, users can also confine the data for all selected symbols to a
particular time range each day.
To activate these fields, check the boxes to the left of the Start Sessions At and/or End Sessions
At fields (you can use either or both). Then enter the desired hours and minutes in 24-hour
(military) time. The End Sessions At value will act as the close of the day, and the last tick of
the session will be the last tick BEFORE the closing time entered.
Output and Formatting/Filtering
The bottom section of the Job window contains two tabs with parameters for output type,
file naming, output fields, and formats.
Output Tab:
Output To: Output data to a file or to the screen. If File is selected, the user must select the
Output parameters on the tab. If Screen is selected, all other Output parameters deactivate
(except for the Output Fields section). Screen output data can be copied in the window (select
64
multiple fields using the Shift and Ctrl buttons) and pasted into spreadsheets and text editors
like Word or Notepad. NOTE: Pasted data will use the Delimiter set in Output Fields; in
order to copy fields into separate cells in a spreadsheet, use Tab as the delimiter.
Compression: The user can write out ASCII files that are unzipped (the largest output files)
or compressed using Zip or Gzip.
If Output Exists: Determines how TickWrite will handle file creation if a file by the same
name already exists in the output directory.
Overwrite Existing: The existing file will be deleted and recreated according to the
parameters in the job. The user will not be warned that the existing file will be
overwritten.
Append Updates: When selected, TickWrite will attempt to append data in an
existing file using data generated by the job. This selection should primarily be used
by clients who subscribe to daily updates and have jobs scheduled to download and
process out the same data every day. It will decrease processing time, as the job will
begin where the existing file leaves off.
Skip: The extraction job will leave the existing file untouched and not extract new
data.
Output Directory: Enter the desired location of output files. This must be chosen prior to
processing data to a file. As with all parameters, this location can be set as a default by
selecting SETUP -> Tab Defaults -> Set Current Values as Default for Tab. NOTE: As with all
defaults, the Output Directory set in a tab will only affect that tab.
Name Output by Symbol: Will use the symbol of the instrument as the filename. This
parameter also allows users to include a file prefix and/or suffix and select the file extension.
Name Output by Custom Value: Allows the user to choose the filename of the output ASCII
file. NOTE: Active only when one symbol is selected.
Email Job Notification: Once you have entered valid SMTP server settings in Preferences,
enter a valid email address in this field to email notifications of Job success or failure, along
with an attached .twj Job file.
DATE WILDCARDS IN FILE PATHS: TickWrite7 supports date wildcards that can be used in
the output directory, file prefix, file suffix, and custom file name. The wildcards will resolve to
the current date and/or time as of when the collection job is first executed. This can be used
to dynamically create new directories/files based on the current date without the need to
create custom scripts. To utilize a wildcard, it must be denoted ${ and } in the literal value.
The following are the supported wildcards:
yyyy – current year
MM – current month
dd – current day of month
HH – hour of day (0 – 23)
mm – minute of hour
For example, the following output directory might be entered:
C:\temp\${yyyy-MM-dd}\TRADES
Assuming that today is April 16th, 2010 this would resolve to the following directory name:
C:\temp\2010-04-16\TRADES
Output Fields: Active whether the user selects Screen or File as the ‘Output To’, here the user
can make choices about the fields within the data file. You can choose whether or not to
65
include a header row that shows the field names at the top of each file. The field delimiter can
be chosen here by selecting Space, Tab, or by entering whatever character you wish to use
(comma ‘,’ is the most commonly-used character). Finally, choose the fields you wish to
include in the file. The up and down arrows to the right of the Field Name list allows users to
move fields up and down. NOTE: Rearranging the field order will slow down file creation
speed.
File Header: You can optionally elect to include a header as the first line in each output file
by checking the Include Header checkbox. By default, the header row will include the name of
each field, in the specified order, delimited by the specified delimiter. However, if you would
like to change the standard header to a custom value, you can do so by clicking the Add Custom
Header button entering your own header. This is useful if your internal systems require a
certain header or you need to name the output fields differently. Note that the custom header
is written exactly as entered; if any changes are made to the field selection the custom header
must be changed accordingly.
Formatting/Filtering Tab:
Date Format: Select the desired date format for the output file.
Price Decimals: Used to select the desired number of decimal places in the output file.
Default is set by default, and will use the standard number of decimal places required for the
contract. The user can also force TickWrite to output a specific number of decimal places by
selecting from the list.
Time Format: Select the desired time format. Since some data Tick Data offers has a
millisecond stamp, while others have only a second stamp or even only a minute stamp, by
selecting Optimal, TickWrite will use the proper time format. Alternately, the user can choose
a specific time format from the list.
Price Multiplier: Activated when checked, this parameter allows users to factor in a
multiplier to the entire output file. This multiplier must be a factor of 10, but can be a decimal
(i.e. .001, .1, 10, 100, etc.).
Time Zone: TickWrite has the ability to output data in various time zones. This is especially
helpful when working with data from an exchange that is not in your country, as some
countries have different schedules for adjusting for Daylight Savings Time. The three choices
are Exchange Time Zone (default), Local Time Zone, and GMT. Exchange Time Zone will
output the data in the time zone of the exchange on which it is traded. For Indices, this
generally means the exchange on which the futures contract is traded. One notable exception
is the DJIA cash index data, which is in Eastern Standard Time even though the DJ futures
contract is traded in CST on the CBOT. The Local Time Zone value is derived from the time
zone to which your computer is set. Please be sure your computer’s clock is set properly. GMT
66
is Greenwich Mean Time, the international baseline time zone. GMT does not adjust for
Daylight Savings Time, so depending on the time of the year, the number of hours from one
time zone to GMT varies. TickWrite handles this automatically.
Field Filters: This feature allows users to filter output data and only display data meeting the
desired parameters. For index/indicator data, you can only filter based on price. Select your
filter parameters and click the ‘plus’ sign. To remove a filter or all filters, right-click in the field
display window to show a context menu.
67
Executing Jobs via the Command Line
In addition to graphical user interface (GUI), certain TickWrite functionality can also be accessed from
the command line:
Execute a job file – the job must be created first using the TickWrite user interface and saved
to a file; you then reference the saved file to execute the job; it is also possible to override the
parameters in the job file as command line switches. Although it would be very verbose, it is
also possible execute a job consistently entirely of command line switches (no job file).
Download data – this feature can be used to check for updates from a custom script that a
user may have developed.
Interact with the TickWrite Scheduler – activate, deactivate, execute or delete scheduled
tasks.
Generate a Change Report – create a text file report of all data files that have been modified
since a given date/time; see Appendix E for more details.
NOTE: Beginning with the 20150615 release of TickWrite 7 for Linux, all command line
switches must first have a –args switch. Linux users of previous versions should upgrade to the
latest version of TickWrite 7. Windows users should not include the -args switch.
For full details and examples of commands, please reference the command line help by typing the
following at the command prompt from the directory where TickWrite is installed:
Windows: TickWrite –help
Linux: TickWrite –args –help
Users can use the -f switch to run an extraction from the command line. There are three options:
1) The -f switch can be followed by one or more Job files. For example:
Windows: TickWrite -f C:/temp/JOB1.twj C:/temp/JOB2.twj
Linux: TickWrite -args -f C:/temp/JOB1.twj C:/temp/JOB2.twj
2) Users can override any number of parameters in the Job file on the command line. For
example:
Windows: TickWrite -f C:/temp/JOB1.twj C:/temp/JOB2.twj -START_DATE
01/01/2011 -END_DATE 01/31/2011
Linux: TickWrite -args -f C:/temp/JOB1.twj C:/temp/JOB2.twj -START_DATE
01/01/2011 -END_DATE 01/31/2011
In this case, the start date and end dates contained in JOB1.twj and JOB2.twj are ignored and
01/01/2011 and 01/31/2011 is used instead.
3) Users supply a complete list of parameters on the command line. For example:
Windows: TickWrite -f -OUTPUT_CONTRACT ALL -WORKING_JOB true COLLECTION_TYPE COLLECTION_TYPE.FUTURES -EXTRACT_TYPE
COLLECTOR_SUBTYPE_FUT_TICK_DAILYBAR -REQUESTED_DATA
8|AD[20110202],224|AU[20110202] -START_DATE 08/01/2010 -
68
END_DATE 01/30/2011 -DESTINATION_DIRECTORY C:/temp/TIK673 -INCLUDE_HEADER_ROW true -OVERWRITE_EXISTING false
Linux: TickWrite -args -f -OUTPUT_CONTRACT ALL -WORKING_JOB true COLLECTION_TYPE COLLECTION_TYPE.FUTURES -EXTRACT_TYPE
COLLECTOR_SUBTYPE_FUT_TICK_DAILYBAR -REQUESTED_DATA
8|AD[20110202],224|AU[20110202] -START_DATE 08/01/2010 END_DATE 01/30/2011 -DESTINATION_DIRECTORY C:/temp/TIK673 -INCLUDE_HEADER_ROW true -OVERWRITE_EXISTING false
Note that the -f switch still must be used, but no file name is necessary here.
Please keep these points in mind:
All other switches (such as -mail and -verify_symbols) are still supported.
The -f switch and (optional) list of Job files must appear first. However, the order of all other
parameters does not matter and they can be supplied in any order.
The format of a parameter that is overriding a Job file parameter is: -NAME_VALUE The
parameter name must be preceded with a dash (-) and it is separated from its value by a space
(NOT an equals sign). So if the name of the parameter is START_DATE, the format should be START_DATE 01/01/2011
The names and values of parameters should be exactly as they appear in the .twj Job file. Any
values that contain spaces MUST have double quotes around the value when specified on the
command line.
The best approach to using the Command Line is to create a Job in the TickWrite GUI, save it,
and open it in a text editor to see the names of the various parameters, which to use, and how
to input values.
69
Appendix A: Network Connectivity Requirements
With the introduction of features like daily updates and multi-user installations, TickWrite 7 is a
networked-enabled application that depends on certain network access being available in order to
function properly (as opposed to TickWrite 6 which functioned as a purely standalone application).
Network connectivity is required for both receiving updates for Tick Data as well as normal TickWrite
operation. These are each discussed below:
Data Updates from Tick Data
If you subscribe to data updates from Tick Data, an Internet connection from the machine on which
TickWrite is installed is required (at least during the times when the updates will be run). All data
updates will be handled by Tick Data’s update server cluster under the host name
tw-update.tickdata.com. TickWrite handles encryption of all sensitive data (e.g. user account
information) before being transmitted.
By default, all TickWrite updates are retrieved using the Hyper-Text Transfer Protocol (HTTP) at port
80. This is suitable for nearly all users as HTTP is widely support and the least problematic with
organizational firewalls. In certain customer environments, HTTP connectivity is restricted by use of
a proxy server. In this case, you may need to enter the details about your proxy server by going to
Setup -> Preferences and selecting Connection Settings. Here you can enter your organization’s proxy
server information as well as proxy server credentials if they are required. This is the same
information you might enter into your web browser in order to establish Internet connectivity. If you
do not know your organization’s HTTP proxy server information, please consult your IT department
for assistance (Tick Data is NOT able to provide this information to you).
The connectivity to Tick Data’s update server can be tested from within TickWrite at any time by going
to:
Help -> Test Connection To Update Server
It is a good idea to do this after installation or after adding/editing any connection settings (e.g. proxy
server info) in order to ensure that TickWrite can still connect to get data updates.
While not very common, it is possible to have TickWrite connect for updates directly over a
TCP socket (as opposed to using HTTP) at port 11100. The update behavior is identical to using HTTP,
but this should generally only be enabled if there is a problem using HTTP. To change to use TCP,
please go to Setup -> Preferences from within TickWrite and select Connection Settings. Optionally,
the name of a SOCKS proxy can be entered for use with TCP updates if your organization requires it.
Again, the connection can be tested from within TickWrite by going to:
Help -> Test Connection To Update Server
TickWrite Operation – Single Installations
Because of the TickWrite scheduler and other features, TickWrite 7 utilizes a service process that runs
in the background. Therefore, even a single installation of TickWrite 7 still makes use of network ports.
However, because connections are only made back to the same host, firewalls should almost never be
a problem. Additionally, TickWrite has attempted to use higher, non-standard ports to avoid conflicts
with existing applications. The below information on port usage is intended as a reference only and
port numbers only need to be changed or configured when it is shown that there is a problem or
conflict. Currently, there are two static ports and one dynamic port used in TickWrite (dynamic ports
are dynamically chosen at application startup based on availability on the host system).
The static ports are 12092 and 12093 and they must either be available on the system or set to
alternate available ports. To change TickWrite to utilize different ports, create the following text file:
<TICKWRITE_ROOT>/config/user-configs/custom_ports.properties
70
In this file, add the following lines:
TW_METASERVER_PORT=<something_besides_12092>
TW_RMI_PORT=<something_besides_12093>
You can optionally add comments lines to the file as long as they are preceded by the # character.
Regarding the dynamic port, it should not conflict with any other ports since it is automatically selected
from available ports on the system. However, if you do need to makes this port static, you may do so
by adding the following line to the custom_ports.properties files created above:
TICKWRITE.TICKWRITE_SCHEDULER.SERVICE_PORT=<some_port>
TickWrite Operation – Multiple Install Environments (e.g. Site Licenses)
In an environment with multiple TickWrite installations, one installation is designated as the primary
installation. Other installations are known as client or workstation installations. Workstation
installations must be able to communicate with the primary installation. Additionally, because of the
scheduler functionality, all TickWrite installations make use of a background service with which it
must communicate. All of this communication takes place using TCP ports. Firewalls are generally not
an issue because communication is confined to the Local Area Network (LAN). Additionally, TickWrite
has attempted to use higher, non-standard ports to avoid conflicts with existing applications.
Therefore, in most cases there should be no configuration necessary with regard to network ports. The
below information on port usage is intended as a reference only and port numbers only need to be
change or configured when it is shown that there is a problem or conflict.
The primary installation makes use of two static ports and one dynamic port (dynamic ports are
dynamically chosen at application startup based on availability on the host system). The static ports
are 12092 and 12093. To change TickWrite to utilize different ports, create the following text file:
<TICKWRITE_ROOT>/config/user-configs/custom_ports.properties
In this file, add the following lines:
TW_METASERVER_PORT=<something_besides_12092>
TW_RMI_PORT=<something_besides_12093>
You can optionally add comments lines to the file as long as they are preceded by the # character.
Regarding the dynamic port, it should not conflict with any other ports since it is automatically selected
from available ports on the system. However, if you do need to makes this ports static, you may do so
by adding the following lines to the custom_ports.properties files created above:
TICKWRITE.TICKWRITE_SCHEDULER.SERVICE_PORT=<some_port>
A workstation installation makes use of one static port (12093) and one dynamic port. If you need to
make port changes on a workstation installation, the process is similar to the instructions for the
primary installation. Create the custom_ports.properties file add the following lines:
TW_RMI_PORT=<something_besides_12093>
TICKWRITE.TICKWRITE_SCHEDULER.SERVICE_PORT=<some_port>
Additionally, if you changed the port numbers of the primary installation, you will need to configure
each workstation with these modified port numbers. This can be achieved by adding the following two
lines to the custom_ports.properties:
TW_METASERVER_PORT=<TW_METASERVER_PORT_ON_PRIMARY_INSTALL>
TW_CENTRAL_RMI_PORT=< TW_RMI_PORT_ON_PRIMARY_INSTALL>
71
TickWrite Operation –Special Standalone Mode
For customers who use TickWrite on single computer AND by only one user at a time, you have the
option of running TickWrite in special “standalone” mode. As discussed above, even a single instance
of TickWrite utilizes a background process and network communication. While this setup offers many
advantages and powerful features, it may be undesirable for certain users that have TickWrite installed
on a single computer.
In standalone mode, no network communication is utilized and TickWrite operates as a single desktop
application. However, there are some limitations to running TickWrite in standalone mode which
include:
The TickWrite Scheduler is disabled; all data updates and extraction jobs must either by run
from the GUI or command line interface (you could, however, use your operating system
scheduling utility to run TickWrite commands).
TickWrite is limited to performing one operation at a time (only one extraction job or data
update at a time can occur). If you attempt to open multiple instances of the TickWrite GUI,
you will receive an error message on the second and subsequent attempts.
Workstation installations on other machines are not supported.
The above limitations are not intended to penalize a user for running in standalone mode but are,
unfortunately, necessary to avoid possible data corruption that might otherwise occur.
If you wish to enable standalone mode, it must be done manually, but it is a relatively simple, one time
setup.
1) Shut down TickWrite GUI if it is running.
2) On a Windows machine, you should disable the TickWrite Service. Go to Start -> Run and
type services.msc This will present the Microsoft Windows Services applet. Scroll down
and locate the TickWrite Service. Right click and select Stop to stop the service if it is
Started. Then right click again, select Properties, and set the Startup Type to Disabled.
Click OK to save.
NOTE: These actions require administrative rights on the computer.
NOTE: You could optionally uninstall the service but we do not recommend this as
it makes it more difficult to revert back to normal mode if necessary.
3) On a Linux machines, kill any TickWrite processes that are running on the machine.
4) Create the following text file:
<TICKWRITE_ROOT>/config/user-configs/standalone.properties
In this file, add the following line:
STANDALONE_TICKWRITE=true
5) Restart TickWrite and it will be running in standalone mode.
NOTE: If you wish to back up any .properties files before making changes, do not
store the back-up files in the \config folder or any subdirectories therein; TickWrite
will read every properties file in \config and its subdirectories regardless of their
locations.
72
Appendix B: Special Notes for TickWrite on Microsoft Windows Machines
When TickWrite is installed on Microsoft Windows machines, it utilizes a “Windows Service” for
certain functionality, including the TickWrite Scheduler. By using a Windows Service, TickWrite is able
to run scheduled tasks while the TickWrite UI is not running and even when you are logged off your
machine.
To view and manage the TickWrite Service, do one of the following:
Right click My Computer, select Manage, drill down on Services and Applications, and select
Services
Alternatively, go to Start -> Run and type “services.msc” (without the quotes)
You will be presented with the Microsoft Windows Services Applet where you can find the TickWrite
Service:
NOTE: You may not be able to access or modify Windows Services if you do not have
administrative privileges on your machine. In this case, you will need the assistance of your IT
department.
By default, the TickWrite Service is configured to Log On As the LocalSystem account. This
configuration works fine if your Deep History (i.e. data files), your job files, and your output directories
are all local locations (e.g. all on local hard drives such as C:\ or D:\). However, if you are using a
network location, this is a problem because for security reasons the LocalSystem account cannot access
network locations (this is a restriction imposed by Microsoft and Tick Data has no control over this).
For example, it is very common for TickWrite to be configured such that the Deep History data resides
on a network device that has a large storage capacity. While you would be able to run jobs without any
problem from the TickWrite GUI, any jobs you attempt to automate using the TickWrite scheduler
would fail because the TickWrite Service running under LocalSystem is not allowed to access this
network location.
73
The solution for this is the modify the TickWrite Service’s Log On As setting to a user account that has
the appropriate access to the network. Usually, you can just modify it to run as the same user account
that you use to log into the computer.
NOTE: You only need to follow the below steps if your installation of TickWrite references network
locations. If you operate on a single computer in a standalone environment where all your data
and jobs reside on the same machine, you do not need to take any action.
Follow these steps to modify the Log On As setting:
Right click the TickWrite Service in the Microsoft Windows Services Applet and select
Properties.
Select the Log On As tab as shown below:
Select the “This Account” radio button and type in your user ID in the text box to the right.
Usually, your user id needs to be proceeded by your organization’s domain. For example, if
you organization’s Windows domain is “TICKDATA” and your user id is “tickwrite”, you would
enter “TICKDATA\tickwrite” (without the quotes).
Enter and confirm the user’s password in the fields provided.
Click OK to confirm your changes. If there is some problem such as an incorrect password,
Windows should alert you. If you do not have sufficient privileges to modify a service, you will
need to seek help from your IT department.
The new user settings for the service will stay in effect indefinitely and will persist even if your
machine is rebooted. However, if you need to upgrade your installation of TickWrite to a newer
version, the service will be deleted and reinstalled. Therefore, you must re-perform the above
steps whenever your upgrade TickWrite to a newer version.
Once this change is in place, the TickWrite Scheduler will be able to access any network locations
the specified user account can access. However, one additional restriction imposed by Microsoft
is that Window Services are not able to utilize mapped network drives. It is quite common for
users to map frequently used network locations to available drive letters on their computer. For
example, a location on a network device might be mapped to the V:\ drive on your computer. If
this is where you want your data files to reside, you might have configured your Deep History
location to be something like V:\TICKWRITE_DATA. Again, while this setting will work fine when
running extractions from the TickWrite GUI, any job automated via the TickWrite Scheduler will
fail because it is unable to resolve the V:\ drive.
74
The solution to this is to not reference mapped network drives within TickWrite configuration and
to instead use UNC style paths. For example, the V:\ drive might be mapped to the share MYSHARE
on the machine MYMACHINE. In this case instead of setting up the Deep History location to be
V:\TICKWRITE_DATA, you would use the UNC path:
\\MYMACHINE\MYSHARE\TICKWRITE_DATA
which avoids use of the drive letter and is a location that can be resolved by the TickWrite
Scheduler.
Generally speaking there are three places to ensure that UNC paths (or local paths like C:\) are
used:
Deep History Locations – these are initially set up during installation as part of the
configuration wizard. However, they can be edited after installation by going to the
following menu in TickWrite: Set Up -> Preferences and drill down on DEEP HISTORY
LOCATIONS. Review the paths used under each items and ensure that mapped network
drives are not used.
Output directories in job files – for any jobs that are scheduled, open those jobs in the
TickWrite GUI and ensure that Output Directory defined (at the bottom on the Output tab)
is not using a mapped network drive letter.
The path to job files within schedule tasks – access the scheduler within TickWrite by
going to Set Up -> Scheduler. For each task defined, select Edit and select the Jobs tab in
the dialog that comes up. Ensure that the path to any job files defined are not using
mapped network drive letters and change to UNC paths if necessary.
75
Appendix C: Special Notes for TickWrite on Linux Machines
TickWrite Service
A TickWrite installation on a Linux machine utilizes a background service/process known as the
TickWrite Service. The use of this background service allows the TickWrite Scheduler to execute tasks
when the TickWrite GUI is not running or if no user is currently logged into the machine. Additionally,
on a primary installation, the TickWrite Service runs a lightweight metadata server to support
TickWrite workstation installations on other machine on the network.
By default, the TickWrite Service will be automatically started upon installation of TickWrite.
Additionally, whenever the TickWrite GUI (or command line) is run, the TickWrite Service will be
started if it is not already running.
However, due to the platform differences in various versions of Linux, the TickWrite Service does not
come up automatically after a machine reboot. This can pose a potential problem if scheduled tasks
are set up to download data updates or run jobs at regular intervals. For example, if the machine is
rebooted and no user opens the TickWrite GUI or runs a TickWrite command, the TickWrite Service
does not get restarted. Therefore, any scheduled tasks will not run during this time.
The solution to this is to create a custom script that starts the TickWrite Service and configure that
script to be run each time the system is rebooted. The TickWrite Service can be started by invoking
the TickWriteWindow executable with the following parameters (all on one line):
TickWriteWindow–Dlog_file_name=TICKWRITE_SERVICE.log
com.tickdata.tickwrite.centralnode.TickWriteCentralNode
Kernel Settings for running TickWrite
When extracting data during normal use, TickWrite 7 may require many files to be opened
simultaneously. If the user account running TickWrite 7 is not properly set up, corruption can occur
when running large jobs. We recommend changing the /etc/security/limits.conf file so the “hard
locks” is set to 28000. For example, where user ID = tickdata, the settings should be:
tickdata
tickdata
tickdata
tickdata
tickdata
tickdata
soft nofile
hard nofile
soft noproc
hard noproc
hard locks
soft locks
1024
65636
2047
16384
28000
14000
76
Appendix D: TickWrite Data File Change Report
Tick Data will at times make corrections to certain data. While these corrections will be
automatically downloaded into the customer’s deep history, many customers desire to know what
files have been impacted since a certain point. Therefore, TickWrite offers a Data File Change Report
that can be generated by customers. This report can either be generated from the TickWrite user
interface or from the command line. To generate this report from the user interface, go to the Tools
menu and select Data File Change Report.
To generate a report from the command line, type the following command from the directory where
TickWrite is installed:
TickWrite –cr –help
This will print complete details about the required and optional switches as well as examples of how
to generate the change report from the command line.
Depending on the amount of data for which a customer is licensed, the report will take anywhere
from a few seconds to several minutes to generate. The change report generated is an ASCII file that
is human readable but that can also be easily parsed by a script or program that the customer might
choose to develop. The report contains the following format:
1) CHANGE_REPORT_SINCE_DATE: Contains the date and time specified for change report
2) MARKET_HEADER: Contains the name of the market and dataset that follows
3)
a. For equity markets
FILE: Path to file, last modified timestamp of file
b. For futures, indices, and indicators
OUTER_FILE: Path to monthly zip file, last modified timestamp of file
ENTRY_FILE: Name of zip entry inside of outer file, last modified timestamp of entry
Repeat ENTRY_FILE for each entry modified since date/time specified for report
4) MARKET_SUMMARY: Total number of change items for this market
Repeat items 2 – 4 for each market that is part of the change report
5) TOTAL_SUMMARY: Total number of changed items for all markets in the change report
Please see below for an example report run that includes two market/data set combinations:
CHANGE_REPORT_SINCE_DATE:2010-02-15 17:45
MARKET_HEADER:FUT,TRADE_DB
OUTER_FILE:C:\DATA\FUT\C\CF\2009_12_CF.zip,2010-03-31 22:49
ENTRY_FILE:2009_12_CF_SUMMARY.asc.gz,2010-03-11 13:37
ENTRY_FILE:CFF10_2009_12_31.asc.gz,2010-03-11 13:36
ENTRY_FILE:CFG10_2009_12_31.asc.gz,2010-03-11 13:36
ENTRY_FILE:CFH10_2009_12_31.asc.gz,2010-03-11 13:36
OUTER_FILE:C:\DATA\FUT\E\EN\2009_12_EN.zip,2010-03-31 22:49
ENTRY_FILE:2009_12_EN_SUMMARY.asc.gz,2010-02-23 19:07
ENTRY_FILE:ENH10_2009_12_11.asc.gz,2010-02-23 19:07
MARKET_SUMMARY:6
MARKET_HEADER:US_TED,TIMEBAR_DB
FILE:C:\DATA\US_TED\2010\01\OMB\2010_01_04_X.zip,2010-03-31 22:12
77
FILE:C:\DATA\US_TED\2010\01\OMB\2010_01_05_X.zip,2010-03-31 22:12
FILE:C:\DATA\US_TED\2010\01\OMB\2010_01_06_X.zip,2010-03-31 22:12
FILE:C:\DATA\US_TED\2010\01\OMB\2010_01_07_X.zip,2010-03-31 22:12
FILE:C:\DATA\US_TED\2010\01\OMB\2010_01_08_X.zip,2010-03-31 22:12
FILE:C:\DATA\US_TED\2010\01\OMB\2010_01_11_X.zip,2010-03-31 22:12
FILE:C:\DATA\US_TED\2010\01\OMB\2010_01_12_X.zip,2010-03-31 22:12
FILE:C:\DATA\US_TED\2010\01\OMB\2010_01_13_X.zip,2010-03-31 22:12
FILE:C:\DATA\US_TED\2010\01\OMB\2010_01_14_X.zip,2010-03-31 22:12
FILE:C:\DATA\US_TED\2010\01\OMB\2010_01_15_X.zip,2010-03-31 22:12
FILE:C:\DATA\US_TED\2010\01\OMB\2010_01_19_X.zip,2010-03-31 22:12
FILE:C:\DATA\US_TED\2010\01\OMB\2010_01_20_X.zip,2010-03-31 22:12
FILE:C:\DATA\US_TED\2010\01\OMB\2010_01_21_X.zip,2010-03-31 22:12
FILE:C:\DATA\US_TED\2010\01\OMB\2010_01_22_X.zip,2010-03-31 22:12
FILE:C:\DATA\US_TED\2010\01\OMB\2010_01_25_X.zip,2010-03-31 22:12
MARKET_SUMMARY:15
TOTAL_SUMMARY:21
78
Appendix E: Moving a TickWrite Installation to Another Computer
For a variety of reasons, you might find that you need to move your TickWrite installation from one
computer to another. Because a TickWrite installation may contain many custom settings, these tips
offer a shortcut for getting your new installation up and running without needed to reconfigure
everything you already did.
NOTE: These tips should work in most situations, but if problems occur you may need to
perform a fresh installation.
1) Uninstall from the old machine. Always use the uninstall program included with TickWrite
and found in the TickWrite installation directory (on Windows computers, there should also
be an Uninstall item off of the Start menu).
2) Note that after the uninstall completes, some directories and files are left behind and not
deleted. These files represent your custom settings such as scheduled tasks, extraction jobs,
data file location configurations, and possibly the data files themselves. Do NOT delete these
files; they will be used later in this process.
3) Use the installer to install on the new machine. After the installation part completes, the
configuration wizard will come up where it asks you whether this is a Primary Installation of
Workstation Installation. At this point, click Cancel to exit the wizard. You do not need to
complete the wizard at this time.
4) Copy all the files left behind from the uninstall from Step 2 to the new installation. Be sure
that the directory structure remains intact so that all files are copied to the corresponding
locations in the new installation. Overwrite any existing files.
5) Start up TickWrite; if the main window comes up, then you have successfully completed the
move. If the configuration wizard comes up again, it most likely means that you version you
have just installed is newer than the version you uninstalled from the old computer. In this
case, complete the configuration wizard to complete the move (all your relevant custom
settings have still been imported).
There are a couple special considerations to keep in mind when performing the move:
The instructions above assume that you are installing to the same location on the new
computer. For example, if the old computer was installed at C:\TickData\TickWrite7 it is
assumed that it is installed to the same location on the new computer. If this is not the
case, then it is possible that your Deep History Root locations (i.e. data file locations) are
not correct. Please verify the paths by going to Setup -> Preferences -> DEEP HISTORY
LOCATIONS and correct if necessary.
If the installation that was moved was a primary installation AND your organization has
one or more workstation installations, those workstations installations need to be
updated to reference the new primary installation. The easiest way to do this is actually
to reinstall each workstation as this ensures its version is consistent with the primary (a
requirement of TickWrite7). On each workstation, simply uninstall using the uninstall
program and reinstall to the same location. On the first page of the configuration wizard
change the primary installation host name to the new value and complete the wizard. This
workstation is now up to date and synced with the new primary installation. All custom
settings such as scheduled tasks, job files, etc. on the workstation installation are still in
place. However, the one final thing to verify on the workstation installation is that its own
Deep History Root locations are still correct (since the primary installation was moved,
these would be incorrect if the data files resides within the primary installation). On the
workstation installation, please go to Setup -> Preferences and select DEEP HISTORY
LOCATIONS. Review all paths provided and correct if necessary.
79
If you have any questions please call (703) 757-1370 during normal business hours
8a.m. – 6 p.m. (Eastern Time) or e-mail us at [email protected].
10134-G Colvin Run Road
Great Falls, VA 22066
(703) 757-1370
www.tickdata.com
80