1
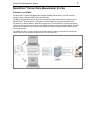
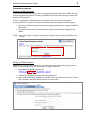
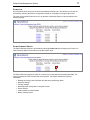
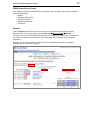
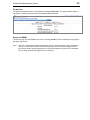
Patient Data Management System User Manual Model 4340 Rev Date: 11/2014 DN 1014638 Rev 3 © 2013 NeuroPace, Inc. Introduction 3 TABLE OF CONTENTS Introduction ................................................................................................................................................. 5 Contacting NeuroPace.............................................................................................................................. 5 About this Manual ..................................................................................................................................... 5 Typographic Conventions ......................................................................................................................... 5 ® NeuroPace Patient Data Management System ....................................................................................... 7 Overview of the PDMS ............................................................................................................................. 7 Accessing the PDMS ................................................................................................................................ 8 Password Information ............................................................................................................................... 9 Setting up Personal Profile Information .................................................................................................. 10 Navigating the PDMS ............................................................................................................................. 10 Patient List .............................................................................................................................................. 11 Patient Summary Report ........................................................................................................................ 11 PDMS Patient-Specific Pages ................................................................................................................ 12 Reports ................................................................................................................................................... 12 Neurostimulator History .......................................................................................................................... 17 Configure Detection ................................................................................................................................ 18 Programming Epochs ............................................................................................................................. 23 Patient Info .............................................................................................................................................. 24 Exiting the PDMS .................................................................................................................................... 24 PDMS Troubleshooting ............................................................................................................................ 25 4 5 Introduction INTRODUCTION CONTACTING NEUROPACE ® All questions or concerns regarding the NeuroPace Patient Data Management System should be forwarded to: NeuroPace, Inc. 455 N. Bernardo Ave. Mountain View, CA 94043 Customer Support: 1-866-726-3876 (Toll Free in the United States) Website: www.NeuroPace.com ABOUT THIS MANUAL ® This manual is intended to provide instructions for using the NeuroPace Patient Data Management System. Additional information is presented on the Patient Data Management System website. ® ® This is a reference manual supporting the NeuroPace RNS System. For further information ® ® ® about the RNS Neurostimulator, NeuroPace Programmer, and NeuroPace Remote Monitor ® ® see the RNS System User Manual and the NeuroPace Remote Monitor Manual available at www.NeuroPace.com or by contacting NeuroPace, Inc. TYPOGRAPHIC CONVENTIONS This manual uses different formats and symbols to distinguish notes and instructions. Note: Notes provide additional information that is particularly useful or important. 1. Numbered paragraphs contain instructions that provide procedural information. ® BOLD SMALL CAPS identify text or user-selectable buttons on the NeuroPace Patient Data Management System website pages. BOLD SMALL CAPS BOLD SMALL CAPS: phrases or words in BOLD SMALL CAPS separated by an ® arrow ( ) indicate a sequential series of commands to be selected on the NeuroPace Patient Data Management System website pages. 6 7 Patient Data Management System NEUROPACE® PATIENT DATA MANAGEMENT SYSTEM OVERVIEW OF THE PDMS ® The NeuroPace Patient Data Management System (PDMS), Model 4340, is used to store and ® provide access to historical RNS Neurostimulator data. ® ® The RNS Neurostimulator stores data until interrogated by either the NeuroPace Programmer or ® the NeuroPace Remote Monitor. Interrogation transmits data from the Neurostimulator to the Programmer or Remote Monitor. When the Programmer or Remote Monitor is synchronized via the internet by way of a secure connection to the PDMS, the data are transmitted to the PDMS. The data are stored on PDMS and can be accessed by authorized users through the PDMS website using a secure web browser. The PDMS can also be used to create and simulate detection settings. The detection settings can then be sent to a user identified Programmer for use at a later date. Patient Data Management System ACCESSING THE PDMS 1. Using any computer with internet access, navigate to https://patientcare.neuropace.com/. 2. Enter the USER NAME and PASSWORD. 3. Click LOG IN. 8 Patient Data Management System 9 PASSWORD INFORMATION Obtaining a PDMS Password A user name and password are required for user authentication and access to the PDMS. The user name and password provided for accessing the PDMS are NOT the same as those provided for the ® NeuroPace Programmer. Users are responsible for maintaining the confidentiality of their user name and password. Contact NeuroPace to obtain a user name and password and then complete the following steps: 1. Enter the NeuroPace assigned user name and temporary password to access the PDMS for the first time. 2. Follow the instructions on the website page to change a password after logging into the PDMS. NOTE: Users are required to change their temporary password after accessing the PDMS for the first time. Editing the PDMS Password Changes to an existing PDMS password can be made at any time in the future by logging into the PDMS. Follow the directions on the website page to change a password. 1. Select My Profile Edit My Password. 2. Complete the information to change the existing password. 3. Select a hint to remember the password should it need to be retrieved in the future. The hint will be emailed to the email address listed in the user’s profile. Patient Data Management System 10 SETTING UP PERSONAL PROFILE INFORMATION Viewing and Editing Personal Profile Profile settings can be viewed and modified by selecting MY PROFILE, which is located on every page in the upper-right corner. Changes to profile information can be made at any time by selecting MY PROFILE EDIT MY PROFILE. Editing the Time Zone ® The PDMS displays RNS Neurostimulator event timestamps in the time zone of the user’s choice. Some information may be time-stamped in a different or preferred time zone. To change the time zone information, select MY PROFILE EDIT MY TIME ZONE. NAVIGATING THE PDMS Navigating on the PDMS is done through a tab system and hyperlinks. Tabs, which are located at the top of every PDMS page, are also used to navigate to other pages on the website, and inform the user where he or she is within the PDMS. In the example, the REPORTS tab has been selected. Hyperlinks are also used to direct the user to another location within the PDMS or to open a PDF file. Patient Data Management System 11 PATIENT LIST A list of patients at the user’s site is shown immediately following login. The Patient List can also be accessed by selecting the Patient List hyperlink located on every page in the upper-right corner. The most recent Implant Date and an icon to generate a Summary Report are also provided on the Patient List page. PATIENT SUMMARY REPORT The Patient Summary Report is accessible by selecting PATIENT LIST and clicking on the Printer icon under Summary Report on the same line as the Patient name. The Patient Summary Report provides an overview of the each patient’s Neurostimulator data. The report is generated in PDF format which can be printed. The Report contains the following information: • Montage (including Lead information and last two programming dates) • Detection settings • Therapy settings • Neurostimulator activity data in histogram format • Recent ECoGs • Lead impedance measurements • Battery measurements Patient Data Management System 12 PDMS PATIENT-SPECIFIC PAGES Once a patient is selected, additional tabs are available to the user. Each of these will be explained on the following pages. • Reports • Neurostimulator History • Configure Detection • Programming Epochs • Patient Info REPORTS From the REPORTS tab, the user can access a series of reports detailing information about the Neurostimulator. To access this page, select PATIENT LIST Select a Patient REPORTS. The user can select the desired Neurostimulator data by clicking on the “Report Type” of interest and can view ECoG data for the indicated date by clicking on the ECoG thumbnail under “Additional Information”. Note that the user can customize the “Report Type” and “Additional Information” presented by navigating to the “preferences” hyperlink. Patient Data Management System Types of Reports There are six types of patient reports: • Interrogation (Initial or Subsequent within the Programmer session) Interrogation time/date Programmed Neurostimulator settings Event counters (# of detections, stimulations, etc) Event date/time and details • Programming Programming date/time Programmed Neurostimulator settings • Electrode Impedance Impedance measurement date/time Impedance measurement of each electrode (in ohms) • Battery Measurement Battery measurement date/time Battery measurement value (in Volts) • Therapy Testing (shows therapy testing values) • ECoG ECoG trigger time/date ECoG record ECoG trigger reason ECoG markers (detections, stimulations, etc) 13 Patient Data Management System 14 Viewing Reports Neurostimulator Reports To view Interrogation, Programming, or Electrode Impedance reports, click on the report hyperlink provided under “Report Type”. Battery Measurement and Therapy Testing values are provided directly on the reports page under “Additional Information”. Viewing ECoGs To review an ECoG, click on one of the ECoG thumbnails under “Additional Information”. Clicking on the ECoG thumbnail directs the user to 3 visualizations of the ECoG record as described below. Example images are provided on the next page. • Top panel: displays the entire ECoG record • Middle panel: spectral domain signal. The X-axis units are time in seconds. The Y-axis units are frequency from 0 Hz at the bottom to 125 Hz at the top. The amount of power present at each frequency is conveyed by the “hotness” of the color with red being the highest power and blue being the lowest. • Bottom panel: larger, scrollable ECoG. The gain and timebase can be adjusted for detailed review. Patient Data Management System 15 Patient Data Management System 16 Categorizing Electrocorticograms (ECoGs) Users have the option to categorize ECoGs under the Report Type column by selecting a category from the drop-down list located next to each ECoG thumbnail. In the example below, an ECoG category of “Epileptiform activity” is selected. Patient Data Management System 17 NEUROSTIMULATOR HISTORY The NEUROSTIMULATOR HISTORY tab provides a histogram view of historical Neurostimulator data. To review the historical data select PATIENT LIST Select a Patient NEUROSTIMULATOR HISTORY. The user can view a narrower time window by clicking on a year to view by month, then on a month to view by day, and then on a day to view by hour as desired. th The numbers in the figure above represent the total count for each day. For example, on March 16 2010, there were 2 ECoGs stored, 114 Pattern A / Channel 1 detections, 339 Pattern B / Channel 2 detections, 450 Episode Starts and Episode Starts with Therapy (Tx), and 2 Long Episodes. Patient Data Management System 18 CONFIGURE DETECTION The CONFIGURE DETECTION tab provides a series of steps to enable the user to create detection sets. To access this page select PATIENT LIST Select a Patient CONFIGURE DETECTION. A Detection Set is a combination of 2 detector channels and up to 3 detection tools that can be programmed into the Neurostimulator. The user may create Detection Sets and simulate the new detection settings on ECoGs stored on the PDMS. When the physician is satisfied with the detection simulation, the Detection Set can be downloaded to a Programmer from the PDMS. When the patient is in the office, this Detection Set can be programmed into the Neurostimulator. Creating a Detection Set There are five steps to configure and save a new Detection Set. Each step is summarized below, then explained in detail on the following pages. 1. Create/Modify an ECoG Set. 2. Load an ECoG Set to use in configuring detection. 3. Load Detection Set to use in configuring detection. 4. Modify and Simulate Detection Set. 5. Save and Send Detection Set. Step 1: Create/Modify an ECoG Set ECoG Sets are used to test proposed Detection Sets. The ECoG set should include ECoGs containing the type of ECoG activity the user wishes to detect as well as ECoGs containing baseline activity the user does not wish to detect. Detection Sets should promptly detect ECoG activity and not detect on baseline activity. Below are the steps for creating an ECoG set: 1. Click “Create a New ECoG Set” or “Modify/Delete an Existing ECoG Set” as applicable. 2. If a new set is being created, skip to the next step. If an existing set is being modified, select the ECoG Set to be modified (or deleted) from the drop-down list to the right of ECoG Sets. Patient Data Management System 19 3. Select the ECoGs to be included in the ECoG Set by placing a check in the box next to each ECoG. The background of the selected ECoG record will become highlighted. The ECoGs selected will also appear in the right panel of the browser window (not shown here) under “Selected ECoGs”. 4. After the desired ECoGs have been selected, if not already named, name the ECoG Set (Example: “Test Set #1”) and click the “Save Set” button. 5. After the Detection Set is saved, click the “Configure Detection” hyperlink to return to the LOAD DETECTION SET tab. Step 2: Load an ECoG Set 1. Select the ECoG Set that will be used for configuring detection. The saved ECoG sets are provided in a drop-down list at the top right of the CONFIGURE DETECTION page. Patient Data Management System 20 Step 3: Load Detection Set 1. Select the Detection Set of interest from the drop-down list a. All Detection Sets previously created on the PDMS for the current Neurostimulator and montage, as well as the currently programmed Detection Set, are available as a starting point for configuring new settings. b. It is also possible to load the currently programmed detection settings by selecting the “Load Currently Programmed Detection Set” button. This is often a good choice because adjusting detection in small increments may result in a more predictable response. c. If no Detection Sets have been created on PDMS, the “<You have not created any detection sets>” message will appear in the Detection Set selection drop-down list window. If so, select the “Load Currently Programmed Detection Set” button, then proceed with next step. 2. After selecting a Detection Set, click the “Load Detection Set” button. Patient Data Management System 21 Step 4: Modify and Simulate Detection Set Once the “Load Detection Set” button is selected, the user is taken to the SELECT/ADJUST TOOLS tab. From this screen, Detection Sets can be modified and performance simulated for the associated ECoG Set. Using simulation, the user is able to make the detection more or less sensitive to the electrographic activity of interest by adjusting the individual settings within a tool. Before modifying a Detection Set, the user should review several ECoGs to determine which channel(s) and detectors need to be adjusted. In the example below, the Short-Term Trend of a Line Length tool is being adjusted using the dropdown list. After the new Detection Set has been configured, simulation can be performed to assess detection performance. 1. Select the “Simulate On All ECoGs” button on the right side of the screen to simulate detection for all the ECoGs in that ECoG Set. 22 Patient Data Management System 2. Simulated detection appears in green on the ECoGs. To zoom in on the simulated results, select an ECoG on the right by clicking on it. The selected ECoG thumbnail background will turn blue and this ECoG will appear in large format on the left side of the screen. Use the mouse or arrow keys to move left or right in the large format ECoG. Step 5: Save and Send Detection Set Detection Sets can be saved and sent to a Programmer to be used for a future programming session ® with that patient. It is important to note that Detection Sets will only be sent to NeuroPace Programmers that have previously interrogated the Neurostimulator for which the Detection Set was configured. Detection Sets may also be shared with another PDMS user authorized to view the patient’s data. ® 1. If the Detection Set is to be sent to a NeuroPace Programmer, check the box next to “Send detection set to Programmer”. 2. If the Detection Set is to be sent to an authorized viewer, select the appropriate recipient from the drop-down list. 3. Once the selections are made, click the “Save Detection Set” button Note: When a Detection Set is sent to a Programmer or another user, the ECoG set used to configure the Detection Set will also be sent. 23 Patient Data Management System PROGRAMMING EPOCHS ® The Programming Epochs screen displays a history of RNS Neurostimulator programmed settings as well as the daily count and monthly averages of detections, delivered therapies, magnet swipes, saturations, and long episodes that have occurred between two programming dates. To view this information, select PATIENT LIST Select a Patient PROGRAMMING EPOCHS. Clicking on the date of programming will navigate to the Programming Report for that date. The settings in blue are programming changes that were made on that date. Note: If a patient does not interrogate for over 28 days, data will be over-written, so the counts shown in the epoch summary become inaccurate. Patient Data Management System 24 PATIENT INFO The Patient Information screen is accessible by selecting PATIENT INFO. This page provides detail on the patient, including information about the implanted Neurostimulator. EXITING THE PDMS The user can log off of the PDMS at any time by selecting LOG OFF, which is located on every page in the upper right corner. Note: The user is automatically logged off whenever the user exits the website, closes the browser window, or after a period of 30 minutes without activity. Please note that changes made to the personal profile, reporting preferences or ECoG annotations may be lost if not submitted prior to being automatically logged off due to inactivity. PDMS Troubleshooting 25 PDMS TROUBLESHOOTING If you are having trouble accessing the PDMS or during a PDMS session, try the following: 1. Ensure the internet connection is functioning properly. 2. Log off of the PDMS and then log back in. Next, try to access the website page that you want to view. 3. If you are still having trouble, close down your internet browser completely. Then open a new browser window and log back into the PDMS. 4. If you are still having trouble, record all error messages displayed and contact NeuroPace. NeuroPace, Inc. 455 N. Bernardo Ave. Mountain View, CA 94043 Customer Support: 1-866-726-3876 (Toll Free in the US) Fax: 650-237-2855 Website: www.NeuroPace.com