1
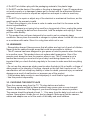
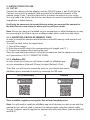
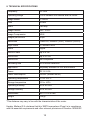
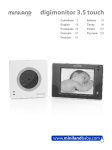
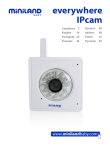
everywhere
IPcam
ENGLISH
www.minilandbaby.com
INDEX
1. Introduction
2. Contents
3. Safety instructions
4. Product features
5. Instructions for use
6. Product care
7. Troubleshooting
8. Technical specifications
1. INTRODUCTION
Congratulations on purchasing this cutting-edge technology IP camera. We are sure
that you will be completely satisfied with this product’s quality and features.
This camera emits wireless audio/video signals which are received by smartphone
(Android/ iPhone) or tablet (Android/ iPad) with the eMyBaby app.
The features described in this user manual are subject to modifications without prior
notice.
You are advised that changes and modifications not carried out on the
equipment by the MINILAND technical service are not covered by the product
guarantee.
2. CONTENTS
a) 1 Camera
b) 1 AC/DC adapter
c) 1 Network cable
d) 1 Tripod
e) 1 Quick guide and Guarantee
If any of the above is missing, please contact your retailer
3. SAFETY INSTRUCTIONS
3.1. GENERAL SAFETY INSTRUCTIONS
Read this instruction manual before using your baby monitor for the first time and
keep it for future reference.
When you use electrical appliances you will need to follow a series of basic safety
precautions at all times:
1. You will need to take extra care when children or elderly people use any products,
or when you use these products near them. Keep the device out of the reach of
children while not in use.
2. This product should not be used as the only monitoring method, and should never
be a replacement for responsible adult supervision of children, adults or property.
3. Only use the IP camera with the mains adapter supplied.
2
4. Do NOT let children play with the packaging materials, like plastic bags.
5. Do NOT use the device if the cable or the plug is damaged. If your IP camera does
not work properly or is damaged, please get in contact with the authorised Miniland
customer service centre to request an inspection and repair in order to avoid any
risks.
6. Do NOT try to repair or adjust any of the electrical or mechanical functions, as this
would render the warranty invalid.
7. Check the voltage in your home in order to make sure that it is the same as the
device’s specifications.
8. If the IP camera is not going to be used for a long period of time, unplug the mains
adapter. To unplug the device from the socket, hold the adapter and unplug it. Never
pull the cable directly.
9. This product has not been designed to be used in wet or extremely damp
conditions. Never place the camera or charger in a place where it could fall into a sink
or a container with water. Store it in a dry place while not in use.
3.2. WARNINGS
· Strangulation hazard. Always ensure that all cables are kept out of reach of children.
Never route the cables through areas that could be accessible to children.
· This IP camera has been designed to give peace of mind to parents when the baby
is in another room. This product does not replace adult supervision. One of the
parents must always be near the receiver when in use. The IP camera is not a
medical device and you must not let your baby’s well-being depend on it. It is
important that you check the baby regularly in the room to make sure that everything
is fine.
· Do not use this camera as a baby monitor when the baby’s life or health, or those of
other people or the integrity of furniture, depend on the fact that it works or not. The
manufacturer will not accept any liability or claim for death, personal injury or material
damage as a result of malfunction or improper use of the product.
· If this wireless baby monitor is used improperly it could lead to legal action.
· Use this product responsibly.
3.3. CHOOSING THE RIGHT PLACE
Place the camera away from the TV, TV relay stations and radios.
The strong signals emitted by these products may cause noise or even transmit
noises in the receiver. If this happens, you should change the camera’s position.
The camera should be placed at least 1 - 1.5m away from the baby’s cot and on a flat
surface. Never place it inside the cot, bed or playpen. Make sure that the camera,
cables and adapter are out of the reach of the baby and small children.
3
4. PRODUCT FEATURES
4.1. CAMERA FUNCTIONS AND CONTROLS
1. Antenna
2. Microphone
3. Lens
4. Infrared
5. ON LED indicator
6. Power supply connector
1
7. Network connector
8. Loudspeaker
9. Tripod mount
10. QR Code (underside of camera)
11. MicroSD card slot
12. Reset
2
4
11
3
RESET
12
5
9
10
8
7
6
4
5. INSTRUCTIONS FOR USE
5.1. SET UP
Connect the camera with the adapter, and the ON LED (page 4, part 5) will light up.
Connect one end of the network cable provided to the network connector of the
camera (page 4, part 7) and the other end to a network connector on your router.
You only need to do this for the first time and does not need to be done for additional
smartphone or tablet devices.
It will only be necessary to repeat this step when you connect the camera for
the first time to a new router or when you turn off your router.
Note: Ensure you have wi-fi enabled on your smartphone or tablet otherwise you may
be connecting to the IPcam via your mobile provider which could incur data costs.
5.1.2. INSERTING A MICRO SD MEMORY CARD
In order to record the camera must also have a microSD memory card inserted (not
included).
To insert the card, follow the steps below:
1- Turn off the camera.
2- Enter the microSD card in the corresponding slot (page4, part 11 ).
3- Connect the camera after inserting the card.
Once the card has been entered, it must be formatted so that the camera can record
on it (see section 5.2.2.5. FORMAT SD CARD).
5.1.3. eMyBaby APP
In order to see your baby you will have to install our eMyBaby app
on your smartphone (Android/ iPhone) or tablet (Android / iPad).
To do this, you will have to access the store on your device and search for the
eMyBaby app or download it directly by scanning the QR code:
IOS (iPhone/iPad)
Android
Availabl e on the
Availabl e on the Androi d
App Store
App Store
Once installed, register your app for free at http://emybaby.com/
Note: You will need to install the eMyBaby app on all devices you wish to use with the
camera but you will not need to connect the camera again using the network cable.
You will, however, need to register the camera with each new device (see sections 5.2
and 5.2.1).
5
5.2. ACCESSING THE IP CAMERA FUNCTIONS
After starting the app, select the camera option
on the main menu. Then select the
‘everywhere IPcam’ from the list of camera/monitor devices.
5.2.1. ADDING & DELETING CAMERAS
5.2.1.1. ADDING A CAMERA USING THE QR CODE
Click on the add camera
icon and press the ‘Scan’ button to scan the QR code,
which you will find on the bottom of the IPcam.
Note: It is necessary for Android users to download a QR code reader.
If you intend to add more than one camera enter a name for your camera and press
‘OK’. The camera you have just added will appear on your camera list.
5.2.1.2. ADDING A CAMERA MANUALLY
IOS
ANDROID
Click the add camera icon
and
press the ‘Add’ button.
In the UID field, key in the S/N number
with 20 characters which appears on
the label alongside the QR code. This
label is situated at the base of the
camera.
Once the UID has been entered,
change the camera name if you so
desire and press ‘Save’. The recently
added camera will appear on your list
of cameras.
Click the add camera icon
.
In the UID field, key in the S/N number
with 20 characters which appears on
the label alongside the QR code. This
label is situated at the base of the
camera.
Once the UID has been entered,
change the camera name if you so
desire and press ‘OK’. The recently
added camera will appear on your list
of cameras.
To access the list of cameras again, press the camera icon which is located
on the lower part of the screen or press the ‘Back’ button.
Note: Remember that if you use the application on different devices, you will have to
carry out the step of adding the camera to all of them.
6
5.2.1.3. DELETING A CAMERA
IOS
ANDROID
On the list of cameras, click ‘Edit’, click
the delete icon for the camera you
wish to delete and then select ‘Delete’.
Press the ‘Edit’ button again to exit the
camera delete option.
On the list of cameras, click on the
edit icon
for the camera you wish to
delete and select the ‘Remove camera’
option
.
Note: Remember that if you use the application on different devices, you will have to
carry out the step of removing the camera on all of them.
5.2.2. ADVANCED SETTINGS
IOS
ANDROID
Press the i-icon
and within this option,
press ‘Advanced configuration’.
The ‘Advanced Configuration’ allows you
to configure the following functions:
Click the edit icon
and on the menu
choose ‘Edit camera’ . Within this
option, press ‘Configure’
.
- Video quality
- Video flip
- WiFi settings
- Motion detection
- Notification
- Mode
- Format microSD card
- Device information
- Video quality
- Video flip
- WiFi settings
- Motion detection
- Recording mode
- Format microSD card
- Device information
5.2.2.1. VIDEO SETTINGS
- Video quality
This is a characteristic which allows us to choose the quality with which we wish to
see the image. It must be borne in mind that the greater the quality, the greater will be
the delay between the real image and the receipt on your device as the video will take
longer to be transmitted. You can choose between 5 quality levels: Maximum, High,
Medium, Low, Minimum
- Tilt screen/Video flip
This feature allows you to change the screen orientation in the manner you wish:
IOS
ANDROID
Normal
Vertical flip
Horizontal Flip (Mirror)
Vertical and Horizontal Flip
Normal
Flip
Mirror
Flip & Mirror
7
5.2.2.2. WI-FI SETTINGS
Connect one end of the network cable provided to the network connector of the
camera (page 4, part 7) and the other end to a network connector on your router.
You only need to do this for the first time and does not need to be done for additional
smartphone or tablet devices. To connect wirelessly follow the steps below.
IOS
ANDROID
1. Click on the ‘WiFi’ button and the
device will automatically scan the
networks available.
2. Select the required network and enter
the password.
3. Click on ‘Connect’.
1. If you click on ‘Manage WiFi
Networks’, the device will automatically
scan the networks available.
2. Select the required network and enter
the password.
3. Click ‘OK’ and wait until the device
says it is connected.
The camera will then be configured to work on wireless mode. Disconnect the network
cable from the camera and it will continue to work while connected to the selected
Wi-Fi network.
It will only be necessary to repeat this step when you connect the camera for
the first time to a new router or when you turn off your router.
5.2.2.3. EVENT SETTINGS
IOS
ANDROID
- Motion detection
This characteristic serves for the camera
detecting whether the baby is moving.
You may deactivate this function or
activate it with different sensitivities:
Off, Low, Medium, High and Maximum.
If your baby usually moves around
a lot whilst they sleep, choose a low
sensitivity. If, by contrast, they only move
when they wake up and need something,
choose a higher sensitivity.
- Sound detection
This characteristic serves for the camera
detecting whether the baby is moving.
You may deactivate this function or
activate it with different sensitivities:
Off, Low, Medium, High and Maximum.
If your baby usually moves around
a lot whilst they sleep, choose a low
sensitivity. If, by contrast, they only move
when they wake up and need something,
choose a higher sensitivity.
Not available on IOS.
See 5.2.2.4 RECORDING SETTINGS
- Notifications
• Silent
• Tones only
• Vibrate only
• Ringtone and Vibrate
8
5.2.2.4. RECORDING SETTINGS
IOS
ANDROID
- Recording Mode
Setting the recording mode to ‘ALARM’
allows the baby to be recorded when
motion is detected, hence, for it to
work, it must have both the motion
detection option (see previous section
5.2.2.3 EVENT SETTINGS ) as well
as the recording mode activated. If,
by contrast, you don’t wish to record,
you will only have to deactivate the
recording mode.
- Mode
Setting the mode to ‘ON’ allows the
baby to be recorded when motion is
detected, hence, for it to work, it must
have both the motion detection option
(see previous section 5.2.2.3 EVENT
SETTINGS ) as well as the recording
mode activated. If, by contrast, you
don’t wish to record, you will only have
to deactivate the recording mode.
5.2.2.5. FORMAT SD CARD
This option can be found on the lower part of the advanced Configuration menu.
Press the ‘Format SDCard’ button and confirm.
WARNING: All the data on the microSD card will be deleted if you format it.
IMPORTANT
In order to record the camera must also have a microSD card inserted (not included).
To insert the card, see section 5.1.2 INSERTING A MICRO SD MEMORY CARD.
5.2.2.6. DEVICE INFORMATION
In this section you will find information about the device:
• Model
• Software version
• Company
• Total space
• Free space
9
5.3. USING THE CAMERA
5.3.1. VIEWING YOUR BABY
On the list of cameras, click on the camera you wish to view and the image of what
the camera is pointing at will appear.
If the camera appears to be ‘Disconnected’, you will need to connect it again. To do
this, click on the edit icon
(Android) or i-icon
(IOS) on the camera list for the
camera you wish to configure and select the ‘Reconnect’ option.
Note: Infrared night-vision is automatically triggered in low light conditions. Whilst in
night-vision mode the screen will capture images in black & white.
5.3.2. TURN AUDIO ON/OFF/TALK TO BABY
Whilst you are viewing the image transmitted by the camera, you can choose between
listening or talking to the baby or silence options.
IOS
ANDROID
Depending on your IOS device’s current
mode it will display one of the following
three icons.
Listening mode
Silence mode
Talking mode
To change mode click on whichever of
the above icons is currently displayed
and select either ‘Listening’, ‘Silence’ or
‘Talking’ from the dropdown list. The icon
will change to reflect the choice made and
‘Listening’, ‘Silence’ or ‘Talking’ will appear
in the lower right of the screen.
To turn audio on press the speaker icon
To turn audio off press the mute icon
To talk to your baby via your smartphone/
tablet device press the talk icon
.
Pressing the talk icon will automatically
select the mute mode. Deselecting the talk
icon will return the camera to whichever
mode it was previously in.
Note: You will not be able to hear your baby whilst the device is in talking mode
hear your baby, deactivate the talking mode or press the listening mode icon
5.4. TAKING PHOTOS
To save a snapshot of what the camera is seeing, click on the camera icon
5.4.1. PHOTO ALBUM
While you are viewing your baby via the IPcam click on the album icon
.To
.
.
.
IOS
ANDROID
Click on any of the photo thumbnails in the
photo album to view that photo.
Swipe your finger across the screen to
view other photos in the album.
Click on any of the photo thumbnails in the
photo album to view that photo.
Press your phone/tablets back button to
return to the photo album and view another
photo.
10
5.4.2. DELETING PHOTOS
IOS
ANDROID
Whilst viewing the photo album click ‘Edit’
and select the photo(s) you wish to delete.
Each photo you select for deletion will be
marked with a tick.
Click ‘Delete’ and confirm you wish to
delete the selected photos.
Press ‘Back’ to return to the camera view.
Whilst viewing the photo album press and
hold the photo you wish to delete.
5.4.3. EMAIL PHOTOS
IOS
Whilst viewing a photo click on the icon
in the top right of the screen.
A popup menu will appear with the
following choices:
‘Delete Photo’
‘Email Photo’
‘Save Photo’
‘Cancel’
Select ‘Email Photo’ to email or cancel to
close the popup menu.
ANDROID
Not possible from within the eMyBaby app.
Close the app, open your device’s photo
gallery and email from there.
6. PRODUCT CARE
6.1. CARE AND MAINTENANCE
Clean the appliance with a soft dry cloth. Do not use cleaning products or solvents.
6.2. BATTERY & PRODUCT DISPOSAL INFORMATION
• Remember to dispose of the product in an environmentally responsible way,
removing the battery first.
• Do not mix products bearing the symbol of a crossed out bin with normal household
waste. For proper collection and processing of these products, take them to the
collection points designated by local authorities. You can also contact the store where
you purchased the product.
11
7. TROUBLESHOOTING
PROBLEM
POSSIBLE CAUSE
SOLUTION
It is not possible to
access eMyBaby
from your mobile
device.
You are not registered
with eMyBaby.
Register at the website
www.emybaby.com
There is no image
reception in the
application.
Camera: The current adaptor
has not been plugged in.
Connect the camera and
follow the steps indicated in
section 5.2.1.
Camera: It has not been
configured properly.
See section 5.2.1.
Only black and
white images are
shown.
Check whether the camera
is in the night vision/‘infrared’
mode.
To see the images in colour,
increase the light at the place
where the camera is located.
The camera is not
recording.
Problem with the microSD
card.
Make sure you have entered
the microSD card in the
camera.
Format your microSD card in
the manner indicated in
section 5.2.2.5.
The app does not
recognise the
camera (unknown
camera).
The app is not properly
configured.
In order to record, you must
have the motion detection
and recording mode active;
both options are in the
Advanced Configuration
section of your camera, see
sections 5.2.2.3 and 5.2.2.4.
The camera and its device are
not connected to the same
network.
Make sure that the first time
you connect the camera, both
devices are connected to the
same network.
The camera may be
disconnected or it may
have been momentarily
disconnected.
Make sure the camera is
connected to the current.
12
Press ‘Reconnect’ in your
camera options, see section
5.3.1.
PROBLEM
POSSIBLE CAUSE
SOLUTION
Connection Error
message.
The network cable is not
connected to the camera.
If this is the first time you
have used your IP camera,
make sure it is connected to
your router by means of the
network cable provided.
You have turned off your
router or you have had a
power cut and the
configuration has been lost.
In the event that your router
has been turned off, you must
reconfigure your camera in
the manner shown in section
5.2.1.
It is not possible to
read the QR code
of the camera.
The QR code of your
camera has deteriorated
or, owing to the movement,
the reading application is
unable to capture it.
If you try this for a while
and you are unable to scan
the code, you may enter
it manually in the manner
indicated in section 5.2.1.1.
Unsatisfactory
audio reception.
There are mobile phones
or wireless phones too near
the surveillance device.
Keep the phones away from
the device.
The camera and its device
are too close to each other.
Keep the devices away from
each other until reception
improves.
The network to which the
camera or your device is
connected is saturated.
Download the video quality in
the advanced configuration of
your camera.
The image is seen
with too much
delay.
Make sure that your Wi-Fi
network is working properly.
It is not possible to
see the video
events.
Your camera has lost the
connection.
13
Press ‘Reconnect’ in your
camera options, see section
5.3.1.
8. TECHNICAL SPECIFICATIONS
Frequency
2.4 GHz
Operating Range
100 m between the camera and the router*
Image sensor
¼ CMOS
Lens
4.2MM
Audio
Two-way
Image Format
PAL / NTSC
Image Compression
H264
Images per second
30fps
Resolution
1280x780, 640x480 (VGA), 320x240 (QVGA)
Night vision
21 infrared LEDs
Zoom
Digital
microSD card
Up to 4 Gb
microSDHC
Up to 32 Gb
microSDXC
Not compatible
Recording time
20 s/ motion detection
Application
eMyBaby available for iOS and Android
Power
DC 5V 2.0A
Power consumption
6W/4W (infrared on/off)
Operating temperature
-10 to +55 ºC
Storage temperature
-20 to +60ºc
Operating humidity
20 to 80%HR
Storage humidity
20 to 95%HR
Dimensions
85 x 110 x 40 mm
Weight
126 gr.
*This distance may vary in line with the characteristics of the router.
Hereby, Miniland S.A. declares that this ‘89079 everywhere IPcam’ is in compliance
with the essential requirements and other relevant provisions of Directive 1999/5/EC.
14
DECLARATION OF CONFORMITY
Miniland S.A. P.Ind. La Marjal I C/ La Patronal 8-10. 03430 ONIL (Alicante) SPAIN
Technical support: +34 966 557 775 · www.minilandbaby.com · [email protected]
We declare under our own responsibility that the product:
everywhere IPcam · Miniland Baby · 89079 · Miniland, S.A.
to which this declaration refers conforms with the relevant standards or other
standardising documents:
· Directive 1999/05/EC of the European Parliament and of the Council of 9th March 1999
on Radio Equipment and Telecommunications Terminal Equipment
- 300 328 V1.7.1 (2006-10) Electromagnetic compatibility and Radio spectrum Matters
(ERM); Wideband transmission systems; Data transmission equipment operating in the
2,4 GHz ISM band and using wide band modulation techniques; Harmonized EN
covering essential requirements under article 3.2 of the R&TTE Directive.
- EN 301 489-1 V1.9.2 (2011-09) Electromagnetic compatibility and Radio spectrum
Matters (ERM);
ElectroMagnetic Compatibility (EMC) standard for radio equipment and services; Part
1: Common technical requirements.
- EN 301 489-17 V2.1.1 (2009-05)Electromagnetic compatibility and Radio spectrum
Matters (ERM); ElectroMagnetic Compatibility (EMC) standard for radio equipment;
Part 17: Specific conditions for Broadband Data Transmission Systems
· Low Voltage Directive (LVD) 2006/95/EC
- EN 60950-1:2006+A11:2009+A1:2010+A12:2011 Information technology equipment.
Safety. General requirements.
· RoHS. Directive 2011/65/EU on the Restriction of the use of certain hazardous
substances in electrical and electronic equipment (recast)
· REACH (Registration, Evaluation, Authorization and Restriction of Chemical substances)
Regulation (EC) No 1907/2006 Waste Electrical and Electronic Equipment (WEEE)
Directive 2002/96/EC
Miniland, S.A.
P.P.
José Verdú Francés
Onil, Alicante, Spain. 26th October 2013
15
For technical support in the United Kingdom contact
the Kooltrade helpline on 0161 335 2508
Miniland S.A. P.Ind. La Marjal I C/ La Patronal, 8-10
03430 ONIL (Alicante) SPAIN
Technical support: +34 966 557 775
Fax +34 965 565 454
www.minilandbaby.com · [email protected]
© Miniland, S.A. 2013
Made in China. Keep this information.
Fabricado en China. Conservar los datos.
Fabricado em China. Conservar dados.
Fabbricato in China. Conservare i dati.
Fabriqué en China. Conserver ces informations.
Hergestellt in China. Bewahren Sie diese Angaben auf
Wyprodukowano w Chinach. Zachowaj instrukcję.
Vyrobeno v Číně. Tyto informace si prosím uchovejte.
Сделано в Китае. Сохраните эту информацию.
This product is designated for separate collection at
an appropriate collection point. Do not dispose of as
household waste. Protect the environment.
Recogida selectiva. Cuida el medio ambiente.
Tri sélectif. Prend soin de l’environnement
Bitte gesondert entsorgen. Schützen Sie die Umwelt.
Raccolta differenziata. Rispetta l’ambiente.
Recolha selectiva. Conserve o Meio Ambiente.
Chroń środowisko! Segreguj śmieci!
Tříděný odpad. Chráníme životní prostředí.
Раздельный сбор мусора. Берегите окружающую среду.
89079 everywhere IPcam
120214