1
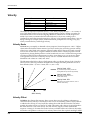
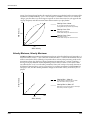
Zone Parameters
Chapter 5
Zone Parameters
This chapter describes all of the menus you can access from the top row of Zone Parameter buttons.
These include: MIDI Transmit, Program, Key Range, Transpose, Velocity, and Controllers.
Z one Parameters
MIDI Transmit
Program
Key Range
Transpose
Velocity
Controllers
Before we dig into the Zone Parameters, letÕs review a few things that, if you keep in mind, will
make your life easier.
First, Zones:
You select which Zone you are working on with the four Zone buttons Ñ press a button once
to make it current. The current Zone number will be shown at the upper left of the display.
•
If a button is showing green, and no other button is red, then it is playing Ñ i.e., you can
hear it. If it is orange, it is muted. To mute the current Zone, press its button. To mute a
Zone thatÕs not current, press its button twice.
•
You can solo the current Zone (mute all the others) by pressing the Solo button. The current
ZoneÕs button turns red. Pressing any other Zone button will solo its Zone. Pressing Solo again
turns the other Zones back on. Zones that are not Soloed will still transmit non-note information.
•
A Zone that has been turned off will have a dark button, and will show ÒOffÓ in the
display. (If you Solo a dark Zone, you will hear nothing.)
Second, Data Entry:
•
Remember there are two methods of entering data for most parameters:
Direct Entry, using the Alpha wheel, decrement/increment buttons, or the numeric
keypad, and
Intuitive Entry, using sliders, pedals, wheels, buttons, or notes.
•
Also remember that most of the Parameter buttons access menus of two or more parameters, so
donÕt get confused if you donÕt see the parameter you want immediately after pressing a
button. Pressing a Parameter button always goes to the Þrst item on its menu Ñ even if youÕre
already in the menu. To get to other parameters in the menu, use the left and right cursor
buttons directly underneath the display.
Information about storing Zone parameters to a Setup is on page 5-19. The section below
discusses storing Zone parameters with the PC88Õs Internal Voices.
•
Zone Parameters and Internal Voices
The PC88Õs Internal Voices have only one active Zone: Zone 1. Saving Zone parameters to
Internal Voices is a little different than saving to a Zone in a Setup, since any parameter you
change will affect all Internal Voices; you cannot change parameters for just a single voice. To
change one of the parameters of the Internal Voices, Þrst choose the parameter you want to
change (for example, ÒTransposition: -12Ó). Then, press the Store button, followed by the
Internal Voices button at the ÒSave Setup xx?Ó prompt. When the display says ÒSave to
Internal Voices?Ó you can either press the Enter button to conÞrm the change, or return to
Internal Voices mode without making any changes by pressing Internal Voices followed by a
Sound Select button. See ÒCustomizing the Internal Voices ModeÓ in Chapter 3 for some
examples of this.
Musician’s Guide
5-1
Zone Parameters
MIDI Transmit
MIDI Transmit
Parameter
MIDI Channel
Dest
BndRng (ST)
BndRng (ct)
Values
Off, 1-16
Local, MIDI, Local+MIDI
0-127
0-127
MIDI Channel
The Þrst parameter you see after pressing this button is the MIDI channel that the Zone will
send data on. Setting this to ÒOffÓ turns the Zone off completely: no MIDI data and no local
sound either. A Zone that is off will have a dark Zone button.
Destination
The second parameter (press the right cursor button) is the destination (Dest) of the data being
generated in the Zone. Data can be sent either to the PC88Õs sounds (Local Ñ which includes
the VGM sounds if the board is installed); out the MIDI Out jack (MIDI); or both
(Local+MIDI). Note that if MIDI is not selected, and you play the PC88 into a sequencer, you
may hear nice sounds, but the sequencer wonÕt record anything from this Zone.
Generally speaking, each Zone will have its own MIDI channel. This is necessary if you want to
layer sounds on the PC88. If two Zones have the same MIDI channel (and destination), but they
have different Program settings, there will be conßicts: no MIDI device, including the PC88, can
respond correctly to two different simultaneous Program Change commands on one channel.
The result will be that only one Program Change will be recognized, but every note played will
sound double. This can create unpredictable odd timing effects, and will reduce polyphony by
50%.
There will, however, be occasions when ÒstackingÓ Zones on the same MIDI channel might
come in handy. One such situation would be if you would like a physical controller on the PC88
to send data out on two different numbered MIDI controllers on the same channel. In this case,
you must create two Zones assigned to the same channel, but with different controller
assignments. If a receiving synth is using Controller #1 for modulation depth and Controller
#13 for modulation speed, for example, you can increase both the depth and the speed with one
slider by assigning that slider in Zone 1 to #1 and in Zone 2 to #13, and assigning both zones to
the same MIDI channel. (You will probably want to do something to make sure you arenÕt
sending doubled notes. Use the Key Range parameter to make sure the two zones arenÕt set to
the same note range.)
Another example: create two or more Zones that are identical except for their transposition
settings. Now you can play parallel intervals (or chords) with single keystrokes.
Pitchbend Range
The third and fourth parameters in this menu, BndRng (ST) and BndRng (ct), set the
pitchbend range. This is the interval that the pitch wheel will change the pitch at the end of its
travel, both top (up) and bottom (down). The Þrst parameter is coarse, which sets the range in
semitones (ÒSTÓ). The second is Þne, which sets it in cents, or 1/100ths of a semitone (ÒctÓ).
Since both values are positive, they add to each other: If you want to set the range to just under
3 semitones, you would set ST to 2 and ct to 99. The maximum value for both parameters is 127.
5-2
PC88
Zone Parameters
Program
Whenever this parameter is set (or the Setup containing it is called up), a pair of MIDI
Controller Messages known as Registered Parameters are sent on the MIDI channel assigned to
this Zone. These messages will set the coarse and Þne pitchbend range of any MIDI instrument
receiving data on this channel from the PC88, as long as that instrument recognizes the
messages. It will set itself to respond to pitchbend commands exactly the same way as the
Zone on the PC88. Since this a relatively recently-adopted addition to the MIDI speciÞcation,
there are plenty of instruments that donÕt recognize Registered Parameters Ñ if you want to
adjust the pitchbend range on one of those, youÕll have to do it by hand. The PC88 not only
sends them, it also recognizes them, so if you send the PC88 these commands from an external
source (like another PC88), it will respond accordingly. (See Appendix F for more information
about Registered Parameters.)
Program
Parameter
Values
(Program)
0 - 127 + name
Bank
(press <<< )
0:Internal Voices - 16383(127/127)
Entry Transmit
Off - On
Bank Mode
None, Ctl 0, Ctl 32, Ctl 0/32, K2000, K1000
PNumDisp
0-127, 1-128, 11-88, A1-H8
PNameDisp
Off, Internal, Gen. MIDI
The Þrst parameter under this button selects the program assigned to the Zone. When you Þrst
enter this menu, you have the choice of selecting among the 64 Internal Voices. Use the Sound
Select and Previous or Next Group buttons just as you would in Internal Voices mode, or use
the wheel and buttons in the Data Entry section, or use Intuitive Entry with any controller.
(DonÕt press the Internal Voices button or you will leave Setups mode and lose everything
youÕve done on this Setup!) If the Zone has been turned off, the program name will be ÒZone
OffÓ. Setting a program selects a voice for the Zone, and also sends a Program Change
command out the MIDI cable, on the channel assigned to the Zone. This is how you use the
PC88 to select programs on your other instruments.
Bank
As we saw in the last chapter, if the VGM board is installed, you can use sounds from Banks
other than the Internal Voices. The Internal Voices are in Bank 0; VGM sounds are in Banks 1-3.
There are two ways to access Banks from the Program menu. One is to use the numeric keypad:
Press the Program button, enter the number of the Bank, and then press the Ò+/-Ó button (next
to the Ò0Ó button). Then enter the Program number, and press Enter. The +/- button creates a
colon (Ò:Ó) in the display, which separates the Bank number from the Program number.
The second method uses a special Bank parameter. From the Program display, press the left
cursor button (<<<). Now the display says ÒBank:Ó and the name, if there is one, of the Bank.
Musician’s Guide
5-3
Zone Parameters
Program
(If there isnÕt one, it just shows a number.) HereÕs an example of the PC88Õs display when you
press the <<< key while an internal voice is active:
Zone
number
Bank Program
number number
Zone:1||||||0:001|||
Bank:Internal|Voices
Bank name
You can set the Bank by any of the usual data entry methods, Direct or Intuitive. Like Programs,
any Bank can appear in any Zone. For example, turn the alpha wheel one notch clockwise
while the above is displayed to see:
Zone:1||||||1:001
Bank:General|MIDI
Notice that the Bank number and name change, but the Zone number and program number donÕt.
Sending Bank Select Messages to External MIDI Devices
Bank Select messages can go to external MIDI devices as well, if the Destination is set
accordingly. Some instruments have more banks than the PC88: the Kurzweil K2000, for
example, has 10. The MIDI SpeciÞcation says a device can have up to 16,384(!) Banks, and the
PC88 gives you access to every single one of them. Bank switching over MIDI makes it easy for
the PC88 user to scroll through sounds on external instruments, no matter how many Banks
they might have.
If you select an empty Bank (like Bank 1 if you donÕt have the VGM board; Bank 4 if you do),
the Zone will produce no sound on the PC88, but will still send MIDI data out. The Program
display will say ÒExternal Program,Ó indicating that any sounds produces will be created by an
external device. If the Bank parameter is showing on the display, instead of a name you will see
some numbers, in the display below, for example: Ò292 (2/36)Ó.
Zone:1|||||292:049
Bank:292||(2/36)||
The Þrst number is the Bank number and the ones in parentheses show the Bank number in the
two-byte form (Most SigniÞcant Byte (MSB) followed by the Least SigniÞcant Byte (LSB))
prescribed by the MIDI SpeciÞcation. The Bank number is the MSB multiplied by 128, plus the
LSB. If this is confusing, donÕt worry Ñ weÕll discuss what it means shortly.
Press the right cursor (>>>) to return to the Program menuÕs program display. From the above
display, for example, pressing >>> would change the display to this:
Zone:1|||||292:049
049|External|Prog|
From this display, use any data entry method to change the program number.
Entry Transmit
The next parameter on the Program menu (press the right cursor button, twice if you have to) is
Entry Transmit. If it is set to On, then whenever you select this Setup, the program number
assigned to the Zone will immediately be sent out as a Program Change command on the
ZoneÕs MIDI channel (assuming that MIDI is one of the destinations). When it is Off, no
program change is sent from the Zone when the Setup is called. A Bank Select command may
or may not accompany the Program Change, as weÕre about to see.
5-4
PC88
Zone Parameters
Program
Bank Mode
Bank Mode determines if bank numbers will be sent over MIDI when the Setup is selected, and
in what format.
None means no bank number is sent, just the program number. Ctl 0 means that the bank number
is sent as a MIDI Controller #0 message. Ctl 32 means it is sent as MIDI Controller #32. Ctl 0/32
means it is sent as a dual-controller (two-byte) message, with the MSB of the bank number sent as
Controller #0 and the LSB as Controller #32. Single-byte Bank Select messages (either 0 or 32) allow
you to specify banks numbered 0-127. Two-byte messages allow you to specify banks numbered 016,383. With 128 programs per bank, this allows you to access 2,097,152 different programs on one
instrument. Have a good time, and call us when youÕre done.
Seriously, if all this seems bizarre to you, youÕre not alone. The MIDI SpeciÞcation is a little
ambiguous when it comes to Bank Select messages, as to whether they should be only
Controller 0, only Controller 32, or both Controllers sent as a pair. Different manufacturers
design their instruments to respond to different schemes, and if you send Bank Select in a form
an instrument doesnÕt like, it may ignore it or interpret it wrong. This PC88 parameter is
designed to allow the greatest ßexibility in addressing other MIDI instruments. Usually you
can look on the MIDI Implementation chart in the userÕs manual of an instrument to determine
how it likes to receive Bank Select messages, and then set this parameter for each Zone to suit
the instrument that is receiving data from it. The default setting, which will work with the
largest number of other instruments, is Ctl 0/32.
There are two other options, which will be of special interest to owners of other Kurzweil
instruments. Setting Bank mode to K2000 takes advantage of that instrumentÕs ÒExtendedÓ
mode. The Bank Select message is sent as Controller #32, with a value between 0 and 9
(remember the K2000 only supports 10 banks). The K2000 only supports 99 programs per bank,
so Program Changes 100 or higher are sent as Bank Select 1, followed by the last two digits as a
Program Change. For example, if Program 124 is assigned to the Zone, this will be sent out the
MIDI jack as Bank Select (Controller #32) 1, and then Program Change 24.
K1000 is used with any of the 1200-series keyboards or modules, or any of the 1000-series
instruments that have version 5 software installed. Those instruments pre-date the adoption of
standard Bank Select messages; instead, they use Program Changes 100-109 as Bank Selects. If
you select Bank 5: Program 42 for a PC88 Zone, for example, it will send out Program Change
105 followed by Program Change 42. PC88 program numbers over 99 are not sent.
Program Number Display
PNumDisp is useful because different MIDI instruments and sequencers refer to program
numbers differently Ñ another ambiguity in the MIDI Spec. Some start counting at 0, while
others start at 1. Still others arrange them in groups of 8, with the Þrst digit (or a letter)
denoting the group, and the second digit denoting the number within the group.
This parameter allows you to display the program numbers on the PC88 so that they agree with
the way your receiving instruments display them. It changes nothing in the outgoing MIDI data:
itÕs merely a convenience to you, so that you arenÕt constantly adding or subtracting 1 or doing
base-8 arithmetic to Þgure out how to get to speciÞc sounds on your other synths. Whenever a
program is displayed for this Zone, its number will follow the format you choose here. The
choices are:
0-127 for those devices that believe life starts at zero
•
•
1-128 for those who start at one
•
11-88 for instruments that use this scheme (primarily Roland)
•
A1-H8 for other instruments that like this way of doing things
When using this last format, donÕt get confused with the Internal Voice modeÕs Groups: they
each contain 16 programs, not 8.
Musician’s Guide
5-5
Zone Parameters
Key Range
Program Name Display
The Þnal parameter under Program is PNameDisp, which determines how the program name
will be shown in the display when you select the Zone but like PNumDisp has no effect on
anything else, either the choice of program or the outgoing MIDI data.
If you set this to Internal Voices, the program name will show up as the name of the current
PC88 sound from the Internal Voices bank or (if there is one) the VGM board. A program for
which there is no internal sound (for example, in an empty bank) will be called ÒExternal ProgÓ.
If Dest (MIDI Transmit Menu) is set to MIDI, then the display will read ÒExternal Prog.Ó
Set it to General MIDI, and the PC88Õs display will show the General MIDI program list (the
VGM board does not have to be installed for this.) This is helpful if you are driving an external
General MIDI synth and would like to see those names displayed.
Set it to Off and the display says ÒExternal ProgÓ for all programs. Use this setting if you are
using neither the internal sounds nor a General MIDI synth, to avoid possible confusion.
Key Range
Parameter
Values
Low:
C-1 to G9
Hi:
C-1 to G9
Note Map:
Off, Linear, 1 of 2, 2 of 2, 1 of 3, 2 of 3, 3 of 3, 1 of 4, 2 of 4, 3 of 4,
4 of 4, Invrs, Const
Low, Hi
There are three parameters under the Key Range button. The Þrst two, both of which appear on
the initial display, set the lower and upper note limits of the Zone. Use the cursor buttons to
move between the low and high settings. Intuitive entry is useful here: after youÕve chosen
which limit to set, press and hold Enter and hit the note you want.
The limits of MIDI are C-1 to G9. The normal 88-key range is A0 to C8.
You can create ÒnegativeÓ ranges by setting the high limit lower than the low limit. This results
in the Zone being active at the top and bottom of the keyboard, but being silent in the range
between the two limits. This lets you create a layer with a ÒholeÓ in the middle, which you can
then Þll with a different sound on another zone (either internal or on an external synth).
Note Map
Note Map lets you change the way notes are sent from the PC88, which can be useful in a
number of situations. The default setting is Linear: all notes go out as played. Moving
decrementally takes you to Off: no notes are sent, but controllers and other non-note data are.
Moving back up takes you through the ÒalternatingÓ maps, which weÕll skip over for just a
second.
After them comes Inverse, which turns the keyboard upside-down, with the highest key being
A 0 and the lowest C 9. Finally, if you set it to Constant (Const) all of the keys on the keyboard
will play the same note. The note defaults to C4, but you can change this with the Transpose
parameter.
5-6
PC88
Zone Parameters
Transpose
Alternating Maps
Alternating maps can be used when you are addressing multiple synthesizers that can play the
same sound, to increase the apparent polyphony of your system.
An obvious use of alternating note maps is with the Ò64-Note PolyÓ instruments on the VGM
board. The instruments in this Bank are exact duplicates of some of the sounds in the Internal
Voices bank. By assigning all of the odd-numbered notes to the Internal Voices, and all of the
even-numbered notes to the duplicates on the VGM board (which have the same names,
preceded by ÒvÓ), you can achieve 64-voice polyphony within the PC88.
An example of how this is done is found in Setup #49 Ò64-note PianoÓ. The MIDI channel of
Zone 1 is 1. Its Bank is Internal Voices and its Program is 000, ÒClassical PianoÓ. Look at its Key
Range map: it is set to 1 of 2. Only odd-numbered notes played on the keyboard will play
sounds from the Internal Voices bank. Now go to Zone 2. Its MIDI channel is 2, its Bank is 64Note Poly and its program is also 000, ÒvClassical PianoÓ, which is an exact copy of the sound
in the Internal Voices bank. Its Key Range, however, is 2 of 2. Only even-numbered notes will
play the sounds on this Bank in the VGM board. Since each Bank can support 32 voices by
itself, combining them in this way gives you 64 voices Ñ unless you happen to play more than
32 odd or 32 even notes at a time!
This mapping of the keyboard is also applied to outgoing MIDI data: odd-numbered notes are
sent out channel 1, and even-numbered ones channel 2. If you have two identical synths
receiving on the two channels, say each with 16-voice polyphony, you can set one to channel 1
and the other to channel 2, and thereby combine them to create a single 32-voice instrument
(and you donÕt need the VGM board to do this).
You can use three Zones this way (1 of 3, 2 of 3, 3 of 3) or even, if youÕre really ambitious, all
four Zones (1 of 4, etc.). These maps wonÕt accomplish much on the PC88, but they can come in
handy with external synths.
Transpose
Parameter
Transposition:
Values
-127 to 127
This is a simple menu: it has but one item. This parameter changes the pitch of the Zone,
without changing its position on the keyboard. It also changes the MIDI note numbers
generated by the keys in the Zone, without physically shifting the Zone. The range is ±127
semitones. Since there are 12 semitones (or half steps) to an octave, you can transpose up or
down over ten octaves. If you transpose out of the range of the active voice, however, no notes
will sound; beyond MIDI note numbers, no notes will transmit.
If the Note Map is set to Const, then this parameter determines what note will be transmitted
over the Zone Ñ the sort of thing that comes in handy when youÕre laying a ride cymbal over a
bass, or a wood block over a ßute. Intuitive Entry can be used with the keyboard to set this
parameter, holding the Enter button and playing a note. C4 is no transposition; above that is up
and below it is down. To enter negative numbers on the numeric keypad, use the +/- button any
time before you press Enter: e.g., to enter -100, you can press +/-, 1, 0, 0, Enter; or 1, +/-, 0, 0,
Enter; or 1, 0, 0, +/-, Enter; etc.
Musician’s Guide
5-7
Zone Parameters
Velocity
Velocity
Parameter
Vel Scale:
Vel Offset:
Vel Curve:
Vel Min:
Vel Max:
Values
-300% to 300%
-127 to 127
Linear, Sin+, Cos+
1 to 127
1 to 127
The PC88 can respond to keyboard velocity Ñ how hard you play the keys Ñ in a variety of
ways. Each Zone can have its own velocity response settings, and any change you make in a
Zone affects both local sounds and outgoing MIDI data. Variations in velocity response are
useful if you want to customize the feel of the keyboard, or if you are working with a
synthesizer or patch that responds strangely to velocity, or for special dynamic effects. You can
design a Setup, for example, where certain instruments, perhaps horns or strings, only play
when you strike the keys with a high velocity.
Velocity Scale
Vel Scale lets you amplify or diminish velocity response. Normal response is Ò100%Ó. Higher
values make the keyboard more sensitive (you donÕt need to play as hard to get more sound)
while lower values make it less sensitive (playing harder doesnÕt change the sound as much).
You can also set the scale to a negative number, in which case the velocity response is turned
upside-down: playing harder produces a softer sound and vice versa. See the following section
on Velocity Offset for ideas about negative scaling. A neat thing to try is to set up two Zones
with opposite scale factors so that key velocity acts as a crossfade between the two sounds.
Maximum scale values are +300% and -300%.
The illustration that follows shows what happens when you change Velocity Scale. Note that
Velocity Scale is the only parameter changed in this example; the other parameters are set to
their defaults (offset = 0, curve = linear, min = 1, max = 127).
127
Velocity Scale: 100%
MIDI Velocity
as you strike the keys harder (increase the
velocity) MIDI velocity increases proportionally
Velocity Scale: 200%
MIDI velocity reaches maximum on
medium strike velocity
64
Velocity Scale: 50%
MIDI velocity never reaches maximum, even on
maximum strike velocity
0
64
127
Strike Velocity
Velocity Offset
Vel Offset also changes the response, but in a more direct way, by adding or subtracting a
constant to the key velocity. For example, if this is set to 25 (assuming a scale of 100%), then 25
is added to the velocity of every keystroke, making the sound that much louder. The softest
possible keystroke will have a value of 25, while a keystroke with velocity of 102 will produce
the same sound as a note with velocity 127 (102+25=127). Negative values diminish the
response: a setting of -25 means the loudest velocity available will be 102, while any keystroke
25 or below will produce a velocity of 1 (a velocity value of zero has a special meaning in MIDI
5-8
PC88
Zone Parameters
Velocity
and cannot be used for note-ons). You can think of Scale as being a proportional change to the
velocity, while Offset is a linear change. The maximum values for Offset are ±127. The
illustration below shows the effects of Velocity Offset. Note that Velocity Offset is the only
parameter changed in this example; the other parameters are set to their defaults (scale = 100%,
curve = linear, min = 1, max = 127).
MIDI Velocity
127
Velocity Offset: +64
low velocity keystrikes produce
medium MIDI velocity and greater
64
Velocity Offset: -64
low velocity keystrikes result in MIDI velocity of 1;
maximum MIDI velocity reduced
0
64
127
Strike Velocity
Offset and Scale work together. If scaling takes the velocity out of the ballpark Ñ for example,
you want to set it to 300% but that puts all of your notes at maximum velocity Ñ using a
negative offset, say around -60, can make it possible to still play at different volumes, although
your curve will still be a lot steeper than normal. If you use a negative scaling, then you must
use an offset: otherwise all of your velocities will end up as zeroes (well, ones actually, since a
MIDI note-on with velocity zero is something else). So to get true inverse scaling (that is, 100%), you must set an offset of 127 to get the full range of velocities. Setting the offset to 127
and the scale to -100% produces a slope like this:
MIDI Velocity
127
64
0
64
127
Strike Velocity
Velocity Curve
Vel Curve lets you taper the velocity response. The default setting is ÒLinearÓ, which means
that the output velocity changes directly proportionally to the played velocity. ÒSin+Ó sets the
taper to resemble the Þrst quarter-cycle of a sine wave, in which there is a ÒbulgeÓ as the
velocity increases from 1 to 64. If you start playing softly, and then progressively louder, the
response will increase more quickly than normal until you reach the middle of the velocity
Musician’s Guide
5-9
Zone Parameters
Velocity
range. If you keep playing harder, the sound will continue to get louder, but the increase will be
less than it would be normally. ÒCos+Ó sets the taper to resemble a cosine wave, in which the
ÒbulgeÓ goes the other way: the change in response is slower than normal as you approach the
velocity midpoint, and then increases faster than normal as you play harder.
127
Velocity Curve: Linear
MIDI Velocity
as you hit the keys harder (increase the
velocity) MIDI velocity increases proportionally
Velocity Curve: Sin+
MIDI velocity is greater at
medium strike velocity than with Linear curve
64
Velocity Curve: Cos+
MIDI velocity is less at
medium strike velocity than with Linear curve
0
64
Strike Velocity
127
Velocity Minimum, Velocity Maximum
Vel Min and Max set minimum and maximum velocity values that the Zone will respond to. A
keystroke whose velocity Ñ after it has been scaled and offset Ñ is below the minimum will not
make a sound in the Zone. Similarly, a keystroke whose velocity after processing is above the
maximum will not play the Zone. These parameters are important for Òvelocity switchingÓ Ñ
having a note play different sounds depending on how hard you strike it. The values can be
anywhere from 1 to 127. As with other parameters, Zones can overlap or be totally discrete, or
be identical. Intuitive Entry gives us a special way to set these parameters: hold the Enter key
and play a note, and the current parameter changes to the actual velocity of the note youÕve
played.
MIDI Velocity
127
Velocity Min: 1, Max: 64
no MIDI velocity is produced when you strike
keys with medium velocity or greater
64
Velocity Min: 64, Max: 127
MIDI velocity isn’t produced unless you strike keys
with velocity of medium or greater
0
5-10
64
Strike Velocity
127
PC88
Zone Parameters
Controllers
Controllers
Continuous Controllers
Physical
Controller
Wheel 1 Up
Parameter:Values
Ctrl Num: None, 0 - 127, Pitch Up/Down, Pressure, Tempo, special functions
Ctrl Scale: -300% to 300%
Ctrl Offset: -127 to 127
Ctrl Curve: Linear, Sin+, Cos+
Entry Value: None, 0 - 127
Exit Value: None, 0 - 127
Wheel 1 Down
(same as Wheel 1 Up)
Wheel 2
(same as Wheel 1 Up)
MPressure
(same as Wheel 1 Up)
Sliders A, B, C, D
(same as Wheel 1 Up)
Pedals 1, 2, 3, 4
(same as Wheel 1 Up)
Switch Controllers
Physical
Controller
Buttons E, F, G
Parameter:Values
SwType: Toggle, Momentary
On Ctrl: None, 0 - 127, Pitch Up/Down, Pressure, Tempo, special functions
On Value: None, 0 - 127
Off Ctrl: None, 0 - 127, Pitch Up/Down, Pressure, Tempo, special functions
Off Value: None, 0 - 127
Entry State: None, Off, On
Exit State: None, Off, On
SwitchPdl 1, 2
(same as Buttons E,F,G)
Controller editing is one of the strongest aspects of the PC88Õs usefulness as the main controller
for a sophisticated MIDI studio. In this chapter, weÕll talk about two different types of
ÒcontrollersÓ as they apply to the PC88. One is the physical controllers: the wheels, buttons,
pedals, etc. that you move with your Þngers or feet. The other is MIDI Controllers, which are
MIDI commands sent by the PC88. For our purposes, ÒMIDI ControllersÓ includes the
complete set of Controllers deÞned by the MIDI SpeciÞcation, as well as pitchbend, aftertouch,
and a few other useful MIDI commands. To fend off confusion, weÕll refer to the PC88Õs
physical controllers with a lower-case ÒcÓ, and MIDI Controllers with an upper-case ÒCÓ.
Any of the physical controllers, in any of the Zones, can take on the identity of any MIDI
Controllers. In addition, each controller in each Zone can be tweaked just like keyboard
velocity. You see that controller editing on the PC88 can be very complex, but also very
rewarding.
Musician’s Guide
5-11
Zone Parameters
Controllers
The PC88Õs physical controllers include (in the order they appear in the menu):
•
•
•
•
•
•
•
the pitch wheel, which is actually split into two controllers, one for movement up from the
center (Wheel 1 Up) and the other for movement down (Wheel 1 Dn)
the second wheel, often referred to as the modulation wheel (Wheel 2)
keyboard aftertouch, or Mono Pressure (MPressure)
the four sliders (A, B, C, and D) in the Assignable Controllers section
the four continuous control pedals (1, 2, 3, and 4)
the three buttons (E, F, and G) in the Assignable Controllers section, and
the two footswitch pedals (1 and 2).
Getting Around
As usual, the cursor buttons select the various parameters associated with the physical
controllers. You must scroll through all of the parameters for one physical controller before you
get to the parameters for the next physical controller. For example, if you are looking at Wheel
1 Up and you want to jump to Slider A, you have to scroll through the rest of Wheel 1 UpÕs
parameters, all of Wheel 1 DownÕs, all of Wheel 2Õs, and all of MPressureÕs before you get to
Slider A. The cursor buttons have an Òauto-repeatÓ function: hold one down and it keeps
scrolling. Each controller has either 6 or 7 parameters, so even with auto-repeat this can get
pretty tedious. Therefore, two special ways of accessing controller parameters are available.
One is Òjump selectionÓ: if you press both cursor buttons simultaneously, the display will jump
to the same parameter of the next controller. So if you are working on the scaling of Slider A, as
shown here:
Zone|1:|||Slider|A
Ctrl|Scale:|133%||
and you want to check the scaling of Slider B, press both cursor buttons (<<< and >>>) and
youÕll get Slider BÕs Scale setting:
Zone|1:|||Slider|B
Ctrl|Scale:|75%|||
The other quick method of getting around is a special Controllers Intuitive Entry mode: when
youÕre in Controllers mode, press and hold the Controllers button and then make a movement
of any kind with the physical controller you want to adjust. The display will change to show
the controller youÕve selected and its initial parameter (ÒCtrl NumÓ). Pressure can also be
selected this way: hold the Controllers button and play any note, adding a little extra weight at
the bottom of the downstroke.
To get back to the very beginning of the Controllers menu (Wheel 1 UpÕs number), just press
the Controllers button.
Intuitive Entry also works in the normal way when setting the value of a parameter: hold the
Enter key while you move any slider, wheel, or pedal, or play a note, and the value will change
accordingly. To quickly set a parameter to its default value (scale: 100%, offset: 0, curve: linear)
press the decrement (-) and increment (+) buttons simultaneously.
The Continuous Controllers
The continuous (physical) controllers are those that have a range of values: the two wheels, four sliders, and
four pedals, and also pressure. As the table above shows, all of them use the same parameters.
A word about pressure. Key Range in a Zone does not deÞne which notes will generate
pressure in that Zone. If pressure is enabled in a Zone, playing with aftertouch anywhere on the
5-12
PC88
Zone Parameters
Controllers
keyboard will produce data. For example, if Zone 1Õs Key Range is C3-C5 and you play C2 and
push down on the note, pressure messages will be sent from Zone 1. As with any other physical
controller, however, you can disable pressure in any Zone, or scale it or offset it differently in
the various Zones. It might help to think of pressure as a Òthird wheelÓ Ñ wheels operate in a
Zone regardless of Key Range, and so does pressure.
MIDI Controllers and Other Parameters
After youÕve selected which Zone and which physical controller to work with (using the cursor
buttons or Intuitive Entry), use the Ctrl Num parameter to choose what this controller will do.
Some of the controllers have default settings that are pre-programmed in all of the factory
Setups (of course, you can change them). You can select from the entire list of numbered MIDI
controllers, as well as other MIDI commands and some Òspecial functionsÓ. To move through
the list, you can use the Alpha wheel, or Intuitive Entry with any continuous controller, or call
up the ControllerÕs number with the numeric keypad.
Here are some of the common ÒtargetsÓ for each controller, in scrolling order:
•
•
•
•
•
•
•
•
Musician’s Guide
None (the controller does nothing)
MIDI Controller messages 0-127. The most commonly used Controllers are:
¥ 1 Modulation (the default assignment on factory Setups for Wheel 2)
¥ 2 Breath Controller
¥ 4 Foot Control (the default for Pedal 2 and Slider C)
¥ 6 Data Entry Slider
¥ 7 Volume
¥ 10 Pan (stereo position) Ñ Pan messages on the PC88Õs internal sounds only affect the
beginnings of notes, and do not change notes that are being sustained.
¥ 11 Expression Ñ an attenuator for fading in and out (the default for Pedal 1)
¥ 64 Sustain (the default for Switch Pedal 1)
¥ 65 Portamento
¥ 66 Sostenuto Ñ it holds notes that are currently down, but not notes played
subsequently (the default for Switch Pedal 2)
¥ 67 Soft Ñ lowers the volume by a pre-set amount and may softens the timbre as well
¥ 69 Hold 2 or Freeze Ñ it freezes a synth envelope at its current state
¥ 72 Envelope Control (also called Sound Controller 3) Ñ shortens or lengthens the
envelope of a sound
¥ 91 Reverb Depth Ñ (the default for Slider A)
¥ 93 Effects Depth Ñ (the default for Slider B)
The PC88 uses some MIDI Controllers in unique ways to edit effects (83, 90, 92, and 94)
and operate the Arpeggiator (116-119): see Chapters 6 and 7 for more. A detailed list of the
entire set of MIDI Controller messages appears in Appendix F.
A number of Controllers can cause trouble if not used carefully, such as 0 (Bank Select),
and all of the ones above 119, which include All Sound Off (120), Reset All Controllers
(121), etc. Be warned.
Pitch Up (128 on the numeric keypad) Ñ pitchbend commands of 64 and above. This is
the default assignment for Wheel 1 Up.
Pitch Down (129 on the numeric keypad) Ñ pitchbend commands below 64, going
negatively. The default for Wheel 1 Down. Since Wheel 1 Up and Wheel 1 Down are
conÞgured separately, you can have all sorts of wild pitchbend combinations going in
various directions over the four Zones.
Pressure (the MIDI command) (130)
Tempo (131). You can use the PC88 to clock an external sequencer, and this parameter sets
the tempo by determining the speed of outgoing MIDI Clock messages. It can also set the
tempo of the internal Arpeggiator. The range is 20-300 beats per minute.
5-13
Zone Parameters
Controllers
The rest of the Controllers, which weÕll refer to as ÒSpecial FunctionsÓ, are usually controlled by
the PC88Õs Switch controllers, which weÕll get to momentarily:
•
•
•
•
•
•
•
•
•
•
•
Program Increment (Prog Inc) (132). Moving the controller takes the Zone to the next
highest Voice, and sends out the next highest Program Change number.
Program Decrement (Prog Dec) (133) takes the Zone to the next lowest Voice and sends
out the next lowest Program Change.
Goto Program (Goto Prog) (134). Selects an entirely different Voice for the Zone. The Voice
number is the On value.
Setup Increment (Setup Inc) (135) takes the PC88 to the next highest Setup, and sends out
all of the appropriate Exit and Entry values. When you change Setups, itÕs quite possible
that the Setup you go to wonÕt have the same controller conÞguration as the current Setup,
and that this command wonÕt be in the same place (or even present at all) in the next
Setup. Therefore you may only be able to use this controller once before it turns itself off
or turns into something else!
Setup Decrement (Setup Dec) (136) takes the PC88 to the next lowest Setup.
Goto Setup (137). Selects a speciÞc Setup. In this special case, the controller values are 1128, to match the Setup numbers.
Sequence Start (Seq Start) (138) sends out a MIDI ÒStartÓ command, which will set an
external sequencer connected to the PC88 to the beginning of its sequence and start it. (If
the sequencer is set up to accept external sync.) The tempo of the external sequence will be
determined by the settings of the clock parameters in the Global menu and the Tempo
setting.
Sequence Stop (Seq Stop) (139) stops any external sequencer.
Sequence Continue (Seq Cont) (140) starts an external sequencer from wherever it
happens to be. This is either where it was stopped by a Stop command, or where it was
sent by a MIDI Song Position Pointer message. The PC88 doesnÕt transmit Song Position
Pointers, but most sequencers do.
Transpose Up (Trans Up) (141) raises the pitch of the Voice, and also raises the MIDI note
numbers generated by the Zone. The amount of transposition is variable from 1 to 127.
Transpose Down (Trans Down) (142) lowers the pitch of the Voice and lowers the MIDI
note numbers.
Scaling
After youÕve selected the MIDI command associated with a continuous physical controller, you
can modify the controllerÕs response similarly to the ways you can modify velocity response.
Refer to the graphs beginning on page 5-8 for illustrations of the velocity scaling parameters.
Ctrl Scale lets you amplify or diminish the action of the controller. Full scale (0-127) is 100%.
Higher values will make the controller more sensitive, and lower values will make it less so.
Setting the scale to a negative number makes the controller action work in reverse. As with
velocity, you can use a controller to crossfade between two Zones by setting the scaling for one
Zone positive and the other negative. Maximum scale values are +300% and -300%.
Ctrl Offset adds or subtracts a constant to the controller, and at the same time sets minimum or
maximum values (thereÕs no need for separate Max and Min parameters). If the offset is 25, the
minimum value of the controller will be 25. If it is -25 (and scale is 100%) the Þrst one-Þfth of
the controllerÕs movement (25/127 = about 1/5) wonÕt do anything, and the maximum value of
the controller will be 102 (= 127-25). As with velocity, Scale is a proportional change to the
controller, while Offset is a linear change. The maximum values for Offset are ±127.
Ctrl Curve lets you taper the controller response. The default setting is Linear, which means
that the response follows a straight line as you move the controller. Sin+ sets the taper to
resemble the Þrst quarter-cycle of a sine wave, in which there is a ÒbulgeÓ as the response
5-14
PC88
Zone Parameters
Controllers
increases. As you move the controller up from the bottom of its travel, the output will increase
faster than normal until you reach its midpoint, at which point it will start to increase slower
than it would normally. Cos+ sets the curve to resemble a cosine wave, in which the ÒbulgeÓ
goes the other way: the response is less than normal as you approach the controllerÕs midpoint,
and then increases faster than normal as you move higher.
Entry and Exit Values
Entry value allows you to specify an initial value for a controller in a Setup that will be sent
whenever you select that Setup. For example, if you want to make sure that a voice in a Zone is
panned to the center whenever you select the Setup, you would assign MIDI Controller 10 to
one of the physical controllers, and then set an Entry Value of 64. Or perhaps you want to make
sure that all of the modulation in a Zone is turned off when you select a Setup. Assign MIDI
Controller 1 to a physical controller and set its Entry Value to 0.
Entry values ignore the current position of the physical controller when the Setup is selected. In
fact, if the physical controller is above or below the Entry Value when the Setup is selected
(which it often is), moving the controller will have no effect until it is past its entry value. In the
modulation example, moving the assigned controller wonÕt turn on any modulation until itÕs
pushed all the way down, and then up again.
An Entry Value of None is quite different from a value of Ò0Ó. ÒNoneÓ means that there will be
no initial controller command when the Setup is selected, and any subsequent movement of the
physical controller will be effective. (The position of the physical controller when the Setup is
Þrst selected, however, is still ignored.)
Exit Value tells the PC88 to send a value for that controller whenever you leave the Setup,
either by selecting another Setup or by switching to Internal Voices mode. It can be very useful
when a controller is doing something special to the sound which you donÕt want to continue
after you leave the Setup. For example, if you want to make sure a ZoneÕs pan position is
centered whenever you leave a Setup, you would give an Exit Value of 64 to any controller
assigned MIDI Controller 10. Or, if you wanted to make sure a channel was playing at full
volume when you left a Setup, you would give an Exit Value of 127 to a controller assigned
MIDI Controller 7. Again, ÒNoneÓ means no command is sent.
The Switch Controllers
Switch (physical) controllers have only two states: on and off. They are found after the
Continuous controllers when you are scrolling the menu. They are:
•
•
Buttons E, F, and G
Switch Pedals (ÒSwitchPdlÓ) 1 and 2
The parameters for Switch controllers are slightly different from those for continuous
controllers. The Þrst parameter is Switch Type (SwType). The choices available are Momentary
in which a switchÕs action lasts only as long as you are pushing it, and Toggle, in which the
switchÕs action lasts until you press it again. The Momentary mode is used for functions like
sustain or portamento, while the Toggle mode is used for functions such as arpeggiator start
and stop or latch, program GotoÕs, and transpositions. The buttons show which mode they are
in by the behavior of their lights: if a button is in Momentary mode, its light glows only as long
as you are holding it, while if it is in Toggle mode, the light stays on until you press it again.
Bear in mind that button assignments are independent per zone, and since thereÕs just a single
light per button, the light only shows the state of the button for the current zone. When you
press the button, however, it executes its assignments for all four zones.
The next parameter for the Switch controllers is On Controller (On Ctrl). This determines what
MIDI Controller or other message will be sent when the switch is ÒonÓ Ñ either pressed or
Musician’s Guide
5-15
Zone Parameters
Controllers
toggled the Þrst time. The list of available controllers is the same as for the continuous
controllers, and can be accessed the same way.
Then comes On Value: the value of the Controller when the switch is on. In the case of
conventionally-switched functions, such as sustain, the On Value will be 127. (For example, the
default for Switch Pedal 1 is Controller #64 Ñ Sustain Ñ with an On Value of 127.) However,
you might want to use a button or pedal as a ÒsoftÓ switch, in which case you might set On Ctrl
to 7 (Volume) and On Value to 50. On Value can also be set to ÒNoneÓ, so that turning on the
switch has no effect at all in this Zone, which can be useful when you are using one switch for
multiple functions in different Zones.
Off Ctrl is the MIDI Controller or other message that is sent when the switch is turned off Ñ
either released or toggled a second time. Whenever you set the On Controller, it automatically
sets this parameter as well to match. If you want the Off Controller to be something else,
however, you can change it after setting the On Controller. A situation where this might come
in handy is when you want to switch a synth between Mono and Poly mode. The On Ctrl
would be 126 (MonoOn) and the Off Ctrl would be 127 (PolyOn).
Off Value is the value of the Controller when the switch is off. The default value is 0. You might
want to change this, as in the Òsoft switchÓ example above: in order to bring the Zone up to full
volume when you release the pedal, set Off Value to 127. ÒNoneÓ is also a choice here.
Entry State determines whether an initial setting for the switch will be sent when the Setup is
selected. There are three choices: None (no message), Off (the Off controller and value), and On
(the On controller and value). In a button, if the entry state is ÒOnÓ, the light will glow as soon
as you select the Setup.
Exit State similarly determines whether a setting for the switch will be sent when the Setup is
left, either for another Setup or for the Internal Voices mode. The same three choices are
available. Very useful for turning off Sustains when changing Setups.
Do These Parameters Always Mean Something?
Be careful not to set up parameters that will do crazy things. When in doubt, leave things off, or
at the factory default settings. All of the Special Function controllers should have their Entry
and Exit values set to ÒNoneÓ.
On some of the higher-numbered MIDI controllers and Special Function controllers, the on
and/or off values donÕt have any meaning, because the controllers have very limited
functionality. The following list shows these. Ò>0Ó means you can use any value thatÕs greater
than zero. Ò=0Ó means the value should be 0. ÒxÓ means you can use any value, except ÒNoneÓ.
ÒÖÓ means the value does count for something:
On Value
Off Value
120 All Sound Off
>0
x
121 Reset All Controllers
>0
x
122 Local Control Off
>0
=0
123 All Notes Off
>0
x
124 Omni mode Off
>0
x
125 Omni mode On
>0
x
126 Mono mode On
Ö
x
(the On value, in some synths, speciÞes the number of MIDI channels to respond to, with one voice on each)
127 Poly mode On
>0
x
Program Increment
x
x
Program Decrement
x
x
Goto Program
Ö
Ö
Setup Increment
x
x
5-16
PC88
Zone Parameters
Copying Parameters
Setup Decrement
x
x
Goto Setup
Ö
x
(once you go to another Setup, this SetupÕs parameters are no longer operative)
Sequence Start
x
x
Sequence Stop
x
x
(Start and Stop will usually be on the same button, as On and Off Ctrls)
Sequence Continue
x
x
Transpose Up
Ö
Ö
Transpose Down
Ö
Ö
Do I Need All Those Pedals?
ItÕs important to realize that you donÕt have to have an actual pedal plugged into every Pedal
and Switch Pedal jack in order to take advantage of all of them. Entry and Exit Values can be
assigned to a Zone and a physical controller even if the controller isnÕt there, and they will
behave as if the controller were in fact plugged in. So if you want a speciÞc group of Controller
commands to be sent out whenever you choose a Setup, and you know theyÕre not going to
change while youÕre playing, you can assign them to physical controllers that arenÕt in use.
Multiple Controllers
Sometimes it can come in handy to assign the same Controller to more than one physical
controller. For example, you might want to be able to control modulation depth both with
Wheel 2 and pressure. The PC88 has no restrictions on assigning multiple controllers to a
particular MIDI message. For live performers, a useful trick is to assign Goto Setup to the three
buttons (E, F, and G) each with its own value. This lets you choose from among three Setups
(more if you want to include the Switch pedals in the fun) to jump to, at any one time.
Remember though, since going to another Setup turns off all of the old SetupÕs parameters,
youÕll have to include GotoÕs in the Setups youÕre going to, or you may not be able to get back!
HereÕs an example. YouÕre playing a tune in which you want to use four Setups, numbers 1, 12,
14, and 82. HereÕs how you would program the buttons to be able to move among the four
Setups at will:
Goto Setup values
Button E
Button F
Button G
Setup 1
12
14
82
Setup 12
1
14
82
Setup 14
1
12
82
Setup 82
1
12
14
Copying Parameters
Very often, two or more Zones in a Setup will be very similar Ñ perhaps all of the MIDI
parameters will be identical, but you want to use a different instrument sound on a certain
portion of the keyboard. Since there are so many parameters that deÞne a Zone, it can be
difÞcult making sure theyÕre all the same in two different Zones. For that reason, a Copy
function has been included.
Leave the Controllers mode (itÕs a special case, which weÕll talk about in a moment) by pressing
any of the other buttons on the top row of Zone Parameters. Select a Zone from the current
Musician’s Guide
5-17
Zone Parameters
Copying Parameters
Setup with the Zone buttons. Now press Copy. The display asks if you want to copy the current
Zone. If you do, press Enter. If you want a different Zone copied, press its button. Press any
other parameter button to cancel.
Now press the right cursor button. The display asks you where to paste the Zone youÕve just
copied. Press the button of the Zone you want to paste into, and press Enter. Again, any other
parameter button cancels. When you paste a Zone, the PC88 retains the destination zoneÕs old
MIDI channel, which is less likely to conßict with the MIDI channel you have copied. ItÕs a
good idea to set the MIDI channel of the zone before you paste into it.
You can also copy a Zone from one Setup to another. Copy it the same way, and then press the
MIDI Setups button and select the Setup you want to go to with the Select buttons or Data
Entry controls. Press Copy, and then the right cursor, and the display will ask whether you
want to paste into the current zone. You can select another Zone (with its Zone button), or not.
Press Enter and the deed is done.
Besides entire Zones, you can also copy the parameters associated with a single physical
controller in a Zone. The procedure is the same, except instead of using the Zone buttons to
select an entire Zone, select a single controller from the Controllers menu. Press Copy, and the
display conÞrms the controller youÕve selected, and the Zone itÕs in. Press Enter and all of that
controllerÕs parameters are copied. This information can now be pasted to another controller,
another Zone in the Setup, or another Setup.
To copy to another controller, press the Controllers button, and scroll through the list of
controllers with the cursor buttons (or use Intuitive Entry) to get to the controller you want.
Press Copy, then right cursor, and you can paste the copied values into this controller. To copy
the controller into another Zone, press a Zone button right after copying. You can also select a
different controller in this Zone to paste into. To copy into another Setup, press MIDI Setups
right after copying and select your Setup. Press the appropriate Zone button if the Zone you
want isnÕt current. Press Controllers, the Copy, then the right cursor. Paste away.
You can only paste information from a continuous controller into another continuous controller.
Likewise, you can only paste information from a switch controller into another switch
controller. Different memory buffers are used to store information during Copy operations
depending on whether youÕre copying a Zone, a single switch controller, or a single continuous
controller, so different types of copy and paste operations can overlap. For example, you could
copy a Zone, then copy a switch in a different Zone, then paste the Þrst Zone into another Zone,
then copy a continuous controller, then paste the continuous controller into another Zone, then
paste the switch.
In addition, there are separate copy buffers for Effects parameters and for Arpeggiator
parameters. WeÕll discuss them in the chapters on those subjects.
Here is a table that can help you keep track of what can go where:
You have copied:
5-18
It can go:
a Zone
to another Zone in the same Setup, a Zone in a different Setup
a Switch controller
to another Switch controller in the same Zone, or in a different
Zone, or in a different Setup
a Continuous controller
to another Continuous controller in the same Zone, or in a different Zone, or in a different Setup
an Effect
from the Internal to the VGM effect in the same Setup, or to
either effect in a different Setup
an Arpeggiator
to the Arpeggiator in a different Setup.
PC88
Zone Parameters
Storing a Setup
You can also set the zone, controller, switch, arpeggiator, or effects to a default value. ÒClear,Ó at
the end of each copy menu, copies information stored in Setup #127 that contains default
parameter information. You can overwrite this setup with your own information, however, to
create your own ÒdefaultÓ parameter settings.
Storing a Setup
In Chapter 3 we discussed storing data with an Internal Voice. The Voice itself canÕt be
modiÞed, but the performance parameters affecting all of the Internal Voices can be saved, to
the Òinternal defaultsÓ memory.
In Setups mode the story is quite different. Each Setup has four complete set of parameters Ñ
one for each Zone Ñ and saving parameters for one Setup has no effect on any other Setup.
The Store button starts the procedure. When you press it, the display asks if you want to
ÒReplace setupÉÓ, and the name and number of the current Setup, as shown below:
Replace|setup|3?
003|EBass/E|Pno|
If you press Enter now, you will replace the old version of the current Setup with your newlyedited version. If you want to store the new Setup to a different location, you can scroll to it
with the Alpha wheel or enter its Setup number with the numeric keypad. For convenience,
you can immediately Þnd the Þrst empty Setup location by pressing the increment and
decrement buttons (+ and -) under the Alpha wheel simultaneously. Whenever you have
selected an empty location, the display asks you if you want to save to the Setup at the selected
location with a message such as this one:
Save|setup|33?
03|EBass/E|Pno
Press Enter and itÕs done.
You can also select a Setup location with the alpha wheel, the numeric keypad, or increment/
decrement buttons (one at a time). Locations that are already occupied will say ÒReplaceÉÓ
while empty ones will say ÒSave...Ó.
Names
If you would like to come up with a new name for this Setup, then before storing it, press the
right cursor button once. The display says ÒRename setupÉ?Ó. Press Enter, and you can now
edit the SetupÕs name. Use the cursor buttons to locate the cursor under the Þrst letter you want
to change. Now you can scroll through the available characters using the alpha wheel. This
includes an upper-case alphabet, a lower-case alphabet, the numerals 0-9, and two sets of
punctuation marks. Use the cursor buttons to select other letters to change, and press Enter
when youÕre done. In the display shown below, for example, you could change the name from
ÒEBassÓ to ÒPBassÓ by turning the alpha wheel until the ÒEÓ above the cursor changes to ÒPÓ.
Setup|name:
EBass/E|Pno
There are a few shortcuts available when naming a Setup. You can call up letters using the
numeric keypad: each keypad button chooses from the letters that are printed right underneath
it. Repeated pressings select the different letters in a group: for example, press the Ò1Ó button
one time, the letter ÒAÓ will appear in the name, press it again and ÒBÓ appears, and one more
Musician’s Guide
5-19
Zone Parameters
Storing a Setup
time and you get ÒCÓ. Press it yet again, and it brings us back to ÒAÓ. The number Ò2Ó button is
responsible for the letters D, E, and F, and so on.
To change the case of a letter, from UPPER to lower or the other way around, use the Ò+/-Ó
button. To get numbers into a name, use the Ò0Ó button: press it repeatedly to scroll through the
digits 0 through 9. The Clear button makes the current letter a space. To insert a space, press the
ÒEÓ button in the Assignable Controllers section. To delete a letter press the ÒFÓ button, and to
move the cursor instantly to the end of the name in the display, press ÒGÓ.
Cancel works the same way with letters as it does with numerical parameter values: use it if
you want to start over or forget the whole thing.
The PC88Õs preset voices and Setups in ROM can never be erased. You can, however, save over
them into RAM with the same number. If you subsequently delete the program in RAM, the
preset ROM program will again be stored at that number.
Dumping a Setup
From the Store function, press the right cursor button (>>>) twice and you will come to ÒDump
setupÉ?Ó. This allows you to transmit the parameters that make up this Setup over MIDI
System Exclusive to another PC88, or to a sequencer (if it is capable of recording Sysex
messages) or other MIDI storage device, so that they can be recalled at another time. If you are
using complex Setups, itÕs always a good idea to have them stored externally so you can load
them back into the PC88 should something go wrong with the memory (or if you have to do a
hard reset). You can change which Setup you are dumping by turning the Alpha wheel or
entering a number on the keypad.
Loading a Setup back into the PC88 is simply a matter of playing it from the storage device into
the PC88Õs MIDI In jack. However, the Device ID of the PC88 (which is set from the Global
menu) must be set to the same number both when dumping and reloading the Setup for this to
work. The same is true when going from one PC88 to another: they must have the same Device
ID. You can avoid problems by setting the Device ID to Ò127Ó. In MIDI-speak, this means
Òbroadcast to all unitsÓ, so any PC88 on the MIDI cable will receive the Setup data. (You might
not want to do this if you have multiple PC88s that youÕre trying to keep different from each
other.)
You canÕt dump an empty Setup Ñ if you try, the display will say ÒNot FoundÓ. Press either
cursor button or any Parameter button to get out of here.
There is also a function for dumping all Setups Ñ itÕs on the Global menu.
Deleting a Setup
The last item on the Store menu is Delete. This comes in handy when you are designing and
storing lots and lots of fancy Setups. It erases a Setup from memory without replacing it with
another Setup, thus freeing up more space to store other Setups in other locations. (You can
check the free memory in the PC88 at any time, using the ÒMem AvailÓ option on the Global
menu.) From the Store function, press the right cursor button (>>>) three times. The display
says ÒDelete setupÉ?Ó. If the number is wrong, change it with the alpha wheel or numeric
keypad. If the Setup is empty, the display will say ÒNot FoundÓ and nothing will happen. Press
the left cursor button or any Parameter button to bail out.
The factory-programmed Setups in the Þrst 32 locations (64 if you have a VGM board) cannot
be deleted, although they can be written over. You can Store any Setup in any of those locations,
but if you then Delete it, the factory Setup that was originally in that location will reappear.
5-20
PC88