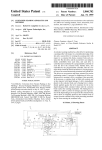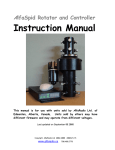
1
Capacitor Testing, Safe Discharging, and Other Related Information
Capacitor Testing, Safe Discharging
and Other Related Information
Version 2.40
Copyright © 1994-2004
Samuel M. Goldwasser
--- All Rights Reserved --For contact info, please see the Sci.Electronics.Repair FAQ Email Links Page.
Reproduction of this document in whole or in part is permitted if both of the following
conditions are satisfied:
1. This notice is included in its entirety at the beginning.
2. There is no charge except to cover the costs of copying.
Capacitor Testing, Safe Discharging, and Other Related Information
Table of Contents
•
Preface
Author and Copyright
DISCLAIMER
Introduction
o Scope of Thie Document
Safety Considerations
o Basic Capacitor Safety
o Capacitor Testing Precautions
Basic Capacitor Testing
o Testing Capacitors with a Multimeter
o Ray's Notes on Capacitor Testing
o Gary's Comments on Capacitor Testing
o What About Capacitance Meters?
o More About Capacitor Testing than You Probably Wanted to Know
Safe Discharging of Capacitors in TVs, Video Monitors, and Microwave Ovens
o Why This Matters
o Capacitor Discharge Technique
o Capacitor Discharge Tool
o Capacitor Discharge Indicator Circuit
o Voltage Checkers
Equivalent Series Resistance (ESR) and Related Parameters
o What is ESR and How Can It be Tested?
o More on ESR, DF, and Q
o Simple ESR meter schematics and plans
o ESR testing without an ESR meter
Electrolytics Capacitors and Special Types
o Cool Electrolytics - Temperature Rating Versus ESR
o Care, Feeding, and Storage of Electrolytic Capacitors
o Comments on ESR and uF Ratings
o Voltage Rating of Electrolyitc Capacitors Versus Reliability
o Some Qs & As about Capacitor Failure
o Comments on Old Electrolytics and Failure Mechanisms
o What are These Scored Lines on the Ends of Electrolytic Capacitors?
o Making Non-Polarized Capacitors from Normal Electrolytics
o About Tantalum Capacitors
o Supercaps and Ultracaps
o What are those X and Y Capacitors in the AC Line Input?
o Photoflash Capacitors
o
o
•
•
•
•
•
•
Capacitor Testing, Safe Discharging, and Other Related Information
Preface
Author and Copyright
Author: Samuel M. Goldwasser
For contact info, please see the Sci.Electronics.Repair FAQ Email Links Page.
Copyright © 1994-2004
All Rights Reserved
Reproduction of this document in whole or in part is permitted if both of the following conditions are
satisfied:
1.This notice is included in its entirety at the beginning.
2.There is no charge except to cover the costs of copying.
DISCLAIMER
We will not be responsible for damage to equipment, your ego, blown parts, county wide
power outages, spontaneously generated mini (or larger) black holes, planetary
disruptions, or personal injury that may result from the use of this material.
Capacitor Testing, Safe Discharging, and Other Related Information
Introduction
Scope of This Document
Capacitors may not be considered the superstars of electronic equipment (except
perhaps in devices like xenon flash units and pulsed lasers), but more like the helpers
and extras. However, they play a vital role in virtually everything that uses electrons
in some way. A defective 2 cent capacitor in a TV or monitor can render it useless.
This document describes techniques for the testing of capacitors using a multimeter
without a capacitance test mode. Information on safe discharging of high value or
high voltage capacitors and a discharge circuit with visual indication of charge and
polarity is also included.
There is also general information on capacitors, capacitance and ESR meters, and
other related topics.
Capacitor Testing, Safe Discharging, and Other Related Information
Safety Considerations
Basic Capacitor Safety
While accidental contact with capacitors on a 3.3 V logic board isn't going to result in
a shocking experience, this is not true of many common types of equipment including
TVs, computer and other monitors, microwave ovens; the switchmode power supplies
in some VCRs, laptop computers, camcorder battery chargers; electronic flash and
other xenon strobes; laser power supplies, and many other consumer and industrial
devices.
Where equipment is AC line connected or uses high voltages, special precautions are
required both for personal safety and to prevent damage to circuitry from careless
actions. In addition to the specific safety issues with respect to capacitors discussed
below, read, understand, and follow the recommendations provided in the document:
Safety Guidelines for High Voltage and/or Line Powered Equipment before
attempting any testing or repairs to equipment for which this applies.
Capacitor Testing, Safe Discharging, and Other Related Information
Capacitor Testing Precautions
WARNING: make sure the capacitor is discharged! This is both for your safety and the
continued health of your multimeter.
A pair of 1N400x diodes in parallel with opposite polarities may help protect the
circuitry of a DMM. Since a DMM doesn't supply more than 0.6 V generally on ohms
ranges, the diodes will not affect the readings but will conduct should you
accidentally put the meter across a charged cap or power supply output. They won't
do much with a charged 10 F capacitor or high current supply where you forgot to
pull the plug but may save your DMM's LSI chip with more modest goof-ups.
This approach cannot be used with a typical analog VOM because they usually
supply too much voltage on the ohms ranges. However, my 20 year old analog VOM
has something like this across the meter movement itself which has saved it more
than once.
Capacitor Testing, Safe Discharging, and Other Related Information
Basic Capacitor Testing
Testing Capacitors with a Multimeter
Some DMMs have modes for capacitor testing. These work fairly well to determine
approximate uF rating. However, for most applications, they do not test at anywhere
near the normal working voltage or test for leakage. However, a VOM or DMM
without capacitance ranges can make certain types of tests.
For small caps (like 0.01 uf or less), about all you can really test is for shorts or
leakage. (However, on an analog multimeter on the high ohms scale you may see a
momentary deflection when you touch the probes to the capacitor or reverse them. A
DMM may not provide any indication at all.) Any capacitor that measures a few
ohms or less is bad. Most should test infinite even on the highest resistance range.
For electrolytic caps in the uF range or above, you should be able to see the cap
charge when you use a high ohms scale with the proper polarity - the resistance will
increase until it goes to (nearly) infinity. If the capacitor is shorted, then it will never
charge. If it is open, the resistance will be infinite immediately and won't change. If
the polarity of the probes is reversed, it will not charge properly either - determine
the polarity of your meter and mark it - they are not all the same. Red is usually
**negative** with VOMs, for example. Confirm with a marked diode - a low reading
across a good diode (VOM on ohms or DMM on diode test) indicates that the positive
lead is on the anode (triangle) and negative lead is on the cathode (bar).
If the resistance never goes very high, the capacitor is leaky.
The best way to really test a capacitor is to substitute a known good one. A VOM or
DMM will not test the cap under normal operating conditions or at its full rated
voltage. However, it is a quick way of finding major faults.
Capacitor Testing, Safe Discharging, and Other Related Information
A simple way of determining the capacitance fairly accurately is to build an oscillator
using a 555 timer. Substitute the cap in the circuit and then calculate the C value
from the frequency. With a few resistor values, this will work over quite a wide
range.
Alternatively, using a DC power supply and series resistor, capacitance can be
calculated by measuring the rise time to 63% of the power supply voltage from T=RC
or C=T/R.
Capacitor Testing, Safe Discharging, and Other Related Information
Ray's Notes on Capacitor Testing
(This section from: Raymond Carlsen ([email protected])
The best technique depends on what the cap is used for. A lot of electrolytics are said
to be "leaky" when they are really partially open and just not doing their job.
Electrolytics that are actually electrically leaky are not as common. You can take
each capacitor out of circuit and test it with a cap checker or even a VOM, but incircuit testing is faster. I don't like to grab for a soldering iron unless I'm pretty sure
the part is bad. Time is money.
I first do a visual inspection and see if any electrolytics are bulging (they -are- leaky
and usually get hot), or physically leaking (corrosion around terminals). Bulging caps
in a switching power supply are a dead giveaway, but can point to leaky diodes as
well. Next, if the unit will power up, I look for signs of filter caps open... hum bars in
picture, hum in audio, flickering displays, low B+ but nothing gets hot, etc. You can
tell quite a lot by just being observent and a makling a few simple checks. Try all
controls and switches... you may get other clues. What works and what doesn't?
If you have an obvious fault... like a reduced vertical scan on a TV set or monitor for
example, to find the cap that is starting to open up, you can bridge each of them with
another cap, one at a time and see if it corrects the problem. (Experience has taught
me that bad electrolytics will not -usually- kill vertical sweep completely.) In a TV set
that is several years old or more, there could be more than one cap dried out (open).
Check them all.
"Popping" filters (as it used to be called) by bridging the original with a like value is
not good practice with solid state electronics. The shock to a live circuit is likely to
damage other components, or it could shock the circuit into working again... for
awhile. Then you get to sit there like a fool and wait for it to act up again... minutes
or weeks later. For small electrolytics, I use a trick of bypassing each one with a small
0.1 to 0.47uF capacitor while the set is running. If I see -any- change in the
performance, I KNOW the original is not doing its job (greatly reduced in value or
open). Of course if you hit the timing caps, it will upset the vertical oscillator a bit...
that's normal. For bigger electrolytic caps like the one used to feed the yoke or power
supply main filters, the only effective way to check them is by substitution with the
same or larger capacitance. Turn the set off, connect the new cap into the circuit and
power it up again.
As I stated before, leaky caps are actually quite rare... but it does happen. They
usually upset a circuit a lot more than open ones. Things tend to get hot quickly if the
cap is a filter in a power supply. Shorted tantalums and electrolytic caps in power
Capacitor Testing, Safe Discharging, and Other Related Information
supplies can literally explode. Obviously, leaky caps must be removed from the
circuit to substitute them for test purposes.
Most of the other types of small capacitors: Mylar, disc ceramic, etc. are pretty
rugged. It is rare indeed to find them bad. It happens just often enough to keep a tech
humble.
Capacitor Testing, Safe Discharging, and Other Related Information
Gary's Comments on Capacitor Testing
(From: Gary Collins ([email protected]).)
All an ohm-meter tells you is if the cap is shorted or not if it is an electrolytic of fairly
large value it can tell you if a cap is open. I am a tech in a large industrial controls
company in the factory service center. We consider any electrolytic cap to be suspect
if it's code date is over five years old. We have a Fluke 97 and it is useless for in
circuit tests. All a meter like a Fluke 97 can tell you is if the Cap is on the way to
being open from electrolyte loss or if it is shorted. Actually not all you need to know.
Several other facts you need to know are what is the conductance (internal leakage
resistance), it sometimes varies with voltage. You also need to know what a caps
power factor is in some cases. That is its ability to pass A.C. This is especially
important in computer equipment that has to pass harmonics and noise to ground.
Switching power supplies like are found in almost all PC's these days use high
frequency voltage converters to regulate voltage. The harmonics and noise produced
by this rapid switching heats DC filter caps and causes them to loose moisture from
their imperfect seals. This effect causes the capacitor to gradually open or drop in
capacitive value.
If you are talking about other types of capacitors you can test their value with a
meter but I have seen caps that look good with a meter but break down under
voltage. Special cap meters exist that test all these parameters and let you judge
whether the cap is good or not but the best test short of that is to replace the cap and
see if it works or not. Feel free to ask if that isn't what you wanted to know.
Actually sometimes the best test is to use a oscilloscope to look at what the cap is
doing in the circuit.
What About Capacitance Meters?
Simple capacitance scales on DMMs just measure the capacitance in uF and do not
test for leakage, ESR (Equivalent Series Resistance), or breakdown voltage. If the
measurement comes up within a reasonable percentage of the marked value (some
capacitors have tolerances that may be as much as +100%/-20% or more), then in
many cases, this is all you need to know. However, leakage and ESR frequently
change on electrolytics as they age and dry out.
Many capacitance meters don't test anything else but are probably more accurate
than a cheap DMM for this purpose. A meter of this type will not guarantee that your
capacitor meets all specifications but if it tests bad - very low - the capacitor is bad.
Capacitor Testing, Safe Discharging, and Other Related Information
This assumes that the test was made with the capacitor removed (at least one lead
from the circuit - otherwise other components in parallel can affect the readings.
To more completely characterize a capacitor, you need to test capacitance, leakage,
ESR, and breakdown voltage. Other parameters like inductance aren't likely to
change on you.
ESR testers, which are for good for quick troubleshooting, are designed to just
measure the Equivalent Series Resistance since this is an excellent indicator of the
health of an electrolytic capacitor. Some provide only a go/no go indication, which
other actually display a reading (usually between 0.01 and 100 ohms so they can also
be used as low-ohms meters for resistors in non-inductive circuits).
Note: always place the test probes on the capacitor terminals themselves if possible.
Any wiring between your meter and the capacitor may affect the readings. Although
your user manual may state that you can test capacitors in-circuit, other components
in parallel with the capacitor can screw up the readings - usually resulting in an
indication of a shorted capacitor or excessively large uF value. Removal is best.
Unsoldering only one of the pins is adequate if you can isolate it from the circuit.
Substitution is really the best approach for repair unless you have a very
sophisticated capacitance meterd.
The March 1998 issue of Popular Electronics has plans for a digital capacitance
tester with a range from 1 pF to 99 uF.
The May 1999 issue of Popular Electronics has plans for an "Electrolytic Meter"
which will accurately measure the capacitance and allow the determination of some
of the other characteristic of large value capacitors - up to several hundred thousand
uF. This is basically a time constant based tester using a constant current source.
Capacitor Testing, Safe Discharging, and Other Related Information
More About Capacitor Testing than You Probably Wanted to
Know
(From: John Whitmore ([email protected]).)
First, you need an AC ripple current source. Then, you tune to the frequency of
interest (120 Hz for rectifier power supply filter capacitors is usual) and apply both
the AC current and a DC voltage bias. Measure the phase shift between the current
and the voltage (for a perfect capacitor, this is 90 degrees) and measure the induced
voltage (for a perfect capacitor, this is I*2*pi*f*C).
Take the tangent of the difference of the phase shift and 90 degrees. (This is
'tan(delta)' and appears on the spec sheet for the capacitor...)
Then remove the AC, and crank the DC bias up to the voltage surge rating; measure
leakage current. Ramp the DC bias down to the working voltage rating; measure
leakage current.
Raise temperature and repeat the capacitance, phase shift, and working-voltage
measurements at the max temperature the capacitor is rated for.
Yes, it DOES sound rather elaborate, but that's the test that the manufacturers use.
Capacitor Testing, Safe Discharging, and Other Related Information
Safe Discharging of Capacitors in TVs, Video Monitors, and
Microwave Ovens
Why This Matters
It is essential - for your safety and to prevent damage to the device under test as well
as your test equipment - that large or high voltage capacitors be fully discharged
before measurements are made, soldering is attempted, or the circuitry is touched in
any way. Some of the large filter capacitors commonly found in line operated
equipment store a potentially lethal charge.
This doesn't mean that every one of the 250 capacitors in your TV needs to be
discharged every time you power off and want to make a measurement. However, the
large main filter capacitors and other capacitors in the power supplies should be
checked and discharged if any significant voltage is found before touching anything some capacitors (like the high voltage of the CRT in a TV or video monitor) will
retain a dangerous or at least painful charge for days or longer!
A working TV or monitor may discharge its caps fairly completely when it is shut off
as there is a significant load on both the low and high voltage power supplies.
However, a TV or monitor that appears dead may hold a charge on both the LV and
HV supplies for quite a while - hours in the case of the LV, days or more in the case
of the HV as there may be no load on these supplies.
The main filter capacitors in the low voltage power supply should have bleeder
resistors to drain their charge relatively quickly - but resistors can fail. Don't depend
on them. There is no discharge path for the high voltage stored on the capacitance of
the CRT other than the CRT beam current and reverse leakage through the high
voltage rectifiers - which is quite small. In the case of old TV sets using vacuum tube
HV rectifiers, the leakage was essentially zero. They would hold their charge almost
indefinitely.
Capacitor Testing, Safe Discharging, and Other Related Information
(From: Edwin Winet ([email protected]).)
Some of us work in areas where capacitors are huge, unusual or sometimes both.
Many people believe that only "big" capacitors can kill you, knock you across the
room, blow a hole in you, or get your attention. Here are a couple of comments:
When a capacitor is safely discharged, do not stop there. Some capacitors, due to
their ability to leak---are "dead" after being safely discharged with a "bleeder
resistor" of the right value for the job. Using a resistor that is under-rated - wattagewise - can result in the bleeder going open circuit DURING a discharge sequence
LEAVING some energy! High voltage capacitors, or worse yet, high energy-high
voltage capacitors require correct wattage AND correct resistance to be bled safely.
Also, high microfarad low voltage capacitors can vaporize a screwdriver and spray
metal in your eyes. (Adequate voltage margin is also essential for resistors used in
high voltage circuits. --- Sam.)
Certain types of capacitors are made of VERY good materials, which can hold a
charge for YEARS! Putting away charged capacitors of this type is an invitation to
disaster!
Low inductance capacitors that are used in energy pulse circuitry, many times are of
the oil-filled high energy/high voltage type. This type can give a MOST un-pleasant
surprise AFTER it has been completely drained by a safe bleeding technique. After
the capacitor has been bled, IMMEDIATELY short it, from terminal to terminal
AND to the external metal can (if applicable)!!! These capacitors RE-charge from
their internal fluid and can STILL deliver a lethal, as they "recover" a certain
amount of energy! this type of capacitor, or any capacitor of any high (enough)
energy value MUST be LEFT shorted.
Be particularly leery of any capacitor with a broken off lead that is sitting in a
drawer! Sometimes, these units break off during testing and don't get thrown out but remain charged - to kill or shock years later.
Lastly, the word "electrocution" is used in many high voltage device writings. That's
bad, because it was only intended for the "electric chair", short for electro +
execution.
Capacitor Testing, Safe Discharging, and Other Related Information
Capacitor Discharge Technique
The technique I recommend is to use a high wattage resistor of about 5 to 50 ohms/V
of the working voltage of the capacitor. This isn't critical - a bit more or less will be
fine but will affect the time it takes to fully discharge the capacitor. The use of a
current limiting resistor will prevent the arc-welding associated with screwdriver
discharge but will have a short enough time constant so that the capacitor will drop
to a low voltage in at most a few seconds (dependent of course on the RC time
constant and its original voltage).
Then check with a voltmeter to be double sure. Better yet, monitor while discharging
(monitoring is not needed for the CRT - discharge is nearly instantaneous even with
multi-M ohm resistor).
Obviously, make sure that you are well insulated!
•
•
•
For the main capacitors in a switching power supply, TV, or monitor, which
might be 400 uF at 350 V, a 2 K ohm 25 W resistor would be suitable. RC=.8
second. 5RC=4 seconds. A lower wattage resistor (compared to that calculated
from V^^2 / R) can be used since the total energy stored in the capacitor is not
that great.
For the CRT, use a high wattage (not for power but to hold off the high voltage
which could jump across a tiny 1/4 watt job) resistor of a 1 to 10 M ohms
discharged to the chassis ground connected to the outside of the CRT - NOT
SIGNAL GROUND ON THE MAIN BOARD as you may damage sensitive
circuitry. The time constant is very short - a ms or so. However, repeat a few
times to be sure. (Using a shorting clip lead may not be a bad idea as well while
working on the equipment - there have been too many stories of painful
experiences from charge developing for whatever reasons ready to bite when
the HV lead is reconnected.) Note that if you are touching the little board on
the neck of the CRT, you may want to discharge the HV even if you are not
disconnecting the fat red wire - the focus and screen (G2) voltages on that
board are derived from the CRT HV.
For the high voltage capacitor in a microwave oven, use a 100 K ohm 25 W (or
larger resistor with a clip lead to the metal chassis. The reason to use a large
(high wattage) resistor is again not so much power dissipation as voltage
holdoff. You don't want the HV zapping across the terminals of the resistor.
Clip the ground wire to an unpainted spot on the chassis. Use the discharge
probe on each side of the capacitor in turn for a second or two. Since the time
constant RC is about 0.1 second, this should drain the charge quickly and
safely.
Capacitor Testing, Safe Discharging, and Other Related Information
Then, confirm with a WELL INSULATED screwdriver across the capacitor
terminals. If there is a big spark, you will know that somehow, your original
attempt was less than entirely successful. At least there will be no danger.
DO NOT use a DMM for this unless you have a proper high voltage probe. If
your discharging did not work, you may blow everything - including yourself.
The discharge tool and circuit described in the next two sections can be used to
provide a visual indication of polarity and charge for TV, monitor, SMPS, power
supply filter capacitors and small electronic flash energy storage capacitors, and
microwave oven high voltage capacitors.
Reasons to use a resistor and not a screwdriver to discharge capacitors:
1. It will not destroy screwdrivers and capacitor terminals.
2. It will not damage the capacitor (due to the current pulse).
3. It will reduce your spouse's stress level in not having to hear those scary snaps
and crackles.
Capacitor Testing, Safe Discharging, and Other Related Information
Capacitor Discharge Tool
A suitable discharge tool for each of these applications can be made as quite easily.
The capacitor discharge indicator circuit described below can be built into this tool to
provide a visual display of polarity and charge (not really needed for CRTs as the
discharge time constant is virtually instantaneous even with a muli-M ohm resistor).
•
•
•
Solder one end of the appropriate size resistor (for your application) along with
the indicator circuit (if desired) to a well insulated clip lead about 2-3 feet long.
For safety reasons, these connections must be properly soldered - not just
wrapped.
Solder the other end of the resistor (and discharge circuit) to a well insulated
contact point such as a 2 inch length of bare #14 copper wire mounted on the
end of a 2 foot piece of PVC or Plexiglas rod which will act as an extension
handle.
Secure everything to the insulating rod with some plastic electrical tape.
This discharge tool will keep you safely clear of the danger area.
Again, always double check with a reliable voltmeter or by shorting with an insulated
screwdriver!
Capacitor Discharge Indicator Circuit
Here is a suggested circuit which will discharge the high value main filter capacitors
in TVs, video monitors, switchmode power supplies, microwave oven capacitors, and
other similar devices quickly and safely. This circuit can be built into the discharge
tool described above (Note: different value resistors are needed for LV, HV, and
EHV applications.)
A visual indication of charge and polarity is provided from maximum input down to
a few volts.
Capacitor Testing, Safe Discharging, and Other Related Information
The total discharge time is approximately:
•
•
•
LV (TV and monitor power supplies, SMPSs, electronic flash units) - up to
1000 uF, 400 V. Discharge time of 1 second per 100 uF of capacitance (5RC
with R = 2 K ohms).
HV (microwave oven HV capacitors) - up to 5,000 V, 2 uF. Discharge time of
0.5 second per 1 uF of capacitance (5RC with R = 100 K ohms)
EHV (CRT second anodes) - up to 50,000 V, 2 nF. Discharge time of 0.01
second per 1 nF of capacitance (5RC with R = 1 M ohm). Note: discharge time
is so short that flash of LED may not be noticed.
Adjust the component values for your particular application.
(Probe)
<-------+
In 1
|
/
\
2 K 25 W (LV)
Unmarked diodes are 1N400X (where X is 1-7)
/ 100 K 25 W (HV)
or other general purpose silicon rectifiers.
\
1 M 10 W (EHV)
Resistors must be rated for maximum expected
|
voltage.
+-------+--------+
__|__
__|__
|
_\_/_
_/_\_
/
|
|
\ 100 ohms
__|__
__|__
/
_\_/_
_/_\_
|
|
|
+----------+
__|__
__|__
__|__
__|__
Any general purpose LED type
_\_/_
_/_\_
_\_/_ LED _/_\_ LED
without an internal resistor.
|
|
|
+
|
Use different colors to indicate
__|__
__|__
+----------+
polarity if desired.
_\_/_
_/_\_
|
In 2
|
|
|
>-------+-------+--------+
(GND Clip)
Capacitor Testing, Safe Discharging, and Other Related Information
The two sets of 4 diodes will maintain a nearly constant voltage drop of about 2.8-3 V
across the LED+resistor as long as the input is greater than around 20 V. Note: this
means that the brightness of the LED is NOT an indication of the value of the voltage
on the capacitor until it drops below about 20 volts. The brightness will then decrease
until it cuts off totally at around 3 volts.
WARNING: Always confirm discharge with a voltmeter before touching any high
voltage capacitors!
For the specific case of the main filter caps of switchmode power supplies, TVs, and
monitors, the following is quick and effective.
(From: Paul Grohe ([email protected]).)
I've found that a 4 watt 'night light' bulb is better than a simple resistor as it gives an
immediate visual indication of remaining charge - well down to below 10 V.
Once it stops glowing, the voltage is down to non-deadly levels. Then leave it
connected for a little while longer, and finish it off with the `ole screwdriver.
They're cheap and readily available. You can make dozen 'test-lamps' out of an old
'C7' string of Christmas lights (`tis the season!).
Editor's note: where a voltage doubler (or 220 VAC input) is involved, use two such
bulbs in series.
(From: Dave Talcott ([email protected]).)
I built the capacitor discharge tool. I had all the parts to hand except for the series
resistor, for which I used a 2 watt axial unit, since the power dissipation is not
critical. I decided to package it in probe form for convenience. Except for the series
resistor, which lives in a counterbore, everything is surface mounted and
communicates through a LOT of cross-drilled holes. A piece of heat-shrink tubing
holds everything in place. The only tricky part was making two small recesses to
locate the LEDs. The probe tip is a short piece of solid copper wire salvaged from
some Romex house wiring and ground to a point.
Capacitor Testing, Safe Discharging, and Other Related Information
Voltage Checkers
Whereas a multimeter is intended to measure voltages (and other things), a checker is
used mostly to just produce a quick indication of the presense of voltage, its polarity,
and other basic parameters. One use is a quick, but reliable indication of the status of
the charge on a BIG capacitor. An, example of a simple version of such a device is the
"capacitor
discharge
indicator
circuit"
described
above.
(From: Ian Field ([email protected]).)
The version of the checker that I have, also contains a miniature 12 V battery for
continuity checking - any resistance less than about 22K will produce some glow. It's
handy for quick checks of semiconductor junctions - in general if it produces a slight
glow it's leaky, but transistor B/E junctions have an inherent zener voltage, so there
is usually some glow. Also schottky-barrier diodes give a reverse leakage glow - this
does not mean they're faulty, check the Vf with the diode-check on a DMM before
binning! Any zener diode above 10-11 V can be given a quick test for S/C, lower Vz
will produce some glow - again check Vf before binning.
These checkers are getting hard to obtain, most of the component stockists here only
carry vastly over complicated (and expensive) versions with built-in measurement
computer and LCD - these wouldn't last 5 min's around flyback circuitry! Some
Automotive accessory shops have a simpler version with no battery - always check
that it's stated to be capable of measuring AC or DC at 4 to 380 V before parting with
money! The internal circuit should contain the LED's, a 15 ohm resistor to limit the
maximum surge current when the PTC is cold and the special PTC film-thermistor.
The battery can be added with a button from a VCR front panel - but don't blame
me if you kill yourself because you didn't insulate the added components properly!
There is a more complicated non-battery version with 2 LED's close to the front of
the handle to indicate polarity and a row of LED's along the length of the handle to
indicate the voltage-range. This version contains 2 special PTC's and a discretetransistor bargraph circuit - there might be room to add a battery inside the case. As
for the special PTC this is the only place I've seen them - one possibility that might be
worthy of looking into is the Siemens PTC SMPSU startup thermistor for TDA4600
control chips, this usually has a series resistor of at least 270 ohms and is more likely
to turn-up in European TV set's, but I have seen it in early Matsushita IBM displays
and a few others (possibly Tandon) the PTC thermistor is always blue and looks like
a very-miniature copy of the Philips white-plastic PTC degauss thermistor.
Capacitor Testing, Safe Discharging, and Other Related Information
Capacitor Testing, Safe Discharging, and Other Related Information
Equivalent Series Resistance (ESR) and Related
Parameters
What is ESR and How Can It be Tested?
ESR (Equivalent Series Resistance) is an important parameter of any capacitor. It
represents the effective resistance resulting from the combination of wiring, internal
connections, plates, and electrolyte (in an electrolytic capacitor). The ESR affects the
performance of tuned circuits (high ESR reduces the Q factor) and may result in
totally incorrect or unstable operation of devices like switchmode power supplies and
deflection circuits in TVs and monitors. As would be expected, electrolytic capacitors
tend to have a high ESR compared to other types - even when new. However, due to
the electrochemical nature of an electrolytic capacitor, the ESR may indeed change and not for the better - with time.
Here is a Web site that discusses ESR testing in some detail:
•
Stephen M. Powell's ESR Page
When troubleshooting electronic equipment, electrolytic capacitors, in particular,
may degrade resulting in a significant and unacceptable increase in ESR without a
similar reduction in uF capacity when measured on a typical DMM's capacitance
scale or even a cheap LCR meter.
There commercial ESR meters and kits available ranging from $50 to $200 or more.
Here are a couple of sites to check out:
•
•
Bob Parker's ESR Meter Site (both low cost kit and assembled versions are
available).
Capacitor Wizard Site
There devices can generally be used to measure really low resistances of noninductive devices or circuits as well (they use AC so inductance would result in
inaccurate readings). Since their lowest range is at least 10 times better than a typical
DMM (1 ohm full scale - 0.01 ohm resolution), they can even be used to located
shorted components on on printed circuit boards.
Note: always place the test probes on the capacitor terminals themselves if possible.
Any wiring between your meter and the capacitor may affect the readings. While
usually not a problem, very low resistance components in parallel with the capacitor
may result in a false negative indication - a capacitor that tests good when in fact its
ESR is excessive.
Capacitor Testing, Safe Discharging, and Other Related Information
(From: Larry Sabo ([email protected]).)
I find my ESR meter invaluable for finding high ESR caps, and have never seen a
shorted cap that hadn't exploded. It's such a pleasure to zip through the caps in a
power supply that's duff and find the ones that have had it, all without touching the
soldering iron.
There have been days I wish I had the LC102 for it's leakage measuring capability,
but in my limited experience the 10% figure seems high. The LC102 commends itself
for the inductance ringer, too, but you sure pay a premium. I'll build Sam's gizmo
first.
BTW, I built my ESR meter from a kit purchased from Dick Smith Electronics in
Australia, for $A 52.74 + $A 25.00 for delivery. It took about 8 hours to assemble, but
I'm a fuss-ass.
More on ESR, DF, and Q
(From: Michael Caplan ([email protected]).)
Before I bought my ESR meter I too wondered--what exactly did it measure?
Nevertheless, having heard so much about the meter, I went ahead and bought one. It
works, and that's the real bottom line.
A recent question about what exactly in being measured (DF or Q) piqued my
interest again. I think I have the answer -- 'think' being the operative word. Here's
my interpretation.
In summary, the ESR is indeed related to Dissipation Factor (DF), but it is not the
same. A DF measuring device might not as readily identify a bad capacitor as does
the ESR meter because the reading varies and is not direct, as described below.
Capacitors may be thought of as having pure capacitance (C) and some pure
resistance (R), the two being in series. An ideal capacitor would have only C, and no
R. However, there are the leads and plates that have some resistance and constitute
real R. Any R in series with C will reduce the capacitor's ability to pass current in
response to a varying applied voltage, as in filtering or DC isolation applications, and
it will dissipate heat which is wasteful and could lead to failure of the component. As
with ESR, a lower DF (or higher Q, it's inverse) may be equated with better
performance, all other things being equal.
Capacitor Testing, Safe Discharging, and Other Related Information
Now I get a bit more mathematical, but only using basic electronic theory and
formulas so I hope most will be able to follow this.
DF is defined as Rc/Xc, the ratio of the R in the capacitor (Rc) to the reactance of the
capacitor (Xc). The higher the Rc, the higher the DF and the "poorer" the capacitor.
So far so good.
The reactance (Xc) is a function of frequency. Xc=1/(2*pi*f*C). So, as the frequency
goes up, Xc goes down. Now look back at the formula for DF. DF is an inverse
function of Xc. As Xc goes down, DF goes up, and vice-versa. So DF varies
proportionately with frequency.
Here's an example using the ubiquitous 22 uF, 16 V electrolytic that seems to be at
fault too often in many switched mode power supplies.
At 1000 Hz, this capacitor has an Xc of 7.2 ohms. If the series Rc is only 0.05 ohms
(pretty good), then the DF is 0.0069.
At 50,000 Hz, this same capacitor would have an Xc of only 0.14 ohms. At this
frequency, the DF is 0.36, again good.
Now, change the Rc from 0.05 to 25 ohms. At 1000 Hz, DF = 3.4. At 50,000 Hz, DF =
178.
So we see that DF is a function of the test frequency. The higher the frequency, the
higher the DF. DF is a measure of the capacitor "quality", but the figure is valid only
at the frequency of the test. (A good capacitor, with an ideal Rc of zero, will have a
DF of zero regardless of frequency.)
DF can indeed be used to identify a bad capacitor, but the user must interpret the
level of measured DF that would indicate a bad component. Any 'go/no go' tables of
DF values would be valid only at the specified frequency. As an alternative, the user
can calculate the Rc by first measuring both DF and C, and then, knowing the test
frequency, determine if the Rc is excessive. (Rc=DP*Xc).
The ESR meter measurement system, however, does not appear to be a function of
Xc. It measures the voltage across the capacitor resulting from the application of a
very short pulse of current. This short pulse is not enough to charge the capacitor so
the voltage being measured across the capacitor's leads is primarily a function of Rx,
which is not frequency sensitive. And, with the 'tables' of typical ESR (=Rc) that is
provided with the ESR meters I have seen, there is no need to do any further
calculations.
Capacitor Testing, Safe Discharging, and Other Related Information
The ESR meter is not going to be reliable with very small capacitors. In this case,
they will become more fully charged by the applied current at the time the meter
samples the voltage. Even if the Rc is an ideal zero ohms, the meter will now read the
voltage built up on the capacitor and interpret it as a very high (possibly off-scale)
ESR. Thus its advantage, and main purpose, is in testing electrolytics which tend to
be larger value capacitors.
(Note: The inability of the ESR meter to test low value capacitors is true only if the
meter does not distinguish between in-phase and quadrature voltages, and it does not.
If it did sense only the in-phase voltage that is produced across Rx (i.e. in-phase with
the applied current), then it would not be sensitive at all to the delayed (minus 90
degrees) voltage built up on the capacitor's plates.)
All testing I have done with small capacitors (less than 0.001 uF) seems to suggest
that the (Bob Parker) ESR meter is not phase discriminating and Bob Parker has
confirmed this. This is not a great disadvantage. The objective of the ESR meter is to
identify capacitors that have gone bad. This is more the case with electrolytics where
the dielectric compound tends to dry up. Smaller capacitors usually are not
electrolytic and therefore tend to be relatively stable. Faults in the latter (e.g.
ceramic, mica, polystyrene) are more likely to be open, shorted, or leaky, all of which
will be detectable by capacitance or resistance measuring devices.)
(From: Roy McCammon ([email protected]).)
Note that "equivalent series resistance" is not necessarily the same as "series
resistance".
"Series resistance" is just the resistance in series with the capacitance. This is what
most of the descriptions have delt with, and with high currents and frequencies as
you tend to see in a switchmode supply, the "true series resistance" is just what you
want to know.
"Equivalent series resistance" is the resistance that you would have to place in series
with a pure capacitance to produce the same loss. It may be frequency dependent. A
cap with a resister in parallel has an esr. At a single frequency, you cannot tell the
difference between a cap with a parallel resister and a cap with a series resister. For
example, at 100 Hz, a 1 uF and 10 ohm in series has a reactance of 10 + J1591, as does
a 1 uf in parallel with 253K, hence both have an ESR of 10 ohms.
You need to know just what your meter is doing. It’s best that the measurement
relate to your use.
Capacitor Testing, Safe Discharging, and Other Related Information
Simple ESR meter schematics and plans
Electronics magazines have published various ESR meter schematics over the years.
Here is one that is unique is being able to test caps on live equipment though I'm not
sure what great advantage this is:
(From: Pete Culf ([email protected]).)
"The January 2003 issue of Television magazine has an article about a
live - in circuit electrolytic ESR tester. The battery operated project by
Ian field is based on a TL431 high gain comparator with the input
isolated via an optocoupler. It is designed for live testing. I haven't built
the thing yet as it's my habit to wait awhile and read about any problems
the other guys find before I try it, but in subsequent issues I havn't read
of any problems."
Here are a couple of basic analog ESR meter schematics:
Mark Zenier ([email protected]) has an ESR Meter Schematic which is about as
simple as it gets.
(From: Gary Woods ([email protected]).)
Thanks to a friend with a scanner, ESR meter schematics, theory of operation, and
sales literature (From a company that, alas, no longer exists) are on my ESR Meter
Page.
Boat-anchor relevance - although the device is sand-state, it's just the ticket for
checking out those old 'lytics!
Capacitor Testing, Safe Discharging, and Other Related Information
ESR testing without an ESR meter
While, the techniques described below can in principle be applied to any capacitor,
they will be most useful for electrolytic types. Of course, make sure to observe the
polarity and voltage rating of the capacitor during testing! In addition, take care with
the maximum voltage applied to other components if you attempt to test caps incircuit. It should be small enough that semiconductor junctions do not get forward
biased (a few tenths of a volt max) and the impedance should be such that low value
resistors don't smoke!
The ultimate in cheap if you have an oscilloscope would be: 99 Cent ESR Test
Adapter.
(From: Ron Black ([email protected]).)
An inexpensive way (for the cost of a resistor) to measure the ESR of a capacitor is to
apply a squarewave signal through a resistor in series with the capacitor under test.
Monitor the waveform on the capacitor using an oscilloscope. When using a sensible
squarewave frequency (a few kHz - not one where the inductance of the circuit
becomes an issue) there will be a triangle waveform with a step at the squarewave
transition times. The amplitude of the step will proportional to the ESR of the
capacitor. Calibrate things by adding a known small value ESR simulating resistor in
series with the capacitor. This doesn't have to cost anything if you have a squarewave
generator, or can build one cheaply.
(From: Gary C. Henrickson ([email protected]).)
Motivated by the discussions on the virtues of ESR testing, I ordered a genuine ESR
meter. While waiting for it's arrival, a large pile of dogs were accumulating in my
shop.
To crank out these repairs quickly in the meantime, I constructed an 'ESR meter' by
cabling a (50 ohm) function generator output to the scope input and, via a Tconnector, on to a set of test leads.
With the test leads shorted, mere millivolts displayed on the scope. Across a good
capacitor, mere millivolts. Across a sick capacitor, mucho volts. The defective caps
stuck out like a sore thumb.
Wow, this is too easy. Instant in-circuit (power off) fool-proof testing of electrolytics.
I wish I had thought of this 50 years ago.
Capacitor Testing, Safe Discharging, and Other Related Information
I used 100 kHz and 5 V p-p. With scope set at 0.2 V/div you can also check diodes
surrounded by low ohm transformer or inductor windings.
(Editor's note: to avoid the possibility of damage to semiconductors due to excessive
voltage, use a lower amplitude signal - say 0.5 V p-p - for in-circuit testing. This will
also prevent the most semiconductor junctions from conducting and confusing your
readings.
(From: Bert Christensen ([email protected]).)
I have been reading the various messages about ESR checkers and while I don't
doubt their value in electronic servicing, I think that the use of these devices adds an
extra and IMHO unneeded step. My method of diagnosing possible electrolytic fault
is to use just a scope. Remembering that electrolytics pass AC or signals through
them, a scope should show *the same* waveshape on both sides of the cap. If the cap
is a bypass cap to ground, then the waveshape should just be a flat line on both sides;
if it is a coupling cap, the waveshape should be the same on both sides.
There are some exceptions, one being a cap that is used for waveshaping in a vertical
circuit but such applications are few. Most electrolytics are either coupling or bypass.
Using 'my' scope method has several advantages. The main one is that it tests caps
dynamically in the circuit they are used in and using the actual signals applied to
them in real life. The method is fast because you just have to go from one to another
(if you are using the scatter-gun approach) using just the scope prod. But, best of all,
it seamlessly integrates a total dynamic approach to servicing using the set's own
signals or lack thereof. If you are tracing a video circuit, you can find an open cap, an
open transistor, or a defective IC using the same piece of equipment.
I have been running a service business for over 40 years. Most of my business today is
doing tough-dog service for other service companies.
But, I must admit that sometimes I fix sets just by changing the caps that are swollen.
;-}
Capacitor Testing, Safe Discharging, and Other Related Information
(From: Clifton T. Sharp Jr. ([email protected]).)
I still do just enough work that I'll one day break down and buy an ESR meter (I
always give in and indulge myself with the toys of my "trade"). For now, though, the
quickie method I use is the oscilloscope. It goes something like this:
1. Scope positive lead. Any significant AC? If not, go to next cap.
2. Is the AC more than about 5% of the DC? If not, note this location and go to
next cap.
3. Scope negative lead. AC here roughly the same as on positive lead? If so, go to
next cap. (If this lead is *obviously* grounded, skip this step.)
4. Set off; note value; jumper in roughly same value at safe voltage rating. (Note:
make sure both caps are discharged! --- sam)
Set on; scope positive lead. Significant difference? If not, note this location and
go to next cap.
5. Replace cap. Test set. If not okay, go to next cap.
If that doesn't catch it, a quick review of the "noted locations" often does. This fixes
98% of cap problems. Not exhaustive or perfect, nor is it intended to be. Close cover
before striking. Probably causes cancer in laboratory rats. Your mileage may vary.
(From: Tony Williams ([email protected]).)
It is always best when measuring a component parameter to lean the measurement
method towards some sort of emulation of the application to which the parameter is
important. This is particularly true of power components, because the parametervalue may vary with operating conditions. It is essential with magnetics, less so with
electrolytics, but a good habit anyway.
Hold the cap charged up and find some way of applying repetitive square *current*
pulses to it, an Amp or more each time, depending on the expected ESR.
If the cap has no ESR then a scope across its terminals will show that each current
pulse results in a nice smooth ramping triangle. If the cap has an ESR then each
triangle will be preceded by a small vertical step. If the current is known,
measurement of that step gives you the ESR-value. You can cross-check the accuracy
of the method by seeing the effect of increasing the "ESR" as low-value R's are put in
series with the cap, 0.01 to 0.1 ohms.
Capacitor Testing, Safe Discharging, and Other Related Information
Be careful about the placement of the scope leads, you don't want to measure the IRdrop in the wiring.
If the size of each step+triangle is small compared to the steady voltage on the cap
then the known "constant-I" discharge pulse can be approximated with no more than
a resistor and switching Fet.
(From: Oliver Betz ([email protected]).)
If you want to the decoupling capability, you maybe want to know the ESR only at
the series resonant frequency. It's quite simple:
Use a sine generator, connect some coax cable to its output, at the end of the cable put
47 ohms in series and connect the resistor to one end of the cap, connect a kind of
detector in the same way (47R - cable - detector) to the same lead. Other end of the
cap (and coax shields) to a small ground plane. Detector can be voltmeter, scope or
spectrum analyzer, depends on your equipment and resonant frequency. Spectrum
analyzer with tracking generator eliminates need for separate generator, makes
measurement easy and enables you to measure even very small capacitor values.
Tune to minimum signal at the detector. With a scope you can check also phase shift
(thanks for this hint, Winfield!), cap should be only resistive (no phase shift). ESR
can be easily calculated now.
(From: George R. Gonzalez ([email protected]).)
After seeing all the glowing recommendations for ESR meters on the
sci.electronics.repair newsgroup, I decided to look into this. Being a cheap sort, I first
tried setting up my own ESR meter using stuff lying around the shop: Function
generator set to 2 volts p-p, 100 kHz sine wave, hooked up to a BNC tee, one side of
the tee goes to some clip leads, other side to the scope, set for 0.1 volts/cm, 10 us/cm
sweep.
With the clip leads dangling free, the scope trace is almost invisible, as it's zooming
up and down 20 cm 10 times across the screen. With the clip leads shorted, I get
about 0.3 cm of a sine wave. With a 1 ohm resistor across the clip leads, I get about 1
cm of sine wave.
I put a GOOD 2 uF capacitor across the clip leads, we see about 0.5 cm of sine wave.
Tests with various good electrolytic caps all give less than 1 cm of sine wave.
Capacitor Testing, Safe Discharging, and Other Related Information
Now we can just hop along a circuit board bridging the electrolytics as we go along. A
good electrolytic is going to show 1 cm or less of deflection. Many old ones with
1970's date codes will show 2 or 3 cm. Probing around a suspect old pc board
revealed that 80% of the caps gave more than 2 cm of deflection!
Now this isn't always a bad thing. You have to use a little judgement. If the
electrolytic is in a high-impedance circuit, such as coupling two voltage amp stages, a
few ohms isn't going to hurt too much. But if it's a bypass capacitor on a Vcc line, it
could be significant. Just realize that a circuit may appear to work just fine even with
caps with many ohms of ESR. I usually replace these caps anyway, as they're only
going to go downhill from here.
I can't tell you how much time this little set-up has already saved me!. Before I had to
unsolder one lead of the capacitor, hook it up to the cap bridge, twiddle the dials until
I got a semblance of balance, or if it was a bad capacitor, I'd waste even more time
trying to find the missing null. Now I can just probe the caps in-circuit, and mark the
bad ones with a big red magic-marker for later replacement. It's quick and great for
morale.
This method works well with caps in the range of 1 to 500uf, with medium or high
ESR. But it doesn't have enough oomph to drive BIG caps. For this you'd need a
generator with a lower output impedance.
Next experiment-- we'll hook up a tranny from an old dead SMPS to lower the
generator's output impedance so we can test those big PS capacitors. Stay tuned....
BTW, this isn't meant to take away from built ESR meter sales! It may even increase
them as once you see how wonderful this technique is, you may want to buy a
dedicated ESR meter.
Capacitor Testing, Safe Discharging, and Other Related Information
Electrolytic Capacitors and Special Types
Cool Electrolytics - Temperature Rating Versus ESR
(From: Jeroen H. Stessen ([email protected]).)
Electrolytic capacitors like to be kept cool! If there's anything that these capacitors
can't stand, it's heat. It causes them to dry out.
Electrolytic capacitors exist in (at least) two different temperature ratings: 85 C and
105 C. The latter are obviously more temperature resistant. Unfortunately they also
tend to have a higher ESR than their 85 C counterparts. So in an application where
the heat is due to I^2 * ESR dissipation, the 105 C type may actually be a *worse*
choice! If the heat is due to a nearby hot heatsink then 105 C is indeed a better
choice.
From: Ralph W. M. ([email protected]).)
While it seems true that 105 C electrolytics have about 50% greater ESR when new,
compared to similar 85 C electrolytics, IMO, that is not significant in the circuit. If
you would (could) perform a long term experiment and install a 85C and a 105 C in
the same circuit, and measure the ESR after 1,000 hours, I would expect to see the
ESR of the 105 C part after aging/usage, now to be less than the 85 C.
Care, Feeding, and Storage of Electrolytic Capacitors
"I seem to recollect reading (or is it an old wives' tale?) that electrolytics
last longer if you apply a voltage across them every so often. This to me
implies that seldom used devices should be turned on every now and
again to make them last longer, not left sitting on the shelf. True or
false?"
(From: Ralph W. M. ([email protected]).)
Electrolytic caps have a shelf life. They can go bad (i.e., dry out) on the shelf even
though they were never used/turned on even once.
Technically, a "stale" electrolytic (more than one year after it was manufactured)
would have excessive DC leakage, and should be properly re-formed before using it.
Capacitor Testing, Safe Discharging, and Other Related Information
In practice, I have never found this to be a problem 99% of the time (only exception
is critical timing/direct coupled circuits; very rare these days). The worst I have even
noticed, when installing a stale electrolytic, was that the circuit was slightly unstable
for 15 minutes, but cleared up and was fine thereafter and NEVER "bounced". (all
bets are off if something so old it has "whiskers" is tried though).
How old is too old? I would offer that up to 5 years on the shelf, in practice, should
not be a problem. But 10 years stale MIGHT upset things a bit.
Technically, if you read electrolytic specification sheets, you will find that the best
(i.e., lowest) DC leakage is not until it has been ACTUALLY used for at least 10% of
the total projected lifetime, (i.e., a 1,000 hour @105C electrolytic would not achieve
the lowest DC leakage until it was used for 100 hours @ 105C (or used for 600 hours
@ 65C; but that conversion is another story).
In practice, IMO, the vast amount of circuitry designs/type of circuits being currently
designed, have built into it enough tolerance for above average DC leakage, that
(these days), excessive/drifting DC leakage is rarely a problem.
As far as "exercising" seldom used equipment; couldn't hurt.
Some Qs & As about Capacitor Failure
Here is a three part question concerning electrolytic capacitors. This is an automotive
computer application.
Problem: Electrolytic capacitors are leaking after a period of time causing computer
failure.
Questions:
1. What is/are the physical mechanism which causes the dielectric to leak?
2. Is there advantage to upping the voltage rating for a replacement cap?
3. What are the pros and cons of Tantalum replacements?
(From: Asimov ([email protected]).)
1. Heat is the enemy of the dielectric, it may be passing a lot of high frequency
current for which it was not designed. Leakage current increases exponentially
with temperature.
Capacitor Testing, Safe Discharging, and Other Related Information
2. This reduces the possibility of rupture of the dielectric junction which, though
usually self-healing, can become permanent after repeated episodes.
3. Tantalums will work well into the sub megahertz range. The main problem
with them is when their dielectric ruptures and it is connected across a supply
with ample current, it can draw some fantastic amount of energy. This usually
results in an explosion of the capacitor which sprays hot molten material all
around. It goes off like a gunshot and the tantalum pellet is the bullet.
4.
Comments on ESR and uF Ratings
(From: Asimov ([email protected]).)
I saw a very revealing graph in the Sprague catalog concerning life tests at +130'C
plotting ESR versus time. It turns out that for a 10 uF cap, the ESR actually drops
during the first 1,500 hours or so. The interesting part is that from 1,500 hours out to
5,000 hours the value then about doubles.
On the other graph the results of a 47 uF cap shows no change in ESR over the whole
life time test. However, it's uF value drops by about 2.5%. The 10 uF electro on the
other hand shows little capacitance change (less than 1%).
If we extrapolate these results we can see a general trend of the larger value caps
losing capacitance over time but their ESR remaining pretty constant and the smaller
caps keeping their value but their ESR increases over time. Thus this sort of makes
some sense to me as to why those little 1 uF caps are so notorious. Comments
welcome...
Voltage Rating of Electrolyitc Capacitors Versus Reliability
Some of the questions go like:
"I am wondering if there is any problem with replacing a cap of lower
voltage rating with one of higher rating. For example, would a 2.2uf 50v
cap generally work OK as a replacement for a 2.2uf 16v cap which is
used as a filter in a 6 volt or 12 volt circuit? I never used to think twice
about doing this, but have seen some discussion recently leading me to
question whether an electrolytic will function properly if it is only
operated at a small fraction of its rated voltage."
Capacitor Testing, Safe Discharging, and Other Related Information
(From: Ralph W. M. ([email protected]).)
I know a lot of people try to improve reliability by increasing the volt of the
replacement electrolytic. And some companies like Sony issue modification upgrades
increasing volt rating. And yes, SOME, (but NOT all) electrolytic manufacturers
recommend increasing volt rating to improve reliability of ORGANIC electrolytics.
But in my opinion, I would not, and do not.
To improve reliability, I first upgrade the temp. Or I might chose to upgrade to a
Low ESR electrolytic. Sometimes, circumstances or logistics prevents the proceeding,
and I will increase the uF up to 200% of original IF it is filtering or decoupling
application.
Basically, any improvement in lifetime from increasing volt rating would simply
come from the larger case size allowing the electrolytic core temp to be perhaps 5C
cooler, i.e., the temp reduction comes from the larger case size being a better
"radiator". I estimate that increasing the volt rating of the replacement part would
not achieve greater than 50% lifetime improvement; BUT at the expense of
greater/worse DC leakage, (the greater DC leakage might not be a problem).
On the other hand, I have read some component manufacturers who recommend
increasing the uF to improve reliability, and I estimate that 2X the original uF will
result in at least 200% improvement (maybe 400%), in component operating lifetime.
And, to anticipate a possible question, i.e., "what if you tried to restore the "1.5X"
cap that was operated at a lower voltage to it's original volt rating by trying to
carefully, and slowly increasing the applied voltage in order to restore the dielectric".
Maybe, I don't know, never performed such an experiment. At a minimum it would
require a lot of labor on something that cost relative pennies.
(From: Steve Bell ([email protected]).)
From experience I see no problem fitting capacitors of slightly higher voltage ratings.
I keep a full range of high frequency low ESR 105 deg caps. I find, as an example,
when I replace a 47uf 35V cap, it is with a 47uf 50v device. Due to improvements in
capacitor manufacturing, the replacement fitted is usually the same size, possibly
smaller, and usually has a lower ESR than the original did before failing..
Capacitor Testing, Safe Discharging, and Other Related Information
Where problems might occur is if someone fits a much higher voltage cap in a critical
area, such as a monitor switchmode power supply or video circuit. Higher voltage
capacitors have higher ESR that may be unsuitable for the circuitry.
(From: Robert Macy ([email protected]).)
The higher voltage electrolytic has a higher esr value.
The ripple current will be the same for both caps and the higher esr means more
power dissipated into the cap, drying out the electrolyte and shortening the
capacitor's life a lot.
Comments on Old Electrolytics and Failure Mechanisms
A question that often (well, at least sometimes) comes up is what to do with respect to
electrolytics capacitors in really old equipment. Replace all?
Without going into an extended discussion (see below):
1. There is no general rule.
2. Equipment that has been heavily used and/or in a hot environment will likely
have more problems with dried up capacitors.
3. I would generally just check them and replace any that are much reduced in uF
value, have higher ESR, or higher leakage after giving them time to reform.
I just was working on a 30 year old Minox strobe. Its electrolytics seem to be as
good as the day they were manufactured.
(From: David Sherman ([email protected]).)
I have been "into" electronics for at least 20 years and learned electronics
originally on old WWII military surplus gear which was cheap at the time.
Since then I have been a degreed EE and professional engineer and an avid
junk collector. To really old military gear designers often went to a lot of
expense to avoid electrolytics. They' use a big 2-section choke and a couple 4uF
oil-filled paper capacitors in a power supply rather than just one big
electrolytic because the electrolytics in those days tended to "dry out" and fail
with age.
Capacitor Testing, Safe Discharging, and Other Related Information
In early consumer electronics I have often found bad electrolytics. The first
thing to do on that old stuff is look and see if anything has leaked out of the
capacitors. Next, power it up. It's not unusually at that point for something that
has been idle to blow a capacitor with a puff of steam! Then you know which
one's bad. Signal capacitors (coupling, emitter/cathode bypass, etc) are not
usually a problem because they don't have so much voltage on them as power
supply capacitors. After replacing any blown capacitors (and maybe other that
look just like it) fire the thing up again. If it doesn't work, check DC voltages
across all electrolytics. Even if you don't know what they're for, they should all
have DC of the proper polarity and usually within a fair fraction of the
working voltage printed on them. Also feel to see if any is hot. I think you're
getting the idea.
Now, about salvaging old capacitors. Ones made since, maybe, 1970 are FAR
better than ones from the '40s and '50s and are all worth saving unless they
have goo leaking from them or the rubber plug is bulging out (kind of like
evaluating an old can of beans!). I have never found one in post-1970 gear to go
bad from storage. If you want to be sure before installing it in a circuit, simply
apply the rated working voltage from a variable power supply (right polarity,
of course) and let it sit with it for a few minutes. If you can set the current limit
on the supply to a low value, it will prevent a potentially gooey explosion.
Applying the DC voltage is actually a good thing. It's called "forming" the
capacitor and it builds the insulating oxide film on the aluminum foil.
(From: John Popelish ([email protected]).)
There are at least two distinct wear-out mechanisms at work in electrolytics.
One is electrolyte loss by leakage from the container. This is made worse by
poor seals and heat, so varies a lot depending on the quality of the original
package and things like ambient temperature and internal heating by ripple
current. If they are stored in cool conditions, they can stay wet for a lot longer
than 10 years. The second is oxide deterioration, and this has a thermal and a
bias component. Heat speeds up the deterioration during storage, and lack of
bias voltage also speeds up the loss. I always plug very old equipment into a
variac the first time I bring it up, and apply no more than about 70% line
voltage for a while, and check for caps heating up. If everything looks good, I
will slowly raise the line to full voltage over about an hour. This allows some
oxide recovery to occur without catastrophic thermal rise. I have not had to
replace caps wholesale unless reliability was very important (where a later
malfunction would be a lot more costly than all the capacitors).
Capacitor Testing, Safe Discharging, and Other Related Information
Electrolytic caps have one metal plate and one liquid plate. The dielectric
between them is a very thin layer of oxide that is formed on the metal plate
after it has been etched to make its surface very spongy and porous. This
etching process multiplies the surface area of the metal by many times
(increasing the capacitance which is proportional to surface area), but means
that the oxide is formed over a very rough surface. So some of the oxide is
wrapped around very sharp edges and over points. This is a chemically less
stable situation compared to oxide formed over a smooth surface or inside a
hollow. Same for oxide formed over metal grain boundaries. Over time, some
of this oxide either breaks off, cracks, or reverts to metal and oxygen atoms,
resulting in thin spots in the insulating layer.
If the cap is stored with a DC bias, these thin spots draw current which
liberates atomic oxygen from the electrolytic which reoxidizes those weak spots
as they form. If it is stored without applied voltage, all these spots need
reforming at once when the cap is put in service. This makes them leak
excessive current, produce lots of gas, and give off heat. If the leakage is bad
enough, the cap may self destruct. If large and expensive caps, especially high
voltage types, are going to be put in service after extended storage, they can be
more gracefully reformed by applying a voltage in series with a current
limiting resistance. And they should be checked for acceptable leakage current
at rated voltage before being used. I think modern electrolytic caps are
expected to last about 10 years in cool storage. Higher temperatures shorten
their life.
If you were going to be reforming lots of similar caps, you could build an
adjustable DC supply that had both voltage regulation and a current limit that
could be set to values appropriate for various sized caps. For one or two, I have
used a Variac upstream of a simple unregulated supply. The point is to allow
some forming current to flow, but limit it to less than what would cause a
noticeable temperature rise in the cap. For a small tubular cap, this on the
order of a tenth of a watt. Divide that by the applied voltage, and you have
some idea of the current limit needed. For large (fist sized) caps, you might
allow the internal dissipation to approach a watt. These power levels would not
raise the cap's temperature so that you would notice it with your fingers
(though they might cause some quite measurable hot spots at small areas
within the cap).
Capacitor Testing, Safe Discharging, and Other Related Information
(From: Dbowey)
My recollection of forming electrolytics is that a time-stepped voltage was
applied. The timer was me, and I increased the Variac output to a power
supply over the span of a day or two, starting with 10% of the rated voltage
and ending up with 100%.
(From: Jack Schidt ([email protected]).)
This works well. NOS electrolytic caps should always have this done prior to
using. Often, for old gear, NOS or used caps must be used for economics or
availability.
Since I do a lot of tube equip repair, I built a small isolated tripler- to easily
deliver 450V for the supply electrolytics. I used all new mylar caps.
I modified your procedure slightly by setting the tripler to the working voltage
of the cap unloaded, putting a 2 M or so resistor in series with the cap, and
connect it to the supply.
For really large (1000 uF+) caps, I use a few hundred K; you want the applied
current to be more than the average leakage current of a good cap.
Check the cap voltage periodically with a DVM or VTVM, disconnecting the
meter probes immediately after measurement. If you use a high voltage, low
leakage transistor as an emitter follower, you can leave the meter connected at
all times. I recommend this.
Often you see an older cap get to a particular voltage, then drop dramatically,
as its dielectric breaks down, then the process repeats. These should be tossed,
as the dielectric clearly has thin spots, and will fail in service.
Some will charge up completely in a few hours [t=RC], some a few days, and
some never get off the ground. Toss those that do not charge.
What are These Scored Lines on the Ends of Electrolytic Capacitors?
They are there to channel the debris in a known direction should the capacitor
turn into a bomb. Really :-).
Capacitor Testing, Safe Discharging, and Other Related Information
However, exploding capacitors aren't all THAT common in properly designed
equipment.... (Well, except for that EPROM programmer that had a tantalum
electrolytic installed backwards at the factory. Six months later - K-Blam!)
(From: Gary Woods ([email protected]).)
If you look in a DigiKey catalog, they detail the 'Vent Test' in which an
electrolytic cap is overloaded in a specified way and the can fails expelling the
material *only* through that scored portion. Sounds like material for another
urban legend; like the supplier who carefully tested each incoming fuse for
blowing in a specified time at a specified overload. Of course, the people trying
to *use* those fuses didn't appreciate how nicely they passed these tests!
You can do a vent test by hooking up an electrolytic to your 'suicide cord' and
plugging it into 110 VAC. Entertaining. (I did NOT recommend you do this,
and am NOT liable!)
Making Non-Polarized Capacitors from Normal Electrolytics
You may find non-polarized electrolytic capacitors in some equipment - usually
TVs or monitors though some turn up in VCRs and other devices as well.
Large ones may be found in motor starting applications as well. These usually
do need to be replaced with non-polarized capacitors. Since polarized types are
generally much cheaper, the manufacturer would have used them if it were
possible.
For small capacitors - say, 1 uF or less - a non-electrolytic type will very likely
be satisfactory if its size - these are usually much larger - is not a problem.
There are several approaches to using normal polarized electrolytic capacitors
to construct a non-polarized type.
None of these is really great and obtaining a proper replacement would be best.
In the discussion below, it is assumed that a 1000 uF, 25 V non-polarized
capacitor is needed.
Capacitor Testing, Safe Discharging, and Other Related Information
Here are three simple approaches:
1. Connect two electrolytic capacitors of twice the uF rating and at least
equal voltage rating back-back in series:
- +
+ o----------)|-----------|(-----------o
2,000 uF
2,000 uF
25 V
25 V
It doesn't matter which sign (+ or -) is together as long as they match.
The increased leakage in the reverse direction will tend to charge up the
center node so that the caps will be biased with the proper polarity.
However, some reverse voltage will still be unavoidable at times. For signal
circuits, this is probably acceptable but use with caution in power supply
and high power applications.
Connect two electrolytic capacitors of twice the uF rating and at least equal
voltage rating back-back in series. To minimize any significant reverse
voltage on the capacitors, add a pair of diodes:
+---|>|----+----|
Note that initially, the source will see a capacitance equal to the full
capacitance (not half). But very quickly, the two caps will charge to the
positive and negative peak values of the input across the combination via
the diodes. In the steady state, the diodes will not conduct at all and
therefore it will be as though they were not in the circuit.
However, there will be some non-linearity into the circuit under transient
conditions (and due to leakage which will tend to discharge the
capacitors) so use with care. The diodes must be capable of passing the
peak current without damage.
Capacitor Testing, Safe Discharging, and Other Related Information
Connect two capacitors of twice the uF rating in series and bias the center
point from a positive or negative DC source greater than the maximum
signal expected for the circuit:
+12 V
o
|
/
\ 1K
/
- +
|
+ o----------)|-----+-----|(-----------o
2,000 uF
2,000 uF
35 V
35 V
The resistor value should be high compared to the impedance of the
driving circuit but low compared to the leakage of the capacitors. Of
course, the voltage ratings of the capacitors need to be greater than the
bias plus the peak value of the signal in the opposite direction.
About Tantalum Capacitors
(From: Ralph W. M. ([email protected]).)
First off, you need to identify/specifiy the particular Tantalum you're speaking
of. There are both SOLID, and ORGANIC tantalum's. If it is the familar epoxy
teardop case style, it is the solid variety; any other package could be either solid
or organic, (and they are NOT the same).
Yes, Solid tantalums can explode. But this is either rare in the case of
manufactured equipment in original condition, OR someone modified, the
circuit and selected/sized it improperly. Solid Tantalums are VERY intolerant
of spikes/surges; BUT organic electrolytics are tolerant of spikes/surges; (BUT
organic electrolytics are NOT a direct subsitute for solid tantalums!!!).
Solid tantalums are VERY stable in regards to:
Capacitor Testing, Safe Discharging, and Other Related Information
2. The uF value.
3. Extreemly stable DC leakage. Notice, I did NOT say low leakage; they
have average DC leakages compared to modern electrolytics.
Solid tantalums also have VERY low impedance, at low frequencies; (organic
tantalums do not).
The statement that solid tantalums have lower DC leakages when compared to
organic electrolytics has become a misnomer, i.e., 20 years ago that would
basically be true, but not today. Currently the DC leakages of Solid tantalum's
is similar to the average organic electrolytic; there are some organic
electrolytics that have approx 50% LESS DC leakage, (after allowing from 2 to
5 minute "warm up"), (BUT solid tantalums have both VERY stable DC
leakage, and NO "warm up").
Capacitor Testing, Safe Discharging, and Other Related Information
Supercaps and Ultracaps
(From: Nicholas Bodley ([email protected]).)
Within the past 2 weeks or so (current date: 11-August-1997), probably
prompted by an article in EE Times, I set Excite to dig for 'supercapacitors'
and 'ultracapacitors'. I did find that when you use the 'More Like This option'
enough, it gives you the same hits.
Anyhow:
What I found was fascinating to an old-timer. Capacitor technology is now at
the point where it can do load-leveling to extend the life of electric vehicle (EV)
batteries. The high power needed for EV acceleration can be provided by an
ultracapacitor. The ultracap. can also absorb energy for regenerative braking,
to limit the otherwise very high charging current for the battery.
Noted in passing was a Mazda experimental EV that uses ultracaps. this way; it
is called, believe it or not, the Bongo Friendee. No kidding. (I have a collection
of 7 or 8 other such names...)
Mentioned were capacitors of 1,800 farads at 2.3V. Yup, we're now in the
kilofarad era, folks! The capacitor bank comprised a total of 80, in groups of
two in parallel, 40 groups in series. Total voltage was 92.
Other specifications noted in passing:
Ultracaps. are now in the 0.1 to 8 kWh (kilowatt-hour) range.
Some are made of carbon aerogels (that must not be news...)
Maxwell has an 8-cell assembly rated at 24V, bipolar, 4.5 Wh/kg. The same
company also has a monopolar cell (monopolar?) rated at 2,300 F, 3V; 5
Wh/kg. This one can provide over 100 A !
Some ultracapacitors apparently (pretty sure) do not use electric double layer
technology. They use oodles of alternating layers of conductor and dielectric,
stacked 'to the thickness of a credit card'. Some keen mind(s) have found out
how to make a dielectric layer that is 'intrinsically free of defects'. These caps,
fairly sure, use metal conductors; they have quite-low inductance.
Multilayer thin-film caps can be made up to 25 cm^2, to 1,200 V (!), and store
10 joules / cm^2 with applied voltage just below breakdown.
Capacitor Testing, Safe Discharging, and Other Related Information
Also noted, but considering the topic, maybe a repeat: Carbon aerogel caps can
go to 40 F /cm^3; work excellently as cold as -30 C, and can manage power
over 7kW/kg. Self-discharge is in weeks.
I found this info. utterly fascinating. When I get a decent job, I'm getting
myself a 100F Elna.
BTW, did you hear that a DMM uses a supercap. for power? I think the figures
are that a 3 minute charge will run it for 3 hours.
What are those X and Y Capacitors in the AC Line Input?
"I have noticed recently that so-called "X" and "Y" capacitors are
used at the input power section of power supplies. When I have
looked into this further, I find that there are various grades of X
and Y - X1, X2, Y1, Y2, etc. Apparently this is code or regulatory
agency related.
4. What is the definition or use of the various classes are (X1,
X2, etc.)
5. Where do the regulator agencies say we must use the various
types.
6. What is good design practice for noise filtering of a SMPS
using these devices et al."
(From: Paul Kasley ([email protected]).)
Class X caps are for across-the-line use. Class Y caps are for line-to-safety
ground. These caps are constructed to be "self-clearing". That is, if the device
develops a short, the energy dissipated in the short will "blow" the short away.
A typical line input filter will have a single Class X cap from line to neutral or
from line to line and a Class Y cap from each line to ground or from line to
ground and neutral to ground. No regulatory agencies require their use.
However, you may find you need them to meet EMI/EMC regulations and to
meet your own EMI/EMC susceptibility requirements. UL, CSA, VDE, and
other safety agencies will require that you use proper components to meet
safety standards (which is always good practice) and to receive permission to
use their safety markings. As for the precise differences between the types (X1,
X2, Y1, Y2), I suggest you contact cap manufacturers such as VishayRoederstein for their catalogs and applications books.
Capacitor Testing, Safe Discharging, and Other Related Information
Photoflash Capacitors
These are found not only in electronic flash units and strobes, but pulsed laser
power supplies and other fast discharge applications. They are designed for
rapid discharge with minimum losses and without self destructing. Thus, the
ESR and inductance are very low and the internal structure is set up to survive
very high peak currents (hundreds or thousands of amps).
The common ones from photographic flash units are electrolytic capacitors but
those in more specialized applications may be other types which can have much
shorter pulse durations.
Note that photoflash capacitors may have mediocre temperature ratings like 55
°C instead of the 70 to 105 °C normally found in consumer electronic
equipment. Thus, they may not be appropriate for use as service parts
replacements for general electronics even though the uF and voltage ratings
match.
-- end V2.40 --