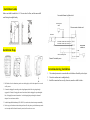
1
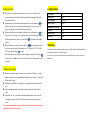
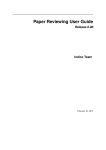
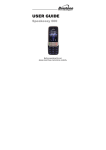
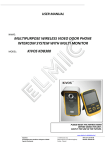
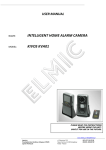
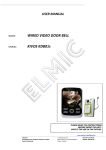
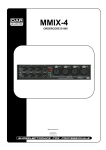
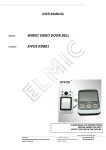
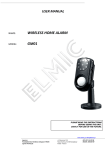
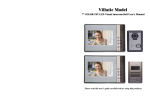
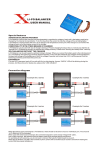
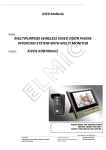
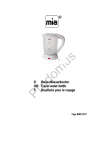
Fashion· Technology· Taste Enjoy Intelligent Life The wireless peephole video door phone is a 2.4G wireless high-tech household intelligent product integrating doorbell,PIR photo-taking, intercom,monitor and unlocking functions into one. Especially is its unique human body detection function, when visitor is in its detection range, the indoor monitor shall be activated, show the image of the outdoor on its screen and take photo automatically. Therefore, even you were not at home, you also could know who visited you. This model is the guarantee for your home security. This product does not use wires. It is convenient to install and simple to use. It’s specially designed for villas. A outdoor unit can work with three matched handsets with max. working distance 600 meters in an open area. Adopting the latest energy saving technology, its stable performance and fashionable apperance design make it the first choice of your high-quality intelligent life. Introduction…………………………………………………………………………….......... Safety Warnings & Attentions……………………………………………………………… Product Overview…………………………………………………………………………… Product Diagram ………………………………………………………………………… Installation Guide …..……………………………………………………………………… Installation Step…………….……………………… ……………………………… Attention During Installation……….………….………………………………………… Battery Installation ……………………………………………………................................... Functions & Application………………………………………………………………… Outdoor Unit Starting Up………………………………………………………………… Handset Starting Up…..……………………..…………………………………………… Night-Vision……………………………………………………………………………….. Time & Day Setting………………………………………………………………………… Ringing Setting…………………………………………………………………………..… Lock delay Setting……………………………………………………………………..… PIR Setting……………………………………………………………………………..… Outdoor Unit CALL Handset…………………….………………………………………… Handset CALL Outdoor Unit(Monitor)…………………………………………………..… Exposure Adjustment………………………….…………………………………………… Photo-preview deletion……………………………………………………………………… Battery & charge………………………….…………………..…………………………..… Configuration…………………………….…………………..…………………………..… Statement………………………………………………………………………………..… Introduction Thank you for choosing this wireless video door phone. Please read this Manual carefully to fully understand its usage, perfect functions and simple operation. The company reserves the right to modify this Manual from time to time without prior notice. Safety Warning & Attention 1. Attention Do not place this product on an uneven or unstable table-board to prevent failure or damage caused by falling. Only the battery and charger designated by the Company can be used on this product. Application of other products may lead to leakage, overheating, blowout and fire of the battery. Do not violently strike, shake or toss the wireless video door phone to prevent failure and fire caused to the wireless video door phone. Do not put battery, charger or wireless video door phone in the microwave over or high-pressure device; otherwise, damage and fire of electrical circuit and other accidents may be caused. Do not use this product in a place with flammable and explosive gas; otherwise, amount of dust; otherwise, product failure may be caused. 2. Attention for operation of this product Do not apply force on LCD screen or knock other objects with it, otherwise, breakage and damage of LCD panel and seepage of crystalline liquid will be caused. If the crystalline liquid enters your eyes, there will be danger of ablepsia. Wash your eyes (be sure not rub your eyes) and go to see the doctor immediately. Do not dismantle or remodel this product, otherwise, damage, creepage and electrical fault may be caused to this product. Do not press the keys with a pin, stump of pen/pencil and other keen-edged objects; otherwise, damage or mis-operation will be caused. Place tiny metal objects such as drawing pin at a place far away from the speaker. As the speaker has magnetic property while working, it will attract these tiny metal objects, which may lead to personal injuries or damage of the speaker. Do not press the terminal of lens at strong light source, such as the sun; otherwise, damage of the image sensor may be caused. Do not press the terminal of lens with much force; otherwise, personal injuriy or damage of the device may be caused. 3. Attention for operation of charger You may charge the device with a charger or through a USB data line connected to the computer. Charge with matched alternate current; creepage, fire and damage of the door phone and charger may be caused if other voltage is used. It is forbidden to short circuit the charge, otherwise, electrical shock,smoke and damage of the charger will be caused. Do not use the chager at the time when the power cord is damaged, otherwise, fire and electrical shock will be caused. Clear away the dust accumulated on power outlet ASAP. Do not place a vessel used to retain water beside the charger to prevent overheating, creepage and failure of charger caused by spilling water. If the charger is in contact with water or other liquids, disconnect the power supply immediately to prevent overheating, fire electrical shock an dfailure of the charger. Do not dismantle or remodel this product, otherwise, damage, creepage and electrical fault may becaused to this product. Do not use the charger in places with high humidity such as bathroom, otherwise, electric shock, fire and damage of the charger will be caused. Do not touch the charger, electrical line and power outlet with wet hand(s), otherwise, electric shock may be caused. Do not place heavy objects on the electrical line or refit the electrical line, otherwise, electric shock and fire will be caused. Before cleaning and maintenance, first pull the plug off the power outlet. Grasp the charger while pulling off the plug, as pulling the electrical line will lead to damage of electrical line, electric shock and fire. 4. Operation and maintenance ● Please keep this product dry, as rainwater, moisture, humidity and liquids or moisture content may contain mineral matters that erode the circuit. ● Do not keep this product in any place with high temperature. As high temperature may shorten the lifespan of electronic device, damage the battery and cause deformation or melting of certain plastic parts and components. ● Do not keep this product in any place with low temperature. As when being moved from a place with low temperature to a place with normal temperature, it may generate humidity inside, which may cause damage of circuit board. ● Do not attempt to dismantle this product. As improper handling by nonprofessional personnel may cause damage of the device. ● Do not toss, knock or shake this product, as tough operation mode may damage the motherboard inside the device. ● If this product is made wet by mistake, shut it down, remove the battery, and restart the product after confirming it complete dry after 24 hours. ● Do not have the metal parts (specially configured interfaces of charger and data line excluded) in contact with charger interface to avoid short circuit. ● Use clean and dry soft cloth to clean the lens, infrared lamp and light sensor. !Warning: improper operation will void warranty! Product Overview 一.Characteristics and application: 1. Fashion appearance —— adopt European design, full of modern science and technology feeling, suitable for houses of various decorative styles. 2. Hidden antenna —— adopt built-in antenna design, protect the antenna effectively. 3. Extra large range of vision —— an extra wide angle viewable. 4. High-resolution color LCD screen —— adopt 7-inch mainstream TFT digital LCD screen, achieve outstanding clarity. 5. High-resolution digital camera —— adopt 300,000 pixels digital camera, image focusing vivid and clear. 6. High speed transmission ---image transmission speed is 25fps, the image is clear and fluent. 7. Infrared Night-Vision —— under the environment of insufficient outdoor light, the handset can activate the infrared Night-Vision to clearly display and record the outdoor scenes. 8.12 kinds of ringtones —— users can select the desired doorbells ringtones freely 9. One-key display —— simple and convenient to use, view the outdoor scenes and take photos just by pressing down one key. 10. Auto detection ——it would auto take photo when a visitor come close to the door.. 11. Intercom function —— can choose one-way or both-way talkback function. 12. Super long standby —— high capacity rechargeable lithium batteries are provided, adopt intelligent energy-saving technology, fully charged batteries service time could be up to 40 days. 13. Charge-and-record supported —— without the need to worry that the operation will be affected due to depletion of electrical quantity. 14. Auto circulating memory ——100 photos auto circulating stored. 15. USB data charging wire —— charge through the USB interface. 16. Multifunction holder —— matching charger. 17. Multimachine extended function —— support two outdoor units and three handsets at most. 18. Long distance transmission —— communication distance can reach 600 meters in open space. 19. Frequency range —— adopt 2.4G ISM digital public frequency range: 2402~2483.5MHz 20. Adaptive frequency hopping technique —— adopt AFH (Adaptive Frequency Hopping Technique), produce communication frequency and Auto-Sync frequency randomly. 二、Performance parameters: Outdoor Unit Indoor Monitor Back-up Power by Specific lithium battery EB-1G6LLU (2100mAh) Consumption 350mA Outline dimension 134*74*31mm Net Weight 130g Operate Temperature Range -10℃~+50℃ Waterproof grade IP55 Placement Hang on outwall Surface material ABS & hardware accessories Camera 300,000pixels View angle 100°wide angle Night vision pattern Infrared lamps PIR 3M*100° Working time 7 hours continuously Standby time 1050hours Charge time 4hours External power DC5V 1A (AvailableDC5V~DC16V) Power Specific lithium battery EB-1G6LLU (2100mAh) Consumption 450mA Outline dimension 230*150*17mm Net Weight 355g Operate Temperature Range -0℃~+40℃ Placement table style (handheld) LCD size 7" TFT color screen Wireless Frequency 2.4GHz Images spread 25fps Picture format JPEG Working time 5hours continuously Standby time 300hours Charge time 4hours External power DC5V 1A Application distance About 600m in open space Product Diagram Installation Guide Outdoor unit shall be installed at 1.4~1.7 meter above the floor, and the camera shall avoid facing the sunlight directly. Connection Diagram for Outdoor Unit Unlocking power 12VDC Wire connector of outdoor unit Electrolock Electrolock maintain close if connect “5” Electrolock maintain open if connect “4” Charger 5VDC outdoor unit Installation Steps (-)black Manual unlocking switch Remark: Provided by users. (+)red Attentions during Installation 1. The outdoor photosensitive sensor should not be hidden or blocked by other objects. 2. Do not face outdoor unit to sunlight directly. 3. Install the connection line correctly, otherwise, normal use shall be failure . 1. Drill a hole refer to the dimension, put the screw rubber plug in, then fix the rainproof cover on the wall by screws. 2. Connect the charging line according to the wiring diagram(the hole for wire getting through suggested 16~30mm), if charging line comes from indoor, lead the charging line pass through the hole, if charging line comes from outdoor,lead the charging line pass through the bottom of rainproof cover and connect the line . 3. Install rechargeable lithium battery (EB-1G6LLU) to outdoor unit, the unit starts up automatically. 4. Put the top part of outdoor unit into the rainproof cover like the picture, push the bottom part, make sure its steady and fix it from the bottom by screw, then fit on the screw cover. Function Description Unlocking Explanation Only in the state of intercom, press “ON/OFF Switch” to unlock with unlocking symbol Indoor Unit Feature Setting Feature setting is divided into: language settings, date&time settings, ring setting, unlock time settings, screen brightness setting, a total of six kinds of body sensor switch settings. This function is set by the unlock button to confirm and enter the next one feature set or press the call key to make a single function to save and exit. 1. Language setting When the screen lights up,press the unlock key ( ) three seconds into the feature set, the showing on the screen. 5. Exposure Adjustment Exposure adjustment: under the environment of extremely poor visibility and the image is not clear due to the brightness, however, the brightness is adjustable: 7grades for exposure adjustment. When the screen lights up,press the unlock key ( ) three seconds into the feature set, double-click four times unlock key ( ) to enter the screen brightness adjustment, press the arrow keys to adjust, adjustable range of 1~7 grade, fourth grade default. first set for the language, namely Simplified Chinese, English two languages,the factory default English. 2. Date & Time setting When the screen lights up, press the unlock key ( ) three seconds to enter the function settings, press the unlock key( ) to enter the time setting mode, press the left, right conduct various options, up, down keys to adjust. 3. Ringing setting When the screen lights up, press the unlock key ( ) three seconds into the feature set, double-tap the unlock key ( ) that enter the ring setting mode, press the left, right to choose ringtones, up and down keys ringtones size selection, 12 pieces in total. 4. Lock Delay When the screen lights up, Long press the unlock key ( ) three seconds into the feature set, double-click three times to unlock key ( ) to enter the unlock constantly setting, press the Up or Down keys to adjust the time,the range of time is 1~6 seconds, the default is 1 second. 6. PIR : ON/OFF When the screen lights up,press the unlock key ( ) three seconds into the feature set, double-click five unlock key ( ) to enter the human body sensor switch, press “up”or “down”to choose “ON” or “OFF”, the setting value shall be sent to outdoor camera by pressing ( ) key PIR Explanation The PIR detects human being within its detection range, the signal shall be sent to indoor monitor to wake up the screen and activate photo snapping. After that, outdoor camera and indoor monitor would get into standby state. When the screen is lit, press “OK” key to intercom When the configuration is one camera and three indoor monitors, the PIR function could be switched on or off through menu of each indoor monitor. A red PIR symbol shall be shown on the top of the screen after switching on the PIR function. The other two indoor monitors shall show PIR state synchronously when communicating with outdoor camera. When someone is getting into the detection range of PIR, only one of the indoor monitors would be woken up and takes photo. After matching code, PIR would be switched off. When the screen lights up, press the call key ( ) 3 seconds, the green music symbol ( ) Crossed into the red symbol ( ), is the silent mode, silent mode, the external drive CALL came in indoor function to work but does not ring. Then long press the call key ( ) 3 seconds to cancel the mute mode. call key ( ) hook, black indoor unit enters standby mode; If the indoor unit does not make off-hook operation, the interior will automatically capture a 5S pictures are saved, if the indoor unit within the 30S nobody answered, both indoor unit and outdoor unit automatically enters standby mode, the indoor unit prompts missed calls. Communication 90s after off-hook after hook automatically if no key operation each into standby. 8. Indoor intercom volume adjustment 4. Monitoring In the call intercom or monitoring mode, press the left (small) right (big) keys to adjust, the adjustment range 0~7 level, the default is 5 level. In the call intercom or monitoring mode, press the arrow keys to adjust the color, adjust the range of 0~9 grade, transferred to 0 after the black and white images. In standby mode, press any key to wake the machine (ie the machine is lit screen state), and then press the monitor key ( ) Into the surveillance state, then you can see the condition of the outdoor room rumored to come and hear the sound. This state if no sustainable 30S, 30S inside if no operation is automatically returned to the standby state. Monitor and then press the call key ( ) that enter the call, then press the call key ( ) to hang up. Operation Introduction 5. Battery Power 7. Quiet Mode Setting 9. Color adjustment 1. Outdoor Unit Starting Up After the outdoor unit mounted on the battery, and then snap into rain cover to communicate, do not pay attention to the battery installed anti. 2. Indoor unit switch After loading the battery, press the switch button 3 seconds to boot, without any operation after about 30S enters standby off screen; under bright screen, press the switch button 3 seconds to enter the off state, under the bright screen mode, press the switch machine key or the call key ( ) to enter the off-screen state, press any key to light up the screen. 3. Indoor unit call & unlock Guests visiting press CALL outdoor unit, the outdoor unit lights blue lights and loud "beep ~ beep" tone, ringing immediately indoor unit and outdoor unit displays an image, the indoor unit, press the call key ( ) access to speaking, press the unlock key ( ) to unlock a wireless remote control of the outdoor unit, after the end of the call, press the Indoor Electrical amount display: bright screen in the top right of the battery status symbol displayed is the indoor unit on battery power, if the battery is not charged, the battery symbol turns red and blue work lights flash once one second to be inserted into the standard at this time when the adapter, charging red light, red light off after full. Outdoor Electrical capacity: In the upper right corner of the indoor unit when normal communication shows a small battery symbol for the outdoor unit on battery power, if the battery is dead battery symbol turns red, then the need to access the standard adapter for charging. 6. Photo function Configuration User Manual 1piece Outdoor Unit 1piece Indoor Monitor 1~3 pieces Charger (DC5V) 2pieces Lithium battery (BP-6M) 2~4pieces Screw M4 1bag Warranty Card 1piece Certificate 1piece Automatic camera: When the outdoor unit CALL pass after 5 seconds after no answer at this time of the outdoor unit is automatically photographed and stored inside the indoor unit; Manual camera: In conversation or monitoring mode, press the camera key ( ) can take pictures, you will see the prompt when taking pictures, can store up to 100 photos, automatically overwrite the oldest photo after full. Check photos:Bright screen in standby or talk mode, press the camera key ( ) three seconds to enter to view photos, view photos defaults to enter the final photographs. Left Right Select browse photos, press the call key ( ) to exit back to the standby desktop. Delete photos:In view photos, press the camera key ( ) will be prompted whether to delete the photo, press the left button to select "Y (Delete One)", "N (NO), ALL (all)", press the camera key ( ) to select. Delete this Chang, or all of the photos, such as deleting a single press the call key( ) to exit back to the standby state, such as the choice to delete all automatically return to standby. 7. Match code setting Handset is in shutdown mode-》long press power button-》"Welcome" would be displaied on the screen-》please immediately click the power button-》screen would be displayed "Pairing"; Meanwhile, click "Reset" key of launcher-》red lamp flashes and then match the code. If there is image on handset, code match succeeded; otherwise, match the code again. When there are 2 or 3 sets of Indoor monitor finished matching code, please call once again by outdoor unit. If these handsets are displaying at the same time, it succed. Note: a launcher could max. support 3 handsets. If you match the code forth time, it would delete the previous three codes. Statement This product maximum supports 1outdoor units to 3 Indoor monitor .The door phone has finished code match and can be used directly. If you need more pieces of indoor monitors or outdoor units, please contact your local distributors . General faults and solutions Fault Can not start up Can not charge Outdoor unit cannot call or connect to Indoor monitor Image has noisy point or flickers No signal for Indoor monitor Cause(s) Neglected to press switch button Lithium battery is not installed Low battery No connection to power adapter when battery runs out Adapter connector doesn’t connect to charging port of machine correctly Adapter doesn’t connect to 110V--240V alternating current Code match failed Handset is placed near to TV player, microwave oven, daylight lamp or mobile phone which produces electromagnetic wave interference. Outdoor unit doesn’t connect to the power Distance between outdoor unit and Indoor monitor is too far Disturbed by magnetic field around Solution(s) Press switch button Install lithium battery Charge up lithium battery Connect to power adapter Reconnect correctly Plug into the socket to connect to alternating current Clear code, and re-match code Keep handset far away from the interference items Connect to the power Adjust to appropriate distance Keep handset far away from magnetic field.