1
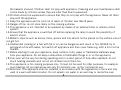
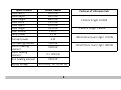
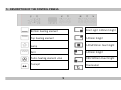
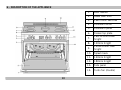
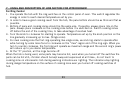
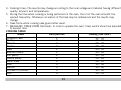
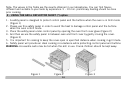
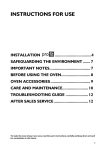
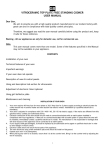
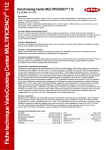
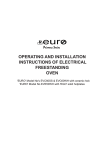
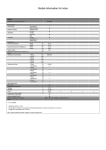
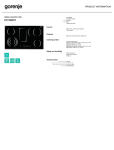
GB
90x60 SEMI-PROFESSIONAL FREE
STANDING ELECTRIC COOKER
USER MANUAL
Dear User,
It is our ultimate desire that you achieve the best performance from our product, which has been
passed through meticulous quality control checks and is manufactured in modern facilities.
To this effect, we recommend that you read the entire guide carefully before operating the product and
keep it as a reference.
ATTENTION!
THIS APPLIANCE SHALL BE INSTALLED IN ACCORDANCE WITH THE REGULATIONS IN FORCE
AND ONLY USED IN A WELL VENTILATED LOCATION. READ THE INSTRUCTIONS BEFORE
INSTALLING OR USING THIS APPLIANCE.
1 - TABLE OF CONTENTS
Part
Part
Part
Part
Part
Part
Part
1
2
3
4
5
6
7
Part 8
Part 9
Part 10
Important warnings
Installation of your oven
Installation of the oven feet
Technical features of your oven
Descriptions of the control panel
Descriptions of the appliance
Using and description of hob
section for vitroceramıc
Using oven section
Using the grill deflector sheet
Maintenance and cleaning
2
1 - IMPORTANT WARNINGS
1. This appliance has been designed for home as freestanding furniture.
2. After removing the packagıng, make sure to check if there is any damage to the appliance. If there
is any damage, never attempt to use the appliance and immediately contact your Authorised
servise. As packaging materials (nylon, perforator, sytrofoam etc.) will pose a threat to children,
such materials need to be collected immediately and put out of reach. Pay attention to minimum
health and safety requirements.
3. Power supply voltage of your oven is 220-240V, 50-60 Hz for mono phase and 230V/400V, 50-60
Hz for 3 phases.
4. If the current rate of the fuse in your installation is less than 32 Amp, make a qualified electrician
fit a 32 Amp fuse.
5. Since the plug of your oven has earth system, ensure using socket with earth system. If it is used
without earth system, our firm is not responsible for any loss which may arise.
6. Keep the electrical cable of your oven away from the hot areas, do not let it touch the appliance.
Keep it away sharp sides and heated surfaces.
7. This appliance is produced in accordance with the safety regulations. Incorrect use will harm
people and appliance.
8. The appliance and its accessible parts become hot during use. Care should be taken to avoid
touching heating elements. Children less than 8 years of age shall be kept away unless
continuously supervised.
9. This appliance can be used by children aged from 8 years and above and persons with reduced
physical, sensory, or mental capabilities or lack of experience and knowledge if they have been
given supervision or instruction concerning use of the appliance in a safe way and understand
3
the hazards involved. Children shall not play with appliance. Cleaning and user maintenance shall
not be made by children unless they are older than 8 and supervised.
10.Children should be supervised to ensure that they do not play with the appliance. Never let them
play with the appliance.
11.Keep the appliance and its cord out of reach of children less than 8 years.
12.Danger of fire: do not store items on the cooking surfaces.
13.This appliance is not intended to be operated by means of an external timer or remote-control
system.
14.Ensure that the appliance is switched off before replacing the lamp to avoid the possibility of
electric shock.
15.Metallic objects such as knives, forks, spoons and lids should not be placed on the surface since it
can get hot.
16.Unattended cooking on a hob with fat or oil can be dangerous and result ın fire. NEVER try to
extinguish a fire with water, but switch off appliance and then cover flame e.g. with a lid or a fire
blanket.
17.Before starting to use your appliance, keep curtains, tulle, paper or flammable materials away
from your appliance. Do not keep combustible or flammable things in or on the appliance.
18.Your oven will be very hot during operating and in a short period of time after operated; do not
touch heating elements and do not let children touch them too.
19.This appliance is for cooking purposes only. It must not be used for other purposes, for example
room heating. All our appliances are only for domestic use, not for commercial use.
20.Attention! This appliance shall be installed in accordance with the regulations in force and only
used in a well ventilated location. Do not splash cool water in an oven tray or inside the oven
4
when the surface of the appliance is still hot. Arising steam may cause burns and sudden
temperature exchange may cause damages on the surface of the appliance.
12.Prolonged intensive use of the appliance may call for additional ventilation, for example opening
increasing the level of mechanical ventilation where present.
13.Do not operate your oven near bathroom or shower and in a room containing a bath or shower.
14.Caution: glass lids may shatter when heated. Turn off all the burners before shutting the lid.
15.Attention! This appliance shall be installed in accordance with the regulations in force and only
used in a well ventilated location.
16. In models that have digital timer, after power cut set your digital timer rightly. Otherwise, your
oven will not operate.
17. When the supply cable gets defective, get it replaced by conducting our service as soon as
possible.
18. When the oven is hot never touch the oven glass by hand or touch by means of a tool.
19.You must use the safety sheath of control panel when the oven section is in grill mode.
20.Please place the tray to the lowest shelf and add 200 ml water when you cook something in
chicken roast section.
21.Make sure that rear pulley section of the grill swelling is fixed on V-bed on the grill when you use
the grill swelling.
22.It is not suitable to operate both lower and upper burners simultaneously. The lower burner is
designed for cooking and upper burner is designed for frying.
23.CAUTION! Do not touch hot parts with bare hands and keep children well supervised.
24.If the surface is cracked, switch off the appliance to avoid the possibility of electric shock, for hob
surfaces of glass-ceramic or similar material which protect live parts.
5
2 - INSTALLATION OF YOUR OVEN
Electrical Connection and Security
1. Your oven is adjusted in compliance with 230 Volt 16 Ampere electric supplies. (For 3 phase
230V/400V 32 Ampere) If the mains is different from these values, contact your authorized
service.
2. Electrical connection of the oven should only be made by the sockets with earth system installed in
compliance with the regulations. If there is no proper socket with earth system in the place where
the oven will be placed, immediately contact a qualified electrician. Manufacturer shall never be
responsible from the damages that will arise because of the sockets connected to the appliance
with no earth system.
3. Electrical cable should not touch the hot parts of the appliance.
4. Some models are supplied without a plug-an-lead set. In this case please use a flexible cable to
suitable for connection to mono phase: H05 VV-F 3 G 4 mm2 or for 3 phase: H05 VV-F 5 G 1.5
mm2
3 - INSTALLATION OF THE OVEN FEET
In order to install the oven feet;
1. Foot attachment lath is installed on the oven from the bottom of the oven as shown in Figure 1.
Nuts are centered on these lathes in order to screw feet (Figure 2). Complete the feet installation
process by screwing the feet to the nuts (Figure 3).
2. You can balance your oven by turning the screwed feet according to the surface type you are using.
3. If your oven has plastic food as in Figure-4 you can adjust your ovens height from these feet as
turned clockwise or anticlockwise.
6
Figure 1
Figure 2
Figure 3
Figure 4
4 - TECHNICAL FEATURES OF YOUR COOKER
Before making the connections of your appliance:
Before starting to use the appliance, read the user manual of the appliance carefully. In this user
Manual, there are important information regarding your, our customers' security, how you will use it
and how you will make its maintenance. The conversion to the natural gas will be made by exchanging
the auxiliary material (injector) given in the delivery of the oven with the equivalent one which was
installed to the oven and mentioned in the user manual Idling adjustment will be made according to
the flame high pursuant to the below data by turning counter clockwise of the adjustment screw in the
tap shaft.
7
Specifications
Outer width
Outer depth
Outer height
Inner width
Inner depth
Inner height
Oven volume
Lamp power
Turnspit power
Top heating element
Bottom heating
element
Turbo heating
element
Grill heating element
Supply voltage
90x60 Cooker
950 mm
635 mm
880 mm
765 mm
410 mm
355 mm
110 lt.
15 W
Features of vitroceran hob
140mm hilight 1200W
180mm hilight 1800W
180/120mm Dual hilight 1700W
6W
1500 W
140x250mm Oval hilight 1800W
2000 W
2 x 1250 W
2500 W
220-400V, AC 50-60 Hz
8
5 - DESCRIPTION OF THE CONTROL PANELS
Front right 140mm hilight
Bottom heating element
Top heating element
140mm hilight
140x250mm Oval hilight
Lamp
Grill
140mm hilight
Turbo heating element +fan
180/120mm Dual hilight
Turnspit
Thermostat
9
6 - DESCRIPTION OF THE APPLIANCE
1-
Door handle
2-
Glass oven door
3-
Push buton switches
4-
Command knob
5-
Command panel
6-
10-
Cooker top plate
180/120mm Dual
hilight
140mm hilight
140x250mm Oval
hilight
Splash back
11-
140mm hilight
12-
180mm hilight
13-
Side panel
14-
Turbo fan (double)
789-
10
7 - USING AND DESCRIPTION OF HOB SECTION FOR VITROCERAMIC
For Ring Control
1. You operate the hob with the ring switches on the control panel of oven. This switch regulates the
energy in order to reach desired temperature set by you.
2. In order to have a good cooking result from the hob, the pans bottom should be as thick and flat as
possible.
3. Bottom of pans and cooking zones should be the same size. If possible, always place lids on the
pans. Always place cookware on the cooking zone before it is switched on. Switch cooking zones
off before the end of the cooking time, to take advantage of residual heat.
4. Turn the knob to clockwise for starting to operate. Temperature set up by the knob position on the
line gradually increasing up to max. (Single zone)
5. For dual cooking zone the first ring operating like single zone; second ring starts to operate after
extra turning by some more force to clockwise on the “max” region end of the ring sign. When you
turn to counter clockwise, the first ring will operate as maximum range and the second ring’s power
will reduce up to you desire temperature.
6. At the “0” position, all the rings become off.
When the hob is being used, some parts may become hot, even when you turned off the switches the
parts can be hot still; children should be kept away and supervised at all times., do not touch to
cooking zone on vitroceramic hob during warning indicators are lighting. The indicators stay lighting
during danger temperature on the surface of cooking zone even you turned off cooking switches of
hob.
11
For rotary switch
1. Electric hilights have 6 temperature levels (as described herein above)
2. In order to operate the hilight, turn its relative knob that is fixed on the control panel.
3. Bottom of pans and cooking zones should be the same size. If possible, always place lids on the
pans.
When the hob is being used, some parts may become hot, even when you turned off the switches the
parts can be hot still; children should be kept away and supervised at all times., do not touch to
cooking zone on vitroceramic hob during warning indicators are lighting. The indicators stay lighting
during danger temperature on the surface of cooking zone even you turned off cooking switches of
hob.
8 - USING OVEN SECTION
1. When your oven is operated first time, an odor will be spread out which will be sourced from using
the heating elements. In order to get rid of this, operate it for 45 minutes while it is empty. In
order to make cooking in your oven; oven switch must have been rotated and ignition must have
been made. Otherwise, your oven will not run.
2. Kinds of meals you will cook, cooking times and Thermostat positions (Optional) were given in
cooking table. The values given in the cooking table are characteristic values and were obtained as
a result of the tests performed in our laboratory. You can find different flavors suitable for your
taste depending on your cooking and using habits.
3. Open the oven cover at level 1 and use the safety panel when grilling on your oven
12
4. Cooking times: The results may change according to the local voltage and material having different
quality, amount, and temperatures.
5. During the time when cooking is being performed in the oven, the lid of the oven shouldn't be
opened frequently. Otherwise circulation of the heat may be imbalanced and the results may
change.
6. Cake forms while cooking cake gives better result.
7. MECHANIC TIMER KNOB (Optional): In order to operate the oven, timer switch should be adjusted
to desired time.
COOKING TABLE
Meals
Rack position
Cooking time (min.)
Creamed cake
2
30 - 35
Pastry
2
35 - 45
Biscuit
3
20 - 25
Cookie
3
20 - 35
Cake
2
25 - 35
Braided cookie
2
30 - 40
Filo pastry
2
35 - 45
Savory pastry
2
20 - 30
Lamb meat
3
20 - 25
Veal
3
30 - 40
Mutton
3
30 - 40
Chicken (in pieces)
3
30 - 40
Fish
3
20 - 30
13
Note: The values in the Table are the results obtained in our laboratories. You can find flavors
different and suitable to your taste by experience. 5 - 10 min. preliminary heating should be done
prior cooking.
9 - USING THE GRILL DEFLECTOR SHEET (*) option
1. A safety panel is designed to protect control panel and the buttons when the oven is in Grill mode
(Figure 1)
2. Please use this safety panel in order to avoid the heat to damage control panel and the buttons
when the oven is Grill mode.
3. Place the safety panel under control panel by opening the oven front cover glass (Figure 2)
4. And then secure the safety panel in between oven and front cover by gently closing the cover.
(Figure 3)
5. It is important for cooking to keep the cover open in specified distance when cooking in grill mode.
6. Safety panel will provide an ideal cooking circumstance while protecting control panel and buttons.
WARNING: Accessible parts may be hot when the grill in use. Young children should be kept away.
Figure 1
Figure 2
14
Figure 3
10 - MAINTENANCE and CLEANING
1. Disconnect the plug supplying electricity for the oven from the socket .
2. Never clean the interior part, panel, lid, trays and all other parts of the oven by the tools like hard
brush, cleaning mesh or knife. Do not use abrasive, scratching agents and detergents.
3. After cleaning the interior parts of the oven with a soapy cloth, rinse it and then dry thoroughly
with a soft cloth.
4. Clean the glass surfaces with special glass cleaning agents.
5. Never use inflammable agents like acid, thinner and gasoline when cleaning your oven.
6. Do not clean your oven with steam cleaners.
7. Don't wash any part of your oven in dishwasher.
8. In order to clean the front glass lid of the oven; remove the fixing washers fixing the inner glass by
means of a screwdriver, clean and rinse it thoroughly. After drying, place the gasket properly and
re-install the glass.
9. While oven is operating or shortly after it starts operating, it is extremely hot. You must avoid
touching heating elements.
10.Before opening the upper lid of the oven, clean spilled liquid off the lid. Also, before closing the
lid, ensure that the cooker table is cooled enough.
IF YOUR OVEN DOES NOT OPERATE
1. Please check the plug of power supply cord has a well connection with wall socket or not.
2. Please check the electric network.
3. Please check the fuse.
4. Please check power supply cord for any damage problems.
5. If you can not to solve the problem, to apply manufacturer-supplier services agent or similar
qualified persons.
15