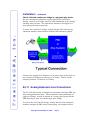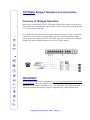
1
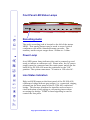
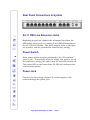
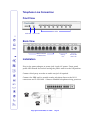
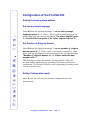
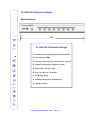
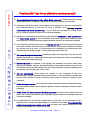
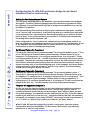
I n c . F r e e l i n e U S A , Eight Channel Conference Bridge User’s Manual and ordering guide FL-USA 400 The FL-USA 400 is a stand-alone teleconference bridge that is connected with 2-wire Central Office lines and / or analog PBX extensions. It offers a virtual meeting room for two to eight participants, with no additional service provider costs. “Meet Me” and “Dial-Out” service is supported for easy cell phone use. FreelineUSA Inc. Copyright © 2005 All Rights Reserved Reproduction, adaptation, or translation without written permission is prohibited, except as allowed under the copyright law. No part of this manual may be reproduced or transmitted in any form or by any means, electronic or mechanical, including photocopying, recording, or information storage and retrieval systems, or translated to another language, for any purpose other than the licensee’s personal use and, as specifically allowed in the licensing agreement, without the express written permission of FreelineUSA Inc. Information in this manual is subject to change without prior notice and does not represent any commitment on the part of F r e e l i n e U S A I n c o r p o r a t e d , H ig h l a n d s R a n c h , C o l o r a d o 8 0 1 2 6 — 4 0 3 9 . Regulatory Approvals FCC REQUIREMENT: PART 15 CLASS A DIGITAL DEVICE OR PERIPHERAL This device complies with part 15 of the FCC Rules. Note: This equipment has been tested and found to comply with the limits for a Class A digital device, pursuant to part 15 of the FCC Rules. These limits are designed to provide reasonable protection against harmful interference when the equipment is operated in a commercial environment. This equipment generates uses and can radiate radio frequency energy and, if not installed and used in accordance with the instruction manual, may cause harmful interference to radio communications. Operation of this equipment in a residential area is likely to cause harmful interference in which case the user will be required to correct the interference at his own expense. If this equipment does cause harmful interference to radio or television reception, which can be determined by turning the equipment off and on, the user is encouraged to try to correct the interference by one or more of the following measures. ♦ Reorient or relocate the user’s receiving antenna. ♦ Increase the physical separation between the user’s equipment and the receiver. ♦ Connect the equipment into an outlet on a power supply circuit different from that to which user’s receiver is attached. ♦ Consult an experienced radio or TV technician for assistance. This device complies with part 15 of the FCC Rules. Operation is subject to the following two conditions: This device may not cause harmful interference, and this device must accept any interference received, including interference that may cause undesired operation. FCC REQUIREMENT: PART 68 TIA-968-A Equipment Registration This device complies with part 68 of the FCC Rules. Testing Laboratory: Bay Area Compliance Laboratory Corp. (FCC No. 0I-XBR-06BC-L800) Part 68 2005-01-20 Test Report B0501181 AC-REN .06dB RJ11C Copyright FreelineUSA, Inc. 2005 Page 2 Safety Precautions For your protection, observe the following safety precautions when setting up your FL-USA equipment. Your personal safety and protection are our first priority. Caution - Hazardous voltages are present. To reduce the risk of electric shock and danger to personal health, follow the instructions. This product is designed to operate from 120 Volts AC. Care must be exercised when installing and maintaining this equipment Caution - There is risk of personal injury and equipment damage. Follow the instructions to minimize this risk. Caution- If using in an office environment place the equipment on a solid smooth surface. If mounting in rack mount equipment bay or cabinet, place on a solid metal shelf. Caution- Do not disassemble, or modify the equipment, unless authorized to do so by trained FL-USA service personnel. Disassembling without removal of the high voltage power supply may cause personal harm and potential electric shock. Disassembly without proper grounding of personnel to eliminate static charges may result in premature product failure. System disassembly and reconfiguration by other than trained FL-USA service personnel is not covered under the standard product warranty. Caution- Do not install or use this equipment in wet locations. In the event the unit becomes wet, turn it off, disconnect it from the power source, and contact the FL-USA service personnel for your site. Do not use communications system if wet. Caution- Caution- Keep this communication system away from direct sunlight, heat, gas or other flammable substances. While no active fans or filters are used in the FL-USA system, try to limit exposure to fine dust particles. Do not block chassis ventilation ports as the FL-USA 400 system is convection cooled. Caution- Do not touch the equipment with wet hands. It might lead to severe electric shock. Do not disassemble the primary switching power supply as this part transmits high current and could cause severe electronic shock. Do not place objects on top of the FreeLineUSA 800 System when in use. It might cause the system to overheat or damage the chassis case. Copyright FreelineUSA, Inc. 2005 Page 3 Package Content Thank you for your purchase of the FL-USA 400 series conference bridge. You should have three key items in your package: User Manual Conference Bridge AC Power Adapter. Product Overview The FL-USA 400 eight port conference bridge provides low-cost, quick and reliable multipoint audio conference capability for private companies and large work groups. A prominent feature of the FL-USA 400 is it’s ability to use existing PBX or Electronic Key Systems. The FL-USA 400 permits eight way conferences on a dial in “Meet Me” or a “Dial Out” configuration with any combination of inside or outside lines, without expensive conference service provider fees. Operating in high quality full-duplex mode, the FL-USA 400 system is also expandable as your needs grow. Two FL-USA 400 systems may be cascaded to provide up to a 14 party teleconference. Providing clear synthesized voice prompts, the 400 provides the conference Chairperson password access to initiate conference calls. Once a conference is in progress, the Chairperson may lock the conference bridge to prevent unauthorized call attendance (i.e. eaves dropping). For example; an uninvited user dials into the FL-USA 400 bridge that has a conference in progress, they receive a clear voice message indicating “A Conference is in Progress” and are NOT connected to the call. Our FLUSA 400─ simple and secure, for sensitive business communications. Our FL-USA 400 Conference Bridge is designed for an absolute minimum footprint. The compact, stand-alone metal chassis consumes only 10 watts and measures 8 x 6 x 1.25 inches. Installation Place the FL-USA 400 where it will not be subject to extreme temperature changes, humidity or electromagnetic interference. Operating temperature range is between 32 and 122 degrees Fahrenheit, Humidity should be less than 90% and be non-condensing. Please ensure adequate ventilation is provided for system cooling. Do not block the ventilation slots on either side of the chassis. Take care to label PBX extension connections clearly. Copyright FreelineUSA, Inc. 2005 Page 4 Installation continued The FL-USA 400 conference bridge is a plug and play device. No user settings are generally required for proper operation. Simply connect up to eight, two wire PBX extensions to the bridge starting with port one. The extensions should be arranged in a hunt group starting at port one. To enter the conference bridge, simply dial the lead hunt group extension number from another internal PBX extension phone. Connect the supplied AC adapter to the power jack at the back of the conference bridge and connect to AC main. The UL Listed adapter provides 12 volts DC at 500ma. RJ-11 Analog Extension Line Connections The FL-USA 400 Series is designed to terminate standard PBX two wire analog extension lines. These extension lines (maximum of eight per bridge) should be placed in a rotary hunt group (in the PBX) starting at port one on the eight port bridge. To access the FL-USA 400 bridge, simply dial the first extension number assigned to PBX rotary hunt group, see diagram above. Copyright FreelineUSA, Inc. 2005 Page 5 Front Panel LED Status Lamps Recording Audio The audio recording jack is located to the left of the status LEDS. This analog output may be used to record critical conference calls with a standard memo recorder. The auxiliary audio output ranges from –50dbm to –2 dbm. Power Lamp A red LED power lamp indicates the unit is powered up and ready to initiate a conference call. Please note, the AC power supply must be connected and the main power switch on the back of the FL-USA 400 must be positioned to the “ON” position. The system consumes ~10 watts at 120 volts AC. Line Status Indicators Eight red LED lamps on the front panel of the FL-USA 400 conference bridge indicate port status, (i.e. connected, ringing, released) on the front panel of the FL-USA 400 conference bridge. This feature provides the installer and end user a clear indication of any wiring or call routing issues when accessing the bridge. DTMF in-band signaling is used to control the line ports. Copyright FreelineUSA, Inc. 2005 Page 6 Rear Panel Connections to System RJ-11 PBX Line Extension Jacks Beginning at port one connect the telephone lines from the PBX rotary hunt group (i.e. analog 2-wire PBX Extensions) to the FL-USA 400 system. The three unused jacks to the right are unused, and are provided for initial factory testing. Power Switch Main power switch must be positioned to the “ON position” prior to use. To manually reset the bridge and prevent use of the conference bridge, the switch may be manually turned off. The power LED on the front of the FL-USA 400 indicates the system power status. Power Jack Connect the low voltage external AC power supply to the system through the power jack. Copyright FreelineUSA, Inc. 2005 Page 7 Naming Conventions for the FL-USA 400 Bridge Meeting Room The virtual meeting room provided by FL-USA 400 where two or more participants can converse over the conference bridge. Participant A person who is provided the “participant” password and has joined the meeting room, after login authentication is completed. Chairperson A person who manages the participant attendance and enters the meeting room by using the “Chairperson” password. The Chairperson manages the conference call and attendees. Only one active Chairperson per meeting room is allowed by the system. System Administrator A person provided the “administrator” password which enables them to program the overall system configuration and set access passwords. Lock Meeting Room The Chairperson may choose to lock the meeting room to new participants. No new participants can then enter the conference call in progress. Open Meeting Room The Chairperson may choose to unlock the meeting room at any time to allow additional participants to join or dial-out to add additional participants to the meeting room. Port State (a.k.a. channel pattern/state for RJ-11 ports on bridge) This term describes the state of a FL-USA 400 conference channel port. When a port is set on a “wait-for-ring” pattern, that particular port is in an active state in which it answers incoming calls. It can also can be used to place outgoing calls a directed by the Chairperson. When a port is set to a “busy” state, the port is in a “dormant” state so it is transparent to the telephone network. When set to a “busy” state, the port cannot make or receive telephone calls. ( see appendix B for detail on system set-up to support this ) Copyright FreelineUSA, Inc. 2005 Page 8 Telephone Line Connection Front View Audio Out Power LED Port LED Back View PBX Extensions or Phone Lines Factory Use Power SW Power In Installation Plug in the power adapter to power jack. Apply AC power. Front panel power LED should be lit after setting the power switch to the ON position. Connect third party recorder to audio out jack if required. Connect the PBX and/or outside analog telephone lines to the RJ-11 connectors on FL-USA 400. Observe standard telephone wiring practices. Copyright FreelineUSA, Inc. 2005 Page 9 OPTIONAL Bridged Telephone Line Connection Overview of Bridged Operation When use is occasional, the FL-USA 400 conference bridge can be placed in parallel to an existing two-wire telephone line, such as an analog system C.O. line or direct Fax line. It is CRITICAL the Status of the ports/channels be set to “busy” when the conference is not active on these lines─ so the Fax transmission or line usage is not disturbed by the FL-USA 400. Refer to “setting Port/Channel Status” section on about how to set ports to “busy” status. IMPORTANT While this arrangement is supported, it is not recommended for other than occasional use, as it has potential to be misconfigured by the administrator when not in an active conference call. See appendix B for administrative software options required to support bridged wiring of the phone lines. Copyright FreelineUSA, Inc. 2005 Page 10 Organizing a Meeting Overview The FL-USA 400 is ready to provide conferencing service from the first moment you power it on. Telephone connections should be completed in advance of using the conference bridge. A successful teleconference requires all parties to show up to the “Meeting Room” on time. Participants can show up by dialing into the conference at the preset time. Alternatively, the participants can wait to be invited to the meeting room by answering the call (out-dial) that the Chairperson initiates from inside the meeting room. Summary The meeting room is initiated by the Chairperson dialing in and entry of their password phrase. Participants join the meeting room by dialing in. Alternatively, the Chairperson may dial out to invite new participants. Chairperson enters assigned password phrase to join the meeting. Conference call proceeds to completion. Chairperson ends the conference call by entry of ###. Copyright FreelineUSA, Inc. 2005 Page 11 As Participant Attending a Conference Meeting Engaging the FL-USA 400 Conference Bridge Pick up the handset and dial the phone number associated with your new FL-USA 400 conference bridge. As soon as the FL-USA 400 answers the call, you will hear a “beep” tone, then be verbally prompted to “Please enter password”. Authenticate the participants identity Enter on your ℡ 456, the default password phrase, or the one your meeting Chairperson gives you to join the call. You are automatically forwarded to the meeting room after you are authenticated. Converse with others in Meeting Room You will either hear conversation from the attendees, or you may be the first one to join the conference bridge. If you are first to enter the meeting room, you will hear music and occasionally the message “please hold”. This indicates you are the only one currently signed into the meeting room. Speak as you normally would in a standard telephone conversation, if you hear a short “beep” tone it signals a new participant has just entered the meeting room. If you hear two short “beep” tones, it indicates that a participant just left the meeting room. Leaving the Conference Call Simply hang up the telephone and you will leave the conference call. After you hang up, you will release the port on the FL-USA 400. This permits the open port to be used to connect another participant if required. Copyright FreelineUSA, Inc. 2005 Page 12 As Chairperson ( Instructions Page 1 of 3 ) Initiating a Conference Meeting Engaging the FL-USA 400 Conference Bridge Pick up the handset and dial the extension number associated with your FL-USA 400 conference bridge. As soon as the FL-USA 400 answers the call, you will hear a “beep” tone, then be verbally prompted to “Please enter password”. Authenticate the Chairpersons identity Enter on your ℡ 123, the default Chairperson password phrase, or the one your system administrator gives you to initiate conference calls. You are automatically forwarded to the meeting room after you are authenticated. As the call organizer, you will usually be the first to enter the bridge. You will hear music and occasionally the message, “please hold”. Invite off-premise party to join your meeting As Chairperson, you have the exclusive power to place outgoing calls from the meeting room to invite off-premise parties to join your call. Use this procedure to invite off premise parties to your call: (a) Press on your ℡ # 0, this instructs the FL-USA 400 to retrieve an available free port for you. If no additional ports are available, you may hear “all lines are occupied”. Alternatively, you can enter on your phone # 0 plus the assigned port number (1-8) for the desired out going port. (b) When you hear the outside dial tone, press the number you wish to reach, you may be required to dial 9 to access an outside line from your PBX. You will hear normal ringing tone after the off-premise attendee number is dialed. Copyright FreelineUSA, Inc. 2005 Page 13 As Chairperson ( Instructions Page 2 of 3 ) Initiating a Conference Meeting (c) Press on your ℡ # 9. This instructs the FL-USA 400 to add the called party into the meeting room. The system automatically prevents the Chairperson from accidentally connecting a ring-no-answer, or a busy connection, into the meeting room using # 9. If the line is busy or does not answer, simply enter # 0 again. (d) Repeat steps A to C if you wish to invite a new party. (e) Press your Chairperson password phrase ℡ 123. This returns you as the Chairperson into the meeting room. Do this after you have invited all of your call attendees. Out Dial Note: The second time you enter # 0 or # 0 plus the port number, during a conference sesssion it indicates you wish to cancel the current out-dial call attempt and retrieve a new open line for a new call attempt. Entering your password phrase 123 during the out-dial call attempt also indicates you wish to cancel the current call attempt; but will also rejoin you back into the meeting room. Plan to make use of these two commands when encountering situations like “all lines are occupied” or “ring-no answer connection”, “busy connection” or the called party suddenly hangs up right after they answered your call. If you take no action for a period of time after encountering any of the earlier stated situations, you will be prompted with a verbal warning message “You will be disconnected soon. Or to maintain On Hold status press #”. If you take no action in 5 seconds after this warning message you will be disconnected from the bridge. Copyright FreelineUSA, Inc. 2005 Page 14 As Chairperson ( Instructions Page 3 of 3 ) Initiating a Conference Meeting Manage your Meeting When you confirm all your targeted participants are in the meeting room, you may press # to lock up your meeting room. Once the Chairperson presses # you, together with all participants, will hear the message “Meeting room has shut off”. Locking up the meeting room prohibits any more offpremise parties. When off-premise parties try to join the conference in session, they will hear the warning message “The meeting is in progress” after they enter their participant password phrase. If you change you mind, and chose to accept new callers to join the meeting, press # . You, together with all particpants, will hear the message “The meeting room has reopened”. Converse with “Invited Participants” in Meeting Room As Chairperson, speak as you normally would in a standard telephone conversation. If you hear a short “beep” tone, it signals a new participant has just entered the meeting room. If you hear two short “beep” tones, it indicates that a participant just left the meeting room. Shutting down the Meeting Room Press # # # , all ports and callers you have been engaging with will be immediately disconnected after entry of this sequence. Copyright FreelineUSA, Inc. 2005 Page 15 Configuration of the FL-USA 400 Setting the basic administrator options for regular use Engaging the FL-USA 400 Conference Bridge Pick up the handset and dial the phone number associated with your new FL-USA 400 conference bridge. As soon as the FL-USA 400 answers the call, you will hear a “beep” tone, then be verbally prompted to “Please enter password”. Authenticate with the System Administrators identity Enter on your ℡ 885. The default system adminstrators password phrase, or the configured administrative password. After authentication, you will hear the system audio announcement: “To set port state (i.e. channel pattern), press 1, to set password press 2, to set voice prompt language press 3, to set number of rings press 4...”. Setting the port state (a.k.a. Channel pattern– in appendix B ) Ignore this section unless setting the system to operate in a bridged mode on shared telephone lines. If you choose to use the optional bridged wiring plan, please read appendix B to set the correct template patterns ( A or B ) for your system. Set New Passwords Press after the system message “...to set password press 2…”; Then, sequentially reprogram the password of participant, meeting organizer (Chairperson), and system administrator by interacting with the system messages “To change participants password press 1, to change meeting organizer’s password press 2, to change system administrators password press 3.” Copyright FreelineUSA, Inc. 2005 Page 16 Configuration of the FL-USA 400 Setting the basic system options Set voice prompt Language Press after the system message “...to set voice prompt language press 3…”; Then, choose your desired language by interacting with the system messages “To select English press 1, To select Chinese press 2, To select Japanese press 3.” Set Number of Rings to Answer Press after the system message “...to set number of rings to answer press 4…”; Then, enter your desired number of rings when you are prompted by interacting with the system message “Number of rings to answer is ..#.. Please enter the new number now…” This setting specifies the number of rings the FL-USA 400 accepts before answering an incoming call from a conference participant. The factory default is one, answering incoming calls on the very first ring. Exiting Configuration mode Press # and you will exit the system configuration mode immediately. Copyright FreelineUSA, Inc. 2005 Page 17 FL-USA 400 Conference Bridge Specifications: 8.0 ” FL-USA 400 Conference Bridge Interfaces: 2 wire analog (POTS) telephone lines Dial Interface: DTMF Capacity: 8 Ports (option to stack two for 14 ports) Auxiliary audio output: -50 dbm to –2 dbm Power Input: AC 12V 1 Amp Size: L 8 x W 6 x H 1.25 inches Net Weight: 890 g Working Temperature: 5-40 Degree C Humidity: 20-80% Copyright FreelineUSA, Inc. 2005 Page 18 USER Instructions FL-USA 400 Conference Bridge Attend a Conference Meeting FUNCTIONALITY KEYPAD ENTRY/ ACTION Dial extension PBX number for the bridge Engage the FL-USA 400 Bridge Enter the Meeting Room Press 456 or password ON YOUR SYSTEM Dial: ______ Press: _____ Hang up the phone End the Conference Call Organize a Conference Meeting FUNCTIONALITY KEYPAD ENTRY/ ACTION Dial extension PBX number for the bridge Engage the FL-USA 400 Bridge Enter the Meeting Room Invite off-premise party to join the conference call. Press 123 or password Press #0 or #0 plus the port number + phone number of attendee —————————————————Enter # 9 to add attendee to conference Retrieve a new phone line when encountering a ring-no-answer or busy connection. Press ON YOUR SYSTEM Dial: ______ Press: _____ REPEAT UNTIL ALL ATTENDEES ARE IN THE MEETING ROOM #0 End Invitation for off-premise party. Press 123 or password Press: _____ Return from inviting off-premise party to the Meeting Room. Press 123 or password Press: _____ Lock up the Meeting Room. Press #7 Open the Meeting Room. Press #8 Shut down the Conference Call. Copyright FreelineUSA, Inc. 2005 Press ### Page 19 Administrator Instructions FL-USA 400 Conference Bridge System Configuration of the FL-USA 400 FUNCTIONALITY KEYPAD ENTRY/ ACTION Dial extension PBX number for the bridge Engage the FL-USA 400 Bridge Enter Configuration Menu Press 885 or password ON YOUR SYSTEM Dial: ______ Press: _____ Set Port State on Template A (a.k.a. channel pattern) 1 + 1 if pattern now set on template B. 1 + # if channel pattern is now set on template A BRIDGE OPTION Set Port State on Template B (a.k.a. channel pattern) 1 + 1 if pattern now set on template A. 1 + # if channel pattern is now set on template B BRIDGE OPTION Configure Template A 1 + 1 + 1 + channel/port numbers for wait-to-ring + # if channel pattern is set on Template A. 1 + 2 + 1 + channel/port numbers for wait-to-ring + # if channel pattern is set on Template B Configure Template B 1 + 1 + 1 + channel/port numbers for wait-to-ring + # if channel pattern is set on Template A. 1 + 2 + 1 + channel/port numbers for wait-to-ring + # if channel pattern is set on Template B BRIDGE OPTION BRIDGE OPTION Reprogram Participant Password Press 2+1+1 + Password + # DEFAULT PASSWORD IS Þ456 Reprogram Meeting Organizer (Chairperson) Password Press 2+2+1 + Password + # DEFAULT PASSWORD IS Þ123 Reprogram System Administrator Password Press 2+3+1 + Password + # DEFAULT PASSWORD IS Þ885 DEFAULT IS ENGLISH Set Voice Prompt Language to English Press 3+1 Set Voice Prompt Language to Chinese Press 3+2 Set Voice Prompt Language to Japanese Press 3+3 Set number of rings before system answers call Press 4+1+1+ 1,2,3…9 + # Exit Configuration. Copyright FreelineUSA, Inc. 2005 (set for each port number) Press Page 20 # DEFAULT IS (1) ONE RING Appendix A FreelineUSA Tips for an effective conference call ! Suggest participants located in busy offices find a quiet spot or small conference room to reduce distractions. Designate a coordinator if you have a number of participants. Telephone conferences require close attention from participants, and such concentration over extended periods of time can be tiring. If possible, avoid planning telephone conferences over ninety minutes long. If your conference call may run as long as two hours, include a ten-minute break or two in the formal agenda. Agendas for most telephone conferences should include introduction , main agenda items, and short review periods to ensure feedback. Plan major agenda items mixing long and short segments, to help hold the participants attention and allow for continuous feedback. The introduction period should include an informal roll call, to let everyone be heard once and become familiar with the sound of all participants' voices, take a moment to mention any ground rules to be used. If all participants are in attendance, the Chairperson may choose to lock the bridge using # 7, to open again later please enter # 8. Use names throughout the meeting. Unless participants know each other very well and can identify voices easily, it's a good idea to have participants give their names (and sometimes their location) each time they speak. Maintain the pace you establish in the agenda, and remember to go more slowly when dealing with complex subjects. Sometimes speakers keep talking- because they lack the visual clues that will tell them whether they are being understood. If you are speaking, stop periodically to ask whether your point is clear. Ask for participation. Some people are hesitant to talk, especially at their first teleconference. People may also hesitate because they are unsure whether a speaker has finished. Allow silences of several seconds to give people a chance to respond to your comments. Firmly follow your agenda. You will need to stop on time and vacate the conference bridge. If you find that you seldom get through the agenda, consider scheduling conferences more frequently. A final review can help summarize the ideas generated, decisions made, and actions to be taken. You can also set a date for your next meeting, and schedule it immediately with the conference manager. The moderator and all conferees should keep in mind that it is not advisable to put a telephone line on hold while participating in a conference call. Many telecommunication systems incorporate music when put on hold; this music will seize the audio path of the bridge and be audible to the entire conference. Copyright FreelineUSA, Inc. 2005 Page 21 Appendix B Configuring the FL-USA 400 conference bridge to use shared telephone lines for conferencing. Setting the Port Status/Channel Pattern You can ignore all paragraphs in this appendix if you use the standard (non-bridged) wiring plan. The factory default settings support the standard wiring plan out-of-thebox. Read on if you use Optional Wiring Plan to bridge active telephone lines used by the PBX or Fax machine. The Optional Wiring Plan requires configuring the conference bridge ports, normally set to "wait-for-ring" auto-answer, from interfering with your routine phone calls when you are not active on a conference call. Switching the status (a.k.a. pattern) of these ports to "busy" in the system software, prevents the FL-USA 400 from automatically answering these routine telephone calls. Ports configured to a "busy" pattern are transparent to your telephone network, so they don't interfere your telephone network or your fax machine. Two templates, A and B, are added on the configuration menu for quick switchover from active for voice conferencing to passive, standby operating mode. Set Channel Pattern On Template A Following the Channel Pattern system message “To set channel pattern, press 1” Then, press 1 following the Channel Pattern system message “Channel pattern is set on template A. To change press 1, to configure template press 2, to exit press #.” Finally reconfigure pattern of 2nd, 3rd, ...and 8th channels by interacting with various system messages. Template A is primarily designed for use over the time period you actively wish to hold a teleconference meeting, when all connected lines need to be ready to answer incoming calls, or to initiate outgoing calls. In this template, the factory default setting is all ports (1st to 8th) are set on "wait-for-ring" pattern. This default setting should not be changed in almost call cases. Set Channel Pattern On Template B Following the Channel Pattern system message “To set channel pattern, press 1” Then press 1, following the Channel Pattern system message “Channel pattern is set on template A. To change press 1, to configure template press 2, to exit press #.” Then, press 2, following the system message "Channel pattern is set on template B. To change press 1, to configure template press 2, to exit press #." Finally reconfigure the pattern of the 2nd, 3rd, ⋯ and 8th ports by interacting with system messages. Template B is opposite to template A. It is for use over the time period that you don't hold telephone conference meetings. The factory default is that 1st channel is set on "wait-for-ring" pattern* and all remaining channels (2nd to 8th) are set on a bridged "busy" pattern. When you hear the system message “In template B, wait-for-ring channels are 234...Enter the channel numbers you wish to set to wait-for ring.”, change the setting from 2nd - 8th channels individually. An example of your entry is 234567, which entry is used to set channels 2, 3, 4, 5, 6 and 7 on "wait-for ring" pattern and channel 8 on "busy" pattern. * The FL-USA 400 must be engaged first to start a conference, otherwise system configuration would not be possible. For this reason, the first port is permanently optioned for a "wait-for-ring" pattern. Copyright FreelineUSA, Inc. 2005 Page 22 Confidential Pricing and Ordering Information FreelineUSA, Inc., 9457 S. University Blvd., Suite 166, Highlands Ranch, CO 80126 Telephone: (303) 791-1405 x101 ◊ Fax (303) 791-2163 ◊ http://www.freelineusa.com January 2005 Order Number LIST Price Description Quantity R3.0 FL-USA 400 Eight Port Analog Conference Bridge $Call CONTACT Your Dealer or: FreelineUSA, Inc. 9457 South University Blvd., Suite 166 Highlands Ranch, CO 80126 Telephone (303) 791-1405 x101 Fax: (303) 791-2163 Email: [email protected] WEB: http://www.freelineusa.com Confidential FreelineUSA, Inc. © 2005—Financial Terms are Pre-paid- FOB Highlands Ranch, CO