1
Thuraya Satellite Telecommunications Company
ThurayaMarine
User Manual
Copyright© Thuraya Satellite Telecommunications Company
All rights reserved
Information in this document is subject to change without notice and does not represent a commitment on the part of ThurayaMarine.
Thuraya recommends users to download the latest version of the manual from the Thuraya website to obtain the best results.
Thuraya website: http://www.thuraya.com
© 2008 Thuraya Satellite Telecommunications Company. All rights reserved.
Intermatica S.p.A.
Service Provider ThurayaMarine per l’Italia - www.intermatica.it
1
Safety Summary
The following general safety precautions must be observed during all phases of operation,
service and repair of this equipment. Failure to comply with these precautions or with specific
warnings elsewhere in this manual violates safety standards of design, manufacture and intended
use of the equipment. Thuraya assumes no liability for the customer’s failure to comply with these
requirements.
Microwave Radiation Hazards
During transmission the antenna in this system radiates Microwave Power. This radiation may be
hazardous if exposed directly to humans, close to the antenna. During transmission, make sure
that nobody gets closer than the recommended minimum safety distance. The minimum safety
distance to the antenna on the focal line, is 2m.
Ground the equipment
To minimize shock hazard, the equipment chassis and cabinet must be connected to an electrical
ground.
Do not operate in an explosive atmosphere
Do not operate the equipment in the presence of flammable gasses or fumes. Operation of any
electrical equipment in such an environment constitutes a definite hazard.
Keep away from live circuits
Operating personnel must not remove equipment covers. Component replacement and internal
adjustment must be made by qualified maintenance personnel. Do not replace components with
the power cable connected. Under certain conditions, dangerous voltages may exist even with
the power cable removed. To avoid injuries, always disconnect power and discharge circuits
before touching them.
Do not service or adjust alone
Do not attempt internal service or adjustments unless another person, capable of rendering first
aid resuscitation, is present.
Intermatica S.p.A.
Service Provider ThurayaMarine per l’Italia - www.intermatica.it
2
Table of Contents
1. Before you start____________________________________________________________ 6
1.1. For your safety _________________________________________________________ 6
1.2. Battery Information______________________________________________________ 6
1.3. Taking Care of your ThurayaMarine ________________________________________ 6
1.4. ThurayaMarine Package__________________________________________________ 7
Introduction _________________________________________________________________ 8
1.5. The ThurayaMarine Service _______________________________________________ 8
1.6. ThurayaMarine _________________________________________________________ 9
1.7. ThurayaMarine Main Unit ________________________________________________ 10
1.8. LCD display ___________________________________________________________ 11
1.8.1. Function keys _______________________________________________________ 11
1.8.2. External Interfaces ___________________________________________________ 11
1.8.3. Additional interfaces & functions ________________________________________ 12
1.9. Handset ______________________________________________________________ 13
1.9.1. LCD display ________________________________________________________ 14
1.9.2. Function of buttons___________________________________________________ 14
1.9.3. Alpha-Numeric Buttons _______________________________________________ 15
1.9.4. Cradle_____________________________________________________________ 15
2. Installation _______________________________________________________________ 16
2.1. How to install the Main Unit ______________________________________________ 16
2.2. How to start the Handset ________________________________________________ 19
2.3. Handset Registration ___________________________________________________ 20
3. Functions of Main Unit _____________________________________________________ 21
3.1. How to power on/off ____________________________________________________ 21
3.2. Voice calls using External Telephone ______________________________________ 21
3.3. Fax Calls using G3 Fax machine __________________________________________ 21
3.4. Fax Calls using PC Software _____________________________________________ 22
3.5. Data Calls using PC Software ____________________________________________ 22
3.6. GmPRS Service Access _________________________________________________ 23
3.7. Emergency Call________________________________________________________ 26
3.7.1. How to make a Distress call ____________________________________________ 26
3.7.2. How to stop a Distress call _____________________________________________ 27
3.8. GPS Manager _________________________________________________________ 27
3.8.1. Current Position _____________________________________________________ 27
3.8.2. Waypoint __________________________________________________________ 27
3.8.3. Location Tracking ____________________________________________________ 27
3.8.4. Setting Info _________________________________________________________ 27
3.9. Call Log ______________________________________________________________ 28
3.9.1. All ________________________________________________________________ 28
3.9.2. Voice Call __________________________________________________________ 28
Intermatica S.p.A.
Service Provider ThurayaMarine per l’Italia - www.intermatica.it
3
3.9.3. Fax Call ___________________________________________________________ 28
3.9.4. Data Call __________________________________________________________ 28
3.10. SSAS Call Center _____________________________________________________ 29
3.11. Setting ______________________________________________________________ 29
3.11.1. HS Registration ____________________________________________________ 29
3.11.2. Factory Setting _____________________________________________________ 29
4. Functions of Handset ______________________________________________________ 30
4.1. How to power on/off ____________________________________________________ 30
4.2. Voice calls using Handset _______________________________________________ 30
4.3. Options during call using the Handset _____________________________________ 31
4.4. SMS _________________________________________________________________ 31
4.4.1. Inbox _____________________________________________________________ 31
4.4.2. Outbox ____________________________________________________________ 32
4.4.3. Sent Message ______________________________________________________ 32
4.4.4. Draft ______________________________________________________________ 32
4.4.5. Write Message ______________________________________________________ 33
4.5. Emergency Call________________________________________________________ 33
4.5.1. How to make a Distress call ____________________________________________ 33
4.5.2. How to stop a Distress call _____________________________________________ 34
4.6. Phonebook ___________________________________________________________ 34
4.7. CID __________________________________________________________________ 35
4.8. GPS _________________________________________________________________ 35
4.8.1. Current Position _____________________________________________________ 35
4.8.2. Waypoint __________________________________________________________ 36
4.8.3. Position Tracking ____________________________________________________ 36
4.8.4. Continue Position ____________________________________________________ 37
4.8.5. Setting ____________________________________________________________ 37
4.9. Call Divert ____________________________________________________________ 38
4.9.1. Voice Call __________________________________________________________ 38
4.9.2. Fax Call ___________________________________________________________ 38
4.9.3. Data Call __________________________________________________________ 38
4.9.4. Clear Divert ________________________________________________________ 38
4.10. Security _____________________________________________________________ 38
4.10.1. Call Barring _______________________________________________________ 38
4.10.2. PIN Code _________________________________________________________ 39
4.10.3. Change Codes _____________________________________________________ 40
4.10.4. IMEI Number ______________________________________________________ 40
4.11. Setting ______________________________________________________________ 40
4.11.1. Sound ____________________________________________________________ 40
4.11.2. Phone ____________________________________________________________ 41
4.11.3. Handset Clock _____________________________________________________ 41
4.11.4. Reset Handset _____________________________________________________ 42
4.12. Key Lock ____________________________________________________________ 42
4.13. HS Registration_______________________________________________________ 42
4.14. Other Status Display___________________________________________________ 43
5. Additional Functions using Multi-Hands_______________________________________ 44
5.1. Additional Handset Registration __________________________________________ 44
Intermatica S.p.A.
Service Provider ThurayaMarine per l’Italia - www.intermatica.it
4
5.2. Intercom______________________________________________________________ 44
5.3. Conference Call _______________________________________________________ 44
5.4. Transfer ______________________________________________________________ 45
5.5. Room Monitor _________________________________________________________ 45
6. PC Application Software____________________________________________________ 46
6.1. About Main Unit Manager Software________________________________________ 46
6.2. Installation____________________________________________________________ 47
6.2.1. USB Driver Installation ________________________________________________ 47
6.2.2. Program Installation __________________________________________________ 47
6.2.3. Program Uninstallation ________________________________________________ 47
6.3. Registration___________________________________________________________ 48
6.4. Login ________________________________________________________________ 48
6.5. Menu Bar Functions ____________________________________________________ 48
6.5.1. Tool_______________________________________________________________ 48
6.5.2. Connect ___________________________________________________________ 50
6.5.3. About _____________________________________________________________ 50
6.6. GPS Manager _________________________________________________________ 50
6.6.1. Position Report______________________________________________________ 50
6.6.2. Location Tracking ____________________________________________________ 52
6.6.3. Waypoint __________________________________________________________ 52
6.7. SMS Manager _________________________________________________________ 53
6.7.1. New SMS __________________________________________________________ 53
6.7.2. SMS List___________________________________________________________ 55
6.8. Phonebook Manager ___________________________________________________ 56
6.8.1. Phonebook List _____________________________________________________ 56
6.8.2. Group Info _________________________________________________________ 57
6.8.3. Phonebook Copy ____________________________________________________ 57
6.9. SSAS Manager ________________________________________________________ 58
7. Troubleshooting __________________________________________________________ 59
7.1. Warnings _____________________________________________________________ 59
7.2. Care and Maintenance __________________________________________________ 59
7.3. Common Problems_____________________________________________________ 60
8. Warranty_________________________________________________________________ 61
9. ThurayaMarine Specifications _______________________________________________ 62
9.1. Main Unit Specifications ________________________________________________ 62
9.2. Handset Specifications _________________________________________________ 63
Intermatica S.p.A.
Service Provider ThurayaMarine per l’Italia - www.intermatica.it
5
1. Before you start
Welcome to the world of Thuraya! Your newly purchased ThurayaMarine product will open up
boundaries of communication, enabling you to communicate from virtually any ocean region in
the world using Thuraya’s satellite communication services. The ThurayaMarine supports high
quality Voice call, Fax call, Data call, SMS, and GmPRS. In addition the ThurayaMarine supports
wireless up to 4 handsets.
Please read carefully and make yourself familiar with the safety measures and user instructions in
this manual before you start to use your ThurayaMarine.
1.1. For your safety
Read these simple guidelines that will help you get most out of your ThuryaMarine.
For more detailed information, please refer to the complete user guide.
Switch on safely
Do not switch the system on when the use of wireless phone is prohibited or when it may cause
interference or danger.
Switch off near blasting
Follow any restrictions.
Do not use the system where blasting is in progress.
1.2. Battery Information
Use only Thuraya approval battery pack for handset, and Thuraya approved chargers for your
handset.
• Do not short-circuit the battery. Short-circuiting the terminals may damage the battery or
the connecting object.
• Do not expose to high temperatures.
• Please dispose the battery in accordance with local regulations.
1.3. Taking Care of your ThurayaMarine
Your system is a product of superior design and craftsmanship, and should be treated with care.
The suggestions below will help you protect your warranty coverage.
• Keep the system dry. Liquids or moisture can contain minerals that will damage
electronic circuits. If your handset does get wet, allow the device to dry completely before
replacing it.
• Do not use or store the system in dusty or dirty areas. Its moving parts and electronic
components can be damaged.
• Do not store the system in hot areas. High temperatures can shorten the life of electronic
devices and damage batteries of the handset.
• Do not store the system in cold areas. When the system returns to its normal
temperature, moisture can form inside the system and damage electronic circuit boards.
• Do not attempt to open the system other than as instructed in this guide.
• Do not drop, knock, or shake the system. Careless handling can break internal circuit
boards and fine mechanics.
• Use only the supplied or approved replacement antenna. Unauthorized antennas,
modifications, or attachments could damage the device and may violate regulations
governing radio devices.
• Always create a backup of data you want to keep (such as contacts and calendar notes)
before sending your device to a service facility.
Intermatica S.p.A.
Service Provider ThurayaMarine per l’Italia - www.intermatica.it
6
1.4. ThurayaMarine Package
Your package contains the following items;
Main Unit
AC/DC adapter
Handset
Handset Charger
Handset Battery
Cradle
Utility CD
Manual & Warranty card
RJ11 cable
USB cable
Serial cable
External I/O cable
Intermatica S.p.A.
Service Provider ThurayaMarine per l’Italia - www.intermatica.it
7
Introduction
1.5. The ThurayaMarine Service
ThurayaMarine is designed to meet the high-performance, seamless communication demands on
all types of water vessels moving across Thuraya satellite footprint.
Ideal communication solution for
• Fishing boats
• Supply vessels, merchant fleets, commercial carriers
• Yachts and leisure crafts
Keeping mariners connected with business, family and friends
• With the ThurayaMarine, seafarers can make voice and data calls, connect to the Internet,
send SMS, faxes and e-mails, while moving across waters, whether on motor or sailing boats,
yachts or commercial vessels.
• In case of an emergency, Thuraya Region Distress button is available to alert pre-configured
contacts.
• Convenient social calling facility for crew and passengers on-board.
Easy to install and to use
• Compact, lightweight, below the deck equipment complies with IP66 casing.
• Wall-mounted or desktop, the main unit can be easily connected to an extension phone, fax
machine or laptop.
• Supports up to four wireless handset for on-board mobility.
• Easy to handle omni-directional or stabilized antenna.
Advanced on-board communication
ThurayaMarine supports a wide range of communication services including:
• High quality voice communication
• “Always-on” Internet with ThurayaGmPRS at speeds up to 60/15kbps download/upload
• Web browsing, e-mail, web mail
• File Transfer Protocol (FTP)
• Virtual Private Network (VPN)
• E-commerce and more
• Data 9.6kbps
Intermatica S.p.A.
Service Provider ThurayaMarine per l’Italia - www.intermatica.it
8
•
•
•
•
•
•
Fax 9.6kbps (G3)
Messaging
GPS capabilities for location and position tracking
Thuraya Region Distress button sends multi SMS and e-mail alerts to user-defined contacts
Flexible postpaid and prepaid pricing plans
Crew calling with prepaid calling cards
1.6. ThurayaMarine
The ThurayaMarine includes the following system components:
• Main Unit: Main Unit (MU) and AC/DC adapter
• Handset: Wireless Handset (HS), Charger, and Cradle
• Accessories (Manual, Software, cables, etc.)
Note: The external antenna is not included in the product package.
ThurayaMarine Main Unit and Wireless Handset
Intermatica S.p.A.
Service Provider ThurayaMarine per l’Italia - www.intermatica.it
9
ThurayaMarine supports the following services.
•
•
•
•
•
Circuit switched Voice/Data/Fax services
Packet services
Messaging
Supplementary services
Other functions
■ Phonebook function
■ Position reporting and simple tracking functionality using GPS function
■ Main Unit management S/W application
■ Support 4 wireless handset connection (option)
1.7. ThurayaMarine Main Unit
Main Unit is a satellite communication equipment using Thuraya Satellite on the sea.
Main features of the Main Unit are as following;
• Support waterproof (IP66)
• Fully support the GMPCS service (Voice, Fax, Data, SMS, GmPRS)
• Various external device interface (USB, DTE, RJ-11)
• Include DCT base station module to support the wireless handset
• Graphic LCD display
• Aluminum Die-casting case
• Apply Touch keypad
• Supports total 4 wireless handset access per Main Unit (Option)
Intermatica S.p.A.
Service Provider ThurayaMarine per l’Italia - www.intermatica.it
10
1.8. LCD display
SAT Signal Strength
THURAYA
UAE
12:00A
15.08.07
GPS Time
GPS Date
Logo & Network Name
GPS MANAGER
CALL LOG
SSAS CALL CENTER
SETTING
12:00A
15.08.07
Function Menus
1.8.1. Function keys
As the function keys of the Main Unit adopted the touch-pad technology, it is very easy to operate
them. The waterproof function is also provided.
Up/Down Key
2-way direction key for moving focus in menu screen.
OK
This key is used to select and confirm menu options.
Cancel
This key is used to unselect and back to previous menu.
Power
This key is used to power on/off of Main Unit.
Thuraya Region Distress
This key is used to send emergency messages.
1.8.2. External Interfaces
The external interface of the Main Unit allows the connection between the Main Unit and other
external devices. It is also designed waterproof so that it can be used in the ocean. However, you
need to use the exclusive connector enclosed with the product in order to ensure waterproof
feature.
Analogue RJ11 connector
The RJ11 ports can be used for connection of analogue telephone and G3 fax machine. For this
interface the following services are available:
• Voice call using external telephone
Intermatica S.p.A.
Service Provider ThurayaMarine per l’Italia - www.intermatica.it
11
• 9.6kbps fax call using external G3 fax machine
USB connector
USB is an interface that allows a single universal plug to connect PCs. For this interface the
following services are available:
• 9.6kbps data call using PC software
• 9.6kbps digital fax call using PC software
• GmPRS
• SMS and GPS tracking service using MU Manager software on PC.
DTE connector
DTE is an interface that allows a single universal plug to connect PCs. For this interface the
following services are available:
• 9.6kbps data call using PC software
• 9.6kbps digital fax call using PC software
• GmPRS
• SMS and GPS tracking service using MU Manager software on PC.
External I/O connector
External I/O supports the connection of the external wire distress button. The external wire
distress button is not included in the product package.
Satellite antenna connector
Satellite antenna connector supports the connection of the omni-directional antenna or the
tracking antenna.
GPS antenna connector
GPS antenna connector supports the connection of the omni-directional antenna or the GPS
antenna.
DC power connector
DC power connector supports the connection of AC/DC adapter.
1.8.3. Additional interfaces & functions
SIM card inserter & Key locker
SIM card inserter is an additional interface to insert the Thuraya SIM card. The key locker is
convenient when inserting or ejecting the SIM card.
Wireless handset antenna
Wireless handset antenna connects the Main Unit and Handset using radio frequency.
Thuraya region distress
With the Thuraya region distress button, you can make an emergency SMS call in an emergency
situation on the sea.
Intermatica S.p.A.
Service Provider ThurayaMarine per l’Italia - www.intermatica.it
12
1.9. Handset
The Handset is the primary interface for the Main Unit. It enables the user to dial numbers, it
displays status messages, and it can be used to configure the Main Unit and Handset.
The handset is divided into three distinct and inter-working sections.
• The first is the LCD section. This section gives the user visual indications about the operation
and status of the system.
• The second is the function buttons section. This section enables the user to interact with the
software menu system of the Main Unit and Handset.
• The third is the alphanumeric section. This section enables the user to dial and enter data
into the Main Unit and Handset.
Main features of the Handset are as following;
• Apply the DCT solution for wireless handset
• Support total 4 wireless handset access (Option)
• Support Voice/SMS using Handset
• Support Speakerphone function and Ear jack connection for Voice call
• Support Intercom, Transfer, Conference call using Multi Handset
• Provide internal phonebook, CID, etc.
• Check and monitor the Main Unit using Handset
Intermatica S.p.A.
Service Provider ThurayaMarine per l’Italia - www.intermatica.it
13
1.9.1. LCD display
The top of the Handset contains the LCD for displaying information to the user. The LCD display
is graphically shown below:
Current Time
Battery Status
SMS Indicator
Date
12:00
AM
PM
SAT Signal
20/ 7
12:00
THURAYA
UAE
HANDSET #1
Menu
Redial
Status &
Function
SMS
Special Function Menu
AM
20/ 7
>Call Divert
Security
Setting
OK
Back
Function Menu
Short message stored at SIM card.
The number of bars following this antenna symbol indicates received
signal strength. Up to 5 bars. The number of displayed bars may
fluctuate during a call. This is due to a signal level between the
ThurayaMarine and the Satellite network.
The number of displayed bars indicates the battery changing status.
The user can turn the external speaker on and off by pressing “SPK”
button. When the speaker is turned on, the symbol will be displayed in
the LCD screen.
1.9.2. Function of buttons
The function buttons enable the user to enter the menu system of the Handset and change
various settings. Each button is described in detail below.
[Power] button:
Switch the terminal on or off.
[Thuraya Region Distress] button:
Send the emergency message.
[Multi function #1] button:
Select the left side function menu.
[Multi function #2] button:
Select the middle side function menu.
[Multi function #3] button:
Select the right side function menu.
[Send] button:
While in the menu system, press this button to go back one level until
the Menu is completely exited.
[End] button:
Finish the voice call during voice call.
Move menu position from sub-menu to first top menu.
[Scroll up/down] button:
The primary function is to scroll up and down to menu items not shown
on the 3-line display of the LCD.
The secondary function is the CID. Scroll up and down to check the
information of missed calls.
Intermatica S.p.A.
Service Provider ThurayaMarine per l’Italia - www.intermatica.it
14
[GPS] button:
Select the GPS menu options.
[Phonebook] button:
Select the Phonebook menu options.
[Intercom] button:
Select the intercom menu options.
[Speakerphone] button:
Select/deselect the speaker-phone function.
1.9.3. Alpha-Numeric Buttons
The keypad can be in normal (numeric) mode or alpha mode. Use the normal mode to enter
digitals (phone numbers) while using the alpha mode to enter letters (names in the Phonebook).
The alpha mode and numeric mode are toggled automatically.
1
2
3
4
5
6
7
8
9
0
*
#
Key toggles
@ _ * , 1
A b c ( 2
d e f ) 3
g h I # 4
j k l / 5
m n o \ 6
p q r s 7
t u v ? 8
w x y z 9
. $ + - 0
When entering letters, toggle between upper case and lower case by using the “*” button.
1.9.4. Cradle
Use the cradle when mounting the Handset on the desk or wall. You can also connect the travel
charger to the cradle to charge the Handset’s battery.
Intermatica S.p.A.
Service Provider ThurayaMarine per l’Italia - www.intermatica.it
15
2. Installation
2.1. How to install the Main Unit
(1) Location of Installation
Thanks to the Main Unit‘s waterproof feature, there is no limitation of location for installation.
However, as the case of Main Unit is made of aluminum die-casting, if installed at an open place
and exposed to the sunlight too long, the surface and the inside temperature of the Main Unit will
increase, resulting in malfunctioning. It is recommended to install the product within a building or
below a panel from outside environment.
The Main Unit and Handset can be connected wirelessly using radio frequency. If there is an
obstacle between the Main Unit and Handset, this may reduce the communication quality.
Therefore, it is recommended to avoid any obstacles when installing the handset on the wall.
(2) Installation
Wall-mounting type
1. Check the Main Unit’s surface to be installed, and fix the wall-mounting bracket on the
wall using screws.
2. Hold the Main Unit on the wall-mounting bracket using the wall-mounting hole.
3. Separate the support and the back panel from the cradle.
4. Fix the back panel on the wall.
5. Assemble the front panel of the cradle.
6. Hang the handset on the cradle.
How to mount the Main Unit
How to mount the Handset
Desk-mounting type
1. Place the Main Unit and the cradle of the Handset on a flat surface.
(3) External antenna connection
1. Separate the waterproof cover of SAT/GPS connector.
2. Connect the SAT antenna cable to the TNC connector marked with “SAT”.
3. Connect the GPS antenna cable to the SMA connector marked with “GPS”.
4. Connect the antenna for wireless communications (provided with the accessory cable) to
Intermatica S.p.A.
Service Provider ThurayaMarine per l’Italia - www.intermatica.it
16
the main unit.
Connection method of SAT
antenna
Connection method of GPS
antenna
Connecting the antenna
for wireless
communications
Note: Use Thuraya’s authorized antenna to ensure sufficient satellite signaling.
(4) External device connection
The Main Unit supports to connect PC and the Main Unit using both USB port and DTE port. It
supports to connect an external device supporting serial communication and the Main Unit using
the DTE port only. It also supports to connect the external telephone and G3 Fax machine using
RJ-11 port.
1. Separate the waterproof cover from external connector.
2. Connect the interface cable between the external device and the Main Unit.
Note
1. The USB port for the Main Unit supports only the connection between the Main
Unit and PC installed USB driver.
2. The USB driver can be installed via the Utility CD. If you do not have the CD,
please visit the following website to download the installation. (Search for “VCP
driver” at http://www.ftdichip.com)
(5) SIM card Insert
Insert the Thuraya SIM card into the Main Unit to ensure normal operation.
1. Lift the SIM card cover from the left side of the Main Unit using the lock key.
2. Insert the SIM card as shown in the pictures below.
3. Close the SIM card cover.
Note: Turn off the power before inserting or removing the SIM card from the
ThurayaMarine.
(6) Connecting the Main Unit to Power Supply Adapter
Plug the Power Supply Adapter connector into the DC-In connector on the Main Unit. Use the
other end of the Power Supply Adapter to connect the Main Unit to the main power source.
1. Connect the DC plug for the AC/DC power adapter to the Main Unit.
2. Connect the AC power to the external power source.
Intermatica S.p.A.
Service Provider ThurayaMarine per l’Italia - www.intermatica.it
17
(5) Turning on the power of the Main Unit and Initialization
1. Press and hold the power button for a few seconds or until the red LED above the power
button lights up.
2.
Below is an example of the normal readout of the Main Unit display, while the Main Unit
is booting.
It may take for a while for the system to recognize the GPS signals if the antenna has been
turned off for a long time or there is no free view to the GPS satellites. When the display reads as
shown above, the system is ready to make and receive calls.
Note
1.
If the satellite signal strength is weak or GPS signals cannot be received, the
following warning will be displayed. In this case, check the factors such as the
antenna position or RF cable length which influences the Tx/Rx satellite signals
and to remove the factors.
2.
If turning on the Main Unit without using the SIM card, the following message will
be displayed. In this case, user should turn off the power, insert the SIM card into
the Main Unit and then turn on the power again.
3.
Once you turned off the power, wait at least 5 seconds before turning on the
power again.
Intermatica S.p.A.
Service Provider ThurayaMarine per l’Italia - www.intermatica.it
18
2.2. How to start the Handset
(1) Connecting Battery
1. Open the battery cover at the back of the Handset using a coin.
2. Connect the battery to the battery port of the Handset.
3. Close the battery cover using a coin again.
Note: Close the battery cover correctly to keep the Handset waterproof.
(2) Charging the battery
1. Plug the charger into the charger socket.
2. Connect the charger to an AC source.
How to charge using Travel Charger
How to charge using Cradle
Charge the battery enclosed with the handset package as soon as you can in order to ensure full
battery charge. While the battery is charging you can see the bar of battery symbol changing
cyclically. It may take approximately 3 hours and 30 minutes to fully charge the battery. The
charger stops changing automatically when the battery is full. As long as the charger is not
disconnected it restarts charging after a while to keep the battery fully charged.
You may still use the handset while charging the battery.
The internal clock for time, date and alarms will still keep running for about two hours if neither
the battery nor the charger is connected, but no alarm will sound unless a charged battery is
connected.
(3) Handset power on
1. The handset power button is placed in the upper left corner of the handset. See the
figure below. To power on the system, just press the button until you hear a beep sound.
2. When the display reads as shown above, the system is ready to make and receive calls.
Intermatica S.p.A.
Service Provider ThurayaMarine per l’Italia - www.intermatica.it
19
Out of range
If the Handset could not receive the enough RF signal from the Main Unit or Main Unit’s power
was off, the following message will be displayed. In this case, user needs to check the RF
condition between the Main Unit and Handset.
SAT ALERT or NO NETWORK
If the Main Unit cannot receive the signals sufficiently from the external antenna, the following
message will be displayed. .
12:00
AM
20/ 7
12:00
No Network
HANDSET #1
Menu
Redial
AM
20/ 7
Sat Alert
HANDSET #1
SMS
Menu
Redial
SMS
Note: Once you turned off the power, wait at least 5 seconds before turning on the power
again.
2.3. Handset Registration
The Handset should be registered at the Main Unit before using it. Typically, the Handset gets
registered at the Main Unit during the manufacturing of ThurayaMarine in the factory
Registration procedure of the Handset
1. Select the “HS Registration” in at the Setting menu of the Main Unit.
2.
Execute Register ”Press OK to Regist handset” or “Out of range” is displayed.
3. To complete handset registration, the security code must be entered. The default security
code is “0000”, and can be changed by the user following registration.
Note: If the Handset was not registered correctly, repeat the 1~3 procedure.
Intermatica S.p.A.
Service Provider ThurayaMarine per l’Italia - www.intermatica.it
20
3. Functions of Main Unit
3.1. How to power on/off
Main Unit power on
1. Press and hold the power button for a few seconds or until the red LED above the power
button lights up.
Main Unit power off
1. Press and hold the power button for a few seconds.
Notes
1. Once you turned off the power, wait at least 5 seconds before turning on the power
again.
2. The GMT information provided by the embedded GPS receiver is used to
automatically display the time and date.
3. Accurate display of the time and date indicates normal reception of GPS information.
3.2. Voice calls using External Telephone
To make a call, you must be connected to a network with an adequate SAT signal.
Dialing using Telephone
The Main Unit supports to connect External telephone using RJ-11 port.
1. Pick up the handset of the external telephone.
2. Enter the phone number using keypad.
3. Press “*”
Note: Enter (*) after entering the destination call number.
Receiving using Telephone
1. Pick up the handset of the external telephone.
3.3. Fax Calls using G3 Fax machine
You can use the Main Unit for receiving and sending fax messages. This can be done by a group
3 Fax machine connected to the RJ-11 interface.
Sending Fax
1. Dial the destination number followed by “#”.
2. Press Fax “Start” button.
Note: To make a fax call from a Group 3 Fax machine, you must dial “#” as the last digit
after the destination number.
Intermatica S.p.A.
Service Provider ThurayaMarine per l’Italia - www.intermatica.it
21
Receiving Fax
1. Switch on the group 3 Fax machine that is connected to the RJ-11 interface.
Notes
1. A ring tone in the fax machine indicates an incoming fax call.
2. When using the automatic answering feature for faxes, the number of rings must
be set to less than three rings.
3.4. Fax Calls using PC Software
You can send/receive a fax through a PC connected to the USB or DTE interface of the Main Unit.
This can be done through a PC connected to the USB or DTE interface of the Main Unit. For
sending a fax through PC, your PC should have appropriate PC Fax software installed.
Note: While sending a fax through PC connected to the USB or DTE interface, the fax
software should be configured in the class 2.0 mode.
Sending Fax
1. Connect the PC to the USB or DTE interface of Main Unit.
2. Invoke the PC fax software.
3. While configuring the fax software, set resolution as ‘Fine’.
4. Enter the destination number. (e.g. 12345678)
5. Select the document/file to be sent.
6. Use the appropriate option in the fax software to send the fax.
Note: No need to dial “#” after the destination number while using fax on the PC.
Receiving Fax
1. Connect the PC to the USB or DTE interface of the Main Unit.
2. Activate the fax software.
3. If there is no group 3 fax machine present at the RJ-11 interface of the Main Unit,
incoming fax calls will be received by the PC connected to the USB or DTE interface.
3.5. Data Calls using PC Software
You can use the Main Unit to receive and make data calls. This can be done through a PC
connected to the USB or DTE interface. To receive/make data calls by a PC, appropriate data
communication software should be installed on the PC.
Note: The DTE port and USB port of the Main Unit support baud rates of
4800/9600/19200/38400/57200bps.
Sending Data from PC
1. Invoke the data communication software in your PC.
2. Dial the destination number (e.g. ATDT 12345678)
3. Select the data file to be sent after call connection.
Intermatica S.p.A.
Service Provider ThurayaMarine per l’Italia - www.intermatica.it
22
4. Use appropriate options in the data communication software to send the file now. (Refer
to the S/W guide book for more information.)
Receiving Data Calls
The PC should be connected to the Main Unit through USB or DTE interface. To receive a data
call on the PC, an appropriate data communication software should be running, e.g. Hyper
terminal (default program available on Windows OS).
1. Connect PC through USB or DTE interface.
2. Invoke the data communication software.
3. You will hear a special signal tone in the Main Unit when a data call is coming through.
4. The data will be received by the communication software (Refer to the S/W guide book
for more information).
3.6. GmPRS Service Access
With the Main Unit, you can access Thuraya’s GmPRS network. Use the USB port of DTE port to
connect the Main Unit and your PC.
Setting a Phone connection modem to access Thuraya’s GmPRS network
1. Select “Control Panel Æ Phone and Modem Option Æ Modems” and then set a port by
adding the “Standard 57600bps Modem” according to the following procedures.
2. Right-click the mouse on the “Standard 57600bps Modem” which is newly created in the
modems window. Right-click the mouse to select “Properties” and then select “57600” for
“Maximum Port Speed”. (Enter “at+cgdcont=1,”IP”,”GET”,,0,0” for AT command)
Intermatica S.p.A.
Service Provider ThurayaMarine per l’Italia - www.intermatica.it
23
3. Select “Control Panel Æ Network Connections Æ Create a new connection” to
automatically execute the “New Connection Wizard” follow the procedures below to
create a phone connection. (Make sure to enter “*99#” for Phone Number to Dial”.)
4. Once all the settings are complete, a new icon for phone connection will be generated on
the main screen.
5. Double-click the newly generated phone connection icon to execute phone connection.
Select “Properties Æ General Æ Configure” and then set “57600” for “Maximum Modem
Speed”.
6. Select “Internet Protocol Properties” again and then select “Obtain an IP address
Intermatica S.p.A.
Service Provider ThurayaMarine per l’Italia - www.intermatica.it
24
automatically”. Select “Use the following DNS server address” and then enter
“85.115.64.64” for DNS Server Address.
Procedures to access Thuraya’s GmPRS network
1. Click the phone connection icon on the main screen or from the program.
2. See if the dial number is “*99#” and then click “Dial”.
3. Then, the “Phone Connection Network” icon will be created on Windows’ task bar and
you can see “GMPRS” on the LCD which indicates the Main Unit.
GMPRS
THURAYA
UAE
12:00:00A
15.08.07
GMPRS
CONNECTING . . .
12:00:00A
15.08.07
THURAYA
UAE
12:00:00A
15.08.07
Procedures to disconnect from Thuraya’s GmPRS network
1. Click the “Phone Connection Network” on Windows’ task bar and then select “End”.
Intermatica S.p.A.
Service Provider ThurayaMarine per l’Italia - www.intermatica.it
25
3.7. Emergency Call
In case of an emergency, the SSAS emits a ship to shore security alert that indicates the identity
of the corresponding vessel, the vessel’s location, and the nature of the emergency. The service
administration relays the alert to the competent authorities.
According to the second section of the MSC/Circ.1072 “SSAS Equipment Guide”, it is not
required to follow any internationally standard vessel security alert procedures or for all vessels to
be equipped with a universal type of SSAS. In other words, the SSAS can be composed of a
variety of systems.
The Main Unit composes an SSAS using the Thuraya network. Pressing the “Thuraya Region
Distress” button on the Main Unit executes an emergency call.
SSAS Message
ThurayaMarine01,EMERGENCY,2514.2024,N,05517.3612,E,20,160007.273
Vessel name
ThurayaMarine01,
Message type
EMERGENCY,
GPS position information, ddmm.mmmm, dddmm.mmmm
2514.2924,N,055173612,E,
Vessel speed, knots
20,
UTC, hhmmss.sss
160007.273
Notes
1. You can make emergency calls within the area covered by the Thuraya network.
2. The user must enter more than one center number and/or center e-mail address.
(Up to three can be entered.)
3. The emergency call frequency is once every one minutes. An SMS in not
transmitted if there is no center number and/or center e-mail address stored, or
reception of GPS information is not possible.
3.7.1. How to make a Distress call
1. Open the cover of “Thuraya Region Distress” button.
2. Press “Thuraya Region Distress” button for 5 seconds.
Intermatica S.p.A.
Service Provider ThurayaMarine per l’Italia - www.intermatica.it
26
3.7.2. How to stop a Distress call
1. Open the cover of “Thuraya Region Distress” button.
2. Press “Thuraya Region Distress” button for 5 seconds.
3.8. GPS Manager
A GPS receiver is embedded in the Main Unit. Using the location information from the GPS and
SMS, the Main Unit offers various functions.
3.8.1. Current Position
The current position information consists of latitude, longitude, UTC (Universally Coordinated
Time – formally known as GMT), and speed indications.
3.8.2. Waypoint
Display the waypoint list. The corresponding menu on the handset can be used to save waypoint
and modify saved waypoint names. A maximum of nine waypoints can be saved in the Main Unit.
Detailed information about a waypoint can be viewed by selecting the number of the
corresponding waypoint from the waypoint list.
3.8.3. Location Tracking
Display the direction/speed/distance of a selected location from the current vessel location and/or
waypoint.
3.8.4. Setting Info
Display the information regarding the Position Tracking.
Text Mode
E-mail Mode
Ship ID
Display the IMEI number of the ThurayaMarine. The Ship ID can be edited using the Handset.
Intermatica S.p.A.
Service Provider ThurayaMarine per l’Italia - www.intermatica.it
27
SMS Format
This option is used to select the SMS format to be used when transmitting GPS location
information via the Position Tracking function. The two available SMS formats are Text mode and
E-mail mode. Text mode is the default, and the mode in effect is displayed next to the menu.
Tracking Duration
This option is used to select the transmission interval for the Position Tracking function. The
cycles supported are 5/15/30/60 minutes.
Center Number or Center Address
Display the telephone number and/or e-mail address of the call center that receives the GPS
location information when the Position Tracking function is used.
The telephone number and/or e-mail address of the call center can be modified using the
Handset.
3.9. Call Log
Facilitate the searching of the log of calls made via the Main Unit. Up to 40 calls can be saved in
the Call Log regardless of a call type.
3.9.1. All
All calls made are displayed regardless of call type (Voice/Fax/Data).
View
Display the telephone number and duration of the call selected from the Call Log list.
Delete
Delete the call log.
3.9.2. Voice Call
Display the full log of voice calls.
View
Display the telephone number and duration of the call selected from the Call Log list.
Delete
This option deletes the voice call log.
3.9.3. Fax Call
Display the full log of fax calls.
View
Display the fax call number and duration of the call selected from the Call Log list.
Delete
Delete the fax call log.
3.9.4. Data Call
Display the full log of data calls.
View
Display the data call number and duration of the call selected from the Call Log list.
Delete
Delete the data call log.
Intermatica S.p.A.
Service Provider ThurayaMarine per l’Italia - www.intermatica.it
28
3.10. SSAS Call Center
Display the Call Center numbers or e-mail address.
THURAYA
UAE
12:00:00A
15.08.07
GPS MANAGER
CALL LOG
SSAS CALL CENTER
SETTING
12:00:00A
15.08.07
008821622770001
008821622770002
008821622770003
[email protected]
[email protected]
[email protected]
12:00:00A
15.08.07
Select a number and/or e-mail address to view corresponding information in more detail.
3.11. Setting
Perform Register, Clear, Paging Test for the handset, Factory Setting for the main unit.
3.11.1. HS Registration
Perform Register, Clear, Paging Test for the handset with the main unit.
New HS Register
Register the handset with the main unit.
Paging Test
Perform Paging Test for the handset registered with the main unit.
Register Clear
Clear the registration of all the handsets registered with the main unit.
3.11.2. Factory Setting
Return settings on the Main Unit to their factory defaults.
When running Factory Settings, the following items are deleted.
• Handset registration information (re-register to use)
• Call log information
• GPS waypoint list
• GPS position tracking settings information (Ship ID, center number, center e-mail address,
etc.)
• SSAS call center list
• SMS outbox, sent messages, drafts list
Intermatica S.p.A.
Service Provider ThurayaMarine per l’Italia - www.intermatica.it
29
4. Functions of Handset
4.1. How to power on/off
The main unit of the ThurayaMarine must be turned on first before turning on the power of the
Handset.
Handset power on
1. Press and hold the power button for a few seconds.
Handset power off
1. Press and hold the power button for a few seconds.
Notes
1. Once you turned off the power, wait at least 5 seconds before turning on the power
again.
2. The user must set the time and date in a separate menu.
4.2. Voice calls using Handset
To make a call, you must be connected to a network with an adequate SAT signal.
How to make a call
Telephone numbers can be dialed using traditional method.
1. Enter phone number using keypad.
2. You can use [Redial] button to select the desired number from a list of recently called
telephone numbers.
3. Press “Send”.
The [Redial] list stores up to ten of the most recently called telephone numbers.
How to end a call
1. Press “End”.
Accept a call
When there is an incoming call, it is indicated as follows;
• Ring tone (according to melody and volume of current setting) can be heard.
• If caller’s number is set to be displayed, the number will be displayed on the screen. If
the number is stored in the contacts, the corresponding name of contact is displayed.
1. Press “Send”.
Reject a call
1. Press “End”.
Intermatica S.p.A.
Service Provider ThurayaMarine per l’Italia - www.intermatica.it
30
4.3. Options during call using the Handset
Muting/unmuting the microphone
You can switch off the microphone so that the caller is not able to hear what is being said at your
end of the line.
The function selection status can be verified by using the Mute On/Mute Off message.
1. Press “Mute” or Press “Unmute”.
Selecting/release the Speakerphone
You can change the audio path from Receiver to internal speaker.
The user can use the Speakerphone image to verify the selection status of the function.
1. Press “SPK”
Volume Up/Down
The user may use the Up/Down keys during a call to adjust the audio volume. Volume can be
adjusted over four levels.
1. Press “Up (or Down)” key
4.4. SMS
Using the messaging menu of the Handset, you can send and receive the message. Pressing the
SMS shortcut button on the handset enters the SMS-related menu.
Solid
Not display
Blink
There are unread message in your Inbox.
There is no message in your Inbox.
Display the full status of the mailbox.
4.4.1. Inbox
Arrival of Text message can be viewed in the Inbox. Inbox can store up to 30 messages. The
number of messages to be stored may differ depending on the type of the SIM card. Inbox
displays the message list from latest ones first. To make the searching of messages easier the
first part of message is displayed. New Text messages are shown in the indicator line by Mail box
icon.
Contents of Message can be viewed by pressing selected list.
Intermatica S.p.A.
Service Provider ThurayaMarine per l’Italia - www.intermatica.it
31
•
•
An (U) in front of a message in the message list indicates a new message and/or unread
message.
An (R) in front of a message in the message list indicates a read message.
Functions supported in Inbox are as below.
Read
Read the selected message.
Delete
Delete the selected message.
4.4.2. Outbox
When selecting Send in New Message menu, the entered messages will be automatically stored
in Outbox and sent. When all the messages are sent successfully, the messages in Outbox will
be shifted to Sent Message. If the transmission was not successful, the sent messages will be
shifted to Sent Message while the failed messages remain in Outbox.
Functions supported in Inbox are as below.
Read
Read the selected message.
Send
Send contents of message.
Delete
Delete the selected message.
4.4.3. Sent Message
Among messages in the Outbox/Draft folder, successfully transmitted messages are
automatically saved.
Functions supported in Inbox are as below.
Read
Read the selected message.
Delete
Delete the selected message.
4.4.4. Draft
The text message saved while composing is saved in Draft folder.
Functions supported in Inbox are as below.
Read
Read the selected message.
Send
Send contents of message. The telephone number of the party to be called can be entered
Intermatica S.p.A.
Service Provider ThurayaMarine per l’Italia - www.intermatica.it
32
directly or selected from the phonebook. In E-mail mode, the e-mail address of the party to be
contacted must be entered directly.
Delete
Delete the selected message.
4.4.5. Write Message
Edit the message contents.
Functions supported in Inbox are as below.
Send
Send contents of message. The telephone number of the party to be called can be entered
directly or selected from the phonebook. In E-mail mode, the e-mail address of the party to be
contacted must be entered directly.
Edit
Edit contents of message.
Save
Save the draft message in the draft folder.
Format
Configure the message format either Text or E-mail.
Text: Format for transmitting message in text.
E-mail: Format for transmitting message in E-mail.
4.5. Emergency Call
With the ThurayaMarine, SSAS calls can be executed not only with the Main Unit, but also with
the Handset.
More than one center number as well as center e-mail address must be entered in order to
transmit emergency calls normally. The ThurayaMarine allows for the input of up to three center
numbers and three center e-mail addresses.
4.5.1. How to make a Distress call
1. Press “Thuraya Region Distress” button for 5 seconds.
12:00
AM
20/ 7
12:00
THURAYA
UAE
HANDSET #1
Menu
Redial
[Distress]
SMS
AM
20/ 7
THURAYA
EMERGENCY
HANDSET #1
Menu
Intermatica S.p.A.
Service Provider ThurayaMarine per l’Italia - www.intermatica.it
Redial
SMS
33
4.5.2. How to stop a Distress call
1. Press “Thuraya Region Distress” button for 5 seconds.
4.6. Phonebook
The ThurayaMarine allows the storing of a phonebook on a SIM card and/or the embedded
memory of the Handset. The quantity of telephone numbers that can be saved in a SIM card
varies with the SIM card type, with the maximum being 200. Up to 70 telephone numbers can be
stored in the Handset memory.
Add New Name
This option is used to enter a new telephone number in the selected telephone number storage
space.
12:00
AM
20/ 7
12:00
AM
20/ 7
>(Add New Name)
- - - - - Private - - - - 1 Ann
Name: 21
>
OK
OK
SIM
CAP
12:00
AM
20/ 7
Name: 21
>Henry
[Up/Down]
Del
Back
OK
12:00
Del
AM
Back
20/ 7
12:00
Number: 21
>
OK
Del
AM
20/ 7
12:00
Number: 21
>008821622770002
Back
Save
Del
AM
20/ 7
Saved
Back
SIM or Private
This option is used to select the telephone number storage space. The ‘SIM’ is used to select a
SIM card, and ‘Private’ is used to select the Handset.
Capacity
Display the phonebook storage capacity on Handset or the SIM card.
View
Display information about the selected telephone number.
Edit
This option is used to edit the information of the selected telephone number.
Intermatica S.p.A.
Service Provider ThurayaMarine per l’Italia - www.intermatica.it
34
Delete
This option is used to delete the selected telephone number.
4.7. CID
Display information regarding missed calls. The Up/Down buttons can be used to review the
information.
The ten most recent calls are automatically stored in the [CID] list.
1. Search through the missed calls using the “Up/Down” buttons.
2. In the search screen, press the “Send” button.
Delete
Delete the telephone number selected from the CID list.
Save
This option saves the telephone number selected from the CID list to the phonebook.
4.8. GPS
Verify the current location via the GPS receiver embedded in the Main Unit.
4.8.1. Current Position
Display the current location. The location information can be saved as a waypoint.
Save
Saves the current position information as a waypoint
Intermatica S.p.A.
Service Provider ThurayaMarine per l’Italia - www.intermatica.it
35
SMS
Transmits the current position information via SMS
4.8.2. Waypoint
Search and manage the saved waypoint list.
Edit
This option is used to edit a waypoint name.
Delete
This option is used to delete a select waypoint from the waypoint list.
SMS
Transmits the waypoint information via SMS
4.8.3. Position Tracking
On/Off the periodic transmission of the current location in SMS format via the Main Unit according
to the specified cycle.
Note:
1. A center number and/or center e-mail address must be stored in order to operate
the position tracking function normally.
2. To modify position tracking settings, make sure the program is closed and the
setting to be modified is entered.
Position Tracking Message
ThurayaMarine01,P/T,2514.2024,N,05517.3612,E,20,160007.273
Vessel name
ThurayaMarine01,
Message type
P/T,
GPS position information, ddmm.mmmm, dddmm.mmmm
2514.2924,N,055173612,E,
Vessel speed, knots
20,
Intermatica S.p.A.
Service Provider ThurayaMarine per l’Italia - www.intermatica.it
36
160007.273
UTC, hhmmss.sss
4.8.4. Continue Position
Continuously display location information.
4.8.5. Setting
When Position Tracking is activated, this function is used to set various settings regarding the
transmission of location information.
12:00
AM
20/ 7
12:00
P. Tracking
Cont. Position
>Setting
OK
AM
20/ 7
12:00
Enter
Security Code
0000
Back
OK
Del
12:00
AM
Back
20/ 7
20/ 7
OK
12:00
Security Code
Not currect
AM
12:00
>Duration
Send Format
Ship ID
Back
AM
20/ 7
OK
12:00
20/ 7
12:00
20/ 7
12:00
20/ 7
AM
Back
20/ 7
20/ 7
Del
AM
Back
20/ 7
Del
Save
12:00
Ship ID
Center Number
>Center Email
OK
OK
Center Number
008821622770001
Back
AM
20/ 7
Back
Save
12:00
Send Format
Ship ID
>Center Number
OK
AM
AM
Enter Ship ID
Thuraya001
Back
AM
Back
OK
12:00
Duration
Send Format
>Ship ID
OK
12:00
>30 MIN
45 MIN
60 MIN
>SMS
Email
Back
AM
20/ 7
OK
12:00
Duration
>Send Format
Ship ID
Back
AM
>05 MIN
15 MIN
30 MIN
AM
Back
20/ 7
Center Email
[email protected]
Back
Save
Del
Back
Duration
This option is used to select the location information transmission cycle. (5/15/30/45/60minuite)
Send Format
This option is used to select the Position Tracking SMS format.
Ship ID
This option is used to search and/or edit the vessel ID information for Position Tracking.
Center Number
This option is used to enter the telephone number of the Call Center to receive Position Tracking
SMS transmissions.
Center E-mail
This option is used to enter the e-mail address of the Call Center to receive Position Tracking
SMS transmissions.
Intermatica S.p.A.
Service Provider ThurayaMarine per l’Italia - www.intermatica.it
37
4.9. Call Divert
Divert calls that cannot be received by the ThurayaMarine to another number registered
previously.
4.9.1. Voice Call
Set the Divert function settings regarding ‘All Voice’ calls.
4.9.2. Fax Call
Set the Divert function settings regarding ‘All Fax’ calls.
4.9.3. Data Call
Set the Divert function settings regarding ‘All Data’ calls.
4.9.4. Clear Divert
Clear all Divert function settings.
12:00
AM
20/ 7
12:00
Fax Call
Data Call
>Clear Divert
OK
AM
20/ 7
Please Wait
12:00
AM
20/ 7
All Divert
Cleared
Back
Exit
4.10. Security
Set security-related settings of the ThurayaMarine.
Note: Thuraya is not liable for any issues arising from the loss of security-related codes
(PIN code, PUK code, barring code, security code).
4.10.1. Call Barring
Sets the Call Barring function defined by call type.
Outgoing
This option sets the Call Barring function according to outgoing calls.
The setting options are as follows.
• All calls
• International calls except Home
Intermatica S.p.A.
Service Provider ThurayaMarine per l’Italia - www.intermatica.it
38
Incoming
This option sets the Call Barring function according to incoming calls.
The setting options are as follows.
z All calls
Clear Barring
This option is used to clear all Call Barring settings. The Barring Code must be entered to
facilitate clearing.
4.10.2. PIN Code
Activate/deactivate the SIM Lock function when booting the ThurayaMarine.
12:00
AM
20/ 7
12:00
Call Barring
>Pin Code
Change Codes
OK
AM
20/ 7
12:00
>Off
On
AM
20/ 7
Enter
Pin Code
1234
Back
Save
12:00
Back
AM
20/ 7
OK
12:00
Off
>Off
Del
AM
Back
20/ 7
Enter
Pin Code
1234
Save
Back
OK
Del
Back
The PIN (Personal Identification Number; 4 digits) is initially supplied together with the SIM card
by your service provider and can be changed later.
1. Enter PIN using keys on keypad.
2. Press OK to confirm PIN.
Note: If more than 3 errors are made when entering PIN code, PUK code must be entered.
Intermatica S.p.A.
Service Provider ThurayaMarine per l’Italia - www.intermatica.it
39
4.10.3. Change Codes
Modify previously set PIN codes/Security codes/Barring code. To modify a code, the previous
code must first be entered.
4.10.4. IMEI Number
Searches for the IMEI Number of the ThurayaMarine
4.11. Setting
Modify the Handset settings.
4.11.1. Sound
Set the Handset sound.
Ring Sound
Modify the ring tone of incoming calls. There are ten ring tones available for selection.
Ring Volume
Adjust the volume level of the ring tone. The volume levels are as follows.
• Off
• Low
Intermatica S.p.A.
Service Provider ThurayaMarine per l’Italia - www.intermatica.it
40
•
•
Middle
High
Keypad Tone
Activate/deactivate the keypad tone of the Handset.
4.11.2. Phone
Turn the information and Room Monitor function of the Handset on/off. After setting, the [Save]
button must be pressed in order for any changes to take effect.
Own Number
Enter one’s own Voice/Fax/Data call telephone numbers.
Room Monitor
Turn the Room Monitor function on/off.
4.11.3. Handset Clock
Set the time and date on the Handset.
Set Time
Set the time on the Handset.
Time Format
Set the time format (12-hour or 24-hour) on the Handset.
Set Date
Set the date on the Handset. The date format is DD/MM.
Intermatica S.p.A.
Service Provider ThurayaMarine per l’Italia - www.intermatica.it
41
4.11.4. Reset Handset
Reset the user settings on the Handset.
Phonebook Reset
Delete all phonebook information stored in the Handset.
Factory Setting
Reset all Handset user settings to factory defaults.
When running Factory Settings, the following items are deleted.
1. Handset registration information (re-register to use)
2. Time and date settings
4.12. Key Lock
Lock the Handset Keypad in order to prevent errors.
12:00
AM
20/ 7
12:00
THURAYA
UAE
HANDSET #1
Menu
Redial
12:00
AM
[MENU]
SMS
20/ 7
OK
20/ 7
THURAYA
UAE
HANDSET #1
AM
12:00
[UNLOCK]
UNLOCK
12:00
SSAS Manager
Room Monitor
>Key Lock
AM
20/ 7
12:00
AM
20/ 7
Keypad locked
THURAYA
UAE
HANDSET #1
UNLOCK
UNLOCK
Back
AM
20/ 7
12:00
Now
Press *
AM
20/ 7
THURAYA
UAE
HANDSET #1
Menu
Redial
SMS
Selecting [Key Lock] in the menu activates the setting, and pressing the [UNLOCK] button
deactivates it.
4.13. HS Registration
You can register a handset although it is already registered or cleared. To register the handset
again, perform Register in the [Menu] to register the cleared handset, perform Register in the
[Menu] or press the [INT] button.
A security code must be entered when registering a handset.
Intermatica S.p.A.
Service Provider ThurayaMarine per l’Italia - www.intermatica.it
42
4.14. Other Status Display
Low Battery
This message is displayed when the Handset battery becomes low in power.
Line in Use
When the Main Unit is busy via another external interface, this message appears indicating that
the handset of the Main Unit is in use.
Intermatica S.p.A.
Service Provider ThurayaMarine per l’Italia - www.intermatica.it
43
5. Additional Functions using Multi-Hands
Up to four Handsets can be registered to one Main Unit. The ThurayaMarine supports a variety of
functions using two or more registered Handsets.
5.1. Additional Handset Registration
The Main Unit supports connection of up to a maximum of four Handsets. If additional Handsets
have been purchased, registration with the Main Unit must first be performed.
Registration of a Handset should be done as follows.
1. Select “HS Registration“ from the Main Unit Settings menu.
2. When the registration message appears on the Handset, press the “OK” button on the
Handset and follow the registration prompts.
3. The following message appears if registration of the additional Handset is completed
without issue.
Note: If registration of an additional Handset fails, retry steps 1~3.
5.2. Intercom
Connect voice calls between the Main Unit and a registered handset.
1. Press the “INT” button on the Handset.
2. In the Handset list displayed, select the Handset for connection.
3. When the selected Handset rings, press the “Send” button.
5.3. Conference Call
Support the simultaneous use of two handsets during voice calls.
1. During a voice call, press the “Conf” button on a Handset.
2. In the Handset list displayed, select the Handset for connection.
3. When the selected Handset rings, press the “Send” button.
Intermatica S.p.A.
Service Provider ThurayaMarine per l’Italia - www.intermatica.it
44
5.4. Transfer
Change Handsets during a voice call.
1. Press the “X-fer” button on the Handset being used for a voice call.
2. In the Handset list displayed, select the Handset for transfer.
3. When the selected Handset rings, press the “Send” button.
4. When the call is connected to the selected Handset, the connection to the previous
Handset is ended.
5.5. Room Monitor
The Room Monitor function allows for the hearing of ambient sound in an area in which a
Handset is installed via a Handset in a remote location. This function is available only to Handsets
that have the Room Monitor function set to ‘On’.
1. Select the Handset for Room monitoring.
Intermatica S.p.A.
Service Provider ThurayaMarine per l’Italia - www.intermatica.it
45
6. PC Application Software
6.1. About Main Unit Manager Software
Main Unit Manager is the software application on the PC to use the Main Unit. The software
operating on Microsoft Windows Series OS enables services including SMS, GPS, and
Phonebook. The Main Unit and user’s PC is connected with USB port and DTE port.
MU Manager’s functional facilities are described below.
NO Division
Function
Description
Signal Tracking
Display GPS signal status with bar graph
Transferring the information of current location to
Position Tracking
center
GPS
1
Location
Tracking
Display the Direction / Distance / Speed from
Manager
(Waypoint Tracking)
current location to destination
Show the user’s current position.
Way Point
Save or delete the way points..
Send SMS (multi destination number supported)
New SMS
Search SMS in the inbox
SMS
2
Retrieve the received SMS from Main Unit show
Manager
SMS List
message list on PC.
Manage sent/received messages
Phonebook List
Add, edit, delete, and search Phonebook.
Phone
Group Info
Manage telephone number groups
3
Book
Copy/Move the phonebook in the SIM and
Phonebook Copy
phonebook in a PC
Enter an SSAS call center
SSAS
4
SSAS Setting
Transmit an SSAS message and review created
Manager
messages
User information
User’s information data base.
Set up serial COM port for the connection between
Serial option
PC and Main Unit.
Port setting
Select the serial COM port
5
Tool
Position Report
Setting the option related to Position report
Location Tracking
Setting the option related to Location tracking
SMS
Setting SMS service parameter
6
Connect
Connect to the MU via the communications port
7
About
Display the information of program
This product operates normally in the following environments.
OS
• Microsoft Windows 2000 Service Pack 4
• Microsoft Windows XP Service Pack 2
• Microsoft Windows 2003
• Microsoft Windows Vista
H/W
• Pentium lIl or higher (or Pentium-compatible) CPU
• Minimum system memory of 128MB
Intermatica S.p.A.
Service Provider ThurayaMarine per l’Italia - www.intermatica.it
46
6.2. Installation
6.2.1. USB Driver Installation
A USB port or DTE port is used to connect the Main Unit with a PC. To use a USB port, the USB
driver must first be installed.
1. Insert the Utility CD in the PC.
2. After the Install Wizard runs automatically, select USB Driver.
3. The following message appears upon successful USB driver installation.
6.2.2. Program Installation
To use the Main Unit Manager, the program must be installed on the PC. Installation procedures
are as follows.
1. Insert the Utility CD in the PC.
2. After the Install Wizard runs automatically, select Install. (refer to the above image)
3. The program installation begins, and the installation process is executed in sequence.
6.2.3. Program Uninstallation
The uninstallation procedures for the Main Unit Manager are as follows.
1. Start Æ Main Unit Manager Æ select Uninstall
Or, the following can be done to remove the Main Unit Manager.
1. Control Panel Æ Add/Remove Programs Æ select Main Unit Manager
Intermatica S.p.A.
Service Provider ThurayaMarine per l’Italia - www.intermatica.it
47
6.3. Registration
To use the Main Unit Manager program, the user registration must first be completed.
ID
Password
Name
Voice Number
Vessel Name
Constraints
alphabet/digit/length(16)
alphabet/digit/length(12)
alphabet/space/length(30)
digit only, “+” input possible
alphabet/digit/space/length(60)
6.4. Login
The user must use his/her registered ID and password to log into the program. Checking the
“Remember Me” box saves the ID and password so that the user does not have to enter them
again.
6.5. Menu Bar Functions
There are three functions included in the menu bar of the Main Unit Manager software.
6.5.1. Tool
The tool offers setting functions (user information & Serial Setting, GPS Setting, SMS Setting).
The following image shows the function.
User Information
You can input your basic information in the User Information tab. When the user inputs the
registered ID and Name, the Voice Number and Vessel Name show up below.
Intermatica S.p.A.
Service Provider ThurayaMarine per l’Italia - www.intermatica.it
48
Serial Option
In Serial Option tab, you can select the serial port number for connection between Main Unit
Manager and the Main Unit.
Position Report
In Position Report tab, you can set the options used on GPS Manager Menu.
Options
Duration
Send Format
Center ID
Center E-mail
Description
Set the repeating cycle of Position Report
Set the SMS format (TEXT or E-MAIL)
Set the destination number of SMS receiving center
Set the address of SMS receiving Email
Location Tracking
In Location Tracking tab, you can set the options used on GPS Manager Menu.
Options
Duration
Save Duration
Unit
Direction
Description
Set the repeating cycle of Location Tracking
Set the repeating cycle of Save Location Tracking at Database
Set the unit of Speed (Km/h or Knots)
Set the direction (Degree or Time)
SMS
In SMS tab, you can set the options applied on SMS Manager Menu.
Intermatica S.p.A.
Service Provider ThurayaMarine per l’Italia - www.intermatica.it
49
Options
Save Sent Message
Delivery Report
Send Format
Description
Select whether to save the Sent message on transmitting SMS
Select whether to confirm the Delivery Report through SMS on
transmitting SMS
SMS format (TEXT or E-MAIL)
6.5.2. Connect
Select Connection (or Disconnection) between the Main Unit and PC.
If the Main Unit and PC program are connected successful, the icon turns on blue color which
means it is activated, otherwise it remains gray (or can be black).
Connection Status
Disconnection Status
6.5.3. About
This shows the version information of MU Manager Program.
6.6. GPS Manager
6.6.1. Position Report
The Position Report transfers the current information of GPS location in an interval set on the
Monitoring Center. The status of GPS signals is displayed on the screen with a graph.
Intermatica S.p.A.
Service Provider ThurayaMarine per l’Italia - www.intermatica.it
50
Part
Function
Buttons
Function Description
Transmit the information of current location by SMS.
Save and display the progressive content of the Position
Report.
Position
Duration
Set the renewal time of GPS location information.
Report
Status
Display the function selection status of the Position Report.
Setting
Send Format
Select the SMS format.
Message Type
Transmitting Message Type (Alert, PT, Test)
Center ID
Phone number of SMS receiving center
Center E-Mail
E-mail address of SMS receiving center
Vessel Name
Vessel Name
Start Time
Position report start time
Note: You can use various options related to the Position Report in the Tools option in the
Position Report menu. The Center ID and Center E-Mail spaces are empty by default and
must be filled in prior to use.
Start
History
Intermatica S.p.A.
Service Provider ThurayaMarine per l’Italia - www.intermatica.it
51
6.6.2. Location Tracking
Location Tracking is displayed on Direction, Distance and Speed from current location to
destination.
Select Way Point
Speed
Direction
Angle
Distance
Current Latitude
Current Longitude
Current Altitude
Current Duration
Description
Select the destination.
Display the current speed (unit: knots or Km/h).
Display the current direction of the vessel by hour based on the
destination.
Display the current direction of vessel by angle based on the destination.
Remaining distance to destination.
Display the current latitude.
Display the current longitude.
Display the current altitude.
Display the current GPS assessment cycle.
6.6.3. Waypoint
Save the information of the current location on the database in the PC. The selected waypoint on
Location Tracking is saved here.
Intermatica S.p.A.
Service Provider ThurayaMarine per l’Italia - www.intermatica.it
52
Acquire GPS
Clear
Send As SMS
Save
Search
Retrieve Data
Delete
Description
Acquire the current position.
Delete data.
Send the acquired current position by SMS.
Save the current position on PC.
Search the information of registered GPS information by name.
Retrieve GPS position data from PC.
Delete the selected Way Point from list.
6.7. SMS Manager
6.7.1. New SMS
Send Message
With New SMS, you can write and transfer SMS messages. Check the limitation of bytes for input
from Byte number in the Edit message window.
Intermatica S.p.A.
Service Provider ThurayaMarine per l’Italia - www.intermatica.it
53
Part
HHT Number
E-Mail Addr
Receive
Phonebook
Last Dialed Call
Group List
Number List
Delete All
SIM Capacity Remain
SEND
Edit Window
CLEAR
Function Description
Enter the destination number.
Enter
the
destination
e-mail
address.
(Switch between HHT Number and E-mail Address
based on the set SMS Format.)
Display the phone number data saved in PC or SIM
card. Selected phone number or e-mail address is
included to the outgoing list
Save five phone numbers of previous SMS calls.
Select a group to send SMS messages.
Send a message to multiple destination numbers.
Delete the destination number from the number list.
Display SMS storage capacity of the SIM card.
Send a message.
Clear everything displayed on the message window and
number window.
Received Message List
You can search messages conveniently and delete the message manually from this window.
You can also check the received messages on the list. To read a message, select the message
you want on the list and then double-click it.
Intermatica S.p.A.
Service Provider ThurayaMarine per l’Italia - www.intermatica.it
54
Part
Save Number
Copy to PC
Forward
Reply
Delete
Function Description
Save the sender’s phone number.
Save the received message in PC.
Forward the received message to another destination.
Send a reply to the sender.
Delete the selected message.
6.7.2. SMS List
The SMS List saves the messages sent or received on PC.
Intermatica S.p.A.
Service Provider ThurayaMarine per l’Italia - www.intermatica.it
55
6.8. Phonebook Manager
6.8.1. Phonebook List
With Phonebook, you can easily input, modify, delete or search addresses in PC directly. The
Phonebook List also displays the phone numbers in the SIM card.
Part
SIM Phonebook
Capacity
Save
Delete
Modify
Clear
Search
Function Description
Display the maximum phonebook capacity and the quantity of phone
numbers provided by the SIM card.
Display the information on the Phonebook information when selecting a
name from the list.
Save the information entered during registration to the phonebook.
Delete the selected information.
Modify the selected information.
Initialize the contents.
Search based on the input condition (Name, Phone number, E-Mail).
Intermatica S.p.A.
Service Provider ThurayaMarine per l’Italia - www.intermatica.it
56
6.8.2. Group Info
Manage the group information of the phonebook.
Part
Add
Modify
Delete
Function Description
Create a new group.
Modify the selected group.
Delete the selected group.
6.8.3. Phonebook Copy
Copy a phonebook from a PC to an SIM card, or vice versa.
Part
Copy to
Copy All
Copy the selected
SIM
Phonebook
Delete
Function Description
Select either the SIM card or PC to save data.
Copy all the data in the list to the set location.
Copy the selected phone number in the list to the set location.
Display the capacity of the used and free space in the SIM card
Delete the contents of the SIM card.
Intermatica S.p.A.
Service Provider ThurayaMarine per l’Italia - www.intermatica.it
57
6.9. SSAS Manager
Set up the Center ID and Send Format for sending SMS and test the message in case of
emergency.
Part
Save
View Message
Test SSAS
Function Description
Save the entered Center ID and SMS Format.
Check the test message.
Send a test message.
Intermatica S.p.A.
Service Provider ThurayaMarine per l’Italia - www.intermatica.it
58
7. Troubleshooting
7.1. Warnings
Servicing
ThurayaMarine does not contain consumer serviceable components. You are advised not to carry
out any kind of troubleshooting. In case you face any problems, contact the nearest service
center. Only authorized service personnel can repair the equipment.
Antenna
Use only ThurayaMarine antenna and cable that have been specifically designed for your
ThurayaMarine.
Unauthorized antennas, cables and cable length modifications, or attachments could damage
ThurayaMarine and may violate the relevant regulations, causing loss of performance and radio
frequency (RF) energy above the recommended limits. If your ThurayaMarine antenna gets
damaged, please take it to an authorized Service Provider.
General
• Do not place ThurayaMarine in a wet area.
• Do not expose ThurayaMarine to temperatures greater than +55°C Celsius or less than -5°C
Celsius.
• Do not expose ThurayaMarine to moisture, dust etc.
• Avoid placing ThurayaMarine close to open flames or any source of heat.
• Do not expose ThurayaMarine to direct sunlight.
• Do not disassemble ThurayaMarine; this will void your warranty.
7.2. Care and Maintenance
ThurayaMarine is a product of superior design and craftsmanship and should be treated with care.
The following suggestions will help you to fulfill any warranty obligations and allow you to enjoy
this product for many years.
• Do not store it in hot areas. High temperatures can shorten the life of electronic devices,
damage batteries, and warp or melt certain plastics.
• Do not attempt to open it. Mishandling of the device may damage it.
• Do not drop, apply pressure or shake it. Rough handling can break internal circuit boards.
• Do not use chemicals, cleaning solvents, or strong detergents to clean it. Wipe it smoothly
with a soft cloth.
• Do not paint it. Paint can clog the device’s moving parts and prevent proper operation.
• Use only the supplied or approved replacement antenna. Unauthorized antennas,
modifications or attachments could damage the ThurayaMarine and may violate regulations
regarding radio devices.
If the ThurayaMarine, handset, battery, charger, or any accessory does not function properly,
take it to your nearest authorized service center. The personnel there will assist you, and if
necessary, arrange for service.
Intermatica S.p.A.
Service Provider ThurayaMarine per l’Italia - www.intermatica.it
59
7.3. Common Problems
•
•
•
There is not enough satellite signal strength (indicated in ThrayaMarine display).
Connections are not proper and firm.
The SIM card may not be installed properly or it may be expired.
Problem
Cannot make a voice call using
external phone
Cannot send/receive fax by fax
machine
Cannot send/receive fax by PC
Cannot make a voice call using
handset
Failed in initialization
Cannot charge battery despite
long charging time
Solution
Check the satellite signal level of the main unit.
Check the PIN code settings using handset.
If the PIN code is set correctly, connect the external phone
to the RJ-11 port and try calling.
If you cannot make a call properly using external phone, try
calling by using handset.
If a call using handset is normal, check the connection
status of the RJ-11 port.
If you cannot check the PIN code setting or make a voice
call using handset, register the handset with the main unit
again.
Check the satellite signal level of the main unit.
Check the PIN code settings using handset.
Check the connection status of the RJ-11 port.
Check if the fax machine is switched on.
Check the fax machine’s “Auto response mode”.
Check if ThurayaMarine’s USB driver is installed in the PC
correctly.
Check if PC Fax software is installed in the PC correctly.
Check if the settings of PC Fax software are valid.
Check the satellite signal level of the main unit and the
handset.
Check if the handset is “Out of range”.
If the handset is within the service range, register the
handset with the main unit.
Confirm that the SIM card is a normal state.
Replace the handset battery.
Intermatica S.p.A.
Service Provider ThurayaMarine per l’Italia - www.intermatica.it
60
8. Warranty
Limited Warranty
ThurayaMarine (Main Unit & Handset)
This Limited Warranty is provided to the original purchaser of ThurayaMarine. This
Limited Warranty is non-transferable in nature.
Warranty Coverage and Service
Thuraya warrants all new ThurayaMarine to be free from defects in material and workmanship
under normal use and wear, for a period of one year (1 year) from the date of purchase.
If under normal use the product becomes defective in materials or workmanship and is returned
to a Thuraya Authorized Service Center during the warranty period, the product will be repaired or
replaced at no charge to the purchaser. The purchaser shall be required to provide reasonable
proof of the date of purchase of the product.
Repair or replacement of the Product is subject to Thuraya System Design’s sole and exclusive
option. Reconditioned replacement components, parts, units, or materials may be used if the
Product is repaired or replaced. Cost incurred in the removal, de-installation or reinstallation of
the Product are not covered.
This Limited Warranty will be void in its entirety if the Product is serviced by anyone other than
Thuraya or a Thuraya Authorized Service Center.
The User’s sole and exclusive solution will be repair or replacement of the product. Thuraya
neither assumes nor authorizes any Authorized Service Center or any other person or entity to
assume any other obligation or liability beyond that which has been specified in this Limited
Warranty.
Limitation of Liability
All liability and obligations of Thuraya under this Limited Warranty shall terminate on the
completion of the warranty period of one year, calculated from the date of purchase of the product
by the original purchaser. The purchaser shall fill in the warranty card attached in the User’s
manual and get it duly stamped and signed by the Dealer as proof of purchase.
This limited warranty sets forth the entire responsibility of Thuraya with respect to the product.
There are no other liabilities of Thuraya arising from the sale of the Product whether based on
warranty, contract, negligence or any other theories of liability.
This Warranty does not cover the following
Thuraya will not be responsible for products or accessories not manufactured or provided by
Thuraya. Thuraya will not take responsibility for the failures caused by misuse, accident,
alteration or neglect, removal or repair, neglect or failure to follow instructions as to installation
and maintenance, fire, flood or other natural calamities.
Thuraya will not guarantee the performance of the Product when used in combination with other
products or equipment.
Intermatica S.p.A.
Service Provider ThurayaMarine per l’Italia - www.intermatica.it
61
9. ThurayaMarine Specifications
9.1. Main Unit Specifications
The main specifications of the Main Unit are as follows.
Item
Specification
Function
External
TEL/FAX
RJ-45, 8P2C, Support External telephone & G3 fax connection.
Interface
IP66
USB
B-type, IP66
Support PC connection.
DTE
D-SUB 9, IP66 Support External device connection.
I/O
4pin I/O, IP66
Support External ERSB connection.
SAT
TNC (F), IP66
Support Satellite antenna connection.
GPS
SMA (F), IP66 Support GPS antenna connection.
DC IN
DC Jack, IP66 DC input port.
SIM
SIM Connector Insert SIM connector.
Display
LCD
128x64 pixel
Display the status of MU.
Power
Red LED
Display the power on/off status.
Keypad
Power
Push button
Main power on/off switch
Distress
Push button
Emergency on/off switch
OK/Menu
Touch button
Select a menu function.
Cancel/Back Touch button
Cancel a menu function.
Up
Touch button
Change a menu item.
Down
Touch button
Change a menu item.
Key lock
SIM card
Key locker
Lock the SIM connector using key.
General
Size
HxWxD
260mm(H) x 220mm(W) x 55mm(D)
Material
Case
Aluminum Die-casting
Operation Temperature
-5°C~+55°C
Input DC Voltage
10~34V DC
Input
100~240Vac, 50/60Hz
AC/DC
adapter
Output
12Vdc, 5A (60W)
Type
Safety
CE
Approval
Intermatica S.p.A.
Service Provider ThurayaMarine per l’Italia - www.intermatica.it
62
9.2. Handset Specifications
The main specifications of the Handset are as follows.
Item
Specification
Function
External
Receiver
Audio receiver
Interface
MIC
Audio mike
Speaker
Audio speaker for speakerphone
Ear jack
Speaker
& Support normal ear jack connection
MIC
DC IN
DC Jack, IP66 DC input port
Display
LCD
16 Char. x 4 Display the status of Handset
Line
Keypad
Power
Tack switch
Main power on/off button
F1/F2/F3
Tact switch
Flexible functional key button
Send
Tact switch
Call start button
End
Tack switch
Call stop & cancel button
Navigation
4 way (Tact)
Up/Down & Short key button
Distress
Tact switch
Emergency on/off switch
Number
Touch button
Number key
INT
Touch button
Intercom function key
SPK
Touch button
Speakerphone function selection key
General
Size
HxWxD
137mm(H) x 53mm(W) x 24mm(D)
Material
Case
ABS
Operation Temperature
-5°C~+55°C
Input Voltage
5V DC
Input
100~240Vac, 50/60Hz
AC/DC
adapter
Output
5Vdc, 1A (5W)
Type
Safety
CE
Approval
Intermatica S.p.A.
Service Provider ThurayaMarine per l’Italia - www.intermatica.it
63
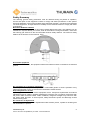

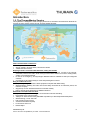
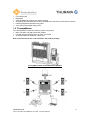
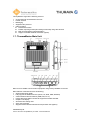
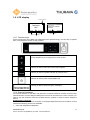
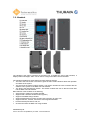
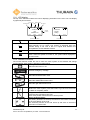
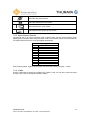
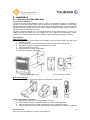
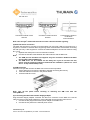
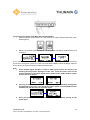
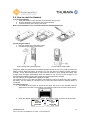
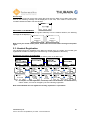
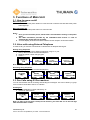
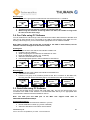
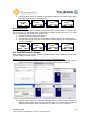
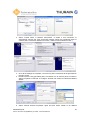
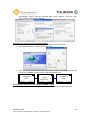
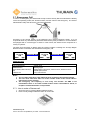
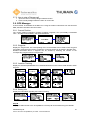
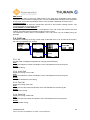
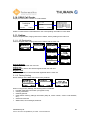
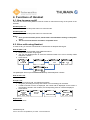
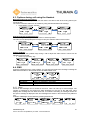
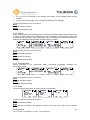
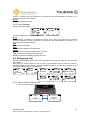
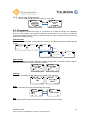
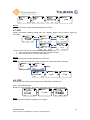
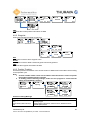
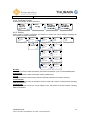
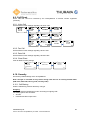
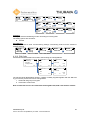
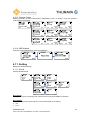

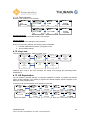
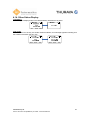
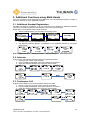
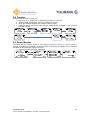
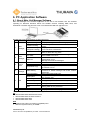
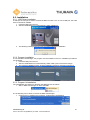
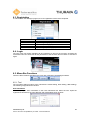
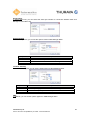

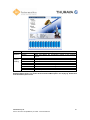
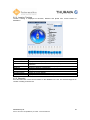
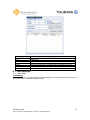
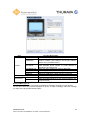
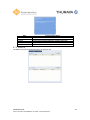
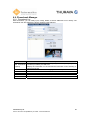
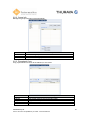
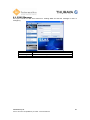
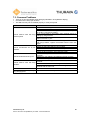
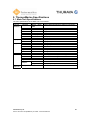
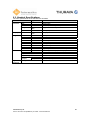


![Corel Office Document [PFP#241512617]](http://vs1.manualzilla.com/store/data/005699212_1-655f6a875c479857ca50d39f97eeaf8f-150x150.png)