1
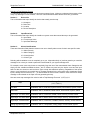
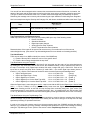
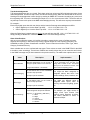
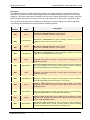
COM3000-SNMP – Quick Start Guide - Traps SimpleComTools, LLC COM3000-SNMP Traps Simple Network Management Protocol (SNMP) is a popular network management tool. Traditionally, SNMP was designed and used to gather statistics for network management and capacity planning. For example, the number of packets sent and received on each network interface could be obtained. But because of its simplicity, SNMP use has expanded into areas of interest to embedded systems. It is now used for many applications such as network and site security, remote alarming, access control, and outage notification. Since the COM3000 is most often used as an alarm appliance, it is somewhat impractical for a Network Manager to poll for information from every object on every interface. It is far more appropriate to use the COM3000 as a Report-By-Exception (RBX) appliance. This allows the embedded agent within the COM3000 to notify the manager without solicitation. It does this by sending a message known as an SNMP TRAP. Trap notifications offer substantial savings of network and agent resources by eliminating the need for repetitive SNMP information poll requests. However, it is never possible to completely eliminate the need for SNMP polling. Such requests are often required for device discovery and network topology changes. They are also required for reading and writing configuration values, such date, time, location, alarm set points, etc. For that reason the COM3000 supports both traps and GET/SET requests. Enabling Traps The COM3000 allows you to ENABLE or DISBALE traps on each interface. This includes traps for Cold Start, Heartbeat, the Analog Input, each of the Digital Inputs and the internal Temperature Sensor. Each interface can be enabled separately from all others so you can choose to only get the alarms you need to receive. Trap Message Format All COM3000 traps are based on a single Trap Message Format. This is a global setting that lays out the structure for ALL trap messages. The Trap Message Format may include any or all of the (11) below listed optional variables. These variables can be presented in any order you wish, but once the order is selected – all traps will follow the same order. While all messages will have a similar message parameter layout, each message can have completely unique message content. Trap messages can be as concise (terse) or detailed (verbose) as you like, and since each individual system event and input alarm has uniquely configurable parameters, each message can contain unique detail pertaining to that specific interface or alarm. Here are the trap message variables that can be included in the Trap Message Format: 0 = No data 1 = Hostname 2 = Date/Time 3 = Location 4 = Device Description 5 = Input Name 6 = Current Input Value 7 = Input State Message 8 = Alarm Severity 9 = Alarm Category 10 = Alarm Number 11 = Alarm Type For example: A Trap Message Format of “1,3,5,7,8,9,11” would result in trap messages with the following (7) parameters: [Hostname, Location, Input Name, Input State Message, Input Severity, Alarm Category, and Alarm Type] SimpleComTools, LLC 1 COM3000-SNMP – Quick Start Guide - Traps SimpleComTools, LLC Selecting a Trap Message Format To understand how best to create your ideal trap message format, it helps to understand the purpose of the many Trap Message Format variables. Their use is best understood when broken down into (3) sections: Section 1: Device Info This is information that helps identify the device that actually sent the trap. 1 = Hostname 2 = Date/Time 3 = Location 4 = Device Description Section 2: Input/Event Info This is information that helps identify the interface or system event that caused the trap to be generated. 5 = Input Name 6 = Current Input Value 7 = Input State Message Section 3: Alarm Classifications These are information fields that the customer can use to classify alarm events for their own specific needs. 8 = Alarm Severity 9 = Alarm Category 10 = Alarm Number 11 = Alarm Type Selecting which variables to use is completely up to you. It depends solely on just how granular you need the message to be or how you intend to parse and use the data for your system management. For example, some users may choose to completely forgo the use of the customizable Alarm Categories and simply use the variables available sections 1 and 2. Others may need only the device name and the input state for data, but choose to add an Alarm Type to help with statistical reporting. Regardless of the values chosen, every trap that is sent would have a message formatted in the exact same way. Heartbeats, Digital Inputs, Analog Set Point Events, etc. – all would follow the same format. However each would have unique message content based on the Input or Event generating the trap. Here are some trap messages from a device with a Trap Message Format of 1,3,5,7,8,9,11. Message Text (1,3,5,7,8,9,11) Trap Cold Start COM3000, Site 22, Cold Start, System Restart, Informational, System, Power Heart Beat COM3000, Site 22, Heartbeat, Health Check, Informational, System, Status Digital Input 1 in Active State COM3000, Site 22, Front Door, OPEN, Critical, Security, Access Control Digital Input 3 in Active State COM3000, Site 22, Motion Alarm, Active, Major, Security, Access Control Digital Input 1 Inactive State COM3000, Site 22, Front Door, CLOSED, Restore, Security, Access Control Analog High Warning Event COM3000, Site 22, Temperature, Rising, Major, Environmental, System SimpleComTools, LLC 2 COM3000-SNMP – Quick Start Guide - Traps SimpleComTools, LLC You can tell from the messages that the customer has customized the names of the device, its location, the names of the inputs and the input states, as well as given the inputs unique severities, categories and types. This type of detail can sometimes result in a in a rather verbose message that your NMS may not prefer. Shortening the message can be done by either shortening the input attributes or eliminating them altogether. Here‟s an example moving the Severity and Category first, with shorter variables and without the Alarm Type: Message Text (9,8,1,3,5,7) Trap Heart Beat SYS, Informational, C1000, 22, HB, OK Digital Input 1 in Active State SEC, Critical, C1000, 22, Door1, OPEN Trap Transmissions and Retransmissions SNMP traps will be sent to the Primary and Secondary NMS upon any of the following events: Device Cold Start Scheduled Heartbeat Digital Input state changes Analog Input Set Point violations Device Temperature Set Point violations Retransmissions of the traps will be sent to both servers every 15 seconds until one of the servers acknowledges the trap. (See section Trap Acknowledgements for more details on formatting the ACK) Trap Identification There are two ways for an NMS to identify the source of the SNMP trap: 1) Examine the trap OID to obtain the source of the specific alarm 2) Examine the message details within the trap itself Trap Identification Using the Trap OID Each alarm point has unique trap OIDs that identify the input state and the status of trap acknowledgement. By sending the trap ACK status OID as the source, the COM3000 makes it easy to determine the source of the trap. For example, all (4) Digital Input variables fall under a single OID group .27404.3.3.2. Each of the inputs has a unique sub-group which contains (3) scalar OIDs – the current digital input status (Active or Inactive; 1 or 0), and the current status of the Active and the Inactive State trap acknowledgements. OID for all Digital Inputs: OID for the Digital Input 1 Group: OID for Digital Input 1 Status: OID for Digital Input 1 Active State Trap ACK: OID for Digital Input 1 Inactive State Trap ACK: .1.3.6.1.4.1.27404.3.3.2 .1.3.6.1.4.1.27404.3.3.2.1 .1.3.6.1.4.1.27404.3.3.2.1.1.0 .1.3.6.1.4.1.27404.3.3.2.1.2.0 .1.3.6.1.4.1.27404.3.3.2.1.3.0 (Group) (Sub-group) (Scalar 1) (Scalar 2) (Scalar 3) When the Digital Input 1 state changes to Active, a trap is sent with the OID for the Digital Input 1 Active State ACK, (: .1.3.6.1.4.1.27404.3.3.2.1.2.0). It is immediately known then that Digital Input 1 has gone into the Active state. Sending an ACK to this OID will stop the traps from continually being sent. (See section Trap Acknowledgements for more details on formatting the ACK). Also - by stepping back one OID number (from 2.0 to 1.0), the NMS can read the current state of the digital input that generated the alarm event if necessary. Trap Identification Using the Trap Message Text Another option for determining the source of the alarm would be to examine the trap message detail. Having a detailed message can provide a great deal more visibility into the source and type of the trap and can help speed the processing of operational decisions. In order to give users the greatest control over the trap message detail, the COM3000 provides the ability to add up to (11) variables to your trap message. Deciding which variables to include in the message is done by setting the Trap Message Format. (Refer to the section entitled Trap Message Format for more info). SimpleComTools, LLC 3 COM3000-SNMP – Quick Start Guide - Traps SimpleComTools, LLC Trap Acknowledgements Trap acknowledgements are very simple. Each alarm point has unique trap OIDs indicating the status of trap acknowledgements. So when a trap is sent, the OID will actually be the state ACK status OID as the source. Sending an acknowledgement is done simply by sending an SNMP SET command containing any value back this originating OID. This can be something as simple as a 1 or 0 or even the word „ACK‟. The device will see any attempt to write to this point as the NMS acknowledging the trap. This will cease any trap retransmission. For example… Each of the digital inputs has their own Active and the Inactive State trap acknowledgements OIDs. OID for Digital Input 1 Active State Trap ACK: .1.3.6.1.4.1.27404.3.3.2.1.2.0 OID for Digital Input 1 Inactive State Trap ACK: .1.3.6.1.4.1.27404.3.3.2.1.3.0 When the Digital Input 1 state changes to Active, the trap will have the OID .1.3.6.1.4.1.27404.3.3.2.1.2.0. Simply sending an SNMP SET command with the value 1 will acknowledge this trap. Alarm Classifications with any event notification system, it is helpful to be able to categorize the event to facilitate accurate response and reporting. In the interest of providing a greater degree of event reporting granularity, the COM3000 provides (4) Alarm Classification variables. These include Alarm Number, Alarm Type, Alarm Category, and Alarm Severity. Alarm variables are not to be confused with trap types. Those values are used in the SNMP PDU for the NMS to be able to react accordingly. These Alarm variables are actually values that you can customize and include in the SNMP message text (as demonstrated in the previous section). The table below explains them in detail. Value Alarm Number Description Numeric designations you can choose to assign a specific alarm from an interface. 5 digit value between 1 and 65535. Alarm Category A user-defined value for the CATEGORY the alarm trap represents. Accepts up to 20 characters. Alarm Type A user-defined value for the TYPE of alarm the trap represents. Accepts up to 20 characters. User selectable value from (5) severity levels assigned to the specific interface. Alarm Severity SimpleComTools, LLC Options: 0 = No Severity (DEFAULT) 1 = Minor 2 = Major 3 = Critical 4 = Informational 5 = Restore 4 Implementation You may choose to configure Digital Input 1 to be connected to the out door, and assign that a number of 100. That would allow you to do research on all the „100‟ alarms over the reporting period. You might use alarm categories to designate alarms that came from certain buildings, floors, locations, etc. You might use different types to designate alarm topics, such as security, environment, lighting, power, etc. For example, you might choose to assign some Input Alarms from external motion detectors as Minor, and others attached to doors or windows as Major. COM3000-SNMP – Quick Start Guide - Traps SimpleComTools, LLC Trap Types The COM3000 supports (12) different trap types broken into (3) basic categories: Informational, Warnings, and Alarms. In an effort to provide additional granularity, the COM3000 provides (2) types for each of these categories. This allows a great deal of flexibility for the end user to assign different types of traps to meet their specific reporting requirements. Finally, there are (2) restore trap types for each of the 3 categories as well. The (12) different trap types have individually pre-assigned trap numbers ranging from 1000 through 6500. The following table describes the trap type and their intended application. Trap Number Trap Name 1000 Inform1 1500 2000 Inform1Restore Inform2 Description Non-critical or Informational trap message. Used for items such as Heartbeat, Cold Start, or access alerts. Non-critical or Informational trap restore message. Indicates the state that triggered an Inform1 trap has returned to normal. Non-critical or Informational trap message. Used for items such as Heartbeat, Cold Start, or access alerts. 2500 Inform2Restore Non-critical or Informational trap restore message. Indicates the state that triggered an Inform2 trap has returned to normal. 3000 Warn1 Non-critical or minor WARNING trap used for Input state changes or set points. Suggested uses include such things as access alerts, motion alarms, or low temperature warnings. 3500 Warn1Restore Non-critical WARNING RESTORE trap. Used to indicate the state that triggered Warn1 has changed back to normal. For Analog Inputs it means the warning level that triggered Warn1 has returned back to normal range. 4000 Warn2 Non-critical or minor WARNING trap used for Input state changes or set points. Suggested uses include such things as access alerts, motion alarms, or low temperature warnings. 4500 Warn2Restore Non-critical WARNING RESTORE trap. Used to indicate the state that triggered Warn2 has changed back to normal. For Analog Inputs it means the warning level that triggered Warn2 has returned back to normal range. 5000 Alarm1 Critical or major ALARM trap used for input state changes or set points. Suggested uses include such things as intrusion alarms, flood alarms, or low temperature alarms. 5500 Alarm1Restore Non-critical ALARM RESTORE trap. Used to indicate the state that triggered Alarm1 has changed back to normal. For Analog Inputs it means the warning level that triggered Alarm1 has returned back to normal range. 6000 Alarm2 Critical or major ALARM trap used for Digital Input state changes or Analog Input set points. Suggested uses include such things as intrusion alarms, flood alarms, or high temperature alarms. 6500 Alarm2Restore Non-critical ALARM RESTORE trap. Used to indicate the state that triggered Alarm2 has changed back to normal. For Analog Inputs it means the warning level that triggered Alarm2 has returned back to normal range. SimpleComTools, LLC 5 COM3000-SNMP – Quick Start Guide - Traps SimpleComTools, LLC Sample Trap Configuration Process Here are some examples of how you might create traps. (This outline uses the Configuration Utility tabs). Heartbeat Traps Step 1: [General Tab] Configure the HOSTNAME and LOCATION, IP Address, Default Gateway, and Netmask Step 2: [SNMP Tab] Configure your SNMP Server IP Address(es), SNMP Message Port and SNMP Trap Port - Unless you have knowledge of other ports to use, leave the default port values. Step 3: [SNMP Tab] Select values to be included in the SNMP Trap Message Format - You may want to start with all the values and tune it back from there. (1,2,3,4,5,6,7,8,9,10,11) - Messages with only be 128 bytes long regardless of what variables you choose. Setup the Heartbeat Values - Enable the SNMP Heartbeat Traps - Configure the Heartbeat Name and Heartbeat Message - Configure the Heartbeat Timer or TOD - Configure the Heartbeat Alarm Category, Number, Type and Severity - Configure the SNMP Heartbeat Trap Type (Enter the value 1000 for Inform1 messages) Step 4: Select the WRITE button to write the values to the device. - Select YES when it asks you if you want to reset the device. You should see 1000 trap type events arrive at the specified NMS based on the specified time interval. Each event will repeat every 15 seconds until the NMS performs a GET or SET to any OID. Digital Input 1 Traps Step 1: [General Tab] Configure the HOSTNAME and LOCATION, IP Address, Default Gateway, and Netmask Step 2: [SNMP Tab] Configure your SNMP Server IP Address(es), SNMP Message Port and SNMP Trap Port Select values to be included in the SNMP Trap Message Format Step 3: [Digital Input 1 Tab] Setup the relevant Digital Input 1 Values - Configure the Digital Input 1 Name - Enable the Digital Input 1Traps - Configure the Alarm Category, Number, and Types - Select the switch type (Normally Open or Normally Closed) - Enter the Active and Inactive State Message Text - Select the Active and Inactive State Alarm Severity - Enter the Active State Trap Type (Enter the value 3000 for Warn1 messages) - Enter the Inactive State Trap Type (Enter the value 3500 for Warn1Restore messages) Step 4: Select the WRITE button to write the values to the device. Select YES when it asks you if you want to reset the device. Step 5: Connect a DRY CONTACT switch to the (+) and (GND) terminal blocks. Triggering a state change to the input will cause a 3000 trap to be sent to the NMS. Changing back will generate a 3500 trap. More Information Should you need more information on how to configure COM3000 traps, please feel free to contact us at [email protected] or visit our website at http://www.simplecomtools.com/support. SimpleComTools, LLC 6