1
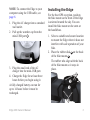
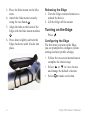
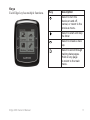
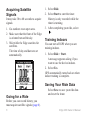
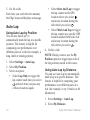
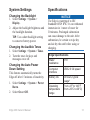
owner’s manual EDGE® 200 GPS-ENABLED CYCLING COMPUTER December 2012 190-01368-00_0B Printed in Taiwan Getting Started About the Battery warning Always consult your physician before you begin or modify any exercise program. See the Important Safety and Product Information guide in the product box for product warnings and other important information. warning This product contains a lithium-ion battery. See the Important Safety and Product Information guide in the product box for product warnings and other important information. When using your Edge® the first time, complete the following tasks: 1. 2. 3. 4. 5. 6. 7. Charge the Edge (page 2). Install the Edge (page 3). Turn on the Edge (page 4). Acquire satellites (page 6). Go for a ride (page 6). Save your ride (page 6). Get Garmin Connect™ software (page 7). 8. Transfer history to your computer (page 8). 2 The Edge is powered by a built-in, lithium-ion battery that you can recharge using the AC charger or the USB cable included in the product box. NOTE: The Edge will not charge when outside the temperature range of 32°F to 122°F (0°C to 50°C). Charging the Edge notice To prevent corrosion, thoroughly dry the mini-USB port, the weather cap, and the surrounding area before charging or connecting to a computer. Edge 200 Owner’s Manual note: To connect the Edge to your computer using the USB cable, see page 8. 1. Plug the AC charger into a standard wall outlet. 2. Pull up the weather cap from the mini-USB port ➊. ➊ 3. Plug the small end of the AC charger into the mini-USB port. 4. Charge the Edge for at least three hours before you begin using it. A fully charged battery can run for up to 14 hours before it must be recharged. Installing the Edge For the best GPS reception, position the bike mount so the front of the Edge is oriented toward the sky. You can install the bike mount on the stem or the handlebars. 1. Select a suitable and secure location to mount the Edge where it does not interfere with safe operation of your bike. 2. Place the rubber disk ➊ on the back of the bike mount ➋. The rubber tabs align with the back of the bike mount so it stays in place. ➍ ➋ ➊ ➌ Edge 200 Owner’s Manual 3 3. Place the bike mount on the bike stem. 4. Attach the bike mount securely using the two bands ➌. 5. Align the tabs on the back of the Edge with the bike mount notches ➍. 6. Press down slightly and turn the Edge clockwise until it locks into place. Releasing the Edge 1. Turn the Edge counterclockwise to unlock the device. 2. Lift the Edge off the mount. Turning on the Edge Press . Configuring the Edge The first time you turn on the Edge, you are prompted to configure system settings and user profile settings. • Follow the on-screen instructions to complete the initial setup. • Select ▲ or ▼ to view choices and change the default selection. • Select to make a selection. 4 Edge 200 Owner’s Manual Keys Each Edge key has multiple functions. Key Description Select to turn the device on and off, cancel, or return to the previous menu. Select to start and stop the timer. Select to create a new lap. Select to scroll through training data pages. Hold on any page to return to the main menu. Edge 200 Owner’s Manual 5 Acquiring Satellite Signals It may take 30 to 60 seconds to acquire signals. 1. Go outdoors to an open area. 2. Make sure that the front of the Edge is oriented toward the sky. 3. Wait while the Edge searches for satellites. The time of day and date are set automatically. 1. Select Ride. 2. Select Start to start the timer. History is only recorded while the timer is running. 3. After completing your ride, select . Training Indoors You can turn off GPS when you are training indoors. 1. Select Ride > Start. A message appears asking if you want to use the device indoors. 2. Select Yes. GPS automatically turns back on when indoor training is complete. Saving Your Ride Data Going for a Ride Select Save to save your ride data and reset the timer. Before you can record history, you must acquire satellite signals (page 6). 6 Edge 200 Owner’s Manual Back to Start You can navigate back to the start of your ride. The timer must be on to use back to start. Garmin recommends that you use Garmin Connect (page 7) to create courses. You can then transfer the courses to your Edge. 1. Select Ride > Start. 2. After completing your ride, select . 3. Select Back to Start > Start. Creating a Course with Your Edge Before you can create a course, you must have history with GPS track data saved to the Edge. Using Free Software 1. Select Courses. 2. Select a ride > Create. Garmin Connect is web-based software for storing and analyzing your ride data. 1. Go to www.garminconnect.com/ start. 2. Follow the on-screen instructions. Courses Starting a Course You must have saved a course to start a course. 1. Select Courses. 2. Select a course from the list > Start. Courses allow you to train using a previously recorded activity. You can follow the course trying to match or exceed previously set goals. Edge 200 Owner’s Manual 7 History The Edge can save at least 130 hours of ride data with typical use. When the Edge memory is full, a message appears. The Edge does not automatically delete or overwrite your history. See page 9 to learn how to delete history. Upload your history (page 8) to Garmin Connect periodically to keep track of all of your ride data. History includes time, distance, calories, average speed, maximum speed, ascent and descent, and detailed lap information. note: History is not recorded while the timer is stopped or paused. 8 Viewing History 1. Select History. 2. Select an option: • Last Ride • Longest Ride • Fastest Ride • All Rides • Odometer 3. Use ▲ and ▼ to scroll through your activities. note: To see lap data, select Options > Laps. Transferring History to Your Computer 1. Connect the USB cable to a USB port on your computer. 2. Pull up the weather cap from the mini-USB port ➊. Edge 200 Owner’s Manual 3. Select Yes. Deleting History ➊ 3. Plug the small end of the USB cable into the mini-USB port. 4. Go to www.garminconnect.com. 5. Follow the on-screen instructions. Viewing the Odometer Select History > Odometer to view the accumulated ride distance and time. Resetting the Odometer 1. Select History > Odometer > Reset. 2. Select an option: • Select Trip to reset current trip data • Select Reset All to reset all odometer data. Edge 200 Owner’s Manual After you have transferred your history to your computer, you may want to delete the history from your Edge. 1. 2. 3. 4. Select History. Select an option. Select a ride. Select Options > Delete Ride. Alerts You can use Edge alerts to train toward specific distance, time, and calorie goals. Using Distance, Time, and Calorie Alerts 1. Select Settings > Alerts. 2. Select Distance, Time, or Calorie. 3. Turn on the alert. 4. Enter a time, distance, or calorie amount. 9 5. Go for a ride. Each time you reach the alert amount, the Edge beeps and displays a message. Auto Lap Using Auto Lap by Position You can use Auto Lap® to automatically mark the lap at a specific position. This feature is helpful for comparing your performance over different parts of a ride (for example, a long climb or training sprints). 1. Select Settings > Auto Lap. 2. Select By Position. 3. Select an option: • Select Lap Only to trigger the lap counter each time you select and each time you pass any of those locations again. • Select Start And Lap to trigger the lap counter at the GPS location where you select and at any location during the ride where you select . • Select Mark And Lap to trigger the lap counter at a specific GPS location marked before the ride and at any location during the ride where you select . 4. Go for a ride. Note: During courses, use the By Position option to trigger laps at all of the lap positions saved in the course. Using Auto Lap by Distance You can use Auto Lap to automatically mark a lap at a specific distance. This feature is helpful for comparing your performance over different parts of a ride (for example, every 10 miles or 40 kilometers). 1. Select Settings > Auto Lap. 2. Select By Distance. 10 Edge 200 Owner’s Manual 3. Enter a value. 4. Select Save. Using Auto Pause You can use Auto Pause® to pause the timer automatically when you stop moving or when your speed drops below a specified value. This feature is helpful if your ride includes stop lights or other places where you need to slow down or stop. Note: The paused time is not saved with your history data. 1. Select Settings > Auto Pause. 2. Select an option: • Select Off. • Select When Stopped to pause the timer automatically when you stop moving. • Select Custom Speed to pause the timer automatically when your speed drops below a specified value. Edge 200 Owner’s Manual 3. Go for a ride. Using Auto Scroll Use the auto scroll feature to automatically cycle through all of the training data pages while the timer is running. 1. Select Settings > Auto Scroll. 2. Select a display speed: Slow, Medium, or Fast. 3. Go for a ride. The training data pages scroll automatically. 11 Changing the Start Notice This feature automatically detects when your Edge has acquired satellites and is moving. It is a reminder to start the timer so you can record your ride data. 1. Select Settings > Start Notice. 2. Select an option: • Select Off. • Select Once. • Select Repeat to change the amount of time to delay the reminder. Changing Your User Profile Settings The Edge uses information that you enter about yourself to calculate accurate ride data. 1. Select Settings > User Profile to update gender, birth year, weight, and height. 12 2. Follow the on-screen instructions. Data Management You can use the Edge as a USB mass storage device. note: The Edge is not compatible with Windows® 95, 98, Me, or NT. It is also not compatible with Mac® OS 10.3 and earlier. Deleting Files NOTICE Your device memory contains important system files that should not be deleted. 1. Connect the Edge to your computer using the USB cable (page 8). 2. Open the Garmin drive or volume. 3. Select the file. 4. Select the Delete key on your keyboard. Edge 200 Owner’s Manual System Settings Specifications Changing the Backlight 1. Select Settings > System > Display. 2. Adjust the backlight brightness and the backlight duration. Tip: Use a short backlight setting to conserve battery power. notice The Edge is waterproof to IEC Standard 60529 IPX7. It can withstand immersion in 1 meter of water for 30 minutes. Prolonged submersion can cause damage to the unit. After submersion, be certain to wipe dry and air dry the unit before using or charging. Changing the Audible Tones 1. Select Settings > System > Tones. 2. Turn the tones for keys and messages on or off. Changing the Auto Power Down Setting This feature automatically turns the Edge off after 15 minutes of inactivity. 1. Select Settings > System > Power Down. 2. Select On or Off. Edge 200 Owner’s Manual Edge Specifications Water resistance IPX7 Computer interface USB 2.0 full speed Battery life 14 hours, typical usage* Operating temperature range From -4°F to 140°F (from -20°C to 60°C) 13 Edge Specifications Bike Mount Specifications Charging temperature range Bands (O-rings) From 32°F to 122°F (from 0°C to 50°C) *The actual battery life of a fully charged battery depends on how much time you use GPS and the backlight. Exposure to extremely cold temperatures will also reduce battery life. Bike Mount Specifications Physical size (W × H × D) 1.5 × 1.5 × 0.36 in. (37.8 × 37.8 × 9.2 mm) Two sizes: • 1.3 × 1.5 × 0.9 in. AS568-125 • 1.7 × 1.9 × 0.9 in. AS568-131 Note: Use EPDM (Ethylene Propylene Diene Monomer) replacement bands only. Go to http://buy .garmin.com, or contact your Garmin dealer. Weight 0.28 oz. (7.9 g) (including bands and rubber spacer pad) 14 Edge 200 Owner’s Manual Troubleshooting Registering Your Device Help us better support you by completing our online registration today: • Go to http://my.garmin.com. • Keep the original sales receipt, or a photocopy, in a safe place. Resetting the Device If the keys stop responding, you may need to reset the device. Hold for 10 seconds. Clearing User Data 1. Turn off the Edge. 2. Hold and simultaneously. 3. Select Yes to clear all user data. Note: This deletes all user‑entered information, but it does not delete your history. Edge 200 Owner’s Manual Updating the Software 1. Connect the Edge to your computer using the USB cable (page 8). 2. Go to www.garminconnect.com. If there is new software available, Garmin Connect alerts you to update the software. 3. Follow the on-screen instructions. Caring for Your Device notice Do not store the device where prolonged exposure to extreme temperatures can occur, because it can cause permanent damage. Avoid chemical cleaners and solvents that can damage plastic components. Cleaning the Device 1. Use a cloth dampened with a mild detergent solution. 2. Wipe it dry. 15 www.garmin.com 913-397-8200 1-800-800-1020 00 358 19 311 001 815 69 555 0808 2380000 +44 (0) 870.8501241 00 33 1 5517 81 89 00800 4412 454 +44 2380 662 915 1-866-429-9296 0180 5 / 42 76 46 - 880 0180 5 / 42 76 46 - 550 00 35 1214 447 460 43 (0) 3133 3181 0 00 39 02 3669 9699 00 902 00 70 97 00 32 2672 5254 0800-0233937 00 46 7744 52020 00 45 4810 5050 www.garmin.com/support Garmin International, Inc. 1200 East 151st Street, Olathe, Kansas 66062, USA Garmin (Europe) Ltd. Liberty House, Hounsdown Business Park Southampton, Hampshire, SO40 9LR UK Garmin Corporation No. 68, Zhangshu 2nd Road, Xizhi Dist. New Taipei City, 221, Taiwan (R.O.C.) © 2011–2012 Garmin Ltd. or its subsidiaries Garmin®, the Garmin logo, Edge®, Auto Lap®, and Auto Pause® are trademarks of Garmin Ltd. or its subsidiaries, registered in the USA and other countries. Garmin Connect™ is a trademark of Garmin Ltd. or its subsidiaries. These trademarks may not be used without the express permission of Garmin. Windows® is a registered trademark of Microsoft Corporation in the United States and/or other countries. Mac® is a trademark of Apple Computer, Inc., registered in the U.S. and other countries. TA-2012/1345