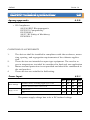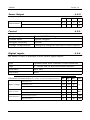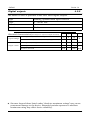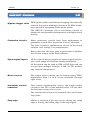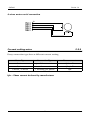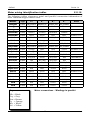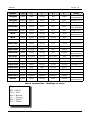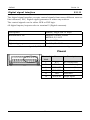
1
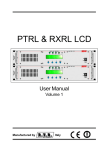
SMD103
Stepping Motor Drive
User’s manual
Version 2.0
Servostep®
Motion Control Equipment
AEC s.r.l.
Via Zambon, 2/4 (z.a.) - Loc.Spessa
36051 Creazzo (Vicenza) Italy
Phone +39 0444 370088
Fax. +39 0444 574958
SMD103
Stepping motor drive
Reference manual
Version 2.0 - January 2005
http://www.aec-smd.it
e-mail:[email protected]
SMD103
Version 2.0
About this manual
1.0
Overview
1.0.1
This book is a technical reference manual for the SMD103 stepper drive.
It describes the operation and installation of the amplifier manufactured by
AEC s.r.l.
Information about cautions
1.0.2
This book may contain cautions,
This is an example of caution statement.
A caution statement points up a critic situation where particular care is needed.
and warnings.
WARNING - This is an example of warning statement
When you’ll meet this message box, would be there risks for
users or the drive.
Related documentation
1.0.3
POTIND User’s manual - It describes the serial communication protocol.
For further informations see AEC website www.aec-smd.it.
Copyrights
1.0.4
All the informations and concepts included in this user guide are copyright
by AEC srl and are supplied to the user with the understanding that it may
not be copied, disclosed or duplicated in whole or in part for any purpose not
authorised by the factory.
Validity
1.0.5
Since AEC srl is constantly working to improve all of its equipments, we reserve to modify products and user guide without prior notice.
-5-
SMD103
Version 2.0
IMPORTANT NOTES
2.0
Please read these notes carefully before powering up the drive
It is very important meet all applicable safety requirements during installation
and operating of any AEC’s motion control equipment.
Any installer has to assume the responsibility to ensure that he recognizes and
complies all the relevant safety standards.
Any installation, not meeting the safety requirements, may damage the equipment or injury the user.
AEC’s motion control equipment shoul be handled, installed, setted-up and
maintenanced only by competent personnel expert and trained in the installation of motion control electronic equipment. Such technicians should be aware
of potential electrical and mechanical hazards .
AEC s.r.l. shall never be liable or have any responsability if the products have
been improperly stored, installed, used or maintened, or if the costumer has
permitted any unauthorized modifications, adjustments, and/or repairs to the
products.
CAUTION
2.0.1
Users must keep well clear in mind that AEC’s motion control equipment is capable of producing high forces and rapid movement so
they must be used with attention especially during the application
program’s development.
AEC’s motion control equipments are sold as end-users products
to be installed only by practical staff in accordance with all local
safety laws and regulations.
The device have to be enclosed such that any part is not be accessible while the system is powered on.
AEC srl strongly reccomend to follow these recommendations in order to avoid wrong uses of the equipment that may be impaired all
the protections provided by the device.
-6-
SMD103
Version 2.0
CONTACTS
3.0
For technical assistance:
AEC s.r.l.
Motion Control Division
Via Zambon, 2/4 (z.a.) - Loc. Spessa
36051 CREAZZO (Vicenza) Italy
Phone +39 0444 370088
Fax. +39 0444 574958
E-mail:[email protected]
For engineering assistance:
AEC s.r.l.
Motion Control Division
Via Zambon, 2/4 (z.a.) - Loc. Spessa
36051 CREAZZO (Vicenza) Italy
Phone +39 0444 370088
Fax. +39 0444 574958
E-mail:r&[email protected]
Sales office:
AEC s.r.l.
Motion Control Division
Via Zambon, 2/4 (z.a.) - Loc. Spessa
36051 CREAZZO (Vicenza) Italy
Phone +39 0444 370088
Fax. +39 0444 574958
E-mail:[email protected]
-7-
SMD103
Version 2.0
CONTENTS
About this manual
Overview
Informations about cautions
Related documentations
Copyright
Validity
Important notes
Caution
Contacts
Contents
Overview of the Servostep® serie
Product features
SMD103: technical specifications
Agency approvals
Power input
Power output
Control
Digital inputs
Digital outputs
Protections
Status LED indicators
Mechanical and environment
SMD103 : features
Typical installation
Warrants conditions
Attention
Installation
Responsability
Shielding and grounding
Ambient conditions
Drive cooling
Mechanical installation
Mounting guidelines
Electrical installation
Caution
Keep in mind ...
Power supply connections
Wiring notes
Transformer selecting
Motor connections
Caution
Motor connection types
-8-
1.0
1.0.1
1.0.2
1.0.3
1.0.4
1.0.5
2.0
2.0.1
3.0
4.0
4.1
4.2
4.2.0
4.2.1
4.2.2
4.2.3
4.2.4
4.2.5
4.2.6
4.2.7
4.2.8
4.3
4.4
4.5
4.5.1
5.0
5.0.1
5.0.2
5.0.3
5.0.4
5.1
5.1.1
5.2
5.2.1
5.2.2
5.2.3
5.2.4
5.2.5
5.2.6
5.2.7
5.2.8
5
5
5
5
5
5
6
6
7
8
10
11
12
12
12
12
13
13
14
15
15
15
16
17
18
18
19
19
19
20
20
21
21
22
22
22
23
24
24
25
25
26
SMD103
Version 2.0
Current setting notes
Motor wiring identification tables
Digital signal interface
Control signals
Connection diagram
Setting up the drive
Current motor setting
Step resolution
Equalization
Automatic current reduction
Step-IN edge
Drive LEDS indications
Testing the installation
Caution
Mechanical test
Wiring test
Voltage level test
Setting up checking
Signal test
Need help?
Appendix A
Axis outlines
Speed vs Time profile
Boost
Hardware summary
Drive specifications - SMD103
Environment specifications - SMD103
5.2.9
5.2.10
5.2.11
5.2.12
5.2.13
5.3
5.3.1
5.3.2
5.3.3
5.3.4
5.3.5
5.4
5.5
5.5.1
5.5.2
5.5.3
5.5.4
5.5.5
5.5.6
5.5.7
6.0
6.0.1
6.0.2
6.0.3
7.0
7.0.1
7.0.2
-9-
27
28
30
31
32
33
34
34
34
35
35
36
38
38
38
38
38
38
39
39
40
40
41
42
43
43
43
SMD103
Version 2.0
Product features
4.1
The SMD103 stepper drive is one of the smallest and powerful, drives now
available.
The drive is capable to obtain the maximum power from the motor and have
optimal performances where the conditions are particularly difficult.
For being able to use in every type of installation, the drive implements some
protection circuit, status indicators and input/output.
Protection circuits
Motor short circuits, phase to phase, phase to ground, phase to H.V.
Over-voltage
Under-voltage
Drive over-temperature
Status indicators (LED)
High Voltage status
Current Off status
Current Full status
Fault status
Inputs and outputs
Step input
Direction input
Current Off input
Current Reduction input
Fault output
-10-
SMD103
Version 2.0
SMD103: technical specifications
4.2
Agency approvals
4.2.0
• CE Compliance:
89/336/EEC Electromagnetic
EN 55011 Compatibility
EN 550082-1
98/37/EC Safety of Machinery
EN 60204-1
CONDITIONS OF ACCEPTABILITY
1.
The devices shall be installed in compliance with the enclosure, moun
ting, spacing, and segregation requirements of the ultimate application.
2.
These devices are intended as open type equipment. The need to repeat a temperature test shal be considered in final end use application
3.
Motor overload protection is not provided and should be considered in
the end product.
4
These devices are suitable for field wiring.
Power Input
Main Voltage
Supply current
4.2.1
Min.
Typ.
Max.
Units
Nominal values, including ripple up to ±10%
12
24
36
Vdc
Absolute maximum values continuous !
10
40
Vdc
Nominal value
0.12
Peak
The power supply voltage has to be a DC isolated voltage
-11-
1.6
A
3
A
SMD103
Version 2.0
Power Output
4.2.2
Min.
Output current
Typ.
Max.
Units
RMS current
0.5
3
A
Absolute maximum values continuous !
0.5
3
A
Control
4.2.3
Output stage
Dual MOSFET H-bridges
Control mode
Bipolar chopper
Chopper frequency
20 KHz
Voltage Compensation
Changes in voltage do not affect current control
Digital inputs
4.2.4
The SMD103 drive is provided of four control digital inputs.
Type
Optoinsulated with constant current absortion
Logic
5 - 24Vdc PNP or NPN no resistors needed
Scan time
Real time
Debounce
fixed
Electrical characteristics (All voltages are referred to Digital Commom)
Input Voltage
Input current
Input Frequency
Min.
Typ.
Max.
-5
0
1.2
2.4
24
30
LOW Logic state
0
0,2
HIGH Logic state
3
8
LOW Logic state
HIGH Logic state
Absolute maximum, surge (≤ 500ms) !
-10
Units
V
50
mA
General purpose inputs
0
5
KHz
High speed inputs
0
80
KHz
-12-
SMD103
Version 2.0
Digital outputs
4.2.5
The SMD103 drive is provided of one NPN Fault digital outputs.
Type
Sinking, optoinsulated open-collector
Logic
5 - 24Vdc PNP
Scan time
1 ms
Function
Fault
Electrical characteristics (All voltages are referred to Digital Commom)
Ouput Voltage
HIGH Logic state (+24 Vdc Aux Voltage - 2W external load)
Absolute maximum(Iout=350mA, L=2.0mH), surge (≤ 500ms)!
Min.
Typ.
Max.
-5
0
1.2
-0.5
5.0
LOW Logic state (Leakage current)
Output current
35
200
Units
V
µA
350
HIGH Logic state
370
Shutdown Threshold
500
mA
! Stresses beyond those listed under “absolute maximum ratings” may cause
permanent damage to the device. Extended periods exposure to absolute
maximum rating may affect device reliability.
-13-
SMD103
Version 2.0
Protections
4.2.12
Min.
Current
short circuit or overload
Temperature
Maximum surrounding air 50 ˚C
Typ.
Max.
3
A
˚C
Status LED indicators
Led
H.V.
C.OFF
C.FULL
FAULT
4.2.7
Color
Green
Green
Green
Meaning
ON
Normal operation (supply voltage within the range)
OFF
Undervoltage or fuse blowned-up
ON
Power output disable
OFF
Power output enable (motor energized)
ON
Nominal setted current supplied
OFF
Half setted current supplied
ON
- Wrong motor phase connection
- Short circuit between phase and ground or H.Volt.
Red
- Undervoltage when HV light on
OFF
Normal operation
Mechanical and environment
4.2.8
Min.
Dimensions
Typ.
Max.
80 x 100 x 30
Width x Lenght x Height
Weight
Ambient Temperature
Units
200
Operating
Storage (not powered)
Units
mm
g
0
50
-40
85
˚C
0
95
%RH
Humidity
Non-condensing
Contaminants
Pollution degree
Cover material
Flammability rating
Cooling
Convection or forced cooling required for continuous power output
˚C
2 or better
-14-
Aluminum - meet 94 V-0
SMD103
Version 2.0
SMD103 : features
4.3
Bipolar chopper drive PWM (pulse width modulation) chopping electronically
controls the motor windings current at 20 KHz obtaining a powerful energizing of the motor phase.
The SMD103 optimizes the re-circulating current to
obtain the best possible performances in stepper motor
driving.
Protection circuits
Many protection circuits have been implements to
guarantee a good drive protection in every situation.
The drive is protect against short circuit on the motor
outputs, over voltage, over temperature.
Every time that the drive goes in protection it disables
the current output to the motor phases.
Optocoupled inputs
All the control inputs/output are optocoupled and permit a wide range of solutions during installation.
All the inputs can be used in NPN or PNP logic and can
accept input voltages between 5 and 36 Vdc without
any external components.
Motor current
The output motor current can be setting using “SWA”
dipswitches from 1.8 to 6 A rms selectable through
eight levels.
Automatic current
reduction
This control automatically reduce the output motor
current to the 50% of the nominal value 100 ms after
the last input step pulse occurs.
The current will return at its nominal value at the next
step pulse.
Step edge
Allows to selection if the step occurs during the rising
edge or during the falling edge of the step signal.
-15-
SMD103
Version 2.0
Typical installation
1.4
4.4
Power supply
24 Vdc
1
2
D.
I
N
P
U
T
I
N
T
E
R
F
A
C
E
STEP +
DIR +
CONTROL
UNIT
C.OFF +
C.RED +
FAULT
SIGNAL
GROUND
3
4
5
6
A
-A
B
-B
-16-
SMD103
Version 2.0
Warrants conditions
4.5
All AEC’s equipment have two years warranty against defect in materials and
assembly .
Wrong installation, miswiring, incorrect settings up, fuse blown up, phisical
mishandling, modifying by the customer avoid warranties.
Attention
4.5.1
Don’t try to remove the label, any tampering will result in
warranty voiding.
WARNING - Risk of damage and/or personal injury
AEC’s drives doesn’t contain any user serviceable part. Attempting to open the case, or to replace any internal component, may result in damage to the unit and/or personal
injury. This may also void the warranty.
WARNING - Risk of damage and/or personal injury
Motor overload protection is not provided and should be considered in the end product.
-17-
SMD103
Version 2.0
Installation
5.0
Responsability
5.0.1
As the end user or installer applying this equipment, it is your responsability to
determine the suitability of the product for any your’s application.
AEC s.r.l. will never be responsable or liable for any damage resulting from a
wrong installation or a wrong use of this products.
Be sure that all wiring complies the local or standard wiring codes.
Danger: Hazardous voltages.
Exercise caution when installing and setting up.
Failure to heed this warning may cause damage, injury, or death.
With the exception of M1 and M2 plug connectors, all of other circuits are mains connected and must never be grounded.
Failure to heed this warning may cause device damage.
Shielding and grounding
Motor
Interface
Power
M
1
Stage
Power
Input/output
SMD103
DC
Supply
5.0.2
M
3
Step IN, Direction,
Current control,
Fault
M
2
The control circuit share a common circuit-ground, so it’s enough to connect
only a point to ground all the internal circuits (analog, serial).
All the ground paths shall be the shortest paths possible in order to minimize
noise.
Never ground secondary transformer in order to avoid internal diode short circuit.
-18-
SMD103
Version 2.0
Case and shield terminal, internal wired, has to be connected to the system
chassis ground, keeping the wire as short as possible.
This improve the shielding effect of the case, and provide a good path to ground
noise currents that may occur in the cable shields
Shielding
It is hard reccomended that connections to the motor, power, I/O and serial signals be
made using shield cables.
They help to reduce the emmissions from the drive and help to protect the internal circuits from interferences due to external sources of electrical noise.
A good system shielding is also required for CE compliance.
Cable shields should be tied to earth or system ground.
Ambient conditions
5.0.3
AEC’s power drives are intended only for use in close locations, guarded from operator contact, in an ambient that
compliance with these characteristics: operating temperature of maximum 50 °C, Humidity limits between 5% to
95% non condensing (Pollution degree 2 or better).
The drives have to be supplied from an isolating transformer or a DC isolated power supply.
For environment temperature above 50°C (122°F), forced
-air cooling is required. (See hardware reference)
Drive cooling
5.0.4
The drive is natural convection air flow cooled. To ensure
the drive cooling and make the installation easier for the
operator it must be installed vertically leaving a free space
of at least 5 cm (2 in) on each side of the device.
Avoid mounting heat producing equipment in the nearest
of the drive or any other device that can obstruct natural or
forced convention air flow.
-19-
SMD103
Version 2.0
Mechanical installation
5.1
Mount the drive vertically
2
3
4
5
6
7
8
9 10 11 12
90
81.8
30
1
Spring fixing
hole for omega
guide
67
80
100
Dimensions are expressed in millimeters.
The SMD103-I drives can be installed either in profile or flat using the relative
grooves on the heat-sink and the supplied brackets.
Mounting guidelines
5.1.1
• Vertical orientation for the device.
• Minimum unobstructed space of 5 cm (2 in) all around the
unit.
• Flat surface capable of supporting the approximate 630 g
mass of the drive (or 1.4 lb weight)
• Free of excessive vibrations
• Maximum heat-sink temperature 70°C (158°F)
-20-
SMD103
Version 2.0
Electrical installation
5.2
The drive must be installed in an enclosure to protect the electronic parts from
atmospheric contaminants. In no case, the acces to the device must be possible
while it is powered up.
Metal cabinets are ideally suited for housing the AEC’s equipments, since they
can provide operator protection, EMC screening, and can be fitted with interlocks to remove all hazardous powers when the cabinet is open.
In no case interlocks must open motor phase connections while system is still
powered, as this could cause damages to the contacts and the drive.
During the installation, use normal precautions against damages caused by
electrostatic discharges (wear earth wrist straps).
Remember to include a circuit breaker, wich must be clearly marked as the disconnecting device and should be within easy reach of the operator.
Caution
5.2.1
All the circuits in the SMD103-I are potential sources of severe
electrical shock, so follow these rules to avoiding possible personal
injury.
1. Power off the drive and wait until all the leds are turned
off before touching, removing, connecting or any other
critical action.
2. Tied the motor case to earth ground before powering up
the drive.
3. Never disconnect any connectors before powering down
the drive.
Keep in mind ...
5.2.2
In case of doubt or in any case you don’t know as to behave
yourself, before access to the drive, power off the device and
wait until all the leds are turned off.
May you have attention when you touch the drive because it
may be hot.
-21-
SMD103
Version 2.0
Power supply connections
5.2.3
The SMD103 need only a DC power supply for the drive .
It can be supply in DC voltages between 10V and 36V.
Normally, the powering voltage is obtained directly from the a rectified secondary winding of an isolating transformer.
Note: If the drive is DC voltage powered, the power supply must be isolated from
the mains.
Description
Female, single row 12 ways
Manufactorer PN
Phoenix Contact GmbH
MSTB 2,5/12-ST
Wire size
14 - 18 AWG
Tightening torque torque
2 - 4 lb / 9 - 18 N
Use only 60/75˚C copper wire only.
Pinout
1
2
3
4
5
6
7
8
9 10 11 12
Terminal
block
Name
Description
DC power supply
1
DC +
Positive pole
2
DC -
Negative pole
Avoid stress on the connector by hanging cables, as this may lead
to connector over-heating.
Keep clear in mind that input power supply must been as stable as
possible and is extremaly important that it never exceeds 45 DC
volts.
Everytime the supply voltage rises above the limit even for a time it
can causes drive’s damage.
-22-
SMD103
Version 2.0
Wiring notes
5.2.4
The plug connector terminals will accept 16 to 30 AWG wire, but AEC recommends to use 16AWG or heavier for power supply and motor wiring.
In multi-axis configurations don’t daisy-chain power connections but reach any
device with a single power supply line.
It is advisable to connect an EMC filter placed on the secondary side of transformer to suppress noises from the mains.
Note: Never insert or disconnect mating connector terminals when the device is powered up. Anyway make sure the terminals screws are tightened
down firmly on the wiring to avoid contacts damages.
Transformer selecting
5.2.5
Transformer’s size required depends on the application and on the maximum
shaft power delivered by the motors.
To optimize the power supply design, the supply current can be measured by
a current meter when the motor is producing the highest shaft power. If is it
too hard to make this measurement, assume load current equals the nominal
current selected by dip-switches.
However the RMS current demanded to the transformer is even lower because
the drive works in chopper mode supplying pulses of current at 20 KHz to the
motor.
The maximum absorbable power from the SMD103-I is approximatively 80
VA.In multi-axis configurations the peak current requests depend on the maximum number of the axis running simultaneously; drives who are stop or stationary used little power if are in the current reduction or current off state.
Often,especially in limited series, is not convenient spend a lot of time and resources to calculate the minimum possible rating but is preferable to be slightly
generous in sizing transformer. In high volume series measure the supply current will give a useful guide to the transformer dimensioning.
-23-
SMD103
Version 2.0
Motor connections
5.2.6
AEC recommend a 16 AWG wire size to connect motor to the drive. Use cables
with two twisted (or screened) pairs for motor phase excitation and a fifth wire
for motor case grounding.
To reduce radiation noise is possible shield the motor cable connecting the braided screens to the ground.
Description
Female, single row 12 ways
Manufactorer PN
Phoenix Contact GmbH
MSTB 2,5/12-ST
Wire size
14 - 18 AWG
Tightening torque
2 - 4 lb / 9 - 18 N
Use only 60/75˚C copper wire only.
Pinout
1
2
3
4
5
6
7
8
9 10 11 12
Terminal
block
Name
Description
3
Phase A
Motor phase A
4
Phase -A
Motor phase -A
5
Phase B
Motor phase B
6
Phase -B
Motor phase -B
Avoid stress on the connector by hanging cables, as this may lead to connector over-heating
Caution
5.2.7
Power supply and motor cables are sources of heavy radiated
noise.
It is advisable to keep them separate from any other low-level
control signal cables to avoid any interference with control signals.
If power cables are not shielded, the control signal cables must
be kept almost 300 mm (12 in.) away from power cables.
-24-
SMD103
Version 2.0
Motor connection types
5.2.8
With the AEC’s stepper motor drives can be used indipendently 4, 6 or 8 wires
(serial o parallel configuration) stepper motors.
4 wires motor connection
1
2
3
4
5
6
A+
AB+
B-
7
8
9 10 11 12
8 wires motor parallel connection
1
2
3
4
5
6
A+
AB+
B-
7
8
9 10 11 12
8 wires motor serial connection
1
2
3
4
5
6
A+
AB+
B-
7
8
9 10 11 12
-25-
SMD103
Version 2.0
6 wires motor serial connection
1
2
3
4
5
6
A+
AB+
B-
7
8
9 10 11 12
Current setting notes
5.2.9
Every connection type have a different current setting.
Motor Type
Connection Type
8 wires
parallel connection
Iph x √2
8 wires
serial connection
Iph / √2
4 wires / 6 wires
1 winding per phase
Iph
Iph = Phase current declared by manufacturer
-26-
Phase current
SMD103
Version 2.0
Motor wiring identification tables
5.2.10
The following tables riassumes serial and parallel connection information of
most common stepper motor used.
Manufac.
Type
A+
A-
B+
B-
Tamagawa
8 wires
Blk/Wh&Or
Blk&Wh/Or
Yel&Wh/Red
Wh/Yel&Red
Tamagawa
6 wires
Black
Green
Red
Blue
Tamagawa
4 wires
Blue
Red
Yellow
White
Oriental Mot
8 wires
Blk&Or
Grn&Yel
Red&Brw
Wh&Bl
Oriental Mot
6 wires
Black
Green
Red
Blue
M.A.E.
8 wires
Blk/Wh&Or
Blk&Wh/Or
Yel&Wh/Red
Wh/Yel&Red
M.A.E.
6 wires
Black
Orange
Yellow
Red
M.A.E.
4 wires
Grn
Wh/Grn
Red
Wh/Red
Sanyo Denki
8 wires
Blk/Wh&Or
Blk&Wh/Or
Yel&Wh/Red
Wh/Yel&Red
Sanyo Denki
6 wires
Orange
Blue
Red
Yellow
Sanyo Denki
4 wires
Orange
Blue
Red
Yellow
Pacific Scientific
8 wires
Blk/Wh&Or
Blk&Wh/Or
Yel&Wh/Red
Wh/Yel&Red
SLO-SYN
6 wires
Wh/Grn
Green
Wh/Red
Red
SLO-SYN
4 wires
Blk
Wh/Blk
Wh/Red
Red
Sonceboz
8 wires
Grn&Blk/Wh
Or&Grn/Wh
Red&Wh
Blk&Wh/Red
Japan servo
6 wires
Black
Brown
Yellow
Orange
Japan servo
4 wires
Red
Blue
Yellow
White
ESCAP
6 wires
Black
Green
Red
Blue
ESCAP
4 wires
Black
Green
Red
Blue
Zebotronics
8 wires
Brn&Wh
Blk&Red
Blue&Gry
Yel&Grn
Bodine
8 wires
Brn&Wh/Or
Wh/Brn&Or
Wh/Red&Yel
Red&Wh/Yel
DPM
4 wires
Red
Blue
Green
Black
DPM
4 wires
Red
White
Green
Yellow
Key
Notes
Wh&Yel N.C.
Wh&Yel N.C.
Wh&Blk N.C.
Wh&Blk N.C.
Wh & Blk N.C.
Red&Bl N.C.
Wh&Yel N.C.
Motor connections - Windings in parallel
Blk = Black
Gry = Grey
Brn = Brown
Or = Orange
Wh = White
Yel = Yellow
-27-
SMD103
Manufac.
Version 2.0
Type
A+
A-
B+
B-
Notes
Yellow
LinkWh/Blk&Wh/Or,
linkWh/Red&Wh/Yel
Wh&Yel N.C.
Tamagawa
8 wires
Black
Orange
Tamagawa
6 wires
Black
Green
Red
Blue
Tamagawa
4 wires
Blue
Red
Yellow
White
Oriental Mot
8 wires
Black
Green
Red
Blue
Oriental Mot
6 wires
Black
Green
Red
Blue
Wh&Yel N.C.
Yellow
LinkWh/Blk&Wh/Or,
linkWh/Red&Wh/Yel
M.A.E.
8 wires
Black
Red
Orange
Red
Link Yel&Or,
link Wh&Brn
M.A.E.
6 wires
Black
Orange
Yellow
Red
M.A.E.
4 wires
Green
Wh/Grn
Red
Wh/Red
Wh&Blk N.C.
Sanyo Denki
8 wires
Black
Orange
Red
Yellow
LinkWh/Blk&Wh/Or,
linkWh/Red&Wh/Yel
Sanyo Denki
6 wires
Orange
Blue
Red
Yellow
Wh&Blk N.C.
Sanyo Denki
4 wires
Orange
Blue
Red
Yellow
Pacific Scientific
8 wires
Black
Orange
Red
Yellow
LinkWh/Blk&Wh/Or,
linkWh/Red&Wh/Yel
SLO-SYN
6 wires
Wh/Grn
Green
Wh/Red
Red
Wh & Blk N.C.
SLO-SYN
4 wires
Blk
Wh/Blk
Wh/Red
Red
Sonceboz
8 wires
Grn&Blk/Wh
Or&Grn/Wh
Red&Wh
Blk&Wh/Red
Japan servo
6 wires
Black
Brown
Yellow
Orange
Japan servo
4 wires
Red
Blue
Yellow
White
ESCAP
6 wires
Black
Green
Red
Blue
ESCAP
4 wires
Black
Green
Red
Blue
Zebotronics
8 wires
Brn&Wh
Blk&Red
Blue&Gry
Yel&Grn
Bodine
8 wires
Black
Orange
Red
Yellow
Motor connections - Windings in series
Key
Blk = Black
Gry = Grey
Brn = Brown
Or = Orange
Wh = White
Yel = Yellow
-28-
Red&Bl N.C.
Wh&Yel N.C.
LinkWh/Blk&Wh/Or,
linkWh/Red&Wh/Yel
SMD103
Version 2.0
Digital signal interface
5.2.11
The digital signal interface accepts control signals from many different sources
like indexeres, PLC, Digital signal generator or other any sources.
The control signals can be either NPN or PNP logic.
All digital inputs/outputs refer to terminal 2 (Digital common).
Description
Female, single row 12 ways
Manufactorer PN
Phoenix Contact GmbH
MSTB 2,5/12-ST
Wire size
14 - 18 AWG
Tightening torque
2 - 4 lb / 9 - 18 N
Use only 60/75˚C copper wire only.
Pinout
1
2
3
4
5
6
7
8
9 10 11 12
Terminal
block
Name
Description
7
N/C
No Connection
8
Fault
Drive fault output
9
CUR.OFF
Current null
10
CUR.RED
Current reduction
11
DIR
12
STEP-IN
-29-
Direction
Steps input
SMD103
Version 2.0
Control signals
5.2.12
STEP INPUT
Terminal 12
Input used to command motor rotation.
A step is taken forward during signal transition from high to low logic level
or low to high logic level (dip-switch 8). Minimum impulse duration 15
microseconds.
It is advisable, whenever possible, to use a 50% duty cycle.
DIRECTION
Terminal
11
Input used to change the direction of motor rotation.
If the motor is correctly connected, the motor will turn clockwise if DIR is disable, counterclockwise if enable.
The logic level must be valid for at least 50 microseconds before the step signal
and staying unchanged for at least 50 microseconds after the last step impulse.
CURRENT OFF
Terminal
Input used to enable or disable the power current output of the drive.
9
When this input is at a low logic level, current is present at the motor’s phases.
If the logic level is high, the current at the phases is annulled.
EXTERNAL CURRENT REDUCTION
Terminal 10
Input used to reduce current output to the motor
When this input is at a high logic level the drive supplies the current set with
the dip-switches.
If at a low logic level, the erogated current is reduced by 50% (see application
notes).
DRIVE FAULT
Terminal
8
Output used to carry out the drive status.
Normally low, this signal moves to high logic level when a protection occurs.
The relative alarm LED lights up to show the event.
-30-
SMD103
Version 2.0
Control signals
5.2.13
Gnd
SIGNAL
SOURCE
2
Common
9
C.Off
10
C.Red
11
Dir
12
Step
Connection diagram in NPN configuration
Gnd
SIGNAL
SOURCE
2
Common
9
C.Off
10
C.Red
11
Dir
12
Step
24 Vdc
Connection diagram in PNP configuration
-31-
SMD103
Version 2.0
Setting up the drive
5.3
Before powering up the drive you must setting up the current level, the step
resolution and all the parameters.
All the drive settings can be changed by the dip-switches SW A.
SW A settings
1
2
3
OFF
OFF
OFF
OFF
Current
(A)
SW A set.
5
6
OFF
3
OFF
OFF
ON
2.6
ON
OFF
2.3
OFF
ON
ON
2
ON
OFF
OFF
1.6
ON
OFF
ON
1.2
ON
ON
OFF
0.9
ON
ON
ON
0.5
-32-
step
resolution
OFF
FULL(2phaseON)
OFF
ON
WAVE(1phaseON)
ON
OFF
HALF
ON
ON
QUARTER
SW A set.
4
Equalization
OFF
Enable
ON
Disable
SMD103
Version 2.0
Current motor setting
5.3.1
The 1st,2nd and 3rd positions of Dip-switch A allow to change curret level choosing it between eight.
Current should be compatible with motor current requirements.
Note: Higher the current, higher power dissipation of the drive, so increase cooling at high current levels to keep heatsink below 70°C (158°F).
Step resolution
5.3.2
Step resolution defines the minimal angle of rotation per step. It can be setted
choosing it between four sizes available.
The common used step size is half step that, in 1,8° stepper motor, corresponds
to 400 steps per revolution.
Step per revolution can be obtained using the following table only for 1,8° steppe motor (200 physical step per revolution).
Step resolution
full (2 phase ON)
200
wave (1 phase ON)
200
half
400
quarter
800
Equalization
5.3.3
Resonance phenomenas typical of all stepping motor at medium frequencies
increase when physical step is divided by the drive.
To avoid this phenomenon AEC’s drives have implemented an equalization
functionality that increase motor current when is working a phase alone.
Dip-switch A(position 4), generally set at OFF. In case of resonance at
medium frequencies, approx. 1000 step/” at half step and approx. 2000 step/”
at quarter step, set at ON.
-33-
SMD103
Version 2.0
Automatic current reduction
JP1
5.3.4
JP2
Automatic current reduction reduces output current every time the motor is not
moving. The switch to the reduced current level occurs 100 ms after the last
step impulse received.
If JP2 is set for automatic current reduction (OPEN), each time the motor stops
the current decreases by 50% of the nominal current.
Automatic current reduction must only be excluded in full cognition of facts.
Input polarity selection
5.3.5
With JP2 jumper it is possible to define the polarity (NPN or PNP) of the stepper
drive.
-34-
SMD103
Version 2.0
Drive LEDS indications
5.4
Any function of the drive can be monitored by the drive status LED.
The SMD103 have 4 indications leds, that display current status, voltage status, faults or over temperature.
Everytime your system has malfunctions check the led’s status on the top of
the drive.
If no leds are turned on, verify that power supply is turned on and that the M1
terminal block is correctly inserted. When drive is correctly supply, all connectors are inserted but the leds are still turned off, disconnect the drive wait
for a while to descharge any accumulator device and control the power supply.
H.V. LED
In normal operation this led is light up, if it is off indicates something wrong in
power supply or the fuse is blowned up.
C.OFF LED
Everytime the drive output current is enabled this LED is light up. When the
LED’s turned off motor phases are not energized.
-35-
SMD103
Version 2.0
C.FULL LED
This LED light up when the output current is at its nominal value and not reduced.
FAULT LED
This LED indicates any type of drive’s malfunctioning; there are many reason
that can create a system fault, first of all wrong connections.
Fault condition maybe due to any of the following causes:
• wrong connection. Motor phases have been connected in wrong way
or the motor cables have been wrong coupled.
• short circuit between phases and ground or phases and Power sup
ply
• under voltage. Input supply voltage level too low to powering up the
system, when the HV LED is turned off.
-36-
SMD103
Version 2.0
Testing the installation
5.5
After the system installation, before powering up the drive, please check carefully all connections, voltage levels and all the requirements you have to met.
Caution
5.5.1
It is highly reccomended to perform the first power up with motor
shaft disconnected from any load to avoid any undesired motion
and prevent things damages and personal injuries.
Be ready to power off the drive if undesired motion control occurs.
Mechanical test
5.5.2
Check that drive is firmly fixed with a free space all around of 5 cm (1.97in), that
there aren’t other heat sorces closed to the drive and without barriers who stop
natural or forced air convection.
Take a look carefully that there aren’t burrs in the nearest of the drives.
Wiring test
5.5.3
Check that all the wires are tightly connected in the right place and that the
wiring meet all safety guidelines and is in accordance with all local safety laws
and regulations.
Voltage level test
5.5.4
Before inserting M1 connector control that voltage level is into the right values
and not exceed maximum absolute ratings.
It is very important to do this because if supply voltage exceed 45 Vdc it causes
drive breackdown.
Setting up checking
5.5.5
Control that all the dip switches are correctly setted and the setup current never
exceed motor ratings.
Need help?
5.5.6
If you need further assistance wuth your installation, please contact us or your
local distributors.
-37-
SMD103
Version 2.0
Signal test
5.5.6
After successfuly perform all the aforesaid tests, power on the drive and verify
that HV LED light up and motor has holding torque by attempting to rotate the
shaft.
Give input step signal and control if motor rotation is in right direction. If not ,
power off the system and exchange the phase A with the phase A-.
Changing the direction signal polarity, the motor shaft should invert its rotation.
Need help?
5.5.7
If you need further assistance wuth your installation, please contact us or your
local distributors.
-38-
SMD103
Version 2.0
Appendix
A
6.0
Axis outlines
6.0.1
STEP
DIR
SMD103
C.RED
C.OFF
Axis ctr
FAULT
Target
FLS
BLS
Carriage
Stepper
AXIS
Direction movement
-39-
SMD103
Version 2.0
Speed vs Time profile
6.0.2
RUN
nr
am
era
tio
p
ram
Ac
cel
ion
Acceleration: step/s2
t
era
Speed: step/s
cel
Ac
p
Maximum Speed
Start/stop
Speed
Time
The speed of stepper motors is expressed in steps per second.
The acceleration ramps should be either linear or “S” shaped, as smooth as
possible, and are expressed in steps per square second.
The START-STOP speed is that certain number of steps per second at which
the motor, when activated with its load, does not lose steps when passing from
zero speed to the START-STOP speed. The general value is 300-600 steps per
second.
The HOME position can be obtained in three different ways:
1) when the backwards limit switch (BLS) is reached, invert the direction until
the same limit switch is disabled.
2) when the backward limit switch (BLS) is reached, invert the direction until
the optic fork or the zero top of an encoder (TOP) is enabled.
3) when the zero TOP sensor is reached, invert the direction until the same
sensor is disabled.
-40-
SMD103
Version 2.0
Boost
6.0.3
Speed
RUN
Acc.ramp
Dec.ramp
Time
T1
T0
T2
T4
T3
To increase the performance of a stepper motor it is possible to act on the phase
current in a dynamic manner.
With the “boost” instruction you obtain an increase in current, but only during
acceleration and deceleration. During the run the current remains reduced.
T0
T1
T2
T0 - T2 -T4
=
Current reduction
T1 - T3
=
Current full
T3
T4
During the run phase (T2) the current is reduced to a minimum value when the
motor turns at a constant speed. This is necessary for overcoming system lacks
and load inertia.
-41-
SMD103
Version 2.0
Hardware references
9.0
Drive specifications - SMD103
9.0.1
Functional description
Parameter
Value
Control type
Bipolar chopper
Nominal chopping frequency
20 KHz
Step resolution
dip switches selectable between 200
to 800 steps per revolution
Maximum output current
3 A rms
Output current adjustment
dip switches selectable between 0.5
to 3 A rms in 8 levels.
Standby current reduction
50% of nominal value (automatic or
external)
Drive supply voltages
12-36 Vdc +5% -20%
LED status indicators
HV status, current status, Fault
Motor inductance range
0.5 - 10mH recommended
Environment specifications - SMD103
Parameter
11.0.1
All drive of servostep series
Environment
Pollution degree 2
Installation category III
Operating temperature range
0 to 50 °C ambient
Storage temperature range
dip switches selectable between 200
to 800 steps per revolution
Humidity
5 to 95 % non condensing
Cooling
Natural convection
Housing
Anodized aluminium
Weight
200g
Forced cooling is required everytime the heatsink exceed 70°C (158 °F)
-42-