1
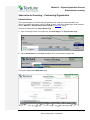
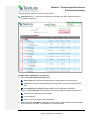
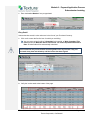
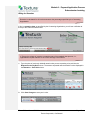
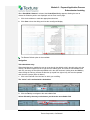
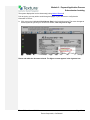
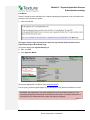
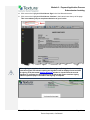
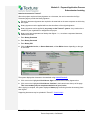
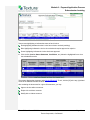
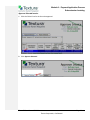
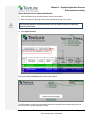
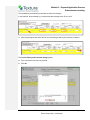
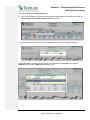
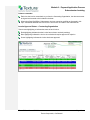
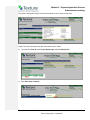
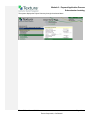
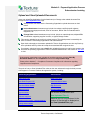
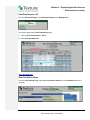
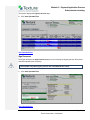
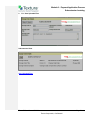
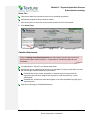
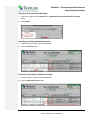
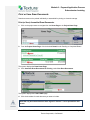
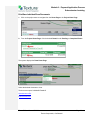
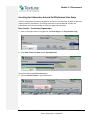
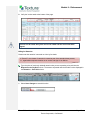
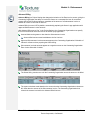
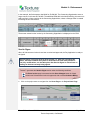
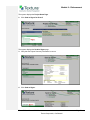
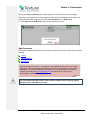
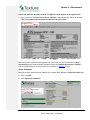
Textura
TM
United States
Module 6
Payment Application Process
Textura User Manual
2008
Textura Corporation 1405 Lake Cook Rd Deerfield IL 60015
866-TEXTURA (839-8872) www.texturacorp.com
Guide to User Manual Navigation
Icons
The following icons are used in the margin throughout the manual to bring the user’s attention to
noteworthy aspects of the Textura™ system, as explained below:
Important Information
Information that may be valuable or necessary to Textura™ users.
Special Topics
More advanced functionality and/or feature. Click icon to view details.
Interfaces
This may be a setting that is required of or is provided for the benefit of
accounting interface users in the Textura™ application. Alternately,
users may be able to import or export data at this point in the process.
Click icon to view the details specific to your accounting package.
Custom Settings
This is a Custom Feature of the Textura™ system. Please contact your
Textura Representative for more information.
Draw Context
This action or setting may be affected by draw context, which impacts
the timing of the application of certain settings in Textura™, and may
cause the system to reset data to the context of the previous draw.
Tutorials
Video tutorial available. Click icon to view details.
Links
Hyperlinks in the Textura™ User Manual appear in a blue font with underlining.
Hyperlinks represent a link to another area of the manual that the user may find helpful to view. When the
user clicks a hyperlink, the user is taken to that topic or area of the manual. Users should note their
starting point prior to navigating away, to facilitate their return.
Some hyperlinks allow the user to view a web page outside of the User Manual. The destination URL
opens in a new “tab” or “window” that the user may close when viewing is complete.
Textura™ User Manual © 2008
i
Textura Corporation, Confidential
PDF Documents for Printing
The following Textura™ documents are available as PDF files for viewing, saving, and printing:
Module 1 – Textura Overview
Approximately 0.7 MB
Module 2 – Create Account
Approximately 2.7 MB
Module 3 – Project Setup
Approximately 4.0 MB
Module 4 – Contract Administration
Approximately 2.9 MB
Module 5 – Budget Management
Approximately 4.4 MB
Module 6 – Payment Application Process
Approximately 6.0 MB
Module 7 – Compliance Management
Approximately 3.0 MB
Module 8 - Disbursement
Approximately 3.2 MB
Textura User Terms
Approximately 0.6 MB
Special Topics
Draw Context
Specified Billing
Parallel Signatory Invoice Approval
Special Budget
Multiple Serial Signatory Invoice Approval
Textura User Manual (Modules 1 – 8)
Approximately 22 MB
PDF date stamp
Textura Documents print with a date stamp to provide users with the ability to see at a glance how current
their information is. The date stamp format is: 12-Dec-08
Textura™ user online help is frequently updated. Access the most current information via
Textura Info on your Home Page.
Textura™ User Manual © 2008
ii
Textura Corporation, Confidential
Module 6 – Payment Application Process
Module 6 – Payment Application Process ........................................................ 5
Subcontractor Invoicing - Overview ...........................................................................................................................6
Subcontractor Invoicing – Contracting Organization .................................................................................................7
Initiate the Draw ....................................................................................................................................................7
Initiating the First Draw .....................................................................................................................................8
Add or Re-invite Draw Participants ..................................................................................................................11
Subcontractor Invoicing – Subcontractor .................................................................................................................14
Enter Invoice ........................................................................................................................................................15
Entry Detail ......................................................................................................................................................16
Billing for Retention .........................................................................................................................................17
Contractor Affidavit Lines ................................................................................................................................18
Display..............................................................................................................................................................19
Navigation ........................................................................................................................................................20
Tab-ordered data entry ................................................................................................................................20
Up and down arrow keys ............................................................................................................................. 21
Send to Signer ......................................................................................................................................................21
Sign Documents ...............................................................................................................................................23
Invoice..........................................................................................................................................................23
Sworn Statement .........................................................................................................................................26
Lien Waiver ..................................................................................................................................................28
Notarize documents in Textura™ .................................................................................................................30
Review/Approve Subcontractor Invoices – Contracting Organization .....................................................................31
Approve Subcontractor Invoices ..........................................................................................................................31
Approve Selected Invoice.................................................................................................................................33
Reject Selected Invoice without Modification .................................................................................................35
Modify and Reject Subcontractor Invoice ........................................................................................................36
Invoice Modification - Subcontractor ..................................................................................................................39
Locked Invoice..............................................................................................................................................42
Invoice Approval Status – Contracting Organization ........................................................................................43
Notification of a Subcontractor not invoicing - Contracting Organization ...........................................................44
Project or Draw Summary ....................................................................................................................................44
Upload and View Uploaded Documents ..................................................................................................................47
Draw Home Page .................................................................................................................................................48
View Draw Request - SC .......................................................................................................................................49
View Lien Waiver Status ......................................................................................................................................49
Approve Invoice ...................................................................................................................................................50
Sign Document.....................................................................................................................................................51
Authorize Payment ..............................................................................................................................................52
Manage Sub Invoicing (Specified Billing) .............................................................................................................52
Change Order Details ...........................................................................................................................................53
Subcontractor View .....................................................................................................................................54
Upload Documents on View Uploaded Files page ...............................................................................................55
Upload Files .................................................................................................................................................55
View and Manage Uploaded Document Files ......................................................................................................56
Delete Files ......................................................................................................................................................58
Classified Attachments ........................................................................................................................................58
Classify a document when uploading: .............................................................................................................59
Textura™ User Manual © 2008
Page 3
Textura Corporation, Confidential
Module 6 – Payment Application Process
Subcontractor Invoicing
Classify previously uploaded documents:........................................................................................................59
Declassify a previously uploaded document: ..................................................................................................59
Print or Save Draw Documents ................................................................................................................................60
Print (or Save) Assembled Draw Documents .......................................................................................................60
Save Document File .........................................................................................................................................61
Print Document File .........................................................................................................................................62
Print/Save Individual Draw Documents ...............................................................................................................63
Owner Billing - Overview .........................................................................................................................................64
Invoicing for Subcontracted and Self-Performed Line Items ....................................................................................65
Enter Invoice – Contracting Organization ............................................................................................................65
Entry Detail ......................................................................................................................................................66
Billing for Retention .....................................................................................................................................67
Enter Invoice Display ........................................................................................................................................68
Navigation ........................................................................................................................................................69
Tab-ordered data entry ................................................................................................................................69
Up and down arrow keys ............................................................................................................................. 70
Advance Billing .................................................................................................................................................71
Send to Signer ......................................................................................................................................................72
Sign Documents ...................................................................................................................................................74
Invoice..........................................................................................................................................................75
Sworn Statement .............................................................................................................................................77
Lien Waiver ......................................................................................................................................................78
Notarize Documents ........................................................................................................................................80
Draw History – View Draw Request .........................................................................................................................81
View Draw Request ..............................................................................................................................................81
View Draw Request – SoV ....................................................................................................................................81
View Draw Request – SC ......................................................................................................................................82
Textura™ User Manual © 2008
Page 4
Textura Corporation, Confidential
Module 6 – Payment Application Process
Module 6 – Payment Application Process
The Textura™ system facilitates the exchange of documents and information that takes place
between a Contracting Organization, its Subcontractors, Material Suppliers, Owner/Developer(s), and
other participants in the construction process.
A typical draw process using Textura™ includes the following steps:
Initiate
Draw
Email
Notification
Submit
Invoices
Review /
Approve
Invoices
Owner
Billing
Sign Pay
Application
Draw
Funded
Payment
Disbursed
• Contracting Organization initiates a draw
• Subcontractors included in the draw receive email
notification from Textura™
• Subcontractors submit signed invoices, lien waivers, and
appropriate legal documents
• Contracting Organization completes review and approval of
invoices in draw
• Contracting Organization enters self-performed work
details and/or fees to complete their Owner Billing
• Contracting Organization signs the pay application (finalizes
invoice and/or sworn statement and lien waiver)
• Disbursing Organization funds the draw according to terms
in contract (e.g., pay when paid)
• Payment is made electronically to all Textura™ participants
through ACH
Link to Owner Billing
Textura™ User Manual © 2008
Page 5
Textura Corporation, Confidential
Module 6 – Payment Application Process
Subcontractor Invoicing
Subcontractor Invoicing - Overview
The following section provides a more detailed view of the steps associated with Subcontractor
Invoicing.
Contracting Organization initiates a draw
Subcontractors included in the draw receive email notification from Textura™
Subcontractors submit signed invoices and lien waivers, including appropriate legal
documents
Users can attach additional documents to their pay application (e.g., certified payroll, photos
of material stored) using the upload attachment functionality.
Users can designate a document attachment (e.g., certified payroll) as “Classified” in
order to limit access to that document within their own organization via user permissions.
All users in the contracting organization have access to the attachment.
The Contracting Organization may request lien waivers to be signed after the draw has been
approved by the owner in a limited number of cases; where this occurs, the Subcontractor(s)
receive an additional email notification to sign their lien waivers.
Except where noted by contract, Textura™ holds the signed unconditional lien waiver in an
“electronic lock box”
The Contracting Organization may view an unsigned version of the lien waiver, but
cannot access the signed version until payment has been made.
Contracting Organization completes review and approval of invoices in draw
Contracting Organization can modify and/or reject Subcontractor invoices prior to final
approval, if necessary.
Subcontractor modifies or re-enters invoice details as required in order to resubmit
Documents signed in Textura™ are displayed using Adobe® Reader®. Before you begin
signing your documents, please verify that you have the most up-to-date version of this
application. You can download Adobe® Reader® at no cost at http://www.adobe.com/.
Follow the instructions for downloading or updating your copy.
Textura™ User Manual © 2008
Page 6
Textura Corporation, Confidential
Module 6 – Payment Application Process
Subcontractor Invoicing
Subcontractor Invoicing – Contracting Organization
Initiate the Draw
The Project Manager for the Contracting Organization may receive an email notification from
Textura™ reminding them that it is time to initiate the draw, if they have updated their Draw Calendar.
Refer to Module 3 – Project Setup: Draw Calendar or click here to view.
The draw is initiated from the Project Home Page.
1. Click on the project name to navigate from the Home Page to the Project Home Page.
2. Select Initiate Draw from the Draw dropdown menu on the central navigation bar.
The system displays the Initiate Draw page.
Textura™ User Manual © 2008
Page 7
Textura Corporation, Confidential
Module 6 – Payment Application Process
Subcontractor Invoicing
Initiating the First Draw
The user is prompted to confirm their Lien Waiver Settings the first time a draw is initiated for a
project, or until the settings are confirmed. These settings determine the timing of Subcontractor Lien
Waiver submission and release as well as the Contracting Organization Lien Waiver release (i.e.,
timing of when Project Lien Waiver is available to on-system participants).
To modify Lien Waiver Signature Timing Settings prior to initiating the draw, return to the Project
Settings page using the link provided. Refer to Module 3 – Project Setup: Lien Waiver Settings, or
click here to view.
If you need to change the release timing (i.e., when signed Lien Waivers will be available to onsystem participants), please contact your Textura™ representative for assistance. This request can
only be complied with under certain circumstances.
1. Click Confirm Settings
Textura™ User Manual © 2008
Page 8
Textura Corporation, Confidential
Module 6 – Payment Application Process
Subcontractor Invoicing
The page reopens without the Confirm Settings dialog.
Draw # defaults to “1” and may be modified on the first draw only. Each subsequent draw is
numbered in sequence.
All fields with a red asterisk (*) are required.
2. Enter the Period From and Period To dates.
Period From date is optional and represents the starting date for the billing period
Period To is required and represents the bill-through date for all invoiced amounts in the
draw
Both Period From and Period To dates appear on Pay Application documents
3. Verify or modify Draw Date, which indicates to Subcontractors the date that invoices are due.
defaults to three days after draw is initiated
may be changed
does not cause the Draw to close automatically
4. Enter an optional “Draw Name” to display on screen and on customized documents as needed.
Please contact your Textura™ representative for more information.
Textura™ User Manual © 2008
Page 9
Textura Corporation, Confidential
Module 6 – Payment Application Process
Subcontractor Invoicing
5. Click Select All to include all participants in the Draw, OR select individual checkboxes under
Participate in Draw? to invite specific subcontractors.
The Contracting Organization is automatically included in the draw.
6. Enable or disable Retention Billing as necessary.
If this is a retention draw for any or all of the subcontractors, click the appropriate
checkbox(es) to the right of their name.
The top check boxes on these columns will automatically select or deselect all.
“Allow Retention Billing” enables the Subcontractor to bill for retention.
“Retention Billing Only” limits the Subcontractor’s billing to retention ONLY (i.e.,
Subcontractor is not able to bill for work completed as part of this draw)
Subcontractors who have not confirmed their contract and are therefore not available to be
included in the draw can be added at a later date by selecting Add Draw Participants on
the Draw Home Page.
7. Click Save and Notify Selected Participants.
The system displays a Status Message confirming that selected participants are included in the
draw, and prompting the Contracting Organization to enter their invoice.
The Contracting Organization should not submit their invoice until all participating
Subcontractor invoices have been received and approved.
Textura™ User Manual © 2008
Page 10
Textura Corporation, Confidential
Module 6 – Payment Application Process
Subcontractor Invoicing
The system generates an email to draw participants to notify them that the draw is open and request
that they either enter their invoice amounts in Textura™ or submit a “No Invoice this Draw” response.
See Enter Invoice or Notification of a Subcontractor not Invoicing for more information.
Add or Re-invite Draw Participants
Participants can be added or re-invited to the draw at any time prior to its close.
1. Click on the project name to navigate from the Home Page to the Project Home Page.
2. Select the Draw # under Pending Draws in the left margin.
Textura™ User Manual © 2008
Page 11
Textura Corporation, Confidential
Module 6 – Payment Application Process
Subcontractor Invoicing
The system displays the Draw Home Page.
3. Click Add Draw Participants.
The system displays the Initiate Draw page.
4. Click the Participate in Draw? checkboxes for any Subcontractors that you are adding to the
draw.
5. Click Save and Notify Selected Participants.
The system displays a Status Message confirming that selected participants are included in the draw.
Textura™ User Manual © 2008
Page 12
Textura Corporation, Confidential
Module 6 – Payment Application Process
Subcontractor Invoicing
The system also generates an email to the added draw participants to notify them that the draw is
open and request that they either enter their invoice amounts in Textura™ or submit a “No Invoice this
Draw” response. Refer to Enter Invoice or Notification of a Subcontractor not Invoicing in this module
for more information.
Textura™ User Manual © 2008
Page 13
Textura Corporation, Confidential
Module 6 – Payment Application Process
Subcontractor Invoicing
Subcontractor Invoicing – Subcontractor
There are two methods in Textura™ by which Subcontractor invoicing may be submitted. Typically,
the Subcontractor navigates to the Textura™ Log In page by clicking the link provided in the email
request for an invoice. The user can also Log into the system using their Textura™ “Bookmark,” or by
selecting “Client Login” from the Textura™ website at www.texturacorp.com. Refer to Module 2 –
Create Account: Logging into the Textura™ system or click here to view.
Once logged in, the action to Enter Invoice for Draw # is available to the user on both the Draw Home
Page and the Project Home Page. The Enter Invoice action remains on the Home Page until the
invoice is signed. Once signed, the invoice cannot be modified by the Subcontractor.
The Contracting Organization either approves the invoice or rejects it back to the Subcontractor. The
Contracting Organization can also choose to modify all or part of the invoice and return it for the
Subcontractor’s review and signature. Final invoices must be signed by the Subcontractor in order to
be included in a draw.
The Contracting Organization sometimes elects to use Specified Billing for the submission of
Subcontractor invoicing. This contract setting enables the Contracting Organization to enter an
invoice on behalf of a Subcontractor and submit it to the Subcontractor to view and sign. Under
Specified Billing, the Subcontractor cannot enter or modify invoice details. Refer to Special Topics for
more information
Textura™ User Manual © 2008
Page 14
Textura Corporation, Confidential
Module 6 – Payment Application Process
Subcontractor Invoicing
Enter Invoice
Navigate to the Enter Invoice page by clicking the ‘enter invoice’ link available in the email or from
the Project Home Page or Draw Home Page. All of these links will take you to the same page.
If you will not be submitting an invoice for the current draw, click No Invoice this Draw to notify
the Contracting Organization.
The Enter Invoice screen displays your line items and current balances.
The Invoice Number may be pre-populated. You may override this number, but the
Contracting Organization may choose to use the pre-populated number in their accounting
system.
Textura™ User Manual © 2008
Page 15
Textura Corporation, Confidential
Module 6 – Payment Application Process
Subcontractor Invoicing
1. Enter the Invoice Number if not pre-populated.
Entry Detail
Unless otherwise noted, invoice values are in the form of your Functional Currency.
1. Click a cell to enter the first line item for which you are billing.
You may enter values for either % Complete for this period, or Work Completed This
Period, as well as Materials Stored This Period, and Total Completed and Stored to
Date. All other fields will be automatically calculated.
Invoice amounts may not exceed the remaining balance for any line item. They can
be saved at any time and edited up until the invoice has been signed.
2. Verify the invoice totals at the bottom of the page:
Textura™ User Manual © 2008
Page 16
Textura Corporation, Confidential
Module 6 – Payment Application Process
Subcontractor Invoicing
Billing for Retention
Retention is calculated for all invoice amounts at the percentage specified by the Contracting
Organization.
If this is a retention draw, as specified by the Contracting Organization, you will see notification at
the top of the screen as shown below.
In Textura, the release of retention is treated as part of the standard draw process, i.e.,
organizations request retention on an invoice and sign a Lien Waiver.
1. Type the value of previously withheld retention that you are requesting to be paid into the
Request Previously Held column. The amount requested cannot exceed the value displayed in
the Retention – Prev Held column.
2. Click Save Changes to save your invoice.
Textura™ User Manual © 2008
Page 17
Textura Corporation, Confidential
Module 6 – Payment Application Process
Subcontractor Invoicing
The system displays a Status page including Next Steps.
Enter Invoice remains a “Next Step” until the Pay Application documents are signed.
The invoice is not submitted for payment until it is signed.
Contractor Affidavit Lines
If there is no Contractor Affidavit requirement, the next step is Send to Signer for Draw #
If there is a project requirement for Contractor Affidavit, your next step is to Edit Additional
Contractor Affidavit Lines.
1. Click Edit Additional Contractor Affidavit Lines.
2. Enter your Contractor Affidavit payment information.
If you do not have Subcontractors or material suppliers to add, simply click Save
Changes to move onto the next step.
You may also choose to type “None” in the first cell to indicate to your Contracting
Organization that you have completed this step.
Contractor Affidavits are covered in greater detail under Special Topics.
Textura™ User Manual © 2008
Page 18
Textura Corporation, Confidential
Module 6 – Payment Application Process
Subcontractor Invoicing
Display
Organizations may choose to customize their Enter Invoice spreadsheet to display only the
fields/columns they use. The Hide/Show Columns option appears as a link in the upper left corner of
the Enter Invoice spreadsheet.
Before altering your present configuration, print or otherwise record the arrangement
so that you can easily return to the format if desired.
By default, the Enter Invoice page displays the following fields:
% Comp
Scheduled Value
Work Completed Previous Amt
Work Completed This Period Amt
Material Stored This Period Amt
Total Completed and Stored to Date Amt
Balance To Finish
Retention This period Amt Held
Retention This Period %
Retention Prev Held
Retention Request Previously Held
The following additional fields may be displayed to allow Unit Price Billing, a specialized invoice
format required by some Contracting Organizations.
Units
Unit Price
Scheduled Quantity
Unit Price data may be used for any open draw, and does not affect the Schedule of Values or
the printed Pay Application. Please consult the documentation under Special Topics for more
information about using Unit Price Billing.
Textura™ User Manual © 2008
Page 19
Textura Corporation, Confidential
Module 6 – Payment Application Process
Subcontractor Invoicing
When Show/Hide Columns is selected, the ControlPanel dialog appears, allowing the user to
choose the fields they wish to see displayed on their Enter Invoice page.
1. Click the checkboxes to make the appropriate selections.
2. Click Save to close the dialog and view the reconfigured display.
The Restore Default option is also available.
Navigation
Tab-ordered data entry
Tab-ordered data entry enables the user to move through the editable cells in the table using only the
Tab key. Tab follows a path from left to right from the starting point, and, after the last editable cell of
each line, moves to the first (leftmost) editable cell in the next line down. Holding down the Shift key
when clicking the Tab key reverses the direction (to a path from right to left), but must be repeated
each time the (reverse) effect is desired.
1. Click in the first field of the line item for which you are billing.
The “active” cell is outlined with a dashed box.
2. Click the Tab key to navigate to the next editable field.
Values affected by the entry recalculate as you tab to the next editable field.
Textura™ User Manual © 2008
Page 20
Textura Corporation, Confidential
Module 6 – Payment Application Process
Subcontractor Invoicing
3. Continue tabbing through the line(s) until entry is complete.
Up and down arrow keys
Users may also navigate vertically through the spreadsheet using the up or down arrow keys. The
cursor moves to the next editable cell in the column, rather than in the line.
Send to Signer
To complete the submission process once the invoice has been saved and any necessary Contractor
Affidavit lines have been entered, the invoice must be forwarded to the designated Signer for the
organization.
Send to Signer is a trigger point for Draw Context, i.e., when the user takes this
action, the draw context in the system is advanced to the next draw (initiated or
not). Any modifications, etc. that take place after Send to Signer is clicked have no
bearing on the draw currently being signed.
1. Click the Send to Signer for Draw # action under Pending Draws on the Project Home Page.
The system displays the Send to Signer page.
View the Project Summary in the column to the right to verify that the numbers are correct.
If the Summary is not correct, return to Enter Invoice from the Draw Home Page to resolve the
discrepancies before continuing.
Textura™ User Manual © 2008
Page 21
Textura Corporation, Confidential
Module 6 – Payment Application Process
Subcontractor Invoicing
2. If the summary is correct, click the Send to Signer button.
The system displays a Status page confirming that the invoice has been sent to Signer.
If the current user is the Signer, the Status page also displays a Next Steps link to Sign Invoice
for Draw # and the user may click the link to proceed with signing the document(s).
The System notifies the designated Signer via email and project actions that there is an invoice ready
to be signed. This email is automatically generated and will be sent even when the signing
action is completed immediately after the Send to Signer step.
Textura™ User Manual © 2008
Page 22
Textura Corporation, Confidential
Module 6 – Payment Application Process
Subcontractor Invoicing
Sign Documents
The system will automatically display the documents required by the Contracting Organization for the
draw, including any or all of the following:
Invoice
Sworn Statement
Conditional Lien Waiver
Unconditional Lien Waiver
Documents signed in Textura™ are displayed using Adobe® Reader®. Before you begin
signing your documents, please verify that you have the most up-to-date version of this
application. You can download Adobe® Reader® at no cost at http://www.adobe.com/.
Follow the instructions for downloading or updating your copy.
Invoice
Use the link provided to open the Sign Document page.
View the Project Summary in the right hand column to verify that the numbers are correct.
The user confirms that the invoice is accurate and complete prior to signing. Signed
documents are transmitted to the Contracting Organization in real time.
Textura™ User Manual © 2008
Page 23
Textura Corporation, Confidential
Module 6 – Payment Application Process
Subcontractor Invoicing
If the Summary is not correct, Reject Draw to PM. Please note that Reject Draw to PM is
available only during the Sign Invoice/Sworn Statement portion of the document signing process.
When the Signer clicks Reject Draw to PM prior to signing a document, the Project Manager
for their organization receives an email message notifying them that their organization’s
invoice has been rejected. They can access the link to Re-Enter Invoice from their Project
Home Page and the Draw Home Page.
In the example, there is a project requirement for a Contractor Affidavit (message in red).
Contractor Affidavit Lines are covered in greater detail under Special Topics.
If there are additional supporting documents that you would like to submit with your Pay Application,
they may be uploaded via View Uploaded Files. View this topic.
To view the unsigned invoice, click the Invoice link under Your Draw Documents.
The system displays the Invoice document(s) using Adobe® Reader®.
When satisfied that the document is correct, proceed with signing.
1. Enter your PIN.
2. Click Sign Invoice.
Textura™ User Manual © 2008
Page 24
Textura Corporation, Confidential
Module 6 – Payment Application Process
Subcontractor Invoicing
The system displays the Invoice document(s) using Adobe® Reader®.
Prior to signing, you may wish to scroll through all pages of your document to verify that the
information is correct.
3. Click once on the highlighted Click Here to Sign in the Invoice document. The cursor changes to
a hand symbol as you roll your mouse over the box; click only once to sign.
Please wait while the document reloads. The Signer’s name appears in the signature box.
Textura™ User Manual © 2008
Page 25
Textura Corporation, Confidential
Module 6 – Payment Application Process
Subcontractor Invoicing
4. Click once on the highlighted Click Here to Continue in the Instructions at the top of the page.
This is a mandatory step to complete submission of your invoice.
Where the project requires a Notary signature on a document, the user is returned to the Sign
Document page to provide the Notary signature. View this topic.
Sworn Statement
Where the project requires a Sworn Statement, the system again displays the Sign Document Page.
1. Enter your PIN.
2. Click Sign Sworn Statement.
The system displays the Sworn Statement using Adobe® Reader®.
Prior to signing, you may wish to scroll through all pages of your document to verify that the
information is correct.
3. Click once on the highlighted Click Here to Sign in the Sworn Statement.
4. Click once on the highlighted Click Here to Continue in the Instructions at the top of the page.
This is a mandatory step to complete submission of your invoice.
Textura™ User Manual © 2008
Page 26
Textura Corporation, Confidential
Module 6 – Payment Application Process
Subcontractor Invoicing
5. The system displays a Status page confirming that the document is signed.
Where the project requires a Lien Waiver signed with invoice, there is a link to Sign Lien Waiver for
Draw # on the Status page. This link also appears in the Signer’s Actions.
Textura™ User Manual © 2008
Page 27
Textura Corporation, Confidential
Module 6 – Payment Application Process
Subcontractor Invoicing
Lien Waiver
Textura™ sends an email notification to the Signer requesting their signature on the Lien Waiver and
providing a link to access the system.
1. Click the email link.
The Signer can also log in and access the action to sign via their Project Actions on the
Project Home Page or Draw Home Page.
The system displays the Sign Document page.
2. Enter your PIN.
3. Click Sign Lien Waiver.
The system displays the Lien Waiver using Adobe® Reader®.
Prior to signing, scroll through all pages of your document to verify that the information is correct.
If available, the Subcontractor can enter Optional Text on the Lien Waiver at this time. The
Contracting Organization determines the availability of this feature. Comments inserted into a
Lien Waiver by the Subcontractor do not alter the document language.
Textura™ User Manual © 2008
Page 28
Textura Corporation, Confidential
Module 6 – Payment Application Process
Subcontractor Invoicing
4. Click once on the highlighted Click Here to Sign in the Lien Waiver document.
5. Click once on the highlighted Click Here to Continue in the Instructions at the top of the page.
This is a mandatory step to complete submission of your invoice.
When signing is complete, the user sees a Status page confirming that the document(s)
have been signed. Documents requiring two signatures will be displayed a second time
for signing. If the document (Adobe® Reader®) window is closed before the second
signature is confirmed, the first signature will be discarded. Please continue signing
until the system displays confirmation that signing is complete.
Textura™ User Manual © 2008
Page 29
Textura Corporation, Confidential
Module 6 – Payment Application Process
Subcontractor Invoicing
Notarize documents in Textura™
Where the project requires a Notary signature on a document, the user is returned to the Sign
Document page to provide the Notary signature.
Electronic document signatures are required to be notarized on the same computer on which they
are signed.
Notary signature must be applied within a short timeframe of the original signature.
Notary signatures can be applied by any notary on the Textura™ system – they need not be a
member of your organization or assigned to the project.
Notary must have a separate user identity than Signer – i.e., must have a separate Username,
Password, and PIN.
1. Enter Notary Username
2. Enter Notary Password
3. Enter Notary PIN
4. Click the Notarize Invoice, or Sworn Statement, or Lien Waiver button depending on the type
of document
The system displays the document to be notarized using Adobe® Reader®.
5. Click once on the highlighted Click Here to Sign in the document’s Notary signature box.
6. Click once on the highlighted Click Here to Continue in the Instructions at the top of the page.
This is a mandatory step to complete submission of your invoice.
When signing is complete, the system displays a Status page confirming that the document(s) have
been signed.
Supporting documents may be uploaded in Textura™. View this topic.
Textura™ User Manual © 2008
Page 30
Textura Corporation, Confidential
Module 6 – Payment Application Process
Subcontractor Invoicing
Review/Approve Subcontractor Invoices – Contracting
Organization
Approve Subcontractor Invoices
When a Subcontractor invoice is submitted, the Project Manager for the Contracting Organization is
prompted to approve invoices for the draw via action items on their Project or Draw Home Page.
1. Click Approve Invoices for Draw #
The system displays the Approve Invoice or Approve Subcontractor’s Invoice (signatory
approvals) page.
Textura™ User Manual © 2008
Page 31
Textura Corporation, Confidential
Module 6 – Payment Application Process
Subcontractor Invoicing
Textura uses highlighting to indicate the status of each invoice:
Red highlighting indicates that the invoice has not been received (awaiting).
Blue highlighting indicates the invoice is received and requires approval or rejection.
Green highlighting indicates the invoice has been approved.
2. Click the link (Invoice, Sworn Statement, Lien Waiver, etc.) below the highlighted line to view
the submitted document.
The system displays the document using Adobe® Reader®. To exit, click the [X] at the top, right-hand
corner of the Adobe® Reader® window..
After reviewing the documents for a given Subcontractor, you may:
Approve Invoice without comment
Reject with or without comment
Modify with or without comment
Textura™ User Manual © 2008
Page 32
Textura Corporation, Confidential
Module 6 – Payment Application Process
Subcontractor Invoicing
Approve Selected Invoice
1. Click the “Select” box for the line to be approved.
2. Click Approve Selected.
Textura™ User Manual © 2008
Page 33
Textura Corporation, Confidential
Module 6 – Payment Application Process
Subcontractor Invoicing
The system displays a Status page confirming the approval.
The “approved” line appears highlighted in green upon re-entering the screen.
Textura™ User Manual © 2008
Page 34
Textura Corporation, Confidential
Module 6 – Payment Application Process
Subcontractor Invoicing
Reject Selected Invoice without Modification
1. Click the Select box for the Subcontractor Invoice to be rejected.
2. Enter the reason for rejecting in the text box provided at the top of the screen.
This message applies to all Subcontractors who are selected. Invoices are typically
rejected one at a time.
3. Click Reject Selected.
The system displays a Status page confirming the rejection.
The Subcontractor receives an email alerting them to the rejected invoice and providing a link for
them to re-enter, sign and submit their invoice.
Textura™ User Manual © 2008
Page 35
Textura Corporation, Confidential
Module 6 – Payment Application Process
Subcontractor Invoicing
Modify and Reject Subcontractor Invoice
The Edit option appears below the selection checkbox for Subcontractor invoices.
1. Click Edit.
The system displays the Modify Contractor Invoice page. The contractor is identified by contract
number, description, and (name) at the top of the screen.
2. Click and enter the change into the cell that requires editing.
Textura™ User Manual © 2008
Page 36
Textura Corporation, Confidential
Module 6 – Payment Application Process
Subcontractor Invoicing
The spreadsheet automatically recalculates to reflect the changes.
In the example, the percentage (%) complete has been changed from 25% to 20%.
3. Click the plus sign at the end of the line you are editing to attach your comment, if desired.
The Invoice History and Comment dialog appears.
4. Type comments in the text box provided.
5. Click Ok.
Textura™ User Manual © 2008
Page 37
Textura Corporation, Confidential
Module 6 – Payment Application Process
Subcontractor Invoicing
Comments appear at the bottom of the invoice line.
[Optional] Select the Lock Invoice checkbox to require the invoice to be accepted “as-is.”
Leaving box unchecked allows Subcontractor to make changes before signing.
6. Click Save & Reject Invoice to “send” invoice back to Subcontractor.
The Status screen confirms your actions.
Textura™ User Manual © 2008
Page 38
Textura Corporation, Confidential
Module 6 – Payment Application Process
Subcontractor Invoicing
Invoice Modification - Subcontractor
The Subcontractor receives email notification that their invoice is not accepted and/or is awaiting
review and/or signature. The Contracting Organization may only have commented on your invoice.
The most recently recorded comment is displayed at the bottom of the associated invoice line.
After viewing, the Subcontractor can:
send to signer
modify invoice and resubmit (if invoice is not locked)
Clicking on the email link brings the user to the Textura™ Login. Entering your Username and
Password takes you directly to the Enter Invoice page. You may skip Step 1 below.
From the Textura™ Home Page, navigate to the Project Home Page, where an action to Re-Enter
Invoice appears under Pending Draws.
1. Click the action to Re-Enter Invoice for Draw # (your selected Draw #).
Textura™ User Manual © 2008
Page 39
Textura Corporation, Confidential
Module 6 – Payment Application Process
Subcontractor Invoicing
The system displays the Enter Invoice page.
2. Click the exclamation point beside the comment that appears above a modified line to view the
Invoice History and comment dialog attached to that line.
3. View comments as displayed or click the plus sign to view a more detailed accounting.
The detailed display contains comment history and breakdowns for Original invoice amount,
Modified amount, and the Difference between the two.
Textura™ User Manual © 2008
Page 40
Textura Corporation, Confidential
Module 6 – Payment Application Process
Subcontractor Invoicing
4. [Opt.] Type a comment in the text box.
Please note that your ability to comment on or modify the invoice is contingent upon
the GC’s unlocked rejection.
5. Click Save to accept your comment, if applicable or Cancel to close without commenting.
Newly added comments appear on the Enter Invoice screen.
6. [opt.] Modify invoice, if necessary, to return to the Contracting Organization with changes.
7. Click Save Changes.
The system displays a Status page confirming your actions.
8. To complete the signing and resubmission process, Send to Signer.
Textura™ User Manual © 2008
Page 41
Textura Corporation, Confidential
Module 6 – Payment Application Process
Subcontractor Invoicing
Locked Invoice
The Subcontractor might also receive email notification that their invoice has been modified and
locked from further changes. In this case, the Subcontractor need only view and sign the invoice.
When the invoice has been locked, the action is to Review Invoice.
A locked invoice does not have editable cells. Comments can be viewed and new comments
entered, but Send to Signer is the only other action available.
1. Click Review Invoice for Draw # (selected Draw #).
2. Click Send To Signer, after reviewing the invoice.
Contracting Organization may:
accept your adjustments and approve the invoice without further comment.
make further modifications and return the invoice for review and signature
restore or make further modifications and return the invoice locked, When you have signed your
documents, the invoice returns to the Contracting Organization for approval. The GC’s
acceptance of your signed invoice ends the negotiation process.
Textura™ User Manual © 2008
Page 42
Textura Corporation, Confidential
Module 6 – Payment Application Process
Subcontractor Invoicing
Points to remember:
Each time the invoice comes back to you from the Contracting Organization, the documents must
be signed and returned to be included in the draw.
When using Specified Billing, Subcontractor invoices cannot be modified as discussed in this
topic. Comments attached to line items of the invoice are not visible to the Subcontractor.
Invoice Approval Status – Contracting Organization
Textura uses highlighting to indicate the status of each invoice:
Red highlighting indicates that the invoice has not been received (awaiting).
Blue highlighting indicates the invoice is received and requires approval or rejection.
Green highlighting indicates the invoice has been approved.
Textura™ User Manual © 2008
Page 43
Textura Corporation, Confidential
Module 6 – Payment Application Process
Subcontractor Invoicing
Notification of a Subcontractor not invoicing - Contracting Organization
The No Invoice this draw button on the Subcontractor Enter Invoice page enables the
Subcontractor to notify the Contracting Organization that they will not be submitting an invoice for a
given draw.
If selected, the Subcontractor is removed from the Approve Invoice screen.
If a subcontractor mistakenly declines to invoice, they can be added back to the draw by the
Contracting Organization. View Add or Re-invite Draw Participants.
Project or Draw Summary
1. On the Project Home Page, click Show project summary.
Textura™ User Manual © 2008
Page 44
Textura Corporation, Confidential
Module 6 – Payment Application Process
Subcontractor Invoicing
The system displays the Project Summary information as of the most current draw.
Project Summary information may also be viewed for prior draws.
2.
Click the prior Draw # on the Project Home Page under Pending Draws.
3. Click Show draw summary.
Textura™ User Manual © 2008
Page 45
Textura Corporation, Confidential
Module 6 – Payment Application Process
Subcontractor Invoicing
The system displays the Project Summary through the selected draw.
Textura™ User Manual © 2008
Page 46
Textura Corporation, Confidential
Module 6 – Payment Application Process
Subcontractor Invoicing
Upload and View Uploaded Documents
Users can upload Pay Application (Invoice Attachment) or Change order related document files
through the View Uploaded Files page.
Subcontractors can also have the Contracting Organization upload documents on their
behalf.
Invoice Attachment documents may include: time-sheets, certified payroll registers,
performance and payment bonds, Proof of Insurance, Bills of Sale for materials and/or
equipment, etc.
Change Order related attachments may include: job site or materials photos, adjusted Bills
of Quantities, supporting supplier invoices, or signed Change Orders.
Files can be uploaded at any point in the draw process. The upload process is essentially the
same for both the Contracting Organization and Subcontractors.
Open book rules apply to documents uploaded in Textura. Organizations can view any files they
have uploaded, and may delete all except those associated with a signed invoice.
If necessary, authorized users may classify the uploaded document to restrict user access to the
file within the uploading organization. Refer to Classified Attachments in this module or click here
to view.
Subcontractor organizations can upload their legal documents by selecting View My
Document Status from the Compliance menu on the Project Home Page.
Please refer to Module 7 – Compliance: Document Compliance for information regarding
Legal Document Compliance.
The point of entry to View Uploaded Files varies as the user advances through the draw process.
Links appear in numerous locations throughout the system, including:
Contracting Organization
Subcontractor
Draw Home Page
Draw Home Page
View Draw Request - SC
View Lien Waiver Status
View Lien Waiver Status
Sign Document
Approve Invoice
Change Order Details
Sign Document
The number in parentheses after
View Uploaded Files (0),
Authorize Payment
Manage Sub Invoicing - (Specified Billing)
Change Order Details
wherever this link is encountered, is the
number of files that will be displayed on
the View Uploaded Files page.
Textura™ User Manual © 2008
Page 47
Textura Corporation, Confidential
Module 6 – Payment Application Process
Subcontractor Invoicing
Draw Home Page
1. From the Project Home Page, click the desired Draw # under Pending or Completed Draws.
2. Click View Uploaded Files under Your Draw Documents.
View Uploaded Files
Textura™ User Manual © 2008
Page 48
Textura Corporation, Confidential
Module 6 – Payment Application Process
Subcontractor Invoicing
View Draw Request - SC
From the Draw Home Page, click View Draw Request under Manage Draw.
The system displays the View Draw Request page.
1. Click the View Draw Request - SC tab.
2. Click View Uploaded Files.
View Uploaded Files
View Lien Waiver Status
From the Project Home Page, select View Lien Waiver Status from the Compliance tab on the
menu bar.
Textura™ User Manual © 2008
Page 49
Textura Corporation, Confidential
Module 6 – Payment Application Process
Subcontractor Invoicing
The system displays the View Lien Waiver Status page.
1. Click Uploaded Files.
View Uploaded Files
Approve Invoice
1. From the Draw Home Page, click the action to Approve/Reject Invoices.
Textura™ User Manual © 2008
Page 50
Textura Corporation, Confidential
Module 6 – Payment Application Process
Subcontractor Invoicing
The system displays the Approve Invoice page
2. Click View Uploaded Files.
View Uploaded Files
Sign Document
The Signer accesses the Sign Document page from a link during the signing process. Documents
should be uploaded prior to signing.
Link available only when signing invoice and unconditional lien waiver.
1. Click View Uploaded Files.
View Uploaded Files
Textura™ User Manual © 2008
Page 51
Textura Corporation, Confidential
Module 6 – Payment Application Process
Subcontractor Invoicing
Authorize Payment
Available only to organizations using the authorize to disburse feature.
From the Project Home Page, click Authorize Payments for Draw #.
The system displays the Authorize Payment page.
1. Click View Uploaded Files.
View Uploaded Files
Manage Sub Invoicing (Specified Billing)
Available only to organizations using Specified Billing. Refer to Special Topics for more
information regarding Specified Billing in Textura™.
From the Project Home Page, click Manage Sub Invoicing.
Textura™ User Manual © 2008
Page 52
Textura Corporation, Confidential
Module 6 – Payment Application Process
Subcontractor Invoicing
The system displays the Manage Sub Invoicing page.
2. Click View Uploaded Files.
View Uploaded Files
Change Order Details
From the Project Home Page, click Show Prime Contractor Show Subcontract Change Orders to
expand lists.
Contracting Organization View
Subcontractor View
1. Click on the change order description for which attachments are to be uploaded, viewed, or
deleted.
Textura™ User Manual © 2008
Page 53
Textura Corporation, Confidential
Module 6 – Payment Application Process
Subcontractor Invoicing
2. Click View Uploaded Files.
Subcontractor View
View Uploaded Files
Textura™ User Manual © 2008
Page 54
Textura Corporation, Confidential
Module 6 – Payment Application Process
Subcontractor Invoicing
Upload Documents on View Uploaded Files page
Files can be uploaded on behalf of sub-tier organizations by primary organizations.
Primary organizations can view documents uploaded by sub-tier organizations.
Open book rules apply.
Upload Files
Use the Upload New Invoice Attachment dialog to select your file and enter a description.
1. Browse for the file on your computer.
2. Select the file to upload.
3. Click Open.
Textura™ User Manual © 2008
Page 55
Textura Corporation, Confidential
Module 6 – Payment Application Process
Subcontractor Invoicing
The system displays the file’s location on your computer in the Filename field.
4. Type a description for the document.
If necessary, authorized users may classify the uploaded document to restrict user access to the
file within the uploading organization. View this topic.
5. Click Submit.
The file appears in the list.
The names of both the submitting organization and user are displayed, as well as the date and time
uploaded. All Invoice Attachment files related to the current draw and contract are listed.
A file must be uploaded separately for each draw that the user wishes to associate it
View and Manage Uploaded Document Files
Filtering options are available as drop down lists in the bar above the column headings.
Filtering defaults to: All (Filename extensions), Current (Draw #), Invoice Attachment (File
Type), and All (Change Order - CO - #)
View all draws from one contract by selecting All rather than Current in the drop down menu
above the Draw # column.
View Change Orders in addition to Invoice Attachments by selecting All rather than Invoice
Attachment from the drop down menu above File Type.
Files are sorted in reverse date order from the most recently uploaded.
Each column heading acts as sort criteria, i.e. Date, Filename, Size, Description, etc.
Textura™ User Manual © 2008
Page 56
Textura Corporation, Confidential
Module 6 – Payment Application Process
Subcontractor Invoicing
1. Click on the Filename to open a file.
The browser displays a pop-up dialog box.
2. Click Open.
3. View the document.
Textura™ User Manual © 2008
Page 57
Textura Corporation, Confidential
Module 6 – Payment Application Process
Subcontractor Invoicing
Delete Files
Files can be deleted by authorized users from the uploading organization.
Attachments to signed invoices cannot be deleted.
1. Click the check box in the far left column beside the date of the file to be deleted.
2. Click Delete File(s).
Classified Attachments
Check the Manage Classified Attachments box when setting up a new user to give them
access to this feature. Refer to Module 2 – Create Account: Create New Users for more
information.
All organizations in Textura™ can classify attachments.
Attachments can be classified at the time they are uploaded or at any point thereafter. by users
with the Manage Classified Attachments permissions
Classified files can be viewed, declassified, or deleted only by a person within the
organization who has been assigned this permission in their user profile by a Local
Administrator.
Classified files, checkboxes, and buttons appear on the View Uploaded Files page only to
authorized users.
Open book rules apply to classified attachments.
Textura™ User Manual © 2008
Page 58
Textura Corporation, Confidential
Module 6 – Payment Application Process
Subcontractor Invoicing
Classify a document when uploading:
1. Click the checkbox next to Classified in the Upload New Invoice Attachment for Draw #
dialog.
2. Click Submit.
Classify previously uploaded documents:
1. Check the box to the left of the file upload date.
2. Click the Classify button.
Declassify a previously uploaded document:
1. Check the box to the left of the file upload date.
2. Click the Unclassify File(s) button.
Textura™ User Manual © 2008
Page 59
Textura Corporation, Confidential
Module 6 – Payment Application Process
Subcontractor Invoicing
Print or Save Draw Documents
Draw documents can be printed individually or assembled for printing or electronic storage.
Print (or Save) Assembled Draw Documents
1. Click on the project name to navigate from the Home Page to the Project Home Page.
2. From the Project Home Page, click the desired Draw # under Pending or Completed Draws.
The system displays the Draw Home Page.
3. Click Assemble Draw Documents for Printing, under Your Draw Documents.
The system displays the Collect PDFs page.
4. Click the checkbox for each document you want to include.
Note that only documents that have been signed in Textura™ can be printed from this
screen.
Textura™ User Manual © 2008
Page 60
Textura Corporation, Confidential
Module 6 – Payment Application Process
Subcontractor Invoicing
5. Click Print Draw Documents.
The browser displays a File Download dialog requesting a response.
All selected draw documents are compiled as one PDF file.
Save Document File
1. Click Save to Save the file to your computer.
Textura™ User Manual © 2008
Page 61
Textura Corporation, Confidential
Module 6 – Payment Application Process
Subcontractor Invoicing
Print Document File
Signatures do not appear on Unconditional Lien Waivers until approximately 72 hours after funds
have been disbursed. Please check documents for signature(s) before printing.
Organizations may print a signed copy of their own Unconditional Lien Waiver; however, to do so
they must open the Lien Waiver document individually from the Draw Home Page by clicking Lien
Waiver..
1. Click Open to display the file on your screen.
2. Select the Adobe® icon for printing.
Textura™ User Manual © 2008
Page 62
Textura Corporation, Confidential
Module 6 – Payment Application Process
Subcontractor Invoicing
Print/Save Individual Draw Documents
1. Click on the project name to navigate from the Home Page to the Project Home Page.
2. From the Project Home Page, click the desired Draw # under Pending or Completed Draws.
The system displays the Draw Home Page.
Select the desired document to view.
The document opens in Adobe® Reader®.
Save document file.
Print document file.
Textura™ User Manual © 2008
Page 63
Textura Corporation, Confidential
Owner Billing - Overview
The following section provides a more detailed view of the steps associated with Owner Billing.
Contracting Organization enters self-performed work details and/or fees to complete their
Owner Billing
Contracting Organization signs the pay application (finalizes invoice and/or sworn statement
and lien waiver)
Optional: Contracting Organization may submit to on-system Owner for approval
electronically via Textura™. Refer to Module 3 – Project Setup: Above the Line Roles.
Optional: On-system Architect may be given access to project to sign General Contractor’s
G702. Refer to Module 3 – Project Setup: Above the Line Roles.
Optional: Additional organizations (e.g., lenders, inspectors) may be given access to the
project via Textura™ for view only privileges as a Supervisory Organization. Refer to Module
3 – Project Setup: Above the Line Roles.
Documents signed in Textura™ are displayed using Adobe® Reader®. Before you begin
signing your documents, please verify that you have the most up-to-date version of this
application. You can download Adobe® Reader® at no cost by pointing your browser to
this URL (web address) http://www.adobe.com/ and following the instructions for
downloading or updating your copy.
Module 8 – Disbursement
Invoicing for Subcontracted and Self-Performed Line Items
Textura™ prompts the Contracting Organization to enter an invoice as soon as the draw has been
initiated; however, submission of your billing information is often postponed until after the
Subcontractor invoices have all been received and approved for payment.
Enter Invoice – Contracting Organization
1. Click on the project name to navigate from the Home Page to the Project Home Page.
2. Click Enter Invoice for Draw # under Pending Draws.
The system displays the Enter Invoice page.
3. Type the Invoice Number in the field provided.
Textura™ User Manual © 2008
Page 65
Textura Corporation, Confidential
Module 8 – Disbursement
Entry Detail
Unless otherwise noted, invoice values are in the form of your Functional Currency.
1. Enter a number for % Comp(lete) or a currency value for Work Completed This Period, or
Total (material) Completed and Stored To Date.
A file must be uploaded separately for each draw.
Invoice amounts may not exceed the remaining balance for any line item.
Where applicable:
Type the value of Material Stored This Period.
Adjust This Period Retention:
Amount Held
%
Retention is calculated for all invoice amounts at the percentage specified by the project
settings. If a line item is not subject to retention, or a different amount must be retained,
the calculated retention amount can be overridden.
Textura™ User Manual © 2008
Page 66
Textura Corporation, Confidential
Module 8 – Disbursement
2. Verify the invoice totals at the bottom of the page:
Invoices can be saved at any time and can be edited until the invoice has been
signed.
Billing for Retention
Please note that retention is entered on a line by line basis.
In Textura™, the release of retention is treated as part of the standard draw process,
i.e., organizations request retention on an invoice and sign a Lien Waiver.
Type the value of previously withheld retention that you are requesting to be paid into the
Request Previously Held column. The amount requested cannot exceed the value displayed in
the Retention – Prev Held column.
1. Select Save Changes to save this invoice.
Textura™ User Manual © 2008
Page 67
Textura Corporation, Confidential
Module 8 – Disbursement
The system displays a Status page including Next Steps.
Enter Invoice remains a “Next Step” until the Pay Application documents are signed.
The invoice is not submitted for payment until it is signed.
Click the Send to Signer link when you are certain that the invoice is complete and all your
Subcontractors have submitted their documents and been approved.
Enter Invoice Display
Organizations may choose to customize their Enter Invoice spreadsheet to display only the
fields/columns they use. The Hide/Show Columns option appears as a link in the upper left corner of
the Enter Invoice spreadsheet.
Before altering your present configuration, print or otherwise record the
arrangement so that you can easily return to the format if desired
By default, the Enter Invoice page displays the following fields:
% Comp
Scheduled Value
Work Completed Previous Amt
Work Completed This Period Amt
Material Stored This Period Amt
Total Completed and Stored to Date Amt
Balance To Finish
Retention This period Amt Held
Retention This Period %
Retention Prev Held
Retention Request Previously Held
Textura™ User Manual © 2008
Page 68
Textura Corporation, Confidential
Module 8 – Disbursement
The following additional fields may be displayed to allow Unit Price Billing, a specialized invoice
format required by some Contracting Organizations.
Units
Unit Price
Scheduled Quantity
Unit Price data may be used for any open draw, and does not affect the Schedule of Values or
the printed Pay Application. Please consult the documentation under Special Topics for more
information about Unit Price Billing.
When Show/Hide Columns is selected, the ControlPanel dialog appears, allowing the user to
choose the fields they wish to see displayed on their Enter Invoice page.
1. Click the checkboxes to make the appropriate selections.
2. Click Save to close the dialog and view the reconfigured display.
Navigation
Tab-ordered data entry
Tab-ordered data entry enables the user to move through the editable cells in the table using only the
Tab key. Tab follows a path from left to right from the starting point, and, after the last editable cell of
each line, moves to the first (leftmost) editable cell in the next line down. Holding down the Shift key
when clicking the Tab key reverses the direction (to a path from right to left), but must be repeated
each time the (reverse) effect is desired.
Textura™ User Manual © 2008
Page 69
Textura Corporation, Confidential
Module 8 – Disbursement
1. Click in the first field of the line item for which you are billing.
The “active” cell is outlined with a dashed box.
2. Click the Tab key to navigate to the next editable field.
Values affected by the entry recalculate as you tab to the next editable field.
3. Continue tabbing through the line(s) until entry is complete.
Up and down arrow keys
Users may also navigate vertically through the spreadsheet using the up or down arrow keys. This
takes the user to the corresponding cell in the next line.
Textura™ User Manual © 2008
Page 70
Textura Corporation, Confidential
Module 8 – Disbursement
Advance Billing
Advance Billing is a Project Setting that changes the behavior of the Enter Invoice screen, giving the
Contracting Organization the ability to invoice the Owner on a contracted line item for an amount
greater than its Self-Performed amount, regardless of the amount of a Subcontractor invoice or
whether an invoice is received for that line.
Advance Billing is turned “Off” by default, automatically populating the Owner’s pay application with
approved Subcontractor invoice amounts.
With Advance Billing turned “On” in the Project Settings, the Contracting Organization must specify
the invoice amounts for each line item on the Owner’s pay application.
Amount billed can be greater or less than the Subcontractor invoice.
Amount billed cannot exceed total balance due for line item.
Approved Subcontractor invoice amounts appear on the Contracting Organization’s Schedule of
Values for reference when preparing the Owner billing.
Subcontractor invoiced amounts appear as a negative amount on the Contracting Organization
Enter Invoice Schedule of Values.
The Owner billing remains zero until the Contracting Organization enters the amount to be billed.
The system calculates totals based on the amount that the Contracting Organization chooses to
bill, rather than the amount of the Subcontractor invoice. The Contracting organization thus
controls the amount invoiced for the Advance Billed line item.
Textura™ User Manual © 2008
Page 71
Textura Corporation, Confidential
Module 8 – Disbursement
In the example, the Subcontractor has billed for $3,200,000. The Contracting Organization enters a
larger amount, in this case $3,700,000. The additional $500,000 is the Advance Billing; this amount is
held back from a future payment to the Contracting Organization, unless a Change Order is created
increasing the line item amount.
The amount entered on the invoice by the Contracting Organization is displayed on the G703.
Send to Signer
When all Subcontractor invoices have been received and approved, the Pay Application is ready to
be signed.
Send to Signer is a trigger point for Draw Context, i.e., when the user takes this
action, the draw context in the system is advanced to the next draw (initiated or
not). Any modifications, etc. that take place after Send to Signer is clicked have no
bearing on the draw currently being signed.
Textura™ generates the Send to Signer action under the following conditions:
The Enter Invoice page is accessed and the Save Changes button is clicked.
At least one Subcontractor invoice is approved, with or without Advance Billing.
1. Click on the project name to navigate from the Home Page to the Project Home Page.
Textura™ User Manual © 2008
Page 72
Textura Corporation, Confidential
Module 8 – Disbursement
The system displays the Project Home Page.
2. Click Send to Signer for Draw #.
The system displays the Send to Signer page.
3. Verify that the Project Summary information is correct.
4. Click Send to Signer.
Textura™ User Manual © 2008
Page 73
Textura Corporation, Confidential
Module 8 – Disbursement
The system displays a Status page confirming that the invoice has been sent to the signer.
The action to sign appears only for the Signer(s). Where the Project Manager is the Signer; the
system provides a link to sign the document under Next Steps on the Status page.
5. Click Sign Invoice for Draw # to proceed with signing the invoice.
Sign Documents
The system automatically displays the documents required for the draw, including any or all of the
following:
Invoice
Sworn Statement
Lien Waiver
Documents signed in Textura™ are displayed using Adobe® Reader®. Before you begin
signing your documents, please verify that you have the most up-to-date version of this
application. You can download Adobe® Reader® at no cost by pointing your browser to
this URL (web address) http://www.adobe.com/ and following the instructions for
downloading or updating your copy.
The user confirms that the invoice is accurate and complete prior to signing. Signed
documents are transmitted in real time.
Textura™ User Manual © 2008
Page 74
Textura Corporation, Confidential
Module 8 – Disbursement
Invoice
Use the link provided to open the Sign Document page.
View the Project Summary in the right hand column to verify that the numbers are correct.
If the Summary is not correct, Reject Draw to PM. Please Note that Reject Draw to PM is
available only during the Sign Invoice/Sworn Statement portion of the document signing process.
When the Signer clicks Reject Draw to PM prior to signing a document, the Project
Manager for their organization receives an email message notifying them that their
organization’s invoice has been rejected. Signatures on Pay Application documents
applied prior to clicking Reject Draw to PM are removed and, if another invoice is
submitted, all documents must be signed again.
If there are additional supporting documents that you would like to submit with your Pay Application,
they may be uploaded via View Uploaded Files. Refer to Upload and View Uploaded Documents
in this module or click here to view this topic.
To view the unsigned invoice, click the Invoice link under Your Draw Documents.The
system displays the Invoice document(s) using Adobe® Reader®. When satisfied that
the document is correct, proceed with signing.
Textura™ User Manual © 2008
Page 75
Textura Corporation, Confidential
Module 8 – Disbursement
1. Enter your PIN.
2. Click Sign Invoice.
The system displays the Invoice document(s) using Adobe® Reader®.
Prior to signing, you may wish to scroll through all pages of your document to verify that the
information is correct.
3. Click once on the highlighted Click Here to Sign in the Invoice document. The cursor changes to
a hand symbol as you roll your mouse over the box; click only once to sign.
Textura™ User Manual © 2008
Page 76
Textura Corporation, Confidential
Module 8 – Disbursement
Please wait while the document reloads. The Signer’s name appears in the signature box.
4. Click once on the highlighted Click Here to Continue in the Instructions at the top of the page.
This is a mandatory step to complete submission of your invoice.
Where the project requires a Notary signature on a document, the user is returned to the Sign
Document page to provide the Notary signature. Refer to the Notarize documents in Textura™
topic in the Subcontractor Invoicing section of this module, or click here to view.
Sworn Statement
Where the project requires a Sworn Statement, the system again displays the Sign Document Page.
1. Enter your PIN.
2. Click Sign Sworn Statement.
Textura™ User Manual © 2008
Page 77
Textura Corporation, Confidential
Module 8 – Disbursement
The system displays the Sworn Statement using Adobe® Reader®.
Prior to signing, you may wish to scroll through all pages of your document to verify that the
information is correct.
3. Click once on the highlighted Click Here to Sign in the Sworn Statement.
4. Click once on the highlighted Click Here to Continue in the Instructions at the top of the page.
This is a mandatory step to complete submission of your invoice.
The system displays a Status page confirming that the document is signed.
Where the project requires a Lien Waiver, there is a link to Sign Lien Waiver for Draw # on the
Status page. This link will also appear in the Signer’s actions under Pending Draws.
Lien Waiver
Textura™ sends an email notification to the Signer requesting their signature on the Lien Waiver and
providing a link to access the system.
1. Click the email link.
The Signer can also log in and access the action to sign via their Project Actions on the Project Home
Page or Draw Home Page.
Textura™ User Manual © 2008
Page 78
Textura Corporation, Confidential
Module 8 – Disbursement
The system displays the Sign Document page.
2. Enter your PIN.
3. Click Sign Lien Waiver.
The system displays the Lien Waiver using Adobe® Reader®.
Prior to signing, you may wish to scroll through all pages of your document to verify that the
information is correct.
If selected in the Project Settings, the Signer can choose to enter Optional Text on the
Lien Waiver. Comments inserted into a Lien Waiver by the Signer do not alter the
document language.
4. Click once on the highlighted Click Here to Sign in the Lien Waiver document.
Please wait while the document reloads. The Signer’s name appears in the signature box.
5. Click once on the highlighted Click Here to Continue in the Instructions at the top of the page.
This is a mandatory step to complete submission of your invoice.
When signing is complete, the user sees a Status page confirming that the
document(s) have been signed. Documents requiring two signatures will be
displayed a second time for signing. If the document (Adobe® Reader®) window is
closed before the second signature is confirmed, the first signature will be
discarded. Please continue signing until the system displays confirmation that
signing is complete.
Textura™ User Manual © 2008
Page 79
Textura Corporation, Confidential
Module 8 – Disbursement
Notarize Documents
Where the project requires a Notary signature on a document, the user is returned to the Sign
Document page to provide the Notary signature. Click here to view this topic.
Textura™ User Manual © 2008
Page 80
Textura Corporation, Confidential
Module 8 – Disbursement
Draw History – View Draw Request
View Draw Request
The View Draw Request SoV and SC screens make past and present period invoice information
available in a graphical format for reference purposes. The information is not editable, but is a
valuable resource for users, providing a snapshot of draw data through the close of the selected draw
period, or up to the date of inquiry for an open draw.
The following fields are displayed on both pages.
Description
Scheduled Values
Work Completed
From Previous Application
This Period
Material stored this period
Total completed and stored to date
% complete
Balance to finish
Retention
This Period
Balance
View Draw Request – SoV
Users can view a line-by-line breakdown of approved Subcontractor invoices and self-performed
amounts, including retention.
Information On the View Draw Request – SoV page is organized by line item (Phase Code).
Textura™ User Manual © 2008
Page 81
Textura Corporation, Confidential
Module 8 – Disbursement
View Draw Request – SC
The View Draw Request – SC page presents a summary of all data up to and including the specified
draw. Users can quickly verify amounts billed for each Subcontract, the percentage of work
completed, retention held, and whether or not Change Orders are included in that period data.
The information is organized by Subcontract, and includes the following fields not present on the View
Draw Request – SoV page:
Subcontract #
Subcontractor (Description)
(Sub)Contract Currency
Users can drill into the detail of each Subcontractor’s Schedule of Values by clicking the linked
number in the Subcontract # column. Also present for each Subcontract on the View Draw Request
screen are individual draw document links and links to the View Uploaded Files page. Refer to
Upload and View Uploaded Documents in this module or click here to view.
Textura™ User Manual © 2008
Page 82
Textura Corporation, Confidential


![EnergyAccessOnline User Manual[1]](http://vs1.manualzilla.com/store/data/005906408_1-e15b8e64694c6ea91dc3f2c3109f09fc-150x150.png)