1
User Manual
44601 Fremont Blvd., Fremont, CA 94538, USA
Tel: +1.510.440.9901 • Fax: +1.510.440.1270 • www.arcsoft.com
Copyright © 2007 ArcSoft, Inc. All rights reserved. ArcSoft, the
ArcSoft logo, and ArcSoft Panorama Maker are registered
trademarks of ArcSoft, Inc. in the United States. All other product
and companies named herein may be trademarks of their
respective owners.
Table of Contents
1.
1.1
1.2
1.3
Introduction .......................................... 1
Installation ............................................. 3
System Requirements............................... 4
Key Features ........................................... 6
2.
2.1
2.2
2.3
2.4
2.5
Main Menus ........................................... 9
File .......................................................11
View .....................................................12
Extras ...................................................13
Register.................................................14
Help......................................................15
3.
3.1
3.2
3.3
Selecting ............................................. 17
Browse and Select Photos ........................19
Select Stitching Mode ..............................21
Select Output Size ..................................22
4.
4.1
Arranging ............................................ 23
Confirm Sequence...................................25
5.
5.1
5.2
5.3
5.4
Fine-Tuning ......................................... 27
Crop & Straighten ...................................29
Enhance ................................................30
Manual Fine-Tune ...................................31
Add Frame, Title, Copyright ......................35
6.
6.1
6.2
6.3
Sharing ............................................... 37
Preview .................................................39
Save .....................................................40
Print .....................................................41
7. How to Shoot Great-Looking Panoramas .. 43
7.1
Ideal Camera Settings .............................45
7.2
Using a Tripod ........................................47
7.3
Photo Overlap ........................................48
7.4
Creating Photo Groups.............................49
7.5
General Tips...........................................50
7.6
Photo Shooting Checklist..........................52
Reference...................................................... 53
Customer Support.............................................54
Technical Support .............................................55
Registering Your Product....................................56
ArcSoft Product Family ......................................57
Licensing Agreement .........................................60
About ArcSoft...................................................64
INDEX ........................................................... 65
Chapter 1: Introduction
1. Introduction
Installation
System Requirements
Key Features
1
Chapter 1: Introduction
Welcome to ArcSoft Panorama Maker® Pro, a powerful digital
imaging application that transforms digital images into spectacular
panoramic fine art photographs.
This Introduction covers the installation and system requirements
and provides an overview of the key features. The rest of the user
manual covers the Panorama Maker Pro menus and workflow,
showing you how to make your photos look picture perfect
through Selecting, Arranging, Fine-Tuning, and Sharing. Tips for
shooting great looking panoramas are included at the end.
2
Chapter 1: Introduction
1.1
Installation
Windows:
1. Insert the CD into your CD-ROM drive.
2. The installer should start automatically.
3. Follow the on-screen instructions to complete the
installation.
Take note as to where the program is installing, and where it can
be found in the Start menu.
Note: If the installer does not start automatically, you will need to
run it manually:
1. Insert the CD into your CD-ROM drive.
2. Click Start>Run.
3. In the Run dialog, type "X:/setup.exe". ("X" is the drive
letter associated with your CD-ROM drive. This letter will
vary from system to system.)
4. Click OK.
5. Follow the on-screen instructions to complete the
installation.
Macintosh:
1. Insert the CD into your CD-ROM drive.
2. Double-click on the CD icon.
3. In the window, click the program installer icon to start
the installation.
3
Chapter 1: Introduction
1.2
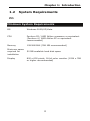
System Requirements
PC:
Minimum System Requirements
OS
Windows 2000/XP/Vista
CPU
Pentium III / AMD Athlon processor or equivalent
(Pentium 4 / AMD Athlon XP or equivalent
recommended)
Memory
128 MB RAM (768 MB recommended)
Minimum space
required for
installation
50 MB available hard disk space
Display
800 x 600 pixels, 16-bit color monitor (1024 x 768
or higher recommended)
4
Chapter 1: Introduction
Macintosh:
Minimum System Requirements
OS
Mac OS X 10.3, 10.4
CPU
PowerPC G4 processor or equivalent (PowerPC G5
or Intel Core Duo processor recommended)
Memory
512 MB RAM (768 MB recommended)
Minimum space
required for
installation
50 MB available hard disk space
Display
800 x 600 pixels, 16-bit color monitor (1024 x 768
or higher recommended)
5
Chapter 1: Introduction
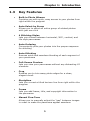
1.3
Key Features
•
Built-in Photo Albums
Provides you with quick, easy access to your photos from
right within the program
•
Auto-Select by Group
Allows you to select an entire group of related photos
with just one click
•
4 Stitching Styles
Lets you choose between horizontal, 360°, vertical, and
tile style panoramas
•
Auto-Ordering
Conveniently puts your photos into the proper sequence
for stitching
•
Auto-Stitching
Ensures quick and seamless blending of each segment of
your panorama
•
Full-Screen Preview
Lets you view your panoramas without any distracting UI
elements
•
Crop
Enables you to trim away photo edges for a clean,
elegant result
•
Straighten
Lets you correct a tilted horizon line from right within the
program
•
Frame
Lets you add frame, title, and copyright information to
the panorama
•
Manual Fine-Tune
Allows you to manually adjust the "gap" between images
in order to make the panorama appear seamless
6
Chapter 1: Introduction
•
Print
Allows you to print your panoramas across multiple
pieces of paper or on banner stock
•
Multiple Save Options
Allows you to save your panorama as an image, HTML, or
interactive QuickTime movie
7
Chapter 1: Introduction
8
Chapter 2: Main Menus
2. Main Menus
File
View
Extras
Register
Help
9
Chapter 2: Main Menus
The Panorama Maker Pro main menus appear in the upper lefthand corner of the workspace. Some of the program's options and
controls are available from the main menus.
10
Chapter 2: Main Menus
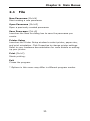
2.1
File
New Panorama (Ctrl+N)
Start making a new panorama.
Open Panorama (Ctrl+O)
Open a previously created panorama.
Save Panorama (Ctrl+S)
Launches the Save As dialog box to save the panorama you
create.
Printer Setup
Launches the Printer Setup window to select printer, paper size,
and print orientation. Click Properties to change printer settings.
Refer to your hardware documentation for more details on setting
up your printer.
Print (Ctrl+P)
Starts printing.
Exit
Closes the program.
* Options in this menu may differ in different program modes.
11
Chapter 2: Main Menus
2.2
View
Zoom In (Ctrl++)
Zooms in to view more image details.
Zoom Out (Ctrl+-)
Zooms out to view image on a larger scale.
Full Screen Preview
Launches the Preview screen and enables you to view the
panorama in full screen mode.
File Properties
View general and EXIF information of the selected file.
Show Tooltip
Select this option to show tips when you position the cursor over
user interface elements. Uncheck it to disable this feature.
* Options in this menu may differ in different program modes.
12
Chapter 2: Main Menus
2.3
Extras
The Extras menu provides valuable information on ArcSoft
services and products. To access these menu options, a live
Internet connection is required.
More ArcSoft Products
Get special deals on other software.
Updates and Patches
Check to see if a free update or patch is currently available, and if
it is, it will be automatically downloaded and installed.
Available Upgrades
Learn about the latest upgrade options for your software.
Send Us Feedback
Tell us what you think about our software.
Visit ArcSoft.com
Go to www.arcsoft.com to learn more about our company and
products.
13
Chapter 2: Main Menus
2.4
Register
Register Product
Register your software online. More information about registration
benefits is in the Reference chapter at the end of this manual. This
menu disappears once you have registered your software.
14
Chapter 2: Main Menus
2.5
Help
Help (F1)
Launches the Online Help.
How to Shoot Photos for Great Looking Panoramas
Offers tips for making great-looking panoramas.
Print a Photo Shooting Checklist
Provides a list of photo-shooting tips that you can carry with you.
About Panorama Maker
Launches the splash screen which contains the software version
number and copyright information.
15
Chapter 2: Main Menus
16
Chapter 3: Selecting
3. Selecting
Browse and Select Photos
Select Stitching Mode
Select Output Size
17
Chapter 3: Selecting
Browse through your photos and select which ones to use in your
panorama. Panorama Maker Pro supports JPEG, TIF, and RAW
files.
18
Chapter 3: Selecting
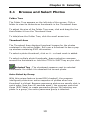
3.1
Browse and Select Photos
Folder Tree
The Folder Tree appears on the left side of the screen. Click a
folder to view its contents as thumbnails in the Thumbnail Area.
To adjust the size of the Folder Tree area, click and drag the line
that divides it from the Thumbnail Area.
To hide/show the Folder Tree, click the small arrow icon.
Thumbnail Area
The Thumbnail Area displays thumbnail images for the photos
contained in the active folder. Roll over a thumbnail to see a popup window containing EXIF information.
To select a photo thumbnail, click on it – a check mark is added.
To select multiple photo thumbnails, drag a selection marquee
around the thumbnails or hold the CTRL or SHIFT key as you click.
Selected Tag - The checkmark appears next to selected
thumbnails. Un-check it to deselect the current photo.
Auto-Select by Group
With this unique feature turned ON (checked), the program
intelligently selects an entire sequence of photos when one
thumbnail is clicked. Because panorama photos are usually shot in
quick order (less than 40 seconds apart), the program uses shot
times (EXIF data) to create panorama groups. By selecting one
photo in a group, the entire panorama group is selected.
19
Chapter 3: Selecting
View Mode
There are several viewing options available to help you select the
photos for your panorama.
Rotate Left 90 - Rotates selected photos to the left at a
90-degree increment.
Rotate Right 90 - Rotates selected photos to the right at
a 90-degree increment.
Note: Functions to rotate images may not be available while
processing RAW files.
Small Thumbnails - Makes the thumbnails appear small in
size - so you can see many at once.
Large Thumbnails - Makes the thumbnails appear large in
size - so you can distinguish from others.
Full-Size Thumbnails - Makes the thumbnails appear full
size - so you can see details.
20
Chapter 3: Selecting
3.2
Select Stitching Mode
You can create four different styles of panorama with Panorama
Maker Pro. For each style of panorama that can be created with
the software, there is a corresponding Stitch Mode. Choose the
one that will work for the photos selected:
Horizontal - Stitch photos as a horizontal row.
360° - Stitch photos as a horizontal set that
completes a full circle around the photographer's position.
Vertical - Stitch photos as a vertical column.
Tile - Stitch a group of images and line them up as
tiles, up to 16 photos can be stitched at one time.
21
Chapter 3: Selecting
3.3
Select Output Size
Output Size - Select an output size for the panorama you want to
create from the drop-down list. The options include Original Size,
1/4 Size, and 1/16 Size.
For printing, select Original Size. For digital display and web
sharing, select a smaller size.
After selecting photos, choosing the proper stitch mode, and
selecting output size, click the Next button to go to the next step,
Arranging.
22
Chapter 4: Arranging
4. Arranging
Confirm Sequence
23
Chapter 4: Arranging
Make sure that the photos are in the proper sequence before
stitching them together.
24
Chapter 4: Arranging
4.1
Confirm Sequence
Confirm that the photos are in the proper sequence before
stitching them together. You can use the photo tray and related
controls to edit your photo sequence.
Photo Tray - Displays the thumbnails in the sequence that they
will be stitched. To change the order, simply drag and drop the
thumbnails into their proper positions. The full-size photos can
also be dragged.
Auto-order - Automatically sorts selected
photos in order for easy stitching.
Add - Enables you to insert a photo into the
sequence without having to go back to Selecting Photos.
Remove - Removes the selected photo from the
sequence. The original file is not deleted from your computer.
After confirming that the photos are in their proper sequence, click
Stitch to begin the stitching process and go to the next step,
Fine-Tuning.
25
Chapter 4: Arranging
26
Chapter 5: Fine-Tuning
5. Fine-Tuning
Crop & Straighten
Enhance
Fine-Tune
Add Frame, Title, Copyright
27
Chapter 5: Fine-Tuning
This section describes how to make your panorama more visually
appealing using Crop, Straighten, Brightness/Contrast, and
Manual Fine-Tune controls.
28
Chapter 5: Fine-Tuning
5.1
Crop & Straighten
Crop off unwanted edges and use Straighten controls to adjust
your panorama.
Crop
Checking the "Crop" option displays a red crop indicator box over
the stitched image. Define the crop area by clicking and dragging
the red box (dragging on the corners of the red box).
When you preview or save the panorama, the area inside the crop
box is kept. Uncheck "Crop" to preview or save the entire
panoramic image as-is.
Straighten
Click the arrow beside this icon to display the Straighten control:
The Straighten control enables you to rotate the panorama image
so it appears level. Click the buttons or drag the scroll bar to
rotate the panorama until the horizon line (or other indicator)
appears parallel with the lines on the grid.
Apply – Applies the current Straighten settings to the panorama.
Cancel – Exits the Straighten control without saving changes.
29
Chapter 5: Fine-Tuning
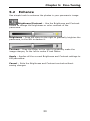
5.2
Enhance
Use simple tools to enhance the photos in your panoramic image.
Brightness/Contrast – Use the Brightness and Contrast
sliders to change the brightness or color contrast of the
panorama.
Brightness – Drag the slider to the right to gradually brighten the
panorama, to the left to darken it.
Contrast – Drag the slider to the right to gradually make the
image sharper, to the left to make it look flatter.
Apply – Applies all the current Brightness and Contrast settings to
the panorama.
Cancel – Exits the Brightness and Contrast controls without
saving changes.
30
Chapter 5: Fine-Tuning
5.3
Manual Fine-Tune
The Manual Fine-Tune screen allows you to manually adjust the
"gap" between images in order to make the panorama appear
seamless.
Manual – Click to go to the Manual Fine-Tune screen,
which has two primary options: Align Points and Adjust Blend.
Align Points
Click Align Points to manually set stitching points.
The overlapped areas of the photos are marked by orange boxes.
31
Chapter 5: Fine-Tuning
Click on one of the boxes to see three pairs of numbered points:
these points indicate where on the image needs to be adjusted.
Click and drag one of the numbered points in the left window to
the area where the "gap" is, and drag the point with the same
number in the right window to where the first numbered point was
placed.
For example, drag point "1" in the left window to a particular
feature in the left photo (such as a tree branch). Then drag point
"1" in the right window to the place in the right photo where that
same feature appears. Repeat for points "2" and "3", then click
Apply.
Note: Although you can place numbered points at completely
separate locations on the panorama, Panorama Maker Pro will not
acknowledge this change even if you click Apply.
Auto Match – Click this and Panorama Maker Pro will
automatically pair the numbered points. You can skip Auto Match
if you prefer to manually pair these points.
32
Chapter 5: Fine-Tuning
Adjust Blend
Click Adjust Blend to see the stitching paths (borders) between
the images outlined in orange.
Click on an orange path to add a point. Drag the point to move
the path. To adjust the path more precisely, add more points.
Note: The orange paths can only be dragged within the
overlapped areas.
Right-click on the points to restore the original stitching path.
Click
Restore to clear points added to the path.
33
Chapter 5: Fine-Tuning
Show Guides – If this option is checked, the overlapped areas
between photos are marked with red boxes on the Align Points
screen, and the seams are marked with orange lines on the
Adjust Blend screen.
To see if your panorama is properly adjusted, uncheck the Show
Guides option to hide both the boxes and the lines. (Note that the
Align Points and Adjust Blend functions will not work when the
Show Guides option is unchecked.)
Click Done when you are finished manually fine-tuning your
panorama.
34
Chapter 5: Fine-Tuning
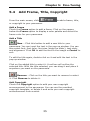
5.4
Add Frame, Title, Copyright
From the main screen, click
or copyright to your panorama.
to add a frame, title,
Add a Frame
Check the Frame option to add a frame. Click on the square
below the Frame option to display a color palette and select the
frame color for your panorama.
Add a Title
New – Click this button to add a new title to your
panorama. You can input the text in the pop-up window. You can
also select font, font color, font size (drag the slider), text style,
and alignment. Click OK to add the text to the image or Cancel to
exit.
To edit the title again, double-click on it and edit the text in the
pop-up window.
Click on the added title to select it. A red box will outline the
selected title. With the title selected, you can drag it and place it
anywhere you want on the panorama.
Remove – Click on the title you want to remove to select
it. Click Remove to delete it.
Add Copyright
Check the Copyright option to add your own copyright
announcement to the panorama. You can use the provided
copyright template, or delete it and write your own copyright
announcement from scratch.
35
Chapter 5: Fine-Tuning
36
Chapter 6: Sharing
6. Sharing
Preview
Save
Print
37
Chapter 6: Sharing
Preview your panorama, then save and print it for sharing with
your favorite photo enthusiasts.
38
Chapter 6: Sharing
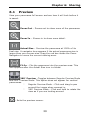
6.1
Preview
View your panorama full screen and see how it will look before it
is saved.
Zoom Out – Zooms out to show more of the panorama.
Zoom In – Zooms in to show more detail.
Actual Size – Preview the panorama at 100% of its
final size. A navigator box appears if the actual panorama size is
larger than your screen size. Drag the red box inside the Zoom
Navigator to move the current viewing area.
Fit In – Fits the panorama into the preview area. This
icon appears after the Actual Size icon is clicked.
360° Preview –Toggles between Regular Preview Mode
and 360° Preview Mode. This option does not appear for vertical
panoramas.
°
Regular Preview Mode – Click and drag to pan
around the image when zoomed in.
°
360° Preview Mode – Click and hold to rotate the
view as if you are looking around.
- Exits the preview screen.
39
Chapter 6: Sharing
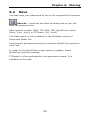
6.2
Save
You may save your panorama to one of the supported file formats.
Save As – Launches the Save As dialog box so you can
save the panorama file.
Save options include: JPEG, TIF, BMP, TGA, QuickTime (.mov),
Flash (.htm, .html), or PTViewer (.htl, .html).
The Flash option is only available in the Windows version of
Panorama Maker Pro.
Vertical style panoramas cannot be saved as QuickTime movies or
html files.
In order for the QuickTime output option to appear, Apple
QuickTime must be installed.
PTViewer is a free and popular html panorama viewer. It is
available on the web.
40
Chapter 6: Sharing
6.3
Print
Print your panorama.
Printer – Select a printer to print out your panorama.
Paper Size – Select a paper size to print (the paper size you
select must be supported by your printer).
Page Layout – Choose how you want your panorama to be
printed (on one or across multiple sheets of paper, etc.). Select a
page layout from the drop-down list. Layout options are generated
automatically based on the resolution of the panorama.
Size – Move the slider to change the print size of the panorama.
Printer Setup – Launches the Printer Setup window where you
can select a printer, paper size, and orientation. Consult your
printer's manual to learn how to optimize settings for photo
printing.
Print – Starts printing.
Note: Print quality is determined by many factors (photo quality,
photo resolution, print size, printer settings, ink, paper, print
nozzle condition, etc.). For best results, consult your printer's
manual to learn how to get the best results from your printer. It is
always best to use the ink and paper recommended for your
printer.
41
Chapter 6: Sharing
42
Chapter 7: Great-Looking Panoramas
7. How to Shoot Great-Looking
Panoramas
Ideal Camera Settings
Using a Tripod
Photo Overlap
Creating Photo Groups
General Tips
Photo Shooting Checklist
43
Chapter 7: Great-Looking Panoramas
The guidelines and technical information in this section remove
the mystery about issues associated with taking photos for
panoramas.
44
Chapter 7: Great-Looking Panoramas
7.1
Ideal Camera Settings
Set Exposure Manually*
Meter the scene in Aperture-priority or Shutter-priority mode.
Read your meter in the brightest section to avoid overexposure,
and manually lock the Aperture and Shutter Speed for the entire
set of shots.
Why: When the camera automatically adjusts the exposure for
each shot, seemingly subtle changes in light can make the
corresponding areas of two overlapping photos look completely
different. When this happens, the final panorama can have big
bands of light and dark.
Turn Auto Focus Off*
Turn off Auto Focus. Use the same focal length for all photos in
the panorama sequence.
Why: Using different focal lengths can present inconsistencies that
cannot be overcome during the stitching process.
Turn Auto White Balance Off*
Turn the camera's auto white balance feature OFF. Manually set
the most appropriate white balance and use that same setting for
all of the shots in the panorama.
Why: When the auto white balance setting is on, slight changes in
lighting conditions can cause the colors in one photo to differ
greatly from the colors in the next.
Use One Exposure Setting*
Before you begin shooting, use the camera's light meter to find an
exposure that works well for the entire range of shots. Use it. If
it's absolutely necessary to shoot some shots using other
exposures (because of dramatic changes in light), keep the other
exposure settings as close as possible to the first.
Why: In general, panorama images stitch better in more even
light. Changes in exposure setting can make the exact
(overlapping) areas of two photos look completely different. When
this happens, the final panorama can show banding.
45
Chapter 7: Great-Looking Panoramas
Turn Off the Flash
Do not use a flash. Turn off the camera's auto-flash feature if it
has one.
Why: A camera's flash has a limited range and a limited field of
coverage and can create shadows that change shape and position
from shot to shot. These inconsistencies make it difficult for the
software to recognize corresponding parts of adjacent photos.
Do Not Change Size or Quality Setting
Use the same photo size (resolution) and photo quality (e.g. fine)
for all shots.
Why: Photos of different sizes cannot be stitched.
* Your camera model may not include this feature or option.
46
Chapter 7: Great-Looking Panoramas
7.2
Using a Tripod
Use a Tripod Whenever Possible
When shooting photos for a panorama, it is critical to keep the
camera on the same plane throughout all of the shots. The easiest
way to do this is to use a tripod.
When shooting for a 360° degree panorama, a level tripod ensures
that the first and last shots line up with each other.
If your tripod does not have a built-in level, you can buy a spirit
level at your local camera shop that fits in your camera's hot
shoe.*
Go Without A Tripod Only If You Must
If a tripod is not available, act as one yourself by locking your
elbows into your body and pivoting on one foot to turn in place.
Pay close attention to the frame of each shot (horizon line),
keeping the camera level as you turn.
If you cannot find a level spot for your tripod, collapse the legs to
create a monopod so you can steady the camera to take pictures.
Use the camera's viewfinder (instead of the LCD) to frame and
shoot your photos.
* Your camera model may not include this feature or option.
47
Chapter 7: Great-Looking Panoramas
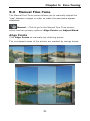
7.3
Photo Overlap
Use 25% to 50% Overlap
Shoot the photos using between 25% and 50% overlap. You do
not need the same amount of overlap for each shot – estimating
the amount of overlap is fine.
For wide angle lenses, use more overlap (50%).
48
Chapter 7: Great-Looking Panoramas
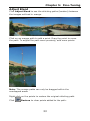
7.4
Creating Photo Groups
By using one or both of the following methods to create photo
groups, building a panorama in the software will be a little easier.
Shoot Sequential Photos in Less Than 40 Seconds Time
The program has a unique feature that, with just one click,
intelligently selects all of the photos that belong to the same
panorama sequence. Because panorama photos are usually shot
in quick order (less than 40 seconds apart), the program uses
shot times (EXIF data) to create groups. By selecting one photo in
a group, the entire group is selected. (This feature can be disabled
by unchecking the "Auto-Select by Group" option; see section
3.1.)
Insert Divider Shots Manually
A simple way to divide one sequence of panorama photos from
another is to insert (shoot) a black photo between them. Before
beginning a new sequence, use the lens cap or a piece of
cardboard to cover the camera and take a shot. After you transfer
the photos to your computer, it will be easy to see where one
sequence ends and the next begins.
49
Chapter 7: Great-Looking Panoramas
7.5
General Tips
•
When stitching photos that have obvious value
differences, noticeable banding effects may appear in the
stitched result. If you have this problem, use a photo
editing application such as ArcSoft® PhotoStudio® to
adjust the brightness and contrast of the photos before
they are stitched.
•
Do not use extreme wide-angle lenses (i.e. fisheye) when
taking panoramic shots. Extreme wide-angle lenses
create distortion at the edges of each photo, making
them difficult to stitch.
•
When shooting photos for horizontal panoramas, make
sure the tallest object in the scene fits into the picture at
the current zoom level. It's wise to leave extra space for
cropping the panorama after it has been stitched.
•
When shooting photos for horizontal panoramas, take an
extra shot on each end (far left and far right), so you'll
have more room from which to crop.
•
To create taller horizontal-style panoramic images, shoot
the entire sequence with the camera turned 90 degrees
(portrait).
•
Turn your camera's Grid Display feature on. Showing grid
lines in the viewfinder makes it easier for you to keep
your camera level as you shoot a series of panorama
shots – especially if you're not using a tripod. Grid
Display is also useful for determining the correct amount
of overlap.
•
50% overlap usually works best for stitching. If you need
help determining the proper amount of overlap, turn your
camera's Grid Display feature on.
•
To avoid object duplication in the panorama, do not use
more than 80% overlap. Turn your camera's Grid Display
feature on if you need help determining the proper
amount of overlap.
50
Chapter 7: Great-Looking Panoramas
•
Make people magically appear in the same panorama
several times by shooting them in different areas of the
shot and at a different distance.
•
Check to see if your printer supports banner paper. If so,
try printing your panoramic creations on long sheets of
photo banner paper – great for framing.
51
Chapter 7: Great-Looking Panoramas
7.6
Photo Shooting Checklist
•
Turn Auto-Exposure OFF
•
Turn Auto White Balance OFF
•
Turn the flash OFF
•
Use the same exposure setting (slight variations if
necessary)
•
Use one focal length for all shots in the sequence
•
Use one size/quality for all shots in the sequence
•
Use a tripod whenever possible – especially when objects
are near to the camera
•
If a tripod is not available, lock elbows and pivot on one
spot, keeping the camera level
•
Use at least 25% overlap for each shot
•
Use 50% overlap when using a wide angle lens
•
Go beyond 360 degrees when shooting for a 360°
panorama – mark your tripod with a piece of tape
•
Create time-based groups – wait no more than 40
seconds between shots
•
Insert visual dividers (black shots) between sequences –
use a lens cap or piece of cardboard
•
Be aware that an object in motion may cause problems
when stitching
•
Be aware that scenes without much detail (cloudless sky
over flat sea) are more difficult to stitch
52
Reference
Licensing Agreement
PLEASE READ THE FOLLOWING TERMS ("Agreement")
CAREFULLY. USE OF THE SOFTWARE (defined below) PROVIDED
BY ARCSOFT IS PERMITTED ONLY UNDER AND IN ACCORDANCE
WITH THIS AGREEMENT. IF YOU DO NOT AGREE TO BE BOUND BY
THIS AGREEMENT, PLEASE DO NOT USE THIS SOFTWARE. IF YOU
OBTAIN THIS SOFTWARE IN FORM OF CD WITHOUT PRINT COPY
OF THIS AGREEMENT, AND YOU DO NOT HAVE OPPORTUNITY TO
READ THIS AGREEMENT, YOU MAY RECEIVE A FULL REFUND OF
THE ORIGINAL PURCHASE PRICE IF YOU (i) DO NOT USE THIS
SOFTWARE, AND (ii) RETURN IT WITH PROOF OF PAYMENT TO
THE PLACE WHERE IT WAS PURCHASED WITHIN 30 DAYS OF THE
PURCHASE DATE.
1. Grant of License. This Agreement permits you to use one copy
of the Software or the Software included in this package or device
on any single computer ("Software"). For each software licensee,
the program can be "in use" on only one computer or hardware
device at any given time. The Software is "in use" when it is either
downloaded, copied, loaded into RAM or installed into the hard
disk or other permanent memory of a computer or other hardware
device.
2. License Restrictions. YOU MAY NOT RENT, LEASE, SUBLICENSE,
SELL, ASSIGN, LOAN OR OTHERWISE TRANSFER THE SOFTWARE
OR ANY OF YOUR RIGHTS AND OBLIGATIONS UNDER THIS
AGREEMENT. You may not modify, translate, reverse assemble,
decompile, disassemble or otherwise attempt (i) to defeat, avoid,
bypass, remove, deactivate or otherwise circumvent any software
protection mechanisms in the Software, including without
limitation any such mechanism used to restrict or control the
functionality of the Software, or (ii) to derive the source code or
the underlying ideas, algorithms, structure or organization from
the Software (except to the extent that such activities may not be
prohibited under applicable law). However, you may transfer all
your right to use the Software to another person or organization,
provided that (a) the followings are also transferred with the
Software, (i) this Agreement; (ii) other software if contained in
the original package, and/or hardware that the Software is
bundled; (iii) any original or updated version of the Software; (b)
no copies including back-up and installed in your computer or
other device are at your possession after the transfer, and (c) the
recipient accepts all the terms of this Agreement. In no event shall
you transfer the Software obtained as a trial, test version, or
53
Reference
otherwise specified as not for resale. A special license permit from
ArcSoft is required if the program is going to be installed on a
network server for the sole purpose of distribution to other
computers.
3. Copyright. The Software or the Software contained in this
package or device is protected by United States copyright laws,
international treaty provisions, and all other applicable national
laws. The Software must be treated like all other copyrighted
materials (e.g. books and musical recordings). This license does
not allow the Software to be rented or leased, and the written
materials accompanying the Software (if any) may not be copied.
4. Ownership. Title, ownership rights, and all intellectual property
rights in and to the Software and any accompanying
documentation, and any copy of the foregoing, shall remain the
sole and exclusive property of ArcSoft and/or its third party
licensers. You agree to abide by the copyright law and all other
applicable laws. You acknowledge that the Software contains
valuable confidential information and trade secrets of ArcSoft
and/or its third party licensers.
5. Warranty Disclaimer. THE SOFTWARE IS MADE AVAILABLE TO
YOU ON "AS IS" BASIS. NO WARRANTIES, EITHER EXPRESS OR
IMPLIED, ARE MADE WITH RESPECT TO THIS SOFTWARE,
INCLUDING BUT NOT LIMITED TO THE IMPLIED WARRANTIES OF
MERCHANTABILITY AND FITNESS FOR A PARTICULAR PURPOSE
AND WARRANTIES FOR NON-INFRINGEMENT OF INTELLECTUAL
PROPERTY, AND ARCSOFT EXPRESSLY DISCLAIMS ALL
WARRANTIES NOT STATED HEREIN. YOU ASSUME THE ENTIRE
RISK AS TO THE QUALITY AND PERFORMANCE OF THE
SOFTWARE. SHOULD THE SOFTWARE PROVE DEFECTIVE, YOU,
AND NOT ARCSOFT OR AN AUTHORIZED RESELLER, ASSUME THE
ENTIRE COST OF NECESSARY SERVICING, REPAIR, OR
CORRECTION. SOME STATES DO NOT ALLOW THE EXCLUSION OF
IMPLIED WARRANTIES, SO THE ABOVE EXCLUSION MAY NOT
APPLY TO YOU. THIS WARRANTY GIVES YOU SPECIFIC LEGAL
RIGHTS, AND YOU MAY ALSO HAVE OTHER RIGHTS THAT VARY
FROM STATE TO STATE. YOUR SOLE REMEDY AND THE ENTIRE
LIABILITY OF ARCSOFT ARE SET FORTH ABOVE.
6. No Liability for Consequential Damages. YOU AGREE THAT IN
NO EVENT SHALL ARCSOFT OR ITS AGENTS BE LIABLE FOR ANY
LOSS OF ANTICIPATED PROFITS, LOSS OF DATA, LOSS OF USE,
BUSINESS INTERRUPTION, COST OF COVER OR ANY OTHER
INDIRECT, INCIDENTAL, SPECIAL, PUNITIVE OR CONSEQUENTIAL
DAMAGES WHATSOEVER ARISING OUT OF THE USE OF OR
INABILITY TO USE THE SOFTWARE, HOWEVER CAUSED AND ON
ANY THEORY OF LIABILITY (WHETHER FOR BREACH OF
54
Reference
CONTRACT, TORT (INCLUDING NEGLIGENCE) OR OTHERWISE),
EVEN IF ARCSOFT HAS BEEN ADVISED OF THE POSSIBILITY OF
SUCH DAMAGES. IN NO EVENT WILL ARCSOFT BE LIABLE TO YOU
FOR DAMAGES IN AN AMOUNT GREATER THAN THE FEES PAID
FOR THE USE THE FOREGOING LIMITATIONS APPLY TO THE
EXTENT PERMITTED BY APPLICABLE LAWS IN YOUR
JURISDICTION.
7. Export. You will not export or re-export the product
incorporating the Software without the appropriate United States
or foreign government licenses.
8. U.S. Government Restricted Rights. If you are a unit or agency
of the United States government, the Software and related
documentation are deemed to be "commercial computer software"
and "commercial computer software documentation," respectively,
pursuant to DFAR Section 227.7202 and FAR Section 12.212(b),
as applicable. Any use, modification, reproduction, release,
performing, displaying or disclosing of the Software and/or the
related documentation by the United States government shall be
governed solely by the terms of this Agreement and shall be
prohibited except to the extent expressly permitted by the terms
of this Agreement. Any technical data provided that is not covered
by the above provisions is deemed to be "technical
data?commercial items" pursuant to DFAR Section 227.7015(a).
Any use, modification, reproduction, release, performing,
displaying or disclosing of such technical data shall be governed
by the terms of DFAR Section 227.7015(b).
9. Termination. THIS AGREEMENT SHALL BE EFFECTIVE UPON
INSTALLATION OF THE SOFTWARE AND SHALL TERMINATE UPON
THE EARLIER OF: (i) YOUR FAILURE TO COMPLY WITH ANY TERM
OF THIS AGREEMENT; OR (ii) RETURN, DESTRUCTION OR
DELETION OF ALL COPIES OF THE SOFTWARE IN YOUR
POSSESSION. ArcSoft's rights and your obligations shall survive
the termination of this Agreement.
10. High Risk Activities. The Software is not fault-tolerant and is
not designed or intended for use in hazardous environments
requiring fail-safe performance, or any other application in which
the failure of the Software could lead directly to death, personal
injury, or severe physical or property damage (collectively, "High
Risk Activities"). ARCSOFT EXPRESSLY DISCLAIMS ANY EXPRESS
OR IMPLIED WARRANTY OF FITNESS FOR HIGH RISK ACTIVITIES.
11. Governing Law and Jurisdiction. This Agreement will be
governed by and construed under the laws of the State of
California and the United States as applied to agreements entered
into and to be performed entirely within California, without regard
to conflicts of laws provisions thereof and the parties expressly
55
Reference
exclude the application of the United Nations Convention on
Contracts for the International Sales of Goods. Suits or
enforcement actions must be brought within, and each party
irrevocably commits to the exclusive jurisdiction of the state and
federal courts located in Santa Clara County.
56
Reference
About ArcSoft
ArcSoft, Inc. is an industry leading software developer of
multimedia technologies and applications across desktop and
embedded platforms. Working closely with major OEM
manufacturers, ArcSoft offers a full line of imaging and video
solutions that enhance the features, performance, and user
experience of mobile phones, digital cameras, optical drives,
personal computers, and consumer electronics devices.
Established in 1994, ArcSoft is headquartered in Fremont,
California, with regional commercial and development facilities in
Europe and the Far East. For further details, please visit us at our
corporate web site: www.arcsoft.com.
57
INDEX
INDEX
F
1/16 Size, 22
1/4 Size, 22
360, 21
preview, 39
File Properties, 12
Fit In, 39
flash, 46
Flash, 40
Folder Tree, 19
font, 35
Frame, 35
frame color, 35
Full Screen Preview, 12
A
Actual Size, 39
Add, 25
Adjust Blend, 33
Align Points, 31
Aperture, 45
Auto Focus, 45
Auto Match, 32
auto white balance, 45
Auto-order, 25
Auto-Select by Group, 19,
49
G
Grid Display, 50
H
Help, 15
horizon line, 29, 47
Horizontal, 21
B
BMP, 40
Brightness, 30
J
JPEG, 18, 40
C
L
Contrast, 30
Copyright, 35
Crop, 29
light meter, 45
M
D
Manual Fine-Tune screen, 31
divider shots, 49
N
E
New Panorama, 11
enhancement, 30
EXIF, 19, 49
Exit, 11
exposure setting, 45
58
INDEX
O
Save Panorama, 11
Selected Tag, 19
Show Guides, 34
Show Tooltip, 12
Shutter Speed, 45
Size, 41
Stitch, 25
stitching paths (borders), 33
stitching points, 31
Straighten, 29
Open Panorama, 11
Original Size, 22
Output Size, 22
overlap, 31, 33, 48, 50
P
Page Layout, 41
panorama
360, 21, 47
horizontal, 21
tile, 21
vertical, 21, 40
Paper Size, 41
Photo Tray, 25
preview
360, 39
full screen, 12
regular, 39
Print, 11, 41
Printer, 41
Printer Setup, 11, 41
Properties, 12
PTViewer, 40
T
TGA, 40
thumbnail, 20, 25
Thumbnail Area, 19
TIF, 18, 40
Tile, 21
Title, 35
Tooltip, 12
tripod, 47, 50
V
version number, 15
Vertical, 21
View Mode, 20
Q
W
QuickTime, 40
white balance, auto, 45
R
Z
RAW, 18
Remove, 25
Rotate, 20
Zoom In, 12, 39
Zoom Navigator, 39
Zoom Out, 12, 39
S
Save As, 40
59
NOTES
NOTES