1
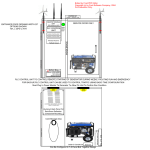
7 AMP SOLAR CHARGE
CONTROLLER
User’s Manual
7 Amp Solar Charge Controller
Maintain 12V batteries in a fully charged state
Specifications
Cut-in Voltage:
Cut-Out Voltage:
Max. Load:
13Volts
14.2 Volts
105 Watts/ 7 Amps
Installation
Connect to Battery:
Attach the Solar Charge Controller positive (+) wire to the positive (+) battery terminal. Then
connect the Solar Charge Controller negative (-) wire to the negative (-) battery terminal.
WARNING: The alligator clips MUST be placed on to the battery in the aforementioned order—
wrong connections may cause sparking or explosion.
Connect to Solar Panel:
Option 1
Strip the solar panel wires. Connect positive (+) wire from the solar panel to the positive (+) of the
charge controller and the negative (-) wire from the solar panel to the negative (-) of the charge
controller. Ensure the connections are secure.
Option 2
Some panels may include a quick connect for use with the Solar Charge Controller. If included,
connect positive to positive and negative to negative of charge controller. Ensure connections
are secure.
Operation:
The Green “Charged” light indicates a full-charged battery. When the battery reaches 14.2 V, the
Solar Charge Controller will cut out voltage thereby ensuring no overcharging. The yellow
“Charging” light indicates a battery that is being charged. When the battery reaches 13 V, the
Battery Charge Controller will cut-in and begin charging.
NOTES
• The Solar Charge Controller should be placed within 5 feet of the battery in a dry well
ventilated area.
• This Solar Charge Controller can support up to 105 watts of solar power. It is not
advisable to use with greater wattage.
• All connections should be in parallel to ensure a 12 Volt system.
• It is normal for both lights to flicker on and off during normal operation. The Battery
Charge Controller should be placed within 5’ of the battery in a dry, well-ventilated area.
This Battery Charge Controller can support up to 105 W and up to 7 A of array current.
All connections should be parallel to ensure 12 V system (positive to positive and
negative to negative).
FAQ
How many panels can I connect to my 7 Amp Solar Charge Controller?
You can connect up to 105 Watts of Solar Power to the 7 Amp Solar Charge Controller.
Panels should be connected in parallel – positive to positive, negative to negative.
When will the Charged Indication light (green) light up?
The charged indication green light will light up when the battery voltage reaches 14.2
Volts and the SCC will prevent the solar panels from overcharging the battery. It is normal for the
SCC LED to light on and off as the battery voltage cuts in and out.
GENERAL TESTING PROTOCOL
Always test outdoors under optimal sunlight
Test Solar Panel for Voltage
Connect Voltmeter to the panel separately from the charge controller and observe Open Voltage.
Open Voltage can range from 16 Volts to 24 Volts.
Test Connection to Charge Controller for Voltage.
Reconnect solar panel, and connect to charge controller as per instructions. Measure the Open
Circuit Voltage at the battery side of the charge controller. Open circuit voltage should read 510% lower than without charge controller. Open circuit measurement will read between 15 and
23.5.
Connect charge controller to battery
First, disconnect solar panels and connect charge controller to battery. Always connect charge
controller to battery first and remove last. Observe polarity – positive to positive and negative to
negative.
Reconnect Solar Panels to Charge Controller
If battery voltage is 14.2 or higher, the GREEN light should be on. If battery voltage is between 13
and 14.2, the YELLOW LED should be on. If battery voltage is 13 or lower, the YELLOW LED
should be on.
If all testing results within the above indicated ranges, solar system is in acceptable range. If
Voltage readings indicate lower ranges, repeat above connections and retest. Finally, it is
common to have 12V Battery issues such as dead cells or non-rechargeable battery problems.
Warranty
This product is covered by a 1 year limited warranty. Sunforce Products Inc warrants to the
original purchaser that this product is free from defects in materials and workmanship for the
period of one year from date of purchase
To obtain warranty service please contact Sunforce Products for further instruction, at 1-888-4786435 or email [email protected]. Proof of purchase including date, and an explanation
of complaint is required for warranty service.
For more information or technical support
Pour plus d’information ou support technique
1-888-478-6435
www.sunforceproducts.com
[email protected]
Made in China
Fabriqué en Chine