1
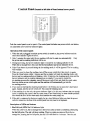
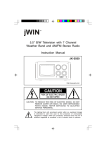
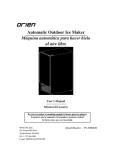
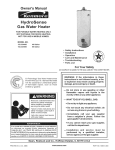
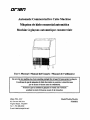
L:7/"le/'7
Automatic
Commercial
Ice Cube Machine
M:tquina _ hielo comercial autom_tica
Machine _ gla_;ons automatique commerciale
User's
ti
Manual / Manual
i
del Usuario
'
/ Manuel
I
de !'utilisateur
.......
Be sure the ice ...........
machine
has been standing upright for at kast 24 hears
C_r_6rme
dt qne hi miquina
d_ hiel_ ha cstado ca p_€_n
vc_
!
Orien
p-or _ menos
S'_s___r
qtte ta _ea
pemiant
an mois
USA, LLC
92i General Hi!l Drive
Virginia Beach, VA23454
Teio: !-757-486,2099
E-marl: [email protected]
24 i_Gras antes
prier to pf_m,
_rzatc
de enci_nfa_.a.
]
]
gL_oRs esl rest_e a hi vert_ca,_e
24 heures avant de ha brancher.
Mod_q_o/Mod_lc
FS260_€/-
]
|
t
!
TABLE
ICE MAKER
OF CONTENTS
Page
2
SAFETY ...............................................................................................................
IMPORTANT
SAFEGUARDS
...........................................................................................
_'FECHNICAL INFORMATION
INTRODUCTION
................................................................................................
.........................................................................................
COMPONEN_I" LOCATIONS
ICE MAKER INSTALLATION
Unpacking
2 - 4
5
..........................
...........................................................................................................
6
..........................................................................................................
7 - Ii
......................................................................................................................
Installing the Adjustable
!ns_
7
Feet ...........................................................................................
7
the StabE, ty Brackets ........................................................................................
Location Requirements
8
.............................................................................................
8 -9
E1_,eetricalRequiremei_
...........................................................................
l.eveling
...................................................................................................................
the tee Maker
Water Supply
Installation
OPERATION
Types
........................................................................................................
ber_re Operation
Method
1!
How the Machine
Normal Sounds
Preparing
.....................................................................................................................
the Ice Maker for Long Storage
Cleaning
Interior Cleaning
15
15
................................................................. ,,............................ 16
.......................................................................................................
System .................................................................................
PANEL ..............................................................................................................................
TROUBLESHOOTING
i4 = i 7
.........................................................................
Ice-Making
13
13 - 14
..........................................................................................................
System Cleaning
Sa_izingthe
!2 - !3
................................................................................. i4
..............................................................................
Water !-'hstribmion Tube CI_
Ice-Making
!2
Makes Ice ......................................................................................................
AND MA_ANCE
Exterior
12 - i 4
.................................................................................
...............................................................................................................
10
10 - i 1
......................................................................................................................................
Operating
CONTROL
9 - !0
............................................................................................................................
Fina! Checklist
CLEANING
5
.....................................................................................................................
LIMtt'TED WA_RRA2qTY ...............................................................................................
We reservethe right to make changes in speeifieatiom
16
17
! 8 - !9
20 - 21
22- 23
and design without prior notice.
ICE MAKER SAFETY
Your safely and the s_ety
We have provided many importam
of others are very important.
safety messages
in this rtmnual and on your appliance.
Always ream and obey all safety messages.
is the Safety Alert Symbo!. This symbol alerts you to potential
hazards
that can injure or kill you and otlx_. All _tfety messages wilt follow the
Safely Alert Symbo! arm either the words '*DANGER", "WARNING" OR
"CAUTR)N'.
statement may result Ludeath or severe persotmt h_j_y.
WARN_G
_onent
_us
means that faiim'e to heed this safety
tray result in cxtenmve pr. due damage,
p_oonal inj_y,or death.
CAUTi()N
st_emerit
means t,hat failure to _
this ._afety
nmy resuR k_ ;minor or txmderate persona| injuu%
or t_rotx_tv or equipment damag-__eo
All _fety mcaar, gcs vail alert )_u m _qa,_ _d'mp_temiai hazard is, tcii you _ow to rcAucc the
chance of mjmy, arid let you know _
can happen if the matructions are not toilowco.
i
iMPO!_!'ANT SAFETY LNS']_ UCT!ONS
J
!
.
maker, follow
the_ basic
precautions:
[ ice
WARNq'NG:
To rcducc
_hc risk
of fire, electric
[ * Plug into gounded 3-prong omiet
I * Do not remove grounding prong
[ * Do not use an adapter
] o Do not use an extension cord
shock or injta-y, when using _ur
[[
[
,PDLsconnect Vower before cleaning
* Disconnect power before servic_
]
[
* Replace all
}_,,,.Iz
_..xo,_,_v,-,,_-_
,!
€ Use 2 or more people to move arm
,i
innt_!l k^_.maker
S.4 VE 7"_rt_"
I
_reTo_
]
_(,'ru'tAm
t
I
IMPORTANT
SA GUARDS
Before the ice maker is used, it must be properly positiormI and installed as
d_cnbed _mthis rmm::M; _ read the manua! caref!atiy, Franklin Industries
strongly recommends that you have a professional install your new machine.
The warranty may be affected or voided hv an ineorr_t installation. To
reduce the risk of fire, electrical struck or imjury when using tP_ i_,'_..maker,
follow basic prccamiora, ha:hlding tlac following:
• Plug into a grotmdcd
3-prov.g outlet.
ard do not use an extcmion
cord.
Do not remove
grourdi_
proog,
do not u_
an. adv.p_.
• It is recon-an_aded that a separate circuit, serving oniy)'our ice maker_ be provided, Use
receptacles
that cannot
be tunm]
off by a switch
or pul! chain.
,, Do_.not eorarect or dJsc_t
the electric plug when your _
are w_.
- Never unplug the ice .maker by puUhag on the power cord. Always grip the plug firmly and puii
straight
out ii'omthe
outlet.
• Nev_ c!e_u ice mak_ parts v,_h _Tanable
flammable
x,apo_ and nqmas in the vicinity
create a fire hazard or explosion.
fluids. Do ___"t_am or usc g_,solh-_e or other
of tins or any other appliance.
The tomes can
• Belbre proceeding
with cleaning and maintermrme
oper_dions,
make sure the power !ine of the
unit _ discmnnccigd
and tim water iine is shut off. (EXCEPTION:
When cleaning
the
_"
s ice making and water systems_ see pages 18 - ! 9.)
• Before
operating,
put al! the enclosure
• Do not touch the evaporator
panels
back into their original
with your hand when the machine
- Unplug the ice ma_k_ or discomaeet
result in eie_ctrical shock or _.
power
bef.:yr¢ c!eaning
places.
is operating.
or sere_icing.
Failu_ne to do so can
• Do not attempt to repair or tepiaee any peat ofyo ,ur ice maker unless it is speeifieaiiy
recommended
in this manual. All other servicing
should be referred to a qualified !echniciano
- Use two or n_are _pie
other i@ay.
!o n,K)ve and install
ice maker.
Failure to &) _) can result
in back or
• To ensure proper ventilation
for yo_ ice maker, the front of the _
must be complete!y
unobstructed,
Choose a well-ventilated
,area with temperatures
above 5 ..IWF(!O_C) and below
100°F (38°C). This u._ _o_J-ST _ i._talled
ha an area protected
from €.he elements,
_ch as
wind, rain, water spray or drips.
• Th_ ice mak_
- The ice maker
should not be locatty3 next to ow-_ns, grills or other sounds ofhig_h b,_,_at.
must be _ed
with all electrical and water connections
in accordance
with s*.me
and local cedes. A standard electrical supply (! ! 5 VAC only, 60 Hz, ! 5 A), properly grounded
accordm_e
with the National
Electfiea! Code and local codes and ordinm'_es,
is requ_.
- Do not kink or phach power
° The fuse (or circuit
supply
cord or drain
bre_,&¢r) size shouid
must be in accordance
the packing
malerL-zalz _
e_
in order
to work
with local plumbing
• Make certain_ that the hoses are not pinched
• Check for _aks after connection.
,, Remm,'e
ice maker
and c_b'met.
be i 5 amperes.
g it is im!mrtant
for the ice maker to be leveled
serial
adjusLments to level ' lt:" o
- A!! insta!lations
lines between
or kinked
the ice maker
properly,
code requirements.
or damaged
before
You may need to make
during installation.
using.
° Turn on the water supply tap before switching on the ice maker. Never turn the water supply
tap offvchen the ice maker is working.
- Except to take ice .c-_,_
m the unit, keep t__hedoor closed
promote
proper ice formation.
in ord_
to reduce
ice melting
,-rod to
in
. Although the u_ _qasbeen tested at the factor'y, due to long-term transit arm storage, the first,
batch
•
of cubes m_ be discarded.
• if the ice maker wil! not be us_ for a long time, b_fore the next use it must be thoroughly
c_Maned. FotMw earef!aUy any insm_ctions pro-cRied for cleaning or _¢e of sanitizing solution.
Do not leave any solution inside the ice maker after cleaning.
• DO NOT touch the condenser fuls. Thecondenser fm_are sharp and can be,easily damaged.
• DO NOT use solvem-based cleaning agents or abmaiv_ on the im,,,'_r. Ttm_ ehmm_ may
transmit taste to the ice cubes, or -dare,age or discolor the interior.
• The i¢¢, machine cleaner contains acids, DO NOT use or mix with any other so'lvera-ba."_sed
cleaner products. Use rubber gloves to _otect handz. C_r¢lhl!y read the _i_.a!
salbty
_tions
on _ comainer of the ice machine ctemaer_
- Do rot use this apparatus for other than its intended _.
SA F_
Eleetri'ea!
THESE
INSTR UCT!ONS
Cozt_
Do not, imder a__nycircum__ances, cut or remove the t2_d (ground) prong from the power cord_
For personal _safety, _
appiiar_e must be properly grounded. The power cord of this applimnee
is equipped vdth a 3-prong grounding plug that mates with a standard 3-prong grounding wall
outlet to minimize the possibility of eieetrie s,hoek hazard from the appliance. Have the waU
omtet and e_mt checked by a qualified electrician to make sure the outlet is properly grounded.
When a s!andard 2-prong wall outlet is encountered, it is your r_ponsibility
amt obligmion to
have it replaced with a properly grotwaJed 3-prong wall om!et.
The ice maker should always be pl,agged into its own -individual elect_
outlet wifieh has a
voltage rathag that, matches the raring label on the appliance. _s
provktes the best performance
and also prevents overloading house wiring circuits which could crease a tL_ l-_rd
from
overheated wires. Never unplug your ice maker by pulling on the power cord. _Always grip the
plug firmly and pui,l _traight out from the omtet. Repair or _place immediately a.!! power cords
that have become frayed or o_i_e
damaged. Do not _ a €o,"d t_ shows cracks or .abrasion
damage along ks length or at either end. V_r__enmoving _d_eice maker, be careful not to damage
the power cord.
E_ee,,sion
Co_l
Betmu:se of ptrtemiai safety hazards under certain conditions,
do aot use an extension cord _
thiz ice maker.
it is _,trongiy retx_mmem!ed t_a¢. you
Technical
Modd:
E,_riea!
input:
Information
FS260IM
115VAC -_60Hz
9.4 kW " h/]00
Power conmmtption:
lee-making/lee-harvest
rated current:
High/Le_
Refrigerant:
sidepresaur_:
Unit width x de!_th x height:
9.2A/i2A
R404a, 22.9 oz.
350psig/!90psig
24" x 24" x 39"
136Ibs maximum
75 lbs maximum
Unit weight:
Ice storage capacity:
Ice-making
capability:
lee shape:
Ice cube dtme-_om:
Ambient
Optimum
250 Ibsdday*
"_b e
%.U
t" X l" X ¾"
temperature range
for best operation:
50OF- 100°F
temperature range
for feed water.
4!°F
*The actualquantity ofi¢,€prt_r, ed _
]bs of ice
- 90°F
day tan vary wilh room and water conditions,
Thetechnicaldataandperformanceindexlistedaboveshouldbe usedforreferenceonly.They
are su_ect
to change.
introduction
The ORtEN FS260LM !ce Cube Machine produces hard, _-clear,
gourmet cube ice, and
offers convenience for homeowners and hotel guests. An insulated ice _omge binis b_itt i_ This
user's n_antml is intended as a resource tbr persons h_stallia_g, asing _
servich_g model FLM200.
It contains valuable information on safety aad mainte.,mnce. ORIEN strongly recowanends *2Lat
this manual be kept ha a place _te
it can be accessed when needed. Ever3' ORtEN Ice Cube
Machine
is designed
and manufactured
acco.,_ttg to the highest smndm_
of safety, and
F_'formance.
It w_cts or exceeds the safety _andard
Often
L.L.C,
USA,
ass_,_,mes ao
liabL!ity
or
of UL563.
responsibility
of any
kL,ld
for
producm
manufa_ured
by Orien USA, L.L.C., that have been altered in any wa); including the use of any
parts and/or other components not specifically approved by Orien USA, L.L.C. Orien USA,
LoL.C. reserves
the right to make design changes and/or improvemems
at any time.
Speeifieations
and designs are subject to change without notice.
Component
Locations
Top pa_|
Door
Water tar&
Wa_
i
I
_
tank screw nut
Adjustable foot
Top view
....
c_
Water ittl_
318" FPT
_
/
Power s_#y
1_
Float
l
Water immp
'
6
" Stability brackets
Ice Maker Installation
UnpacMng
i
i
!
|
Excessive
Weight
|
Hazard
!
i
Use w¢o or ti_!'e persons to _ve
and in.stall ice maker.
Faihu'e to do ,_o can _esult h_ back o!" other is_jury.
i
Remove paeimging materials
L_PORTANT:
D_j not remo_,e old, permanent
ii
iii
i
.....
|
|
:
i_
lasting€lion labels or the data iabel on yo_cr ice
l
maKep°
Remove tape and glue from yov,r ice maker hc)bre using,
• To remove any _ma_ning ta.rre orgJue, rub the a.,_a briskly with your thumb. Tape or glue
residue can also be easily removed by rubbing a small amount of liquid dish soap over the
adhesive _a,Sthyour fingers. Wipe with warm water and dry.
_, n..,_,_,
_,_,,"+
....,_,-_"'_'_,_v
:""_'"_'"-,-_-,,,,_-*,_,
vabhh'ag akzohoi, flammable fluids, or abrasive cleaners to
remove tape or g!ue. Tbe_ products _ damage t'n¢ :_rfl_xceof your ice maker.
• Leave lowermost foam panel in place :.mtil after the adjustable feet are attached.
Cleaning before use
After you remove aH i ape and glue from the machine, clean the inside of your ice maker before
using it. See " _ntenor
, ._leanmg
r,- ,- in the Cleaning and_Maintenance _Hon.
Ir_talliag
tile adj'ustabie
feet
At leasi two persons are required to install the, adjUstable feet.
You will find four _adjustable feet packed in the ice storage bin. To install, tilt one side ofthe unit
and screw in two adjustable feet, as illustrated. (IMPORTANT:
Do not tilt the unit more than 45
degrees.)
Then ti!t the other _de and screw in the remaining two feel.
Lower foam panel
In_lliing
the stability
bracke_
This operation requires at least two persons.
If you wish to install the ice maker in a free-staratMg mode rather tb_ er_iosed, it is _'e_r_y
to
attach the two metallic stability brackets that can be found packed inside the ice storage bin.
Keeping the machine tilted to the right, lint not re, re than 45", attach one bracket to the cemer of
the umierside oldie ice maker with two _'t_ws (_ippticd). St, il_iol_
below. Set the
ba_ on its four feet, then tilt it forward in order to _%-'rewin the second t'_cket on the underside
of the unit opposite Li_ first, bracket. Level IM _o nisei'. This operation will stabiti_ it for
._ee-standing operation.
Location
RequireFnwnts
This ice maker
sho,Md be installed
by quat_-md
p_rsonmt.
NOTICE:
I. Before sett_
Insert
t]_ _
the dminh_se
nmker inside a cabiileL connect
into the drain,
2. Do not kink or pixmh the power
installation
and connect
supply
the wate_ supply pipe correctly.
the power
line [mtween
supply- line.
the lee maker
and wall or ¢abine_
¢learattce
Side view
, \l
ir
',,L\,
\"
i
x
x
',,
",i
",i
8
'.._j
':.-i
_
- To ensm'e pro!_r ventilation for your ice maker, the front of the m-dr must be completely
unobstnacm&
• When installing the ice m_._k_ under a counter, follow the recommended spacing dimensions
,shown. Allow at least 6" (150 ram) clearance at rear, and t" (25 ram) atthe sides and at the top
for proper air circulalion_ The installation should allow tF_ i¢_ maker, to b_ pulled forwa_ for
servicing ff necessary.
,_Choose a well-ventilated
area with temperatures above 50°F (t0°C) and below tO0°F (38°C).
This trait MUST be installed in an area protecte_ _m the _e._
such as wind, rain, water
spray or drips.
• The unit should not be ioeated ,_
to ovens, grills or other sources of high heat.
, Installation of the ice maker requires a cold wat,r supply bale( of 3/8" (9,5 ram) soft copper
tubing with a shut-offvaive.
° The ice maker requires a continuous water supply with a minimum presstn_ of 15 psig and a
static pressure not to exceed 80 psig. The t_
of th_ w-_,gr fozdg'ag into the ice maker
should be bec.ween 41 °F (5°(?) and 90"F (32"C) fbr proper operation.
Nomlal operaling ambient temperature
should be be_vegn 50°Y
(10°C) and IO0°F (38°C L Normal operath\-_ water temperatme
sltoutd be be_veen 4 !°F ( 50(") and 90°F (32°C L Operation of
tim ice maker tbr extended periods outside of these normal
temperature ranges may affect production capacity.
|
• [17 IS STRONGLY
RE,¢dOMMENDED
TO USE A VeATER
FILTE_
A FffLi_i{_
IS OF THE PROPER .TYPE., CAN $_MOVE
TASTE AND ODO!_q AS WELL
PARTICLES AND CAN PROLONG THE LIFE OF THE MACHINE.
• The ice. maker must be installed with all eie_xrical and water connections in accordance
Lif i'i"
AS
with
stae ._x! !ocM code.s.
-- The "_,it should be located on a firm _
level smqhce, h is important ibr tim ice amker m be
level in order to work properly. !f needed, you can adjust _.e height of _ ice w_k._ by
rota_ng the. _e*_. See the Leve!ing:the Ice Maker sec*_.
Electrical
Requirements
Eleclvical
Shock Hazard
Phtg imo a m'omlded 3-prong omlet.
Never remove the _'oundh\_, prong fi'om the phtg.
Never use an adapter.
Never use an extension cord.
Failure to follow these instructions can result in £u'e.
electficM shock ov death,
Before you move your ice maker into its finat location, it is import_ to make sure you have the
proper e_tr_al
coaao_tion. A standard el_:_ic3J supply (115 VAC only, 60 HT_ !5 A), properly
_round_ m _ccord_nce _th the National E!_-_r_a! Code and !oca! cod_ _
Q_m_
is
required. The ice maker should always be plugged into its own indi'vid_a! electrica! outlet, h is
recommendedthat a separatecircuit,serviagonlyyourice t_aker,be provided.Use receptacles
that cannotbe turnedoff b.va switch or pull chain. The fuse (or circuit tm_er) size should be 15
Recommended grounding method
For your personal safety, this appliance must be grounded, it is e,q_
with a power _ly
cord having a 3-prorrggro_g
plug. To ram_Jmizepossible shock hazard, tJx_cord _.mustbe
pk_gged into a math'ag3-pronged and grotmding-type wall receptaeI¢, grounded m aecord__nc¢
with the National Eieetrical Code and local codes and ordinances, ira mati_ wall receptacle is
not avaiiable, it iosthe per_nai responsibility ofthe customer to have a pro_y
grounded,
3 Lprong wall rec.eptae_ installed by a quaLified electrician.
Leveling
the Ice z_daker
Once the ice cube n"mc,
hine is set in its enclosure, ffthe base is not level you can "adjust _e feet
by. rotating the under block (see below) until the machine is level.
-
t
t
/.2_r_l
/_
_€111
)
iii
!
I!
I
)
h
J J
t
_)
)
_t
il
i
iil
°
)_ ....
!!
_i
i i!l') I)lii
iI ,, I) H IJ.-_3
. !._):t,
11
Tta'_.irrg the und_ block
toe, met-clockwise reduces
the machine's
II
,_
/
_!nder block
/
Tumi_
_,_
ckg:kwise
hhe _
b!ock
irmrea_ses the
machine's he_
height
it is important ibr the ice maker to be leveled, or water may not flow properly through the
evaporator (ice mo!d), tee prodtmtion wilt be lower than normal, and operation wilt be noisy.
Adjust the Might of the under block of the adjustable foot, rotating it to the right (counterclockwise) to lower that side ofthe ice maker. Turning the under btoek to the !eft (clockwise)
ra_es tMt side of the ice maker.
Water Supply
The water supply .should be _y
at the point ofinstallatiott The w-ater supply pcessure, should
be a minim,am of 15 psig with a s_,atie pressure not mo.ee.than 80 psig, (A wa!! outlet dh'ectly
behind the ice maker wilt make irt_taltation easier.)
We strongly recommended the use of a water filter. A filter. Orit is ef the proper type, can remove
taste and odors as well as particles and can prolong the l_e of the mac.hine.
10
IMPORTANT:
1. All installations rm_ be in accordance wilh tocai ptumbi,'rg code requirements.
Professiomz! installation is recommended
2. Water inlet fitting: 3/8" FTT __?ema!e Pipe _read);
drain line connection: i/2" FPT.
3. Make certain you have a suitable water supply hose and two suitable drain hoses, and that
the hose._ are not pinched, kinked or damaged during irL_tallatior_
4. Check [br leaks after ccmnectior_
Tools required: 3/8" open-etxl wrench, Phillips screwdriver
Cmmcatiag the wat_ line:
!. Turn oft'mare water supply.
2. Find a water supply line _
fire _n
location. Tim _
length_ of the water supply hose.
a A shut-offvalve must be-instatl_l to ti_ main wa_ _tppi_:
sl_uld
be k_s thaa the
.d,
4, Connect the water supply imse to tap and water inlet valve. Tighten firmly by harM, then
iq_3-B_]] tUI3"lw]_daV,
"*" Tench.
5. Connect one water drain hose to ice maker drain line eonm'et'nm. Tilden
f!_ev,_-_l_!f t_n vcit_hwre_h.
6. Connect anot_r water drain hose to bin drain line connection.
one-ha_turn with wrench.
TJgi_e,a _
7. Tram on main wat_ s uppiy and tap. Check for water s ul_ply connection
c_maection (including
connections
at the wat_ inlet).
NOTE:
if using
In,ta!laaon
a water
filter,
be sure to follow
fm_y
the filter mantffaetureFs
leaks.
by hand,
by hand, tJaen
Tighten
every
directions.
Types
This _e cube machine has been desigaexl to be eaclosed (as under a cabinet), it c,'mai_ be. fi'eestanding (_iv_ L_ supplied stnbi!ity braek_.s) or buiR-_ (sealed to the floor). !n every case,
_cre must be adcquaw air space around the unit forvcatitation
purposcs (see diagrams on page 8).
End_
I_:
,am enclosed installation will allow you to install the ice cube machine -.rudera counter or in a
kitchen cabinet ]_rovided the required e!eamnce space arour_ the ice maker is respected. You
must follow the stated instructions for
a. Electrical requirements
b. Water mpp!y
Free-standing !nsmUation:
The ice cube mac -hine can be installed to be free-s_gting
in any place you desire provided you
have access to a water supply, This installation _hasthe same requiremems as an enclosed
mstauatlon, p!us you muSt also follow the stated instrttc_ns
for tm'tatling the Stability Brackets.
•
_
|I
*
Bni|t-in ln_!ia.m...
!f this met_hod of installation is chosen, it wilt still be nec_
to allow adequaa: vemLation
space around the unit. The iouowang addltio_aal items must be obser-ved.
i. ehce the ice cubemachinein front of_ _ion
location. Raise the nmb2ne a_ place
on the floor or on a platform depending on your installation requirements.
2. The wa_er supply _ne must be. plumbed before eonnecti_
to the ice maker,
3: Turn on the main water supply and tap. Check for v,_ter supply comaeetion leaks. Tighten
every connection (including connections at the water inlet).
4, If the e!eetrieai outlet for the ice maker is behind the eabineL Viug in the ice maker,
5, Push the ice maker into position_
_,_binet _o ,_ noor _ah an approved cau_
comtm__md.
II
it
O ra o.
Final Check List before
Operaffon
I. Have all packMg _teth|s
aad t_I_ b_ _ov_
from flit i,_tetior aad exterior of t!_ ice
maker?."
2. L_d you clean the .ice storage bin'? (See pages i 5 - !7.)
3. Have the installmion instn_iom
been followed, including corw_tr,:ting the rrmchine to water
ard eieetric_TP.
4. Has file machine been leveled?
5, Is the. ice cube matte
in a site where the ambient temperature, is between 5& F (i & C) acid
t 00OF (38 ° C) and the water _mperature between 4 ! oF (5° C) _
90 ° F (3_C) al! ye_r round?
6. Has the water supply pressure been checked to ens_
a mmim_ma of 15 psig with a static
pr.er,_tre not to exceed gO psig?
7. !s tl_ere a clcara_-_'e of at least 6" (t 50 ram) at the rear, t" (25 trim) at the top arm sides for
proper air _-dreulation?
8. Has the !x_-wer supply voltage been checked or teated against the !mmepiaic truing? _
proper ge,_up_ling been itistarded ibl t.he ice cube mackine?
9. is the ice e,d_e machine plugged in?
i0. Have you tamed on the main water supply aad *.he tap?
1I. Have you checked for l_aks at all water supply cormecfions?
Operating
Method
1. iUrn on the water tap, lettmg*,he _ter enter the water tank, then turn the vower s-Mteh ON.
The power switeh's iadi¢_or lamp liglXs, as well a_ the other three iadicator iights on the
control panel.
2_ A____ah_ 3 minutes, the. ice maker wit! automatiealiy proceed m the. ice-making ,stage, and
the sound offlowirsg water vvSl!be heard.
Only the red power switch tamp and*_he green !ce
Making I,ED wit| be on.
3. Whenthebateh
of ice has e_m fuily formed_ _ce w.,I! a_omatJcady lab
" ' ....
into the ice storage o;ii.
_The yet!ow lee Harvest LED and power switch LED are on, and the other two LEDs are ore
4. V,qaen the ice storage bia is _tL the sheet of cubes will not fail completely and v_.ill ir_td the
bin full probe open. The machine is in the bin full _,
"and the red Bin Fu_ LED is tit. The
power switch LED i_ on "andthe other two LEDs are off.
5. The unit starts makL_g ice again amotmtieally approxh_.ate!y 3 mhaut_ _
ice c_
are
removed. ,_ ice is removed, the bin fu!! probe swings back to operating position.
ice-freaking
iMPO_
T_
_ge
]L. ....
...,.,i..
...__
TAZvT:
. Although
storage,
the unit has been tested arm cleaned at the/actoty,
the first batch of cubes must be discarded.
!2
due to long-term
transit
arm
. Never turn the water supply tap offwhen the ice maker .is working.
. Never touch the evalx-a'atorwhen the machine is running.
• Except to take ice from the unit, keep the door closed to reduce melting and insure proper ice
formation.
How _e Machine
Make_
Ice
When the !rower switch is firm turned ON...the machine is in Stand-by mode. After about 3
md_ate_, R _;iU ,a_oLrr,_tkm!!y
_
_ _
;_-mak;w,g stage.
There are two _stinct cycles: Freeze and Harvest° During the Freeze cycle, water flows to Ibe
ev_rJorah-_r surface. !n Ehe Harve._t cycle, the ice is released a_A water enters the machine. A
complete cycle can take 15 to 40 minutes, deptmd_
co_itioas.
Frce_:
Daring the Froze
on mbierit
cycle the €;ompre_sor is pump_
temperature arid oper_d:mg
refrigemat,
the fan motor is blowing
air_ and the water pump is circulating water. When _e batch of ice has been fi.flty formed_
t-be -_¢em,_ker st_,-e¢_
the Freeze cye!e and begins the Harvest cycle.
]!£nfccst: During the Harvest cycle the compressor is still operating, but*;he water p_mip has
stopped. The hot gas ,,_Ive opera, directing hot refrigerant gas i_fto-thc cvai_'_r'ator. "l_c
_gaswarms the evaporator, ca_ing _ cubes to slide as a unit off'the evaporator and into
the storage bin. The Freeze cyeie wi!! rest_ when at! the cubes drop _rto _ _,__
How_.the machine
n_es water:
"___mal_
TTheice cube m_hin¢ begins with a fixed charge of water that is
co''_''--_ m
" the vrdter tank. As
the w_er f!_ws to the free,.inS evaporator .m_faee, the wat_ will freeze and ._tiek to the ice euhe
molds. During Lhe bze-making process, fresh water emers *drewater tank eomim_iy
water from the trough freezes eomixmousiy
h_
"Wa.er
t
_/...f
_/
tray (trotgh)
Condenser
..... "
Hot _
-
on _e evaporator.
'_
b_;! • •
valve--,._,__ pump
Water .Jl,
] ji
_ il
_
_
_ _=_
_)_.i
as
motor
Compressor
i I
Normal Sourds
Your new ice cube machine m_y make sounds t_nt nre unfimiliar to you. Most off.he new
.,_unds _re rmrmn]. Hard sur£,mes !ike the tkmr and..walls e zn _mp,ii._ _he.._imd_, The €O|_wing
describes the _s
of sounds that _ht
be ng_,_"m yea and what may be ea,a,_o;mg_.hem.
• P,_attiingnoises may come from tire flow of the refrigerant orthe water Line. items stored
on top of the ice cube machine cart also make _oiseso
• Tbe h_h-efficiency
compres_r.may
make a _,m!sating or high-pitched sound.
• R_a_tg
water may make a splashing sound.
!3
* You _y hear air bei_ forced over $he _ondanser by the aordcr_ser tim.
* D_
the !!arv_
cycle, you may hear the sound ofice cubes falling imo the ice slomge
bin.
Preparing
the Ice Cube Machl_e
ffthe ice cube machine
wiii be nece_y
to _
for Long Ntorage
will not be u_d for a iong iime, or it is lo be moved io ai_oihcr place, ii
the system of water.
!.
2.
3.
4.
S.hat off the w_r supply m the m'_n wa_- so_¢,.
Disconnect the water supply !ine Erom the water inieL
Shut off the power supply at the _
elec_ca! power some.
St._w offth_ water t'_k _rew nut and d_Zm out w'at_ ¢ompt_.,ety, th_ tig!_en _
finishing. Dry the tank.
5, Remove the ice lfomthe ice aomge bka. Drythe bh-_.
6. Leave the. door open to allow f_r cite _ulationand to prevent mold and milder,:
7. Leave the water supply iine and power cord disconnected umii r_,_adyto reuse.
!MPOR
nut "-after
Z4NT:
° Do not touch
the powerpiug
when your
* Nev_?¥ unplug
#w, unit by pulling
C!e
hands
are wet.
on g:he cord
and Maintenance
If the ice maker is left mmsed for a long tune. before Tlle nex!
use it nmst be thorou_fly
cleaned.
Follow
carefifliy
any
instructions
provided for cleamnz or u_e of sanitizm_ sohltion.
Do not leave any __olution in'.,ide tl_e ice nmker after cleanfl:g.
i!
|
[
_Periodic cleaning and proper rr_intenance will ensure _ciency,
top pertbrmance, and long ii_..
T_ maintenance intervals tksted are based on norma! c_m,JR_a-_s.Y_,a m'_y want _ s._rten the
imerva_ if you b.ave pet.Lsor them are _her s_cia! considerations.
What she-ttldn't be d_ne
Never keep aaytbit_g in _ _e storage bin o_-_erthan ice: ,,,,m,,,_,._,._uv*wt_
.......arm _
not ot,_y u,_sanitary, but the labels may- s!ip offend plug uv the _,a'ain.
What _ouid be k_-.t €ieaa
aer¢ m 4 things to keep cle_n:
!. The exterior
2_
The
ul_._r__
3.
Water di_ribl_k,
ntube
_
_re
Before proceedfalg
with clealmlg
,_ld ummtexmnce
_-,I)el,,t,o-_."
....
make sure tile power line of the mtit is discomlected
and the water
lhle is slmt off. (EXCEP_ON:
Cleating of ice-nmkh_
syslem)
m
i
i
,
i
ii
iiii
i
iii
,
i
i
ii
Exterior Cleaning
The door aM cabinet may be ciem_cd with a mkkl dete.rg¢_ aM warm w_¢r _olufion such as ! oz
of d'._h,_a_tring liquid rrfixed with 2 gaiiow of warm water. Do not _ soivent-ba_d or abrasive
cleaners.
Use a sell sponge and rir, se w4th clean -water. Wipe with a so_ e_an towel to prevera
water spotting. Clean stainless steel with a cloth dampened
wa_ solution. Never use an abrasive cleaning agent
Interior
with a mild- _ergenL
m,_ _,mm
A. _ t..I ..1
.......
Cleaning
The ice storage bin should be sanitized oecasionaFLy. Clean the water tank before the ice cube
mac ._e is used for the first time and reused after stopping for an e_ended period of time. It
usually ¢ouvenient to s_ize
ihe trough after the ice-_
system has been cle_.,_ed _d the
ice storage bi_ is empty-.
1. Disconnect
power to the unit.
2. Or, en the door. You will fi,ud the water tank _rew nut on the _ont rigN ofthe water tmN.
Screw-offthe nut and drah_ water eomplete!y into the ice storage bin. The water drains out of
ti_:_ machine through the drain hole in the bin.
NOTE. Dv_ t ._o.get to screwl,he am 'back into place
• using a samt_'mg
soiutmn made of i ounce of household
ble_h
and 2 ga!lons efhet
w_er
£,.Y
c!otk Ta clean hard,to-reach
4. Rinse thoroughly
corners, apply the sanitizing
with clear water. _
completes
solution with a spray bottle.
the routine interior c!eamng of the unit.
5. Recomaect t_ power.
i
DO NOT
use soKent-based
I
cubes,
or dawage
the interior.
Theseor discolor
cleaners
cteauh_g
agents
the
nmyinterior.
transmit
!5
or abrasives
taste
on
to the ice
I
]
t
Water Distribution
Tube Cleaning
When you find that the ce cubes are i_mpletely
fo_
or _he output of_
cubes is low, the
water di_Mbution _q_bemay be blocked. Set the power switch to OFF. U_rewthe
sic,:screves
holding the top panel and rer_3ve t_ panel. _u
witt _e the water dis!ribution
water disf_dbmion tube so ttmt the holes hait are _acing _O. Using a toothpick
d.,xxlge the ho!c_, then rotate the water distribution
badly blo,.ked, clean it as roiiows:
•] Shh_ off the _€,_
2. Dk_oonect
i
_-md
tube back to its _
Lift one side, remove the distribution
position.
If the tube is
_t_be,
robe.
4. With a brusk clean tM tube wiXh a dilme solution ofwarm
such as dishwas!fi_
liquid. After removing
tube with e!ean water.
water _
a mild detergem
the dirt and lira from the surface,
rinse ti_
tube_..
6, R_'__nnect the water supply and power supp_
7. Re-attach
or similar tool
"' _
the water ho,_ t_om the di_ribut_n
5. Replace *&edistribution
tube. Rotaie the
lines.
the top panel.
Ice-MaMng System Cleaning
MLneraLsthat _e r__moved from water during the freezing cycle will eventually form a hard,
scaly deposit in the v,mer system Cleaning the s3"stem reguhriy helps remove the minerai scale
buildup. How often you need to clean 1thesystem depends on _how hard your wa1_is or how
effective your filtration may be. With hard water of 15 to 20 graimi gallon (4 to 5 grains/liter),
you may need to clean the system as often as ev_,,ry 3 rrKmths.
I.
Set the power switch to OFF.
2.
Remove all ice cubes
fromthe storage bin.
3. K_p*.be _e mak_ connected to the water s upp!_: Pour 8 oz. of Nickel-Safe
Cie_er_, Sok,*ion k-_o _ water tank,
4.
5_
ice Maker
T-,h_n *,he power switch ON. Within 3 minutes: Fress the CLEAN _'tton.
The machine
will
run the Automatic
Clean mode. The green Ice Making arid the yellow Ice Harve._t I,EDs will
bl_:.
The cleaning cycle will continue for 30 minutes unless you press the power switch (you can
press the i_wer switch to stop tM cleaning cycle any time during the. 30 minutes). After
eiea_iag_ the grin !ce Making and yellow !ce Harvest LEDs go on ,._ady and the. nmehj._e
returns to Stand-by mode.
6.
The dirty water must be d.mined oat completely.
(?leaning _ction.
Perform. steps 2 and 3 in the Inlerior
7.
Repeat steps I to 6 above three times to rinse !2he ice-making system completely.
NO/_: Do not add Ice Maker Cleaner So_mion to the water trough during the rinses.
8. If you wa,at to make ic,¢ cubes a.ff_ cleaning, turn off'dae power _Stch, dmkn off _c waste
water, then ram on the power switch.
Tt_ next ice-making cycle wil! begin.
9. Discard the first b_tch of i._.
i6
Sanitizin_ the Ice-_Making System
I. Set the power switch to OFF.
2. Remove a!! ice cubes fi,om the _.orage bin.
3. Prepare a sanitizing
solution by mixhag 1 oz. household beach with t _a!!on of warm wmer.
4. Keep the ice maker connected
solution.
to the water supply. Fill tire water rank with fl_e sanitizing
5. T,,wn the power switch ON. Within 3 minutes, press the CLEAN button. The, machine will nan
the Automatic Clean mode, The yellow Ice Harvest and the red Bin Full LEDs wi!t blink.
6. The cl_ning cycle _M!! continue for 30 minutes unless >_)upress the rower switch (you can
pr"_s the power switch to stop the c_anJ.ug cycle any time during the 30 minutes). A_Cter
cleaning, the yellow Ice Harvest and the greer_ Ice M_king LEDs go Olasteady and the
machine returns to Stand-by mode.
7. The dk_y water must be dmJ_d
Cleaning section.
out co.,rzplete|y. Perform steps 2 am: 3 m de lmerior
8. Repeat _eps 4 to 7 ",_bovethree times with fresh waterto
_
ti_ ]co-making
system
completely.
NOTE: Do not "add_a.v ¢ie-_
or sam_tizing solution to the water trough dm4ng _e rinzes.
9. ffyou want to make ice e::bes after cleaning, turn offt_he power switch, drain offthe
water, then turn on the power switch.
The next ice-making cycle w_I begin.
10. Discard the _st batch of ice.
"Yhe ice n_achme cleaner
contains
acids.
DO .NOT use or mix with ,an),other solvent-based
cleaner prodt_c_s.
Use :ubber gloves to protect hands
Carefidly read the naarerial safety
instructions on the container of the ice nmclmae cleaner.
DISCARD
the first batch oflce produced after cleaamag.
i
waste
Control
Pane|
(loeat_
at leR side of_t
bottom louver I_|)
Push the control panel cover to open iL The control panel includes one power svdaeh, one burton,
one adjustable screw and lbur indicator _s.
Operation ofthe _
!rand:
I. _,wh¢_
n the tmR is plugged in and _€ power swReh is U.gned on, _h¢ power indicator and the
other three indicator lights are al! om
2. After 3 mkmtes for water /Met, the ice machine',viii
the power and ice-making _mdicators will be on.
start to make ice ataomat_ tah'y.
Only
3. D_ing harvesting, the _-ha,-westkrdieator light is on and the ice-making _ic_or
is off.
Wt_n t__ ice st_tw-a_ bin is ful!, only t_ bi_fi_U indk_or and power tndic,_-or _ or_
4. If'the Clean button is pressed during the ice-making
will continue:
mode, it will be lgnor_.d, i ne ice-md_;ing
5. When y_u _
_ cteaa the macMs_!e, t_rnoffth_ ,t_=r switch fir'sL t!_n tlxra it _Jrt
Press the Clean button wiiJain 3 minmes and the ice maker wilt start _he cleaning m_de, ,_ith
_a'vest and ice-making indicators biiakmg, After 30 minutes, the cleaning mode stops and the
harvest indicator aid ice-making indicators arc on steady, if you want to rcs+drl the
ice-making proce_ aiter cleaning, tam off the _wer switch first and drain the waste water,
turnon thepower s_qtchagainard t_ n_chiae_,q9_icatty
go h_o
ice-m',ddng process.
6. if you want to interrupt the cleaning mode bctbre it is fini._hezl, rio no[ prcgsthc
again, instead. _
_._ pow_ sw-iX_ off. :Th..Li_
!ops _ cle__m__om_'_e2..
(;lean buiton
•_c,_o_,_
machine is on but o_y the po_,_er fiadicator light is iiL t_s w_,,' indicate *,_-° not _-'_c_-ou¢_
water _ reaching the system, tlmt the water pump is not functioning, or some simi "ha"problem.
First check the ie ez in the water, tank. then examine the water oump, etc.
8. if the tmAi is connoted io the powm" supply but no visual h-_!icator lights up when the power
swit_ is turned _n, the __se in the eontro| _nei box may need to be replaced.
Dcscrip.._ons of LEDs and buti_s:
I. Bin FuR (red) LED: Bin Full indicator light
,thebin fu11probe.Theunit wittstop w_rking.Whenice c_
_orage
are _moved fromme ice
bin..,c/eanng the bin fu!l probe_, the tea LEJ vd!l .flask for 3 minutes. Then the unit
wiii re_mrtandmum to the ic,-making
mode.
2. Ice Making (gimtm) LED: Ice Mak_rog indicator light
When _
_
_ on, the unit is wofldr_ in th_ ice__
flashing, the unit is working in the ice-making
3. I¢, Harv_t
_the
green LED is
mode htt approaebL, g the ice harvest mode.
(yt41ow) LED:. Ice Harvest indicator
When this LED is on, the unit is working
probe.
_.
light
in the i¢€ harvest mode controlled by the bin full
4. L S. Adjust screw: Ice size _justment
For service only. Adjttstment of this screw by ut',_!ualified perscms can damage the machine's
controls.
5. Power switch
This is the main switc_
When it is turned on, the mill goes into Stand-by mode for abom 3
minutes, with a!! LEDs on, then starts to make ice cubes automatically,
ice-making and ice imrvest modes.
switching
between
6. CLEAN tmtton
While the _
Automatic
NOTE:
is in Stand-by mode (all LEDs on steady), you can press CLEAN to start the
Clean procedure.
When you fini'_ work_g
The green and yellow LEDs will flash together.
with tile control patte!, ¢1o_, tM cover.
IMP O R Z_NT:
• Avoid letting water o0mact tim e.omro! box.
• When you finish working with the control panel close the cover.
19
Troubleshooting
Before
Calling
for
Sercf_
malfunctioning, read through the OPERATION section of this manual
first. !f the problem persists, check the Troubleshooting Guide below and on the. fo!lowing page.
If the unit appears to be
The problemmay be somethingverysimplethatcanbe solvedwithouta _
Possible Cause
Problem
call.
....
The ice mak_ is_mCltmged.Phm
tl_ i€€ maker
KeIfiace
fu_e.
The filse is blowa.
tbr _ervice
The ice maker, t._vcet
sx_-itch i0 OFF
Iron
m.
L¢il haFpe_
to check
the ice maker
t
again..,_
for a _.lort ci_it
pm_et
switch
to
:CE(o_.
_Thetee storage bm is ful! o_ Kemove
so_e _ce:mak_ sure tL_
[.
I_2_'-!Ltgt DIOO¢" 1_ IIL'_ O_ t'Lt'_
t_;e.,
....
tThe ck"amageway ont_
of Dr..-,/- offw-ater by ,m_c_.¢mg
lowe:
drainage am.
[Thew_.Ter_uppb"ra¢ is
l.ntrn-_i, off
maker
!Machine
struts,
makes
ibm; does not _
|vdth ice
tcosmectedl
"'" ""'""
_1.,,_
Turn on the wa¢er
|
t
_oi_eHv._aPPlY
line i_
o..................
~"
]_cotmect
Check
A few water, dropS, fa_ to
the_ fioo_r when
Water
the ice sto_rage bin.
from the umt.
Water
|
•
you open _he
door to r_e out ice from
is k_iz__g
i
ag__.
,upp_,
the ,,:a_
_u_a!,,... _e_
Cneck" the-m_wd_.L_t_on."
" -
up _Thc ambicn; ;c_czararc
m_d water _emp_atuxe
ace
high. or ,_mchine is ne__r
_ome hea_ source.
L
suOOb" tap.
coa_ecuoa
tim mgt _*.dhtioa.
,_mmensa ......... the door osome
:vat_
mgethe_
w_th _ce. _ake
case when you _ake om ice,
Tightenfimag. See "Coaaectiag tt_
Water Line.
2O
• 'l
I
e,robiem
i
J
.
lh'obaMe
POssible Cause
m
i
i
i
.
,
r
j
t
Correction
,
i
,
, ,
Check _the wa,_ef supply pfessltre
Cubes _e pa,-tia_fom_ed or are
.Not eaough
wat_
ia the
below
] 5 p_iv
Check
water
whi_e a¢ _he
restricted.
bottom.
Check_*.
SUl_lyz filrex- may be
a ,xa,_
!e_
.-t th_ wa*._
ITOlt_h_
The feet are nor leveled
locked.
Certain
sounds
and
are aom_aI.
te_n._ermnlre
stops _udde_y
while making
The b_,,
ice maker
ice.
of the
,.s
electr'tfiedo
Sca]._g
occm-s
_equemly
iaside
the . ntacmne.
- .1 :t
See "Normal
R.ecormect
the powe_
_uppiy]me.
C_,t off,he
eiecrriciw;
let _he ice maker
umi] rhe ten_eran.we
rer_r'a_ wiffdn t'he _tated range
The ice _orage
ice.
bin is flail of Remove
The g_ouadiag
line isa't
ice-full
the _ocket
Souads.
stop working
om of ;he stated range.
The ice maker
See "Levelm_
the Ice Maker".
The eieemcit T isoff
The lOOm
Level and lock _he feet.
m
some ice cnhes:
probe
make
_ure the
is free of ice.
Use a ._o,._-kermeevL,__,
,,herequi_ed
electrical staad,_d.
The harda_s of the wate_ is U_e a watef-softe_
roo hi_ll
de_,icemsta!!ed
m from of the wate_ m!et.
!
[ The ice cubes are
[ The sTxink_ is b_k_.
} not co_]etely
l
[ formed wh_n _
dumped,
i
i
i
l Cleaning.
!
Ice Machine
Parts
for Commercial
Products*
and Labor Domesti_
Limited
Ope_ rafingin
a Commercia|
Orien USA LLC (the "Company")
" -
......
cm-lfidges), _ad ice storage b_s to ,he end _st_er
Warr_
Environment
" .............................
ag_Lnst defecls in mat_a'Sal and fi_ory
workmanship
_velve (!2) mont_ Imrts_nd !_er flora the date cf mstzd!_ion.
An additional for_-eight
and labor will be extlmded to all cxaamercially-rated cube ice
(48) month waamaty on _
machine sealed _stems
(_fmcd as _€_-r'ga_
plates, condensersand com_-s)
_om _e da_ of _x_
msmlla6on, The company will replace per the Company facility, without cost to the Customer, that part of any such
ma_
_et bec,_s
am been r_
derive.
In the _
to Onen, _
Cube
date. the aforementioned
fi'_" dale- ,_
-'_srav,,_,
":----"
ice machi._es
wh_!ch _e
;*,_._e6._ d_e
warramy period wiii begin on me dine of sixi_em
Irre_tmVdv¢ of file actual inmall_
sixty (60) m_
a,_m_e Wwnmty !_,_,,istrmimaCard mdicat±,ag_
kom me Company.
seaiod s.,ntems will be warranmd for a maximum of
from _h_Com_a,_y,
c_einl]y
_nct_ll_,d 8_d _e
in _
reg_ed
W_m- Fi_
_ _.rt_.de.-_dW_
Pre,gram wiii receive an additio_mi twenty-four (2_) momhs parL_ coverage on aii non-sealed s_tem
tom.meres
from flae date of originai in_mliation. W_ter filters must be installed at the time _f installation and registered with the
Comply
to maLmain the extended
component
warranty.
3'0 re!_lcement
w_ be man, efor any !tort ar as_nidy
_hb2-h (l) has bee_t :,_bjed 1o at,
alteration or _ceR!_;
ttt_
,_
,
affects the machine'_ performance:
(lid is from a machine on which the serial number has
been altered or remand; or, (IV) uses any replacement _a_ nat a,a_,,.iz _,_ _, _ua _,--_.,
This warranty does not apply to de_uai_n
or danm#e ca_r_ by _u!ha_rtzed
se_v_e, using
other than Orien authorized replacenw.nt_, r_ks of transt_m_on,
dama_ -__suttingft_m
ad_,rse ent_ranmentat
or water condiaons, a_¢iden_, misuse, abuse, knproper drMnage,
interr,.o_tion in the eleetriea! or water supply, charges rdat_d to th_ r_t,
mn_ _._
non-defecave par_ or ca_nponents, damage by fire, flood, or ac_ _f Cad. This warran_ is
valid only when _n,
service, and pre_enave maintenance am performed by a
Company-authorized
service coordinator or service agency. The Ca_pany re_er_es the right to
refuse claims _ltade far gu machines or M_ m'ed in mare than ame !a_afion. Th_ LL--.L_d
Warranq"daes not _
ice bills, _rmal mai__
_lj_
made after insmt!ation,
and cleaning.
Limitation
of Warean_
r'i_is warramy_ is valid only for vrodu¢_s vr_lu_d
v .....
or, ..............
lind shivv_
,_te .._h,.,7,1l
be ¢.._,ered_. _
from the Comvlmy
after O_ol_r
_;--;*"_ Warrant,,"in ,,.w....
10, 2007. A vrodtt_.
,..,,,,._,...._;...,,.:..,..,,....
The !__bi!ityof the Company for breach of this warranty shall, in any case, be limited m the cost of a new pm't m
replace
any
d_aeacter
parL which
as
to
REPLACEMENT
CUSTOMER.
m._s_x_ries
to be defeclive.
'or _y
AS PROVIDED
ORIENUSA
CONSEQUEN't'LAL
PRODUCT,
proves
EXCEPT
DAMA(JES
THIS
NOT
FOR BREACH
TO THE EXTENT
Company
equipmuent
UNDER
_%HALL
The
no_
makes
mmmfaciured
WARRANTY
n_
_t^n_
by
iS THE
_cm
ANY
OF ANY EXPRESS
PROHIBITED
no r_3re_entztion._
BY APPLICABLE
the
or w_rrantie._
REMEDY
_a_r_T^_
OR IMPLIED
OF THIS _ARRANTY,
22
OR
OF THE
€_
WARRANt'Y
LAW, ANY |MPL|ED
FOR MERCHMNTABLLITY OR FITNESS Fog A PARTICULAR PURPOSE ON TiilS "'"_-'
IN DURATIONTO T'rl_ L_OTH
REPAIR
Co mp_my.
EXCLUSIVE
nf any
ON
THIS
WARRANTY
..............