1
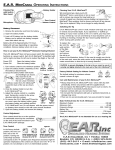
Please read this User Manual carefully before using your SnoreMasker system.
Caution: When properly inserted and with the volume of white noise turned up to the maximum setting, you will
be unable to hear many sounds that are important for you to hear including alarm clocks, children crying, honking
car horns, and others. Before using SnoreMasker be sure there are no sounds that you need to be able to hear.
Caution: SnoreMasker is a device designed to be inserted into your ear canal. If you have any medical condition
related to your ears, especially if you are experiencing pain or drainage from the ear, consult with your doctor
before attempting to use this product.
Instructions For Use
What is in the box?
Two Unifit In-The-Canal White Noise Generators, each Fitted with a Comply Snap-Tip Attachment Point
Four x Size 10 Hearing Aid Batteries (one battery is required for each earpiece)
Comply Snap-Tip Foam Assortment Pack (2 pairs small tips, 2 pairs average tips, and 1 pair large tips)
Deluxe Mirror Finish, Lined Metal Storage Box
Premium Earwax Removal and Battery Handling Tool
Using and Understanding the SnoreMasker System
The purpose of your SnoreMasker is to assist you in sleeping in the presence of noises that are too loud to be
blocked by just ordinary ear plugs. To accomplish this challenging feat, each earpiece has two separate functions.
Firstly, the specially designed ergonomic foam tip, which you will attach to the earpiece before use, will block up
to 25 dB of noise as would any ordinary foam earplug that is deeply inserted into the ear canal.
Secondly, the SnoreMasker earpiece will emit a soothing white noise sound that will prevent your brain from
heightening your hearing senses which it does naturally any time you are in a very quiet situation. The soothing
white noise energy produced by your SnoreMasker earpieces will then hide or “drown out” all or most of the small
amount of irritating noise that passes directly through the bones in your head or through the SnoreMasker
earpieces which you would otherwise hear. Because the Snoring or other noise has already been reduced in level
by the ear plug effect, you will lower levels of the white noise masking sound to do the job than you would need
without the foam tips in place. White noise is virtually devoid of any information, your mind will quickly tune it out,
leaving you free of the distraction previously caused by the noises.
This method of increasing the efficiency of earplugs is known as “threshold shift” and it changes the start point
where the earplugs will be effective from. Put simply this means that at the dead of night the ambient noise
surrounding you could be as low as 40dB. The earplug will cut out about 25dB (and that is near the theoretical
maximum) so that means you will hear anything over 65dB wearing just a normal earplug. Snoring can be
anything up to 100dB, but let us assume that most average snoring volume is around 90dB; we need to make the
earplug work from 65dB so that is the level that the white noise need to be set at. Your hearing threshold is
“tricked” (or masked) at 65dB – add the extra 25dB that the earplug is blocking and hey presto you are on your
way to a good nights sleep.
The Unifit earpieces are designed to fit either ear, and both earpieces use the same Comply Brand Snap-Tips.
Your earpieces are shipped without the tips attached and without a battery installed. Before you install a battery or
insert the earpieces into your ears, first determine the tip size that best fits you. Inside the Comply Trial Pack, you
will find instructions for attaching and removing the Snap-Tips. Carefully following these instructions, attach a tip
to one earpiece. Be sure the tip is fully “snapped on” by tugging on it. If the tip easily comes off the earpiece, put
the tip back into the Snap-Tip case and re-attach the tip by pressing straight down firmly until you feel the snap.
Now roll the foam between you thumb and forefinger to compress it to a small cylindrical shape and insert into the
ear as quickly as possible. The foam is temperature sensitive visco-elastic and when fully expanded will make a
perfect seal in your ear canal. Note that the Snap-Tips include a wax screen that completely covers the end of the
earpiece once the foam tip is installed onto the earpiece. Do not remove this screen. Sound will pass freely
through the screen, and the screen will help prevent earwax from getting into the end of the earpiece.
Once the tip is securely attached, insert that earpiece into your right ear. The earpiece should fit well down inside
the ear canal, with the outer surface of the device completely inside the outer ear cavity. The earpiece is curved to
follow the bend in your ear canal – be aware that the ear canal runs backwards and upwards. As you gently insert
the earpiece with the foam tip first, push the earpiece as needed to let the earpiece follow the curve of your ear
canal. Do not worry about the device going in too deep; the bend in your ear will not allow you to push it in too far.
The foam tip should fit snugly into the ear canal with no pain. If the earpiece with the tip attached will not fit into
your canal, or if it causes pain after insertion, remove that tip using the tip removal feature built into the Snap-Tip
case, and attach the next smaller size, then repeat the test. If the earpiece with the tip attached feels loose after
insertion, remove that tip and replace with the next larger size, then repeat the test. Once you have the best fitting
Snap-Tip on the right earpiece, repeat the process using the second earpiece and your left ear. And remember
which one was the best fit as you can order spare sets of these which are all the same size in the future. Now
remove the Snoremaskers if you still have them in you ears as you now need to install the batteries. Use your
fingernail to gently open the battery compartment on one of the earpieces and insert a battery into the hinged
door, then activate the earpiece by closing the door. Never use any tool to open the battery compartment. The
battery will fit into the hinged door only one way. If it does not fit neatly and easily into the door, turn the battery
over and try it again. Repeat the battery installation procedure for the second earpiece. Do not use any force to
install the battery. The earwax removal and battery handling tool has a small magnet that makes it very simple to
handle, install and remove the battery.
Before inserting the earpieces, turn the volume on each earpiece down to the lowest setting. The volume is
adjusted by placing the tip of a finger onto the round volume control and rotating the finger. The volume control
will only rotate approximately 180 degrees. Do not force it, and never use any tool to adjust the volume. Test to
see if you have the volume turned down by adjusting the volume, then holding the earpiece near your ear to listen
for the white noise sound produced by the earpiece. The volume control turns up the volume when turned
clockwise. Once you have the volume turned down on both earpieces, insert both earpieces and adjust the
volume as needed to mask the irritating noise. For maximum comfort and battery life we recommend that you use
the lowest volume of white noise sound will do the job for you, however, your SnoreMasker earpieces are pre-set
to limit the volume to a completely safe maximum of 80dB. That means you can turn them up as loud as they will
go and the sound they produce will not harm your hearing. You will find it helpful to go through the fitting and
setup process when you have plenty of time – once you are familiar with using the SnoreMaskers it will become
as natural as brushing your teeth!
After using your SnoreMaskers, remove the earpiece using the nylon fibre to gently pull the earpiece out of your
ear. Turn off the white noise, use the wax brush to remove excess earwax from the tip if needed, and store in a
safe, clean, cool, dry place, ideally in the mirror finish storage box provided. To turn off the sound turn the volume
control fully anti-clockwise. Normal battery life is 40-250 hours, depending on the volume at which the earpiece is
operated. The batteries we recommend are A10 zinc-air. Once you have started to use zinc-air batteries they will
have a life of 2 to 3 weeks if you are not using the SnoreMasker.
Maintenance
The secret to maximizing the life of your SnoreMasker earpieces is to keep them in a safe, clean, cool, dry place
when not in use. These are delicate little devices; treat them like jewels and always handle them gently and
carefully and keep them away from excessive heat sources, strong magnets and water. The small battery
handling magnet will not harm the earpieces.
We recommend that you leave the storage case open for a few hours after you place your earpieces into it after
use to give the earpieces a chance to dry out thoroughly.
Remove any excess earwax from the earpiece using a soft cloth moistened with alcohol or earwax remover liquid,
and remove excess earwax from the foam snap-tips using the brush end of the earwax removal tool. The SnapTips come with a wax screen, it is unlikely that earwax will get into the end of the earpieces, but if it does, the
earwax can completely block the white noise sound from coming out of the end of the earpiece. In the event of a
wax clog, use the wire loop on the end of the wax removal tool to remove the wax from inside the tip of the
earpiece.
Troubleshooting
If you are having trouble getting a satisfactory result from your SnoreMasker, please try these suggestions before
you contact us for assistance.
Earpieces do not block hardly any noise and with the white noise turned off, your SnoreMasker earpieces should
reduce the sound you hear by 50-75% of what you hear with your open ears.
To achieve the maximum level of noise isolation of which the SnoreMasker is capable, the earpieces must be fully
inserted into the ear canal and the foam Snap-Tips must be properly sized to completely close off the ear canal.
First make sure the earpiece is fully inserted into your ear canal. Roll the foam between you thumb and forefinger
to compress it to a small cylindrical shape and insert into the ear as quickly as possible. The foam is temperature
sensitive visco-elastic and when fully expanded will make a perfect seal in your ear canal. The base of the
earpiece should be well inside the outer ear cavity. If the earpiece will not go in that far, turn the earpiece
backward and forwards though 180 degrees to align the curve of the earpiece with the curve of your ear canal. If it
still will not go far enough in without causing pain, change the foam tip to the next smaller size and try again.
If the earpiece with the foam tip installed is loose in your ear, remove the tip and install the next larger size.
If the foam Snap-Tips you are using are already very snug in your ear, and you have the earpieces fully inserted
into your ear canals so the base plate is completely inside the outer ear cavity, but you can still hear noise with
little or no attenuation, the problem may be that your ear canals are more flat than round in shape and therefore
the round foam tips may not be able to deform sufficiently to completely block your ear canal.
The earpieces hurt my ears…
The SnoreMasker Pro must be fully inserted into the ear canal with the base plate completely inside the outer ear
cavity. If it is sticking out beyond the outer ear parts, the earpiece may cause pain when you lie on that ear. To get
the earpiece to fit more deeply into your ear canal, you may need to use a smaller Snap-Tip and/or you may need
to rotate the earpiece to align the curve in the earpiece more closely with the curve in your ear canal.
For over 90% of those who use SnoreMasker Pro, the earpieces are small enough and shaped in a way that they
fit comfortably well down inside the ear canal. When the SnoreMasker Pro will fit in that position, you can lie
comfortably on either ear with no pain or other discomfort. For a few individuals, unfortunately, the SnoreMasker
Pro is either not the correct shape or it is simply too big to fit into the canal. Like fingerprint; every ear shape is
unique and therefore it is difficult to absolutely guarantee a fit for everybody. In either case please give us a call,
and we will try our best to solve your fitting problem.
How often do I need to change the eartips…
If you are using the SnoreMasker every evening, they should be good for 10 to 20 times. However if your ears
produce a lot of ear wax (which is not unusual or a problem) you may want to change them more often
My earpiece does not produce any white noise sound…
Each earpiece has an independent volume adjustment knob. Use your fingertip to rotate the volume adjustment
knob all the way in one direction and listen for the sound, then rotate it all the way in the opposite direction and
listen again. The volume knob should only turn about half-way around. Do not force it, and never use any tool to
adjust the volume.
If adjusting the volume did not solve the problem, change the battery. Open the battery door using your fingernail,
then use the magnet on the earwax removal and battery handling tool to remove the battery and then to install a
new battery. Carefully close the battery door and repeat the volume adjustment procedure above.
If replacing the battery did not solve the problem, the trouble may be an earwax clog in the end of the earpiece.
Carefully remove the foam Snap-Tip from the earpiece using the Snap-Tip removal feature on the Snap-Tip case
to reveal the tip of the earpiece. Use the wire loop on the end of the wax removal and battery handling tool to
clear the wax clog. Note that the sound hole is in the side and not in the end of the tip. Insert the wire loop into the
sound hole in the earpiece and pull it back out repeatedly until the wax clog has been completely cleared.
If you have tried all the preceding suggestions without a satisfactory result, or to order additional supplies, please
ask your supplier for assistance.
Consumable Parts
Batteries
Cleaning tool
Foam tips – you will need to note which size you are – small, medium or large. There are 5 pairs of Snap Tips in a
pack.
Contact your supplier or visit www.enhancedlistening.co.uk