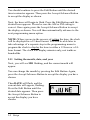
1
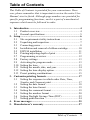
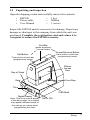
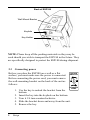
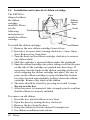
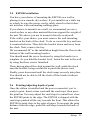
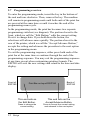
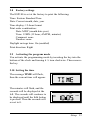
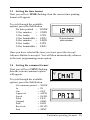
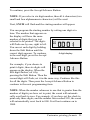
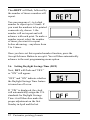
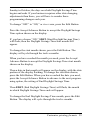
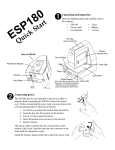
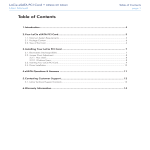
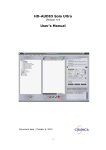
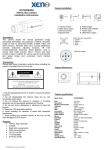
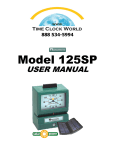
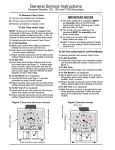
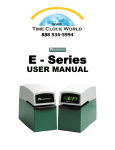
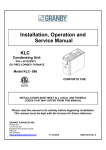
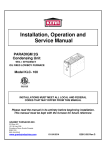
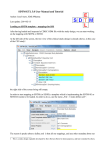
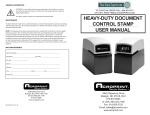
ESP180
User Manual
Thank you for purchasing Acroprint's ESP180 Electronic Time
Recorder. Acroprint offers a complete line of time recording
equipment, accessories, and supplies. Please contact your local
dealer or Acroprint for more information about time cards, card
racks, and replacement ribbons.
FCC Radio Frequency Interference Statement (USA):
Pursuant to part 15 of the FCC Rules, this piece of equipment has
been tested and found to comply with the limits for a Class A
digital device. These limits are designed to provide reasonable
protection against harmful interference with radio communications whenever the equipment generates, uses, or is able to
radiate radio frequency energy. However, such harmful interference can still result if the equipment is not properly installed or
used in accordance with the instruction manual. Even when
properly installed and used, the equipment may still cause harmful interference if it is operated in a residential area; in such case,
the user is required to correct the interference at his or her own
expense.
Declaration of Conformity According to EMC Directive
89/336/EEC
We declare under our sole responsibility that the time recording
equipment ESP180 to which this declaration relates is in conformity with the following standards: EN55022:1998, EN500821:1998. I, the undersigned, hereby declare that the equipment
specified above conforms to the above directive and standards.
Raleigh, North Carolina USA
July 31, 2000
2
________________________
W. Glenn Robbins
Table of Contents
This Table of Contents is provided for your convenience. However, please remember that is important to review the entire User
Manual, start to finish. Although page numbers are provided for
specific programming functions, each is a part of a mechanical
sequence which must be followed in order.
1. Introduction .......................................................................... 4
1.1 Product overview .......................................................... 4
1.2 General specifications ................................................... 5
2. Setup ...................................................................................... 6
2.1 Site requirements/safety instructions ............................ 6
2.2 Unpacking and inspection ............................................. 7
2.3 Connecting power ......................................................... 8
2.4 Installation and removal of ribbon cartridge ............... 10
2.5 ESP180 installation ..................................................... 11
2.6 Printing/adjusting depth of print ................................. 11
2.7 Programming overview ............................................... 12
2.8 Factory settings ........................................................... 13
2.9 Activating the program mode ..................................... 13
2.10 Setting the time ........................................................... 13
2.11 Setting the month, date, and year ................................ 14
2.12 Setting the time display option ................................... 15
2.13 Preset printing combinations ...................................... 15
3. Customize printing formats ............................................... 17
3.1 Setting the sequence in which order Date, Time,
Number and Comment print ........................................ 17
3.2 Setting the date format ................................................ 18
3.3 Setting the time format ............................................... 19
3.4 Setting the comment format ........................................ 19
3.5 Setting the number format .......................................... 20
3.6 Setting Daylight Savings Time (DST) ........................ 22
3.7 Setting print direction ................................................. 24
4. Error messages .................................................................... 25
5. Manufacturer's warranty .................................................. 27
Table of Contents
3
1. Introduction
1.1
Product overview
The Acroprint Electronic Side Printer model 180 (ESP180) has
been designed to be a versatile, reliable, inexpensive time recorder that can handle the needs of most businesses. Its design
allows for fast, easy alignment of forms. The “push button”
electric printing produces clear, clean, accurate printing on either
thin paper stock or thicker card stock.
The ESP180 will always be on time. It never needs resetting: it is
furnished with a perpetual calendar; it automatically adjusts for
daylight savings time; and it has a built-in battery backup to deal
with power outages. It even changes the year, month, and date as
you require.
This compact Time Recorder offers more than 200 printing
options; therefore, the year, month, date, hour, and minute will
appear just as you want them to look. You can even include on
the printout one of nine preset messages. You can choose your
numbering system, control whether the numbers repeat or automatically advance, and decide for yourself whether the print
appears on the left or right side of your form. As a result, the
final product will look just as you want it to look, thereby catering to your business’s unique needs.
With the ESP180, you can use any standard size time card or
form to track the hours your employees have worked or to record
the time expended in the costing of a job. It will time-stamp
activities, number documents, and do a host of other organizational tasks that will keep your business in order. It is an accurate, cost-effective device, produced by Acroprint, a proven
leader in the industry, with more than thirty years of experience in
designing and manufacturing time equipment.
Acroprint … Time for Business™
4
Introduction
1.2
General specifications
Power supply:
voltage input 120VAC, 50/60 Hz
output 16VAC @ 1.5A
Dimensions: 5 in. wide x 7.15 in. tall x 6.5 in. deep
Shipping Weight: 6 lbs.
Introduction
5
2. Setup
2.1
Site requirements/safety instructions
The ESP180 can be installed in any normal office environment.
No special wiring or cooling is required. However, do not use the
ESP180 under the following extreme conditions:
• extremely high or low temperature
[temperature range: 0-50°C (32-122°F) required]
• extremely high or low humidity
(humidity range: 0-90% RH required)
Do not place the ESP in any of the following problematic
locations:
• areas of high dust concentration
• areas with chemical fume concentration
• areas with extreme vibration or when placed on an
unstable or unlevel surface
The following cautions should be attended to seriously:
• Please take the time to read and understand all of the
instructions included in this User’s Manual.
• Always follow basic safety precautions to reduce the
risk of fire, injury or electric shock.
• Do not use this product near water or when your hands
or feet are wet.
• Securely install the product on the wall or on a flat
surface where it will not be knocked off.
• The ESP180 has a 6' power cord. Place it in a protected
location where the cord will not be stepped on or tripped
over.
6
Setup
2.2
Unpacking and inspection
Open the shipping carton and carefully remove the contents:
• ESP180
• 1 key
• Power cable
• Ribbon
• User Manual
• 3 screws
Inspect the ESP180 and its accessories for damage. Report any
damage or shortages to the company from which the unit was
purchased. Complete the registration card and return it to
Acroprint to ensure the ESP180 warranty.
Print Bar
(press anywhere)
(normal mode)
Accept/Advance Button
Edit Button
Rear portion of print bar
(programming mode)
Front portion of print bar
(programming mode)
Ribbon
Access
Door
Day of Week
Date
Time
Card Stop
16
MO
AM
Card Shelf
Digital Display
Note: This is the normal display
in the idle prompt. Your display
may appear different based on
the settings you chose when
programming the clock.
AM or PM
Setup
7
Back of ESP180
Wall Mount Bracket
Keyhole
Key Holder
NOTE: Please keep all the packing materials so they may be
used should you wish to transport the ESP180 in the future. They
are specifically designed to protect the ESP180 during shipment.
2.3
Connecting power
Before you place the ESP180 on a wall or a flat
surface, you must make sure the power is connected.
Before connecting the power cord, you must remove
the wall-mounting bracket on the back of the unit as
follows:
UNLOCK
BRACKET
PROGRAM
MODE
1. Use the key to unlock the bracket from the
bottom.
2. Insert the key into the keyhole on the bottom.
3. Turn it 1/4 turn counterclockwise.
4. Slide the bracket down and away from the unit.
5. Remove the key.
8
Setup
The power cable is then inserted into
the recessed area on the bottom of
the clock. Push the cable into the
opening, being careful to hold the
cable straight until the connector is
snug.
As a precaution against the power cord
accidentally being pulled out, you may
loop the power cord back around the tab
and then through the notch.
When the bracket is reinstalled, be careful
not to pinch the power cord between it
and the unit.
If you want to mount the unit on a wall (see Section 2.5), be sure
to install the ribbon first (see Section 2.4). You can fasten the
mounting bracket to the wall and attach the clock before you
begin programming.
Setup
9
2.4
Installation and removal of ribbon cartridge
The ESP180 is
shipped without
the ribbon
cartridge
installed. Please
use the
Printhead
following
instructions to
install the ribbon
cartridge.
Clips
Ribbon
Access
Door
Knob
Tab
To install the ribbon cartridge:
Ribbon
1. Remove the new ribbon cartridge from its box.
2. Insert key in access door, turning clockwise ¼ turn. Open
door. Remove key from door.
3. Turn the knob on the ribbon cartridge clockwise to remove
any ribbon slack.
4. Slide the cartridge’s exposed ribbon under the printhead.
5. Snap the ribbon cartridge into place taking care that the pins
on the side of the cartridge are pushed into their clips. If
necessary, turn the knob on the ribbon cartridge clockwise
while snapping the ribbon cartridge into place. Be sure to
press on the ribbon cartridge to snap it behind the bottom
two clips located approximately halfway down the ribbon
cartridge. Remove any slack in the ribbon.
6. The door should be closed by pressing on it until it snaps.
Do not use the key.
7. After the power is connected, take a sample print to confirm
that the ribbon is correctly installed.
To remove an old ribbon:
1. Insert the key into the ribbon access door.
2. Open the door by turning the key clockwise.
3. Remove the key from the door.
4. Grasp the ribbon by the tab and pull it straight out.
5. See ribbon installation instructions.
10 Setup
2.5
ESP180 installation
You have your choice of mounting the ESP180 on a wall or
placing it on a smooth, dry surface. If you install it on a table top
or a desk, be sure the power cord is safely stored so that it does
not interfere with surrounding walking space.
If you choose to mount it on a wall, we recommend you use a
wood surface or any other material that can support the weight of
the unit. We advise you not to mount it directly on drywall.
If the wall is your choice, you must remove the wall mounting
bracket on the back of the clock. To do so, insert the key and turn
it counterclockwise. Then slide the bracket down and away from
the clock. Next, remove the key.
We recommend 48" as the installation height from the floor to the
bottom of the wall mounting bracket.
You should mark the screw locations by using the bracket as a
template. As you hold the bracket level, fasten the unit to the wall
by using the three screws furnished.
Then, having placed the clock against the wall, guide the clock
onto the bracket, being careful not to pinch the power cord.
Finally, press downward until the clock snaps securely into place.
You should not be able to lift the clock off the bracket without
unlocking it.
2.6
Printing/adjusting depth of print
Once the ribbon is installed and the power connected, you’re
ready to print. Insert a time card until the card stops, then press
the print bar. You may adjust the card stops to control how close
the ESP180 prints to the edge. The ESP180 is shipped with the
card stops pushed all the way towards the front. This allows the
ESP180 to print close to the edge of paper. To increase the print
distance from the edge, push the card stops towards the back of
the unit.
Setup 11
2.7
Programming overview
To enter the programming mode, insert the key in the bottom of
the unit and turn clockwise. Then, remove the key. The machine
will remain in programming mode until both ends of the print bar
are pressed at the same time or until it reaches the end of the
programming menu cycle.
In the programming mode, the print bar becomes two separate
programming switches (see diagram). The portion closest to the
front, which we call the “Edit Button,” edits the current setting.
Press it to change data. If you hold down the button, the
selections will advance more quickly. The portion closest to the
rear of the printer, which we call the “Accept/Advance Button,”
accepts the setting and advances the procedure to the next option
in the programming menu.
To exit the programming sequence, either press both ends of the
print bar at the same time or continue through the end of the
programming sequence. You may exit the programming sequence
at any time except when customizing printing formats. The
ESP180 will save the new settings and return to the time and date
display.
Front of
ESP180
Print Bar on top of ESP180
Back of
ESP180
This end acts as
the Edit Button.
This end acts as the
Accept/Advance Button.
Press to change the
current setting.
Press to accept the current setting
and advance to the next option.
12 Setup
2.8
Factory settings
The ESP180 is set at the factory to print the following:
Time: Eastern Standard Time
Date: Current month, date, year
Time display: 12-hour format
Print order combination:
Date: MDY (month date year)
Time: 12MN (12 hour, AM/PM, minutes)
Comment: none
Number: none
Daylight savings time: On (enabled)
Print direction: Right
2.9
Activating the program mode
You activate the programming mode by inserting the key into the
bottom of the clock and turning it ¼ turn clockwise. Then remove
the key.
2.10 Setting the time
The message TIME will flash,
then the current time will appear.
The minutes will flash, and the
seconds will be displayed at the
left. The seconds will continue to
be displayed until the Edit button
is pressed. Then the seconds will
revert to 0.
SU MO TU WE TH FR SA
AM
33
Setup 13
You should continue to press the Edit Button until the desired
time in minutes appears. Then press the Accept/Advance Button
to accept the display as shown.
Next, the hour will begin to flash. Press the Edit Button until the
desired hour appears. Please be sure the AM or PM setting is
correct. Once again, press the Accept/Advance Button to accept
the display as shown. You will then automatically advance to the
next programming menu option.
NOTE: When you are in the process of setting the time, the clock
will be displayed in a 12-hour format. You will be able later to
take advantage of a separate step in the programming menu to
program the clock to display the time in either a 12-hour or a 24hour format. The clock will display minutes only, not tenths or
hundredths.
2.11 Setting the month, date, and year
Next, you will see MO flashing, and the current month will
appear.
You can change the month by pressing the Edit Button. Again,
press the Accept/Advance Button to accept the display you have
chosen.
Then DATE will flash, and the
current date will appear, flashing.
Press the Edit Button until the
desired date appears. Then press
the Accept/Advance Button to
accept the display you have
chosen.
14 Setup
29
Next, you will see YEAR flashing, and the current year will
appear. As before, press the Edit Button until the desired number
appears. Then press the Accept/Advance Button to accept the
display you have chosen. You will once again automatically
advance to the next item in the programming sequence.
NOTE: The ESP180 will automatically set the day of the week
for you, based on the month, date, and year you have selected.
2.12 Setting the time display option
You may set the clock to display the hour either in the standard
12-hour format or in a 24-hour format. As mentioned in 2.10,
you do not have to set the time to be displayed in the same
format in which it is printed.
Next, you will see DISP flashing, and your current display option
will appear. You can press the Edit Button to change this option
to a 12-hour or 24-hour format.
Then press the Accept/Advance Button to accept the display you
have chosen. You will automatically advance to the next item in
the programming sequence.
2.13 Preset printing combinations
To simplify programming, you may elect any one of twelve preset
printing combinations. You have the option of choosing either a
12-hour or a 24-hour format, which includes minutes (MN) or
hundredths (HU). Caution: To allow for customized print
formats, you must set the preset printing combinations to
“NONE” (see Section 3, Customize printing formats). You will
find additional choices available in this section.
The display will flash PRST, then NONE.
Setup 15
The preset printing combinations are:
NONE
PR01 Month Date 12MN
PR02 Month Date 24MN
PR03 Month Date 24HU
PR04 Day Month Date 12MN
PR05 Day Month Date 24MN
PR06 Day Month Date 24HU
PR07 Day Month Date Year 12MN
PR08 Day Month Date Year 24MN
PR09 Month Date Year 12MN
PR10 Month Date Year 24MN
PR11 Date Month Year 12MN
PR12 Date Month Year 24MN
DEC12 PM1:45
DEC12 13:45
DEC12 13.75
TH DEC12 PM1:45
TH DEC12 13:45
TH DEC12 13.75
TH DEC12’02 PM1:45
TH DEC12’02 13:45
DEC12’02 PM1:45
DEC12’02 13:45
12 DEC’02 PM1:45
12 DEC’02 13:45
You can choose one of the preset printing options by using the
Edit Button. To customize print formats, you should choose
“NONE.”
If you wish to select a preset option, use the Edit Button to
display it, and then press the Accept/Advance Button to accept it.
Otherwise, choose “NONE,” and you will be ready to customize
the printing format. Do not exit the programming menu if you
want to customize printing formats.
If you have accepted one of the PR01-PR12 preset options, you
then have the option of continuing on to the Setting Daylight
Savings Time step and selecting a print direction. You may exit
the programming menu with or without doing this.
To exit the programming menu, you will need to press both ends
of the Print Bar at the same time. The ESP180 will save the new
settings and return you to the time and date display.
16 Setup
3. Customize printing formats
3.1 Setting the sequence in which order Date, Time, Number
and Comment print
You will see DATE flashing; the current date format will appear.
To cycle through the available options, press the Edit Button.
The print format options do not affect how information is displayed; they do affect how it is printed. You may select three of
four items and the sequence in which they appear: date, time,
number, and comment. If you do not select a particular item, it
will not appear in the programming menu.
You will see ORDR flashing, then the print order will appear.
Press the Edit Button to cycle through the available
combinations:
DTC (Date + Time + Comment)
CDT (Comment + Date + Time)
CTD (Comment + Time + Date)
TDC (Time + Date + Comment)
DTN (Date + Time + Number)
NDT (Number + Date + Time)
NTD (Number + Time + Date)
TDN (Time + Date + Number)
NDC (Number + Date + Comment)
CTN (Comment + Time + Number)
NTC (Number + Time + Comment)
No number
No number
No number
No number
No comment
No comment
No comment
No comment
No time
No date
No date
Once you have selected the combination you want, press the
Accept/Advance Button to accept it. You will then automatically
advance to the next setting menu.
NOTE: You will not be able to exit the programming menu while
you are involved with the print format options.
Customize printing formats 17
NOTE: With the ESP180 you will be able to print up to 21
characters. The size of the typeface, however, will depend on the
number of characters you select to program. For example:
-
-
3.2
At all times, AM and PM will be printed in small type.
If you utilize 16 or fewer characters, everything will
appear in the large typeface.
If you use precisely 17 characters, the date and time will
appear in the larger typeface, while the comment and
number will appear in the small.
If you use 18-21 characters, everything will appear in
the smaller typeface.
Setting the date format
Next you will see DATE flashing, then current date format will
appear.
To cycle through the available
options, press the Edit Button.
No date printed
Month Date Year
Date Month Year
Year Month Date
Month Date
Date
Day of the week
Day Month Date
Day Month Date Year
Month-Date-Year
Year-Month-Date
= NONE
= MDY
= DMY
= YMD
= MD
=D
= DAY
= DMD
= DMDY
= MDY= YMD-
Once you have selected the date you want, press the Accept/
Advance Button to accept it. You will then automatically advance
to the next programming menu option.
18 Customize printing formats
3.3
Setting the time format
Next you will see TIME flashing, then the current time printing
format will appear.
To cycle through the available
options, press the Edit Button.
No time printed = NONE
12-hr, minutes
= 12MN
12-hr, tenths
= 12TN
12-hr, hundredths = 12HU
24-hr, minutes
= 24MN
24-hr, tenths
= 24TN
24-hr, hundredths = 24HU
12-hour format
with minutes
Once you have selected the time you want, press the Accept/
Advance Button to accept it. You will then automatically advance
to the next programming menu option.
3.4
Setting the comment format
Next you will see CMNT flashing,
then the current comment option
will appear.
PF
To cycle through the available
options, press the Edit Button.
No comment printed
In
Out
Approved
Faxed
Filed
Original
Paid
Received
Sent
=
=
=
=
=
=
=
=
=
=
NONE
IN
OUT
APPD
FAXD
FILE
ORIG
PAID
RCVD
SENT
Customize printing formats 19
Once you have selected the comment you want, press the Accept/
Advance Button to accept it. You will then automatically advance
to the next programming menu option.
3.5
Setting the number format
Next you will see NUM flashing,
then either “YES” or “NO” will
appear.
pf
“YES” means that the numbering
feature is activated and numbers
can be printed. “NO” means that
the numbering feature is not
activated.
If you wish to change from one of these to the other, press the
Edit Button.
To continue, press the Accept/Advance Button.
If you have selected “NO,” no number will print. The display will
automatically advance to the next item on the programming
menu, “Daylight Savings Time.”
If you have selected “YES,” a number will print. Continue
through the following steps to set the number of digits you want
printed, the number you wish to be the starting number, and the
repeating number option.
NOTE: The ESP180 does print leading zeroes. For example, if
you have requested three digits, the clock will print “020” rather
than “20.”
DIGT will then flash, and the number of digits to be printed will
appear.
20 Customize printing formats
To continue, press the Accept/Advance Button.
NOTE: If you select a six digit number, then all 6 characters (two
small and four alphanumeric characters) will be used.
Next, SNUM will flash and the starting number will appear.
You can program the starting number by setting one digit at a
time. The number that appears on
the display will have the same
number of digits that you just
selected to be printed. The digits
00
will flash one by one, right to left.
You can set each digit by holding
down the Edit Button until the
6 digit display
correct digit appears. To continue
to the next digit, press the Accept/
Advance Button.
For example, if you choose to
print 6 digits, then six digits will
00
appear on the display. When the
first digit flashes, set it by
pressing the Edit Button. Then the
second digit will flash; set it in the same way. Continue like this
for all the digits. Then press the Accept/Advance Button to
continue to the next programming item.
NOTE: When the number advances to one that is greater than the
number of digits you have set to print, the count will automatically reset back to zero. For example, if you have set the clock to
print only three digits, and the number has reached 999, the count
will automatically reset back to 000. It will not continue on to
1000.
Customize printing formats 21
Then REPT will flash, followed by
the number of times a number will
repeat.
You can program a 1- to 6-digit
number to repeat up to 9 times. If
you want the numbers to be printed
consecutively, choose 1: the
number will not repeat and will
advance with each print. To make a
number repeat, select the number
of times you want it to repeat
before advancing – anywhere from
2 to 9 times.
Once you have set this repeated number function, press the
Accept/Advance Button to accept it. You will then automatically
advance to the next programming menu option.
3.6
Setting Daylight Savings Time (DST)
Next, DST will flash and “OFF ”
or “ON” will appear.
“OFF” and “ON” indicate whether
the Daylight Savings Time feature
is turned on off or on.
If “ON” is displayed, the clock
will automatically assign the U.S.
standards for Daylight Savings
Time: it will therefore make the
proper adjustment on the first
Sunday in April and the last
22 Customize printing formats
Sunday in October, the days on which Daylight Savings Time
begins and ends. If your business requires other date changing
adjustments than these, you will have to remake those
programming changes each year.
To change “OFF” to “ON,” or vice versa, press the Edit Button.
Press the Accept/Advance Button to accept the Daylight Savings
Time option shown on the display.
If you have chosen “ON,” SDST (Start Daylight Savings Time)
will flash; then the Daylight Savings Time start month will
appear.
To change the start month shown, press the Edit Button. The
display will cycle through the twelve months.
When you have reached the month you need, press the Accept/
Advance Button to accept the Daylight Savings Time start month
shown on the display.
Then a date in that month will appear on the display, with the date
portion of the display flashing. To change the start date shown,
press the Edit Button. When you have reached the date you need,
press the Accept/Advance Button to advance to the next programming option, the setting of End Daylight Savings Time.
Then EDST (End Daylight Savings Time) will flash; the month
in which Daylight Savings Time ends will appear.
To change the End Daylight Savings Time month, press the Edit
Button. The display will cycle through the twelve months.
Customize printing formats 23
When you reach the month you need, press the Accept/Advance
Button to accept the month shown on the display.
Then the date will appear on the display, along with the month.
The date portion of the display will be flashing. To change the
start date displayed, press the Edit Button. When you reach the
date you need, press the Accept/Advance Button to advance to the
next programming menu item.
3.7
Setting print direction
Then PDIR will flash; the current print direction will appear.
To change the current setting, press the Edit Button.
Right print = RGHT
Left print
= LEFT
When you have selected the proper print direction, press the
Accept/Advance Button to accept the print direction displayed.
You have now finished executing the entire programming procedure, and the display will once again show only the date and time.
24 Customize printing formats
4. Error messages
ERR: When this appears, it indicates there is no printhead
movement. There are three probable causes:
- The printhead may have jammed.
- The ribbon cartridge may have jammed; or
- The motor may be disconnected or damaged.
Try any of the following:
- Check the ribbon cartridge. Make sure it is inserted
correctly.
- Reset the recorder (see next page for the location of
the Reset Button).
- Contact either the Acroprint distributor from whom
you purchased this product or Acroprint’s Service
Department.
ERR0: When this appears, it indicates that although the printhead
moves, no print appears. It may be that the home sensor is disconnected or damaged.
Try either of the following:
- Reset the recorder (see next page for the location of
the Reset Button).
- Contact either the Acroprint distributor from whom
you purchased this product or Acroprint’s Service
Department.
ERR1: When this appears, it indicates that the timing sensor may
be damaged.
Try either of the following:
- Reset the recorder (see next page for the location of
the Reset Button).
- Contact either the Acroprint distributor from whom
you purchased this product or Acroprint’s Service
Department.
Error messages 25
NOTE: The Reset Button
You can find the ESP180 Reset Button on the back of the unit,
behind the wall mounting bracket. If you press this button, it will
restore the factory default setting to the following:
Time: 6:00 AM
Date: Jan 1, 1999
Time display: 12 hour format
Print: Month Date Year
12-hour, AM/PM, minutes
no comments
no numbering
Reset switch
26 Error messages
5. Manufacturer's warranty
Should you have any questions concerning your warranty
information or supplies, please contact the dealer or store from
which you purchased the equipment.
This product is guaranteed to the original purchaser for a period
of one (1) year from original purchase date against defective
materials and workmanship when used under normal operating
conditions. The repair or replacement of any defective component
or part and any necessary adjustments will be made free of
charge, under the following provisions: (1) The machine must be
shipped prepaid to the factory service center shown below; (2) it
must be securely packaged; and (3) it must be shipped in the
original shipping container. This warranty applies to Acroprint
products purchased and retained in the U.S.A. The warranty is not
applicable if the device has been subject to misuse, abuse,
negligence, accidents, power surges, or lightning. The warranty is
also not applicable if the serial number has been altered, defaced,
or removed, or if the device has been tampered with or taken
apart by anyone other than an authorized service person.
Please return the warranty card to Acroprint to register your
product. For your reference, fill out the information below.
Model Number ____________________________
Serial Number _____________________________
Date Purchased ____________________________
Purchased From ___________________________
Location _________________________________
Telephone Number _________________________
Acroprint Time Recorder
5640 Departure Drive
Raleigh, NC 27616-1841
Product/warranty information: 800.334.7190 or
919.872.5800
Fax: 919.850.0720 or e-mail: [email protected]
www.acroprint.com
Manufacturer's warranty 27
5640 Departure Drive
Raleigh, NC 27616
IN USA 800.334.7190
www.acroprint.com
P/N 06-0251-000 Rev. B