1
User Manual
PCM-2312
2MB MRAM Mini PCIe card
Copyright
The documentation and the software included with this product are copyrighted 2013
by Advantech Co., Ltd. All rights are reserved. Advantech Co., Ltd. reserves the right
to make improvements in the products described in this manual at any time without
notice. No part of this manual may be reproduced, copied, translated or transmitted
in any form or by any means without the prior written permission of Advantech Co.,
Ltd. Information provided in this manual is intended to be accurate and reliable. However, Advantech Co., Ltd. assumes no responsibility for its use, nor for any infringements of the rights of third parties, which may result from its use.
Acknowledgements
Intel and Pentium are trademarks of Intel Corporation.
Microsoft Windows and MS-DOS are registered trademarks of Microsoft Corp.
All other product names or trademarks are properties of their respective owners.
Product Warranty (2 years)
Advantech warrants to you, the original purchaser, that each of its products will be
free from defects in materials and workmanship for two years from the date of purchase.
This warranty does not apply to any products which have been repaired or altered by
persons other than repair personnel authorized by Advantech, or which have been
subject to misuse, abuse, accident or improper installation. Advantech assumes no
liability under the terms of this warranty as a consequence of such events.
Because of Advantech’s high quality-control standards and rigorous testing, most of
our customers never need to use our repair service. If an Advantech product is defective, it will be repaired or replaced at no charge during the warranty period. For outof-warranty repairs, you will be billed according to the cost of replacement materials,
service time and freight. Please consult your dealer for more details.
If you think you have a defective product, follow these steps:
1. Collect all the information about the problem encountered. (For example, CPU
speed, Advantech products used, other hardware and software used, etc.) Note
anything abnormal and list any onscreen messages you get when the problem
occurs.
2. Call your dealer and describe the problem. Please have your manual, product,
and any helpful information readily available.
3. If your product is diagnosed as defective, obtain an RMA (return merchandize
authorization) number from your dealer. This allows us to process your return
more quickly.
4. Carefully pack the defective product, a fully-completed Repair and Replacement
Order Card and a photocopy proof of purchase date (such as your sales receipt)
in a shippable container. A product returned without proof of the purchase date
is not eligible for warranty service.
5. Write the RMA number visibly on the outside of the package and ship it prepaid
to your dealer.
PCM-2312 User Manual
Part No. 2003231200
Edition 1
Printed in Taiwan
February 2013
ii
Declaration of Conformity
CE
This product has passed the CE test for environmental specifications when shielded
cables are used for external wiring. We recommend the use of shielded cables. This
kind of cable is available from Advantech.
Safety Instructions
1.
2.
3.
Read these safety instructions carefully.
Keep this User Manual for later reference.
Disconnect this equipment from any AC outlet before cleaning. Use a damp
cloth. Do not use liquid or spray detergents for cleaning.
4. For plug-in equipment, the power outlet socket must be located near the equipment and must be easily accessible.
5. Keep this equipment away from humidity.
6. Put this equipment on a reliable surface during installation. Dropping it or letting
it fall may cause damage.
7. The openings on the enclosure are for air convection. Protect the equipment
from overheating. DO NOT COVER THE OPENINGS.
8. Make sure the voltage of the power source is correct before connecting the
equipment to the power outlet.
9. Position the power cord so that people cannot step on it. Do not place anything
over the power cord.
10. All cautions and warnings on the equipment should be noted.
11. If the equipment is not used for a long time, disconnect it from the power source
to avoid damage by transient overvoltage.
12. Never pour any liquid into an opening. This may cause fire or electrical shock.
13. Never open the equipment. For safety reasons, the equipment should be
opened only by qualified service personnel.
14. If any of these situations arise, get the equipment checked:
– The power cord or plug is damaged.
– Liquid has penetrated into the equipment.
– The equipment has been exposed to moisture.
– The equipment does not work well, or you cannot get it to work according to
the user's manual.
– The equipment has been dropped and damaged.
– The equipment has obvious signs of breakage.
15. DO NOT LEAVE THIS EQUIPMENT IN AN ENVIRONMENT WHERE THE
STORAGE TEMPERATURE MAY GO BELOW -20° C (-4° F) OR ABOVE 60° C
(140° F). THIS COULD DAMAGE THE EQUIPMENT. THE EQUIPMENT
SHOULD BE IN A CONTROLLED ENVIRONMENT.
16. CAUTION: DANGER OF EXPLOSION IF BATTERY IS INCORRECTLY
REPLACED. REPLACE ONLY WITH THE SAME OR EQUIVALENT TYPE
RECOMMENDED BY THE MANUFACTURER, DISCARD USED BATTERIES
ACCORDING TO THE MANUFACTURER'S INSTRUCTIONS.
17. The sound pressure level at the operator's position according to IEC 704-1:1982
is no more than 70 dB (A).
DISCLAIMER: This set of instructions is given according to IEC 704-1. Advantech
disclaims all responsibility for the accuracy of any statements contained herein.
iii
PCM-2312 User Manual
Wichtige Sicherheishinweise
1.
2.
3.
Bitte lesen sie Sich diese Hinweise sorgfältig durch.
Heben Sie diese Anleitung für den späteren Gebrauch auf.
Vor jedem Reinigen ist das Gerät vom Stromnetz zu trennen. Verwenden Sie
Keine Flüssig-oder Aerosolreiniger. Am besten dient ein angefeuchtetes Tuch
zur Reinigung.
4. Die NetzanschluBsteckdose soll nahe dem Gerät angebracht und leicht zugänglich sein.
5. Das Gerät ist vor Feuchtigkeit zu schützen.
6. Bei der Aufstellung des Gerätes ist auf sicheren Stand zu achten. Ein Kippen
oder Fallen könnte Verletzungen hervorrufen.
7. Die Belüftungsöffnungen dienen zur Luftzirkulation die das Gerät vor überhitzung schützt. Sorgen Sie dafür, daB diese Öffnungen nicht abgedeckt werden.
8. Beachten Sie beim. AnschluB an das Stromnetz die AnschluBwerte.
9. Verlegen Sie die NetzanschluBleitung so, daB niemand darüber fallen kann. Es
sollte auch nichts auf der Leitung abgestellt werden.
10. Alle Hinweise und Warnungen die sich am Geräten befinden sind zu beachten.
11. Wird das Gerät über einen längeren Zeitraum nicht benutzt, sollten Sie es vom
Stromnetz trennen. Somit wird im Falle einer Überspannung eine Beschädigung
vermieden.
12. Durch die Lüftungsöffnungen dürfen niemals Gegenstände oder Flüssigkeiten in
das Gerät gelangen. Dies könnte einen Brand bzw. elektrischen Schlag auslösen.
13. Öffnen Sie niemals das Gerät. Das Gerät darf aus Gründen der elektrischen
Sicherheit nur von authorisiertem Servicepersonal geöffnet werden.
14. Wenn folgende Situationen auftreten ist das Gerät vom Stromnetz zu trennen
und von einer qualifizierten Servicestelle zu überprüfen:
15. Netzkabel oder Netzstecker sind beschädigt.
16. Flüssigkeit ist in das Gerät eingedrungen.
17. Das Gerät war Feuchtigkeit ausgesetzt.
18. Wenn das Gerät nicht der Bedienungsanleitung entsprechend funktioniert oder
Sie mit Hilfe dieser Anleitung keine Verbesserung erzielen.
19. Das Gerät ist gefallen und/oder das Gehäuse ist beschädigt.
20. Wenn das Gerät deutliche Anzeichen eines Defektes aufweist.
21. VOSICHT: Explisionsgefahr bei unsachgemaben Austausch der Batterie.Ersatz
nur durch densellben order einem vom Hersteller empfohlene-mahnlichen Typ.
Entsorgung gebrauchter Batterien navh Angaben des Herstellers.
22. ACHTUNG: Es besteht die Explosionsgefahr, falls die Batterie auf nicht fachmännische Weise gewechselt wird. Verfangen Sie die Batterie nur gleicher oder
entsprechender Type, wie vom Hersteller empfohlen. Entsorgen Sie Batterien
nach Anweisung des Herstellers.
23. Der arbeitsplatzbezogene Schalldruckpegel nach DIN 45 635 Teil 1000 beträgt
70dB(A) oder weiger.
Haftungsausschluss: Die Bedienungsanleitungen wurden entsprechend der IEC704-1 erstellt. Advantech lehnt jegliche Verantwortung für die Richtigkeit der in diesem Zusammenhang getätigten Aussagen ab.
PCM-2312 User Manual
iv
Contents
Chapter
1
Overview...............................................1
1.1
1.2
1.3
1.4
Introduction ............................................................................................... 2
Features .................................................................................................... 2
Applications............................................................................................... 2
Ordering Information ................................................................................. 2
2
Installation............................................3
2.1
2.2
Advantech Device Manager Installation.................................................... 4
Format....................................................................................................... 7
2.2.1 Windows Format ........................................................................... 7
2.2.2 Advantech provides MRAM driver format ..................................... 8
3
Initial Inspection ..................................9
3.1
3.2
Initial Inspection ...................................................................................... 10
Card Installation ...................................................................................... 11
Appendix A
Initial Inspection ................................13
A.1
Initial Inspection ...................................................................................... 14
Appendix B
Diagnostic LEDs ................................17
B.1
Diagnostic LEDs...................................................................................... 18
Table B.1: Diagnostic LED Definition......................................... 18
Chapter
Chapter
v
PCM-2312 User Manual
PCM-2312 User Manual
vi
Chapter
1
Overview
1
1.1 Introduction
The PCM-2312 is an industrial MRAM Mini PCIe card providing 2MB memory making
them suitable for frequent data access and high writing speed. Based on
Everspin MRAM technology, it provides data retention for over 20 years whilst eliminating reliability concerns, functional disadvantages, and system design complexities
of battery backed SRAM (BBSRAM). Fast write times and very high write endurance
make MRAM superior to other types of memory. When facilities such as data logging
and energy harvesting, reading/writing large amounts of data and long-term data
retention, even power failure, are required the PCM-2312 are the best choice rather
than other types of storage device.
1.2 Features
2MB Storage
Supports Microsoft® Windows CE5/CE6 driver
Supports Microsoft® Windows Enterprise Server 2008 / WES (Windows Embedded Standard)7/WES2009/Win7/WinXP 32 and 64bits
Supports Linux Intel x86 hardware platform
1.3 Applications
Bus Interface: Mini PCIe bus spec. 1.2 compliant
Dimensions: 50 x 30 mm (1.97" x 1.18")
Weight:18 g
Power Consumption: 3.3V @ 150 mA (Typical)
Operating Temperature: -20 ~ 75°C (-4 ~ 167°F) (refer to IEC 68-2-1, 2)
Storage Temperature: -25 ~ 85°C (-13 ~ 185°F)
Operating Humidity: 5 ~ 95% Relative Humidity, non-condensing
Maximum magnetic field immunity during write:
– PCM-2312: 8000 A/m
Maximum magnetic field during read or standby:
– PCM-2312: 8000 A/m
1.4 Ordering Information
PCM-2312-AE: 2MB Industrial MRAM Mini PCIe Card
PCM-2312 User Manual
2
Chapter
2
Installation
2
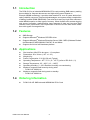
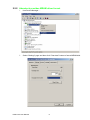
2.1 Advantech Device Manager Installation
Advantech provides WDM MRAM driver that allows you to configure your hardware
and store the settings in your Windows registry. You must install the WDM MRAM
driver if you want to add and manage Advantech MRAM cards.
Follow the steps below to install Advantech MRAM WDM Driver.
1. Select “Next” to continue the installation.
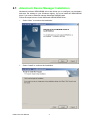
2.
Select “Install” to continue the installation.
PCM-2312 User Manual
4
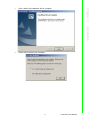
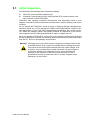
4.
Select OK to Restart your computer.
Installation
After a while, the installation will be complete.
Chapter 2
3.
5
PCM-2312 User Manual
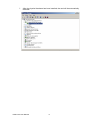
5.
After the physical hardware has been installed, the card will be automatically
detected.
PCM-2312 User Manual
6
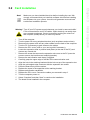
Note!
If you use Windows 7 64bit operation system, use Advantech’s provided
WDM MRAM driver to format the MRAM disk.
1.
Use the right click of mouse to select “format”
2.
Select “Start” to complete MRAM format.
7
Installation
2.2.1 Windows Format
Chapter 2
2.2 Format
PCM-2312 User Manual
2.2.2 Advantech provides MRAM driver format
1.
Use Device Manager….
2.
Select “Settings” page and then click “Clear data” button to format MRAM disk.
PCM-2312 User Manual
8
Chapter
3
Initial Inspection
3
3.1 Initial Inspection
You should find the following items inside the package:
Mini PCIe communication interface card
Industrial Communication Driver, Utility and Mini PCIe communication card
user's manual in UNO DVD-ROM
PCM-2312 was carefully inspected mechanically and electrically before it was
shipped. It should be free of marks and scratches and in perfect working order when
received.
As you unpack the PCM-2312, check for signs of shipping damage (damaged box,
scratches, dents, etc.). If it is damaged or it fails to meet specifications, notify our service department or your local sales representative immediately. Also notify the carrier. Retain the shipping carton and packing material for inspection by the carrier.
After inspection we will make arrangements to repair or replace the unit.
When you handle the PCM-2312, remove it from its protective packaging by grasping
the rear metal panel. Keep the anti-vibration packing. Whenever you remove the card
from the PC, store it in this package for protection.
Warning! Discharge your body's static electric charge by touching the back of the
grounded chassis of the system unit (metal) before handling the board.
You should avoid contact with materials that hold a static charge such
as plastic, vinyl and Styrofoam. Handle the board only by its edges to
avoid static damage to its integrated circuits. Avoid touching the
exposed circuit connectors. We also recommend that you use a
grounded wrist strap and place the card on a static dissipative mat
whenever you work with it.
PCM-2312 User Manual
10
Note!
Make sure you have installed the driver before installing the card. We
strongly recommend that you install the software driver before installing
the hardware into your system, since this will guarantee a smooth and
trouble-free installation process.
1.
2.
3.
4.
5.
6.
7.
8.
9.
10.
11.
12.
13.
14.
15.
16.
17.
18.
Turn off the computer.
Turn the power off to any peripheral devices (such as printers and monitors).
Disconnect the power cord and any other cables from the back of the computer.
Turn the PC if necessary to gain access to the cables.
Remove the PC's cover (refer to your user's guide if necessary).
Locate the expansion slots or passive back-plane (at the rear of the PC) and
choose any unused slot.
Remove the screw that secures the expansion slot cover to the PC (save the
screw to secure the interface card retaining bracket).
Remove the anti-vibration card clamp if supplied.
Carefully grasp the upper edge of the Mini PCIe communication card.
Align the hole in the retaining bracket with the hole on top of the expansion slot.
Align the gold striped edge connector with the expansion slot socket.
Press the board firmly into the socket.
Replace the screw in the expansion slot's retaining bracket.
Replace anti-vibration cardholder.
Replace the PC's cover. Connect the cables you removed in step 3.
Turn the computer power on.
Select “Complete” and then “Next” to continue the installation.
The board is now installed in the computer.
11
PCM-2312 User Manual
Initial Inspection
Warning! Turn off your PC's power supply whenever you install or remove the Mini
PCIe communication card or its cables. Static electricity can easily damage computer equipment. Ground yourself by touching the chassis of
the computer (metal) before you touch any boards.
Chapter 3
3.2 Card Installation
PCM-2312 User Manual
12
Appendix
A
Initial Inspection
A
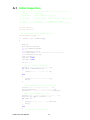
A.1 Initial Inspection
//*******************************************************************
// * Program
: CheckZ.cpp
// * Description
: Demo program for file access
// *
// * APIs used
: GetLogicalDrives, fopen_s, fscanf_s, fprintf, fclose
// *
// * Date
: 1/31/2013
Advantech Co., Ltd.
//*******************************************************************
//
#include "stdafx.h"
#include <windows.h>
// The default drive letter of NVRAM Disk is 'Z'
#define DEFAUT_HD_LETTER 'Z'
int _tmain(int argc, _TCHAR* argv[])
{
DWORD dw;
dw = GetLogicalDrives();
char ch = DEFAUT_HD_LETTER;
int n;
char pathInOut[50] = {0};
char bufferOut[] = "0123456789abcdefghijklmnopqrstuvwxyz";
char bufferInput[50] = {0};
errno_t ErrRet = 0;
FILE *fp_r = NULL;
FILE *fp_w = NULL;
n = ch - 'A';
// Step 1: To check if Z drive exists.
printf("\nStep 1: Check %c Drive.\n", ch);
if( (dw != 0) && (dw >>= n) != 0 )
{
printf("There is a %c drive.\n", ch);
}
else
{
printf("There is NO %c drive.\n", ch);
exit(1);
}
// Step 2: Prepares the path for Input and Ouput
printf("\nStep 2: Prepares the path.....\n");
sprintf_s(pathInOut, 100, "%c:\\inout.txt", ch);
printf("PATH for Input and Output: %s\n", pathInOut);
// Step 3: Writes something to a file....
printf("\nStep 3: Writes something to a file....\n");
ErrRet = fopen_s(&fp_w, pathInOut, "w");
if( ErrRet != 0 )
{
printf("Failed to open %s !!\n", pathInOut);
exit(1);
}
else
{
// Output data to the text file.
PCM-2312 User Manual
14
}
// Step 4: Reads a file and displays its content on the screen.
printf("\nStep 4: Reads a file and displays its content.....\n");
ErrRet = fopen_s(&fp_r, pathInOut, "r");
if( ErrRet != 0 )
{
printf("Failed to open %s !!\n", pathInOut);
exit(1);
}
else
{
// Reads the content and shows it to console.
fscanf_s(fp_r, "%s", bufferInput);
printf("%s\n", bufferInput);
// Close file handle.
fclose(fp_r);
fp_r = NULL;
}
system("pause");
return 0;
}
}
15
PCM-2312 User Manual
Appendix A Initial Inspection
fprintf(fp_w, "%s", bufferOut);
// Close file handle.
fclose(fp_w);
fp_w = NULL;
PCM-2312 User Manual
16
Appendix
B
Diagnostic LEDs
B
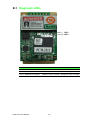
B.1 Diagnostic LEDs
LED1
LED 2
Table B.1: Diagnostic LED Definition
LED
Light On
Light Off
LED 1 - Chip Status
It’s working
It’s not working
LED 2 - MRAM Access Status
MRAM is being accessed MRAM isn’t being accessed
PCM-2312 User Manual
18
Appendix B Diagnostic LEDs
PCM-2312 User Manual
19
www.advantech.com
Please verify specifications before quoting. This guide is intended for reference
purposes only.
All product specifications are subject to change without notice.
No part of this publication may be reproduced in any form or by any means,
electronic, photocopying, recording or otherwise, without prior written permission of the publisher.
All brand and product names are trademarks or registered trademarks of their
respective companies.
© Advantech Co., Ltd. 2013