1
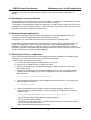
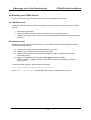
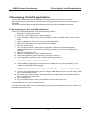
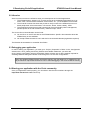
STM32-Primer2 User manual Fun, easy introduction kit for STM32 microcontrollers Document version 2009-03-19 STM32-Primer2 User Manual Contents 1 Presentation.......................................................................................................................4 2 The STM32-Primer2 hardware..........................................................................................5 2.1 List of Contents...............................................................................................................................5 2.2 Description.....................................................................................................................................5 2.3 Opening the STM32-Primer2 case.................................................................................................6 2.4 Inserting and removing a MicroSD card.........................................................................................6 2.5 STM32 microcontroller features.....................................................................................................7 2.6 3D MEMS accelerometer...............................................................................................................7 2.7 Power supply..................................................................................................................................7 2.8 The extension connector................................................................................................................8 2.9 Application-specific daughter-boards...........................................................................................11 2.10 For further information................................................................................................................11 3 Getting started..................................................................................................................12 3.1 Connect battery, charge and power up.........................................................................................12 3.2 Play..............................................................................................................................................12 3.3 Install the Ride7 software toolset for ARM....................................................................................13 3.4 Play with an STM32 application example.....................................................................................13 4 Managing your CircleOS applications..............................................................................14 4.1 CircleOS architecture...................................................................................................................14 4.2 The CircleOS Scheduler...............................................................................................................14 4.2.1 Initialization stage..................................................................................................................15 4.2.2 Periodic systick interrupt........................................................................................................15 4.2.3 Application scheduler............................................................................................................15 4.2.4 Periodic timer2 interrupt........................................................................................................15 4.3 CircleOS Memory map.................................................................................................................17 4.3.1 Resources used by CircleOS................................................................................................18 4.4 Managing applications on your STM32-Primer2...........................................................................19 4.5 Selecting the current application .................................................................................................20 4.6 Downloading new applications.....................................................................................................20 4.7 Restoring the factory configuration...............................................................................................20 4.8 Resetting your STM32-Primer2....................................................................................................21 -2- STM32-Primer2 User Manual 4.8.1 Hardware reset:.....................................................................................................................21 4.8.2 Software reset.......................................................................................................................21 5 Developing CircleOS applications....................................................................................22 5.1 Developing your first CircleOS application...................................................................................22 5.2 Libraries........................................................................................................................................23 5.3 Debugging your application..........................................................................................................23 5.4 Sharing your application with the Circle community.....................................................................23 6 Recycling..........................................................................................................................24 -3- 1 Presentation STM32-Primer2 User Manual 1 Presentation The STM32-Primer2 is an innovative, low-cost evaluation and development package that is designed to provide a fun and easy introduction to the features of the STM32 with ARM Cortex™-M3 core. Based on the previous STM32-Primer (released in 2007), Raisonance developed the STM32-Primer2 thanks to an innovative design and a very active user community. With more user interface options, longer lasting Li-Ion power supply, more hardware peripherals and an STM32F103V with more memory (512 KB of Flash ROM, 64 KB of RAM) than before, the Primer2 is the complete, low-risk environment for starting your application. The STM32-Primer2’s ergonomic design with MEMS-based controls (navigate by tilting the tool left, right, backward or forward), touch-screen backlit LCD display, a joystick, 4 menu push buttons, CAN and IrDA a MicroSD memory card slot and an hardware audio codec with microphone/speaker/headphones interface provide fun and easy control of the included demonstration firmware that includes graphical user interface and games based on the resources of the STM32 microcontroller. Illustration 1.1: STM32-Primer2 presentation The included firmware (CircleOS task scheduler, system services and demonstration applications) implements low level functions driving the various STM32 peripherals. In addition, it includes features for dynamic loading and management of new applications. All firmware, demos (C sources and projects) and more future applications are available for free download at the STM32-Primer2 dedicated site, http://www.stm32circle.com/. The STM32-Primer2 and Ride7 software toolset provide everything needed for programming the STM32 and debugging applications, including: 1. USB host connection for in-circuit programming and debugging 2. Ride7 integrated development environment for code editing, device programming and application debugging (debug up to 32K of code, with included version. For information about upgrade to an unlimited version of Ride, visit http://www.stm32circle.com/resources). 3. GNU C /C++ compiler (unlimited compiling) -4- STM32-Primer2 User Manual 2 The STM32-Primer2 hardware 2 The STM32-Primer2 hardware 2.1 List of Contents You will find when opening the box: 1. The STM32-Primer2 in its plastic case, 2. A USB cable for host PC connection that can be used to program and debug the STM32 microcontroller. Alternatively this cable can be used to communicate with the STM32-Primer2 if you program a USB client application. 3. A CD-ROM containing Ride7 along with its RKit-ARM and all the STM32-Primer2 documentation. 2.2 Description Here is a brief overview of the main components of the STM32-Primer2: MicroSD slot Joystick 3D MEMS sensor USB debug connector 4 menu buttons Headphones jack Loudspeaker USB STM32 connector Microphone STM32F103V (512 KB ROM) Touchscreen Li-Ion battery IrDA transceiver -5- 2 The STM32-Primer2 hardware STM32-Primer2 User Manual The STM32-Primer2 provides the following devices: ● A touch-screen LCD color display (24-bits color, 128x160 pixels), ● 2 USB connectors: 1. One marked "Debug" to connect to a PC running Ride for application development, 2. One marked "STM32" that allows the embedded application to communicate with an external USB host. ● One 4-directions joystick with push button, ● 4 menu buttons, ● An on-board microphone and a loudspeaker providing sound recording and playback capabilities, ● an headphones connector, ● One accelerometer (MEMS) that captures the 3D-position information related to the STM32Primer2, and which is used to navigate through the menus, and to move the pointer, ● One IrDA transmitter that allows communication between two STM32-Primer2, ● One extra connector is linked to some unused I/O pins of the STM32 in order to add extra peripherals. 2.3 Opening the STM32-Primer2 case Opening the plastic case of the STM32-Primer2 is easy (no screw, no clip). Just separate the two halves of the case and separate the orange part from the rest. Note that the board is screwed onto the transparent plastic half of the case. This should not be removed as the display connector (flex) is very sensitive and may suffer from manipulation when detached from the case. Warning: In order to avoid harming your STM32-Primer2, the board should not be unscrewed from the transparent plastic case. 2.4 Inserting and removing a MicroSD card The STM32-Primer2 is equipped with a MicroSD (Micro Secure Digital) card slot, which can be used for storing data. In order to insert a MicroSD card (not provided) into the slot, you just have to open your STM32Primer2 case. After the 2 plastic parts are separated away, the MicroSD card slot is available on the board, close to the battery. Insert your MicroSD card into the slot (card contacts on the bottom), then gently slide it. Be careful not to harm your MicroSD card nor your Primer2! Note: To remove the MicroSD card, do not pull it away from the slot, but push it deep into the slot. A spring mechanism will automatically extract it. -6- STM32-Primer2 User Manual 2 The STM32-Primer2 hardware 2.5 STM32 microcontroller features The STM32-Primer2 is equipped with an STM32F103VET6, one of the new ST, Cortex-based, 32-bit microcontrollers. The main characteristics of this device are: • ARM 32-bit Cortex™-M3 CPU, 72 MHz, 90 DMips with 1.25 DMips/MHz, • 512KB of Flash program memory, 64KB SRAM, • Embedded oscillators (for high-speed crystal + RTC), • SWD debug interface, • Fast input/output: up to 80 I/Os, ADC, DAC, • Embedded communication peripherals: USB 2.0, CAN, USART, SPI, I2C, LIN, IrDA • Multiple timers; watchdog, PWM, Systick timer, ... 2.6 3D MEMS accelerometer The STM32-Primer2 is equipped with a MEMS inertial sensor (LIS3LV02DL from STMicroelectronics). This device is used by the STM32-Primer2 as a human interface device to select commands, in coordination with a graphic pointer. When you start the STM32-Primer2 for the first time, you will see a small ball moving according to the orientation of the STM32-Primer2 circuit. The information about the 3D position is provided by the MEMS. You will find complete documentation of the 3D accelerometer on the companion CD-ROM. Examples are provided that allow evaluation of various functions of the MEMS usage. 2.7 Power supply The STM32-Primer2 features a 400mAh Li-Ion rechargeable battery, equipped with a voltage regulator along with a battery charger. When one of the USB connectors is linked to a PC host voltage supplied by the PC is used to recharge the battery. When no USB host is connected, the battery is used to supply the power for the STM32-Primer2. When the battery is fully charged, the STM32-Primer2 can be used for about 6 hours. The duration of the batteries depends on the Primer2 activity. For instance, it can be extended -or reduced- by changing the setting of the backlight intensity (see the menu “Settings”) and the CPU frequency. -7- 2 The STM32-Primer2 hardware STM32-Primer2 User Manual 2.8 The extension connector The STM32-Primer2 has a 20-pin HE14 female right-angle extension connector that you can access when removing the orange part of the case. The mechanical description of the extension board is available in the “resources” section of the www.stm32circle.com web site. The extension connector exports the following STM32 pins: Pin Name STM32 Description 1 VCC2V8. Vcc Connected to the output of the U9 regulator (2.8V). This source could provide approximatively 100mA to the extension board. 2 GND GND Ground 3 CX_I2CSCL. PB.6 Can be used either as a standard GPIO or considered as an alternate function: - I2C1_SCL - TIM4_CH1 - USART1_TX (if remapped) 4 CX_I2CSDA. PB.7 Can be used either as a standard GPIO or considered as an alternate function: - I2C1_SDA - TIM4_CH2 - USART1_RX (if remapped) 5 AUDIO_SPI_MISO PB.14 Can be used either as a standard GPIO or considered as an alternate function: - SPI2_MISO - USART3_RTS - TIM1_CH2N Note that SPI2 is also connected to the audio device for recording audio data from the microphone. This feature must be disabled when SPI2 is used with the extension board. 6 AUDIO_I2S2_SD PB.15 Can be used either as a standard GPIO or considered as an alternate function: - SPI2_MOSI - TIM1_CH3N Note that SPI2 is also connected to the audio device for recording audio data from the microphone. This feature must be disabled when SPI2 is used with the extension board. -8- STM32-Primer2 User Manual 7 AUDIO_I2S2_SCK PB.13 2 The STM32-Primer2 hardware Can be used either as a standard GPIO or considered as an alternate function: - SPI2_SCK - USART3_CTS - TIM1_CH1N Note that SPI2 is also connected to the audio device for recording audio data from the microphone. This feature must be disabled when SPI2 is used with the extension board. 8 AUDIO_I2S2_WS PB.12 Can be used either as a standard GPIO or considered as an alternate function: - SPI2_MOSI - TIM1_CH3N(6) Note that SPI2 is also connected to the audio device for recording audio data from the microphone. This feature must be disabled when SPI2 is used with the extension board. 9 CX_CANH Connected to the CAN transceiver. When the CAN transceiver is not soldered, these pins could be easily connected to PD.2-PD.3 on the STM32 by shortcutting the signals on the footprint of the CAN transceiver. 10 CX_CANL 11 CX_ADC1 PC.4 Can be used either as a standard GPIO or considered as an alternate function: ADC12_IN14 12 CX_ADC2 PC.5 Can be used either as a standard GPIO or considered as an alternate function: ADC12_IN15 13 CX_ADC_TIM PB.0 Can be used either as a standard GPIO or considered as an alternate function: - ADC12_IN8 - TIM3_CH3 - TIM1_CH2N (if remapped) 14 CX_USART_CTS PA.0 PA0/WKUP/ADC IN0Can be used either as a standard GPIO or considered as an alternate function: - WKUP - USART2_CTS - ADC12_IN0 - TIM2_CH1_ETR 15 CX_USART_RTS PA.1 Can be used either as a standard GPIO or considered as an alternate function: - USART2_RTS - ADC12_IN1 - TIM2_CH2 16 CX_USART_TX PA.2 Can be used either as a standard GPIO or considered as an alternate function: - USART2_TX - ADC12_IN2 - TIM2_CH3 17 CX_USART_CK PA.4 Can be used either as a standard GPIO or considered as an alternate function: - SPI1_NSS - USART2_CK - ADC12_IN4 -9- 2 The STM32-Primer2 hardware 18 CX_USART_RX 19 VCC_EXT. 20 GND PA.3 STM32-Primer2 User Manual Can be used either as a standard GPIO or considered as an alternate function: - USART2_RX - ADC12_IN3 - TIM2_CH4 Could be used to reload the battery (input voltage in the [4.5-5V] range) GND Ground Notes: In case you need CAN connectivity, you will need to solder a CAN transceiver (model MAX3051ESA from Maxim). Its footprint is identified on the picture below. – SPI2 is used for recording purposes on your Primer. Recording facilities must not be enabled in CircleOS if you need to use SPI2 through the extension connector. – The following picture shows the part of the printed circuit that contains the extension connector in order to help you identify the connector pinout; pins 1 and 2 of the extension connector have been identified on the picture. Also the footprint for the (unsoldered) CAN transceiver is shown on the picture. Illustration 2.1: Extension connector footprint - 10 - STM32-Primer2 User Manual 2 The STM32-Primer2 hardware 2.9 Application-specific daughter-boards The STM32-Primer2 has been designed in order to be extended through application-specific daughterboards. Such daughter-boards connect to the extension connector. You can design your own daughter-board in case your application requires it. The following picture shows the mechanical constraints that you should respect so that your daughterboard fits inside the STM32-Primer2 case. Illustration 2.2: Daughter-board mechanical specifications 2.10 For further information This document describes the STM32-Primer2, basic use and its hardware and firmware features. Further information about tools intended for use with the Primer2 may be found in: - “LIS3LV02DL MEMS Inertial Sensor Data Sheet”, available from http://www.st.com/. - “STM32F103 Performance AC Line”, available from http://www.st.com/. - “STM32F10x Flash programming manual”, available from http://www.st.com/. - “STM32F10x advanced ARM-based 32-bit MCU reference manual”, available from http://www.st.com/. - “STM32F10x Datasheet”, available from http://www.st.com/. - The “Cortex-M3 Technical Reference Manual” document describes the Cortex-M3 Core, and is available directly from http://www.arm.com/. - “ST7732 Datasheet”. This document describes the 262K colors single-chip TFT controller/driver, and is available from http://www.sitronix.com.tw/. - The “LCM-TGG000177YP02-01_SPEC.pdf” document describes the characteristics for the 128x160 display of the STM32-Primer2. - The full GNU Compiler Collection (GCC) manuals are available from the Ride7 environment. Please visit the Circle community web site at http://www.stm32circle.com/ for more resources. - 11 - 3 Getting started STM32-Primer2 User Manual 3 Getting started 3.1 Connect battery, charge and power up Your STM32-Primer2 is initially shipped with the battery disconnected, in order to prevent discharging and potentially harming the battery. You need to connect the battery before operating your Primer2: 1. Open the STM32-Primer2’s case by pulling the top and bottom halves of the case apart. There are no catches or releases that hold the case together. 2. Fit the jumper so that it straddles the two pins to connect the power supply. 3. Close the case. 4. Connect the Primer2 to the USB port on a PC to charge its battery. Only the Red LED (L4) will be lit if the battery is charging. The Green LED (L1) is lit when fully charged. 5. After charging the battery, press the push button to activate the Primer2. Illustration 3.1: Battery connector 3.2 Play After the opening screen is displayed, press the push button to call the main menu. Tilt the Primer2 backward/forward or use the joystick to navigate in the menu, use the push button to select a menu command. Initial menu items include: Config Maze Applic About Shutdown Configure parameters for the Primer2 including the pointer, backlight for the LCD display and time This is an addictive game provided as an example. Full source is available from www.stm32circle.com. Select an application to run. The application that you choose will then appear in the main menu. Display information about the CircleOS version and available memory. Turn off the Primer2. To restart the Primer2, simply press the push button. Note: When you receive the Primer2, the MEMS based controls are calibrated to a “zero” position that matches a 30° angle from the horizontal (corresponds to the position of a book when reading). To practice controlling the Primer2, move the blue dot around the main screen. It takes a little practice. Preinstalled applications The Primer2 includes preinstalled applications: ● Maze – A game where the player navigates inside a labyrinth, eating dots to win points while avoiding ghosts. - 12 - STM32-Primer2 User Manual ● ● ● 3 Getting started Breakout – A game where the player uses a paddle to bounce a ball against a wall of blocks, destroying the block to win points. Win the game by destroying all the blocks. COMMTEST –Tests the MicroSD card connector. EchoIrDA – This is an IrDA echo application, which makes it easy to connect your Primer2 to another IrDA appliance such as a cell phone or another Primer2. Configuration menu Configuration and test applications have been pre-installed in order to check your STM32-Primer2’s capabilities. From the main menu of the STM32-Primer2, launch the “Config” command. The following parameters can be set: 1. CPU Freq. This lets you choose the speed of your STM32-Primer2. 2. Backlight. This lets you tune the backlight intensity. Note that the backlight is the main source of power consumption (with the LCD monitor itself). Reducing the backlight intensity allow to extend the duration when Primer2 is powered by the battery. 3. Time. This sets your STM32-Primer2 time. Note that the RTC clock will remain valid even if your STM32-Primer2 is shut off. 4. Test. This performs a quick factory test of the STM32-Primer2. You can add more applications to your STM32-Primer2 by downloading them on the web site www.stm32circle.com/projects. Refer to the chapter 4 “Managing your CircleOS applications”. 3.3 Install the Ride7 software toolset for ARM The CD-ROM contains many resources to help you evaluate the STM32 family: • Ride7, the Raisonance IDE to write and debug new applications. This includes the Rlink driver which is necessary to pilot the programming and debugging of your STM32-Primer2 from your PC. • The RKit-ARM, which is the Ride7 add-on that contains the complete GNU software toolchain based on the GCC compiler. • Some utilities to manage your Circle applications (Circle is the OS embedded on your STM32Primer2; refer to Chapter4.1 "CircleOS architecture" for details). • Documentation: datasheets, user manuals for the different components of the STM32-Primer2. To install, just insert the Raisonance mini CD-ROM on your PC, a menu will appear. Just follow the online instructions for installing the software. Note: Ride7 should be installed before connecting to this USB port. 3.4 Play with an STM32 application example Some example are installed with the Rkit-ARM for Ride7. For instance, the following example will help you build and program a very simple STM32-Primer2 application: “[RIDE7_INSTALL_DIR]\Examples\ARM\Primer\STM32Primer2\toggle\toggle.rprj” - 13 - 4 Managing your CircleOS applications STM32-Primer2 User Manual 4 Managing your CircleOS applications 4.1 CircleOS architecture The STM32-Primer2 is equipped with an STM32F103 that contains 512KB of FLASH ROM and 64KB of RAM. The STM32-Primer2 embeds the CircleOS operating system (source files are available from http://www.stm32circle.com/ after free registration). It provides services that will help you develop your STM32-Primer2 applications, including: 1. Application management, 2. LCD graphic functions, 3. MEMS functions, 4. LED, Buzzer and Push Button functions, 5. Menu functions, 6. Scheduler task, 7. ... CircleOS can load several independent applications. Each application is run by CircleOS when selected, has the full availability of the CPU and can use all the RAM that is not being used by CircleOS (i.e. 16KB in the memory address range from 2000000h to 20003FFFh). It will be scheduled by the CircleOS with full privileges on the device, until it explicitly quits. 4.2 The CircleOS Scheduler CircleOS acts in several stages: An initialization stage which occurs upon device reset, a periodic systick interrupt, and the scheduling of applications. 4.2.1 Initialization stage During the initialization stage, the hardware configuration is performed, and the periodic system timer (systick) is installed. Reset Exception Initialization The systick period depends on the RCC settings: it can be modified through the menu “Config | CPU Speed” to the following predefined values: Level 1 2 3 4 5 CPU freq 18MHz 24MHz 36MHz 48MHz 72MHz Systick Freq 0.75 KHz 1 KHz 1,5KHz 2KHz 3KHz RCC_Configuration(); LED_Init(); MEMS_Init(); etc.... do_nothing Systick Interrupt Periodic Actions The (CPU_freq / SysTick = 24000) ratio is applied for all these values. - 14 - BUTTON_Handler ( ); BUZZER_Handler ( ); MENU_Handler ( ); LCD_Handler ( ); etc... STM32-Primer2 User Manual 4 Managing your CircleOS applications 4.2.2 Periodic systick interrupt The periodic systick makes a call to the CircleOS systick interrupt handler. This interrupt handler will perform a short processing on each of the STM32-Primer2 components: LEDs, button, buzzer, LCD. Note that the MEMS handler is called from the Timer2 interrupt, which has a priority higher than the Systick interrupt. This ensures a fixed and precise measurement rate. I2S transfers towards the audio Codec chip are handled through the I2S interrupt. 4.2.3 Application scheduler CircleOS is the base application of your STM32-Primer2. It will handle the menu selections and react to user actions. Once an application is run (usually through a menu selection), CircleOS will first call an initialization routine for the application, then will repeatedly call the application handler at the Systick frequency until it returns a MENU_LEAVE value. You will find more details about programming CircleOS applications in Chapter 5 “Developing CircleOS applications”. 4.2.4 Periodic timer2 interrupt The SPI used to control the MEMS, as well as the I2C controller used for the audio chip, are both driven from the timer2 interrupt handler which is triggered at a fixed rate: Level 1 2 3 4 5 CPU freq 18MHz 24MHz 36MHz 48MHz 72MHz Systick Freq 0.75 kHz 1 kHz 1.5 kHz 2 kHz 3 kHz Timer2 Freq 136.5 Hz 182 Hz 273 Hz 364 Hz 546 Hz The priority level of the timer2 is HIGHER than the SYSTICK priority. It is mandatory to keep this IRQ at the highest level in order to guarantee proper I2C communication behavior. Indeed, the I2C functions called from the Timer2 interrupt handler could loop for ever if they are themselves interrupted. Note that the frequency of the Timer2 overflow has been set to read a maximum number of measurements from the MEMS. However, this high rate is often useless, and you could easily change this frequency to save CPU time, or to get some more stable data from the MEMS. - 15 - 4 Managing your CircleOS applications STM32-Primer2 User Manual 4.3 CircleOS Memory map The CircleOS firmware requires 64 KB of FLASH and 4 KB of RAM (including the stack usage for the applications). The remaining 448 KB (512 – 64) are available for applications, which can be added or removed at will using a programming tool (see below). Flash memory can be programmed in 1KB blocks only. The following shows an example of memory mapping: FLASH 512KB Circle-OS 0x80080000 (non debuggable part) 128KB ... Application k 24KB ... Application 3 8KB 0x80042000 ... Application 2 4KB RAM 64KB 0x80041000 ... OS 4KB 0x20010000 ↓ 0x2000F000 0x80008000 Debuggable appli, 0x80007FFF Free debug 8KB 0x80006000 (32KB) Circle-OS 0x80005FFF 24KB 0x80000000 Stack Application data 60KB (debuggable part) - 16 - 0x20000000 STM32-Primer2 User Manual 4 Managing your CircleOS applications 4.3.1 Resources used by CircleOS The following figure (from the ST datasheet) shows the peripherals used by CircleOS: Illustration 4.1: STM32 peripherals - 17 - 4 Managing your CircleOS applications STM32-Primer2 User Manual 4.4 Managing applications on your STM32-Primer2 The applications can be managed by the “circle_mgr.exe” utility. You will find it in the “[RIDE7_INSTALL_DIR]\Bin” directory. This utility dedicated to the STM32-Primer2 allows: 4 Listing of the currently loaded CircleOS applications. 5 Adding of new CircleOS applications. Removing of CircleOS applications. Checking how much FLASH memory is available. Refer to the http://www.stm32circle.com/ web site for more information about this utility. The following commands are available with the “circle_mgr.exe” utility: Command List Syntax L Description List the loaded applications. The following information will be output: circle_mgr.exe L Reading FAT table... App0: Name=Maze, Addr=0x08006000, Size=8KB App1: Name=Breakout, Size=4KB Addr=0x08008000, Largest free block= 92KB Add Afilename Add a new application (object file). circle_mgr.exe Ac:\tmp\level.o Linking file C:\tmp\level.o... Link of C:\tmp\level.o succeeded... Hex file generated... Blank-checking the FLASH area...OK Programming file _tmp_.ld.hex to flash...OK Registering application in FAT... OK Erase E* Eappname circle_mgr.exe EMaze circle_mgr.exe E* /*remove only 'Maze'*/ /*remove ALL apps */ Wait W When a command list is launched through a batch file, the W command allows you to pause the execution and to check the intermediate results. Start S Start CPU execution Caution: Any hex file can be programmed to the FLASH memory of your STM32-Primer2 using the “cortex_pgm.exe” utility. However, doing this will destroy your CircleOS firmware, and you will have to - 18 - STM32-Primer2 User Manual 4 Managing your CircleOS applications reinstall it if you wish to use it later (refer to chapter4.7 "Restoring the factory configuration" for details). 4.5 Selecting the current application One application is considered to be the “current application”. The ID of the current application is saved in the backup memory. From the main menu, you can launch it directly. To change the current application, select the “Application” command from the main menu. Then select the application you wish to specify it as the “current application” and push the button. The new “current application” name will now appear in the main menu. 4.6 Downloading new applications You will find on the http://www.stm32circle.com/projects Circle web site a database where the members can share their applications with the stm32circle community. An application can include both the source files and the object files, or the object files. An application is generally made of one object file, but may occasionally have several of them. The linking of the application in such a case can be done either using the circle_mgr.exe software (available in the “[RIDE7_INSTALL_DIR]\bin” directory) or within the Ride7 environment. When an application is split into several object files, these object files must be placed in a library in order to pass a unique filename as an argument to circle_mgr.exe. 4.7 Restoring the factory configuration If you have been experimenting with CircleOS applications and have modified your STM32-Primer2 configuration, you may want to restore the initial (factory) configuration. In order to do this, please follow these steps: 1. Connect your STM32-Primer2’s debug USB port to your PC. 2. Power-up your STM32-Primer2 by pressing its button. 3. Open a command prompt from Windows (Navigate to “Start | Programs | Accessories | Command prompt”) 4. Change the current directory to the Ride7 installation directory. This can be done with the following command (adapt it to your actual configuration if you did not install Ride7 in its default location): cd "C:\program files\Raisonance\Ride" 5. Now change the current directory to the STM32-specific library directory. This can be done with the following command: cd lib\ARM\CircleOS 6. Erase your STM32-Primer2, reprogram it with its factory ROM image, which is in the “circle.hex” file. Then restart the device. These operations can be done with the following single command: cortex_pgm TSTM32F103VET6 E PPrimer2_Circle_Factory.hex S - The TSTM32F103VET6 option selects the appropriate device. - The E command erases the ROM. - The PPrimer2_Circle_Factory.hex command programs the device with the proper hex file. - The S command restarts the device. These operations take approximately 30 seconds. - 19 - 4 Managing your CircleOS applications STM32-Primer2 User Manual 4.8 Resetting your STM32-Primer2 In case you need to reset your STM32-Primer2, several mechanisms can be used: 4.8.1 Hardware reset: A hardware reset will restart your Primer2 (restoring it to a clean state), but will not remove its ROM contents. • Remove any USB cable. • Open your STM32-Primer2’s case to temporarily remove the battery jumper. • Replace your battery jumper, close the case of your STM32-Primer2 and restart it by pressing its button. 4.8.2 Software reset A software reset will erase all the flash memory in your STM32-Primer2 and all applications and the CircleOS will be suppressed. ● ● ● ● Connect your STM32-Primer2’s debug USB port to your PC. Power-up your STM32-Primer2 by pressing its button. Open a command prompt from Windows (Navigate to “Start | Programs | Accessories | Command prompt”) Reset your STM32-Primer2 using the cortex_pgm.exe utility installed in “[RIDE7_INSTALL_DIR]\bin” directory. This must be done with the following command: cortex_pgm S To reload the initial program, use the following command: cortex_pgm TSTM32F103VET6 PPrimer2_circle.hex S where “Primer2_circle.hex” is the full application, which is available on the web site. - 20 - STM32-Primer2 User Manual 5 Developing CircleOS applications 5 Developing CircleOS applications The full source files of CircleOS are available on the http://www.stm32circle.com/ web site. Once registered, you will be able to download them, along with many resources for developing your application. The games originally delivered with the STM32-Primer2 show working application examples. 5.1 Developing your first CircleOS application Creation of a CircleOS application is done automatically in Ride7: 1. Navigate to “Project | New project”. 2. Leave the “Type” selection list to “New application”. 3. In the “Processor” selection list, select the “STM32_Primer2_CircleOS” device from the ARM family. 4. Select an application name such as “My CircleOS application”. 5. Define the location where your new project will be created. 6. Click the “Finish” button 7. Your new project will be created, with an application containing a CircleOS application skeleton as well as the Circle.elf and FAT.elf files necessary to connect your application to CircleOS. 8. Open the “Application.c” file. 9. Search for the Application_Name variable in the file. 10. Change the Application_Name value from “My App” to “HELLO”. 11. In the Application_Handler function, create a new string as follows: const char msg[] = "Hello, World!"; 12. Use the DRAW_DisplayString CircleOS service to display the “msg” string variable you just created on the STM32-Primer2 display: DRAW_DisplayString( 5, 20, msg, sizeof(msg)); // X, Y, string, length 13. Connect your STM32-Primer2 to your PC using the USB cable (be sure to use the “debug” USB port of your STM32-Primer2). 14. From Ride, go to “Debug | Start”, which will program your application to your STM32-Primer2. This may take about 15 seconds. 15. Go to “Debug | Run”. 16. On your STM32-Primer2, select your application name on the main menu. Your application is now on your STM32-Primer2. For further information about CircleOS application programming and available OS services, please visit http://www.stm32circle.com/. - 21 - 5 Developing CircleOS applications STM32-Primer2 User Manual 5.2 Libraries Some common services are offered to ease your development of CircleOS applications. 1. The STM32 libraries, written by ST, provide access to the embedded peripherals (such as timers, ADC, communication interfaces, thermometer, etc...) of the STM32 microcontroller. 2. The low-level CircleOS functions that provide an easy access to the STM32-Primer2’s onboard peripherals: 3D accelerometer, LCD monitor, button, buzzer, battery, LEDs. 3. The graphical functions that provide powerful high-level functionality: Menu management, pointers (linked to the 3D accelerometer), character maps, sound. The source files of these libraries can be found: ● On the CD or on the ST web site for the STM32 libraries. Specific documentation about the STM32 library is also available. ● On the http://www.stm32circle.com/ web site for the CircleOS libraries (registration required). The libraries documentation is accessible from Ride7. 5.3 Debugging your application In order to debug your application, you must go to “Project | Properties” in Ride7. In the “Configuration selection box, Circle_Debug and Circle_Release are available. Make sure you select the Circle_Debug configuration (which is the default). Ride7 will take care of all the settings required for switching between debug and release mode through the use of these configurations. Note: The standard STM32-Primer2 is limited to debug in the first 32KB only. A software key can be purchased on http://www.stm32circle.com/ to allow debugging in the whole 512KB of memory. 5.4 Sharing your application with the Circle community Once your application works properly, you can share it with the other members through the http://www.stm32circle.com/ community. - 22 - STM32-Primer2 User Manual 6 Recycling 6 Recycling As part of our continuing efforts to proved the best service to our users an communities, Raisonance is actively defining take-back and recycling programs for EU customers as part of the implementation of the European WEEE directive. This symbol is a reminder not to dispose of your electronic equipment in standard trash receptacles. For more information about disposal and recycling of electronic goods, please refer to http://www.raisonance.com/support/weee.php - 23 - 6 Recycling STM32-Primer2 User Manual History Date Description 14/11/08 Initial version. 17/11/08 Corrected the memory mapping with the inclusion of the non-debuggable CircleOS part. 05/01/09 Corrected the images and the document title. 13/01/09 Fixed the memory map. Added the Timer2 handler description. Added description of the extension connector and daughter-board specifications. 16/01/09 Some formatting updates. 19/03/09 Added description of the extension connector. Corrected RAM size. - 24 - STM32-Primer2 User Manual 6 Recycling Disclaimer Disclaimer Information in this document is subject to change without notice and does not represent a commitment on the part of the manufacturer. The software described in this document is provided under license and may only be used or copied in accordance with the terms of the agreement. It is illegal to copy the software onto any medium, except as specifically allowed in the license or nondisclosure agreement. No part of this manual may be reproduced or transmitted in any form or by any means, electronic or mechanical, including photocopying, recording, or information storage and retrieval systems, for any purpose other than the purchaser’s personal use, without prior written permission. Every effort has been made to ensure the accuracy of this manual and to give appropriate credit to persons, companies and trademarks referenced herein. This manual exists both in paper and electronic form (pdf). Please check the printed version against the .pdf installed on the computer in the Ride installation directory, for the most up-to-date version. The examples of code used in this document are for illustration purposes only and accuracy is not guaranteed. Please check the code before use. Copyright © Raisonance 1987-2009 All rights reserved. - 25 -