1
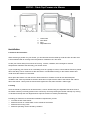
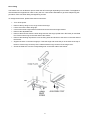
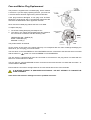
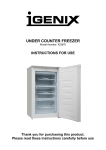
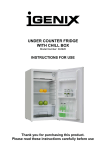
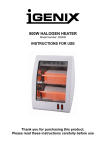
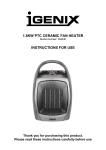
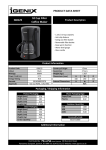
COUNTER TOP FREEZER WITH LOCK
Model Number: IG3750
INSTRUCTIONS FOR USE
Thank you for purchasing this product.
Please read these instructions carefully before use
Trouble with your
freezer? …
Try our troubleshooting
guide on page 9.
If that does not solve the
issue contact us …
Tel: 01473 271 272
Email: [email protected]
Fax: 01473 270 733
Website: www.igenix.co.uk
Postal Address:
Customer Service Department
Pik-a-Pak Electrical Distributors
38 Bluestem Road,
Ransomes Europark,
Ipswich, IP3 9RR
When writing to or emailing us to report a fault please ensure you attach a copy of your proof of
purchase. Please retain your original
2
SAFETY INSTRUCTIONS
Important: This appliance is not intended for use by persons including children with reduced physical,
sensory or mental capabilities, or lack of experience and knowledge, unless they have been given
supervision or instruction concerning use of the appliances by a person responsible for their safety.
•
•
•
•
•
•
•
•
•
•
•
•
•
•
•
This product is intended to be used in a household and similar applications such as:
- staff kitchen areas in shops, offices and other working environments;
- farm houses and by clients in hotels, motels and other residential type environments;
- bed and breakfast type environments;
- catering and similar non retail applications.
Do not use mechanical devices or other means to accelerate the defrosting process, other than
those recommended by the manufacturer.
Do not use electrical appliances inside the food storage compartments of the appliance, unless they
are recommended by the manufacturer.
Do not store explosive substances such as aerosol cans with a flammable propellant in this
appliance.
Ensure that the electricity supply in your home is rated at 220 - 240 volts before operating the
appliance.
Do not use the appliance if there is any damage to the power cord.
Use of an extension cord is not recommended with this product.
This product is for indoor use only.
Keep packaging material out of the reach of children! It can become a choking or suffocation hazard.
Always unplug the appliance before attempting to move it.
Children should be supervised to ensure that they do not play with the appliance.
Ensure that the refrigerant circuit is not damaged.
The refrigerant of this product is R600a which is flammable. Ensure when moving the appliance or
during installation that the cooling system does not get damaged.
DANGER: Risk of child entrapment
- Before you dispose of your old refrigerator or freezer, remove the doors and leave the shelves in
place so that children cannot easily climb inside.
When disposing of the appliance, remove the plug so the appliance is unusable.
IMPORTANT
Always allow 12 hours before turning on the freezer to allow the coolant gases time to settle after the freezer
is in place.
Packaging
The cardboard packaging is recyclable and should be disposed of according to local regulations. Keep the
packaging materials out of the reach of children. Before installation take care to remove all cardboard or
other packaging, including material from the condenser tubes and any material surrounding the motor /
compressor unit.
WARNING
The freezer is heavy and care is needed when unpacking and moving it.
Get extra help and only hold the freezer by the casing – never hold by the
door or the trim.
Check the Contents
Check the following contents are included with the product and inspect the casing for any damage. If
necessary contact your retailer from where you purchased the product.
1 x Wire shelf
CE Marking certifies that this appliance confirms to the following EEC directives:
Low Voltage Equipment – 72/23/EEC & 93/68 EEC
Electromagnetic Compatibility 89/336/EEC, 92/31/EEC & 93/68/EEC
3
IG3750 – Table Top Freezer at a Glance
1.
2.
3.
4.
Thermostat
Wire Shelf
Door
Adjustable Feet
Installation
Location & Air Circulation
When selecting a position for your freezer, you should make sure the table top is flat and firm and the room
is well ventilated with an average room temperature of between 18˚C and 38˚C.
Locate your freezer away from sources of heat e.g. cookers, radiators, direct sunlight as extreme
temperatures will effect how efficiently your freezer works.
If you are placing your freezer in an out-building such as a garage or annex, ensure that the freezer is placed
above the damp course. Failure to do this will result in condensation forming on the freezer cabinet and
could cause the freezer to rust and fail.
Never place the freezer in a wall recess or fitted cabinets or furniture as this will not allow adequate
ventilation and cause a potential fire hazard. Allow 20mm of space at the sides of the freezer and 100mm
above the freezer. Never push the freezer back against the wall, leave at least a 100mm gap.
Levelling
Once the freezer is positioned in its final location, it can be leveled using the adjustable feet at the front of
the freezer until they are firmly placed on the counter top. Correctly leveling the freezer will stop any rocking
or vibration and keep the door aligned which helps the freezer run reliably and efficiently.
Providing you follow the recommended ventilation requirements you will:
•
Increase the life of the freezer.
•
Minimise the risk of condensation on the outside of the freezer.
•
Minimise the running costs.
•
Minimise operating noises caused by vibration.
4
Door Fitting
The freezer door can be fitted to open to either the left or the right depending on its location. The appliance
must be tilted and supported in order to carry this out. It is therefore advisable to get some help during this
procedure. Take care when fitting and tightening screws.
To change the direction, please follow these instructions.
•
Turn off the power.
•
Remove the top hinge cover, hinge screws and hinge.
•
Lift the door off the lower hinge pin.
•
Unscrew the lower hinge bracket screws and remove the lower hinge bracket.
•
Remove the adjustable foot.
•
Remove the fixed foot from the lower hinge and turn the hinge upside down. Re-fit the pin and fixed
foot. Fit the lower hinge to the other side of the freezer.
•
Remove the blanking caps which cover the fixing holes and fit them to the holes on the other side of
the freezer.
•
Support the door on the lower hinge pin. Take the hinge and locate the pin in the bush at the top of
the door. Fit the hinge to the top of the cabinet with the hinge screws. Fit the hinge cover.
•
Screw the fixed foot in to the corresponding hole on the other side of the freezer.
5
Before using your Freezer
Before placing food in the freezer, it needs to be cleaned by wiping the interior using warm water and a soft
cloth. Wipe the freezer completely dry before replacing the shelf.
Check that your power outlet is compatible with the plug supplied with the freezer.
IMPORTANT: Always allow at least 12 hours before turning on the freezer to allow the coolant fluid time to
settle after the freezer is in place. Failure to do this may result in damage to the appliance and such damage
is not covered by the guarantee.
Before placing any food in the freezer it is recommended to leave it 24 hours. This allows you to ensure the
freezer is working correctly and gives enough time to allow the temperature in the refrigerator to drop to the
correct level.
Using your Freezer
The ideal internal temperature of your freezer should be between -12˚C to -18˚C. Before turning on the
freezer, make sure that the temperature control, which is located at the back of the freezer is set to
NORMAL. Allow 24 hours before placing food in the freezer to allow the temperature to fall to the correct
level. If you wish to decrease the temperature in the freezer, turn the thermostat to the MAX position and the
internal freezer temperature will drop to -18˚C.
Your freezer must NOT be placed in a room where the temperature goes below 18˚C or above 38˚C for
prolonged periods, as the internal freezer temperature will not be maintained.
Precautions
The freezer is capable of producing very cold temperatures which may cause injury if safety precautions are
not observed.
Caution: Do not touch ice with bare hands as this could cause ice burns
•
Do not attempt to freeze carbonated drinks suck as fizzy pop, mineral water, champagne etc, as the
bottles may break when frozen.
•
The freezer must only be used for storing edible foodstuffs.
•
Frozen food that has been thawed should not be re-frozen.
Storing Food in Your Freezer
Food which has been purchased frozen should be kept in its original packaging. Maximum storage times and
expiry dates are usually given on the food packaging.
•
Do not attempt to re-freeze food that has thawed or partially thawed.
•
When cooking food you must ensure it has thoroughly thawed, especially when dealing with poultry and
seafood.
•
Do not overload the freezer baskets and always allow space between the packages of food. This
ensures that cold air is free to circulate, preventing the food packaging from sticking together.
•
When removing ice cubes, it may help to hold the tray under running water for a few seconds in order to
loosen the ice cubes.
•
When freezing hot food allow it to cool before placing it in the freezer. Always store it away from food
which is already frozen.
6
Defrosting
After a period of time, frost will build up in the freezer. Regular defrosting will therefore be necessary to
maintain the efficiency of the freezer. Defrosting should be carried out if the frost build up begins to interfere
with the food storage. The best time to defrost your freezer is when the amount stored in the freezer is low,
for example before you go shopping. To defrost the freezer follow the steps below:
1. Take out the frozen food, turn the freezer off at the mains supply and leave the door open. Ideally the
frozen food should be put into another freezer or refrigerator. To speed up the defrosting process, a bowl
of hot water can be placed inside the freezer to raise the temperature.
2. Remove the ice with an ice scrapper. Do not use pointed or sharp edged objects such as knives, forks or
screw drivers to remove the ice.
3. When all traces of ice have been removed and defrosting is completed, clean away any water and wipe
your freezer dry.
4. Clean your freezer as described below, plug in and switch the freezer back on. Allow enough time for the
temperature to fall to the correct level before putting the food back in to the freezer.
Cleaning and Maintenance
Switch off the electrical supply and remove the plug from the socket before cleaning.
Interior
1. Remove all food from the freezer and cover to help keep it cool.
2. Remove the shelf from the freezer and defrost following the instructions above. Wash the shelf in warm
soapy water with a soft cloth and dry thoroughly. Never put the shelf into the freezer wet.
3. Wipe the interior of the freezer with a damp clean cloth. For extra cleaning use a solution of one
teaspoon of bicarbonate of soda to one pint of water.
4. Dry the interior thoroughly with a clean cloth and replace the shelf.
5. Plug in and switch back on and allow the temperature in the freezer to drop to the correct temperature.
6. Replace the food in the freezer.
Exterior
Use a clean, damp soft cloth to wipe the exterior surface of the freezer and dry thoroughly.
WARNING: Do not use abrasive powder, household cleaner, bleach or wax polish to clean the freezer
as these can leave a smell in the freezer and can damage the exterior.
Use a vacuum cleaner to remove dust from underneath the freezer and from around the compressor situated
at the back of the freezer. Use caution not to damage the coolant system.
Door Seal
Use a clean, damp soft cloth to wipe the door seal and in between the creases of it. Take care not to
damage the seal and do not use sharp objects to clean it. Ensure that the seal is dried thoroughly before
using the freezer. Do not use detergent on the seal as it will cause damage to it.
Going Away
If you are going away and do not want to leave the freezer left on, switch off at the socket and pull the plug
from the mains. Remove any food and follow the defrosting and cleaning instructions in the “Defrosting” and
“Cleaning and Maintenance” sections.
Note: Leave the door ajar as this will prevent odours accumulating in freezer and will allow the freezer to dry
completely.
7
Operating Sounds of a Freezer
If you have not owned a freezer before, you may notice that it makes some rather unusual noises. Most of
these are perfectly normal, but you should be aware of them!
The compressor makes a buzzing or humming sound when it is running. This can be louder when the freezer
is first switched on but should become quieter in a few months.
Gases flowing through the cooling system can cause a gurgling, bubbling or whooshing sound. These noises
are normal and have become more pronounced since the introduction of CFC free gases.
Expansion and contraction of parts inside the freezer can produce a cracking noise as they rapidly change
temperature.
Product Specification
Model
IG3750
Climate Class
ST
Electric Protection Type
I
Total Net Capacity (Litres)
40
Voltage (V)
220 – 240
Frequency (Hz)
50
Current (A)
0.55
Noise (dB)
≤ 39
Energy Consumption (kWh / 24h)
0.42
Refrigerant
R600a / 25g
Gross Weight (Kg)
18
Interior Temperature (˚C)
-12 - -18
Disclaimer
Updates to hardware components are made regularly. Therefore some of the instructions, specifications and pictures in
this documentation may differ slightly from your particular situation. All items described in this guide are for illustration
purposes only and may not apply to your particular situation. No legal right or entitlements may be obtained from the
description made in this manual.
Disposal of Old Electrical Appliances
The European Directive 2002/96/EC on Waste Electrical and Electronic Equipment (WEEE), requires
that old household electrical appliances must not be disposed of in normal unsorted municipal waste.
Old appliances must be collected separately in order to optimise the recovery and recycling of the
materials they contain and reduce the impact on human health and the environment. The crossed out
“wheeled bin” symbol on the product reminds you of your obligation, that when you dispose of the
appliance it must be separately collected. Consumers should contact their local authority or retailer for
information concerning the correct disposal of their old appliance.
8
Troubleshooting
If you are having problems with your appliance, please use our troubleshooting guide below. If you
are unable to resolve the issue using the guide please ring our Customer Service Department on
01473 271 272. Please have the model code, batch number and purchase information available.
Problem
Possible Cause
1.
The freezer does not work.
2.
3.
1.
The freezer is making a lot of noise.
2.
Not properly plugged into the
mains wall socket.
No electricity in the mains wall
socket.
The door is not closed properly.
The pipe work is touching the
wall or skirting board.
The freezer has not been
levelled properly.
Solution
1.
2.
3.
Plug in firmly.
Check fuse or breaker.
Make sure the door is properly
aligned and creates a seal
around the door.
1.
Pull the freezer forward so it
does not touch the wall or
skirting board.
Adjust the feet at the front of
the freezer, ensuring they are
in firm contact with the floor.
2.
1.
1.
The temperature in the freezer is
too warm.
2.
3.
4.
The thermostat is set too high
for your environment.
The freezer is too close to a
heat source.
There is not enough ventilation
around the freezer.
The door is not closed properly.
2.
3.
4.
1.
Ice builds up rapidly inside the
freezer.
1.
2.
Door is not closed properly.
Door open too long and warm
air condensates in the freezer.
9
2.
Turn the thermostat to a higher
setting.
Move the freezer away from
the heat source and out of
direct sunlight.
Ensure there is a minimum gap
of 10mm at each side and
30mm above the freezer.
Ensure that the door is properly
closed and the seal is not
damaged.
Check to see if anything is
stopping the door from closing
properly.
Ensure the door is not left open
any longer than needed.
Fuse and Mains Plug Replacement
This product is supplied with a moulded plug, which contains
a 13A fuse. If you are simply replacing the fuse, you must use
a 13A fuse which has been approved by ASTA to BS1362.
FUSE
COVER
FUSE
If the plug becomes damaged, a new plug must be fitted.
Replace the original plug with a 13A (BS1363) plug and make
sure that it is fitted with an ASTA approved 13A fuse.
Never use the moulded plug without the fuse cover fitted.
To replace the plug:
1. Cut off the existing fitted plug and dispose of it.
2. The wires in the mains lead supplied with this appliance
are coloured in accordance with the following code:
Green/Yellow
(Earth)
Brown
(Live)
GREEN/YELLOW = EARTH (E)
BLUE = NEUTRAL (N)
BROWN = LIVE (L)
Blue
(Neutral)
This product MUST be earthed.
CABLE
GRIP
As the colours of the wires in the mains lead may not correspond with the colour markings identifying the
terminals in your new plug, proceed as follows:
The wire which is coloured GREEN or YELLOW/GREEN must be connected to the terminal which is marked
with the letter E or
symbol or a coloured GREEN or YELLOW/GREEN.
The wire which is coloured BLUE must be connected to the terminal in the plug which is marked with the
letter N or coloured BLACK or BLUE.
The wire which is coloured BROWN must be connected to the terminal which is marked with the letter L or
coloured RED or BROWN.
Ensure that the connections are tight and that no loose strands are left out of the terminals.
IF IN DOUBT CONSULT A QUALIFIED ELECTRICIAN – DO NOT ATTEMPT TO CHANGE THE
PLUG YOURSELF
If the mains lead becomes damaged consult a qualified electrician.
10
Guarantee Information
This product is guaranteed for a period of 12 months from the date of purchase against mechanical and
electrical defects.
You can extend your warranty for a further 12 months by registering your product online. Visit
www.igenix.co.uk to register your extended warranty. (Product must be registered within 30 days of purchase)
The warranty does not cover consumable parts that require replacement under normal use or accessories.
This includes shelving, drawers and ice cube trays.
If your appliance becomes faulty within the guarantee period please contact our customer service
department on 01473 271 272 or write to us at the address detailed below.
Please quote the model number which begins IG, the ‘Batch Number’ beginning ‘5’ and give details of the
exact fault.
We will then decide whether to repair or replace the item.
You will be required to return a copy of your proof of purchase. Please retain your original.
If an item is replaced within the guarantee period, the guarantee for the replacement item will be calculated
from the purchase date of the original.
Before calling the Customer Service number please ensure you have checked the Troubleshooting
guide on Page 9.
This product is for domestic household use only. To qualify for the guarantee the product must have
been used according to the instructions in the User Manual. Any misuse of the product will result in
the warranty being void.
Tel: 01473 271 272
Email: [email protected]
Fax: 01473 270 733
Website: www.igenix.co.uk
Postal Address:
Customer Service Department
Pik-a-Pak Electrical Distributors
38 Bluestem Road,
Ransomes Europark,
Ipswich, IP3 9RR
When writing or emailing us to report a fault please ensure you attach a copy of your proof of purchase.
Please retain your original
11
View the range online at www.igenix.co.uk
Follow us on Twitter
@Igenix_Products
Tel: 01473 271 272
Email: [email protected]
Fax: 01473 270 733
Website: www.igenix.co.uk
Postal Address:
Customer Service Department
Pik-a-Pak Electrical Distributors
38 Bluestem Road,
Ransomes Europark,
Ipswich, IP3 9RR
When writing or emailing us to report a fault please ensure you attach a copy of your proof of purchase.
Please retain your original
12