1
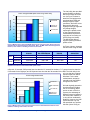
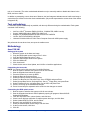
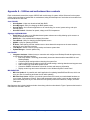
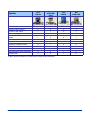
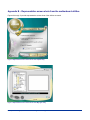
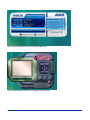
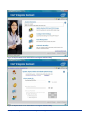
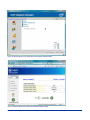
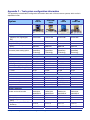
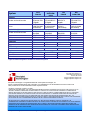
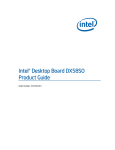
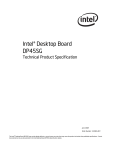
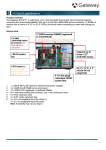
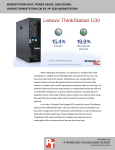
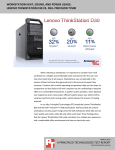
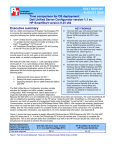
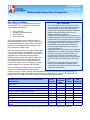
TEST REPORT
NOVEMBER 2008
Motherboard testing: Ease of integration
Executive summary
Intel® Corporation (Intel) commissioned Principled
Technologies® (PT) to evaluate the following Intel
chipset-based motherboards:
•
•
•
•
Asus* P5Q-VM
Gigabyte* GA-EG45M-DS2H
Intel DG45ID
MSI* G45M-FIDR
KEY FINDINGS
z
z
The goal of the testing was to determine which of
these motherboards, in their out-of-box states, would
be easiest and fastest for small computer vendors to
integrate. PT developed the test methodology and
then executed the resulting tests.
Each motherboard came with a support CD/DVD with
a set of system utilities. (See Appendix A.) As Figure
1 shows, the Intel utility let us perform a wide range of
integration and customization tasks from within
Windows, while the Asus and Gigabyte utilities let us
only update the BIOS and the BIOS splash screen
and the MSI utility let us only update the BIOS. To
perform other tasks on the Asus, Gigabyte, and MSI
systems required us to manually enter the BIOS.
z
z
The Intel integration utility let us perform a wide
range of integration and customization tasks from
within Windows, while the Asus and Gigabyte
utilities let us only update the BIOS and the BIOS
splash screen and the MSI utility let us only
update the BIOS. (See Figure 1.)
Changing the BIOS splash screen using the Intel
Integrator Assistant took 29 seconds, 52.5 percent
less time than the 61 seconds for the Asus Update
and 37.0 percent less time than the 46 seconds for
the Gigabyte Face-Wizard. (See Figure 2.) The
Intel DG45ID also supported both JPEG and
bitmap file types, higher resolutions, and more
colors. (See Figure 3.)
Changing the boot order using the Intel Integrator
Assistant took 15 seconds, 59.5 percent less time
than the 37 seconds for the Asus system, 71.7
percent less time than the 53 seconds for the
Gigabyte system, and 50.0 percent less time than
the 30 seconds for the MSI system. (See Figure
4.)
In addition to possessing a more robust set of
features, the Intel Integrator Assistant was as
intuitive and easy to work with as the tools for the
other three motherboards.
We timed changing the splash screen on the three
systems with motherboards that supported this
process. As Figure 2 shows, changing the BIOS splash screen using the Intel utility took 29 seconds, 52.5
percent less time than the 61 seconds for the Asus and 37.0 percent less time than the 46 seconds for the
Gigabyte. (Note: The MSI utilities did not support changing the BIOS splash screen.)
Update BIOS
9
Gigabyte
GA-EG45MDS2H
9
Update BIOS splash screen
9
9
Integration tasks the utilities let you perform from
within Windows
Asus
P5Q-VM
Intel
DG45ID
MSI
G45M-FIDR
9
9
9
Customize boot order settings
9
Customize device management settings
9
Customize power settings
9
Customize security settings
9
Assign asset management values
9
Brand system information with custom logo and text
Share custom configuration file among similar customized
systems
9
9
Figure 1: Tasks that the vendor utilities for the four motherboards we tested let you perform from within Windows.
The Intel utility also provided
greater flexibility regarding
the kind of image we could
use. As Figure 3 shows in
detail, the Intel product also
supported both JPEG and
bitmap file types, higher
resolutions, and more colors.
Because the Asus and
Gigabyte offerings supported
only bitmap images,
replacing the splash screen
on the systems with these
motherboards required the
extra step of converting our
JPEG image to a bitmap.
The MSI utilities did not
support replacing the BIOS
splash screen.
Time to change the BIOS splash screen using vendor utility
70
Time (seconds)
60
Intel DG45ID
50
40
Gigabyte GAE45M-DS2H
30
Asus P5Q-VM
20
10
0
Figure 2: Median time to change the BIOS splash screen using the vendor utility for the three
motherboards we tested that support this feature. (Note: The MSI utilities did not support this
feature.) Lower numbers, indicating shorter times, are better.
JPEG
Bitmap
Resolution
Color
Asus
P5Q-VM
NA
Gigabyte
GA-EG45M-DS2H
NA
As Figure 4 shows, changing
the boot order using the Intel
Intel
DG45ID
1,024 x 768
MSI
G45M-FIDR
NA
NA
NA
32-bit
NA
Resolution
640 x 480
640 x 480
800 x 600
NA
Color
256 colors
16-bit color
8- or 24-bit color
NA
Figure 3: Splash screen image support for the four motherboards we tested. Note: The MSI motherboard did not come with an
application that allowed us to alter the BIOS splash screen.
Time (seconds)
utility took 15 seconds, 59.5 percent less time than the 37 seconds for the Asus, 71.7 percent less time than the
53 seconds for the Gigabyte, and 50.0 percent less time than the 30 seconds for the MSI. The Intel utility is the
only one that let us change
the boot order from within
Time to change the boot order
Windows. For the other
60
motherboards, we had to
manually enter the BIOS to
50
change the boot order.
Intel DG45ID
40
30
20
MSI G45M-FIDR
Asus P5Q-VM
Gigabyte GAE45M-DS2H
10
0
Figure 4: Median time to change the boot order for the four motherboards we tested. Lower
numbers, indicating shorter times, are better.
Principled Technologies, Inc.: Motherboard testing: Ease of integration
We had originally planned to
time the process of hiding
the XD Technology BIOS
option on each of the four
systems; the advantage of
hiding this security feature is
that if users are unaware of
it, they will not accidentally
disable it. However, the Intel
system was the only one
that permitted us to perform
this task. (Note: Doing so
2
took us 16 seconds.) The other motherboards allowed us only to manually enable or disable this feature in the
BIOS, and not to hide it.
In addition to possessing a more robust set of features, the Intel Integrator Assistant was as intuitive and easy to
work with as the utilities for the other three motherboards. (We provide representative screen shots of the utilities
in Appendix B.)
Test methodology
PT built each system as identically as possible, with the only difference being the motherboards. Each system
consisted of the following:
•
•
•
•
•
Intel Core 2 Duo® Processor E8600 (3.33GHz, 1333MHz FSB, 6MB L2 cache)
Corsair* XMS2 2GB 240-pin DDR2 PC2-6400 CL=5
Seagate* ST3320620AS Barracuda 320 NCQ SATA2 7200RPM
Lite-On* SATA DVD-ROM DH-16D3S-04
Linkworld* 536-09-c2228u ATX Mid Tower Computer Case with 430W power supply
We performed all tests three times; we report the median score.
Methodology
Asus P5Q-VM
Setting up the system
1. Reset the system to the base test image.
2. Copy the BIOS splash screen image to the C: drive.
3. Copy the BIOS update file to the C: drive.
4. Insert the Asus Support DVD into the system.
5. Click the Utilities tab.
6. Click Asus Install.
7. Check the box next to Asus Update, and click Go to install the applications.
Customizing the boot order
NOTE: You cannot perform this procedure from within Windows.
1. Boot the system, and allow the system to idle for two minutes.
2. Start the stopwatch and reboot the system.
3. Press the Delete key to enter the BIOS.
4. Select the Boot tab, and press Enter.
5. Select Boot Device Priority, and press Enter.
6. Select First Boot Device, and press Enter. Set to CDROM, and press Enter.
7. Select Second Boot Device, and press Enter. Set to 1st Floppy Drive, and press Enter.
8. Select Third Boot Device, and press Enter. Set to HDD, and press Enter.
9. Press F10 to bring up the saved BIOS changes.
10. Press Yes and stop the stopwatch at the same time the changes are saved.
Customizing the BIOS splash screen
1. Boot the system, and allow the system to idle for two minutes.
2. Start the stopwatch and launch ASUS Update by opening All programsÆAsusÆASUS
UpdateÆASUSUpdate.
3. From the drop-down menu, select Options, and click Next.
4. Check Launch MyLogo application to replace system boot logo, and click Next.
5. Select Update BIOS from a file, and click Next.
6. Browse to the new BIOS file, and click Next.
7. Select the desired splash screen image, and click Next.
8. At the Preview screen, click Next.
9. Click OK.
Principled Technologies, Inc.: Motherboard testing: Ease of integration
3
10. Stop the stopwatch when the flash utility appears.
Hiding XD Technology BIOS Option
NOTE: You cannot perform this procedure. The only option is to enable/disable.
Gigabyte GA-EG45M-DS2H
Setting up the system
1. Reset the system to the base test image.
2. Copy the BIOS splash screen image to the C: drive.
3. Insert the Gigabyte Support DVD into the system.
4. Choose Application Software from the left panel.
5. Scroll down to the Face-Wizard utility, and click Install.
6. Click Next at the Face-Wizard Welcome screen, and click Install.
7. Click Finish when installation completes.
Customizing the boot order
NOTE: You cannot perform this procedure from within Windows.
1. Boot the system, and allow the system to idle for two minutes.
2. Start the stopwatch, and reboot the system.
3. Press the Delete key to enter the BIOS.
4. Select Advanced BIOS Features, and press Enter.
5. Select First Boot Device, and press Enter. Set to CDROM, and press Enter.
6. Select Second Boot Device, and press Enter. Set to Floppy, and press Enter.
7. Select Third Boot Device, and press Enter. Set to Hard Disk, and press Enter.
8. Press F10 to bring up the saved BIOS changes.
9. Press Yes, and stop the stopwatch at the same time the changes are saved.
Customizing the BIOS splash screen
1. Boot the system, and allow the system to idle for two minutes.
2. Start the stopwatch, and launch Face-Wizard.
3. Select On Board BIOS.
4. Click Load Image, and browse to the bitmap location.
5. Click Auto.
6. Stop the stopwatch when the process is finished, and close Face-Wizard.
Hiding the XD Technology BIOS option
NOTE: You cannot perform this procedure. The only option is to enable/disable.
Intel DG45ID
Setting up the system
1. Reset the system to the base test image.
2. Copy the BIOS splash screen image to the C: drive.
3. Copy the BIOS update file to the C: drive.
4. Insert the Intel Support DVD into the system.
5. Choose Install Applications.
6. On the list of applications, check Intel Integrator Assistant, and uncheck all other applications.
7. Click Install Now.
8. At the Automatic Logon dialog, enter the username and password, and click OK.
9. At the License Agreement screen, click Accept.
The system restarts automatically.
10. At the Installation successful screen, click Close.
11. Double-click the Download Intel Integrator Assistant icon.
12. At the Microsoft Phishing Filter, click Turn off automatic Phishing Filter, and click OK.
13. Click the link to download the Intel Integrator Assistant.
14. Save the Intel Integrator Assistant zip file to the desktop.
15. Extract the zip file to the desktop.
Principled Technologies, Inc.: Motherboard testing: Ease of integration
4
Customizing the boot order
1. Boot the system, and allow the system to idle for two minutes.
2. Start the stopwatch, and launch the Intel Integrator Assistant by double-clicking iassist.exe.
3. Click Configure BIOS Settings.
4. Click Boot.
5. Change the Boot Order to boot off CD/DVD, Floppy, and Hard Disk.
6. Click Apply All Changes.
7. Click Continue to apply new settings.
8. Stop the stopwatch when the changes are in place.
Customizing the BIOS splash screen
1. Boot the system, and allow the system to idle for two minutes.
2. Start the stopwatch, and launch the Intel Integrator Assistant by double-clicking iassist.exe.
3. Click Update System BIOS and BIOS Image.
4. Under Choose BIOS file, browse to the BIOS update file located on the C: drive, and click Open.
5. Under BIOS splash image file, browse to the desired splash screen image, and click Open.
6. Select the top left corner to display the Intel logo.
7. Click Apply All Changes.
8. Click Continue to apply new settings.
9. Stop the stopwatch when the changes are in place.
Hiding XD Technology BIOS option
1. Boot the system and allow the system to idle for two minutes.
2. Start the stopwatch and launch the Intel Integrator Assistant by double-clicking iassist.exe.
3. Click Configure BIOS Settings.
4. Click Security.
5. Click the “lock” box icon, until the “glasses” icon appears in the box.
6. Click Apply All Changes.
7. Click Continue to apply new settings.
8. Stop the stopwatch when the changes are in place.
MSI G45M-FIDR
Setting up the system
NOTE: The MSI G45M-FIDR motherboard came with two utilities: Live Update 3 and Dual Core Center. Neither
allows the user to customize the system as we desired.
1. Reset the system to the base test image.
Customizing the boot order
NOTE: You cannot perform this procedure from within Windows.
1. Boot the system and allow the system to idle for two minutes.
2. Start the stopwatch and reboot the system.
3. Press the Delete key to enter the BIOS.
4. Select the Advanced BIOS Features, and press Enter.
5. Select Boot Sequence, and press Enter.
6. Select First Boot Device, and press Enter. Set to CD/DVD, and press Enter.
7. Select Second Boot Device, and press Enter. Set to 1st Floppy Drive, and press Enter.
8. Select Third Boot Device, and press Enter. Set to HDD, and press Enter.
9. Press F10 to bring up the saved BIOS changes.
10. Press Yes and stop the stopwatch at the same time the changes are saved.
Customizing the BIOS splash screen
NOTE: You cannot perform this procedure. The motherboard did not come with a BIOS splash screen application.
Hiding XD Technology BIOS option
NOTE: You cannot perform this procedure. The only option is to enable/disable.
Principled Technologies, Inc.: Motherboard testing: Ease of integration
5
Appendix A – Utilities and motherboard box contents
Each motherboard came with a support CD/DVD with a wide range of system utilities. Below we list the system
utilities each manufacturer bundled with its motherboard, along with descriptions of each that we have taken from
the manufacturers’ Web sites.
Asus P5Q-VM
• Asus Update—Helps user download and flash BIOS
• Asus MyLogo2—Utility for changing the BIOS splash screen
• Asus AI Suite—An innovative application to do overclocking, fan control, power saving, and quiet
thermal control
• Asus PC Probe II—Monitors fan speed, voltage, and CPU temperature
Gigabyte GA-EG45M-DS2H
• EasyTune 6—An easy to use Windows based system enhancement utility allowing quick access to a
variety of performance features
• DMI Viewer—View motherboard hardware information
• Face-Wizard—Utility for changing the BIOS splash screen
• @BIOS—Utility for updating the BIOS
• Q-Share—Data sharing tool that enables users to share data with computers on the same network,
making full use of Internet resources
• Time Repair—Allows a user to quickly backup and restore system data
• Update Manager—Internet update utility
Intel DG45ID
• Integrator Assistant—Makes it easy to customize and configure Intel Desktop Boards through an easy
to use Microsoft Windows interface.
o Intel Smart Search Technology automatically locates and downloads the latest BIOS for Intel
Desktop Boards
o Customize BIOS settings without rebooting the system first
o Configure BIOS settings and then lock/hide critical settings, reducing downtime and support costs
o Add a custom logo to the BIOS splash screen
o Customize SMBIOS information with serial numbers and asset tag information
o Display custom logo and contact information in the Windows System Control Panel
MSI G45M-FIDR
• MSI Live Update 3—A powerful and useful application for updating latest BIOS and Drivers, which can
save your time for searching and lower the risk while updating
• MSI Dual Core Center—Monitor your whole system status and control your motherboard hardware at
your request. Performance, Silence, Sound and temperature smart control, users can also create their
own overclocked profile or your own silent and cool system profile with underclock, voltage, and lower
FAN speed.
Manufacturers also included cables and other items along with the motherboards. Figure 5 presents the items the
manufacturers included in the box.
Principled Technologies, Inc.: Motherboard testing: Ease of integration
6
Asus
P5Q-VM
Gigabyte
GA-EG45MDS2H
Intel
DG45ID
MSI
G45M-FIDR
Motherboard
1
1
1
1
Number of SATA cables
2
2
2
1
Number of IDE cables
1
1
0
1
Number of floppy disk cables
Number of SATA power extension
cables
1
1
0
0
1
0
0
1
System
Driver/Utility CD
1
1
1
1
User's Manual
1
1
1 (on DVD)
1
Hardware Installation Guide
0
1
0
0
Quick Start Guide
0
0
1
1
I/O Shield
1
1
1
1
Intel RAID/AHCI driver floppy disk
0
0
1
0
Chassis label
0
0
1
0
Figure 5: Items the manufacturers included in the box along with the motherboard.
Principled Technologies, Inc.: Motherboard testing: Ease of integration
7
Appendix B – Representative screen shots from the motherboard utilities
Figures 6 through 13 provide representative screen shots of the utilities we tested.
Figure 6: Representative screen shot from the Asus Update utility.
Figure 7: Representative screen shot from the Asus MyLogo2 utility.
Principled Technologies, Inc.: Motherboard testing: Ease of integration
8
Figure 8: Representative screen shot from the Gigabyte @BIOS utility.
Figure 9: Representative screen shot from the Gigabyte Face-Wizard utility.
Principled Technologies, Inc.: Motherboard testing: Ease of integration
9
Figure 10: Representative screen shot from the Intel Integrator Assistant utility.
Figure 11: Representative screen shot from the Intel Integrator Assistant utility.
Principled Technologies, Inc.: Motherboard testing: Ease of integration
10
Figure 12: Representative screen shot from the Intel Integrator Assistant utility.
Figure 13: Representative screen shot from the MSI Live Update 3 utility.
Principled Technologies, Inc.: Motherboard testing: Ease of integration
11
Appendix C – Test system configuration information
This appendix provides detailed configuration information about each of the test server systems, which we list in
alphabetical order.
Asus
P5Q-VM
System
General
Processor and OS kernel:
(physical, core, logical)/(UP,
MP)
Number of physical processors
Single/dual core processors
System power management
policy
Processor power-saving option
CPU
Vendor
Name
Model number
Stepping
Socket type and number of pins
Core frequency (GHz)
Front-side bus frequency (MHz)
L1 cache
L2 cache
Platform
Vendor
Motherboard model number
Motherboard chipset
Motherboard revision number
Bios name and version
BIOS settings
Memory module(s)
Vendor and model number
Type
Speed (MHz)
Speed running in the system
(MHz)
Timing/Latency (tCL-tRCD-tRPtRASmin)
Size
Gigabyte
GA-EG45MDS2H
Intel
DG45ID
MSI
G45M-FIDR
1P2C2L/MP
1P2C2L/MP
1P2C2L/MP
1P2C2L/MP
1
Dual
1
Dual
1
Dual
1
Dual
Balanced
Balanced
Balanced
Balanced
Enhanced Intel
SpeedStep
Technology
Enhanced Intel
SpeedStep
Technology
Enhanced Intel
SpeedStep
Technology
Enhanced Intel
SpeedStep
Technology
Intel
Core 2 Duo
E8600
A
LGA 775
3.33
1,333
2 x 32 KB + 2 x
32 KB
6 MB
Intel
Core 2 Duo
E8600
A
LGA 775
3.33
1,333
2 x 32 KB + 2 x
32 KB
6 MB
Intel
Core 2 Duo
E8600
A
LGA 775
3.33
1,333
2 x 32 KB + 2 x
32 KB
6 MB
Intel
Core 2 Duo
E8600
A
LGA 775
3.33
1,333
2 x 32 KB + 2 x
32 KB
6 MB
Asus
P5Q-VM
Intel G45
1.xx
AMI v1406
AHCI enabled
Gigabyte
EG45M-DS2H
Intel G45
xx
Award vF3d
AHCI enabled
Intel
DG45ID
Intel G45
AAE27729-307
Intel v0085
AHCI enabled
MSI
MS-7521
Intel G45
1.0
AMI v1.1
AHCI enabled
Corsair
CM2X10246400C5DHX
PC2-6400
800
Corsair
CM2X10246400C5DHX
PC2-6400
800
Corsair
CM2X10246400C5DHX
PC2-6400
800
Corsair
CM2X10246400C5DHX
PC2-6400
800
800
800
800
800
5-5-5-18
5-5-5-18
5-5-5-18
5-5-5-18
2,048 GB
2,048 GB
2,048 GB
2,048 GB
Principled Technologies, Inc.: Motherboard testing: Ease of integration
12
System
Number of memory module(s)
Chip organization (single-sided,
double-sided)
Channel (single/dual)
Hard disk
Vendor and model number
Size
Buffer size
RPM
Type
Controller
Driver
2 x 1,024 MB
Gigabyte
GA-EG45MDS2H
2 x 1,024 MB
2 x 1,024 MB
2 x 1,024 MB
Double-sided
Double-sided
Double-sided
Double-sided
Dual
Dual
Dual
Dual
Seagate
ST3320620AS
320 GB
16 MB
7,200
SATA 3.0Gb/s
Intel 82801JR
(ICH10R)
Intel 7.0.0.1000
(02/25/2008)
Seagate
ST3320620AS
320 GB
16 MB
7,200
SATA 3.0Gb/s
Intel 82801JR
(ICH10R)
Intel 8.5.0.1032
(07/20/2008)
Seagate
ST3320620AS
320 GB
16 MB
7,200
SATA 3.0Gb/s
Intel 82801JR
(ICH10R)
Intel 8.6.0.1007
(09/12/2008)
Seagate
ST3320620AS
320 GB
16 MB
7,200
SATA 3.0Gb/s
Intel 82801JR
(ICH10R)
Intel 8.2.0.1001
(05/07/2008)
Windows Vista
Ultimate
6001
1
NTFS
ACPI x86-based
PC
English
10
Windows Vista
Ultimate
6001
1
NTFS
ACPI x86-based
PC
English
10
Windows Vista
Ultimate
6001
1
NTFS
ACPI x86-based
PC
English
10
Windows Vista
Ultimate
6001
1
NTFS
ACPI x86-based
PC
English
10
Intel GMA
X4500HD
Integrated
Intel G45
Express Chipset
1666
782 MB
32 MB
96 MB
654 MB
1,920 x 1,200
Intel
7.15.10.1508
(06/20/2008)
Intel GMA
X4500HD
Integrated
Intel G45
Express Chipset
1666
782 MB
32 MB
96 MB
654 MB
1,920 x 1,200
Intel
7.15.10.1554
(09/02/2008)
Intel GMA
X4500HD
Integrated
Intel G45
Express Chipset
1659
765 MB
32 MB
96 MB
637 MB
1,920 x 1,200
Intel
7.15.10.1576
(10/07/2008)
Intel GMA
X4500HD
Integrated
Intel G45
Express Chipset
1666
781 MB
32 MB
96 MB
653 MB
1,920 x 1,200
Intel
7.15.10.1527
(07/11/2008)
Realtek High
Definition Audio
Realtek
6.0.1.5628
(05/20/2008)
Realtek High
Definition Audio
Realtek
6.0.1.5672
(07/24/2008)
IDT High
Definition Audio
IDT
6.10.6033.2
(07/02/2008)
Realtek High
Definition Audio
Realtek
6.0.1.5657
(07/03/2008)
Asus
P5Q-VM
Intel
DG45ID
MSI
G45M-FIDR
Operating system
Name
Build number
Service Pack
File system
Kernel
Language
Microsoft DirectX version
Graphics
Vendor and model number
Type
Chipset
BIOS version
Total available graphics memory
Dedicated video memory
System video memory
Shared system memory
Resolution
Driver
Sound card/subsystem
Vendor and model number
Driver
Principled Technologies, Inc.: Motherboard testing: Ease of integration
13
Asus
P5Q-VM
Gigabyte
GA-EG45MDS2H
Realtek
RTL8168C PCIE Gigabit
Realtek
6.208.729.2008
(07/29/2008)
Realtek
RTL8168B PCIE Gigabit
Realtek
6.195.625.2007
(06/25/2007)
Intel
82567LF-2
Gigabit
Intel
9.52.9.0
(06/13/2008)
Realtek
RTL8168C PCIE Gigabit
Realtek
6.203.214.2008
(02/14/2008)
Lite-On
DH16D3S
DVD-ROM
SATA
Dual
Lite-On
DH16D3S
DVD-ROM
SATA
Dual
Lite-On
DH16D3S
DVD-ROM
SATA
Dual
Lite-On
DH16D3S
DVD-ROM
SATA
Dual
12
USB 2.0
12
USB 2.0
12
USB 2.0
10
USB 2.0
0
2
2
2
Dell 2405FPW
24”
60 Hz
Dell 2405FPW
24”
60 Hz
Dell 2405FPW
24”
60 Hz
Dell 2405FPW
24”
60 Hz
System
Intel
DG45ID
MSI
G45M-FIDR
Ethernet
Vendor and model number
Driver
Optical drive(s)
Vendor and model number
Type
Interface
Dual/single layer
USB ports
Number
Type
IEEE 1394 ports
Number
Monitor
LCD type
Screen size
Refresh rate
Figure 14: Detailed configuration information for the four test systems.
Principled Technologies, Inc.
1007 Slater Road, Suite 250
Durham, NC 27703
www.principledtechnologies.com
[email protected]
Principled Technologies is a registered trademark of Principled Technologies, Inc.
Intel is a registered trademark of Intel Corporation or its subsidiaries in the United States and other countries.*All
other product names are the trademarks of their respective owners.
Disclaimer of Warranties; Limitation of Liability:
PRINCIPLED TECHNOLOGIES, INC. HAS MADE REASONABLE EFFORTS TO ENSURE THE ACCURACY AND VALIDITY OF ITS
TESTING, HOWEVER, PRINCIPLED TECHNOLOGIES, INC. SPECIFICALLY DISCLAIMS ANY WARRANTY, EXPRESSED OR
IMPLIED, RELATING TO THE TEST RESULTS AND ANALYSIS, THEIR ACCURACY, COMPLETENESS OR QUALITY, INCLUDING
ANY IMPLIED WARRANTY OF FITNESS FOR ANY PARTICULAR PURPOSE. ALL PERSONS OR ENTITIES RELYING ON THE
RESULTS OF ANY TESTING DO SO AT THEIR OWN RISK, AND AGREE THAT PRINCIPLED TECHNOLOGIES, INC., ITS
EMPLOYEES AND ITS SUBCONTRACTORS SHALL HAVE NO LIABILITY WHATSOEVER FROM ANY CLAIM OF LOSS OR DAMAGE
ON ACCOUNT OF ANY ALLEGED ERROR OR DEFECT IN ANY TESTING PROCEDURE OR RESULT.
IN NO EVENT SHALL PRINCIPLED TECHNOLOGIES, INC. BE LIABLE FOR INDIRECT, SPECIAL, INCIDENTAL, OR
CONSEQUENTIAL DAMAGES IN CONNECTION WITH ITS TESTING, EVEN IF ADVISED OF THE POSSIBILITY OF SUCH DAMAGES.
IN NO EVENT SHALL PRINCIPLED TECHNOLOGIES, INC.’S LIABILITY, INCLUDING FOR DIRECT DAMAGES, EXCEED THE
AMOUNTS PAID IN CONNECTION WITH PRINCIPLED TECHNOLOGIES, INC.’S TESTING. CUSTOMER’S SOLE AND EXCLUSIVE
REMEDIES ARE AS SET FORTH HEREIN.
Principled Technologies, Inc.: Motherboard testing: Ease of integration
14